The blog post provides a step-by-step guide on creating auto-apply coupons in WooCommerce. It also guides you in creating coupon URLs that automatically apply the discount at checkout when clicked. Some of the common use cases of these features are also covered in this blog.
Imagine purchasing something from a store, and the coupon is applied automatically. Redeeming coupons can be a complicated process at times. It’s especially troubling when the coupon codes are not placed at visible locations of your store.
What if you can make this a very simple process? Then you can surprise your customers with an automatic discount in their cart. Happy customers bring more business. Let’s see how you can do that!
How To Generate Auto-Apply Coupons?
Auto-apply coupons can be generated using a free coupon extension Smart Coupons for WooCommerce. This plugin will help you to generate coupons that can be redeemed automatically.
It is a simple setup that you can implement with the extension plugin. We’ll explain how to increase your sale by using auto-apply coupon step by step.
How To Create Automatic Coupons In WooCommerce?
Here we’ll discuss how to redeem two different coupons automatically.
Before that, install and activate the free extension plugin Smart Coupons for WooCommerce.
Now, follow the given steps.
- Create a WooCommerce coupon
Let’s take a simple example, Ex: 10% discount
Go to Marketing > Coupons from your dashboard.
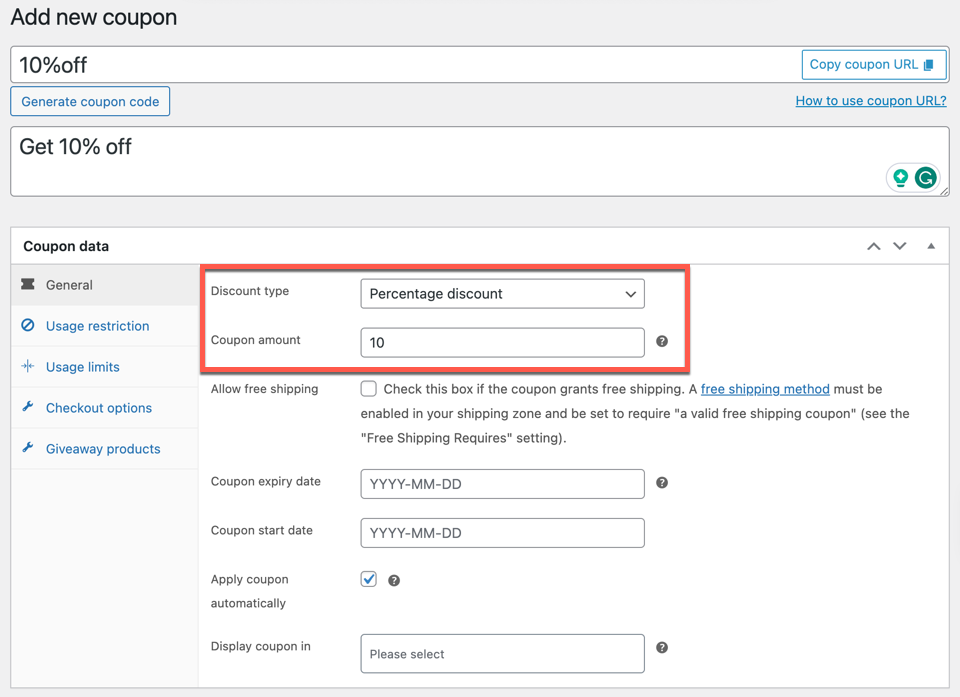
Click the Add Coupon button from the Coupons window and generate a coupon code.
From the General panel, configure the Discount type and Coupon amount.
- Enable coupon auto-apply
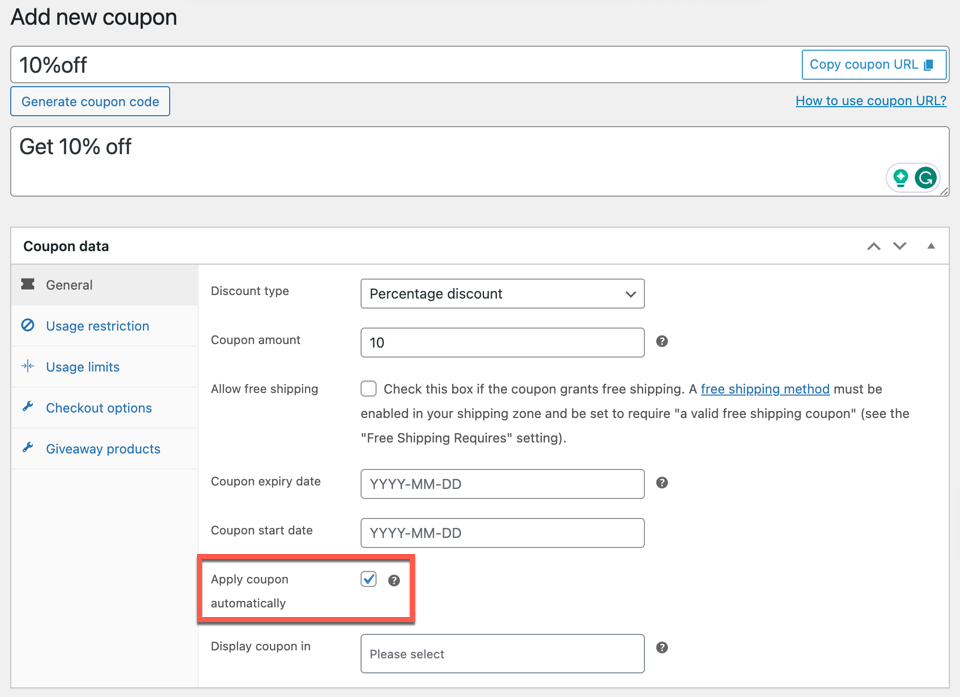
Enable Apply coupon automatically option in the General panel.
- Publish
Publish the coupon.
This simple coupon can be automatically redeemed every time from the cart because it has no other conditions to satisfy. We’ll see you how to use this feature to maximize sales with the help of 2 use cases.
- Apply coupon automatically only if the minimum spend is 100 or more.
- Apply coupon automatically on your 5th purchase.
Let’s see how this can be implemented.
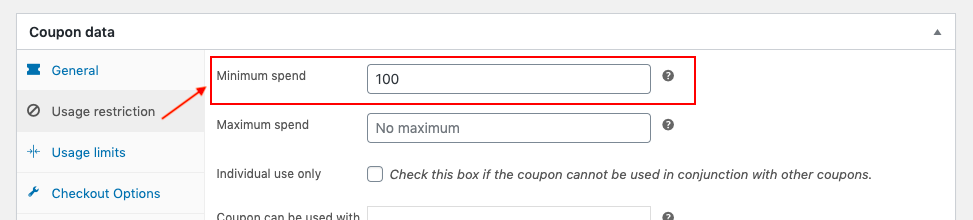
Apply coupon automatically only if the minimum spend is 100 or more
You can use the coupon that you published before to do this by editing its features. For that, you have to set a minimum spend.
Here is how it can be done:
- Edit your coupon from the Coupons page.
- Navigate to the Usage restriction panel.
- Enter a value in the Minimum spend field.
- Update the coupon.
Here is how it will look like for a customer

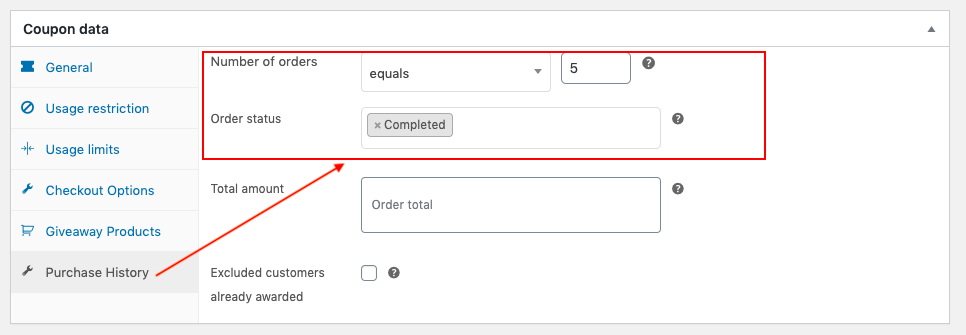
Apply coupon automatically on your 5th purchase
Same as above, edit your published coupon and follow the below steps.
- Edit your published coupon from the Coupons page.
- Navigate to the Purchase History panel.
- Select the Number of orders drop-down value as equals.
- Use the text box next to the Number of orders to enter the nth order.
- Select the appropriate Order status to apply the discount only on successful orders.
- Update the coupon
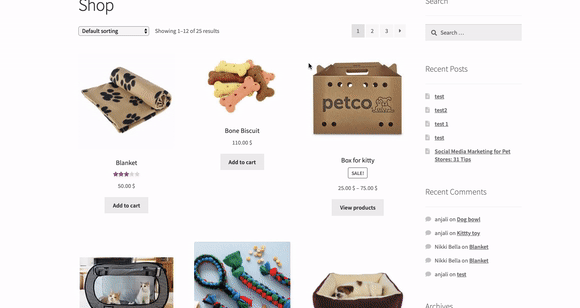
This is how it looks in your store for a customer on his 5th successful order.
Automatically Apply Discounts to the Cart With a Public Coupon URL
Automatically apply a discount coupon to your WooCommerce cart when clicking on a public URL! Sounds intriguing?
Coupons generate sales by attracting new users and retaining existing customers. Coupons persuade users to complete their purchases by giving them the push they need. To optimize its benefits, coupons should be promoted everywhere. Even limiting the promotions to in-house can significantly reduce the forecasted benefits.
This is where the coupon URL comes in. The URL can be used both inside and outside the store. It can therefore play an instrumental role in promoting the coupons.
What Are Coupon URLs?
Coupon URLs are URLs that correspond to a specific coupon code. When a user clicks on this coupon URL, they will be redirected to the eCommerce website, and the coupon code will be automatically attached to the cart.
Why Should Coupon URLs Be Used In WooCommerce?
A discount coupon in WooCommerce is a voucher that will reduce the net cart subtotal when applied to the cart. Store owners can create various discount coupons that suit their online retail business.
The only issue is that people will start to anticipate coupons – this is inherently not bad. However, this teaches customers to look for coupons before purchasing. That is, they leave their cart in the quest for coupons. This is a chance that you should never take – especially when you have no control over where they will go next.
Only a fraction of customers leaving the cart would return to complete the purchase. Others might get distracted or fail to find coupons, so they would abandon their cart.
There is a much better way to increase sales with the help of coupons – creating links for individual coupons. These links make it easy to market and promote the coupon both in-house and on external sites. For example, you can add the coupon link to a promotional blog which will be shared with the customers or on social media.
When the customers click the coupon link, the coupon will be automatically applied. These coupon links can be made either public or aimed at a certain group of audiences to make the best out of them.
Public coupon URLs are usually displayed in blogs/articles, etc., which people often visit. This article shows you how you can display coupon URLs on such platforms.
You first need to install the URL coupon plugin for WooCommerce in your WooCommerce store to enable this feature. Here is how to install this plugin.
Install The URL Coupons Plugin
After purchasing the URL Coupons Plugin for WooCommerce, the plugin will be available as a zip file in the API Downloads section of your My account page.
- Download the .zip file from API Downloads by logging into your Webtoffee My account page.
- Log in to your WordPress admin console.
- Navigate to Plugins > Add New > Upload to upload the downloaded plugin.
- Choose the plugin file to upload.
- Finally, install and activate the plugin.
Create A Public Coupon URL To Display On Your Blog
When you set up and activate the plugin, a new menu appears in the Coupon data widget called the “URL options” when creating a new coupon or editing an existing one.
You will need to fill in those fields to create a coupon URL.
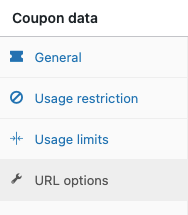
Let us go through the entire process of creating a public coupon URL.
Step 1: Create A New Coupon
Go to Marketing > Coupons and click on Add coupon.
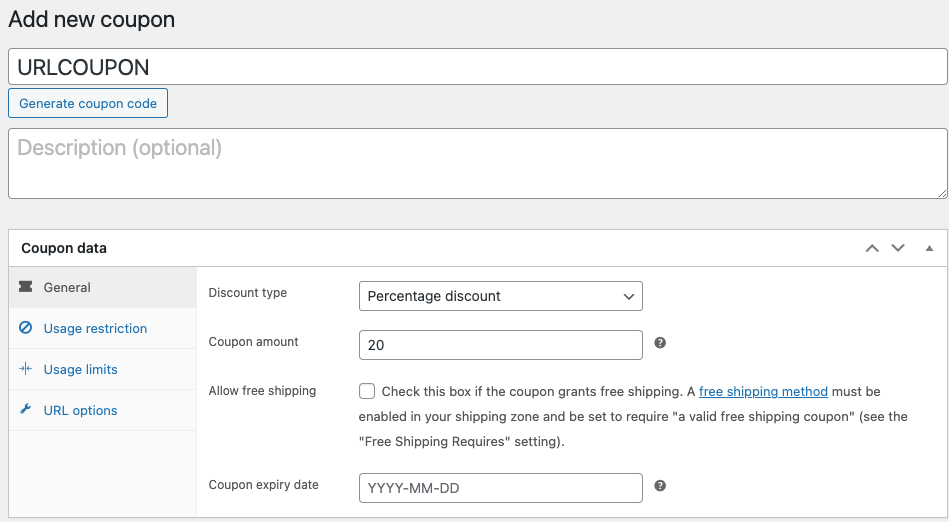
Provide a coupon name and description and fill in the necessary fields in the Coupon data widget.
Step 2: Configure The Coupon
You can move on to fill in the Usage restriction and Usage limits details of the coupon as you prefer.
Step 3: Create A Coupon URL
Go to the URL options tab.
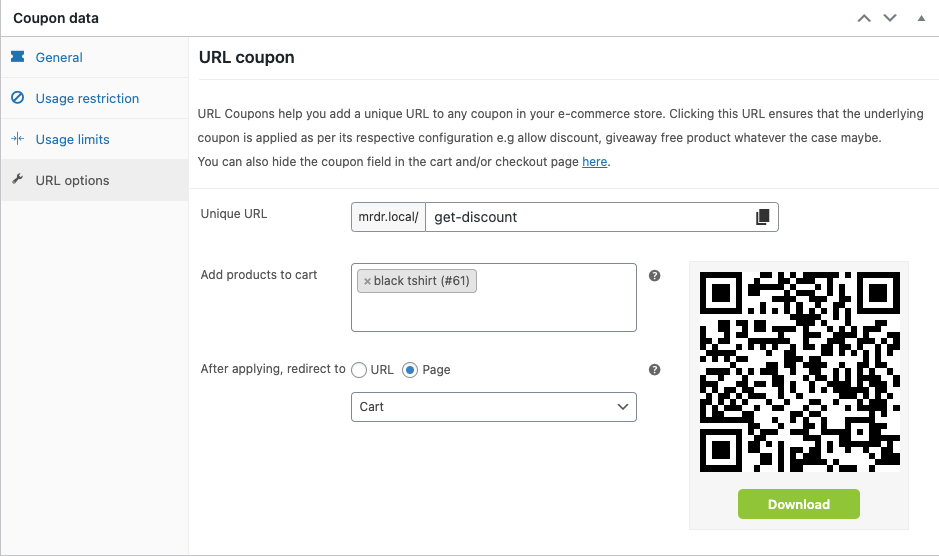
Unique URL: As the name suggests, this will be the public URL for your coupon. You can create a custom URL for individual coupons this way. When a customer clicks on this URL or scans the corresponding QR code, they will be redirected to your store’s cart page, and the coupon will be automatically applied. This unique URL can be later copied to the blog for easier promotion.
Add products to cart: Any product added here will be automatically added to the customer’s cart when applying the coupon. Your customer will only need to either click on the coupon URL or scan the QR code to apply the coupon.
After applying, redirect to: You can choose between a URL and a page. This field determines where the customer should be redirected when clicking on the coupon link from a blog. The cart page is the default configuration, but you can change it to the checkout or any other page if you wish to.
Now click the nearby publish button to make the coupon live.
Step 4: Publish The URL To The Public
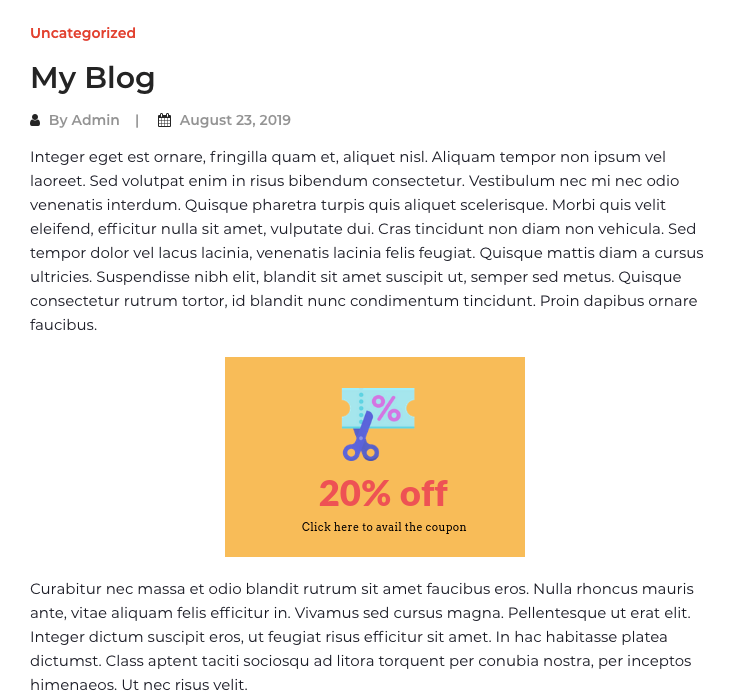
Create a blog to display the coupon link. Once you create the blog copy-paste the coupon URL to a particular word or image of the blog and create a link to the coupon.
In this blog, if you click on the image, you will be redirected to the cart page. Also, the coupon will get automatically applied on clicking the image.
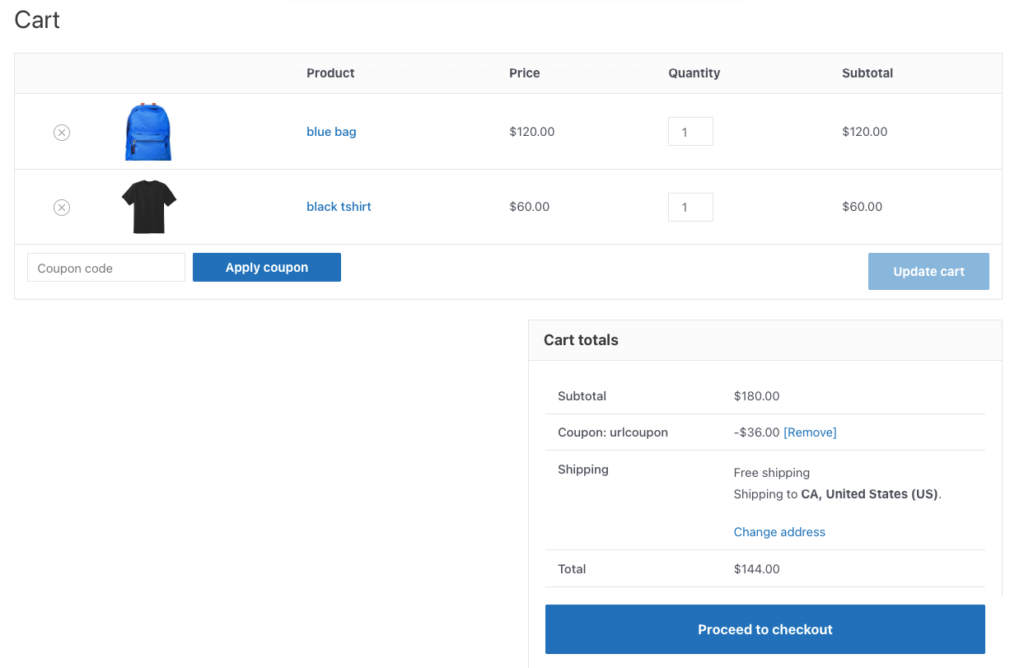
Here is a screenshot of the cart.
When you click on this image, the customers will be redirected to your website’s specific page or URL. In the following image, the product ‘blue bag’ was already in the cart. When the coupon URL was clicked, the user was redirected Cart page, the product ‘black shirt’ was automatically added to the cart, and a 20% discount was automatically applied.
Bringing your website/blog visitor to the cart in a single click will multiply your sales chances.
Conclusion
Of all the coupon strategies that have been used thus far, URL and auto-apply coupons are the best idea. It is a very powerful way to earn more sales for your store. Thus, you do not have to think twice about employing this feature in your WooCommerce store.
Hope this article was of interest to you. Do let us know what you think in the comments below.
Comments (2)
Jessica Berg
February 2, 2022
Is there a way to get this to auto apply on backend manually entered orders?
Mike
February 5, 2022
Hi Jessica,
The coupon auto-apply feature is presently only available on the cart/checkout pages. Thanks for understanding.