This is a complete documentation for the Decorator – WooCommerce email customizer plugin, which helps you customize WooCommerce order emails to fit your business requirements.
Overview of the plugin

The plugin allows customizing WooCommerce transactional emails in a number of different ways.
- Customize the email container/header/footer/content of the WooCommerce emails.
- Ability to edit email text/content.
- Customize all WooCommerce email types.
- Heading specific customizations.
- Option to add custom styles to emails using CSS.
- Real-time preview of changes.
- Provision to add images in the email.
- Link social media icons or title in the emails.
- Option to schedule changes to go live.
- Option to send test email to view changes.
Installation of the plugin
Install the plugin either from the WordPress plugin directory or as a zip downloaded from the WordPress.org website. You can learn more about the installation procedure by reading the article How to Install a Free Plugin from WordPress.
Getting started with the plugin
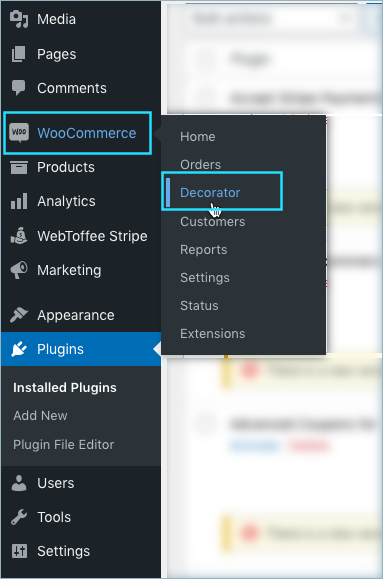
You can get to the plugin in any one of the following ways:
- Go to WooCommerce > Decorator from your WordPress dashboard.
Some other ways to get to the plugin are:
- From the plugin installer page, click on Customize email beneath the plugin name.
- From WooCommerce > Settings > Emails, towards the end of the page, you will see a button ‘Open Decorator’ under the subtitle ‘Decorator’. Click the button Open Decorator to open the customizer.
Customization of WooCommerce Emails
This plugin allows customizing each element of the WooCommerce mail. You can customize the header, content, and footer sections of your emails as per your requirements.
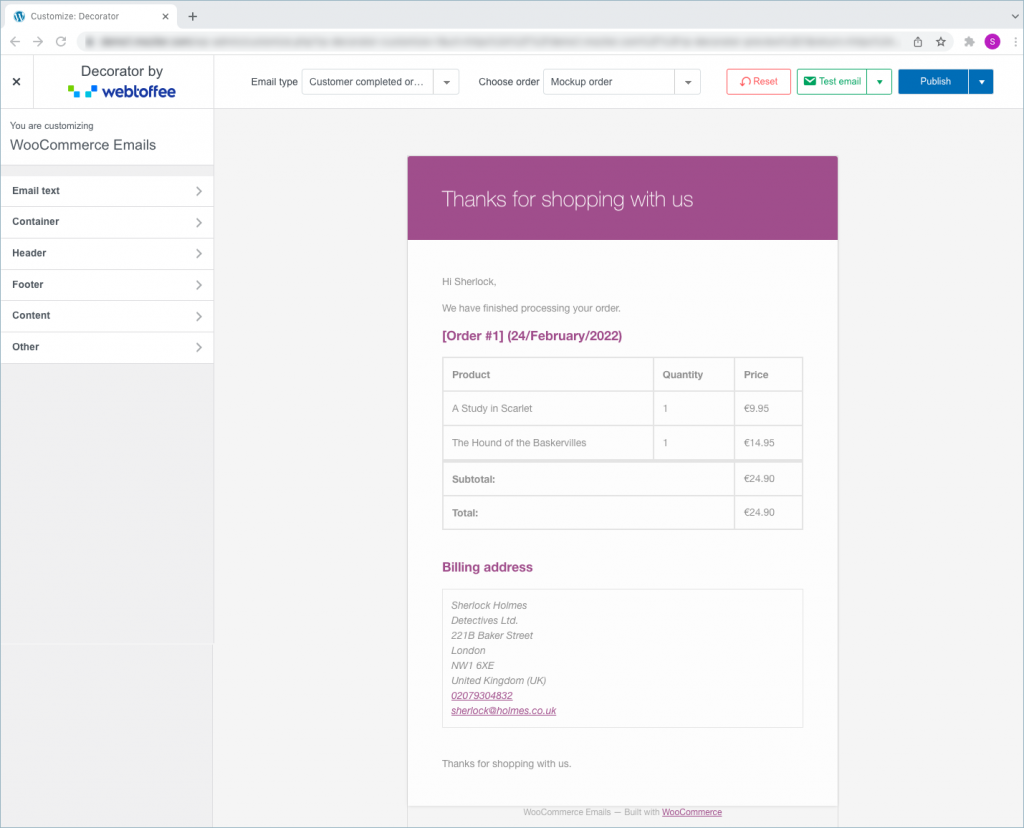
The left side of the page contains each section of emails that you could customize. The right side of the window displays a live preview of the email template as you make changes on the left.
Select email type
The plugins give provision to customize and edit all the default WooCommerce emails based on each order status. You can easily choose an email type and customize it on the go.
Email text customization
Email content such as subject, heading, subtitle, and body text can be edited or modified based on preference. You can use sliders and color pickers for designing email backgrounds, containers, headers, footers, texts, and everything. Also, add shortcodes/placeholders within the email templates to change the content and appearance. There are also options to add images (company logo), social media links, and many more in the email templates.
The plugin allows controlling the following email elements:
- Subject text
- Heading text
- Subtitle text
- Body text
- Additional content
- Shortcodes
Container customization
You can control the padding, container width, border-radius, shadow etc from this option.
- Background color – Allows for choosing a background color for the outer email body.
- Padding – Set padding to display the email.
- Container width – Set width of the email container.
- Border radius – Fix border radius for the container.
- Shadow – Give a shadow effect to the email container.
- Border color: Choose a border color for the email container.
- Container border width: Adjust the width of the border.
Header Customization
The header section has been further divided into three subsections.
Header Style
- Background color – Select a background color.
- Text align – Choose the alignment (right, left, center, justify) for header text from the drop-down.
- Padding top/bottom – Adjust the top/bottom padding for header text.
- Padding left/right – Adjust the right/left padding for header text.
Header Image
Header image – Upload an image to be displayed on the header.
- Alignment: Position the image to left, right, center or justified.
- Max width: Adjust the width of the image.
- Background color: Set a color for the image background.
- Padding top/bottom: Move the image padding to top and bottom.
- Add link to the website on header image: Redirect to your website on click
Heading and subtitle
You can customize the heading and subtitle of the header.
From this section, you can customize both the footer style and footer content for WooCommerce emails. Also, you can add social media links at the footer.
Footer style

- Padding – Adjust padding for footer text.
- Text align – Choose a suitable alignment for footer text from the given options.
- Font size – Select a suitable font size.
- Font family – Choose a font type of your choice.
- Font weight – Adjust the boldness of the footer text.
- Text color – Choose a suitable color for the footer text.
Footer content
Here, you can add the desired footer content for WooCommerce emails.
Social media links
You can insert the social media links like Facebook, Twitter, Instagram, Youtube, LinkedIn, Vimeo into your email templates by using icons, URLs, titles etc.
Content Customization
This section allows to customize the content container of the email body.
Content Container
- Background color – Select a background color for the email body.
- Padding – Adjust it’s padding.
Text Style

- Font size – Allows to adjust the font size for the email body content.
- Font family – Select a font type for the body text.
- Text color – Choose your preferred color for the text.
- Link color – Select a link color of your choice.
Order Items
This section allows you to customize the table for order items.
- Background – Allows adding a background color of your choice.
- Padding – Adjust padding for the order table.
- Border width – Adjust the border width for the table.
- Border color – Select a border color of choice.
- Totals separator width – Adjust the width of the total separator line.
- Totals separator color – Select a specific color for the total separator line.
Order addresses
Adjust the appearance and style of the address detail in the email.
Button styles
Customize the appearance of buttons within the email body.
Note: You will have to turn the toggle on from the email text section to control the button styles.
Other Customizations
This section allows to individually customize heading 1 to 6 and also add custom styles using CSS.
Custom styles
You can add the CSS to the box for adding custom styling to the email. To learn more about custom styling using CSS, refer to this article.
For example, to center align order table contents in the email using CSS, enter the following CSS in the Custom CSS field: #body_content_inner table.td tbody tr td { text-align: center !important; } as shown below:
Send test email
Use this feature to see how the changes would look live on your website before publishing them. Plus, you can share the preview with people who can’t access the customizer and get their feedback on it.
Note: Customization changes should be saved prior to sending the test email.

Publish or schedule the customizations
Click on the Publish button to reflect the changes made to your emails.
Other than publishing the changes right away, you have the option to either save them as a draft or schedule a date for the configured changes to go live on WooCommerce emails. You can also apply the changes to all email types by selecting the checkbox.
Schedule date and time for email Customizations to go live
By clicking on the Schedule, you will be able to schedule a date and time for the customizations to go live on your WooCommerce emails.
You can choose a date and time of your choice.


Comments (42)
Corina
April 12, 2024
Hi We are looking for a possibility to add extra PDF info for our client whenever the order is in progress. This is not an option now. Or am I wrong? Hope so.
Thanks in advance.
Arjun
April 15, 2024
Hi Corina,
Thanks for getting in touch. While we don’t currently have a native feature for this, our PDF plugin allows us to incorporate PDFs into emails via a button. It’s worth noting that the plugin is not completely compactible with the Decorator plugin, but rest assured, the PDF button will still be added to emails for the selected customer in the PDF settings.
Earl Hickey
April 4, 2024
Hello,
Is the Decorator plugin compatible with the WPML plugin?
Arjun
April 8, 2024
Hi Eral,
Thank you for reaching out. The Decorator plugin isn’t compatible with the WPML plugin.
Igor
March 6, 2024
Hello
How to move shipping address above the products, on top of the email layout?
I add this {shipping_address} to Body text but it is not displaying anything.
Is there any list of all available shortcodes?
Arjun Aravind
March 19, 2024
Hi Igor,
Thank you for reaching out. We understand your requirements, but currently, the plugin doesn’t allow you to move the shipping address above the products. The shortcode {shipping_address} is invalid. You can find the available shortcodes under Decorator > Email Text > Shortcodes.
António Alves
February 21, 2024
Boa tarde.
Gostaria de saber se pode e como fazer para configurar o envio em simultâneo de emails do woocommerce para o email do cliente e para o email do admin?
Obrigado.
Arjun Aravind
March 19, 2024
Hi Antonio,
Thank you for getting in touch. We acknowledge your requirement, but currently, we do not offer the functionality mentioned.
Adam
October 31, 2023
Is there anyway to add an additional image upload field? I’m using the header image to show the logo but it would be great if you could upload a second header image which could be changed on every email.
Arjun
November 7, 2023
Hi Adam,
Thank you for reaching out to us. We understand your requirement, but currently, the plugin only supports uploading a single image to the header section.
Vanya
September 26, 2023
Hello there!
The plugin is great! I tried several before reaching it, thanks for creating this!!!
I have two questions:
– what is the best way to optimize the header image for both mobile and desktop?
– Is it possible to customize the [Order number] (date) colorful subject line of the email from somewhere? I cannot seem to find that. Thanks!
Arjun
September 28, 2023
Hi Vanya,
Thank you for reaching out. You don’t need to do anything special in the plugin to optimize the header image separately for mobile and desktop – it happens automatically based on the device. To customize the Order date and Order number, navigate to Others > Heading 2 in the plugin.
Olivera
September 18, 2023
Good day
I need your help – my website is in three languages, also emails need to be sent in three languages, how can I translate a customized email from English to French and Dutch? I tried to do it in several ways but it doesn’t work for me, what do you suggest as the best way
Thanks in advance Olivera
Arjun
September 20, 2023
HI Olivera,
Thank you for reaching out to us. We understand your requirement, but at the moment the plugin is not compatible with multilingual websites.
Richard Reeleder
August 28, 2023
Not clear how the Decorator email types match up with Woocommerce orders.
We have set up woocommerce so that a new order has ‘on hold’ status. We review the order, perhaps add or subtract an item after talking to customer. Then we change status to ‘pending payment’ and generate a new email which should contain a pay link (Invoice Payment plugin). When payment is received, order status in Woocommerce is changed to ‘completed’ and we generate an email to customer with invoice marked paid with payment information.
The Decorator plugin has options for email types that don’t quite match the woocommerce order status (on hold, pending payment, completed). How can they be matched up?
Arjun
September 1, 2023
Hello Richard,
Thank you for getting in touch with us. The Decorator plugin offers various options to address the scenario you described. To achieve this, follow these steps:
1. Utilize the Customer on hold order template to send an email with an “on hold” status when an order is in that state.
2. the Customer Invoice template can be used for different purposes:
Send one type of email while the payment is still pending.
Send another type of email after the payment has been successfully completed.
3. Lastly, use the Customer completed order template to notify the customer once the order has been successfully completed.
The content in the emails can be edited based on your needs. Please don’t hesitate to contact our support if you have any other doubts or require further assistance.
George
August 1, 2023
Hey there,
The plugin works great and all but there’s one issue for me. Every E-mail I send, shows the url source of the header image in email’s description. How can I hide it?
Thanks in advance,
George
Arjun
August 2, 2023
Hi George,
Thank you for getting in touch with us. Sounds like you need some technical assistance. Please visit our support page for technical assistance.
Walter
June 9, 2023
Hello,
I dont find in the plugin a way to customize the email with the address clickable to open a Maps.
I need a way to add tab and the shortcut for the address.
Is it possible ?
thanks
Arjun
June 12, 2023
Hi Walter,
Thank you for getting in touch with us. We understand your requirement. However, the plugin does not have the capability to customize the email with a clickable address that opens maps. Nevertheless, you can achieve a similar effect by adding additional text in the Email text settings and making it clickable to open maps using the tag.
David
May 29, 2023
Hello,
One question, is it possible to add a custom field checkbox (for example vat number), in the mail, where is the billing address?
Thank you.
Arjun
May 30, 2023
Hi David,
Thank you for getting in touch with us. We understand your requirement. But our plugin does not currently include the features you have specified.
B Ng
May 7, 2023
Is it possible to customize the emails of the custom order’s status in WooCommerce?
Arjun
May 8, 2023
Hi B Ng,
Thank you for getting in touch with us. We understand your requirement. But presently, the plugin does not offer the functionality to customize the custom order status emails.
George
April 10, 2023
Hello there,
I’m looking to change the text of two items but I can’t seem to find any option to do so. First one is Button Text on “Customer New Account” where the button shows as “View account”, and the second is I guess body text “Your password has been automatically generated….”. I edited the body text but from this line and below, nothing changes.
Thanks in advance
Arjun
April 25, 2023
Hi George,
Thank you for getting in touch with us. We understand your requirement. But our plugin does not currently include the features you have specified.
Soterios Kyprianou
December 15, 2022
Hi. I use now a standard woocommerce order email. I installed a Decorator but how can i disable woocommerce order email and activate a Decorator to send order emails?
Thank you
Soterios
Mike
December 16, 2022
Hi Soterios,
The Decorator plugin will not create or send any order emails. The plugin is designed to customize the default WooCommerce status emails. By using the plugin, you can customize the order emails according to your need.
zeven
December 13, 2022
hope could add tiktok icon, and could bigger icon, anyway, it’s best email custom plugin for me~thx for your creation
Mike
January 3, 2023
Hi Zeven,
Thanks for reaching out. We understand your requirement. Presently the plugin doesn’t offer any option to add the TikTok icon. Considering your request, we will add it to the plugin in our upcoming release.
Terri
October 12, 2022
Hi there, love the plugin but I’m confused as to why certain changes do not save. For instance, the header visibility is set to not show and the changes are published but the header still shows up. If I go back into edit the header, the header is set to be visible again. No matter how many times I hit publish, it doesn’t seem to save the changes because I go to exit the plugin and it asks me if I’m sure that I want to navigate away before saving changes…but I’ve already saved them. Any idea on what might be causing this?
Mike
October 22, 2022
Hi Terri,
Can you please reach out to us via support to check the issue?
Paweł
September 29, 2022
How do I add a message template generated from another plugin? I have installed the WooConvo – New Message Received plugin and I would like to be able to add a message template to the decorator, is this possible?
Mike
September 29, 2022
Hi Paweł,
Our plugin currently doesn’t provide compatibility/template customization for WooConvo.
Freddie
September 16, 2022
I posted a comment here yesterday, but it isn’t here today. Therefore I am posting it again and also sent the same inquiry at your SUPPORT LINK.
Yesterday I tried your DECORATOR plug-in for customizing WooCom emails. At first I was more than happy with the results as I ventured through the settings. That is until I tried to get the SHIPPING ADDRESS TO SHOW in the emails.
Even though I have selected ‘billing address visibility (ON)” and “shipping address visibility (ON)” settings AND also have both the “billing address title” and “shipping address title” areas filled with my choice of text, ONLY THE BILLING ADDRESS SHOWS ON ALL EMAIL TYPES.
The SHIPPING ADDRESS refuses to comply—NO SHIPPING ADDRESS and NOT EVEN THE SHIPPING ADDRESS TITLE on any email even though the CUSTOMER SUPPLIED A SHIPPING ADDRESS.
And there is NO SHIPPING ADDRESS OR ITS TITLE visible on the Previews when working within the plugin interface area.
Could you please provide a solution and/or instructions on how to correct this problem?
Thank you ever so much for creating this mostly satisfying plugin. No use to us though if the emails don’t provide BOTH A BILLING AND SHIPPING ADDRESS, for both our use and the customers.
Mike
September 26, 2022
Hi Freddie,
We understand your concern. However, it is the default functionality of WooCommerce when the “Shipping Address” is the same as the “Billing Address” checkbox is enabled during the checkout. The shipping address will display without any issues if you have entered the shipping address separately during checkout.
Brian
June 7, 2022
Is there a way to apply the header customization to all email templates?
Shesna
June 7, 2022
Hi Brian,
Yes. Open the drop-down next to the publish button and check the option ‘Apply the changes to all email templates’. The changes you have made in the active template will be reflected in all templates.
Kim H.
May 16, 2022
Hello,
Is there a way to hide the “pick-up time”? We are using a different way to book in the orders and now our customers see two different pick-up times which is very confusing.
Thank you.
Mark
May 27, 2022
Hi Kim,
Are you sure that this issue is related to the Decorator plugin? Kindly try deactivating it and see if the issue persists.
Kitty
April 8, 2022
I wish to deactivate an remove the plugin, it is not working wel with my track ant trace mail settings. Problem is, it won’t deactivate. When I try to remove it by using my FTP the folowing error messege is displayed: The decorator-woocommerce-email-customizer/decorator.php plugin has been disabled due to an error: Plugin file does not exist.
How is dit posible after removing the plugin.
Can you fix this so the plugin can be removed in the correct way without any error messeges?
Alan
April 8, 2022
Hi Kitty,
We’re sorry to hear that you are facing issues with our plugin. Please submit a ticket here so that our technical team can get in touch with you.