WebToffee’s Print Invoice, Packing Slip, Delivery Note & Label Plugin for WooCommerce(Pro) allows you to print, download and customize dispatch labels for your store very easily.
A dispatch label contains product details, payment method information, total cost amount, billing address, shipping address, and from address. It also contains the return address, in case, customers want to return the product. Therefore, the same dispatch label can be used as a Return label also.
Get started
- First of all, install and activate the plugin.
- Go to plugin settings. From the General Settings > Documents tab > Dispatch Label > Settings.
OR - From the WordPress dashboard, go to Invoice/Packing > Dispatch Label.
Setup a Dispatch Label in just two easy steps:
General Settings
You can configure the general settings required for the dispatch label.
- Show variation data below each product: Displays product variation on the dispatch label.
- Sort products by either on the basis of Name or SKU.
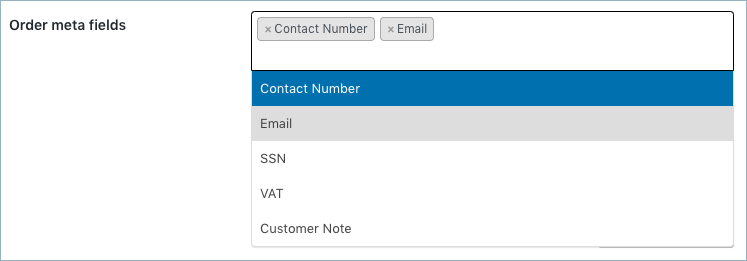
- Order meta fields:
- Select additional order information in the dispatch label from the drop-down.
- You can select an item from the list of default fields or
- Click the Add/Edit Existing Order Meta Field button to create custom meta fields by providing a custom Field Name and the respective Meta Key for the field.
- Likewise, you can view, edit, or delete previously created meta from the previously added tab.
- Product meta fields:
- Select/add additional product information in the dispatch label.
- Click the Add/Edit Product Meta to add a new product meta field by providing a custom Field Name and the respective Meta Key for the field.
- Likewise, you can view, edit, or delete previously created meta from the previously added tab.
- Product attributes –
- To have product attributes in the dispatch label, simply add them by using the Add/Edit Product Attribute button.
- Add new tab will give you options to specify the field name and the corresponding meta of the product attribute.
- Likewise, you can view, edit, or delete previously created attributes from the previously added tab.
- Show individual tax column in product table: Choose ‘Yes’ to have individual columns for tax in the dispatch label.
- Enable print dispatch label for order status: Choose order statuses for which a Print Dispatch Label button will be made available in the order email.
Finally, click on the Update settings button.
Customize Dispatch Label
You can customize the dispatch label using the inbuilt templates and modify them to suit your needs.
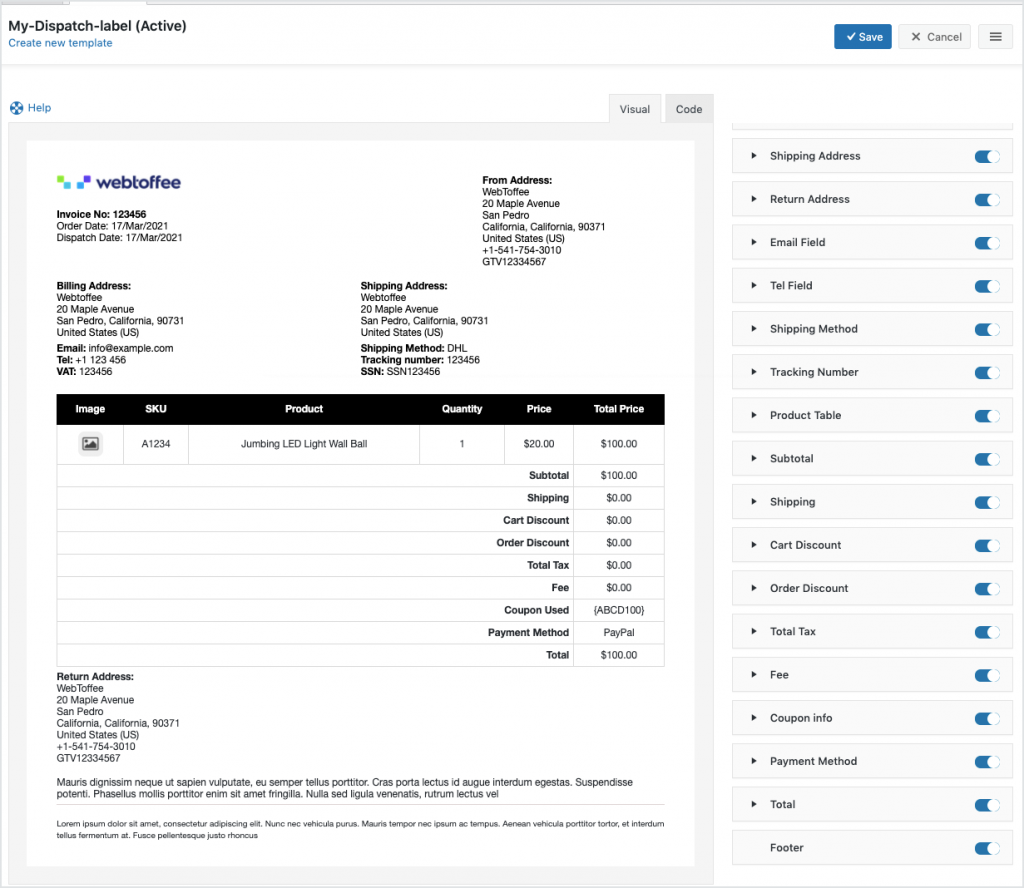
To create a new dispatch label template,
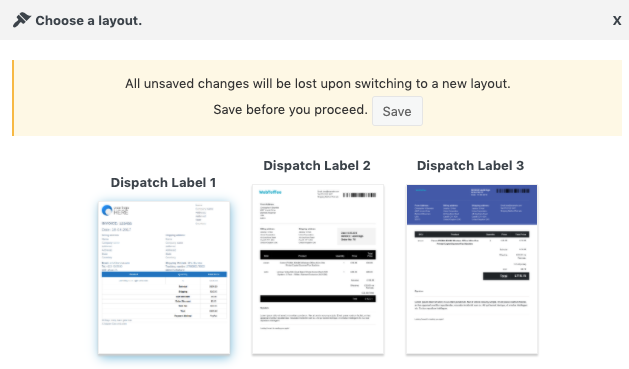
- Select a template from the Create new template option.
- From the inbuilt templates that pop up, choose a layout.
- Make the necessary modifications to the layout and save it.
- After saving, activate the template to use it further for your dispatch label.
- You can even switch to the code editor, to make additional customizations other than the one listed in the visual editor.
- While making changes via code editor it would be better for you to refer to the help which briefs about placeholders, alternate classes for RTL support, etc as shown below:

- Make the necessary modifications to the layout and save it.
- After saving, activate the template to use it further for your dispatch label.
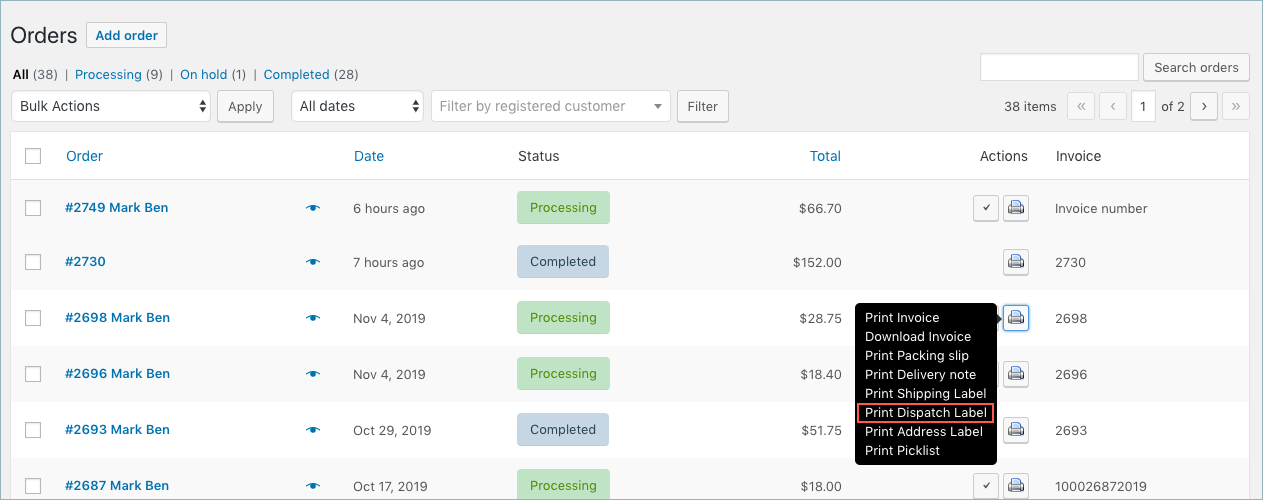
Bulk print Dispatch Label
Furthermore, you can directly print the dispatch label from the WooCommerce orders page as shown below:
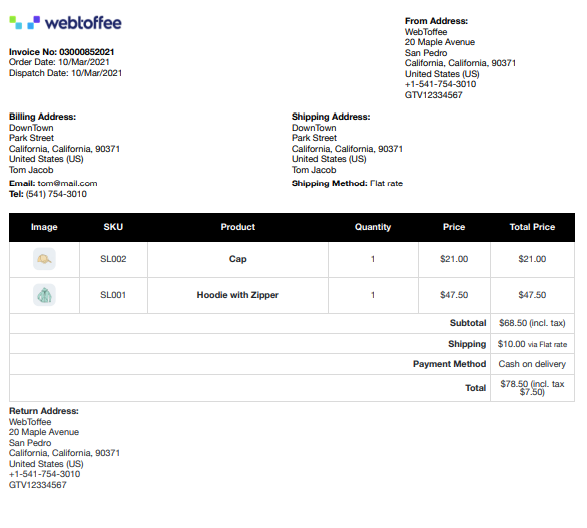
Sample Dispatch Label
A sample dispatch label will be as shown below:
haidar kafaji
August 4, 2020
hello again, also tracking number and shipping method is not active in my invoice . i mean the on/off button is greyed .
Mark
August 5, 2020
Hi,
Firstly, please create a new template from the Customize page. You might be using a presaved template from the free version.
haidar kafaji
August 4, 2020
hi there, i just purchased this product yesterday. having trouble showing tracking no on dispatch invoice. i tried to add it from customize button , i can see it added when i entered in right hand menu but when i download the dispatch invoice the tracking no is not there. is there something i have to to overcome this issue.
thank you
Mark
August 5, 2020
Hi,
Please refer the article here to add tracking number meta to all labels.