Looking to set up a WooCommerce store?
WooCommerce is the biggest eCommerce website builder used for setting up digital commerce websites on WordPress. The platform currently has more than one-third of the market share and is not expected to slow down anytime soon.
Moreover, WordPress and WooCommerce are highly user-friendly and demand no technical expertise in managing them. This makes it one of the common choices of businesses across the globe.
The idea of setting up a store may feel intimidating at first, but the truth is that it is not as challenging as it sounds. Here we will see how you can easily set up a WooCommerce store.
Basics of WooCommerce
WooCommerce is a WordPress plugin that adds eCommerce functionalities to your site. The plugin is fully free to use.
Nevertheless, there are several additional plugins in WordPress that you can use to extend the functionalities of this basic WooCommerce plugin. This would help a business easily create advanced configurations in your store without having to write a single line of code.
Since WooCommerce and WordPress are free to use for everybody, you would only need to purchase a domain name and a web hosting service to set up your store. We will look into all these in detail in the next section.
How to set up a WooCommerce store?
Setting up a WooCommerce store from scratch involves several processes. Let’s look at them one by one.
1. Choose a hosting solutions provider
Choose a domain name that reflects your brand and is easy to remember. Then, select a reliable web hosting service that can support the demands of an e-commerce site.
Some hosting companies such as WordPress.com, DreamHost, Bluehost, Pressable, and SiteGround have partnered with WordPress to give pre-installations of WordPress and WooCommerce.
So it would be ideal to use the official WordPress and WooCommerce recommended hosting provider to set up hosting.
Once you purchase your hosting plan you can register your domain name and then set up your hosting account. Refer to the respective hosting partner documentation to know more about setting up hosting accounts and the domain name. You may also refer to this blog on hosting websites to know more.
Additionally, ensure to install the dedicated IP and SSL certificates on your domain name. It keeps your store secure and protected against online threats.
2. Create a WordPress installation
WooCommerce is an extension for WordPress, so to create a WooCommerce website you will need to have a WordPress installation.
Several hosting companies such as Bluehost offer one-click WordPress installation, so do check if your hosting provider has any such features before installing WordPress.
If don’t, you can download WordPress and follow the installation guide to successfully complete the installation.
3. Activate WooCommerce
Once you have your WordPress installation up and running, you can extend your website to add eCommerce functionality. To do so, you will have to install and activate WooCommerce on WordPress.
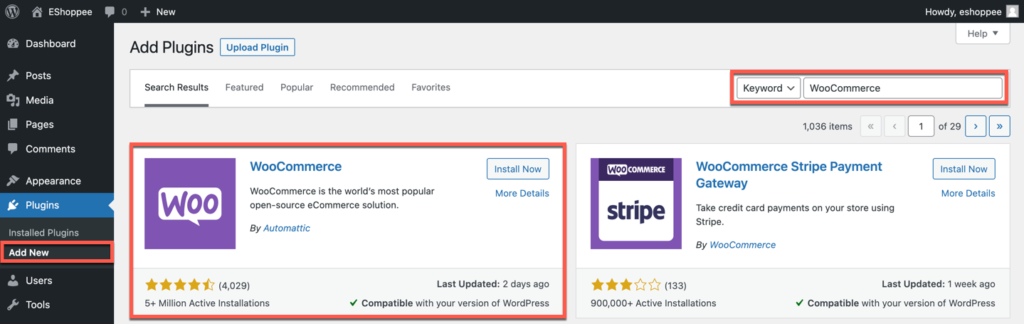
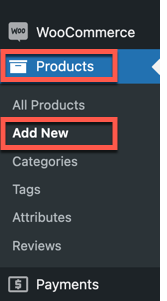
For that, log into your WordPress admin console and navigate to Plugins > Add New.
Search for the Keyword ‘WooCommerce’ and locate the plugin. Now click on Install Now and then Activate corresponding to the plugin.
Upon activation, you will land on the WooCommerce setup wizard where you will be asked to set up the basic details of your store.
Specify the basic store details such as the country, address, zip code, city, and email address of the store owner/admin on the Store Details page.
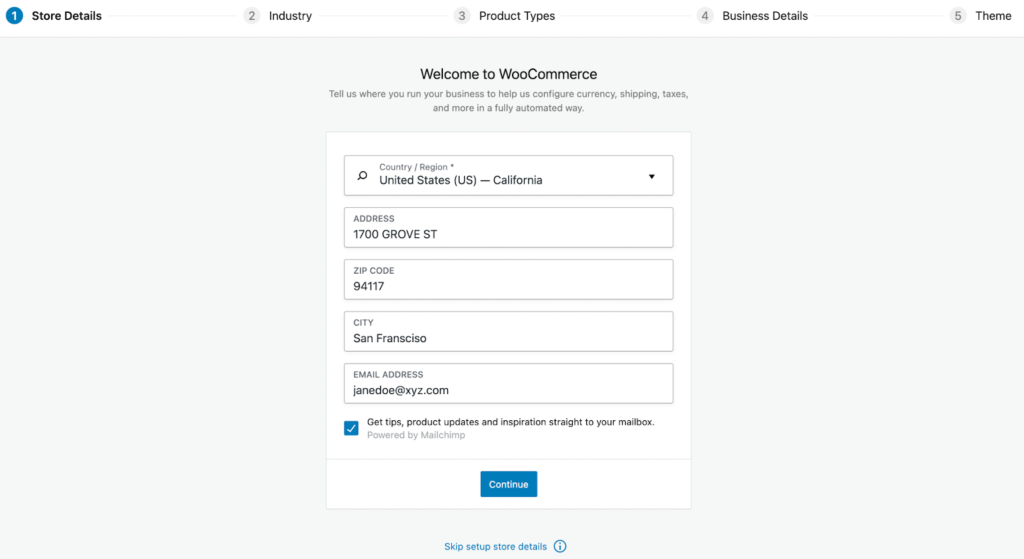
Once this is set up, click on Continue.
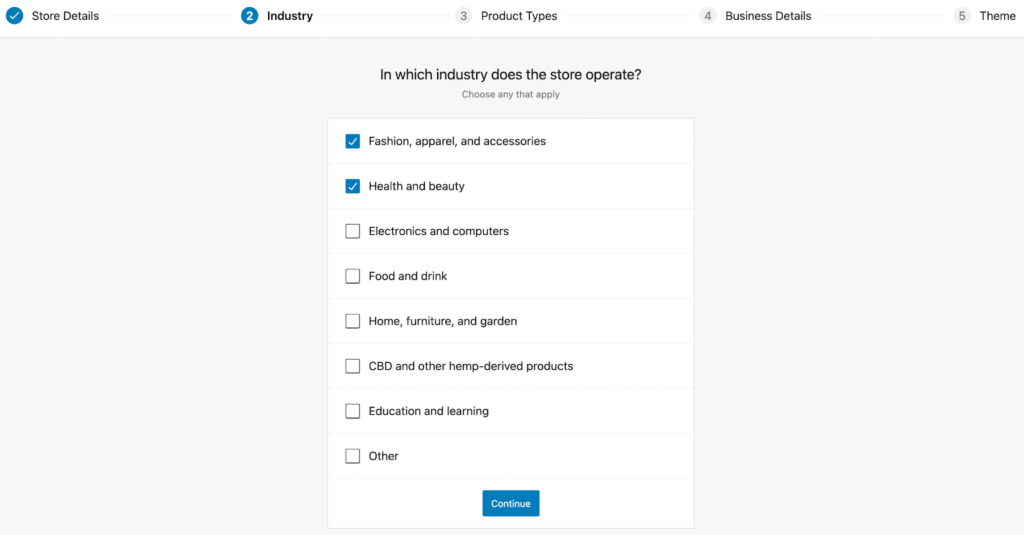
You will now be asked to choose the industry in which the store operates, and select the one suitable for you.
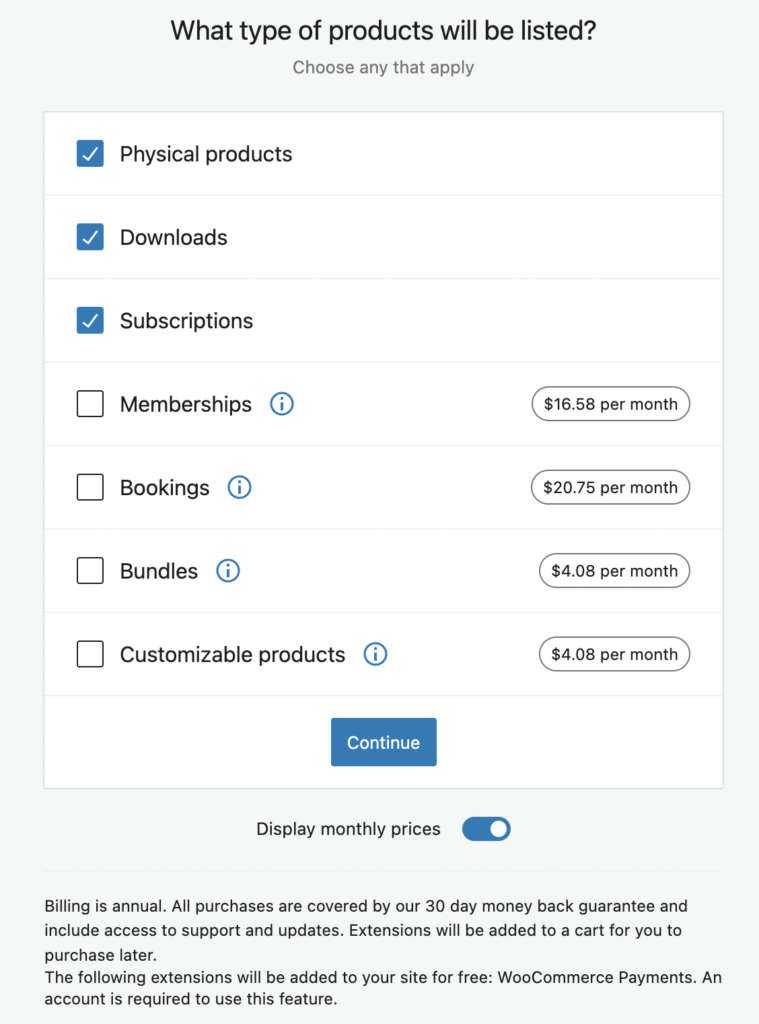
Now you will be asked to choose the type of products that you will be selling.
Physical products, downloadable products, and subscription services can be set up using the basic features of WooCommerce.
However, to set up more advanced products or offerings like memberships, bookings, bundles, and customizable products, you will have to add additional extensions to WooCommerce. Even if you don’t configure it here, you can add these extensions in the future.
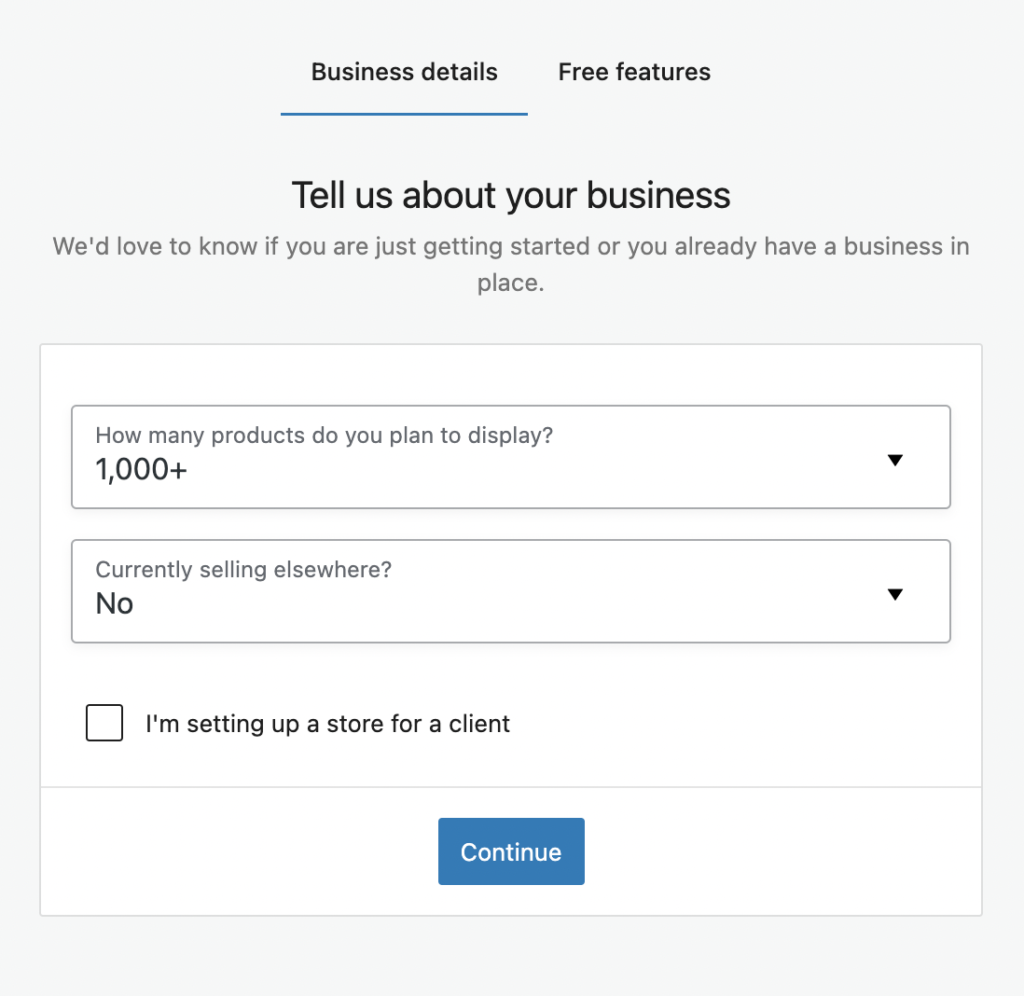
You will then be asked about some of the basic details of your store like – the number of products that you are planning to sell and other platforms where you are selling.
If you are setting this up for your client, you can specify that on the same page.
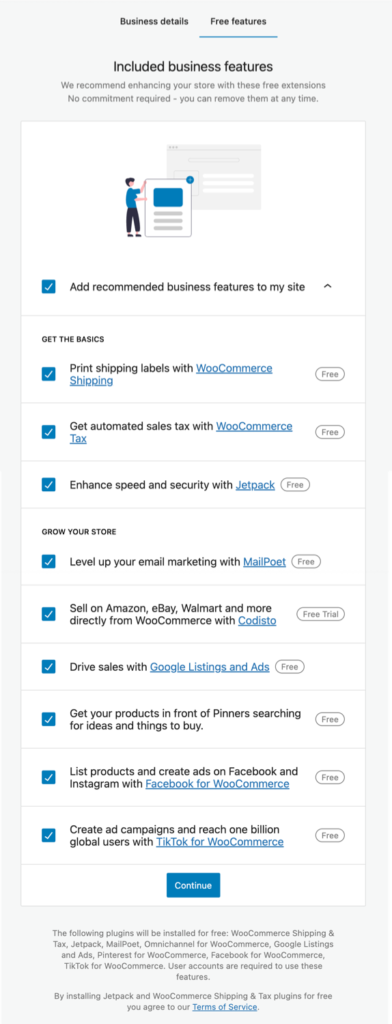
By default WooCommerce will include business features on your site, if you don’t want that, you can disable that in the next step.
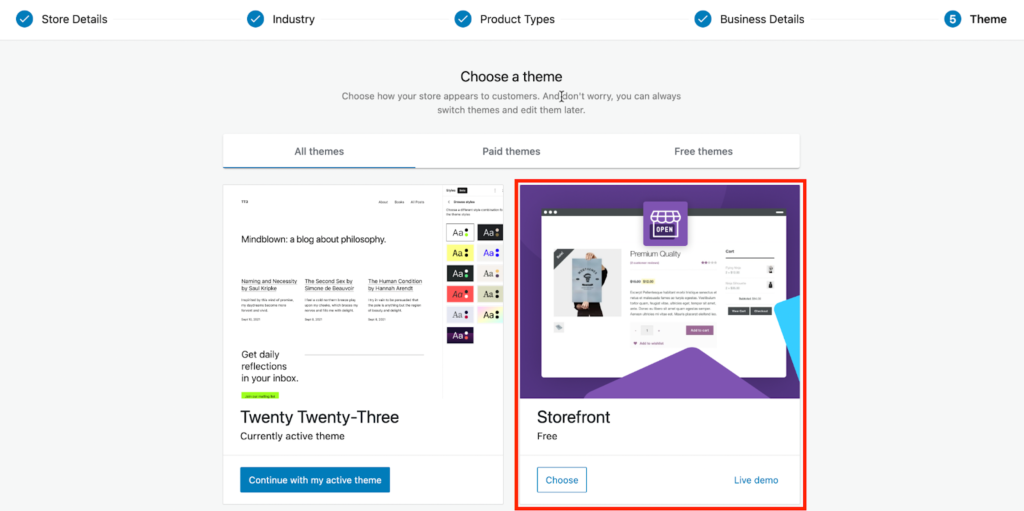
You will then be asked to pick a theme for your eCommerce site. You will find several free and premium themes in that setup wizard. Pick a suitable theme to build a modern eCommerce website.
Note that the appearance of your theme completely depends on the theme of your website, so take good care when selecting one for your store.
WooCommerce recommends using Storefront or its child themes as these are optimized for eCommerce.
4. Add products to sell
To add products, navigate to Products > Add New from the WordPress admin panel.
You can add physical, digital, variable, subscription, grouped, and external products in WooCommerce.
The following are the most basic details of the product that you add to your store.
- Name of the product
- Product image
- Type of product
- Price of the product
- Stock settings
- Shipping details
- Product attributes if any
- Category of the product
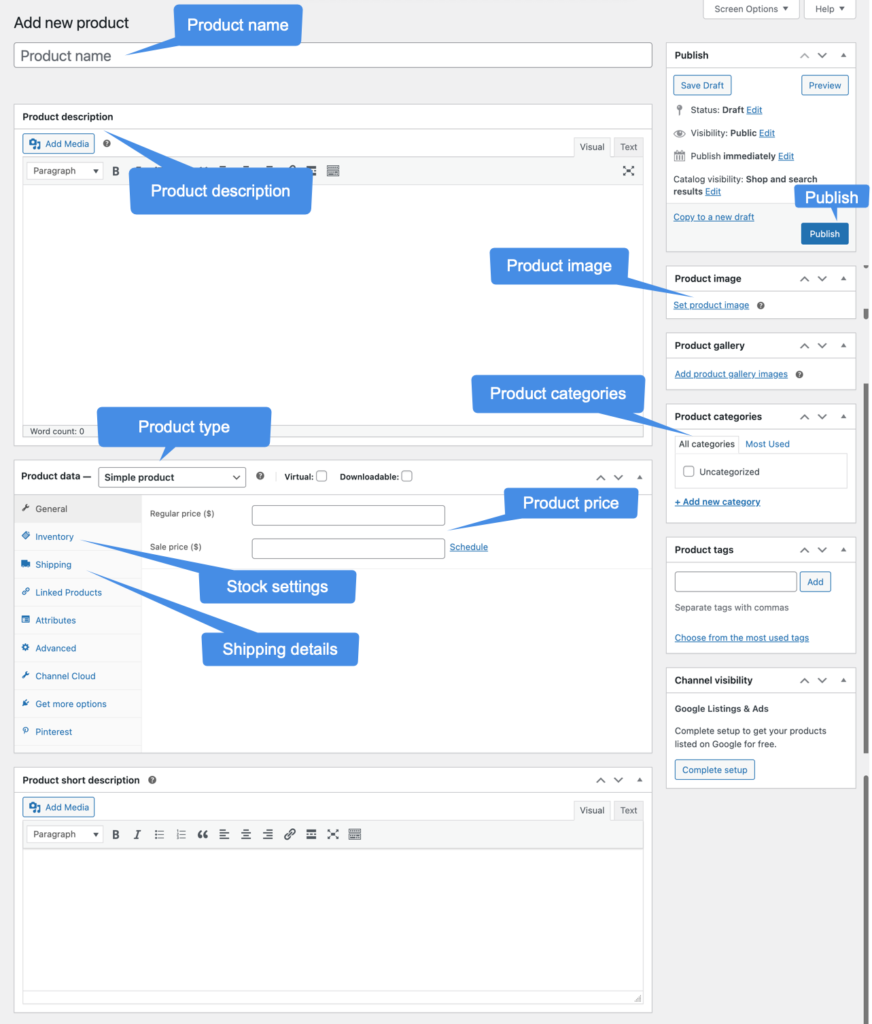
You can add any number of products to your WooCommerce store this way. You may also use the WooCommerce CSV import to import products to your store in bulk.
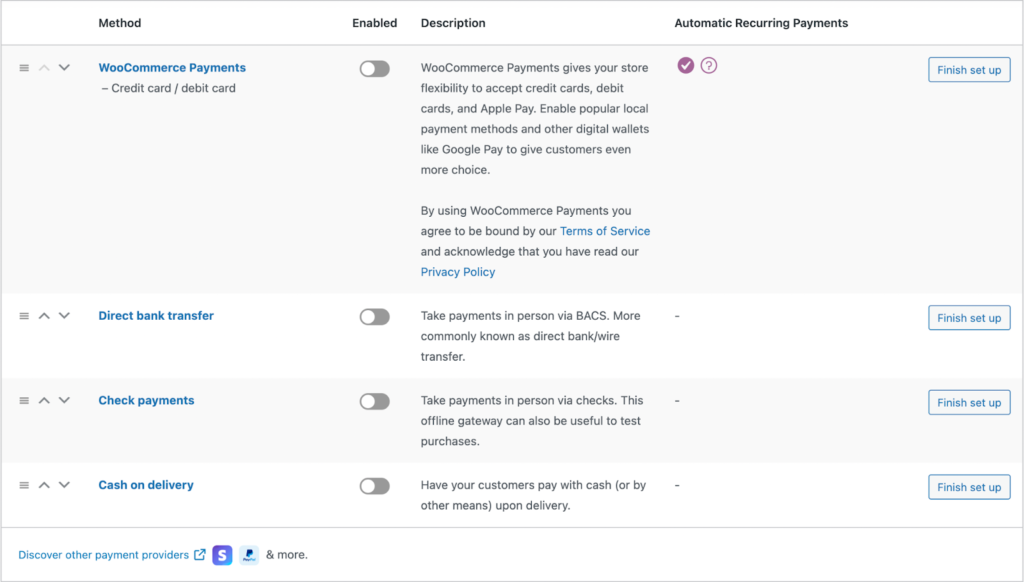
5. Set up payments
For your customers to purchase any products from your store, they should be able to pay. To set up payment in your store,
Go to WooCommerce > Settings > Payments and toggle on the required payment options. WooCommerce payments (credit and debit cards), direct bank transfer, check payments, and cash on delivery is available by default.
Each payment method can be enabled by toggling it on. You may also add additional payment methods other than these with third-party payment plugins.
We will look into configuring taxes next.
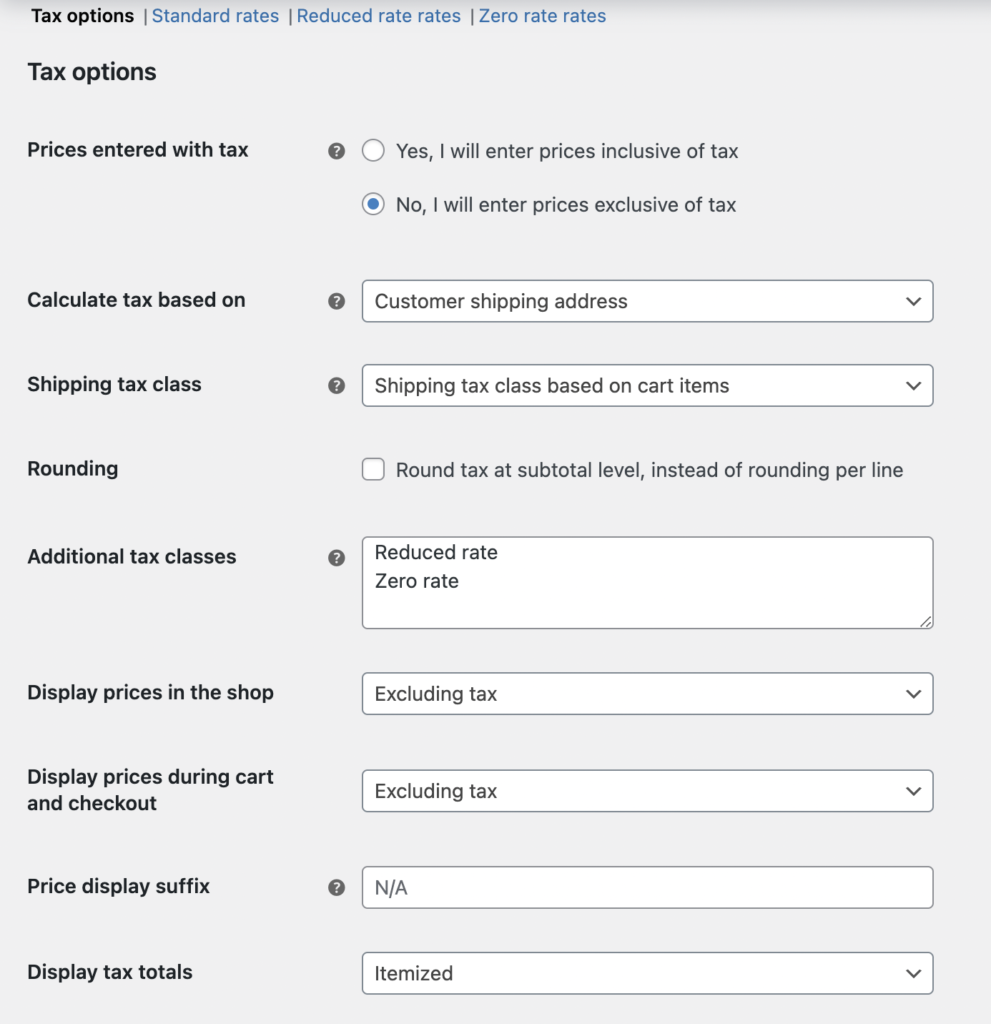
6. Add tax rates
Tax rates can be added in the next step. To do so navigate to WooCommerce > Home. Click on step 4 Add tax rates. Here you can add taxes with the help of the WooCommerce Tax or the Avalara plugins. You may also set up taxes manually or opt for not charging taxes altogether.
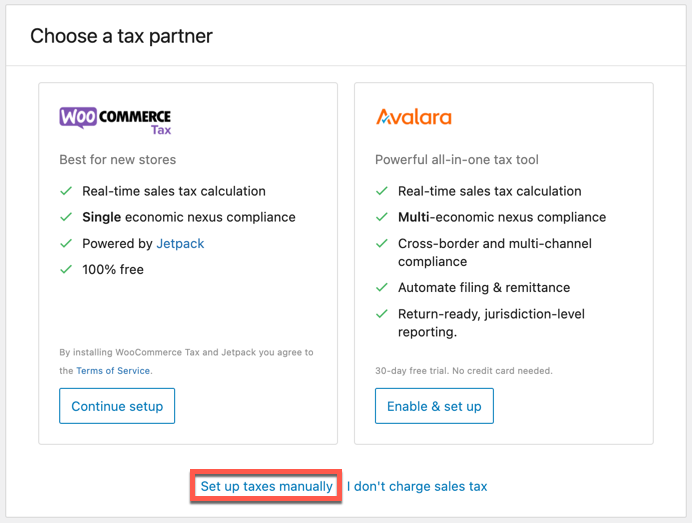
Here let’s look at setting up taxes manually. Go to WooCommerce > Settings > General and make sure the option Enable taxes is turned on. Now go to the Tax tab and set up the tax options.
These are the basic components of your WooCommerce store.
Get more WooCommerce extensions
To set up a WooCommerce store meaningfully you will need additional features and customizations for everything in your store. We will look into some such extensions here.
Administration
Product Import Export Plugin For WooCommerce
Seamlessly import/export WooCommerce products including simple, variable, custom products and subscriptions. You may also import and export product images, tags, categories, reviews, and ratings.
WordPress Users & WooCommerce Customers Import Export
Easily import and export WordPress users and WooCommerce customers using this Import Export plugin for WooCommerce. The plugin supports the use of CSV, XML, TSV, XLS, and XLSX file formats.
Order, Coupon, Subscription Export Import for WooCommerce
Export and Import WooCommerce orders, subscriptions, and discount coupons using a single Import Export plugin. You may customize the export and import files with advanced filters and settings.
Import Export Suite for WooCommerce
An all-in-one plugin to import and export WooCommerce store data. You can import and export products, product reviews, orders, customers, discount coupons, and subscriptions using this single plugin.
WebToffee WooCommerce Product Feed & Sync Manager
Generate unlimited WooCommerce product feeds for Google Shopping and Facebook Business Manager. Use the Facebook catalog sync manager to sync WooCommerce products with Facebook and Instagram shops.
WordPress Backup and Migration
A complete WordPress backup and migration plugin to easily back up and migrate your WordPress website and database. This fast and flexible backup solution makes creating and restoring backups easy.
Accounting
WooCommerce PDF Invoices, Packing Slips and Credit Notes
You can use this WooCommerce invoice, packing slip and credit note plugin to customize, auto-generate, and print WooCommerce PDF invoices, packing slips, and credit notes. You can also send these documents to customers by attaching them to the order emails.
WooCommerce Shipping Labels, Dispatch Labels and Delivery Notes
Customize the settings and appearance of your WooCommerce shipping labels, dispatch labels, and delivery notes. The plugin auto-generates these documents when the order status changes to a set value.
WooCommerce Picklists Plugin
Set up and customize WooCommerce picklists that are automatically generated when the order status changes into a pre-set value. The picklists can be printed or downloaded from the admin order page.
WooCommerce Proforma Invoices Plugin
Automate the generation of WooCommerce proforma invoices when new orders are placed and send them to your customers via order emails. You can also customize the layout and the contents of the invoice.
WooCommerce Address Labels
Generate address labels for all WooCommerce orders in your store and easily print them in bulk using the plugin. You can also customize the label layout and create labels of different types with ease.
Sequential Order Numbers for WooCommerce
Number your WooCommerce orders in a custom, sequential & manageable format. The Sequential Order Number plugin lets your orders follow a custom & unique numbering sequence suitable for your business.
Remote Print Addon for WooCommerce PDF Invoices – PrintNode
A WooCommerce PDF invoice cloud printing solution to remotely print all the WooCommerce store documents generated using the invoice plugin ‘WooCommerce PDF Invoices, Packing Slips, and Credit Notes’.
QR Code Add-on for WooCommerce PDF Invoices
Add a QR Code encoded with the order number, invoice number, and other custom data to your store PDF Invoices. The QR code add-on plugin lets you easily comply with the invoice mandates of various countries.
Promotions
Smart Coupons for WooCommerce
Create coupons to offer discounts and free products to your customers with Smart Coupons for WooCommerce. You can set up BOGO coupons, giveaways, gift cards, store credits, and more with this plugin.
Display Discounts for WooCommerce
Display the WooCommerce coupon deals on your product pages with Display Discounts for WooCommerce plugin. The coupon details like coupon codes and usage restrictions can be displayed using the plugin.
WebToffee WooCommerce Gift Cards
Create and manage advanced gift cards for WooCommerce stores. Enable your customers to buy, redeem, and share gift cards from your store.
WooCommerce Best Sellers
Highlight top-selling products on your WooCommerce store using best-seller labels, sliders, and custom seals offered by this WooCommerce best sellers plugin. You can display ranking positions for best-seller products in different categories.
Frequently Bought Together for WooCommerce
Effortlessly identify the WooCommerce Frequently Bought Together products in your store and boost their visibility on the individual product pages. Grow your sales by setting up discounts on the FBT bundles.
URL Coupons for WooCommerce
Generate custom URLs and QR codes for every discount coupon in your store with the WooCommerce URL coupons plugin. These unique coupons are easy to share and can even be set to add new products to the cart upon application.
Payments
PayPal Express Checkout Payment Gateway for WooCommerce
Offer a fast checkout experience to your customers with PayPal Payment Gateway. You can set up the PayPal Express Checkout option on the product pages to reduce the clicks to complete the checkout.
WooCommerce Stripe Payment Gateway
Ensure a fast and secure checkout experience for your users with WooCommerce Stripe Payment Gateway. Stripe accepts credit/debit cards and offers integrations with Apple Pay, SEPA, Alipay, and more.
Additional extensions to set up a WooCommerce store
GDPR Cookie Consent Plugin (CCPA Ready)
The plugin helps you get compliant with GDPR, CCPA, and other major cookie laws. You can create and manage cookie consent banners, scan website cookies, and generate cookie policies with this plugin.
Subscriptions for WooCommerce
Enable subscriptions on the WooCommerce store to sell products (physical and digital) and services that require accepting recurring payments. Supports both simple and variable subscription products.
WooCommerce Request a Quote
This plugin allows customers to request quotes for WooCommerce products, get price quotes, and submit proposals to the store admin, which the admin and customer can respond to.
Test your store
Before launching your store, it’s important to test it thoroughly to ensure everything is working as expected. Test the site’s checkout process, payment methods, and overall functionality.
After testing, you can launch your store and start promoting it to potential customers.
If interested, check out the five major factors you should consider while building an eCommerce store.