WooCommerce picklists are critical documents that play an important part in order picking and order fulfillment. The document makes it easy for the product pickers to identify and collect the items purchased by your customers from your warehouse. Learn how you can generate picklists and seamlessly print them using WooCommerce.
WooCommerce picklists, if not made right, can have a negative impact on your business. Wrong products on the picklist can lead to sending the wrong items to customers.
It can result in customer dissatisfaction, wasted shipping, return, and packaging costs. An incorrect or difficult WooCommerce picklist format can cause the picker to spend more time collecting items on each order leading to delayed shipments.
Even though picklists are indispensable in WooCommerce, there are no default settings for setting up WooCommerce picklists in WordPress. It is therefore essential to use a third-party WooCommerce picklists generator plugin to aid you in the process.
What is a WooCommerce picklist?
A WooCommerce picklist is a document generated to assist warehouse pickers to identify and collect the products associated with the orders from the warehouse
The products after picking will be segregated, packed, and shipped to the recipients after this. This makes WooCommerce picklists an essential component of the order fulfillment process.
Picklists make the order-picking process organized. A WooCommerce picklist document usually shows data such as product name, SKU, and quantity.
WooCommerce Picklist vs Packing List
A picklist might contain information regarding multiple customer orders on a single document. That is, picklists are only intended to make the product-picking process seamless. For example, a single picklist can have products pertaining to two or more different orders.
A WooCommerce packing list, on the other hand, is required to make the packing process easier. A packing list is similar to a checklist of items pertaining to an individual order. A WooCommerce packing list is generated to ensure that the orders are packed responsibly and would not contain wrong or missing items.
Why are WooCommerce picklists significant?
There are several benefits of using picklists for your WooCommerce orders. Some of these include,
- Picklists make the order fulfillment process more organized and efficient.
- Organized the picking process by making the next set of orders ready to be picked as soon as the current one is completed.
- Accelerates order completion by speeding up product picking.
- Minimizes human error and consumed time.
- Streamlines the process of managing multiple SKUs.
- Differentiates between different variations of products for warehouse pickers.
- The accuracy of order picking and the speed of fulfillment impact profits and competitiveness.
What should be included in picklists for WooCommerce?
Picklists, in general, are basically of two types – physical and digital. Though there are some differences between the types of picklists, the heart of the document remains the same.
A WooCommerce picklist should contain the products and the quantities of the products that your customer has ordered. The picklists for WooCommerce should be designed in a way that makes retrieving products as easy as possible.
Here are some of the basic components of picklists.
- Product SKU
- Order number
- Image of the product
- Order number
- Recipient information
How to create WooCommerce picklist using a plugin?
Picklists for WooCommerce can be generated and printed with the help of third-party plugin solutions for WooCommerce. We will be looking into using the WooCommerce Picklists plugin from WebToffee to create your own custom picklists in this article.
The plugin enables you to create, customize, bulk print, and email picklists directly from your WordPress admin panel.
Let’s see how you can set up the plugin and achieve all your WooCommerce picklist needs.
Step 1: Install and activate the plugins
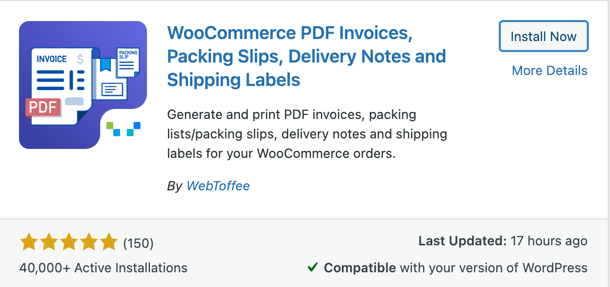
For the WooCommerce Picklist plugin to work, you will need to install and activate the free plugin WooCommerce PDF Invoices, Packing Slips, Delivery Notes, and Shipping Labels. To do this,
- Log into your WordPress admin account and head on to Plugins > Add New.
- Search for the keyword ‘WooCommerce PDF Invoices, Packing Slips, Delivery Notes and Shipping Labels’.
- Click on Install Now corresponding to the WebToffee plugin and then tap on Activate.
This will add the free plugin to your store, you can now go ahead and install the Picklist plugin for WooCommerce.
- From the Plugins > Add New page, click on Upload Plugin.
- Choose the picklist plugin zip file you received after purchasing the plugin.
- Click on Install Now and then on Activate Plugin.
Step 2: Set up WooCommerce picklist
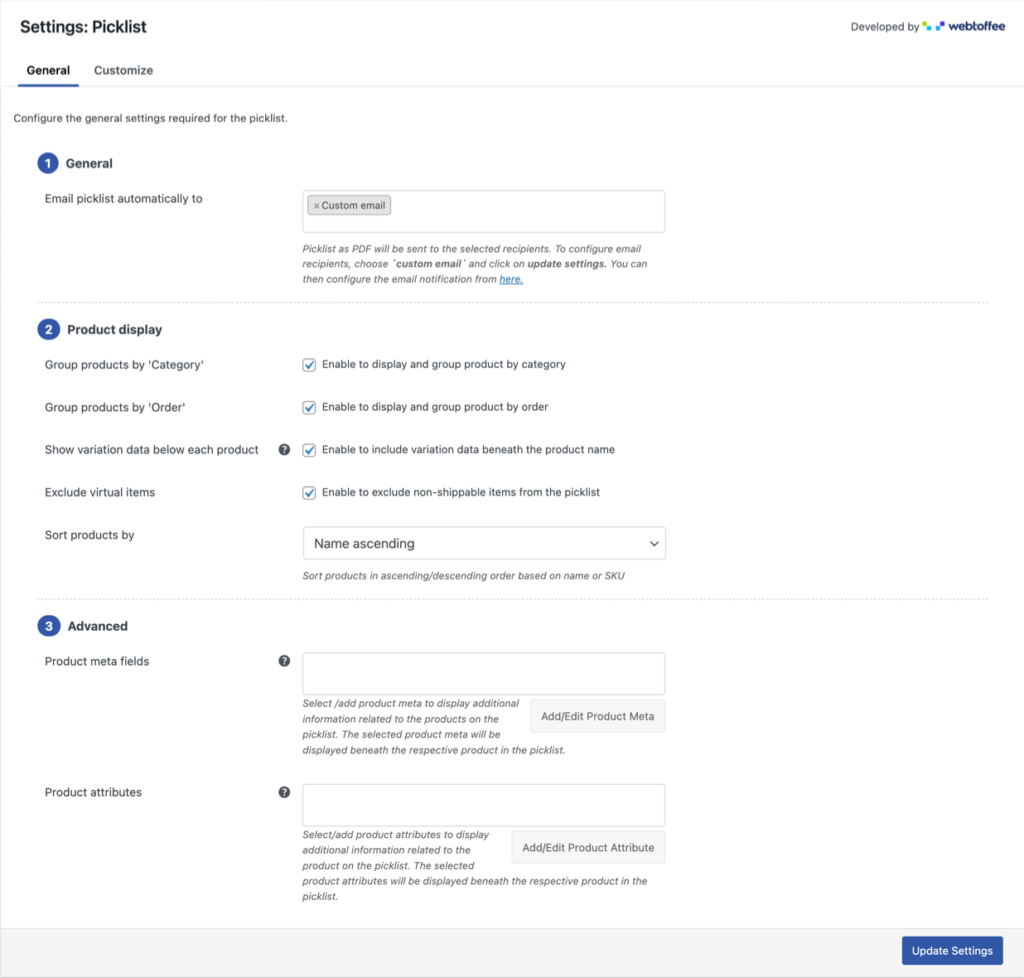
- Click on Invoice/Packing > Picklist on your WordPress navigation bar. This will take you to the picklist General tab.
- Select the order status emails to which you want to attach the picklists. This enables you to attach a PDF of the picklist to the WooCommerce emails such as ‘order processing emails’, ‘order completed emails’, etc. However, if you want to directly send out ‘picklist emails’ to selected recipients, choose ‘Custom email’.
Go to WooCommerce > Settings > Emails > Picklist to configure the custom picklist email recipients and the email content.
- To group all the products in the picklist based on the product on the product category, check the box corresponding to Group products by ‘Category’.
- If you want to display the products belonging to a specific order together, check the box corresponding to Group products by ‘Order’.
- To show the variation data of each product below the product details in the product table, enable the option Show variation data below each product.
- Enable the checkbox Exclude virtual items if you want to exclude non-shippable items from the pick list.
- Choose how you want to sort the products in the picklists. You can arrange it in the ascending or descending order of the name or SKU.
- Create, edit and add additional product meta fields to the picklists with the Product meta fields option.
- Similarly, you can add additional product attributes to the picklist with the Product attributes section.
- Click on Update Settings to update the changes made till now.
Step 3: Customize the design of the picklist document
- Navigate to Invoice/Packing > Picklist > Customize. You will be able to see the default picklist template in the visual editor there.
- Enable or disable the elements such as the Company Logo, Order Lists, Order Count, and more.
- Click on the elements like the Company Logo, From Address, Printed On, and Product Table to configure its style such as text, font, etc.
- Once you are done with this, click on Save, and provide a template name.
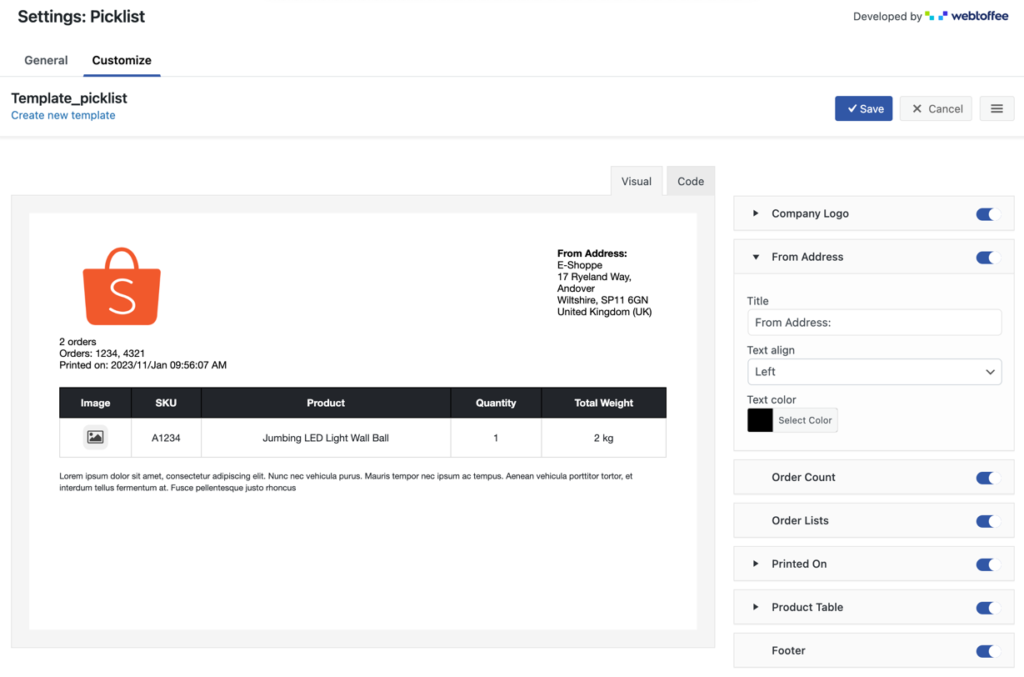
The configuration that you made will now be saved as a template and that template will now be activated. Any picklists generated after activating a template will follow the template design.
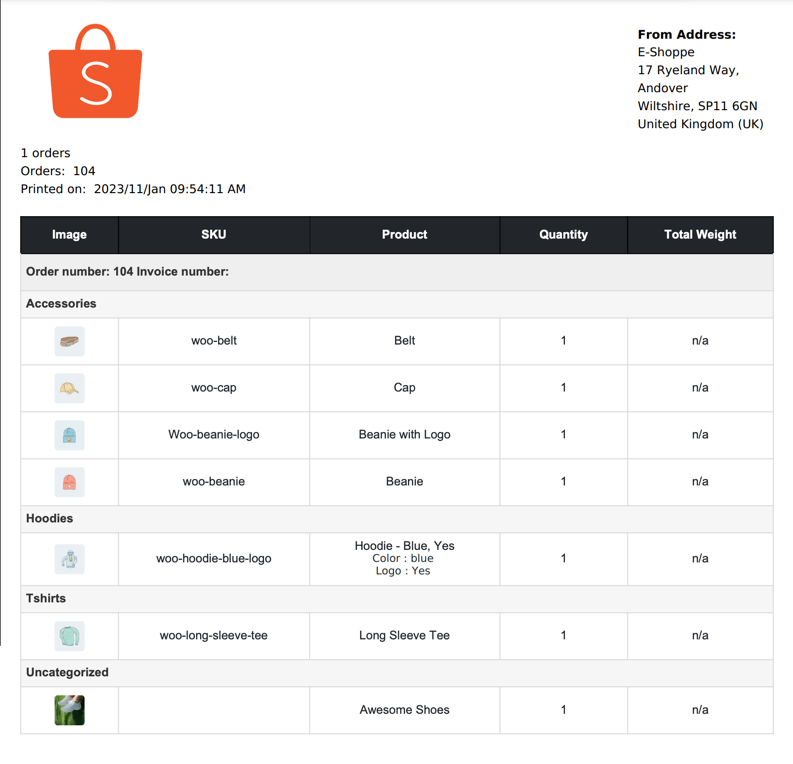
Here is a sample picklist generated using this plugin.
Accessibility of WooCommerce picklists
With this plugin, the picklists will be automatically generated with every order. These generated templates will be sent along with the WooCommerce emails to the required recipients.
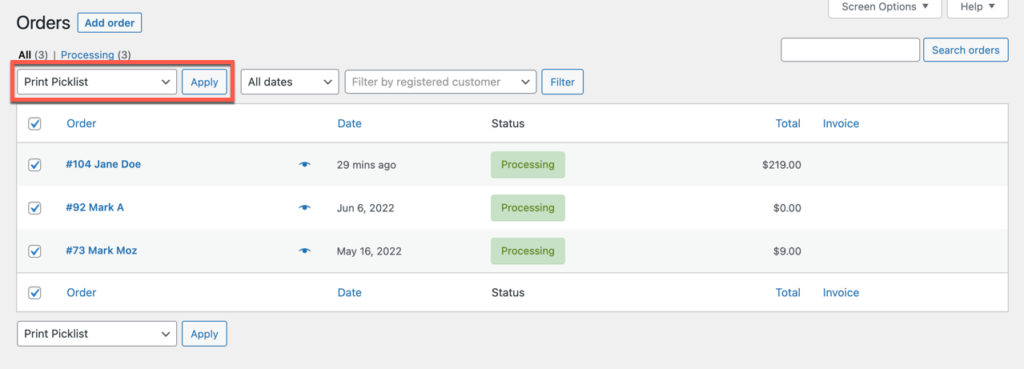
To directly download or print the picklists, navigate to WooCommerce > Orders on your WordPress admin panel and select the orders for which you can create picklists. Once selected, select the bulk action – Print Picklist and click on Apply.
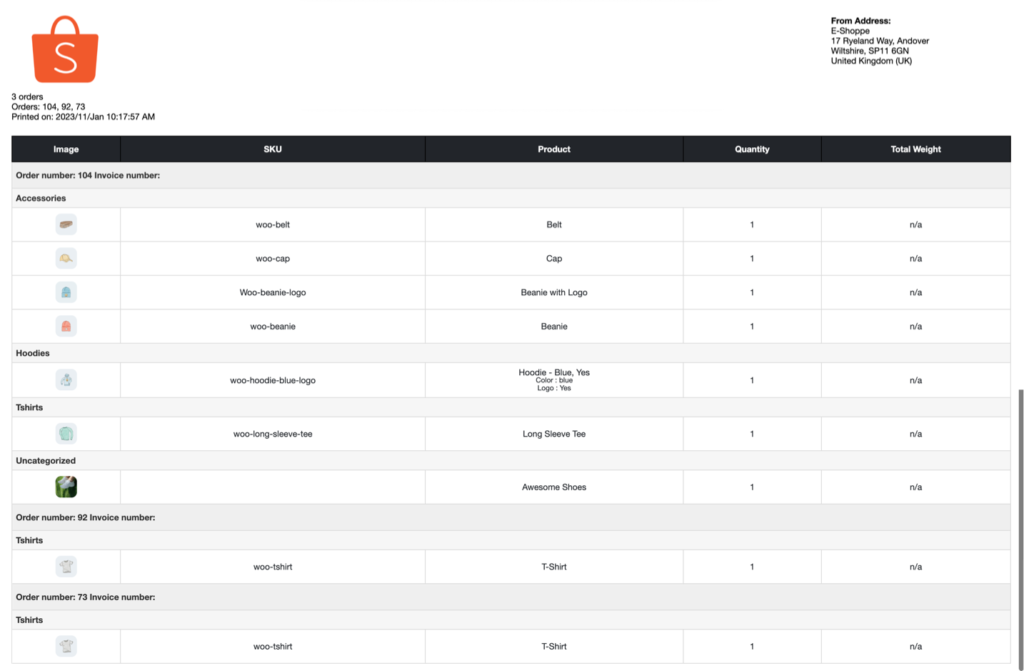
Here is a sample of a common picklist containing products belonging to multiple orders.
Conclusion
Picklists might not seem like a necessity if you are running a small or medium-sized business. However, the reality is far from this. A WooCommerce picklist makes the complex process of order picking seamless, less error-prone, and more time efficient. So even if you are not running a large business, generating picklists and distributing picklists to the warehouse pickers is a great idea.
The WooCommerce picklist plugin from WebToffee is a great tool to help you with this process. Hope this article was of interest to you. Do let us know what you think about the article and the plugin in the comments below.