Webtoffee’s Print Invoice, Packing Slip, Delivery Note & Label Plugin for WooCommerce(Pro) you can set up shipping labels with custom sizes and include additional fields.
Get started
- First of all, install and activate the plugin, a new menu Invoice/Packing appears in the WordPress dashboard.
- Choose Invoice/Packing > Shipping Label from your WordPress dashboard.
OR - Go to General Settings > Documents tab > Shipping Label > Settings.
General settings
The settings included in the general tab are the following:
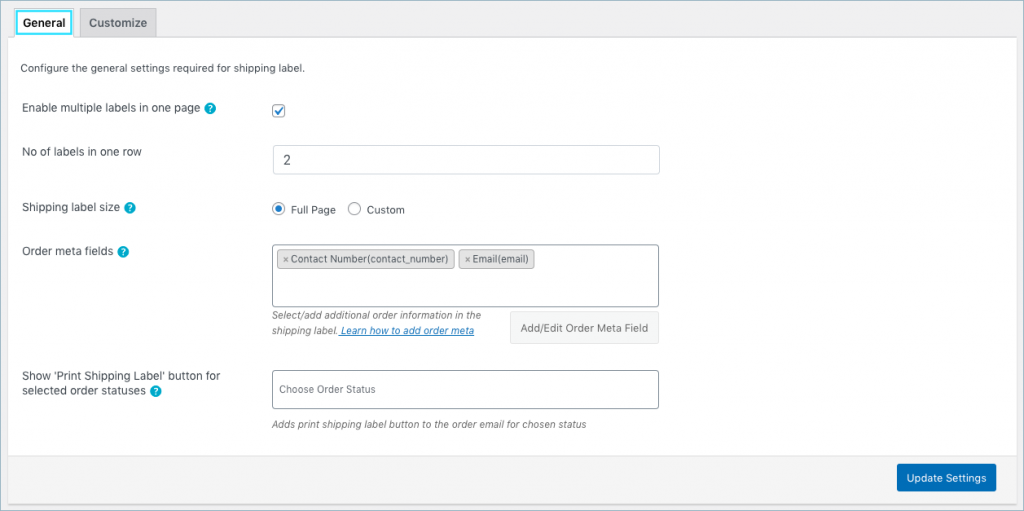
Enable multiple labels on one page – Enable to generate multiple labels on one page itself. When enabled, you will get an option to input the number of labels in a row.
Shipping Label Size – You can choose either full page or set custom size for the shipping label.
- Full Page: This option allows you to print the label which will be spread over the full page. The printing depends on the browser printing option.
- Custom: This option allows you to print the label in the desired size. You can configure a custom shipping label size of your own by entering size values in terms of width and height (inches).

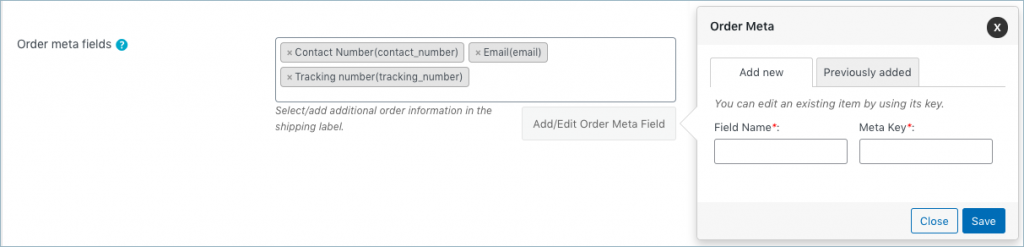
Order Meta Fields – This allows you to add additional order meta fields in the shipping label.
- Select an item from the list of default fields or
- Click the Add/Edit Existing Order Meta field button to create custom meta fields by providing a custom Field Name and the respective meta key for the field. You can get the order meta keys from the custom field section of the WooCommerce Order page.
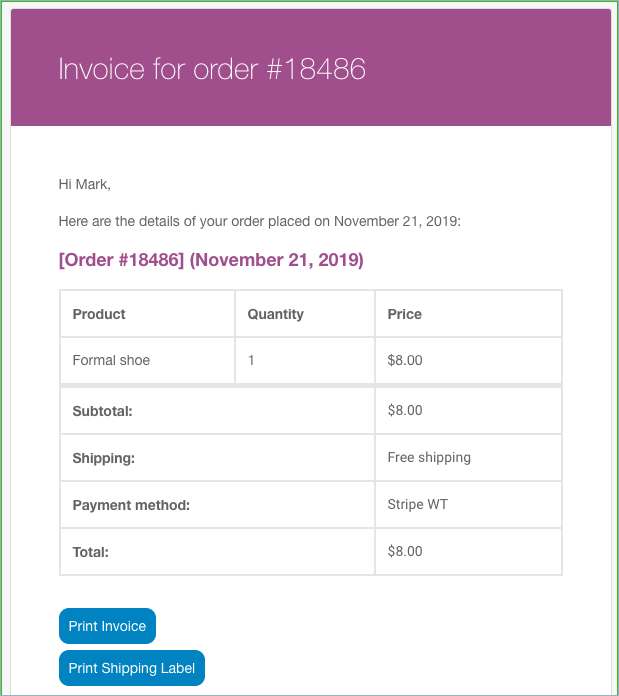
Show ‘Print Shipping Label’ button for selected order status: Adds print shipping label button to the order email for chosen status from the drop-down as shown below.
Finally, click on the Update Settings button.
Customize shipping label
Select a template from pre-defined ones and further customize the shipping label to suite your needs. Head on to the Invoice/Packing > Shipping Label > Customize tab.
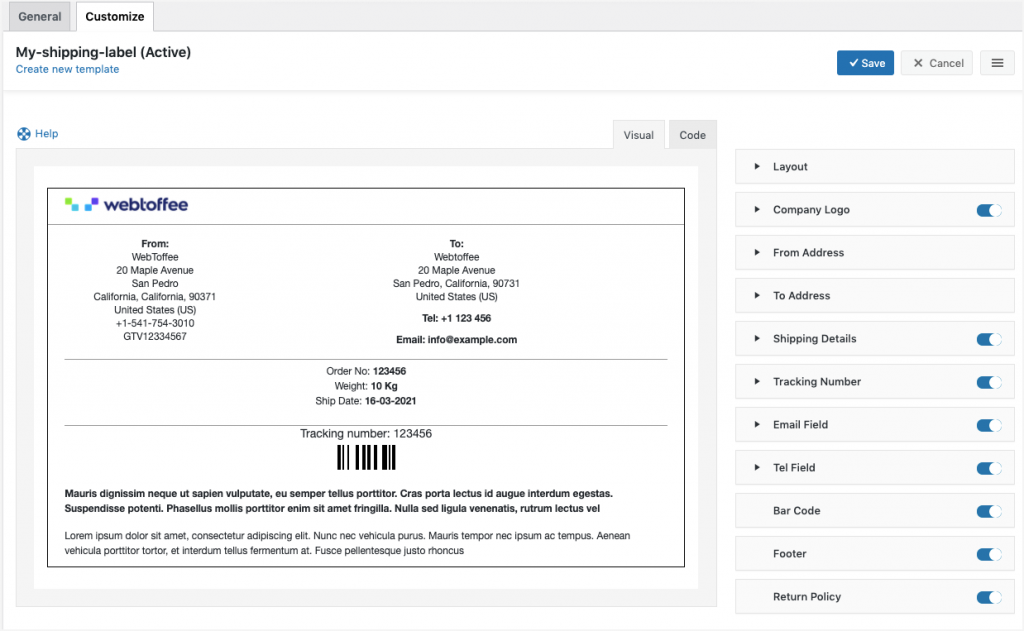
To create a new shipping label template:
- Select a template from the Create new template option.
- From the inbuilt templates that pop up, choose a layout.
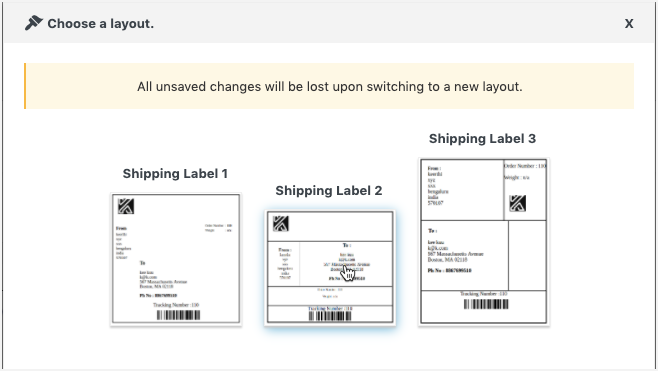
- The template displays sample data for customization. Users can make the necessary changes to the layout using the toggle options.
- You can even switch to the code editor, to make additional customizations other than the one listed in the visual editor.
- While making changes via code editor it would be better for you to refer to the help which briefs about placeholders, alternate classes for RTL support, etc as shown below:

- Make the necessary modifications to the layout and save it.
- After saving, activate the template to use it further for your shipping label.
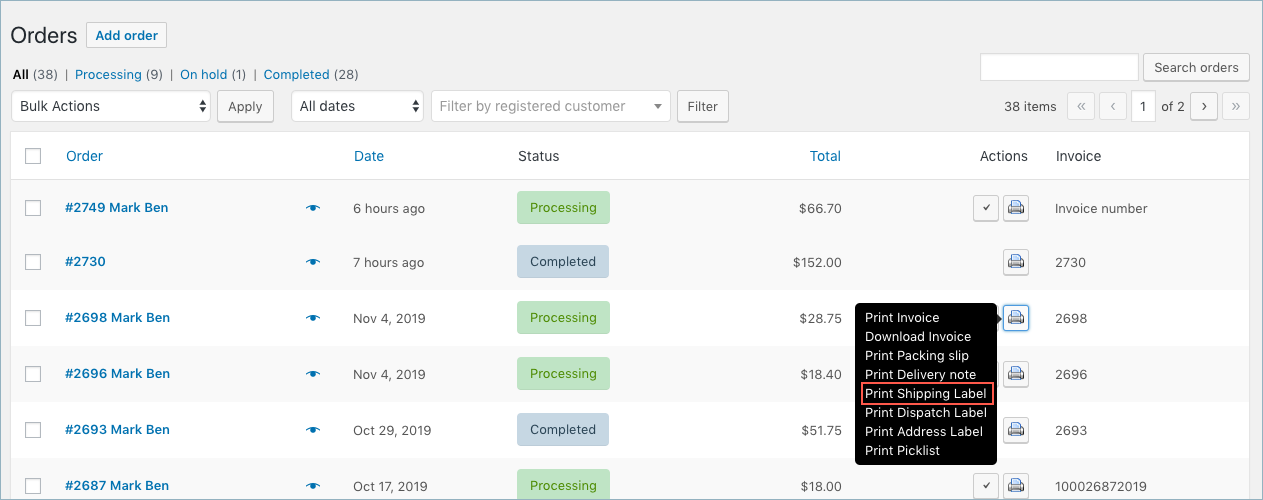
Bulk print shipping label
You can directly print the shipping label from the WooCommerce orders page. Choose multiple orders from the WooCommerce orders page and print them via bulk actions:
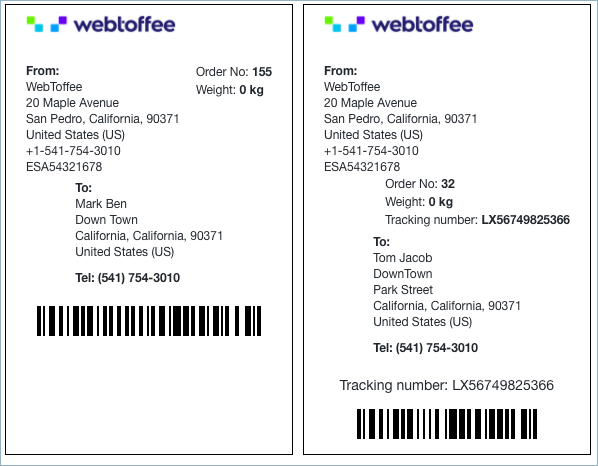
Sample shipping label
A sample shipping label for two different orders will be as shown below:
Andrewj1286
September 7, 2022
Hi Team,
I am having issues with my tracking number not showing up when I go the print labels. It shows up in the customize tab when I preview it there, however, when I go to print labels out of woocommerce it does not appear. I didn’t make any changes to the code either. Any thoughts here on what the issue may be?
Mike
September 26, 2022
Hi Andrew,
By default, the barcode is generated based on the invoice number. Kindly make sure that the invoice number is already generated.
However, you can copy the below-mentioned code snippet to your active theme’s functions.php if you want to generate the barcode based on your order number. Try this out and let us know how it works.
add_filter('wf_pklist_alter_barcode_data','wf_pklist_alter_barcode_data_fn',10,3);function wf_pklist_alter_barcode_data_fn($invoice_number, $template_type, $order)
{
return $order->get_order_number();
}
Please go through this article and follow the instructions to add the tracking number to the documents.
Phil
February 22, 2022
Hello. Is there a way to bulk print shipping labels and packing slips together, meaning order 100 label and packing slip, then order 101 label and packing slip, etc. Or do I have to bulk print first all the labels and then second all the packing slips and collate them?
Mike
February 27, 2022
Hi Phil,
Thanks for reaching out to us. We understand your requirement. However, presently our plugin doesn’t offer any options to bulk print two or more documents types together, you have to print them individually. Thanks for understanding.
Katie Hogan
December 18, 2021
Hello,
How can I place the company logo in the middle of the shipping label? I tried to CSS codes: float centre, float right, added margin to the left etc. but it’s not shifting
Thank you
Mike
January 2, 2022
Hi Katie,
Thanks for reaching out. You can create a new div with your desired styles to place the logo in the middle of the shipping label. If you find any difficulties in doing that, kindly share your shipping label template HTML code via this link.
Amanda Davis
November 15, 2021
I like the pro plugin so far, but ran into an issue. Client wants to add products ordered to the shipping list, because they are using it for a food orders and it is not being actually shipped out (just works with the print labels they have, multiple per page). But any attempt to get the products ordered on there does not work. Is there something I can put into the code, snippet or an edit, that will allow for the product table to show?
Mike
November 30, 2021
Hi Amanda,
Thanks for reaching out to us. Presently our shipping label doesn’t offer any options to display the product details. However, if you are using the premium version of our plugin, kindly reach out to us via this link. So that we can check the feasibility to provide a custom code snippet for your requirement.
Marco Morano
September 13, 2021
hi guys, is it possible to have a pdf size of 50x100mm instead of an A4 format?
Mike
September 27, 2021
Hi Marco,
Thanks for reaching out. Our WooCommerce PDF Invoices, Packing Slips, Delivery Notes & Shipping Labels will let you print labels on any type of printer configured on your PC. Some labels depend on the size of paper used though. The shipping label and address label support to set custom label size, which you can configure for any paper size.
Roy
August 27, 2021
I need to have to image ? can i add more image on shipping ? and also additional text
Mike
September 27, 2021
Hi Roy,
Thanks for reaching out. You can edit the shipping label template HTML (Invoice/Packing > Shipping Label > Customize > Code) to add static images/custom texts to it.
Mubarak
August 5, 2021
May i know the tracking number is generated based on what ?
can i add my own tracking number that is created by shipping courier
Mike
August 9, 2021
Hi Mubarak,
Presently the tracking number is generated based on the invoice number. You can add your own tracking number by adding the respective tracking number meta to Invoice/Packing > General Settings > Advanced > Tracking number meta field.
Joshua Lingan
June 4, 2021
I am very confused. Does this app integrate with USPS directly? I set up the add-on with the assumption that when it creates a shipping label it would automatically generate and charge me a USPS shipping label?
Mark
June 5, 2021
Hi Joshua,
Sorry to let you down, but this plugin does not integrate with any shipping or courier services to generate prepaid labels. You can only create customized generic shipment labels with the template that you choose.
Daniel Bamber
May 18, 2021
I’m looking to print shipping labels per item rather than per order. I saw Mark’s reply to Adrian Smith, stating that “You can choose the pack items individually option under plugin general settings > Advanced tab such that the shipping labels are generated per each item in the order.”
I am not seeing an ‘Advanced’ tab. Is this because I am using the free version?
Mark
May 21, 2021
Hi Daniel,
You are right in your assumption. That feature is currently available in the premium version of the plugin only.
David
December 26, 2021
Could you please share a screenshot of a sample label for “shipping labels are generated per each item in the order”.
TIA
Mark
March 23, 2022
Hi David,
Please reach our via support so that we can provide you sample screenshots.
rafik hanine
May 15, 2021
Hello,
is it possible to add Order Total price on the shipping label, under order number
looking forward for your reply
thanks
Mark
May 18, 2021
Hi Rafik,
You can use the placed holder [wfte_product_table_payment_total] in the HTML template of the shipping label to add order total in the same. Go to Shipping label settings > Customize > Code view to insert it.
Sheikh Farid
August 2, 2021
[wfte_product_table_payment_total] is it work in free plugin?
Mike
August 15, 2021
Hi,
Yes, that will work on the free version of our plugin too.
roman
December 22, 2020
hi guys
is it possible to automate the shipping label or any other components to be printed automatically.
for example via printnode
thank you
Mark
December 23, 2020
Hey Roman,
Remote print support is currently available for invoice only. We will support for more labels in future releases.
Juanjo Díaz
November 16, 2020
Hi guys. It’s possible to include a “print shipping label” or “print any document i’ve enabled” buttons in the New Order email?
Thanks in advance.
Juanjo Díaz
November 16, 2020
Sorry guys, I’ve noticed that function is yet implemented but, for some reason, it’s not working on my site since several weeks ago. I will try to address the problem before opening a support ticket.
Thank you very much.
Roberto
October 21, 2020
Hello guys, thanks very much for your hard work
Im about to buy you plugin for a client, I see that you can send an invoice automatically when a order status is completed, thats great, but is possible to automatically print the shipping label and the invoice too when a order status is completed?
if not, is possible to pay for such customization?
Thanks very much.
Mark
October 23, 2020
We have cloud print support using which you can configure automatic printing of invoices. The shipping label does not support this feature.
juan
September 4, 2020
Hi, is it possible to let my customers print the shipping label after the checkout?
Mark
September 5, 2020
Yes. Go to Shipping label settings and under General tab go to option “Enable print shipping label option for order status” and choose the order status processing there. Once done, users will have a button print shipping label.
Queenie
August 3, 2020
Hi There,
Does this shipping label works with this woocommerce order barcodes https://woocommerce.com/products/woocommerce-order-barcodes/ ? It seems the barcode that generated from your shipping label is based on the order number, am I right?
Thanks,
Queenie
Mark
August 4, 2020
Yes. The barcode will be generated based on order number.
Adrian Smith
July 13, 2020
This would be a useful label but the description of it seems to leave out some use cases:
1. When is a shipping label used? I’m assuming its the label that goes onto the box that is used by the delivery system: Australia Post or DHL for example. As such what happens when an order consists of multiple boxes? A label will be required for each box and it should also have a box count viz., box 2 of 6 or Box 4/5
2. If I’m printing multiple orders and the number of boxes makes it possible, can I print multiple labels on the one-sheet for multiple orders? E.g. on a sheet designed with a 5 x 2 label layout could it print: Order 1 with three boxes: 3 labels, Order 2 with five boxes: 5 labels, Order 3 with one box: 1 label and so on to fill the 10 labels available on that sheet?
3. If I have a roll feed thermal printer, e.g. a DYMO Labelwriter, and an order with 5 boxes, can i set it up to print the five labels consecutively?
4. As to box dimensions, If I specify a number of boxes with different dimensions, does the plugin choose which box goes with which product or do I specify it somewhere. E.g. I have two products and two boxes (the original boxes the products came in). Some orders will come in that are big enough that they can be fulfilled with completely filled boxes of the product plus maybe a final box filled with a mixture of the two products. Will the plugin work that out? How can I help it?
Mark
July 13, 2020
Hi Adrian,
1. If you are using Australia Post or DHL, it would be better if you use some other plugin that generates integrated labels with these services. Our plugin only generates generic shipping labels, that can be used if you are shipping the items manually.
2. You can print multiple shipping labels on the same page.
3. You can choose the pack items individually option under plugin general settings > Advanced tab such that the shipping labels are generated per each item in the order.
4. The plugin checks the dimension and weight you entered in the product details(product edit page) and compare it with the dimensions of the box you specified in the plugin settings to determine which goes into which.
Therese
December 18, 2019
My settings window does not include any meta field options. What am I doing wrong?
Mark
December 19, 2019
Please make sure that you are using 4.0 or above version of the plugin.
Shrink Wrap
July 6, 2019
Very Informative Indeed! Keep sharing.