The Order, Coupon, Subscription Export Import for WooCommerce is an ideal plugin for exporting and importing data either from the WooCommerce store or e-commerce platforms. With this plugin, you can export and import:
- Orders
- Coupons
- Subscriptions
Features Offered
- Migrate orders, coupons and subscriptions using the same plugin.
- The main migration methods are:
- Quick import/export
- Based on a Pre-saved template
- Advanced import/export
- Import/export data processing in batches ensures successful import/export irrespective of its size/count.
- One can automate migration via FTP profiles and schedules.
- Detailed history, debug logs and cron schedules are other main peculiarities.
Pre-requisites
- Make sure mbstring is enabled on the server.
- Supports CSV, XML, TSV, XLS, and XLSX file formats.
- Download a CSV with:
- CSVs should be in UTF-8 format.
Getting Started
To begin with the plugin, download, install and activate.
Once the plugin is activated, from your WordPress admin dashboard, navigate through the WebToffee Import/Export(Pro) menu.

The plugin consists of six different sub-menus :
- Export
- Import
- History
- Import Logs
- Scheduled actions
- General settings
Let us have a look at each of these sub-menus in detail.
Export
Orders, coupons and subscriptions can be exported in just 5 steps:
- Select a post type: The available post types are Order, Coupon and Subscription.
- Select an export method: Quick export, Pre-saved template and Advanced export are the provided export methods.
- Filter data: One can filter data for the chosen post type.
- Map and reorder export columns: To map, edit and reorder export columns.
- Advanced Options/Batch Export: Provides advanced options for export and scheduling export.
Here are the articles to ease your export process:
- How to export WooCommerce orders
- How to export WooCommerce coupons
- How to export WooCommerce subscriptions
Import
Orders, coupons and subscriptions can be imported in just 4 steps:
- Select a post type: The available post types are Order, Coupon and Subscription.
- Select an import method: Quick import, Pre-saved template and Advanced import are the provided import methods.
- Map import columns: To map and edit import columns.
- Advanced Options/Batch Import: Provides advanced options for import and scheduling import.
Here are the list of articles to ease your import process:
- How to import WooCommerce orders
- How to import WooCommerce coupons
- How to import WooCommerce subscriptions
History
The History tab lists the runs and the status corresponding to every import/export with options to :
• Re-run: to re-run the action will take the user to the respective screen.
• Details: view a detailed history
• Delete: delete the entry
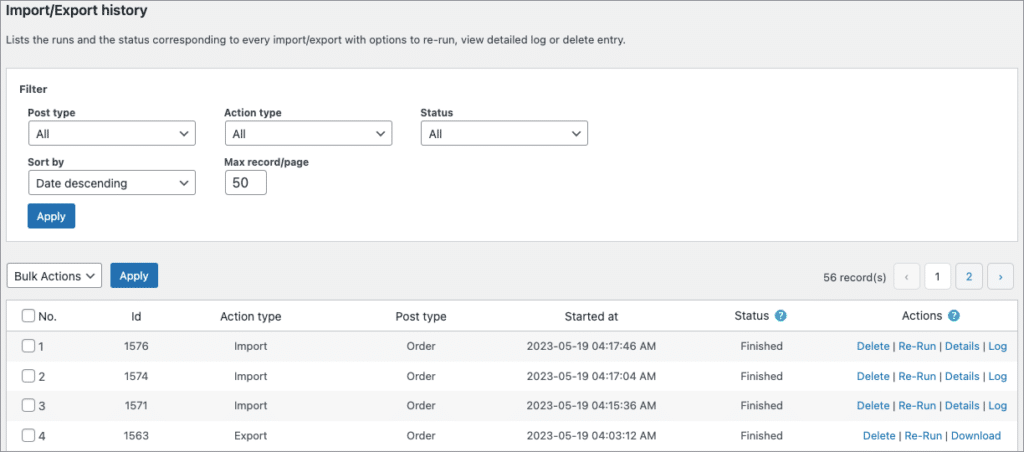
To look into the History section:
- Click on WebToffee Import/Export(Pro) > History
- One can sort the list with these available Filter options:
• Post type: Order
• Action type: All, Export, Import
• Status: All, Finished
• Sort by: Date descending, Date ascending
• Max record/page: The maximum number of records to be included in a page.
The actions will be listed in the following statuses:
- Success: Process completed successfully.
- Failed: Failed process triggered due to connection/permission or similar issues(unable to establish FTP/DB connection, write permission issues etc.).
- Running/Incomplete: Processes that are running currently or that may have been terminated unknowingly(e.g., closing a browser tab while in progress etc).
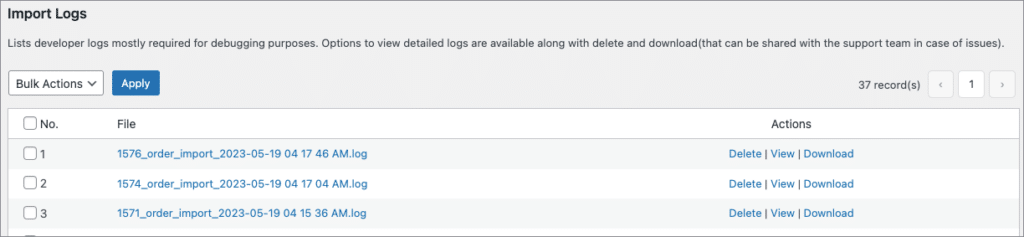
Import Logs
The Logs tab lists developer logs mostly required for debugging purposes with options to perform the following actions:
- View: to view detailed logs
- Delete: to remove the log
- Download: to share the log report with the support team in case of issues
To look into the Logs section: Click on WebToffee Import/Export(Pro) > Import Logs
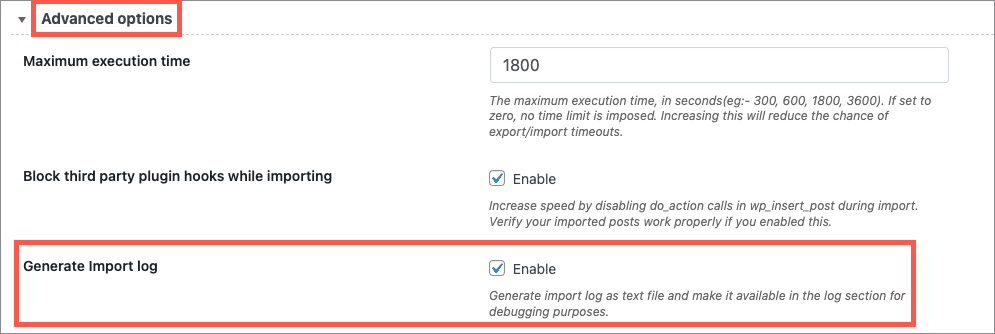
To save the import Logs:
- Click on WebToffee Import/Export(Pro) > General Settings.
- Click on General > Advanced options.
- Enable the option Generate Import log to generate the import log as a text file and make it available in the Import logs section for debugging purposes.
- Click on Update Settings to finish.
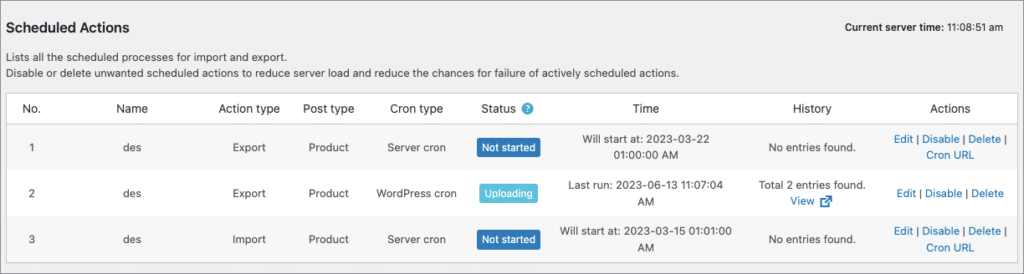
Scheduled Actions
The Scheduled Actions tab lists all the scheduled processes for import and export. One can disable or delete unwanted scheduled actions to:
- Reduce server load
- Reduce the chances for failure of actively scheduled actions.
General Settings
The General Settings helps to configure all the basic settings of the plugin.
Let us navigate through this section:
- Click on WebToffee Import/Export(Pro) > General Settings.
This tab consists of five different sections:
- General
- FTP settings
- Help Guide
- Other Solutions
- License
General
Here, you can configure the basic settings.
- Default import batch count: Provide the default number of records to be imported in a batch.
- Default Export batch count: Specify the default number of records to be exported in a batch.
- Switch to website timezone: By default, the timezone will be in UTC.

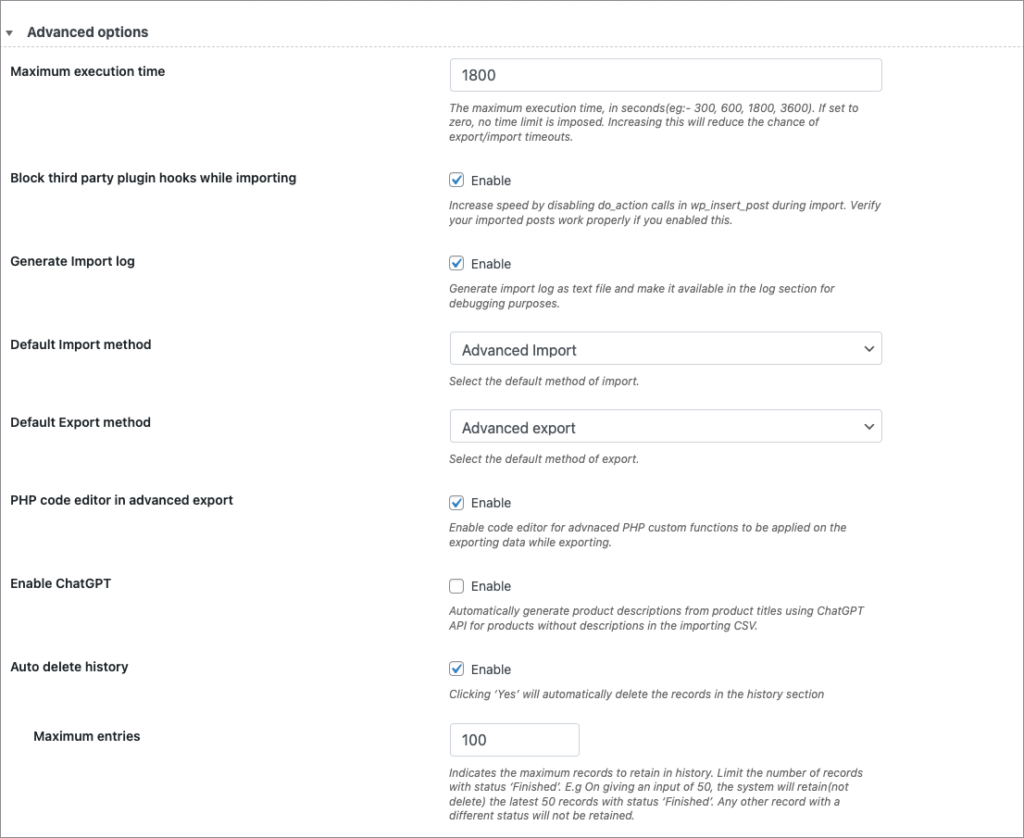
- Maximum execution time: Increasing this will reduce the chance of export/import timeouts.
- Block third-party plugin hooks while importing: Increase speed by disabling do_action calls in wp_insert_post during import. If enabled, verify your imported posts are working properly.
- Generate Import log: Enable to save the import log as a text file. This action will make the file available in the logs section.
- Default Import method: Choose an import method from three options: Quick import, Pre-saved template and Advanced import.
- Default Export method: Choose a default export method from the three options: Quick export, Pre-saved template and Advanced export.
- PHP code editor in advanced export: Enable code editor for advanced PHP custom functions to be applied during export.
- Enable ChatGPT: Enable to automatically generate product descriptions from product titles. The descriptions will be generated only when there are none in the importing CSV.
- Auto delete history: Enable auto-delete of import/export history by selecting the option.
- Maximum entries: Specify the maximum records to retain in history. It will limit the number of records with the status ‘Finished’ to the number you have specified. E.g: if you input a count of 50 the system will retain only the most recent 50 records with the status ‘Finished’. All other records of any other status e.g. In Progress (that may be active as a part of the cron operation) will not be impacted by this count.
This tab also lists the pre-saved import-export templates. Once done with configurations, click Update Settings.
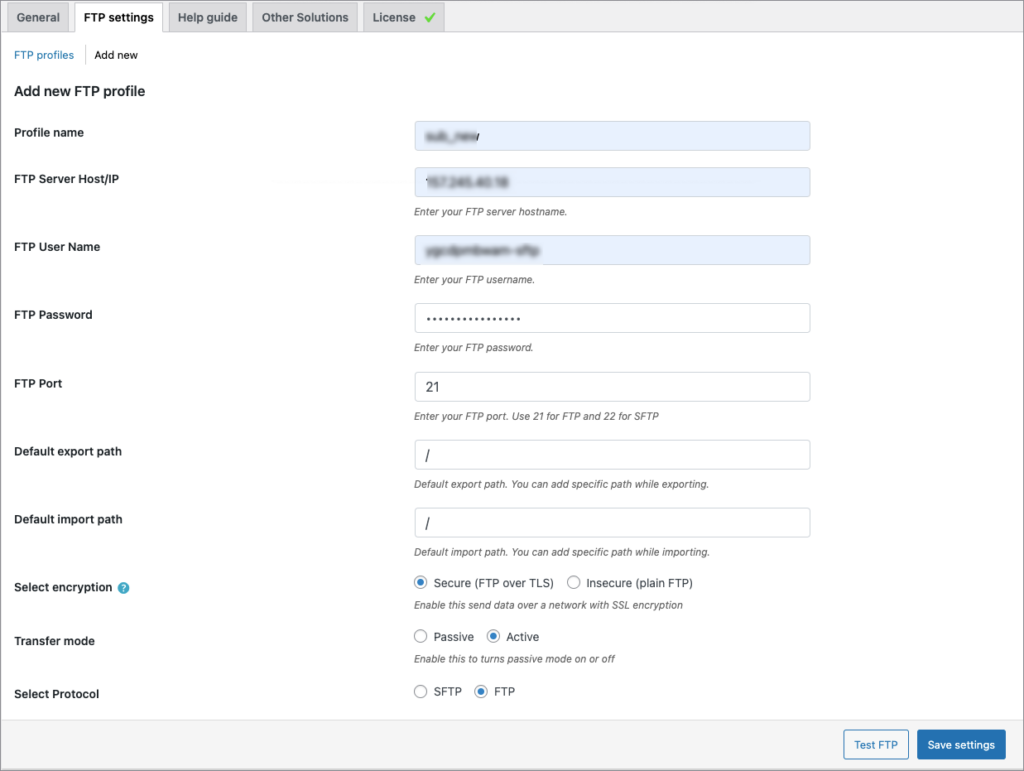
FTP Settings
The plugin is equipped to handle multiple FTP profiles. These dedicated FTP profile settings can be used to manage and manipulate easy scheduled import/export.
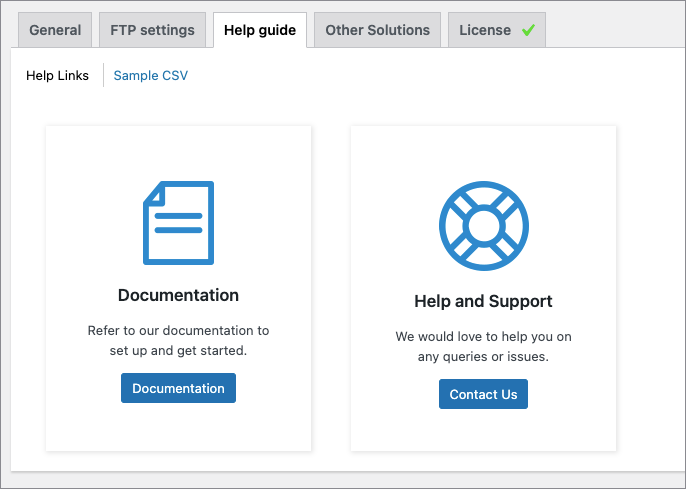
Help Guide
Provides direct links to resources like documentation, support and sample CSVs.
License
After you have installed and activated the Order / Coupon / Subscription Export Import Plugin for WooCommerce on your website, you need to activate the plugin license to get notified about the plugin updates.
To do so, from the WordPress admin dashboard:
- Click WebToffee Import Export(Pro)> General> License.
Know more about Orders, Coupons, and Subscriptions.
Pieter Lamiroy
November 16, 2020
Hello,
I have bought the PRO version but am facing a problem, i can schedule exports to FTP as a XML file, that works! But i when i try CSV files, nothing arrives in my folder.
What can i do?
Mark
November 17, 2020
Hi,
Please reach us via support.
Heiko Heiden
September 4, 2020
Hi, how can i import order and change the status to “shipped”? Also i need to insert the tracking number for my shipping method.
Thanks!
Alan
September 5, 2020
Hi,
In order to update the status of the order to “shipped” you may please provide the updated status and ID of the order in the CSV file and then update the order with the Update order if exists option enabled.
Regarding “tracking number”, if you are using any third-party plugin to add a tracking number field to the orders then you may please export the order with the include hidden metadata option enabled and this custom field will be exported to the CSV file. Later on you may please use this CSV as a template to import data back.
Varsha Gupta
July 29, 2020
I am using this plugin for exporting woocommerce orders automatically to via FTP. But after the schedule i am getting error in exported csv “Unexpected error writing header”.
Can you please tell me , whats going wrong in the setup.
Alan
July 29, 2020
Hi,
Could you please share with us the exported CSV file via support so that we can check it.
Varsha Gupta
July 29, 2020
Hey, I tried to export file though different FTP and I got empty csv exported file.
Laura
July 15, 2020
When I import orders via CSV, is there a way to trigger the ’email order details/invoice to customer’ action without doing it manually?
Alan
July 17, 2020
Hi,
By default, there is no option to send emails to the customers including the order details/invoice. We can check the possibility of providing you with a custom code snippet for the premium version of the plugin so that order details or invoice will be sent to the users when importing. If you are interested in that then please reach us via support.
jamie
June 3, 2020
Looking to get started with importing orders with csv. not able to download or view the sample doc. any special instructions for that? or best / simplest way to create a CSV template to get started.
Alan
June 5, 2020
Hi,
Here is the link to the sample order CSV file: https://www.webtoffee.com/wp-content/uploads/2016/09/Order_Sample_CSV.csv
You can also get the sample template CSV file by exporting an order from your site using the plugin.
Luca
May 27, 2020
Is there a way to export only a certain state order? Like only processing or completed?
Alan
May 28, 2020
Hi,
Yes, using the premium version of the plugin you can filter the order export based on the order status.
Eugene
April 17, 2020
Hello there,
Looking for an export solution from Woocommerce and this is great, but in the csv templates I can see orders with single products only. Does your plugin supports exporting orders with multiple items(lines) and where I can find the template for that to check if it’s suitable for my ERP?
Alan
April 17, 2020
Hi,
Yes, the plugin supports exporting orders containing multiple order items. Here is the sample CSV file containing multiple items in an order.
eugene
April 17, 2020
Thanks! Appreciate! 😉
Eugene
April 20, 2020
Hello again, Alan. One more question – is it possible to export ‘order lines’ each in new line/row(not colun)?
What I am looking for, for the file with order to look like this:
006(sku), 1(qty), 56(price)
B11V2(sku), 5(qty), 111(price)… etc.
We are willing to automatically create orders in our ERP, but parsing order lines where everything is in one cell is not a good idea. Any suggestions?
Mariana Florea
May 28, 2020
I am looking for the exactly the same functionality (like in the Advanced Order Export For WooCommerce plugin from Algol, which, however, does not have import)
Alan
May 28, 2020
Hi,
We can provide you with a custom code snippet for the premium version of the plugin so that you can export the line items into separate rows instead of separate columns. Please reach us via support.
Warren
January 15, 2020
When I try to export orders I get the following message
This site can’t be reachedThe webpage at “site url”/wp-admin/admin.php?page=wf_woocommerce_order_im_ex&action=export might be temporarily down or it may have moved permanently to a new web address.
ERR_INVALID_RESPONSE
Alan
January 15, 2020
Hi,
We are able to export the orders without any issues in our test environments. The issue you are facing on your site might be due to some site-specific issues. Could you please reach us via support.
Michaël
November 7, 2019
Hi
I’m trying to import my coupon with you plugin. My coupon have lower and upper case. The plugin convert every thing in lower case. Is it possible to have them not converted?
Thanks!
Alan
November 8, 2019
Hi,
Our plugin supports importing coupons having both lower and upper case letters. Please note that in the coupon list page all the coupon codes will be displayed in lower case letters. Please try opening/editing the imported coupon where you can see the correct imported coupon code.
If the issue still persists please reach us via support.
michael
November 8, 2019
That’s true, when I click on the coupon, it appears lowercase!
Thanks
Fredrick Housel
October 21, 2019
Hi,
I tried this out and it works mostly, but the few latest orders aren’t importing. In the log it looks like there’s a conflict with the importer trying to import some html and css… I checked the .csv file, there was some at the bottom, but even after cleaning that up, it still won’t import the newest orders. Not sure where it’s getting the html/css stuff.
Alan
October 22, 2019
Hi,
Please reach us via support and share with us the CSV file you are importing. Our support team will follow you up from there.
Ajay
April 11, 2019
Hi
We’re looking to use this plug in for exporting orders with several hundred order lines per order. Is there a way that we can export so that the products can be grouped so that the rows are the products and the columns are the customers? We would want to choose an order range.
Alan
April 11, 2019
Hi Ajay,
Please share us a sample CSV file with the format you would like to have in the exported CSV. Please reach us via support.
jeremy.shreve
April 4, 2019
I am trying to use the export feature, but it is not exporting anything from my woocommerce addons (I use “check-out add’ons” plugin for woocommerce to add fields like “How did you hear about us?” and I need that data included in my export.
Alan
April 4, 2019
Hi,
If you are using any third party plugin to create custom fields to the orders it will be stored as metadata. You may please export the orders with the option include hidden metadata checked and the custom metadata fields will be included in the exported CSV.
Fatma
June 15, 2018
csv export not included weight but i need that with export how i can add weight colums in export as well ?
Mark
June 18, 2018
Hi Fatma,
By default, WooCommerce won’t store or display order total weight with the order details. Are you using any code snippet to do it? If yes, we can develop custom code snippet to export the data into the CSV if you provide corresponding meta key in which you are storing the data.
Please reach us via support.
Erik
February 10, 2018
I’ve done some own columns in the check out form. Is it possible to get them as well when I export the order to a CSV.file?
Karen
February 1, 2018
I’m sure this question is answered somewhere… but I’m not sure whether to use the API key on our existing site that I’m exporting from? Or our staging site (which in a few month’s will be the production site) that I’m importing / merging into?
loison
October 20, 2017
Where can I find exported orders?
Anindo
October 21, 2017
Hi loison,
The exported orders will be downloaded as a csv.
Or if you have an FTP connection setup, then your file will be downloaded in the FTP location.