Stripe Checkout redirects users to a secure, stripe-hosted payment page to accept payment from your WooCommerce store.
1. Ensure that the Stripe API keys are saved in the stripe credential fields.
2. Specify an account name in Stripe Dashboard prior to configuring the settings.
Configuring the Eligible Payment Methods
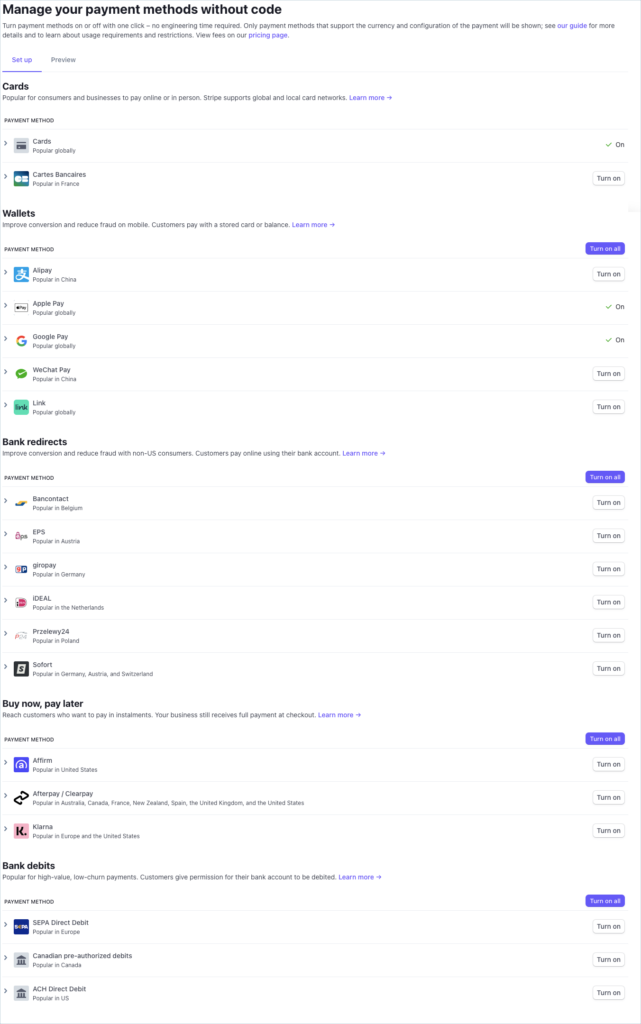
Stripe now presents the most relevant payment methods for each customer based on their location and currency used. The checkout page prioritizes showing payment methods known to increase conversion for your customer’s location while lower-priority payment methods are hidden beneath an overflow menu. The eligible payment methods can be configured through the stripe dashboard.
In the Stripe dashboard, Navigate to Settings > Payment methods > For your account. Here you can enable/disable the eligible payment methods to be shown on the checkout page. The below image shows the eligible payment methods for the United States of America.
Stripe Checkout Settings
- Install and activate the Stripe payment gateway for the WooCommerce plugin.
- Go to plugin settings or from the WordPress dashboard, go to WebToffee Stripe > General Settings.
- Head on to the Stripe checkout tab.
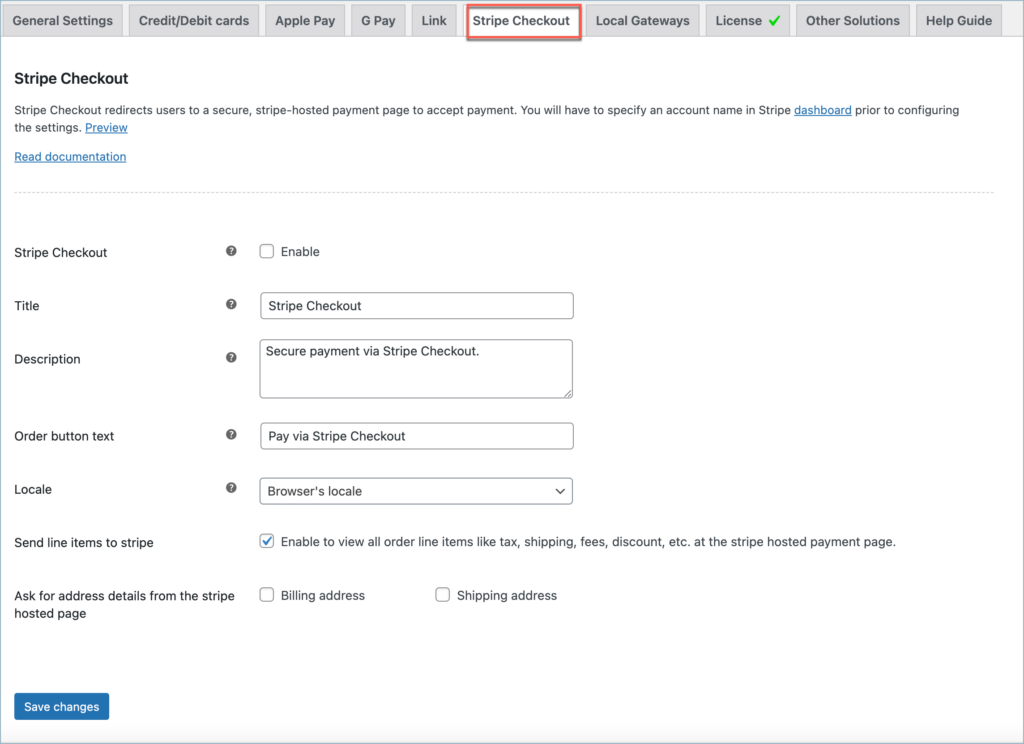
- Stripe Checkout: Enable to accept Stripe checkout payments.
- Title: Enter a custom title for stripe checkout payment. This title will be visible on the checkout page.
- Description: Enter a custom description for stripe checkout payment. This description will be visible on the checkout page.
- Order Button Text: Enter a custom text for the stripe checkout button.
- Locale: Choose a language code from the dropdown.
- Send line items to stripe: Enable to view all order line items like tax, shipping, fees, discount, etc. at the stripe hosted payment page.
- Ask for address details from the stripe hosted page: Enable to receive Billing and shipping address at the stripe hosted payment page.
Finally, click Save changes to save/update the plugin settings.
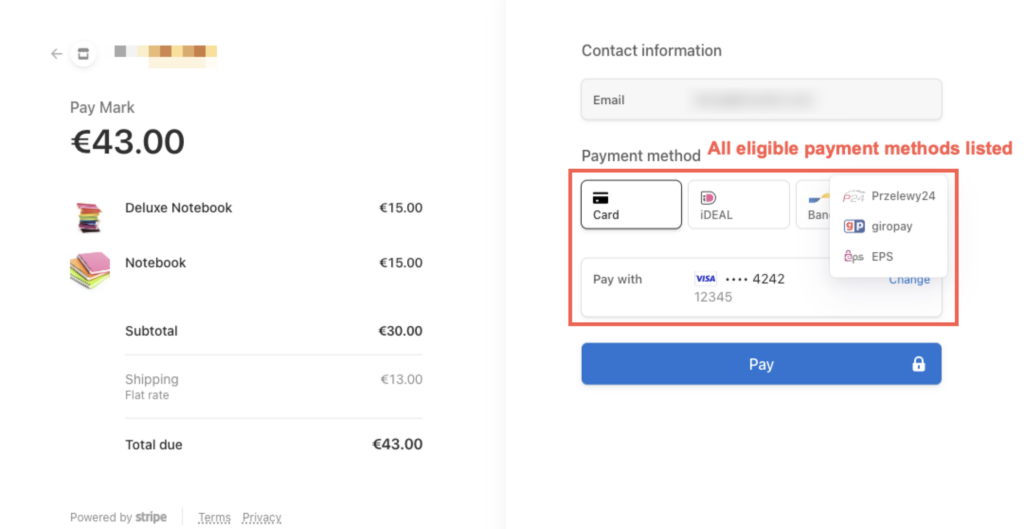
Pay via Stripe Checkout
The image below shows stripe checkout on the checkout page.

The following image shows all the eligible payment methods listed in the subsequent window.
Note:
All eligible payment methods are shown only for one-time payments in the stripe hosted page. For recurring payments, only card payment is visible.
Adding webhook endpoint
To receive the order status updates in a timely manner, it is recommended to add your site’s webhook to the stripe dashboard. Follows the steps in – Setting up Webhooks and Supported events article to add a webhook endpoint.
To know more about the product, check out Stripe Payment Gateway Plugin for WooCommerce.
For understanding each feature of the plugin, visit the product setting up article.
Or check out the documentation section for more related articles.
Greger
April 11, 2024
Would it be possible to add Swish payment method to the plugin too?
It’s available inside Stripe but I cannot see it as an option in the plugin settings.
Thanks,
Greger
Sanjai Valsan
April 19, 2024
Hi Greger,
Thank you for reaching out!
Unfortunately, our plugin does not currently support the Swish payment method.
Stefan Stefanov
January 29, 2024
I’ve just installed your plugin in one new WordPress/Woocommerce and also configured it, but it doesn’t show in WordPress checkout page?
Arjun
January 30, 2024
Hi Stefan,
Thank you for reaching out. Make user you have provided a valid key and secret in the general settings of the plugin and have enabled the required payment method. If you are still facing any issues, feel free to reach out to our support team.
Sebastian Radulescu
October 31, 2023
Is the plugin compatible with WooCommerce multi-vendor marketplaces like WCFM Marketplace that use direct charge on connected accounts? Will payments be directly charged on the Stripe connected accounts? Thank you
Arjun
November 7, 2023
Hi Sebastain,
Thank you for reaching out to us. We understand your requirement, but the plugin is not compatible with multi-vendor marketplaces as of now.
Peter
October 18, 2023
Hi, I need a clarification on the “capture status option”. What is the difference if you capture on processing vs. on completed order?
Arjun
October 27, 2023
Hi Peter,
Thank you for reaching out. It seems there may be some confusion regarding the options. Orders will only be moved to the “Processing” or “Completed” statuses after the funds have been captured. It is not possible to capture funds in these order statuses. If you have enabled the “Capture payment immediately” option, payments will be captured immediately upon successful transactions. Disable to capture payments later manually from the Stripe dashboard/overview/order details page. Further, read to know more about how to capture Stripe payments manually from Stripe overview.
Manoj
March 22, 2023
Hi Team,
Need a clarification regarding the stripe checkout. In future, if stripe adds new payment options will that be available in stripe checkout.
Can this plugin support google pay and amazon pay in the stripe checkout.
Please Could you clarify me as soon as possible !!!
Mark
March 28, 2023
Hi Manoj,
Greetings from WebToffee!
The payment methods supported by Stripe checkout would be available in Stripe hosted page based on the country and currency eligibility and provided that it is enabled in the dashboard, the new ones will also get added automatically. G Pay will be available on Stripe checkout if you’re eligible. Stripe doesn’t support Amazon pay.
Manoj
March 22, 2023
Hi Support team,
Mark
March 22, 2023
Hi Manoj,
Please reach out via support for technical assistance and help guides.
Ace
November 28, 2022
Hi.. I have a WP / WooCommerce site. Clicking a buy button takes user to Stripe Checkout page… after order is complete it is redirected back to my site. How do I get the email address used on the order? I need it to be able to email the customer their receipt and download link? Thank you.
Mike
December 5, 2022
Hi Ace,
You can use the WooCommerce Checkout page to collect the email information of your users before redirecting them to the Stripe Checkout page. The Stripe Checkout payment method captures the order information from the checkout page. It doesn’t send the email address provided on the Stripe-hosted page back to the store. Because of that, it is not possible to get the email after Stripe Checkout. I hope it is clear.
Naga Durgarao Baddhi
November 12, 2022
Hi, I installed your plugin and activated, after activated admin dashboard was not working and getting error 500, trying to capture log file but it’s working to me, I opened my filezilla and deleted your plugin then everything was working fine, I already faced same issue before, please help me out.
paula bearzotti
September 15, 2022
Hi, your plugin is great !!!
I use two payment options : credit card and stripe checkout… I want this option (stripe checkout) to be the default, how do I do it?
thanks in advance !!
paula
Mark
September 23, 2022
Hi Paula,
Thanks for sharing the kind words about our plugin.
WooCommerce by default shows the first payment option among the enabled ones in the list under WooCommerce > Settings > Payments tab. You can move Stripe Checkout to top to show it as default. For logged in user’s, the gateway last used will be default.
Magroud Abder-Rahmane
June 9, 2022
Bonjour stripe checkout ne prend pas en charge les abonnement ?
Magroud Abder-Rahmane
June 9, 2022
Hello stripe checkout does not support subscriptions?
Shesna
June 10, 2022
Hi Magroud,
Thanks for reaching out. Unfortunately, stripe checkout does not support subscriptions. We have added it to the development backlogs.
Ash
January 21, 2022
Hello! I have a problem with the plugin WooCommerce Stripe Payment Gateway by Webtoffee using only Stripe Checkout: Successful payment, but WooCommerce Order showing Pending Payment, then switch to Cancelled because pending payment over time limit.
This is not happening all the time but on the odd occasion this is happening. Wondering if you can help?
Alan
January 25, 2022
Hi,
Since the issue is occurring randomly we are not sure if it’s caused due to the plugin. If there was any bug in the plugin code then the issue will occur in all the transactions. Hope you understand.
If you are still having issues then please reach us via support.
Sam
December 17, 2020
Recently, the Stripe for WooCommerce plugin has some annoying issue. This happened after our site got attacked and we tighten our security, also disable Stripe Payment, only allow Stripe Checkout.
1. Duplicated charge: Customer did not know payment has gone through and pay again
2. after submit payment and successful in Checkout, customer see “Access Denied” instead of /Order-Received/ page. This could be the reason why customer paid twice.
3. Successful payment, but WooCommerce Order showing Pending Payment, then switch to Cancelled because pending payment over time limit.
Are these new or known issues?
thanks
Sam
Mark
December 18, 2020
Hi Sam,
The Stripe for Woocommerce by By Payment Plugins is not our plugin and therefore we are not to be held responsible for any of the issue you faced with it.
Let us know if you have any issue with our WooCommerce Stripe Payment Gateway by Webtoffee plugin.
Andrea
December 29, 2020
Hello! I have the same problem with the plugin WooCommerce Stripe Payment Gateway by Webtoffee using only Stripe Checkout: Successful payment, but WooCommerce Order showing Pending Payment, then switch to Cancelled because pending payment over time limit.
This is not a common problem, but it does occasionally happen.
Could you verify that, please?
Mark
January 6, 2021
Hi Andrea,
Please share the stripe payment logs under Woocommerce. > Status > Logs via the contact page.
Karim
November 25, 2020
Hello! I have 2 questions about your plugin.
1. Can I use the Stripe Checkout to replace the WooCommerce checkout completely? So that the customer is redirected to Stripe Checkout immediately when clicking checkout.
2. Are orders placed via Stripe Checkout copied to the WooCommerce Order section in the admin? So that de default transactional email flow is honored and exports can be made.
Many thanks!
Mark
November 26, 2020
1. You can provide the stripe checkout as an option on the checkout page, but this won’t replace the checkout page.
2. Yes. The stripe checkout behaves as a payment gateway and therefore honors all woocommerce order processing workflows.
JC
November 11, 2020
Good morning, is it able to enrich the Stripe Checkout Page with information about the product I am going to buy, and the company information, so that it will look like more credible? Best, Jan Cerny
Mark
November 12, 2020
The stripe checkout page includes the product image and total of the item. We will check and see if more info is supported by Stripe and update if possible in coming releases.
Jan Černý
November 13, 2020
Hello, thank you. Definitely. I think it is possible. Using Ninja Forms plugin together with Stripe too for example and the Stripe Checkout loading with a product image, product info, company info, and a price. I think it would be great to consider this. Also thank you for your reply.
JC
November 13, 2020
Hello, thank you. Definitely. I think it is possible. Using Ninja Forms plugin together with Stripe too for example and the Stripe Checkout loading with a product image, product info, company info, and a price. I think it would be great to consider this. Also thank you for your reply.