A cron job is simply a scheduled task that runs regularly on your server. The Import Export Suite for WooCommerce Plugin helps you to automate all your exports and imports via FTP profiles and schedules.
The two types of schedulers we use here are:
- WordPress Cron
- Server Cron
It is not necessarv to have an FTP for cron import. You can use URL for creating cron import. However, in case of cron export, FTP is required.
Server cron
When the volume of data to be processed necessitates triggering the URL every minute, use server cron scheduling. This option is most preferred:
- to generate a unique URL that can be added to your system in order to trigger the events.
- if you have a separate system to trigger the scheduled events.
Server cron scheduling on export
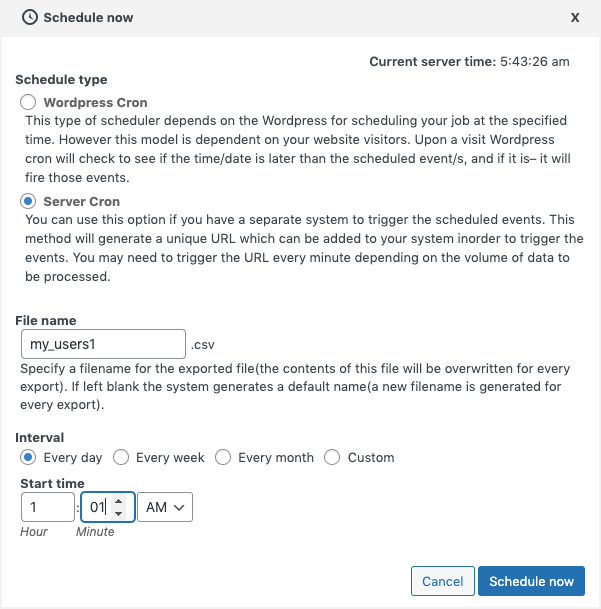
- File name : Specify a filename for the file you want to export.
- Interval: Set the time interval for scheduling.
- Start time: Schedule the time at which you want the automatic export to occur.
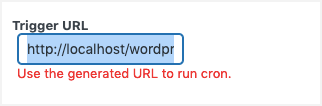
Click on Schedule Now. On saving, a Trigger URL will be generated.
Server cron scheduling on import
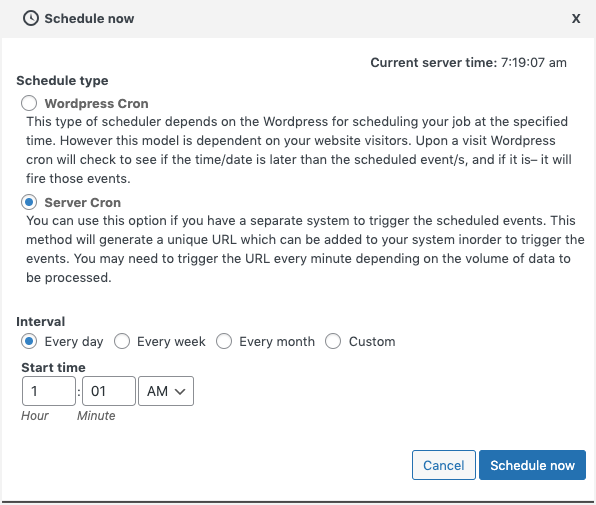
- Interval: Set the time interval for scheduling.
- Start time: Schedule the time at which you want the automatic export to occur.
Click on Schedule Now. On saving, a Trigger URL will be generated.
One can view all the import/export scheduled operations under WebToffee import/Export (Pro)> Scheduled actions.
Know about more Scheduled actions.
Running server cron on different servers
Here, we have listed some servers and how to run server crons on them.
cPanel
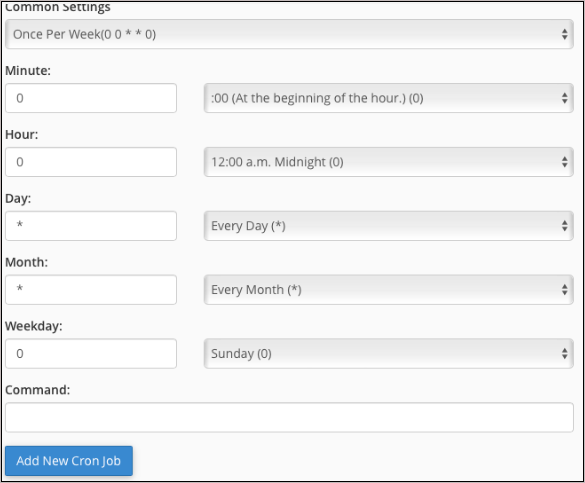
- In cPanel, under the Advanced section of the Main Page menu, select Cron Jobs.
- A new table will appear for setting time intervals and adding new scripts.
- For simpler configuration, the drop down menu has some common settings such as: Once Per Week or Once Per Day etc. We suggest you to select the time interval as Every minute.
To customize the settings different from that of the drop-down menu, enter a time interval in the left side boxes or use the menus on the right to select from typical entries for each period. - As the final step, enter the command or the path to your script in the Command field.

- Hit the “Add New Cron Job” button to save. The cron will run the script automatically at the selected intervals.
Example: The below mentioned command is a combination of trigger URL (fetched from the plugin: Import Export Suite for WooCommerce ) and command. This is the command format followed in cPanel. To dump unwanted log files, simply add /dev/null.
Command:
curl-s“https://www.dogadorer.com/?wt_iew_url_cron=42&a=import&i=product&h=20aaa1505a97fb84434efd3502859671&t=1635935881” >/dev/nullCloudways
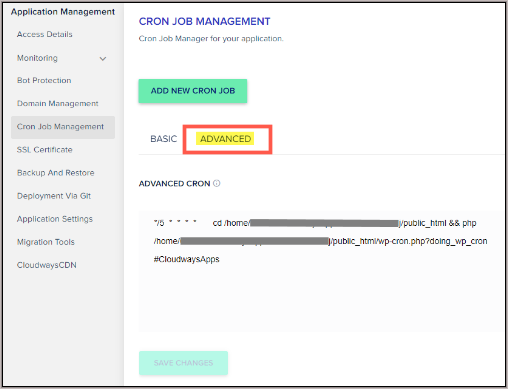
- Log in the Cloudways platform.
- From the top menu bar, click on Applications.
- From the appearing list, select the application you want to set the cron for.
- Under Application Management, click on Cron Job Management section.
- Click on the ADD NEW CRON JOB button.
- Now, decide how often the cron job should run. You can either set it on your own or select the pre-defined values from the Common settings dropdown. However, we recommend you to select the time interval as Every minute.
- As the next step, set the type of script you want to run (PHP, curl, or wget) and the command to execute.
- Click on submit to save.
- The cron job will be listed in the BASIC tab once done.Note: The Basic tab does not allow any switches for wget and curl. You will need to utilize the Advanced tab to apply switches.
- If you prefer to use command-line switches or other advanced cron settings, switch to the advanced editor under the Advanced tab.
 Note: Only account owners or team members with full privileges can edit cron jobs via the Advanced tab.
Example: Below mentioned is the command format in which cron runs in Cloudways. The command is a combination of the trigger URL(fetched from the plugin: Import Export Suite for WooCommerce ) and the command.
If you do not want to get emails when the script runs, simply add /dev/null 2>&1 at the end of the command.
Command:
wget-q-O-“https://www.dogadorer.com/?wt_iew_url_cron=42&a=import&i=product&h=20aaa1505a97fb84434efd3502859671&t=1635935881” >/dev/null 2>&1EasyCron
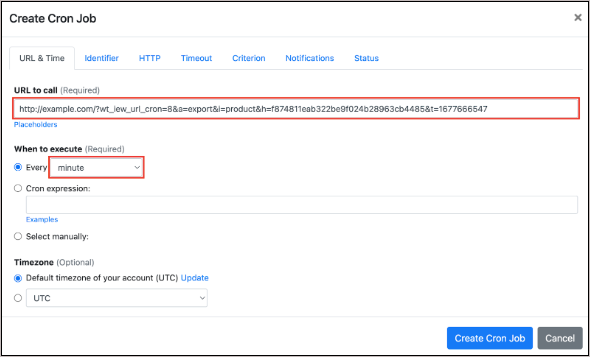
EasyCron is a paid online service which allows user to specify the execution time of cron jobs in 3 ways:
- Manually
- By interval
- By cron expression
- From your cron job dashboard, click on +Cron Job button.
- Enter the trigger URL in the field URL to call.
- Under When to execute, select Every minute.

- Finally, click on the Create Cron Job button, and you are done!
Thus, you can run server cron jobs on different servers using the trigger URL generated using the Import Export Suite for WooCommerce Plugin.
Leslie Nyahwa
January 16, 2023
Do we need to add another like curl https://domain/?wt_iew_url_cron=5&a=import&i=product&h=c8488d6d7b5aa17e9e24a57b9f6bc035&t=1651132011 so the url is triggered becuase just placing the url isn’t triggering the server cron from my end
Alan
January 27, 2023
Hi,
Yes, you may please add the cron command along with the cron URL so that the URL will be triggered by the server cron.
Leslie Nyahwa
February 15, 2023
Which cron command do we use. The documentation does not provide this information.
Göran
April 28, 2022
How come the URL from when I create a server import doesn’t match the URL under “WebToffee import/Export (Pro) > Scheduled actions”?
After creation: https://domain/?wt_iew_url_cron=5&a=import&i=product&h=27234598542464d74e5809a209958680&t=1651130583
From Scheduled actions: https://domain/?wt_iew_url_cron=5&a=import&i=product&h=c8488d6d7b5aa17e9e24a57b9f6bc035&t=1651132011
The “h”, I guess, is the hash telling WebToffee what to do, and they’re different.
The “t” seems to be a timestamp of when I created the schedule, and is also different.
Which one do I run, or doesn’t it matter?
Alan
May 27, 2022
Hi Göran,
It doesn’t matter.You can run it.