BOGO / Buy X get X / Buy X get Y discounts are a common promotion strategy to encourage customers to purchase goods from your online store.
The enhanced BOGO offers varied quantity or price based discounts, such as buy x and gets the same product, any product from the store, a specific product from the store, a product from a specific category, etc.
The plugin allows you to provide full or partial discounts for the giveaway offer. However, you can configure the giveaways in the following manner:
- Same product as in the cart.
- Any product from a specific category.
- A specific product.
- Any product from the store.
- Any product from the same category as in the cart.
Watch our tutorial to set up BOGO easily on your store.
The Buy X Get X/Y discounts facilitates a number of purchasing scenarios such as:
- Percentage (%) or price discount on the second item.
- Percentage (%) or price discount on the second item after spending a certain amount.
- Consecutive discounts such as Buy 1, Get 1 Half off, Buy 2, get 1 at 50% off.
- Scheduling begin and end dates for the BOGO offer.
- Option to exclude products or product categories from applying the BOGO.
- Recurring discounts, e.g., Buy 2, get 1, Buy 4, get 2.
- And many more.
Setting up BOGO
- Once the plugin is installed and activated, From your WordPress dashboard, navigate to Smart Coupons > Add Coupon
Create the desired BOGO coupon with just 3 steps.
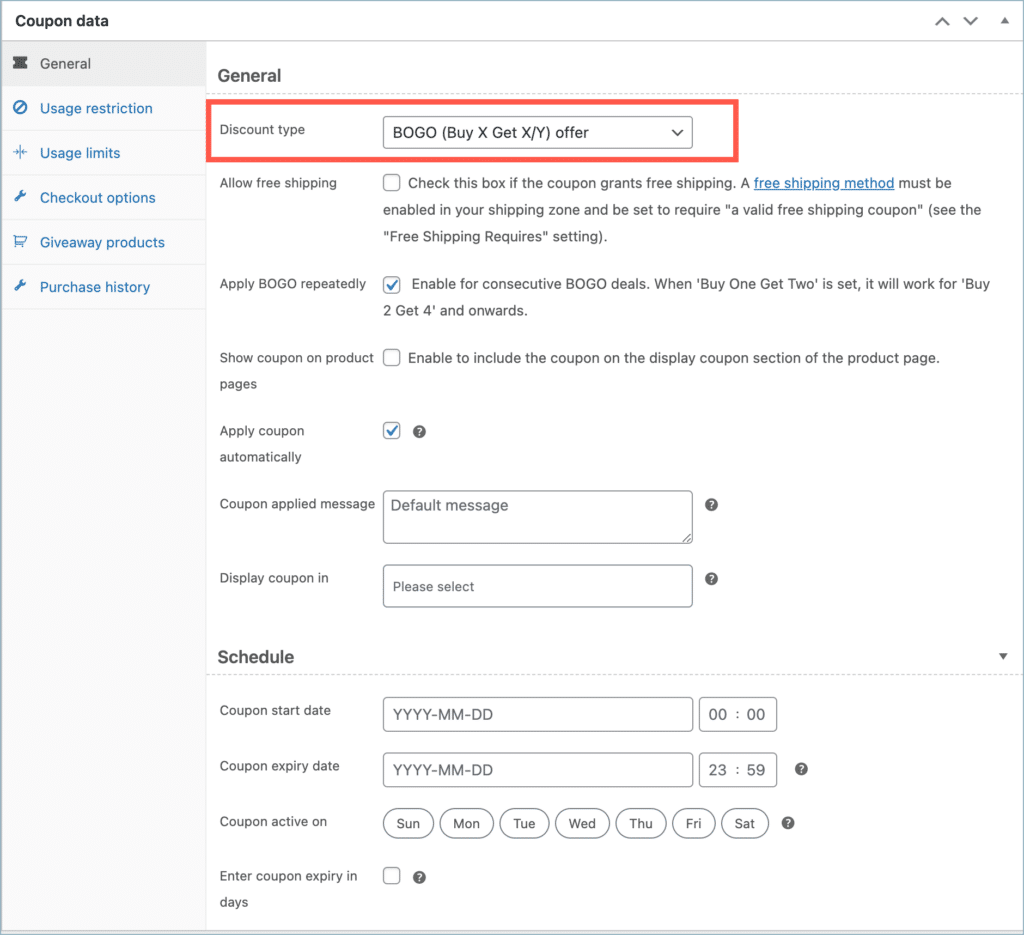
Step 1: Choose BOGO (Buy X Get X/Y) as the discount type
- From the Add new coupon window, key in an appropriate coupon code and description.

- Then, choose the discount type as BOGO (Buy X Get X/Y) offer.
- Set the coupon apply frequency (Number of times).
- Apply once: If the cart is eligible or conditions are met, the coupon applies once. ie: If you set the coupon to offer Buy 2, Get 1, you get one free product. Moving more items to the cart will not make it eligible to get more free products.
- Apply repeatedly: The coupon applies whenever the cart is eligible or conditions are met. ie: If you set the coupon to offer Buy 2, Get 1 then the coupon works repeatedly for Buy 4, Get 2 and so on.
- Optionally, you may also set the following:
- Coupon start and expiry date.
- Apply coupon automatically.
- Display available coupons in the cart, checkout or My Account page.
Step 2: Set the cart eligibility conditions for applying coupon
- From the Usage restriction tab, select the product or category you wish to give the offer.
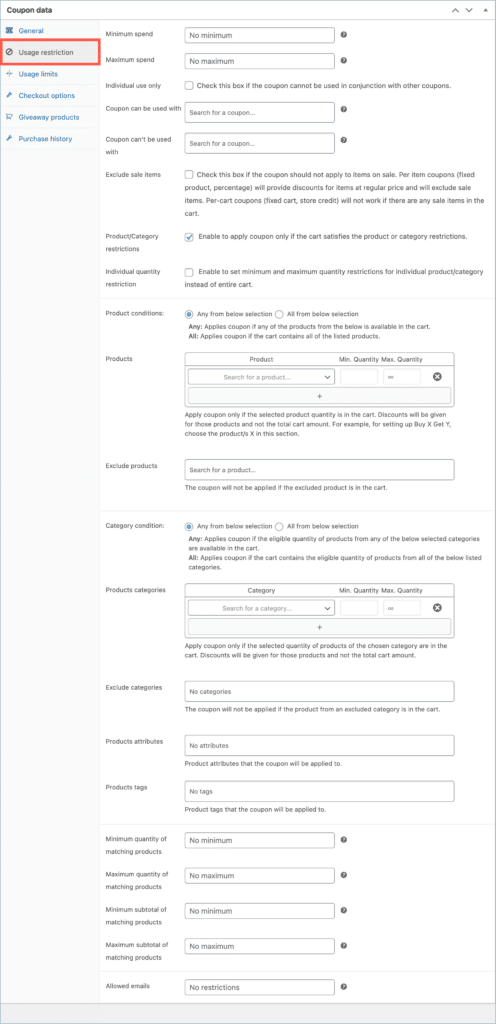
- The UI fields that are directly dependent on the BOGO setup are the following:
- Product/Category restriction: Enable to apply coupons only if the cart satisfies the product or category restrictions.
- Individual quantity restriction: Enable to set minimum and maximum quantity restrictions for individual product/category instead of the entire cart. If disabled, then the Minimum quantity of matching products will be considered.
Product condition
- Any from below selection: Applies coupon if any of the products from below is available in the cart.
- All from below selection: Applies coupon if the cart contains all the listed products.
- Products: Apply coupon only if the selected product quantity is in the cart. Discounts will be given for the chosen product amount and not the total cart amount. For example, for setting up Buy X Get Y, choose the product/s X in this section.
- Exclude products: For a fixed cart discount, the exclude option is used for validating whether the excluded product is in the cart or not. The coupon will not be applied if the excluded product is in the cart.
- However, in the case of all other discount types, the system will apply the coupon code to all eligible products in the cart, even if an excluded product is also present.
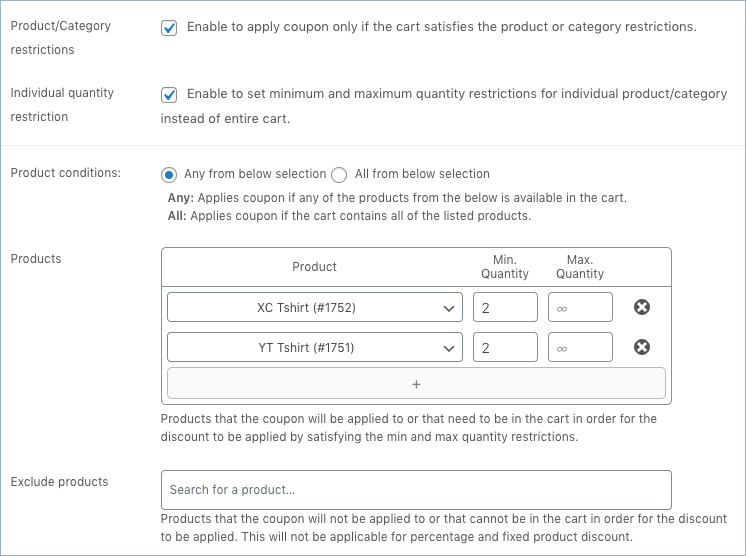
- In the above example, move two ‘XC Tshirt or YT Tshirt’ to the cart to be eligible for the coupon.
Category condition
- Any from below selection: Applies coupon if the eligible quantity of products from any of the below-selected categories are available in the cart.
- All from below selection: Applies coupon if the cart contains the eligible quantity of products from all the below-listed categories.
- Product categories: Apply coupon only if the selected quantity of products of the chosen category is in the cart. Discounts will be given for the chosen product amount and not the total cart amount.
- Exclude categories: For a fixed cart discount, the exclude option is used for validating whether a product from the excluded category is in the cart or not. The coupon will not be applied if the product from an excluded category is in the cart.
- But for all other discount types, the coupon will be applied even if the product from the excluded category is in the cart. In this case, the coupon will be applied to all other products of the eligible category in the cart.
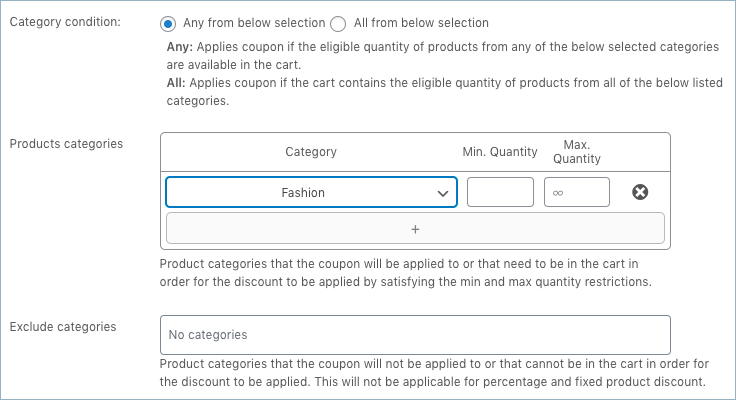
- In this example, move any product from the category ‘Fashion’ to the cart to be eligible for the coupon.
Step 3: Choose what the customer gets on discount
- Under the Giveaway products tab, choose the product or category that you wish to give on offer. It can be the same product in the cart, any product from the store or any product from the same or different category and so on.
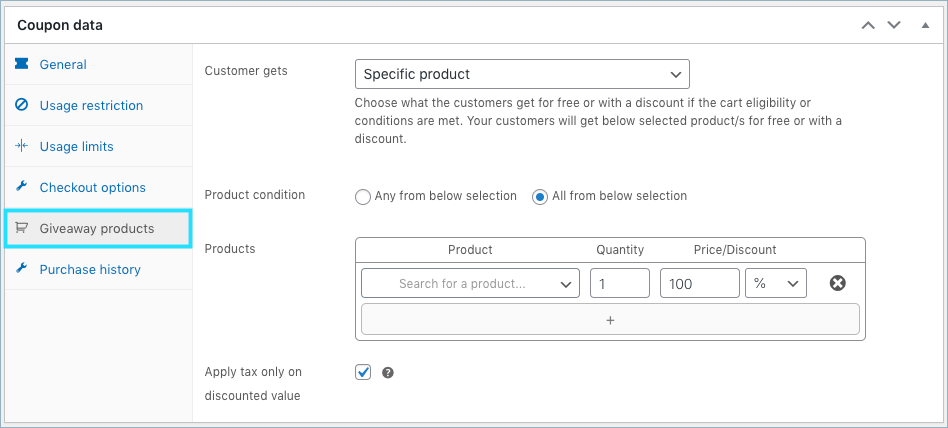
- Customer gets – Choose what the customers get for free or with a discount if the cart eligibility or conditions are met.
Specific product
- If cart eligibility or conditions are met, your customers will get specific product/s for free or with a discount.
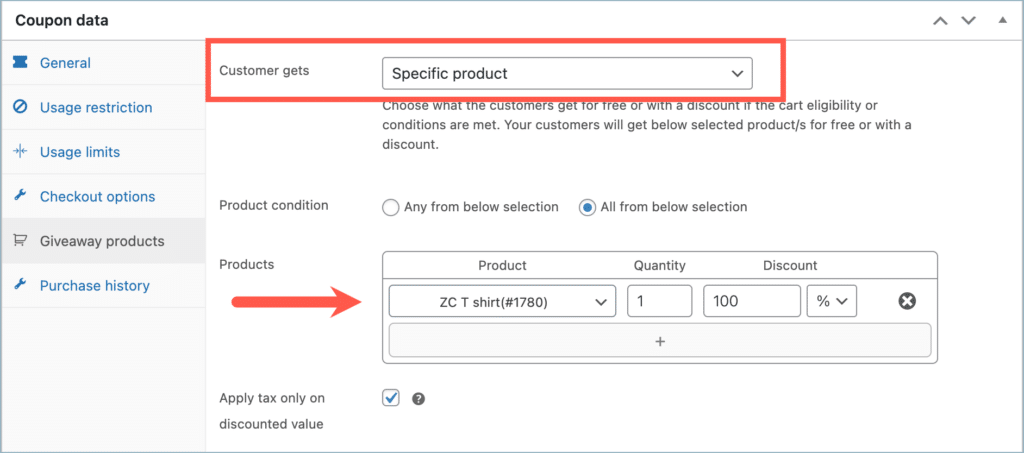
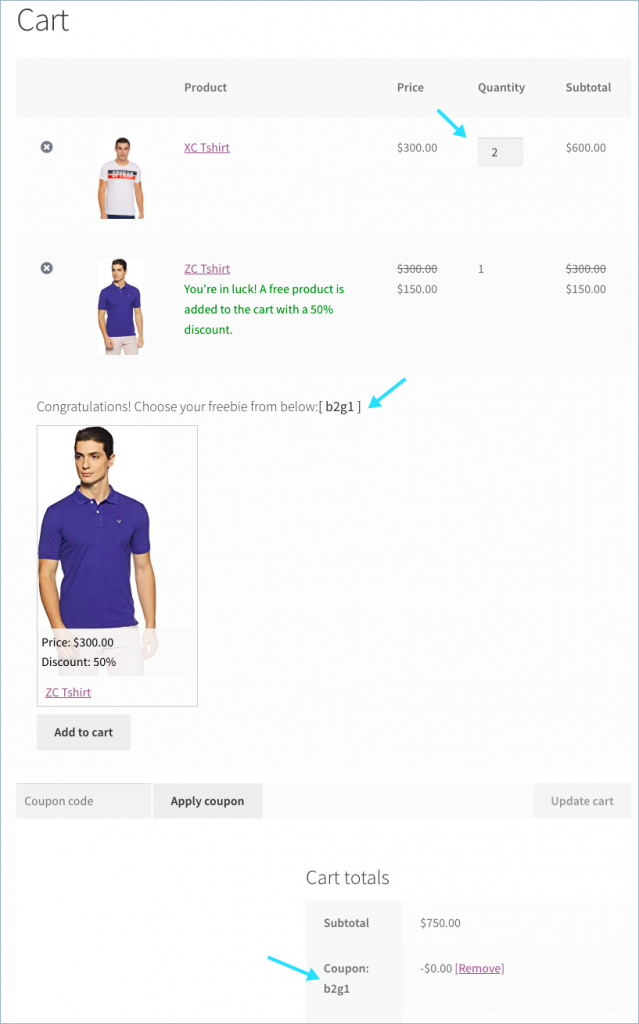
- In the above example, the customer will get ‘ZC T-shirt at 50%’ discount if the cart eligibility or conditions are met. That is, on moving two ‘XC Tshirt or YT Tshirt’ to the cart, the customer will get a ‘ZC T-shirt at a 50%’ discount.
- ‘Buy 2 get 1 at 50%‘ for a Specific product will appear on the front end as shown below:
Any product from a specific category
- If cart eligibility or conditions are met, your customers will get product/s from the selected category for free or with a discount.
- You can change the quantity of products the customer will get, from the quantity field.
- Additionally, enable the option Apply cheapest item in the cart as giveaway, to convert the cheapest product in the cart as a giveaway.
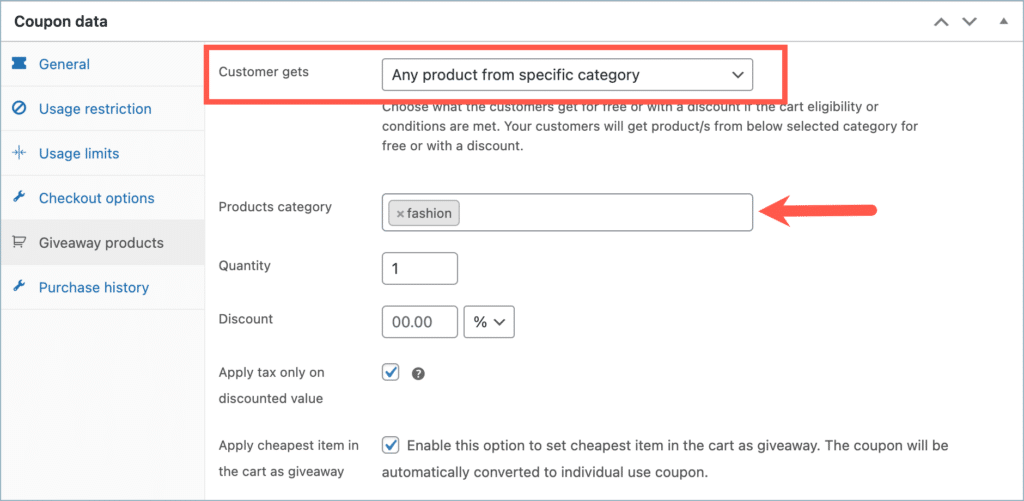
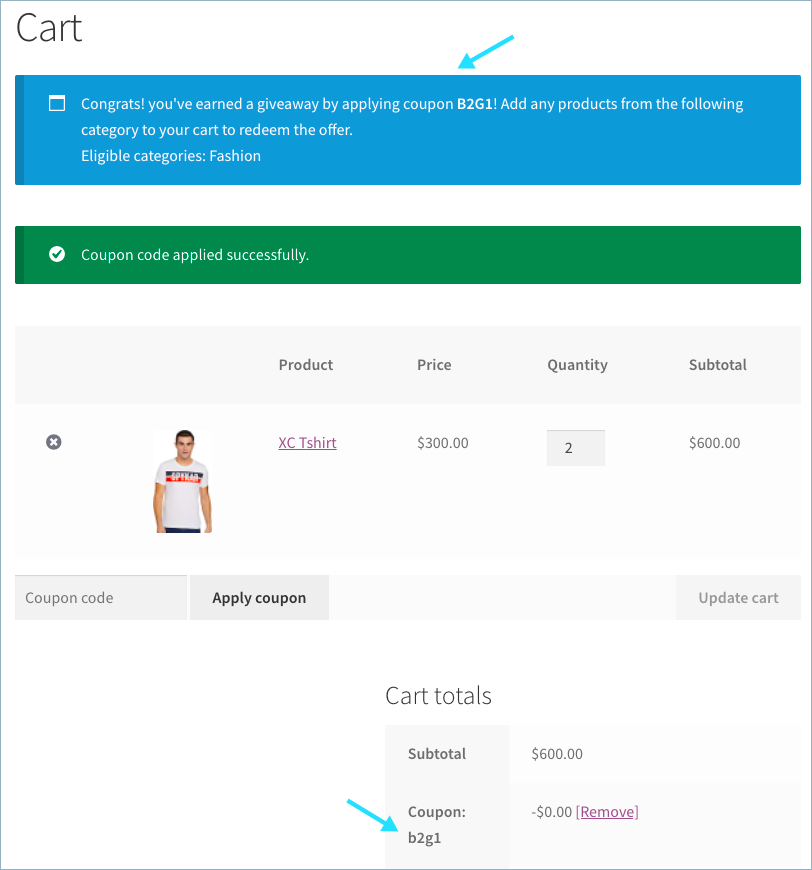
- Buy 2 get 1 from any specific category will appear on the front end as shown below:
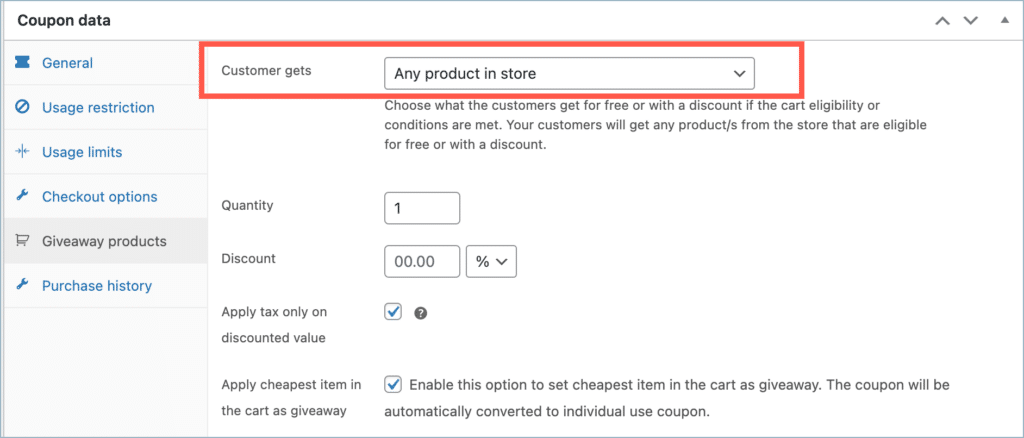
Any product in the store
- If cart eligibility or conditions are met, your customers will get any product/s from the store that is eligible for free or with a discount.
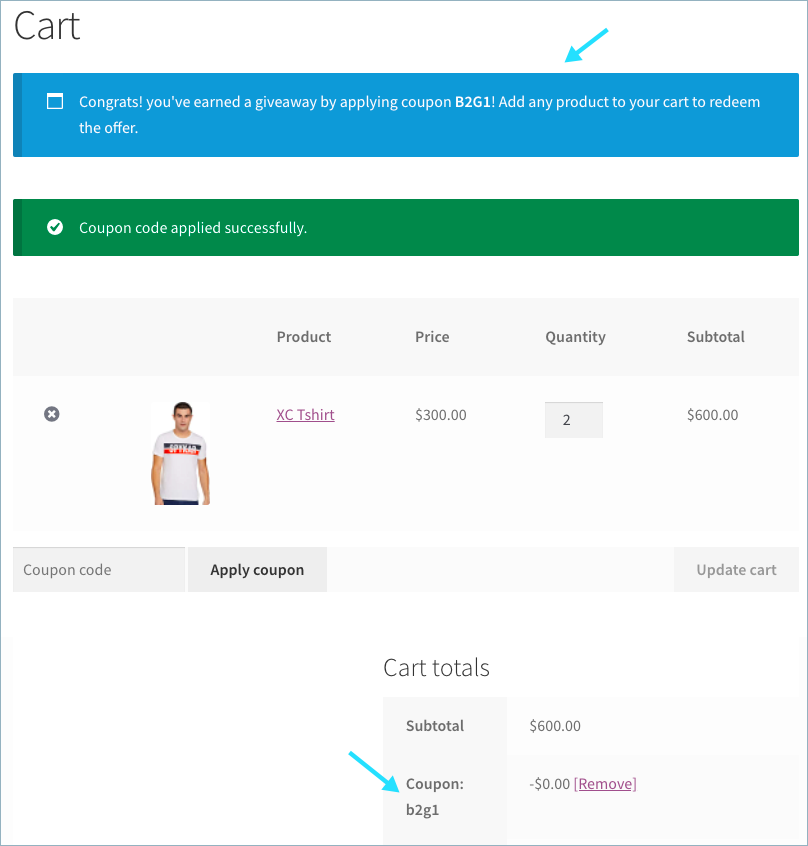
- Buy 2 get 1 for any product in the store will appear on the front end as shown below:
Same product as in the cart
- If the cart eligibility or conditions are satisfied, the customers will receive the product that matches the one in the cart and is configured in the product restriction section.
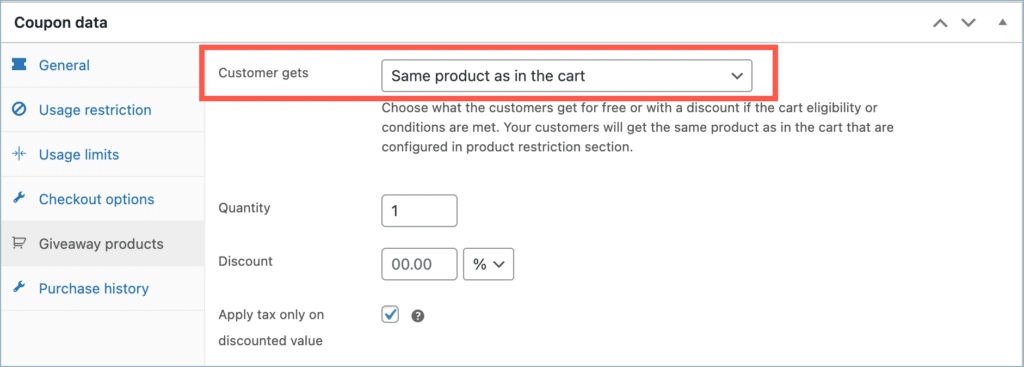
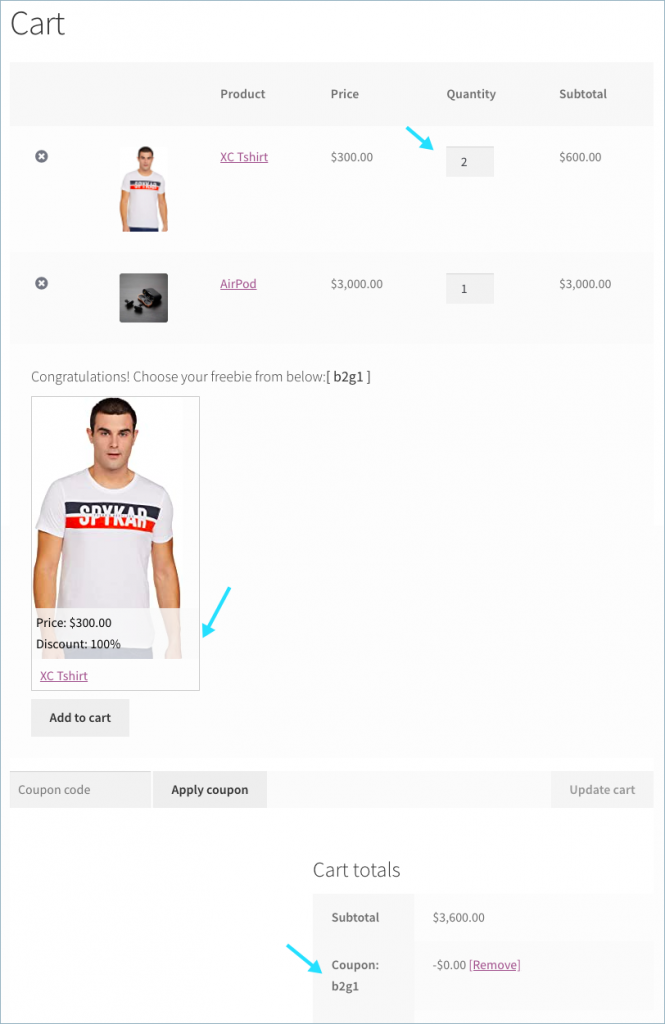
- In the above example, the customer will get ‘Same product as in the cart at 100% discount‘ if the cart eligibility or conditions are met. That is, on moving two ‘XC Tshirt or YT Tshirt’ to the cart, the customer will get the same product as in the cart completely for free.
- Buy 2 get 1 for the same product cart will appear on the front end as shown below:
Any product from the same category as in the cart
- If the cart meets the eligibility criteria or conditions, the plugin will provide customers with a product from the same category as the ones in the cart, as configured in the category restriction section.
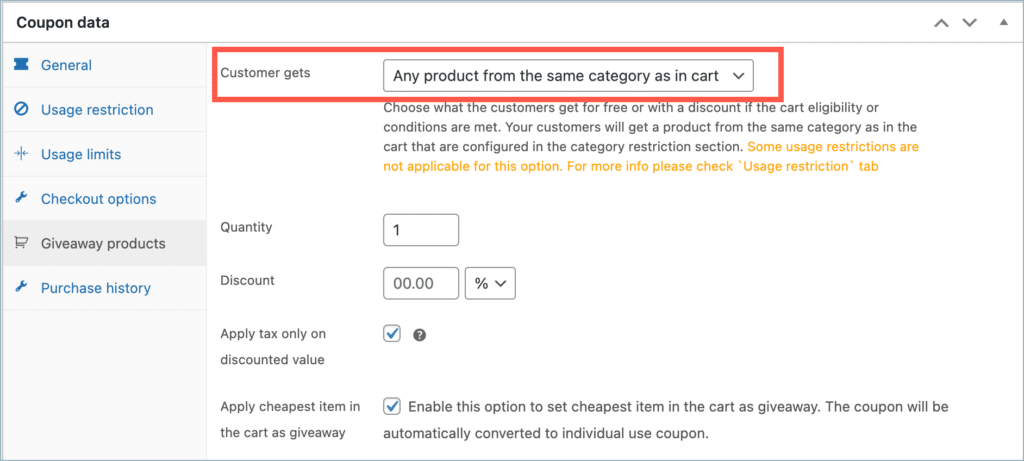
- In the above example, the customer will get ‘Any product from the same category as in the cart at 100% discount‘ if the cart eligibility or conditions are met. That is, on moving two ‘XC Tshirt or YT Tshirt’ to the cart, the customer will get any product from the same category as in the cart completely for free.
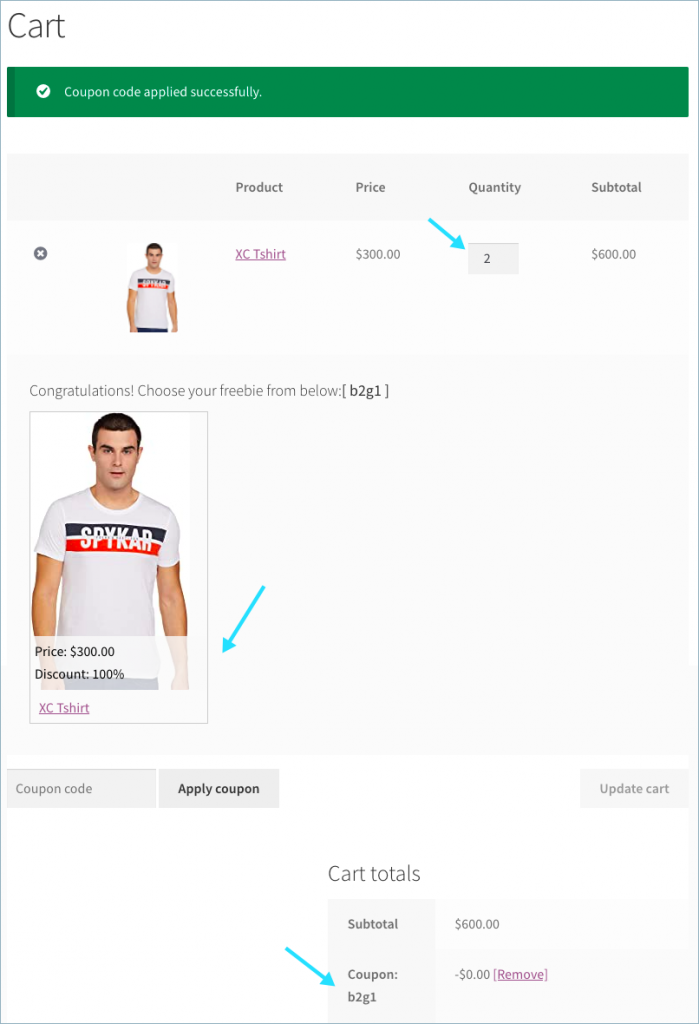
- Buy 2 get 1 for any product from the same category as in the cart will appear on the front end as shown below:
- Apply tax only on discounted value: Enable this option to calculate the tax only on the discounted value, e.g, If you are providing a discount of $10 on a $100 product, enabling this option will calculate tax only on $90, which is the product giveaway price (sale price).
After configuring BOGO in the required manner, publish the coupon and your coupon is ready to use.

Daniel Johnston
January 18, 2024
Hi,
I have a BOGO coupon with the following settings:
General:
Apply BOGO repeatedly: Yes
Usage restriction:
Product/Category restrictions: Yes
Product conditions: Any
Products: ProductA, ProductB
Giveaway products:
Customer gets: Same product as in Basket
Quantity: 1
Discount: 100%
Cart contains:
ProductA x 1
ProductB x 2
When coupon is applied I wish to be added to cart automatically: 1 x free ProductA, 2 x free ProductB
How to do this please?
I do not wish to have to select from a free item.
Thank you.
Arjun
January 19, 2024
Hi Daniel,
Thank you for reaching out. Your current configuration looks good. However, to apply the ‘Buy 1 Get 1’ coupon as you’ve suggested, you’ll need to generate separate BOGO coupons for each specific product you want to include in this offer. Otherwise, the user will be able to select any of the product in the cart as a giveaway. We’re already addressing this concern, and a solution is in development. Soon, you’ll be able to create a coupon that functions exactly as you’ve described.
Martin
September 21, 2023
Hello,
I’m interested in the Pro Version, but I have some questions beforehand.
I would like to offer “buy 1 get 1 for free” and I already tried it with the free version.
Unfortunately I have this problem:
If a customer choose 1 product, he is able to choose 1 variation of this product for free. This works great.
But if he is going to buy 2 products, he is not able to choose an other variation for free. The first variation he chose, is- increased by 1, so the customer gets two same free products. If he buys 3, he will get 3 same free products.
For e.g. he buys a white T-Shirt and choose a black one for free. If he buys two white T-Shirts, he can choose a black one and a red one. At the moment he will get two black one for free.
Is there a chance to allow the customer to choose several variations for free products?
thank you
Arjun
September 21, 2023
Hi Martin,
Thank you for reaching out to us. The plugin currently doesn’t provide the functionality you have specified.
John Emmett
June 1, 2023
Hi, your plugin allows the BOGO offer which is great but I would like to use a variable product but the product block only adds the first option to the basket not the selected option. Is there a way to edit the template for this block or extend the functionality? Thanks John.
Arjun
June 2, 2023
Hi John,
Thank you for getting in touch with us. Sounds like you need some technical assistance. Please visit support page for technical assistance.
Luis Cantos
February 21, 2023
I have a b3g1 coupon set up and I follower all the steps here. when testing I am able to trigger the coupon, however as soon as I select a giveaway and add it to cart, i get this error message: SORRY, IT SEEMS THE COUPON “B3G1FREE” IS INVALID – IT HAS NOW BEEN REMOVED FROM YOUR ORDER.
Mike
March 9, 2023
Hi Luis,
Sounds like you need some technical assistance. Please visit our support page and submit a ticket so we can assist you better: https://www.webtoffee.com/support/.
Make sure to attached
1. Screenshots of the coupon edit pages (all tabs).
2. Site health info (Tools > Site Health > Info tab > Copy site info to clipboard).
Nitesh
December 31, 2022
Hi ,
I am a pro user. I want to offer buy one and get one but there is a problem. The final cart value should be the highest one of them and other should be free but here which one the customer choose first that is cart value and other automatically becomes free. Now if customer chooses high order product it is fine but if they choose low value product first then I am facing a loss here. Please help me resolve it.
Mike
January 12, 2023
Hi Nitesh,
I understand your requirement. Unfortunately, the plugin doesn’t have the feature to provide the cheapest item as the giveaway product. However, we have recently implemented this feature in the beta version of the plugin. It will certainly be included in the next release of the plugin. If you can’t wait till then, we can share the beta version with you. In that case, you may create a ticket through our dedicated support desk.
Giam
December 31, 2022
How to modify the success messages in front end when the coupon is applied?
Mike
February 10, 2023
Hi Giam,
The option to modify the success message is not available in the existing version of the plugin. However, we have implemented this option in the latest beta version and will be available from the next version (2.0.8) onwards.
If you are okay with using the beta version of the plugin, please reach out to us through our support desk and we will share it with you.
Giuseppe
November 24, 2022
Hi, the pugin solves this case:
buy A OR buy B OR buy C OR buy D get Y
where A, B, C, D can be variable products.
I await your reply before proceeding with the purchase. Thank you
Mike
November 25, 2022
Hi Giuseppe,
You can certainly set up a BOGO coupon to achieve this requirement. Once a user adds any of the A, B, C & D products to the cart, they will get the Y product.
You may go ahead and purchase the plugin. We will be there for you if you encounter any issues with the plugin. If it doesn’t meet your expectations or work out for you, you can take advantage of our 30-day money-back guarantee.
Tohar Lugasi
August 2, 2022
Why there is no option of Buy 1 and get 50% off on the lowest price item? this is totally basic!
TyQuan Jainlett
November 9, 2022
Hello, have you found anyway to make this work? I have been trying to get this done. Buy 1 and get 50% off on the lowest price item
Mike
December 5, 2022
Hello there,
The BOGO on the cheapest product feature is currently being implemented in the plugin. We are working hard to find the best solution that is compatible with the plugin’s existing functionality. Thanks for your understanding on the matter.
Mena Cashback
June 7, 2022
Dear One! You are really serving the mankind with the words you are producing. The concept of change is really the main source of your blogs. Keep it up. I promise to come again to read the blogs you have produced.