WooCommerce PDF Invoices, Packing slips, and Credit notes pro-add-on allow you to print, download and manage WooCommerce invoices, packing slips, and credit notes. This is a premium add-on plugin.
Plugin features
- Attach the shipping document (Invoices, packing slips, and credit notes) in PDF format in the WooCommerce order email.
- Set up a custom document number with prefix/suffix/number series.
- Append additional order or product meta details into the invoice.
- Allows customizing the shipping documents using the inbuilt templates.
- Allows using vendor’s store address as the From address in documents (Compatibility with Dokan plugin).
- Allows selection of language preferences for document generation(multi-language compatibility).
- Option to skip backorder and virtual items from the packing slip.
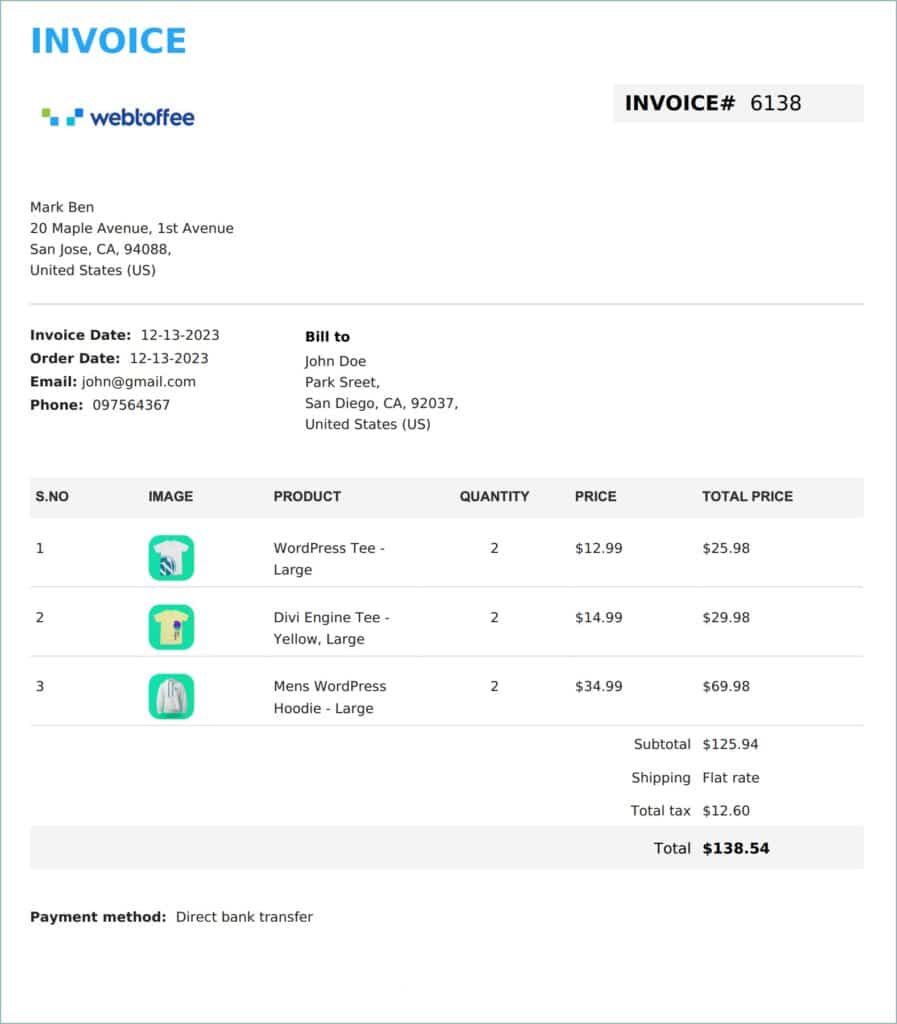
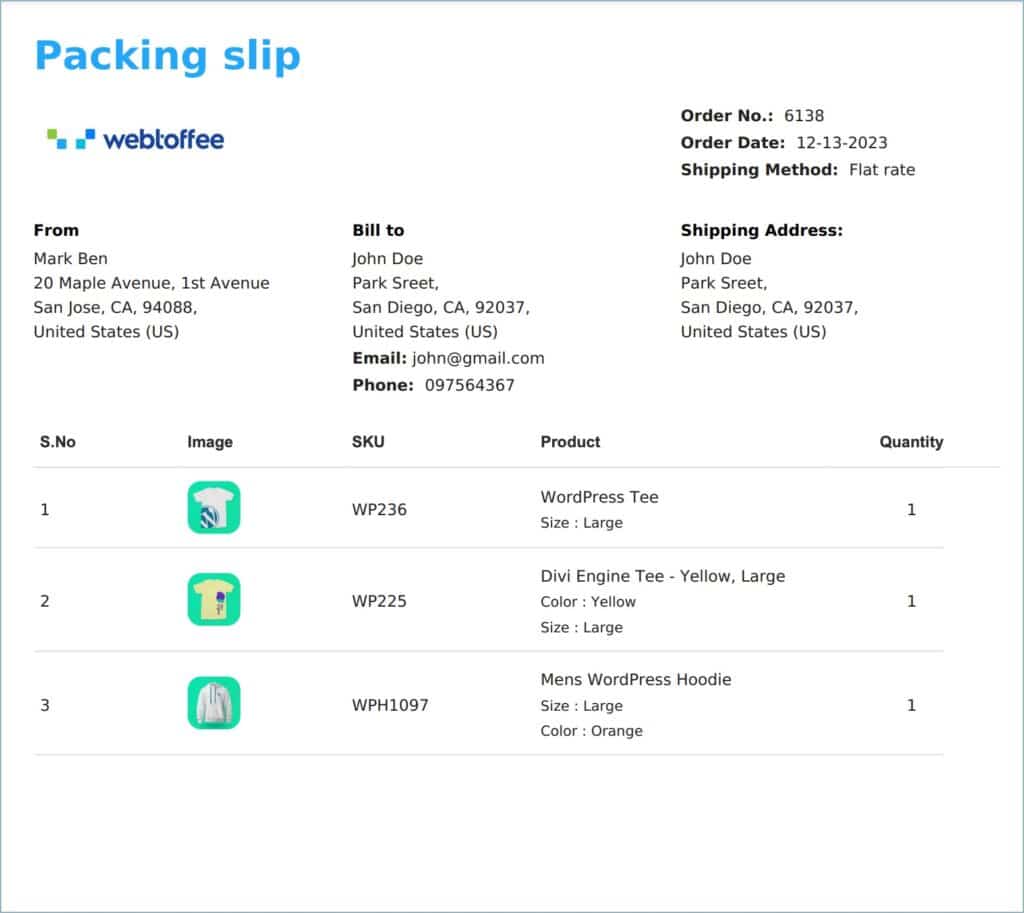
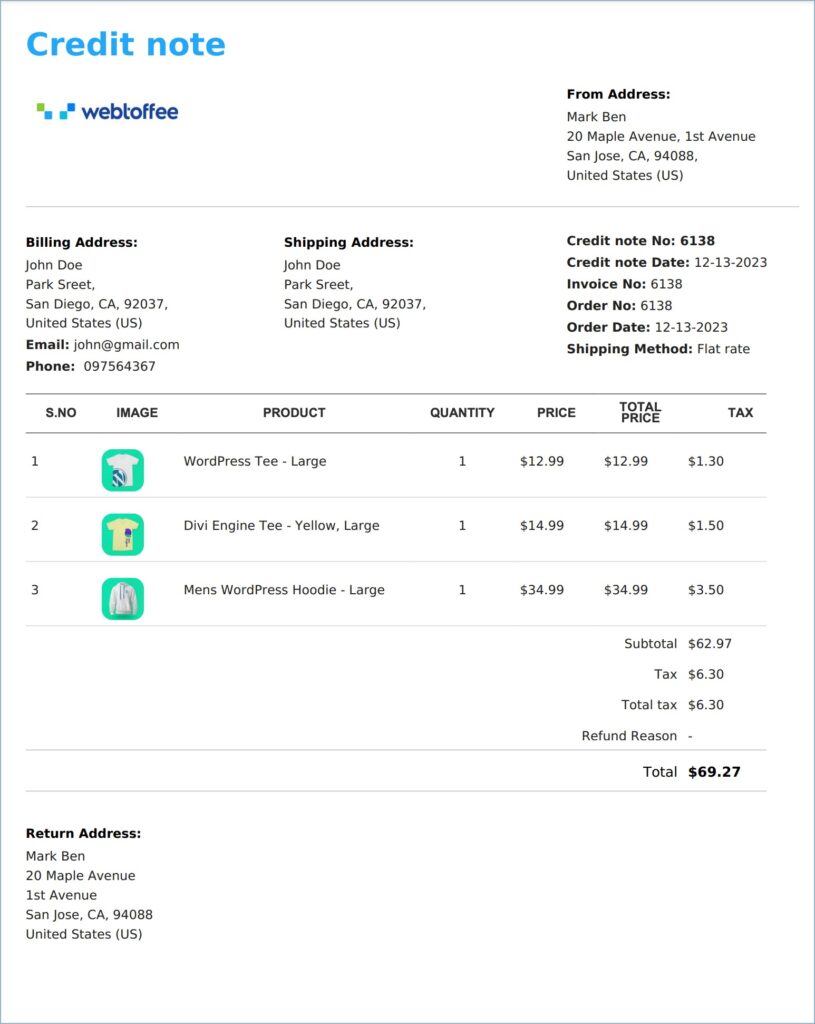
Sample documents created by the plugin
Prerequisite
This plugin is a premium add-on to the WooCommerce PDF Invoice, Packing Slips, Delivery Notes, and Shipping Label (free) plugin.
- Install the free WooCommerce PDF Invoice, Packing Slips, Delivery Notes, and Shipping Label plugin.
Getting started
- Firstly, install and activate the plugin.
- From the dashboard, go to Invoice/Packing. The plugin adds three more documents, shipping label, Dispatch label, and Delivery note.
- Click on the corresponding document to get to the settings screen.
OR - Head to Invoice/Packing > General Settings > Documents tab. This tab lists the newly added shipping documents.
- Installing the pro version will add an Advanced tab to the plugin’s General Settings.
Advanced tab of General Settings
Navigate to Invoice/Packing > General Settings > Advanced to access the Advanced tab. The Advanced tab will look like this:
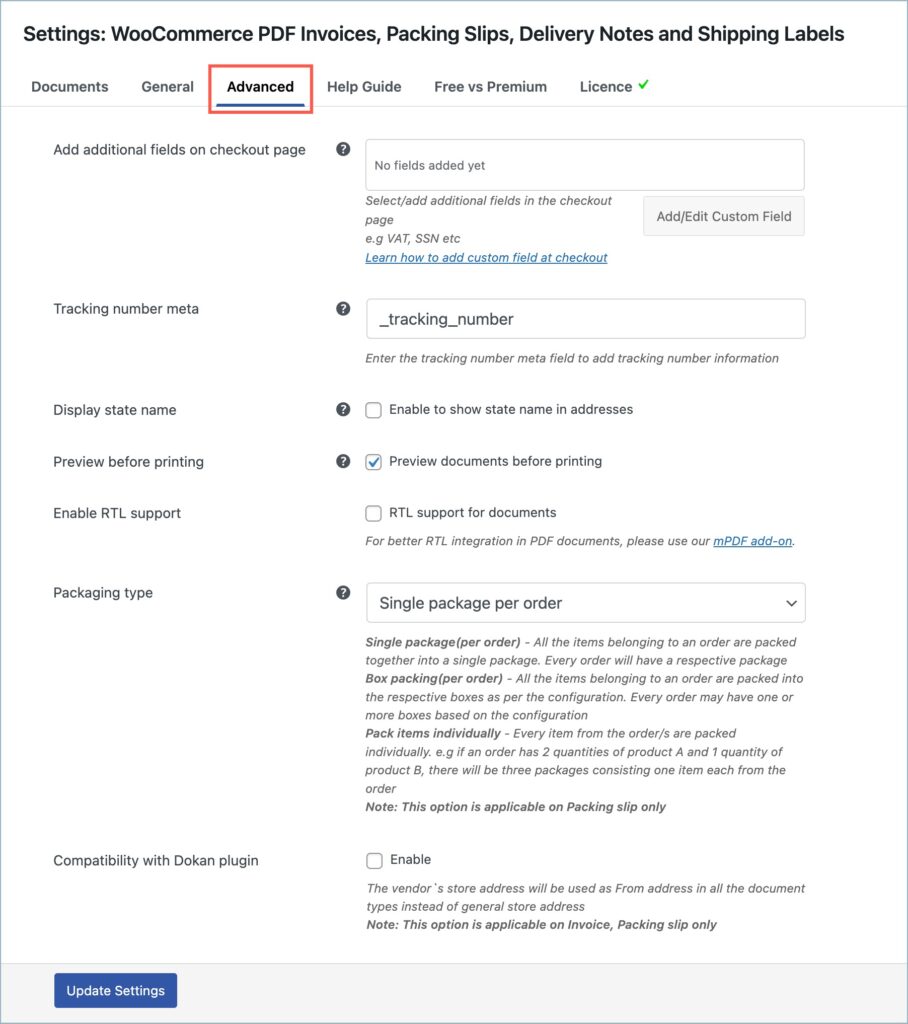
The following are the features offered by the Advanced tab:
- Add additional fields on checkout page – This option helps you to add additional fields to the checkout page. By default, the plugin provides two additional fields ‘SSN’ and ‘VAT’. Click on the Add/Edit Custom Field button to add new fields to the checkout page.
- Tracking number meta – The tracking number added by a third-party plugin can be shown on invoices and other documents by adding its tracking number meta here.
- Display state name – Enable to replace the state code with the state name in all address types. When enabled the state name will be shown on the documents instead of the state code.
- Preview before printing – Enabling this option will show a preview of the document before actually printing it.
- Enable RTL support – Enable to provide RTL support for documents. Use WebToffee’s mPDF add-on for better RTL integration.
- Packaging type – Items within an order will be packed based on the packaging selection. Choose Pack items individually to pack all the items within an order in separate packages, Box packing to pack items in specific boxes and Single package per order to pack all the items in a single package.
- Compatibility with Dokan plugin – Enable to use the vendor’s store address specified in the Dokan multi-vendor plugin as the From address in invoices and packing slips.
Invoices
Navigate to Invoice/Packing > Invoice to access the Invoice Settings page.
General settings tab
The general settings page allows configuring the invoice components. The general settings page looks like the below image.
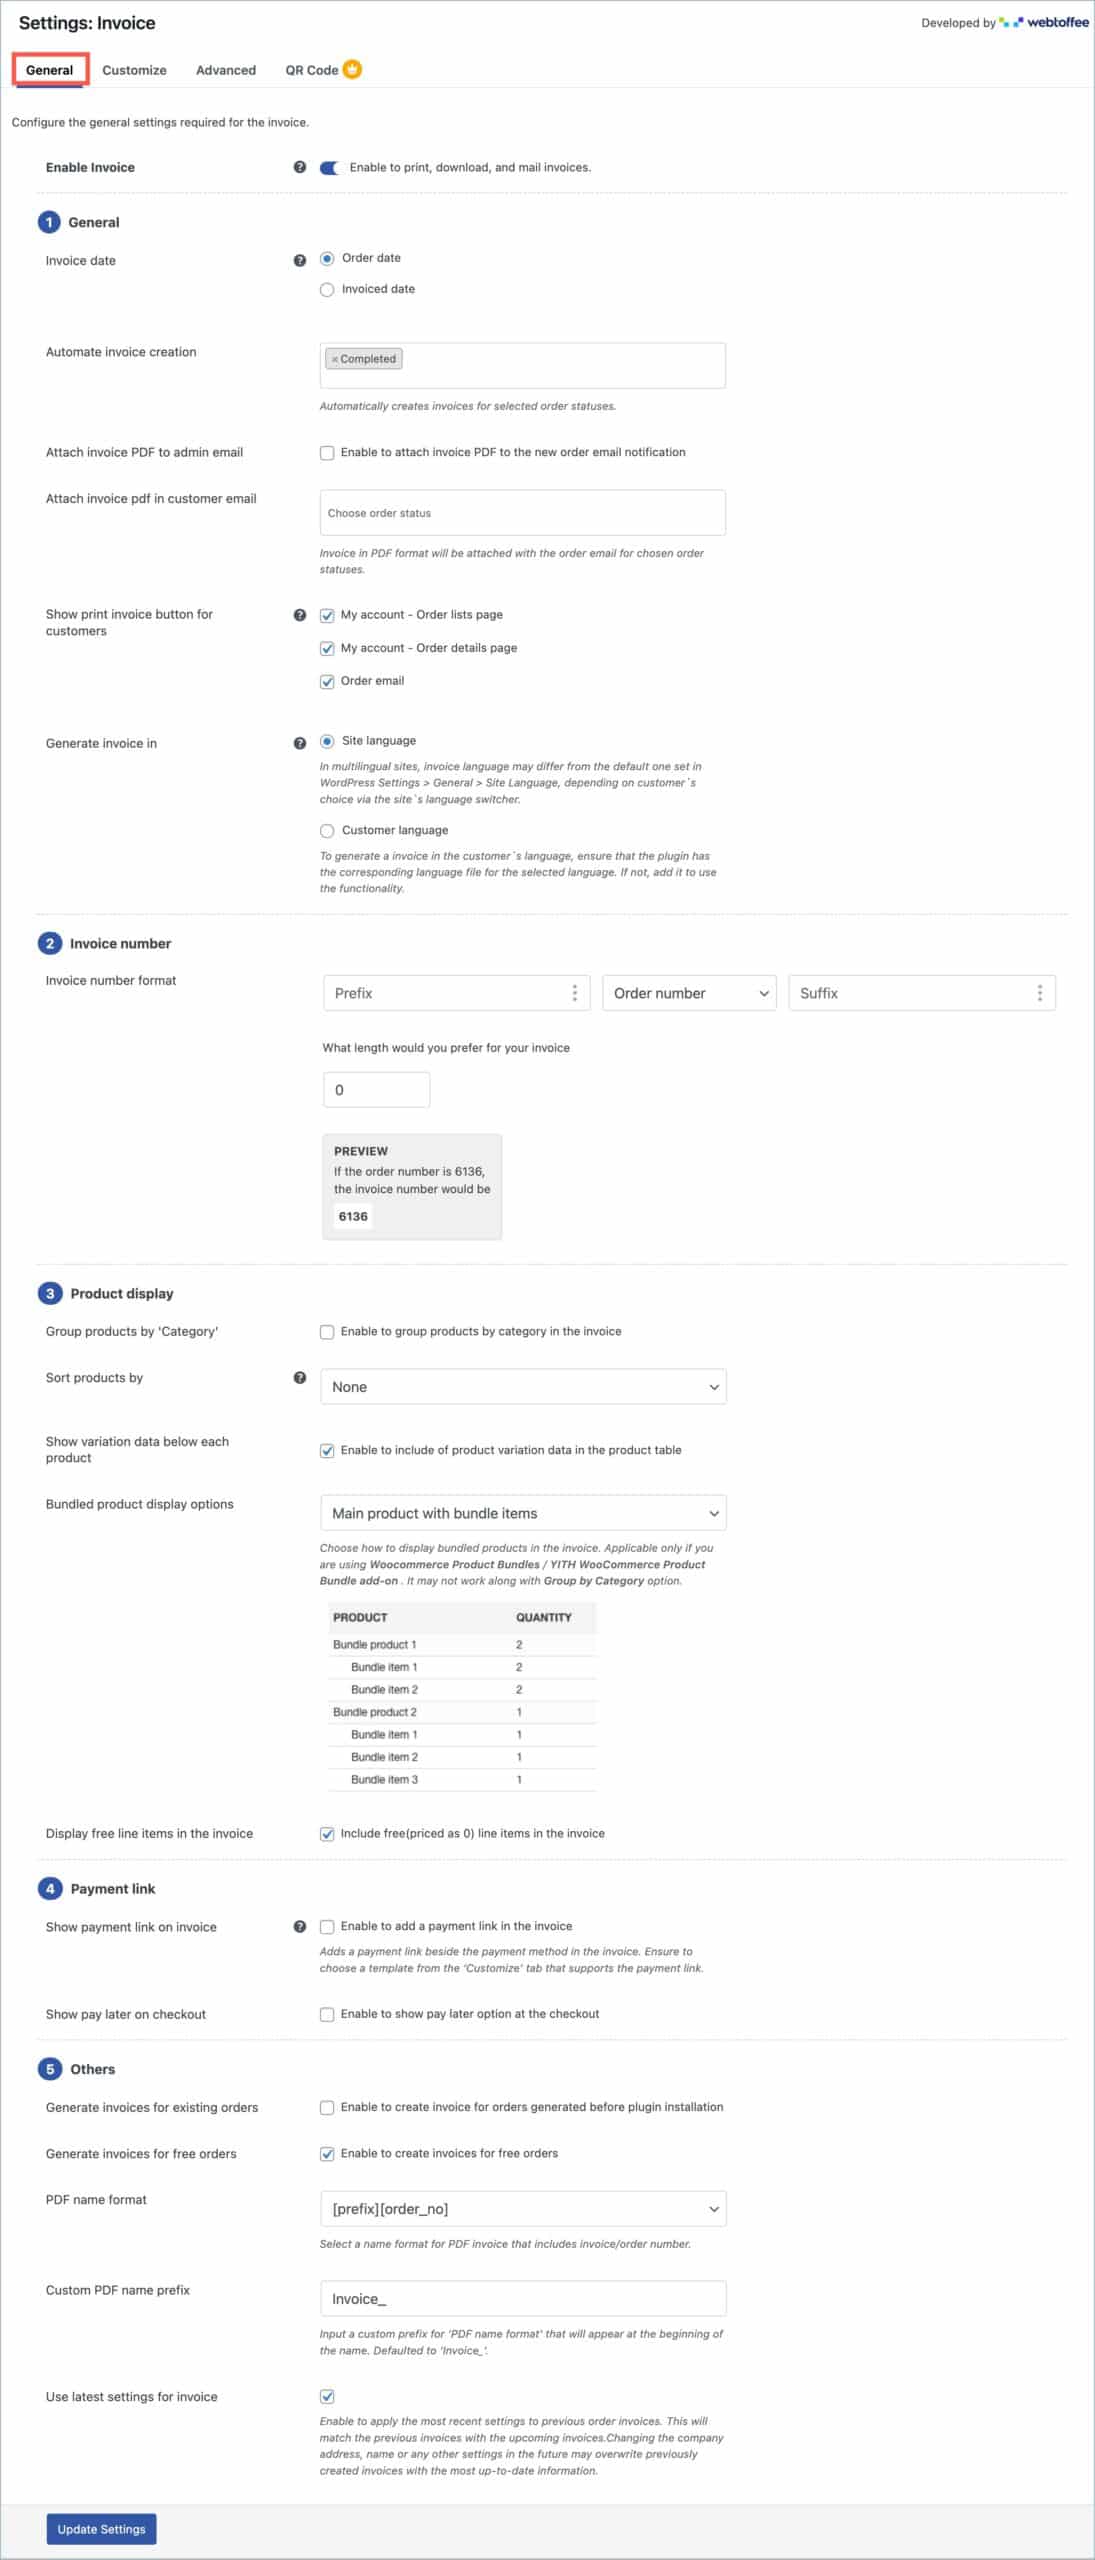
- Enable invoice – Enable to include the invoice view/print provisions for orders. When disabled, the admin can still customize the template and set the invoice number.
General section
The general section elaborates the following features.
- Invoice date – Choose either the order creation date or the invoiced date as the invoice date.
- Automate invoice creation – Automatically creates invoices for selected order statuses. Allows selecting multiple statuses.
- Attach invoice PDF in order email – The invoice as a PDF will be attached to the order email.
- Attach invoice pdf in customer email – Choose the order statuses for which the invoice PDF should be automatically sent as an attachment to the customer email. Your selection is limited to the order statuses specified under the “Automate Invoice Creation” option.
- Show print invoice button for customers – Allows customers to print the invoice from the specified pages.
- My account—Order lists page
- My account -Order details page
- Order email
- Generate invoice in – Allows store owners to select the language preference for invoice generation. Choose from the two options available:
- Site language – Site language is the one chosen under WordPress Settings > General > Site language. In multilingual sites, selecting the site language doesn’t always ensure it. The invoice may be generated in the language chosen by the customer using the language selector.
- Customer language – Generate invoices in the language chosen by the customer on the multilingual site using the language selector.
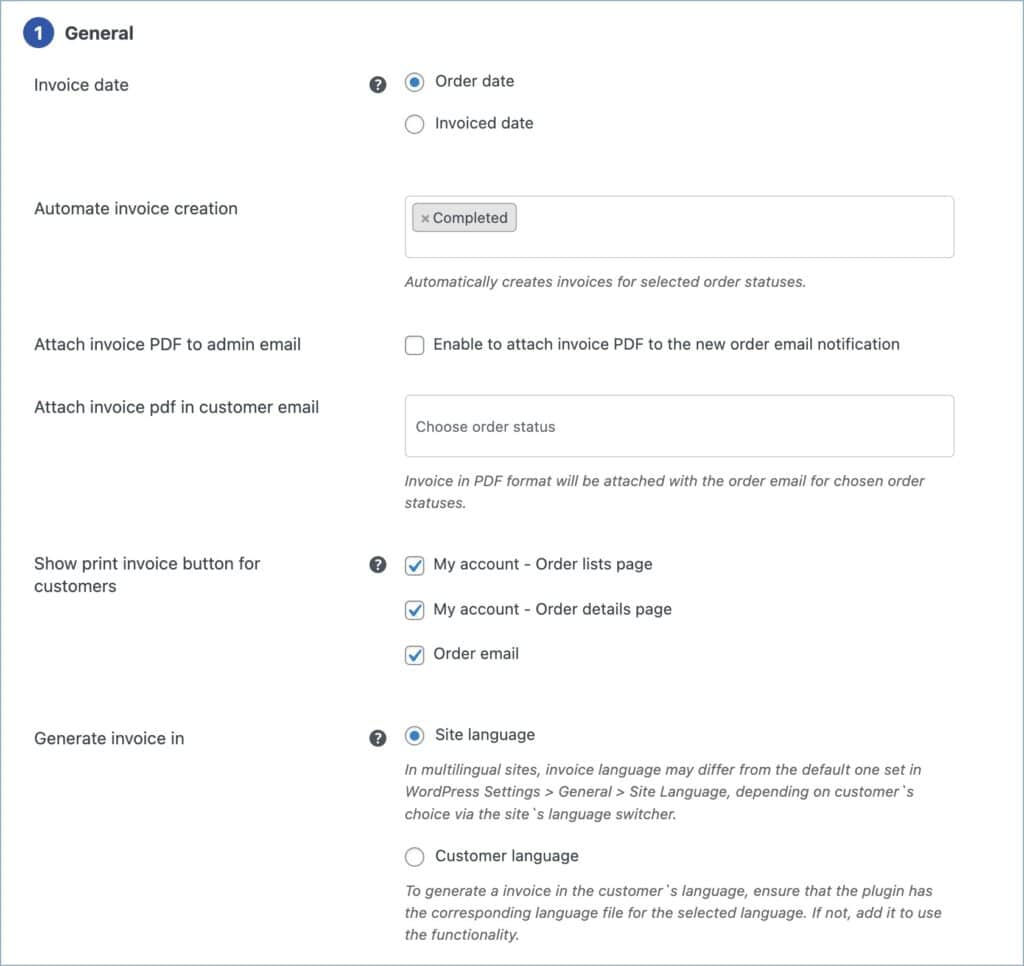
Invoice number section
The invoice number section elaborated the following features.
- Invoice number format – Allows setting a combination of the prefix, number, and/or suffix as your invoice number.
- Prefix – You can select a date format as the prefix by clicking the vertical three-dot menu, selecting “Choose date,” and adding your preferred date format.
- Order number/Custom number – Choose the default order number or a custom number of your choice as the invoice number. If you choose the custom number, specify the starting number for the invoices.
- Suffix – Specify a suffix that will appear at the trailing end of the invoice number. Provisions are included to select predefined date formats as suffixes.
- Invoice number length – Indicates the total length of the invoice number, excluding the length of prefixes and suffixes. If the generated invoice number length is less than the provided, it will be padded with ‘0’. E.g if you specify 7 as invoice length and your invoice number is 2881, it will be represented as 0002881 in the respective documents.

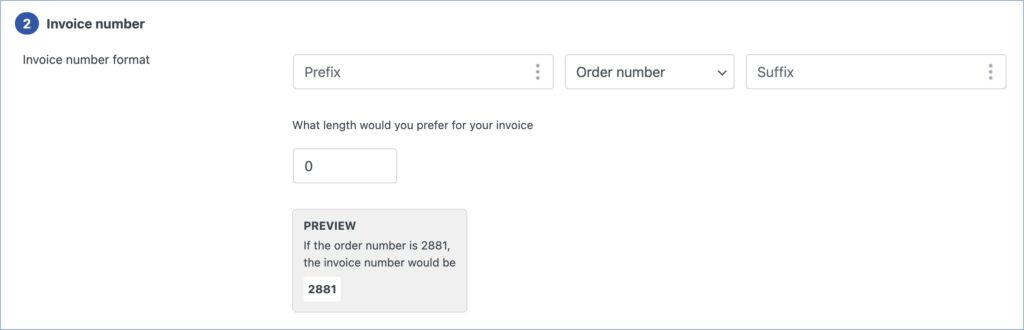
Product display section
The product display section elaborates the following features.
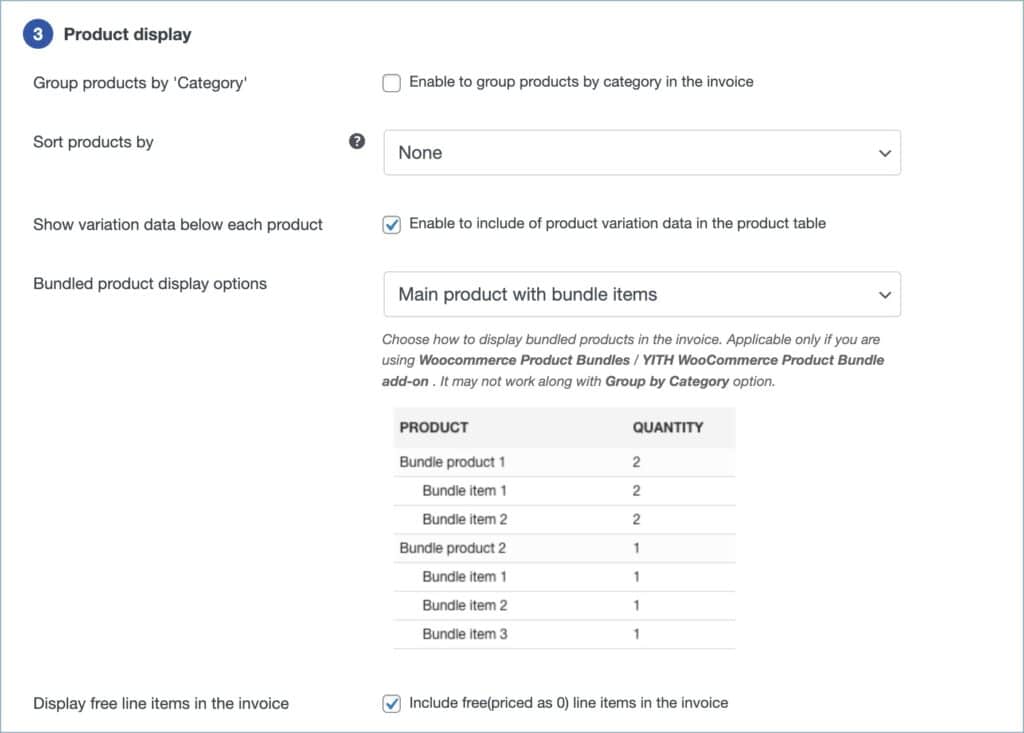
- Group products by ‘Category’ – Enable to group products by category in the invoice.
- Sort products by – Sort products in ascending/descending order based on Name or SKU
- Show variation data below each product – Enable to include of product variation data in the product table
- Bundled product display option – Choose how to display bundled products in the invoice. Applicable only if you are using WooCommerce Product Bundles / YITH WooCommerce Product Bundle add-on. It will not work when Group by Category option is enabled.
- Display free line items in the invoice – Include free (priced as 0) line items in the invoice
Payment link section
The payment link section elaborates the following features.

- Show payment link on invoice – Enable to add a payment link in the invoice. Adds a payment link beside the payment method in the invoice. Ensure to choose a template from the ‘Customize’ tab that supports the payment link.
- Show pay later link on invoice – Enable to show pay later option at the checkout.
Others section
This section elaborates the miscellaneous features.
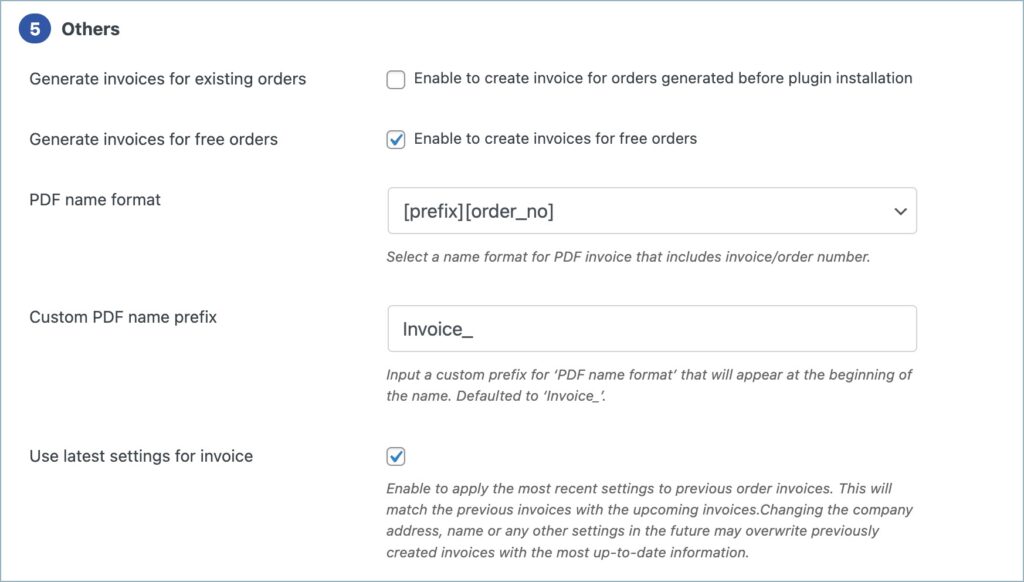
- Generate invoices for existing orders – Enable to create invoices for orders generated before plugin installation.
- Generate invoices for free orders – Enable to create invoices for free orders.
- PDF name format – Select a name format for PDF invoice that includes a prefix and the invoice/order number.
- Custom PDF name prefix – Input a custom prefix for ‘PDF name format’ that will appear at the beginning of the name. Defaulted to ‘Invoice_’.
- Use latest settings for invoice – Enable to use the latest settings for all invoices including those generated previously.
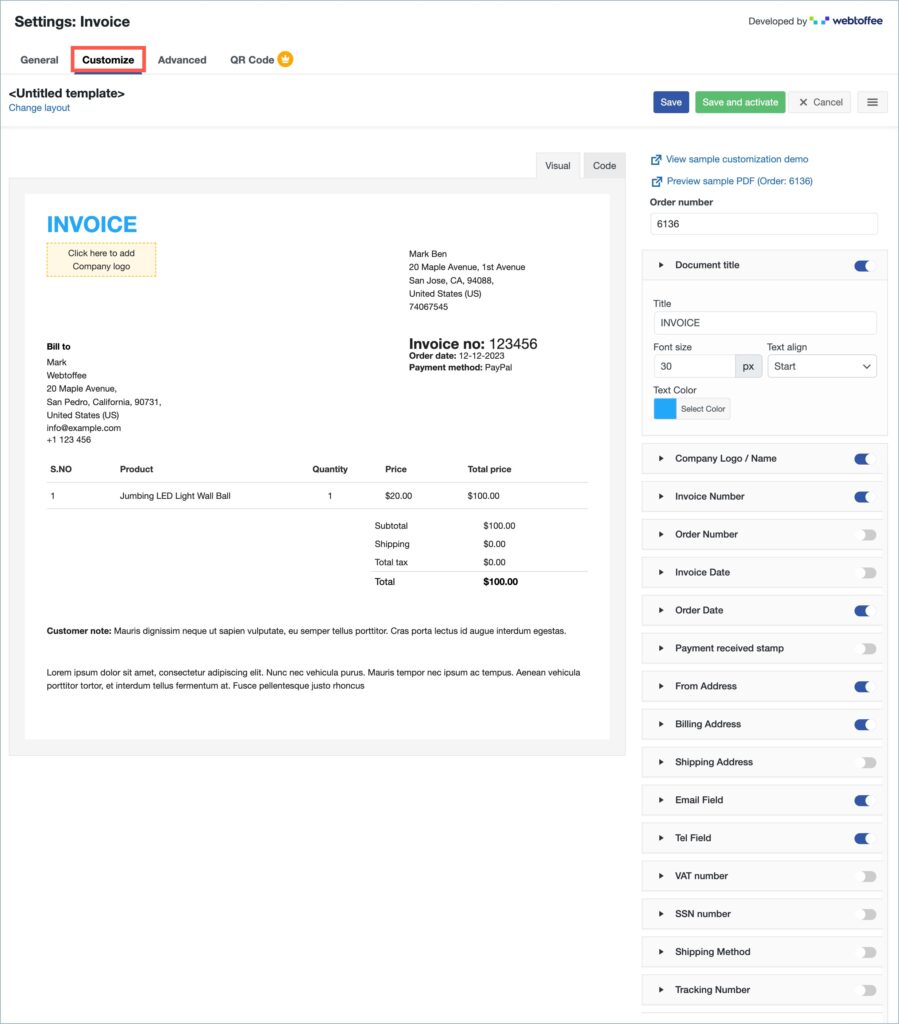
Customize tab
You can customize the Invoice using the inbuilt templates and modify them to suit your needs.
To create a new Invoice template,
Click on Change layout > Choose the template. Make necessary changes and save it.
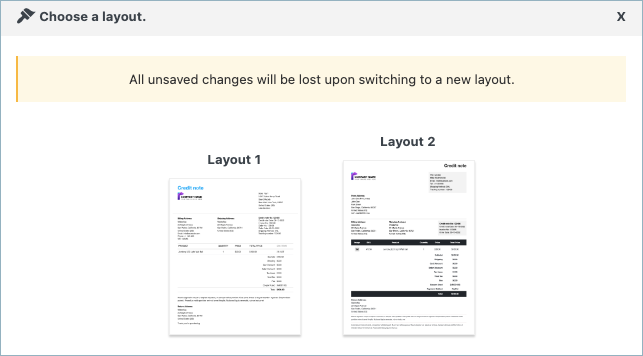
- Select a template from the Change layout option.
- From the inbuilt templates that pop up, choose a layout.
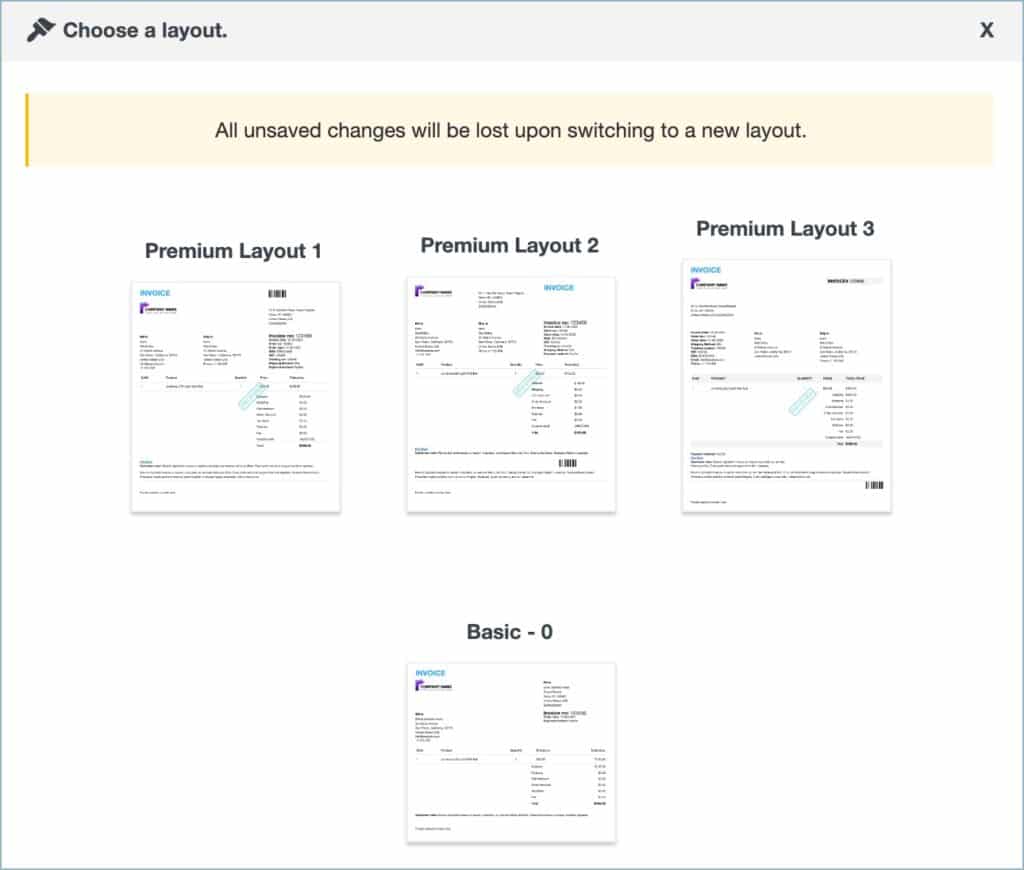
- Make the necessary modifications to the layout and save it.
- After saving, activate the template to use it further for your Invoice.
- You can even switch to the code editor, to make additional customizations other than the one listed in the visual editor.
- While making changes via code editor it would be better for you to refer to the Help Guide(Invoice/Packing > General Settings > Help Guide) which briefs about some useful ‘filters’ that can be used to extend the plugin’s functionality.
- The Template Elements on the right side of the Customize tab lists the various elements of the invoice. You can enable/disable elements using their respective toggle buttons.
Advanced tab
This tab allows adding new product attributes and meta fields to the invoice document. The advanced tab details the following features.
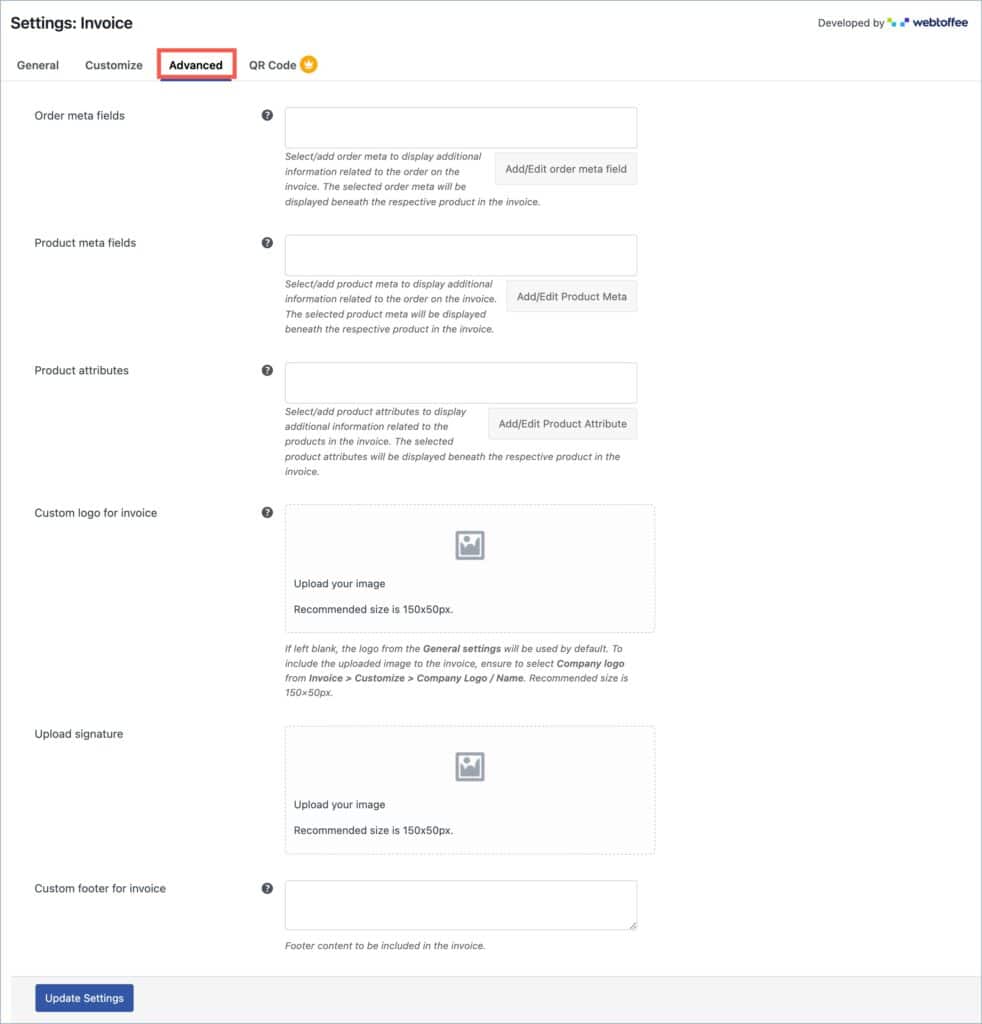
- Order meta fields -Select/add order meta to display additional information related to the order on the invoice. The selected order meta will be displayed beneath the respective product in the invoice. Include custom order meta by clicking on the Add/ Edit order meta field. Key in the field name and meta key to include an order meta. Previously added tab lists the order meta fields added in the past.
- Product meta fields – Select/add product meta to display additional information related to the order on the invoice. The selected product meta will be displayed beneath the respective product in the invoice. Include custom product meta by clicking on the Add/ Edit order meta field. Key in the field name and meta key to include a product meta. Previously added tab lists the product meta fields added in the past.
- Product attributes – Select/add product attributes to display additional information related to the products in the invoice. The selected product attributes will be displayed beneath the respective product in the invoice. Include custom product attributes by clicking on the Add/ Edit order meta field. Key in the field name and meta key to include a product attribute. Previously added tab lists the product attributes added in the past.
- Custom logo for invoice – Overrides the common logo set in the General settings and allows inserting a unique logo in the invoice. If left blank, the logo from the General settings will be used by default. To include the uploaded image to the invoice, ensure to select Company logo from Invoice > Customize > Company Logo / Name.
- Upload signature – Upload a signature to include in invoices.
- Custom footer for invoice – Footer content to be included in the Invoice. Overrides the common footer content specified in the General settings and allows inserting content that is specific only to invoices.
QR Code in Invoices
To add QR code to WooCommerce invoices we would recommend you to use our add-on plugin that reads order number, invoice number or other custom details.
Read more about the QR code add-on set up here.
Packing slips
Navigate to Invoice/Packing > Packing slip to access the Packing slip Settings page.
General settings tab
The General settings tab allows configuring the general settings of the packing slip.
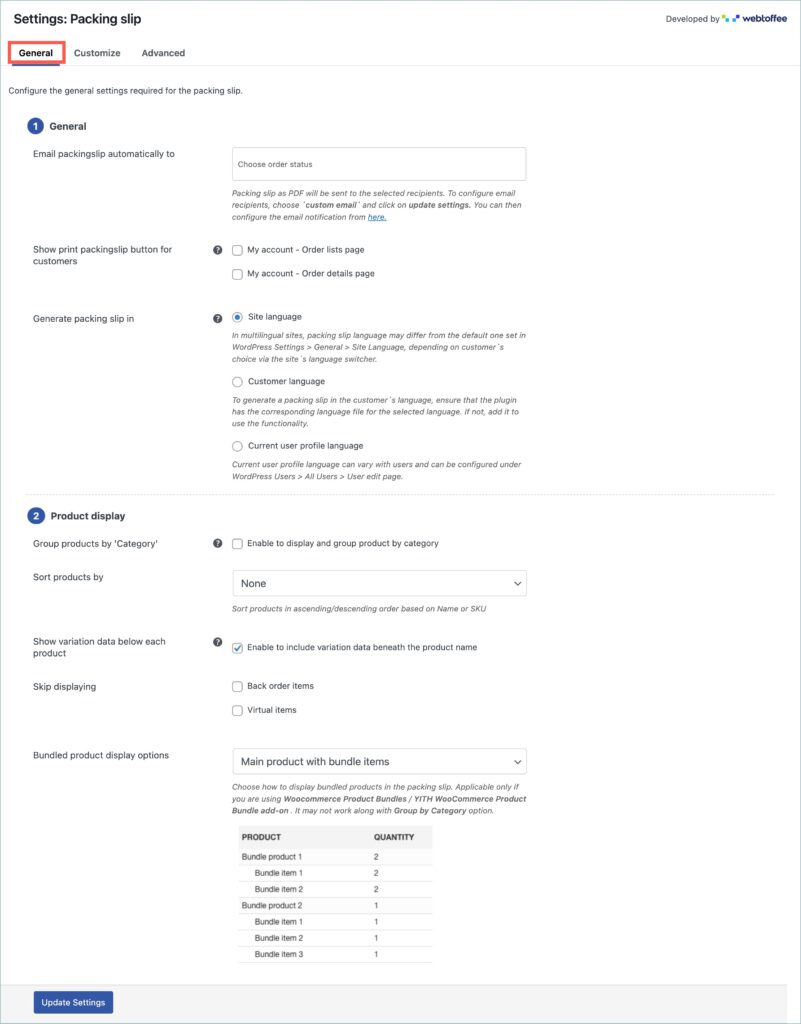
General section

- Email packingslip automatically to – Packing slip as PDF will be sent to the selected recipients. To configure custom email recipients, choose `custom email` and click on Update settings.
- Show print packingslip button for customers – Show print packing slip button for customers. Enabling this option includes a button to print the packing slip from the order lists page or order details page.
- My account – Order lists page
- My account – Order details page
- Generate packing slip in – Allows you to select the language preference for packing slip generation. Choose from the three options available:
- Site language – Site language is the one chosen under WordPress Settings > General > Site language. In multilingual sites, selecting the site language doesn’t always ensure it. The packing slip may be generated in the language chosen by the customer using the language selector.
- Customer language – Generate packing slips in the language chosen by the customer on the multilingual site using the language selector.
- Current user profile language – Generate packing slips in the user profile language. Can be configured by the admin under WordPress Users > All Users > Edit User page.
Product display section
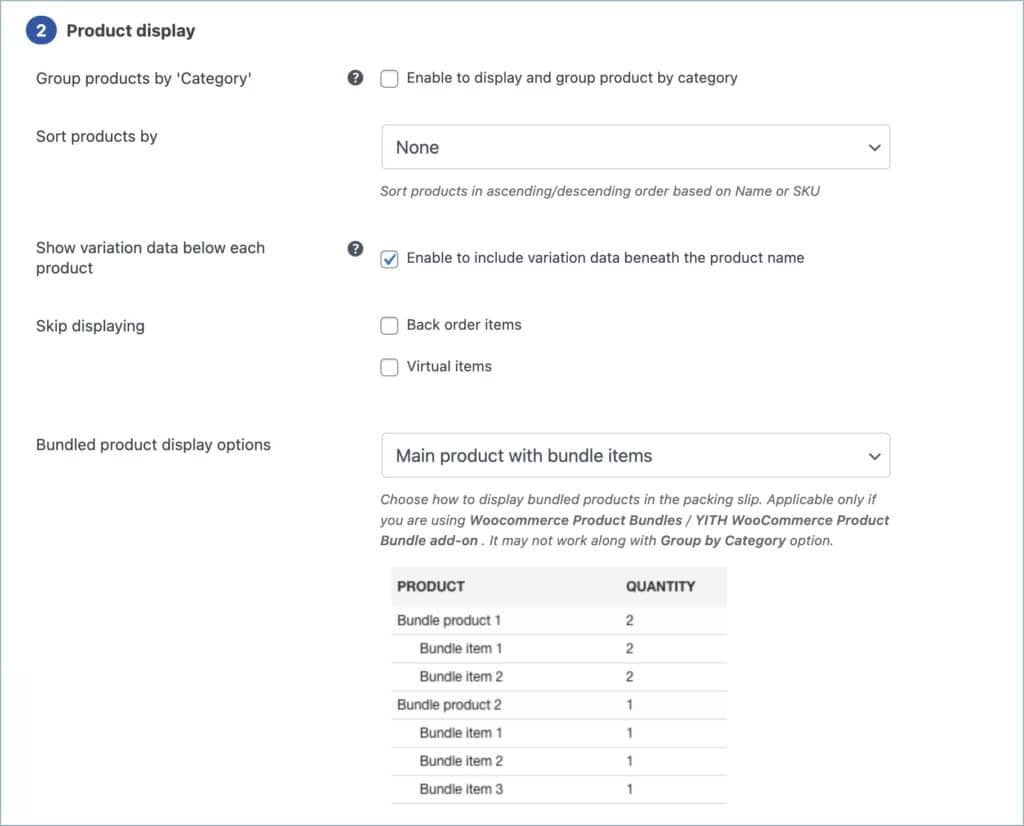
- Group product by ‘Category’ – Enable to display and group products by category. Group products falling under the same category in the packing slip, thus making packing easier.
- Sort product by – Sort products in ascending/descending order based on Name or SKU.
- Show variation data below each product – Enable to include variation data beneath the product name.
- Skip displaying – Exclude backorder and/or virtual items from the packing slip.
- Bundled product display option – Choose how to display bundled products in the packing slip. Applicable only if you are using WooCommerce Product Bundles / YITH WooCommerce Product Bundle add-on. Requires disabling Group product by category option.
Customize tab
You can customize the packing slip using the inbuilt templates and modify them to suit your needs.
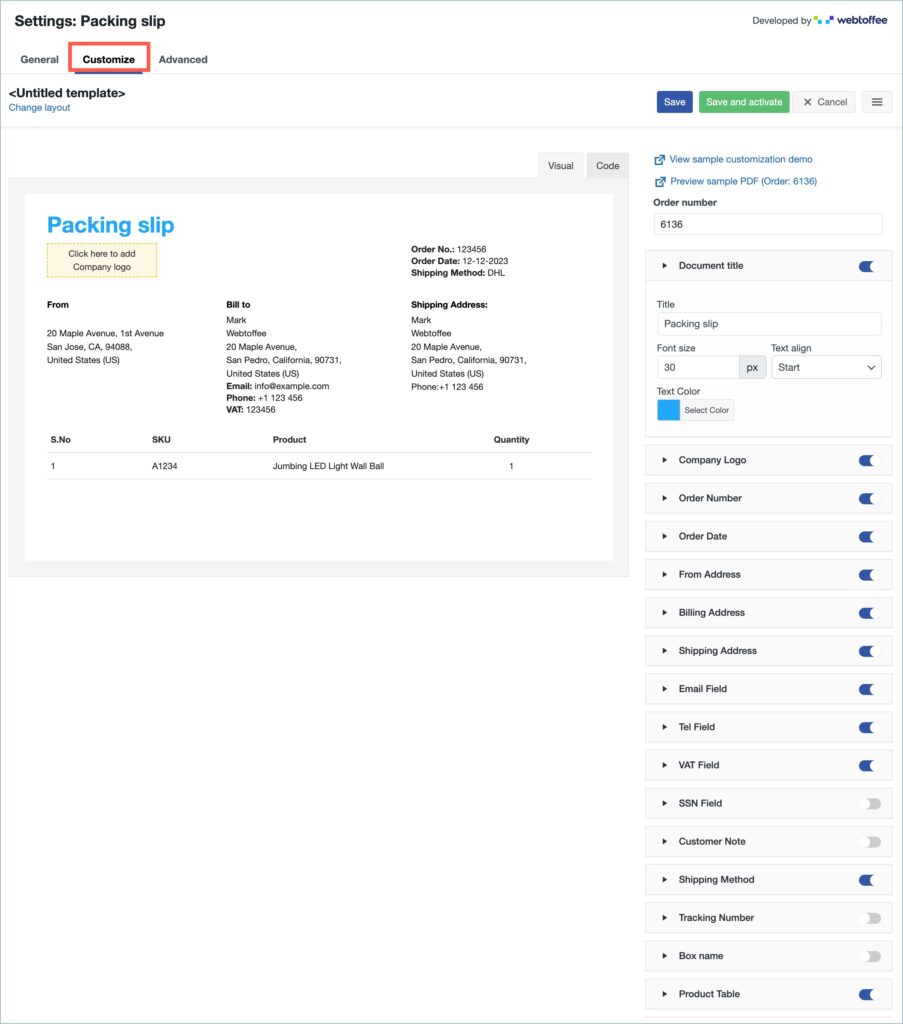
To create a new packing slip template,
Click on Change layout > Choose the template. Make necessary changes and save it.
- Select a template from the Change layout option.
- From the inbuilt templates that pop up, choose a layout.
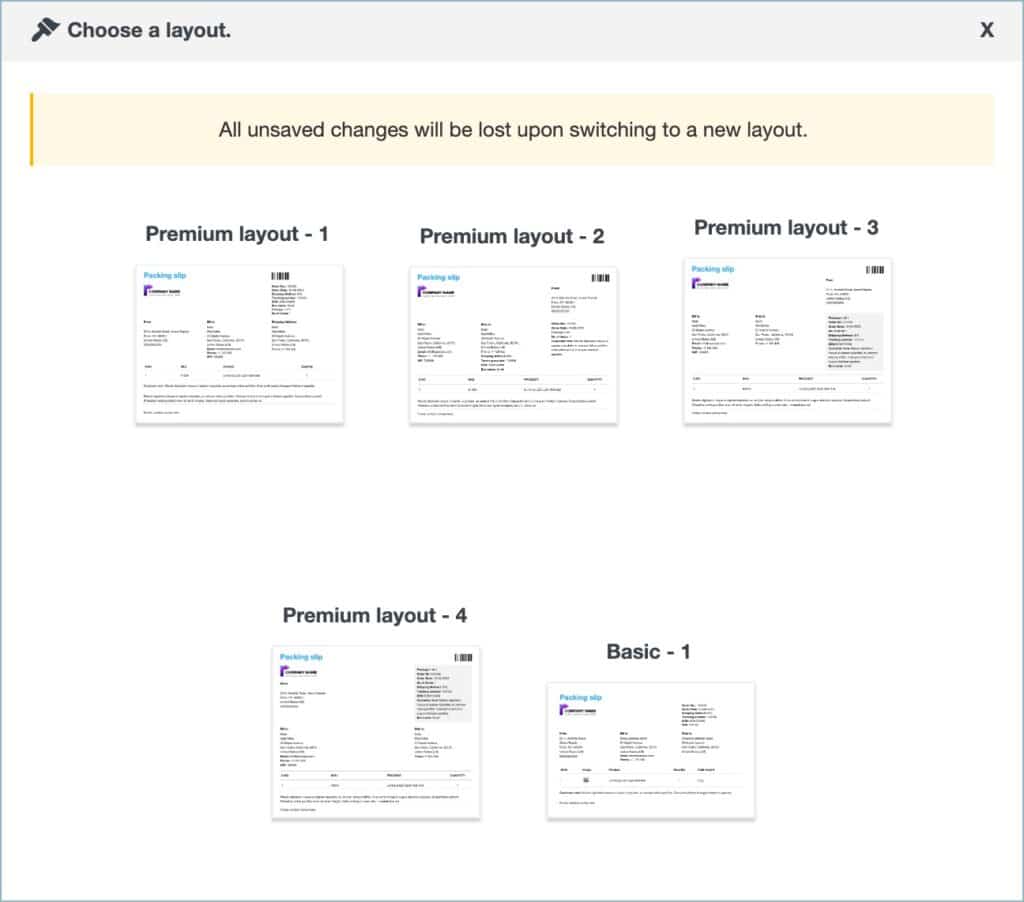
- Make the necessary modifications to the layout and save it.
- After saving, activate the template to use it further for your packing slip.
- You can even switch to the code editor, to make additional customizations other than the one listed in the visual editor.
- While making changes via code editor it would be better for you to refer to the Help Guide(Invoice/Packing > General Settings > Help Guide) which briefs about some useful ‘filters’ that can be used to extend the plugin’s functionality.
- The Template Elements on the right side of the Customize tab lists the various elements of the packing slip. Here you can enable/disable elements using their respective toggle buttons.
Advanced settings tab
This tab allows adding new product attributes and meta fields to the packing slip. The advanced tab details the following features.
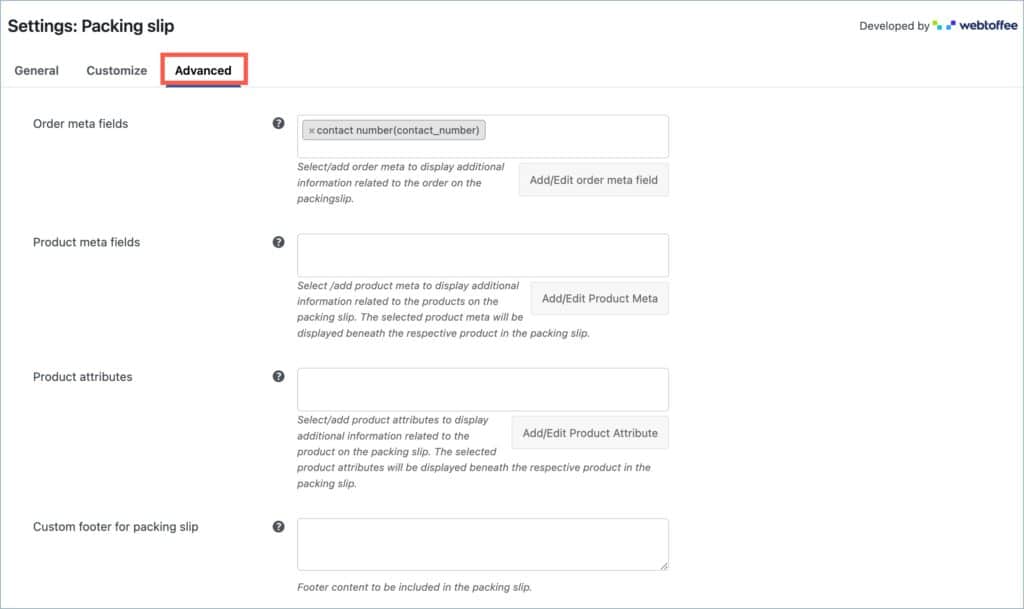
- Order meta fields – Select/add order meta to display additional information related to the order on the packingslip. Include custom order meta by clicking on the Add/ Edit order meta field. Key in the field name and meta key to include an order meta. Previously added tab lists the order meta fields added in the past.
- Product meta fields – Select /add product meta to display additional information related to the products on the packing slip. The selected product meta will be displayed beneath the respective product in the packing slip. Include custom product meta by clicking on the Add/ Edit order meta field. Key in the field name and meta key to include a product meta. Previously added tab lists the product meta fields added in the past.
- Product attributes – Select/add product attributes to display additional information related to the product on the packing slip. The selected product attributes will be displayed beneath the respective product in the packing slip. Include custom product attributes by clicking on the Add/ Edit order meta field. Key in the field name and meta key to include a product attribute. Previously added tab lists the product attributes added in the past.
- Custom footer for packing slip – Footer content to be included in the packing slip. Overrides the common footer content specified in the General settings and allows inserting content that is specific only to packing slips.
Credit note
Navigate to Invoice/Packing > Credit note to access the Credit note Settings page.
General settings tab
The General settings tab allows configuring the credit notes. The below image shows the general settings tab of the credit note.
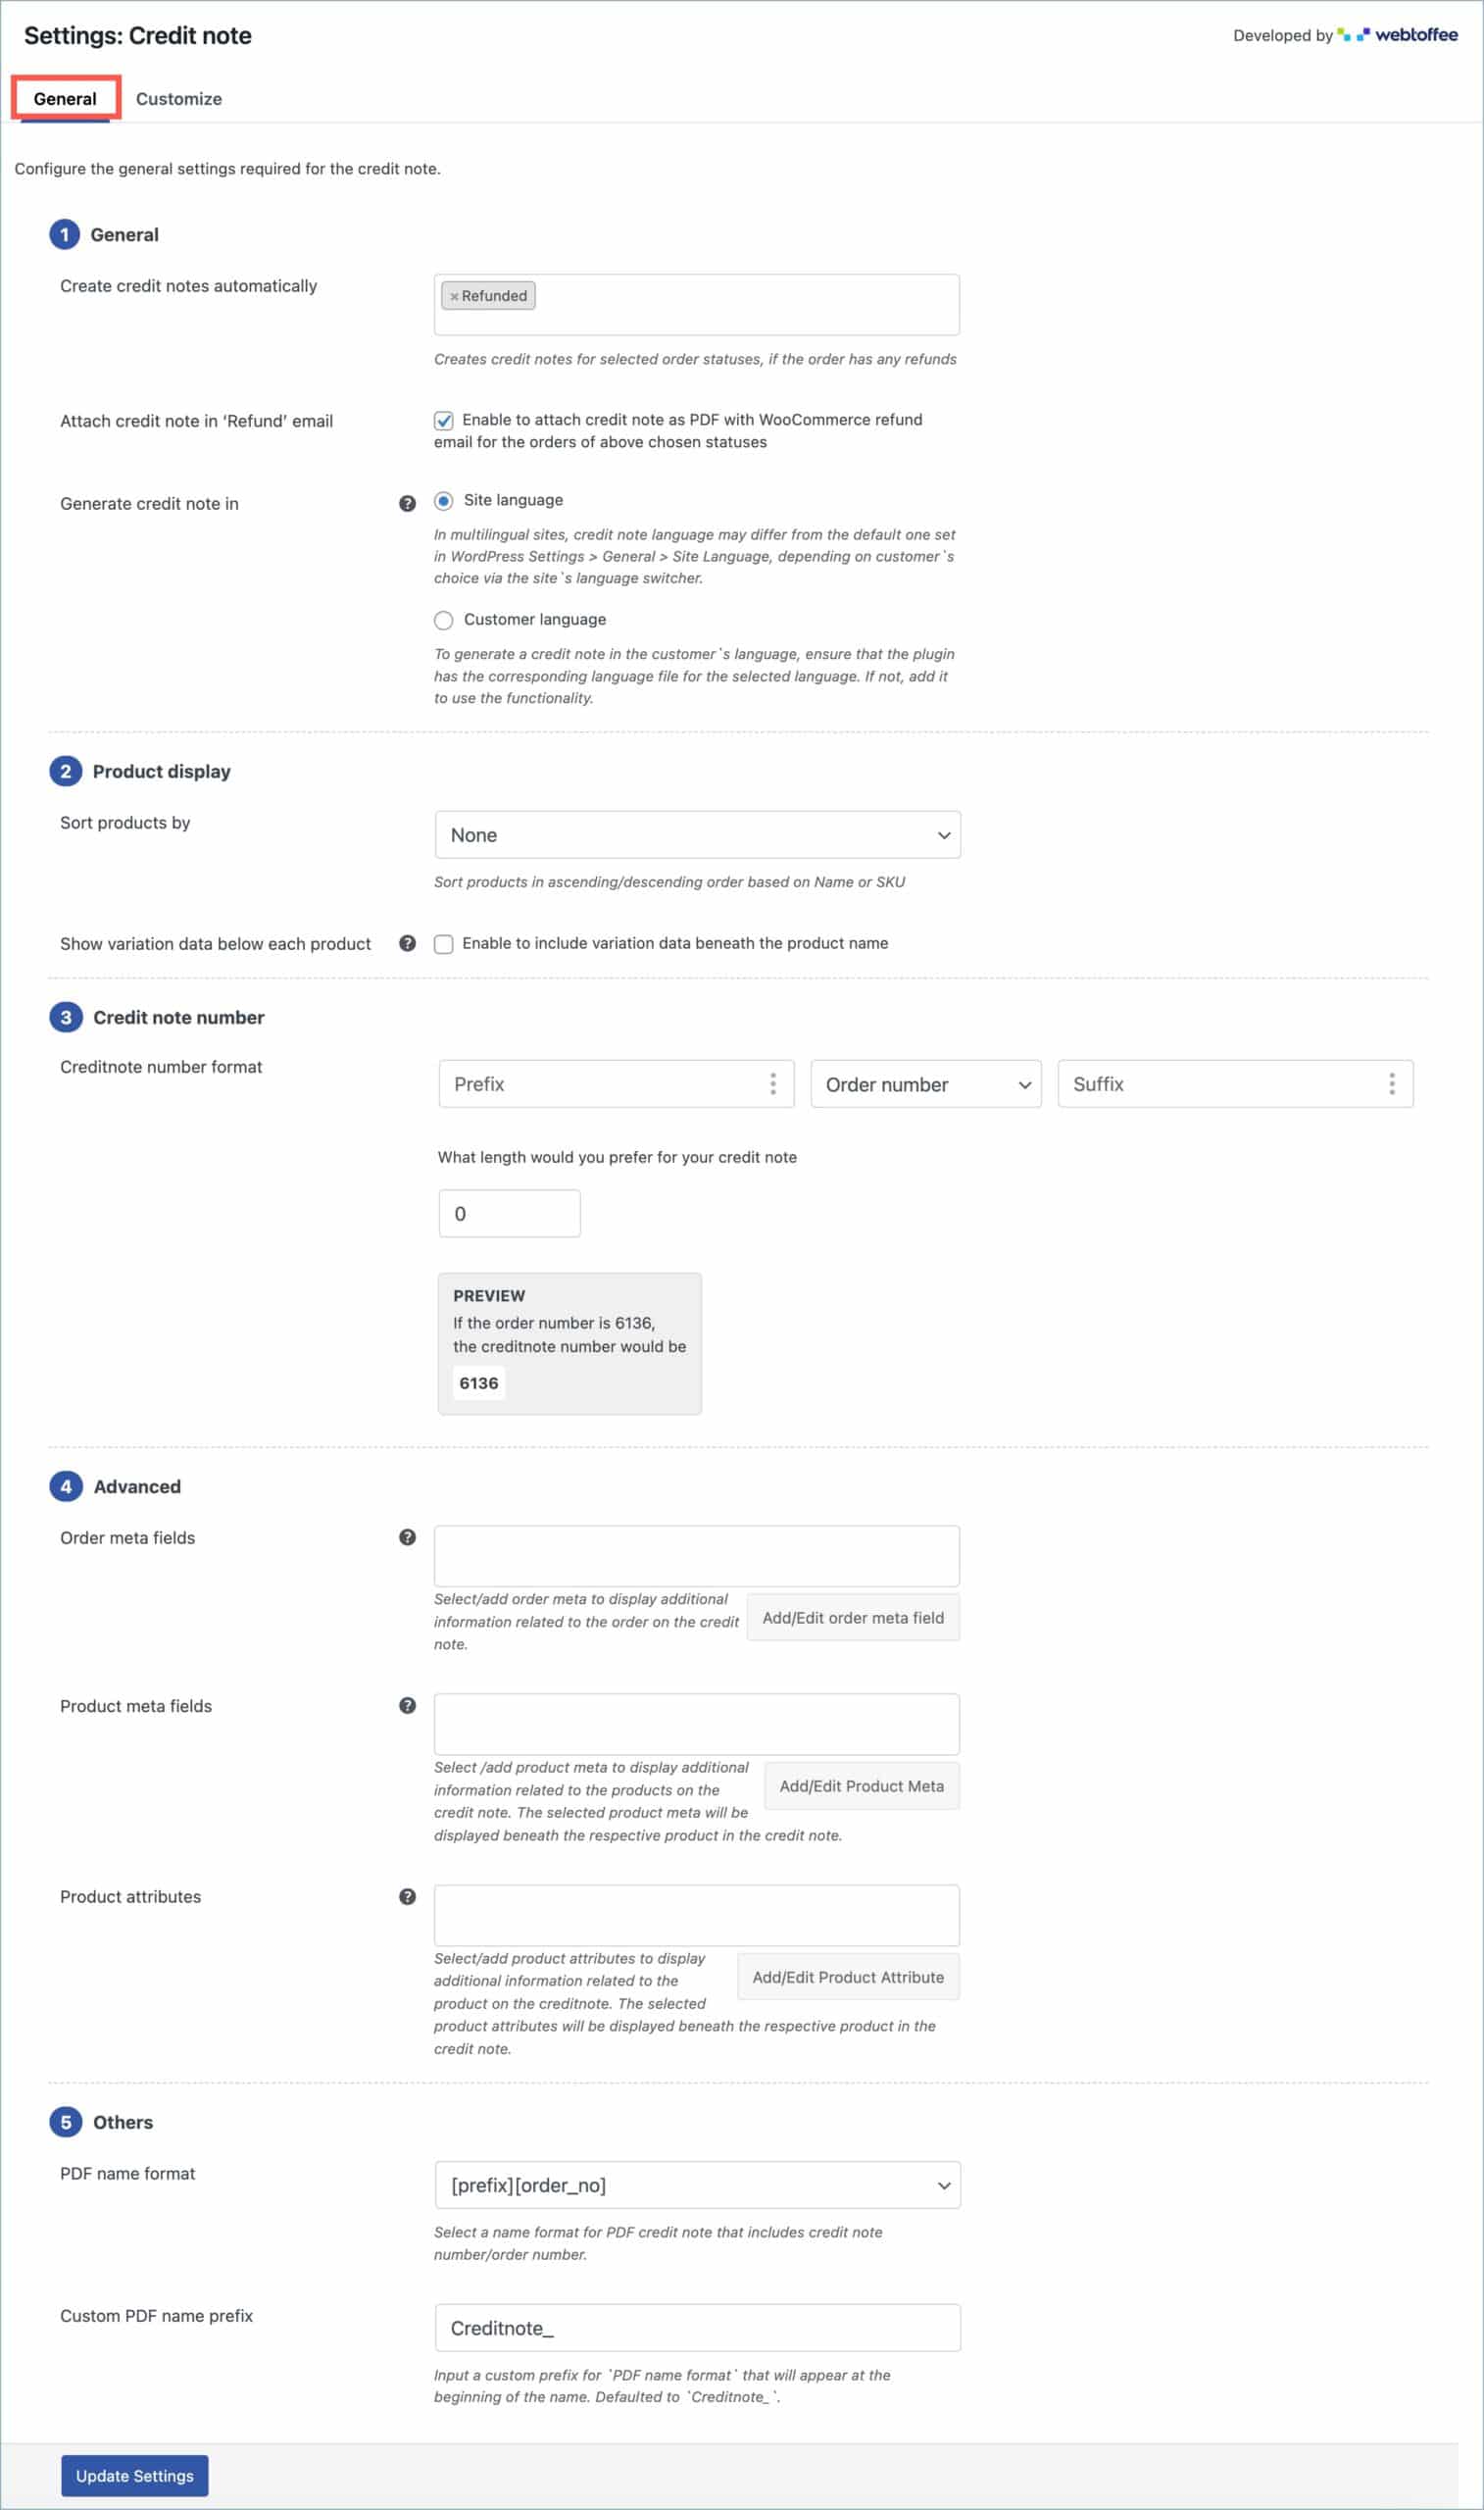
General section
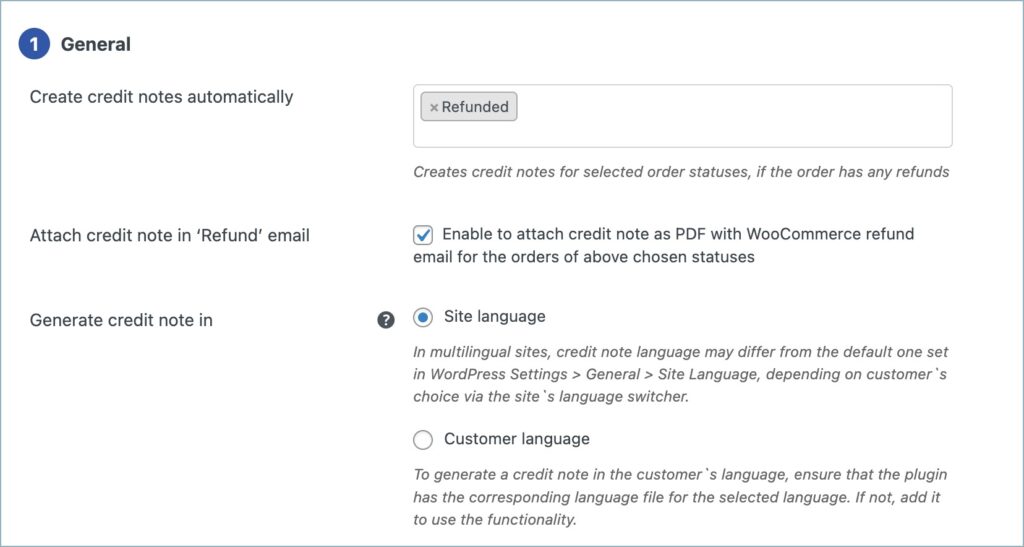
- Create credit notes automatically – Generate credit notes for selected order statuses when refunds occur for the order.
- Attach credit note in ‘Refund’ email – Enable to attach credit notes as PDFs to WooCommerce refund emails for the above selected order statuses.
- Generate credit note in – Allows store owners to select the language preference for credit note generation. Choose from the two options available:
- Site language – Site language is the one chosen under WordPress Settings > General > Site language. In multilingual sites, selecting the site language doesn’t always ensure it. The credit note may be generated in the language chosen by the customer using the language selector.
- Customer language – Generate credit notes in the language chosen by the customer on the multilingual site using the language selector.
Product display section
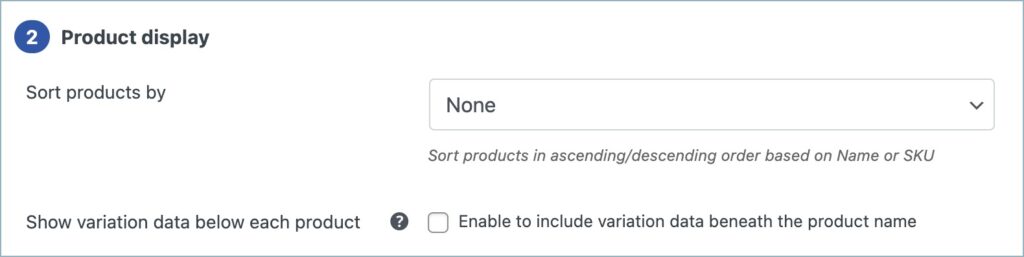
- Sort products by – Sort products in ascending/descending order based on Name or SKU.
- Show variation data below each product – Enable to include variation data beneath the product name.
Credit note number section
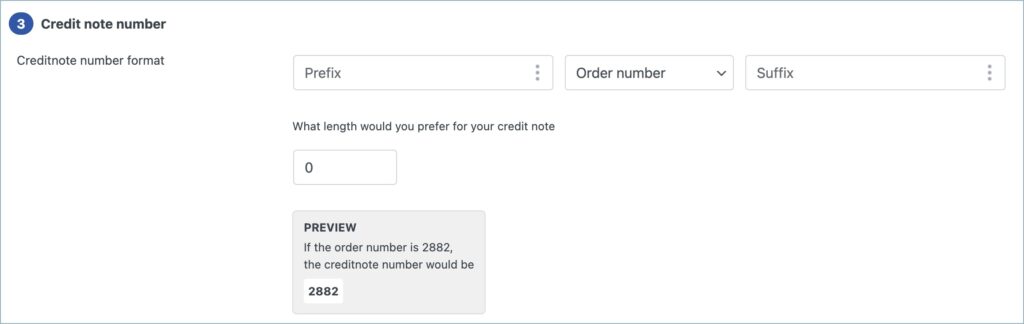
- Credit note number format – Set a credit note number format using a combination of prefixes, order number, or a custom number and suffixes.
- Prefix – You can add prefixes by clicking on the vertical three-dot menu, choosing “Choose date,” and adding your preferred prefix.
- Order number/Custom number – Choose the default order number or a custom number of your choice as the credit note number. If you choose custom number, specify the starting number for the credit note.
- Suffix – You can add suffixes by clicking on the vertical three-dot menu, choosing “Choose date,” and adding your preferred suffix.
- Credit note number length – Indicates the total length of the invoice number, excluding the length of prefix and suffix if added.

Advanced section
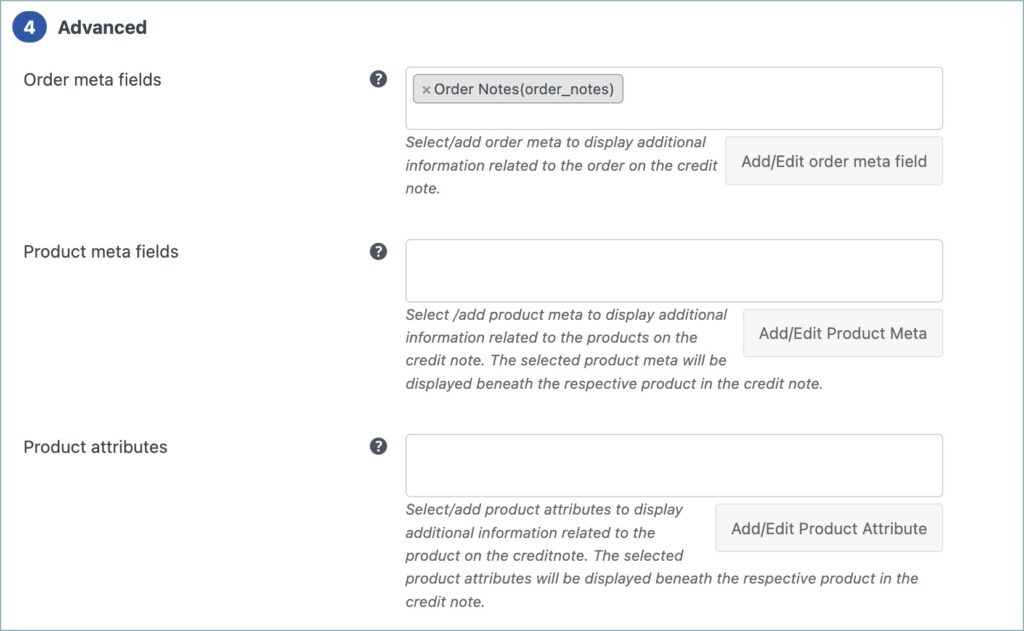
- Order meta fields – Select/add order meta to display additional information related to the order on the credit note. Include custom order meta by clicking on the Add/ Edit order meta field. Key in the field name and meta key to include an order meta. Previously added tab lists the order meta fields added in the past.
- Product meta fields – Select /add product meta to display additional information related to the products on the packing slip. Include custom product meta by clicking on the Add/ Edit order meta field. Key in the field name and meta key to include a product meta. Previously added tab lists the product meta fields added in the past.
- Product attributes – Select/add product attributes to display additional information related to the product on the packing slip. Include custom product attributes by clicking on the Add/ Edit order meta field. Key in the field name and meta key to include a product attribute. Previously added tab lists the product attributes added in the past.
Others
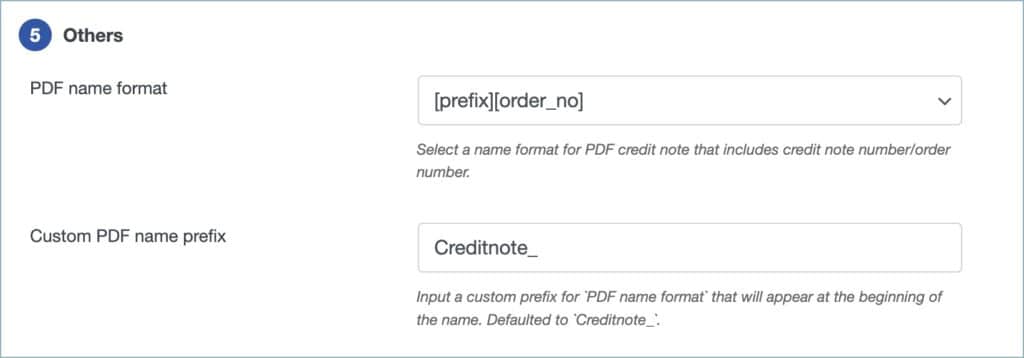
PDF name format – Select a PDF name format for credit notes consisting of a prefix and the order number or the credit note number.
Custom PDF name prefix – Enter a preferred prefix for the credit note PDF name. Defaulted to ‘Creditnote_‘.
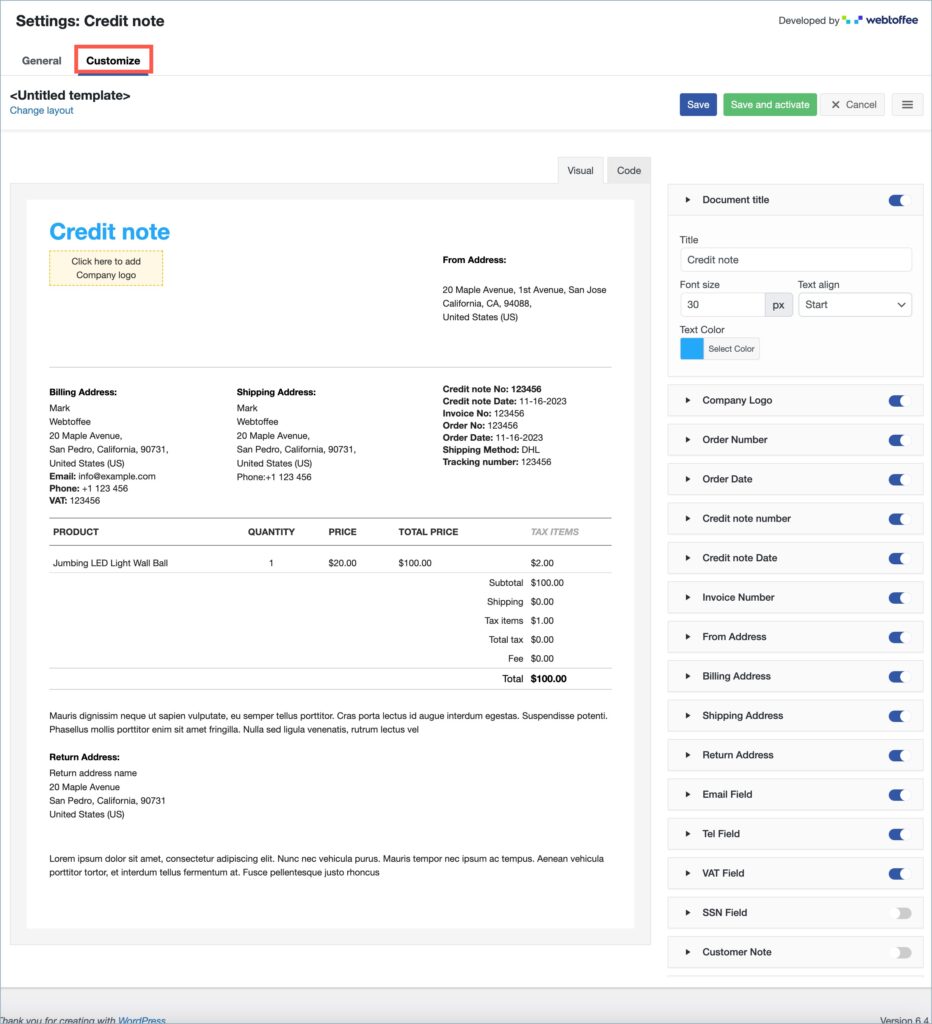
Customize tab
You can customize the credit note using the inbuilt templates and modify them to suit your needs.
To create a new Invoice template,
Click on Change layout > Choose the template. Make necessary changes and save it.
- Select a template from the Change layout option.
- From the inbuilt templates that pop up, choose a layout.
- Make the necessary modifications to the layout and save it.
- After saving, activate the template to use it further for your credit note.
- You can even switch to the code editor, to make additional customizations other than the one listed in the visual editor.
- While making changes via code editor it would be better for you to refer to the Help Guide(Invoice/Packing > General Settings > Help Guide) which briefs about some useful ‘filters’ that can be used to extend the plugin’s functionality.
- The Template Elements on the right side of the Customize tab lists the various elements of the credit note. Here you can enable/disable elements using their respective toggle buttons.
Bulk print shipping documents
You can print the shipping documents for a specific order by clicking either the common print button or the dedicated print buttons(enable it from Invoice/Packing > General Settings > General) in the Actions column on the orders listing page. While using the common print button, select the print option corresponding to the document type. To print shipping documents for multiple orders, select the orders from the WooCommerce orders listing page and print documents via Bulk Actions.
Tom
February 11, 2024
Hi,
Is it possible to generate a credit note using an API?
Thanks
Tom
Sanjai Valsan
February 13, 2024
Hi Tom,
Thank you for reaching out,
Unfortunately, the current version of the plugin does not support the generation of credit notes using an API.
George
May 24, 2023
Hi. Can the pay via invoice payment method be used for GUESTS to your store as well or must a customer be logged in to use the functionality. Kind regards. George.
Hema
May 26, 2023
Hello George,
Thanks for reaching out.
The Guest users can’t pay via the link in the PDF. The link will redirect them to the WooCommerce Checkout page and prompt them to login.
Rahela Loncaric
May 2, 2023
Hi,
is it possible to change / edit Invoice which is already sent to customer?
For example – customer forgot to input business info, so Invoice must be edit and resend.
thanks,
best regards
Hema
May 9, 2023
Hello Rahela,
Thanks for reaching out. The Invoice can be edited if the customer has access to the orders edit page.
After editing the invoices can be sent manually from the orders edit page. From the orders action section, choose the action as Email invoice / order details to customer and click on Update.