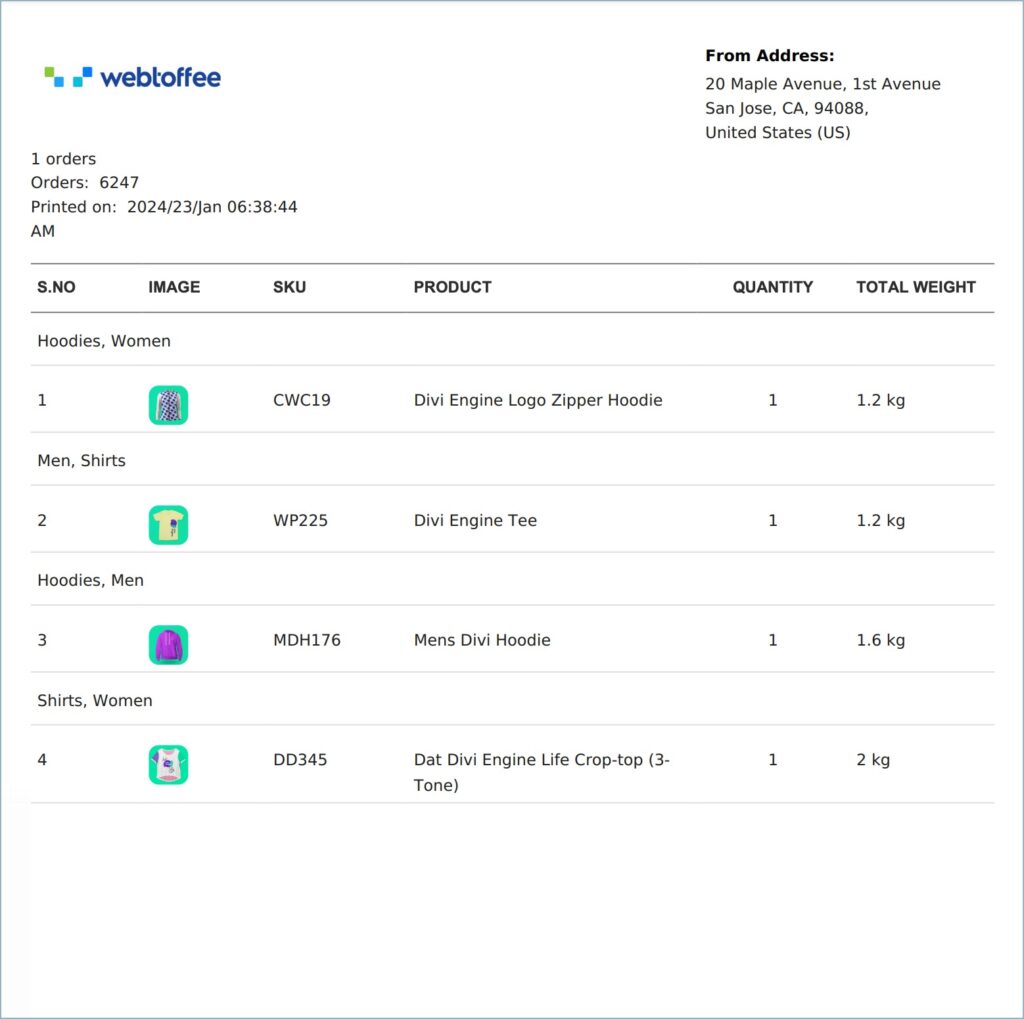
Packers of your store use the picklist to get the entire list of products for a selected order. WooCommerce Picklist plugin allows you to print, download and customize this picklist document for your store. This plugin is an add-on to the WooCommerce PDF Invoice, Packing slips, Delivery Notes, and shipping label (free) plugin. The plugin created the below sample picklist.
This article explains how the WooCommerce Picklist plugin can be setup to manage orders in an e-commerce store.
Features of the plugin
- Adds Picklist automatically to email for set order statues.
- Allows to group products on a picklist.
- Allows adding variation data to a picklist.
- Allows excluding virtual items and backorder items from a picklist.
- Allows selecting language preference for generating picklist.
Prerequisite
This plugin is a premium add-on to the WooCommerce PDF Invoice, Packing Slips, Delivery Notes, and Shipping Label (free) plugin.
- Install the free WooCommerce PDF Invoice, Packing Slips, Delivery Notes, and Shipping Label plugin.
Getting started
- Firstly, install and activate the plugin.
- From the WordPress dashboard, go to
- Invoice/Packing > Picklist.
OR - Invoice/Packing > General Settings > Documents tab > Picklist Settings.
- Invoice/Packing > Picklist.
- Installing the Picklist add-on will add an Advanced tab to the General Settings page of the free plugin.
Advanced tab of General Settings
You can access the Advanced tab by navigating to Invoice/Packing > General Settings > Advanced. The Advanced tab of the General Settings will look like this:
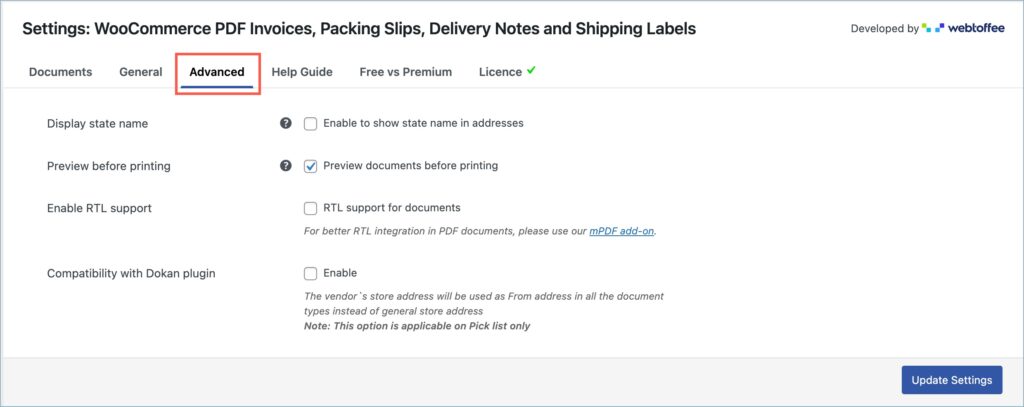
The following are the features offered by the Advanced tab:
- Display state name – Enable to replace the state code with the state name in all address types. When enabled, the state code will be shown on the documents instead of the state name in all address types.
- Preview before printing – Enabling this option will show a preview of the document before actually printing it.
- Enable RTL support – Enable to provide RTL support for documents. Use WebToffee’s mPDF add-on for better RTL integration.
- Compatibility with Dokan plugin – Enable to use the vendor’s store address specified in the Dokan multi-vendor plugin as the From address in picklist.
General Settings
Navigate to Invoice/Packing > Picklist to access the picklist settings.
The General tab elaborates the general settings pertaining to the picklist. The general settings tab lists the features in 3 sections. They are,
- General
- Product display
- Advanced
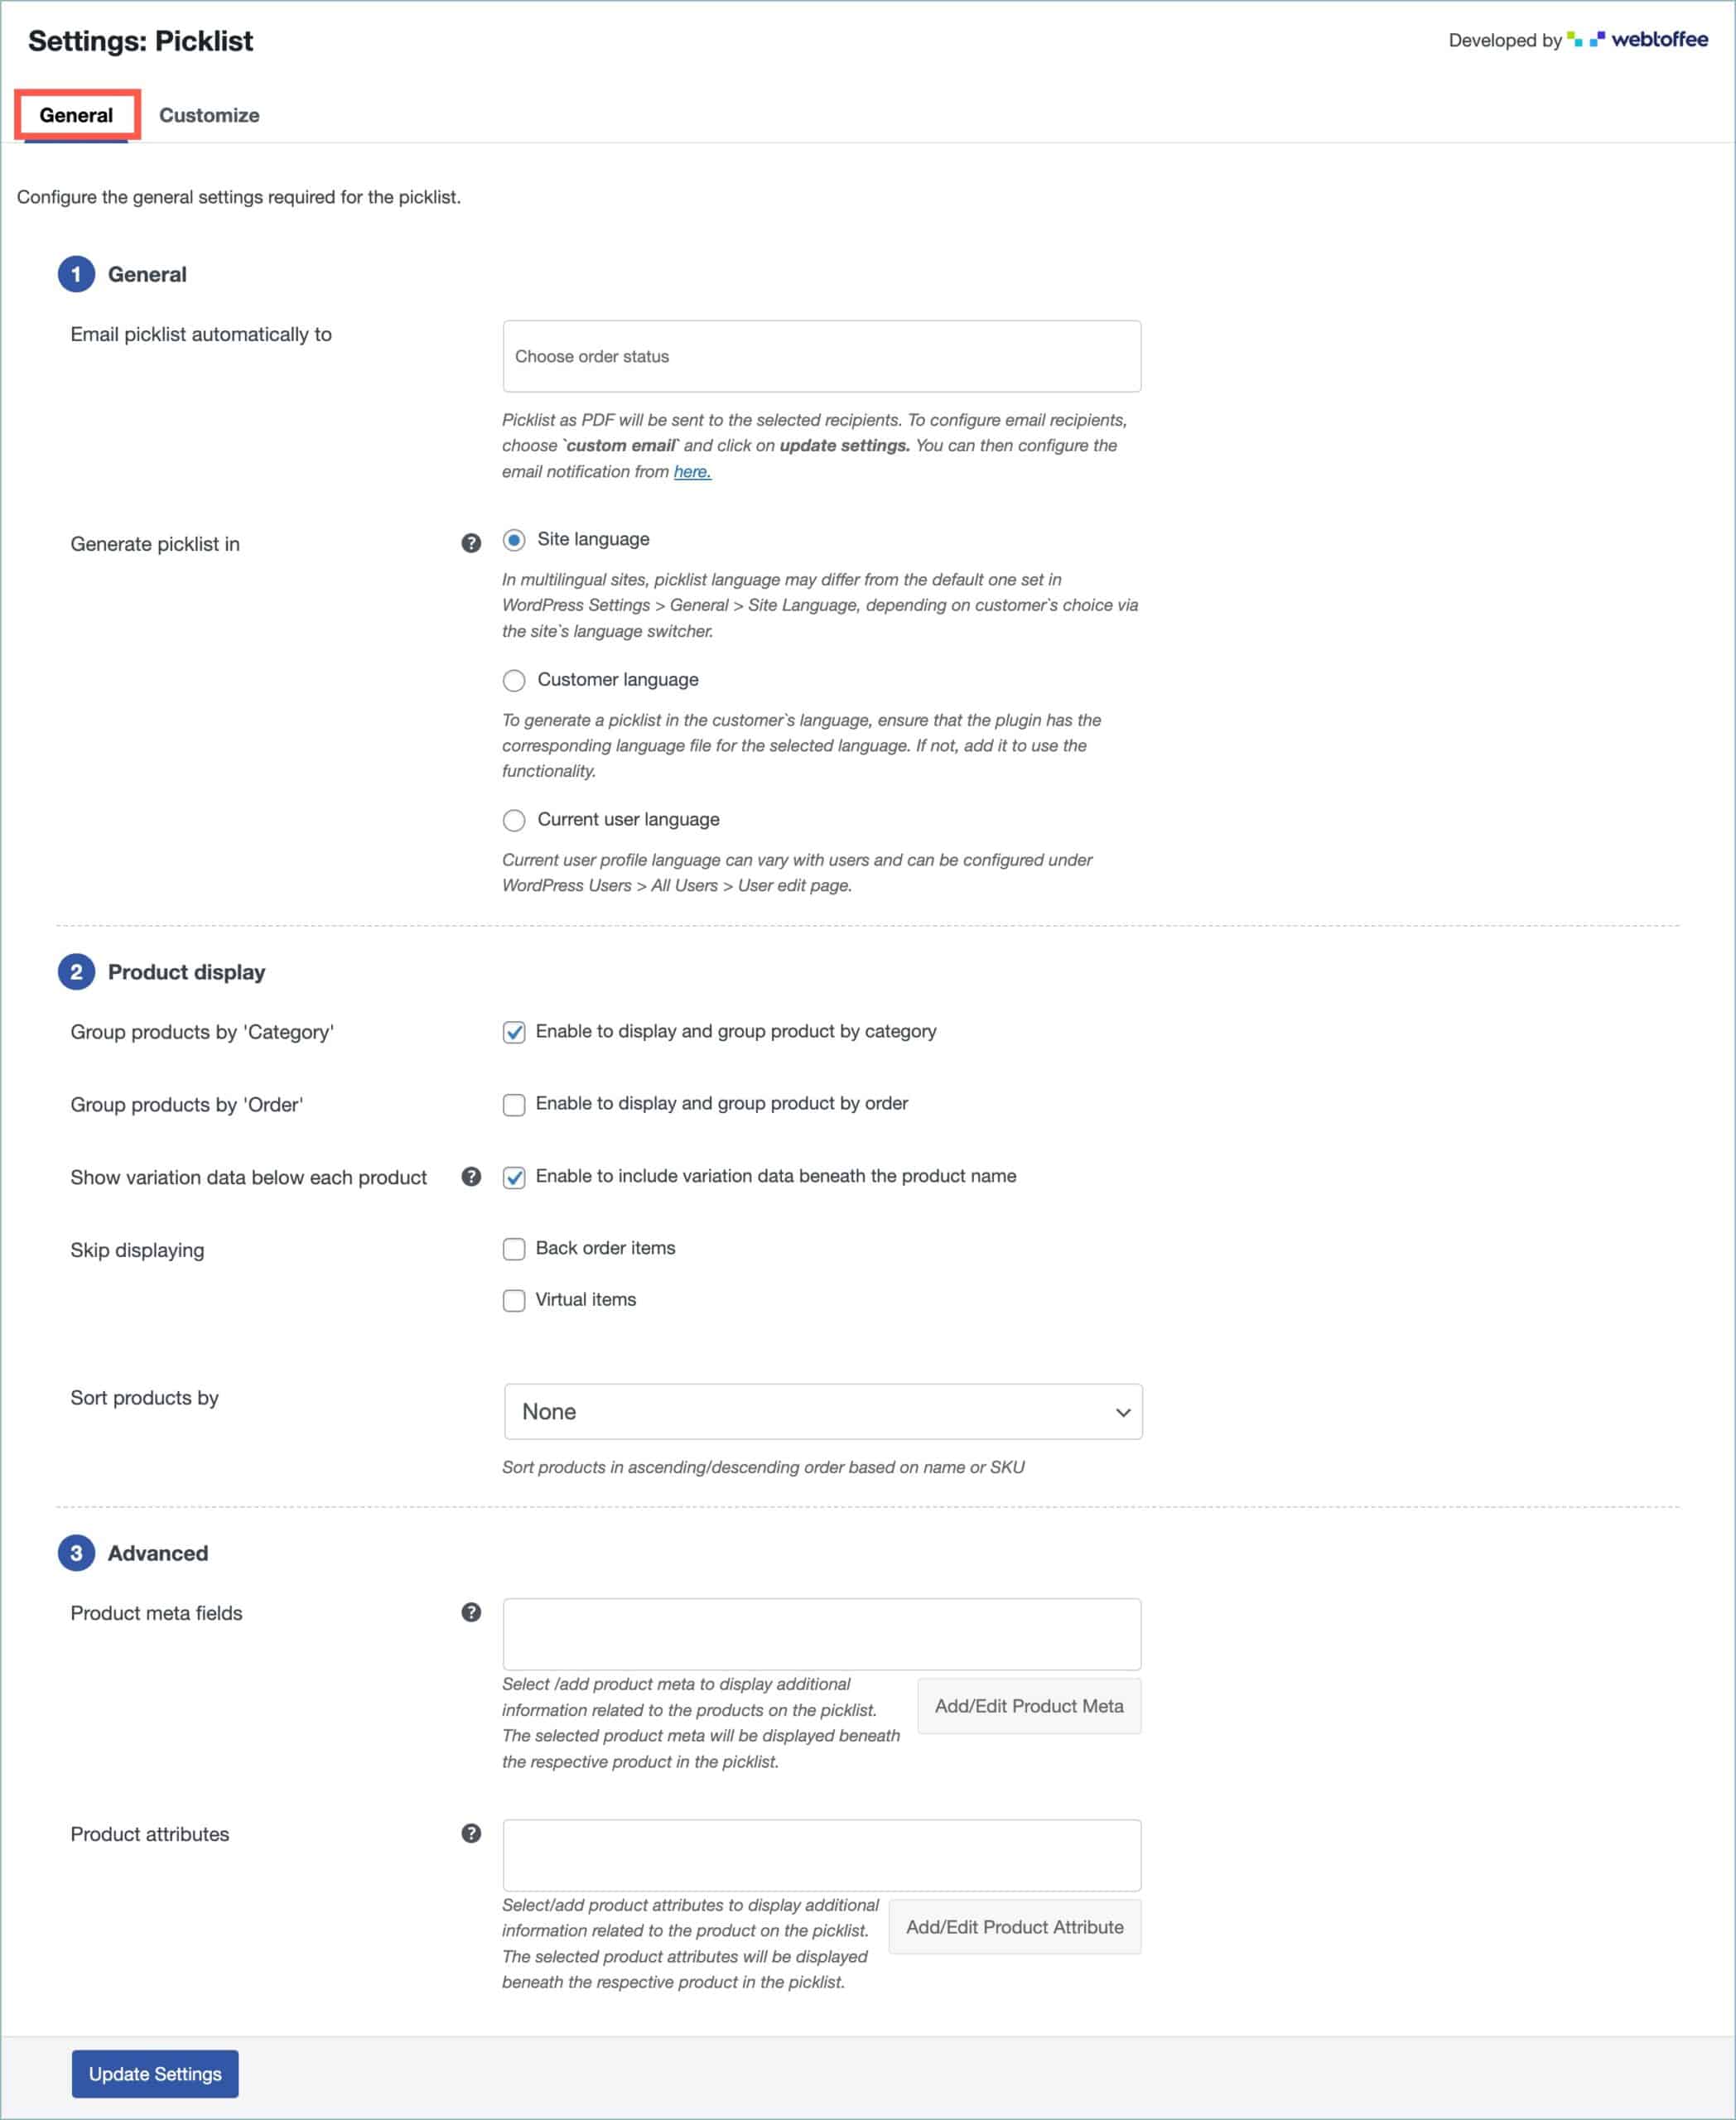
General Section
This section elaborates the following features.

- Email picklist automatically to – Picklist as PDF will be sent for the selected order statuses. To configure custom email recipients, choose `custom email` and click on update settings. You can then configure the email notification from WooCommerce > Settings > Emails.
- Generate picklist in: Choose a language preference for generating picklist.
Product display section
This section allows us to customize the products on the picklist. The product display section elaborates the following features.
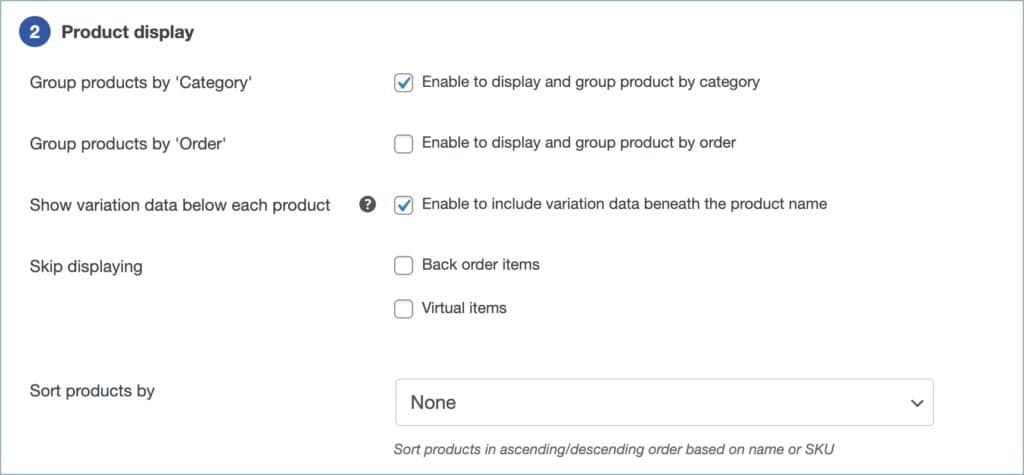
- Group products by category – Enable to group picklist by category. This is applicable only when the option Packaging Type is set to “Single package per order”, configurable through Invoice/Packing → General settings→Advanced.
- Group products by order – Enable to group picklist by order. Applicable only when the option Packaging Type is set to “Single package per order”, configurable through Invoice/Packing → General settings→Advanced.
- Show variation data below each product – Enable to include variation data in the product table of the picklist. The variation data will be included below the product name.
- Skip displaying – Enable to exclude non-shippable and/or backorder items from the picklist.
- Sort products by – Sort products in ascending/ descending order based on Name or SKU.
Advanced section
The following options are configurable through the Advanced section.
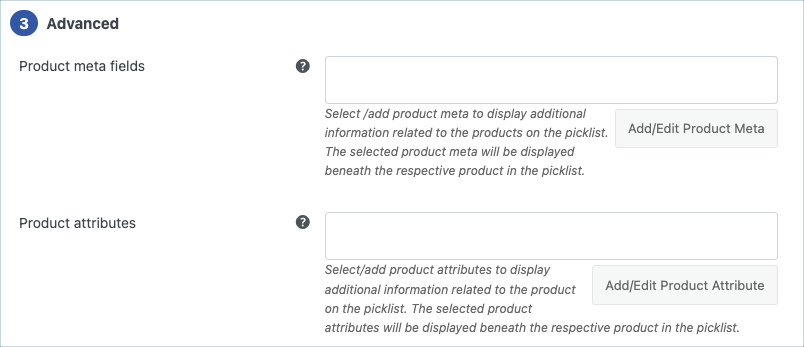
- Product meta fields: Select /add product meta to display additional information related to the products on the picklist. The selected product meta will be displayed beneath the respective product in the picklist. Include custom product meta by clicking on the Add/ Edit order meta field. Key in the field name and meta key to include a product meta. Previously added tab lists the product meta fields added in the past. Get the order meta keys from the custom field section of the WooCommerce Order page.
- Product attributes: Select/add product attributes to display additional information related to the product on the picklist. The selected product attributes will be displayed beneath the respective product in the picklist. Include custom product attributes by clicking on the Add/ Edit order meta field. Key in the field name and meta key to include a product attribute. Previously added tab lists the product attributes added in the past.
Finally, click on the Update Settings button.
Customize tab
You can customize the picklist using the inbuilt templates and modify them to suit your needs.
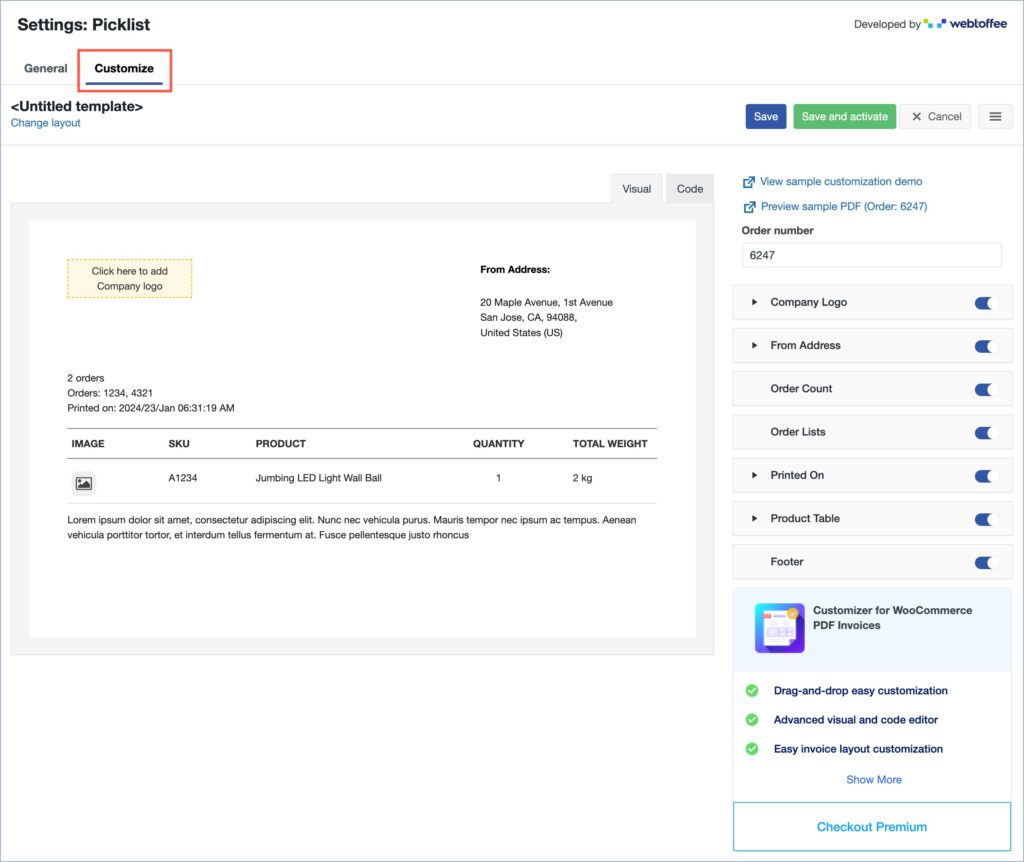
- Toggle buttons are incorporated in the customize tab to enable or disable an item from the pick list template. You can modify the current layout by changing the different attributes like font color, style, format, etc. provided under each property.
- You can even switch to the code editor, to make additional customizations other than the one listed in the visual editor.
- While making changes via code editor, it would be better for you to refer to the Help Guide(Invoice/Packing > General Settings > Help Guide) which briefs about some useful ‘filters’ that can be used to extend the plugin’s functionality.
- Make the necessary modifications to the layout and save it by giving the document a name.
- If there are no templates saved, Then the saved template will be activated automatically.
- When there are multiple temples saved already, You need to select the appropriate template from My template that needs to be activated.
Bulk print Picklist
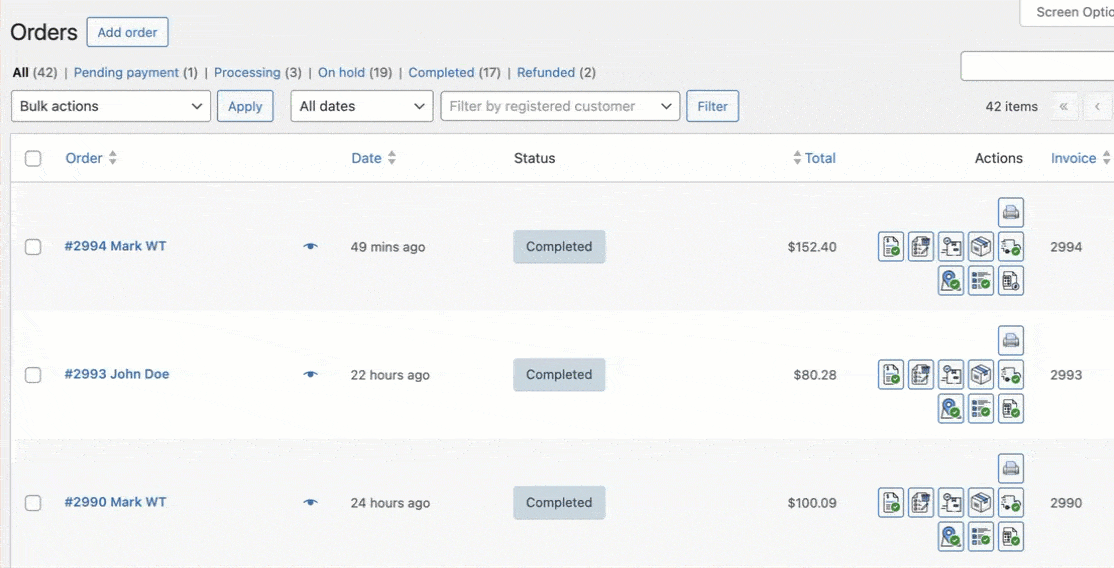
You can print the picklist for a given order by clicking on the Print icon or the dedicated print button (enable it from Invoice/Packing > General Settings > General) in the Actions column from the orders listing page. Select Print Picklist while using the print icon. To print picklist for multiple orders, select multiple orders from the WooCommerce orders page and print them via Bulk Actions.
Comments (2)
Toby
March 21, 2024
Quick question. One of the things about a picklist is knowing where in a warehouse to find something. How do you recommend handling the physical location of a product?
Sanjai Valsan
March 22, 2024
Hi Toby,
Thanks for reaching out!
While our plugin excels at generating picklists for orders, it doesn’t directly manage the physical location of products within the warehouse.