In the ever-changing field of digital marketing, integrating social media platforms has become critical for businesses looking to grow their online presence. The WooCommerce Product Feed plugin will assist you in generating WooCommerce product feeds for popular sales channels and syncing product catalogs for Facebook and Instagram.
Features offered
- Meta(Facebook/Instagram) sync
- Facebook Dynamic ads
- WPML compatibility for multi-language and multi-currency
- Custom feed refresh intervals
- Powerful filters for product filtering:
- Exclude product categories
- Only include specific product categories
- Exclude products
- Only include default variation
- Exclude out-of-stock products
- Advanced filter that enables users to filter products by any product fields
- Easily generate product feeds for the supported channels.
Supported channels
- Custom feed
- Facebook /Instagram Catalog
- Google Shop
- Google Local Product Inventory
- Google Promotions
- Google Product Reviews
- Buy on Google
- Bing Shop
- Leguide Shop
- Pinterest Shop
- TikTok ads
- Snapchat Shop
- Idealo Shop
- PriceSpy Shop
- Skroutz Shop
- Shopzilla Shop
- Bizrate Shop
- Become Shop
- Price grabber Shop
Getting Started
Refer to the Installation guide to learn about the installation process of the plugin. On successful installation and activation, the WebToffee Product Feed menu will appear on the admin dashboard as shown.
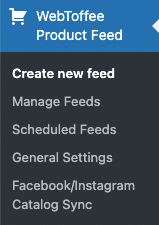
The plugin has five sub-menus:
- Create new feed – Create new product feeds for various sales channels.
- Manage Feeds – Manage the existing feeds.
- Scheduled Feeds – This section lists all the scheduled processes.
- General Settings – Manage all the basic configurations and licence activation.
- Facebook/Instagram Catalog Sync -This section helps to get connected to the Facebook/Instargram business center and perform catalog syncronisation.
Let us have a look at each of these in detail.
Create new feed
This page allows you to configure a new product feed in four steps and they are:
- Creating new feed
- Attribute mapping
- Category mapping
- Generating feed
Step 1: Create a new feed
In this step, the user can create a new feed for the required channel.
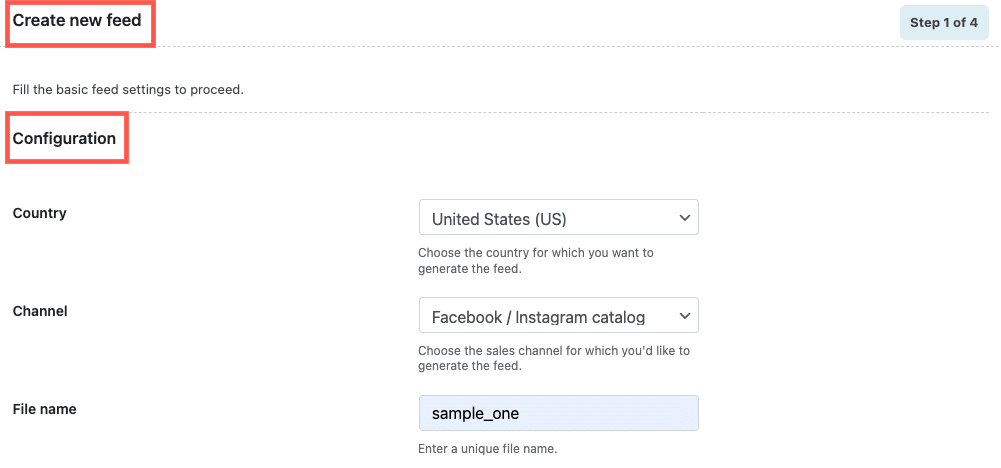
Configuration
Under Configuration, the basic feed settings are configured as shown.
- Country – Allows choosing a country for the feed.
- Channel – Allows users to create feeds based on channel. Different channels will have different requirements in terms of product data, structure, etc. The available options are listed here. The above-added image shows configurable options in step 1 with the channel as Facebook /Instagram catalog.
- File name – Specify a unique name for the feed.
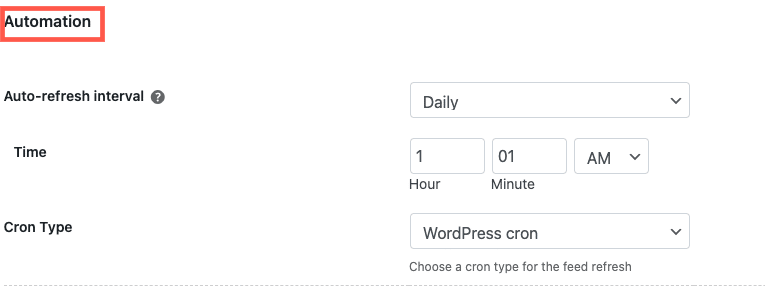
Automation
- Under Automation, you are provided with options to refresh the created feed in a selected interval of time.
- Auto-refresh interval: The feed will be refreshed automatically after the set interval. Choose from available options to enable automatic feed refresh.
- Daily: Automatically refresh the feed every 24 hours. You can specify the time as required.
- Weekly: Automatically refresh the feed every 7 days. Here, you can specify the day and time as required.
- Monthly: Automatically refresh the feed every 30 days. Specify the day of the month as required.
- Hourly: Automatically refresh the feed after the specified hours.
- Every 30 minutes: Automatically refresh the feed in every 30 minutes.
- Every 6 hours: Automatically refresh the feed in every 6 hours.
- Every 12 hours: Automatically refresh the feed in every 12 hours.
- No Refresh: No automatic feed refresh. You will have to refresh the feed manually.
- Cron Type: Choose among WordPress cron and server cron. Server cron is mostly beneficial for users who depend on managed hosting.
- Auto-refresh interval: The feed will be refreshed automatically after the set interval. Choose from available options to enable automatic feed refresh.
Filtering

The Filtering section is used for including or excluding store products from feed based on several criteria. The available options are:
- Categories – Choose category filter between Include and Exclude and specify the category to create feed based on product categories.
- Include – Feed will be created for only the selected categories.
- Exclude – Feed won’t be created for the selected categories.
- Tags: Choose tag filter between Include and Exclude and specify the tag to create feed based on product tags.
- Include – Feed will be created for only the selected tags.
- Exclude – Feed won’t be created for the selected tags.
- Exclude products – Excludes specific products from feed. Search and add one or more products to be excluded from the feed.
- Exclude out of stock products: Enable to exclude out-of-stock products from feed.
- Product variations – Select among All variations, Default variation and Lowest priced variation.
- Product types – Use to include specific product types (simple, variable, grouped, external, simple subscription, variable subscription, variations) in the feed. If you leave it empty all product types will be included in the feed.
Advanced Filtering
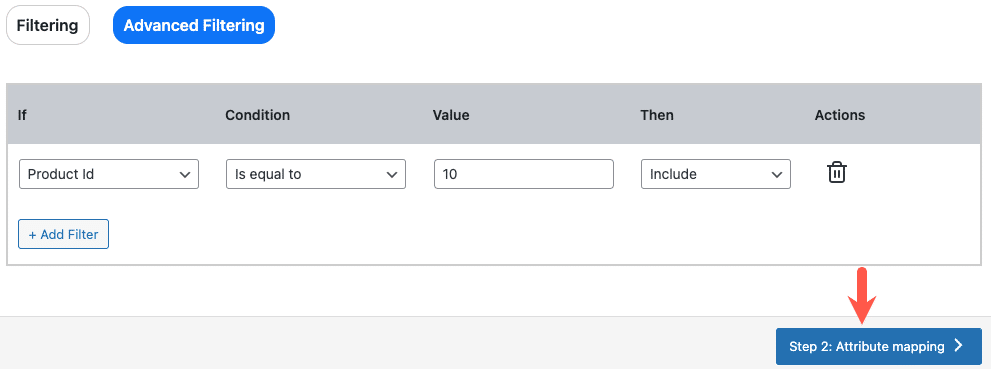
Under Advanced Filtering, specify the conditions as required. Advanced filtering allows users to filter products by any WooCommerce fields. There is an option to delete a particular field. Click on Add Filter to add more. The above added images shows creating feed having product ID 10.
Once all the basic feed settings are done, click on Step 2: Attribute mapping.
Step 2: Attribute mapping
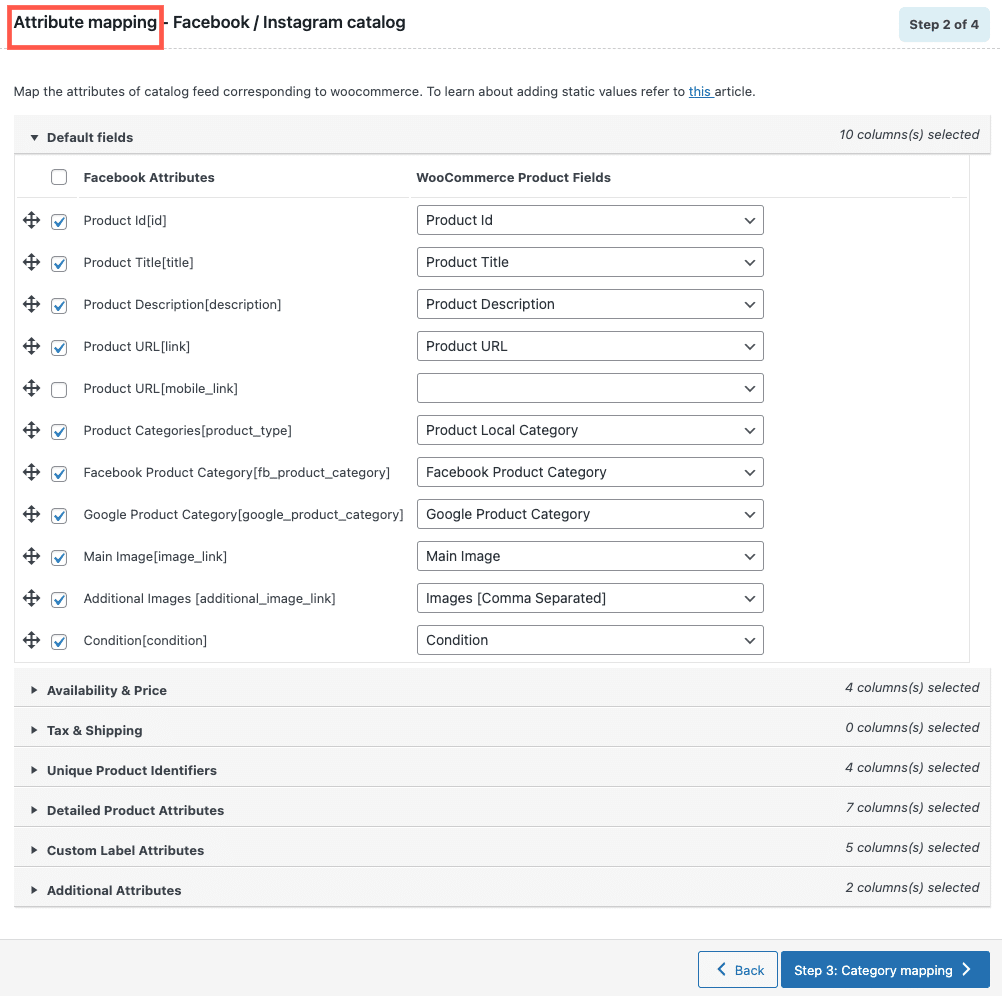
All available attribute fields of the selected channel are listed here and are mapped to the corresponding WooCommerce Product fields by default. If any fields need to be remapped, store owners can do the same from here.
Once the attributes are mapped, click on Step 3: Category mapping.
Step 3: Category mapping
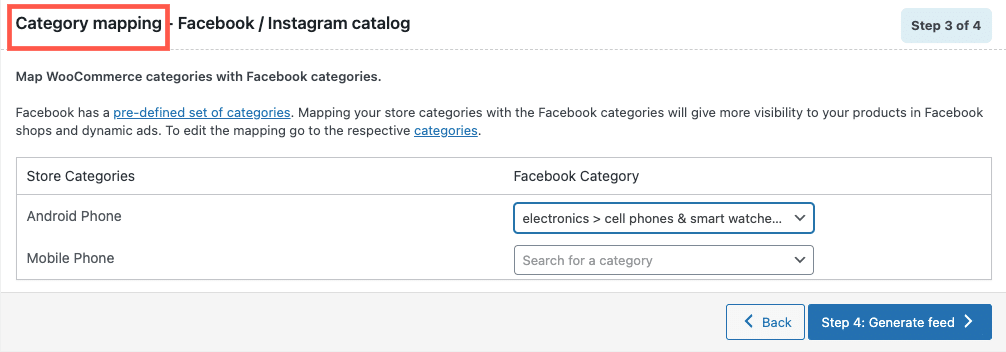
This section enables to map of the selected channel category with the WooCommerce store categories. This is a one-time process as the preferences will be saved for future feed generation as well. Whenever the plugin identifies a new category for mapping, it will be notified in the mapping section for you to map.
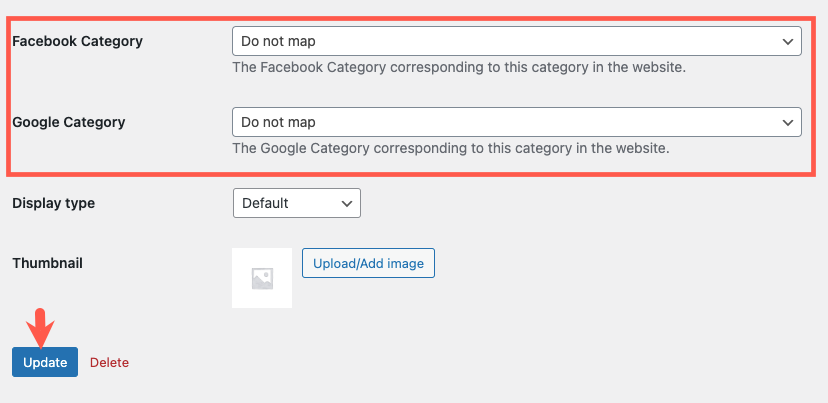
Edit category mapping
For editing a previously mapped category, navigate to Products > Categories section within WooCommerce. Click on Edit under the category name.

Make the required changes under Facebook and Google category. Click on Update to save.
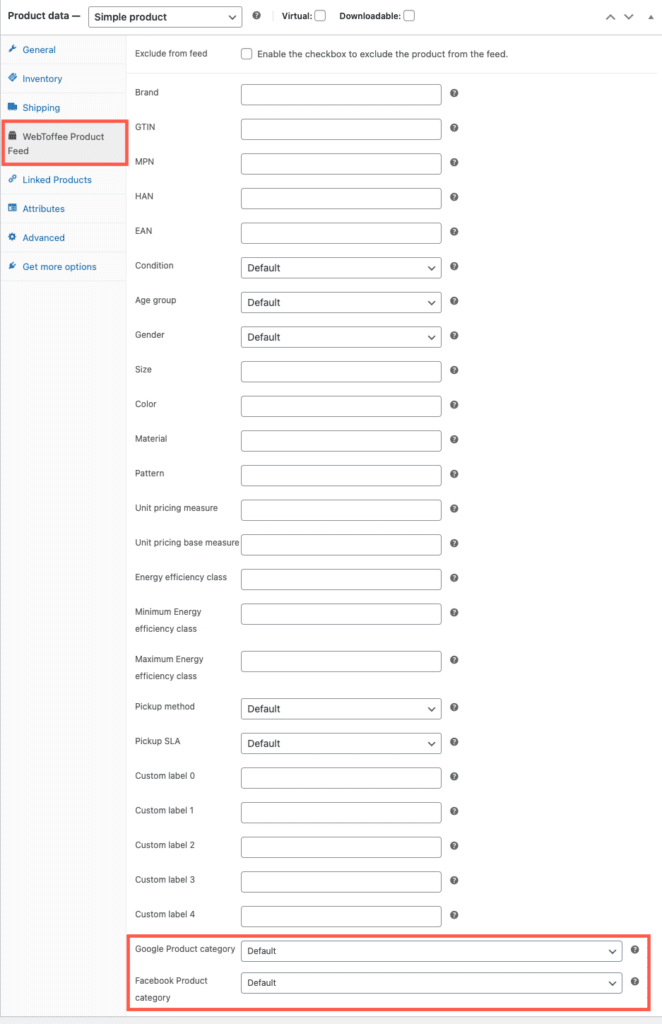
Categories can be mapped at product level by navigating to the respective product’s edit page. Click on Update to save the changes.
Once the categories are mapped, click on Step 4: Generate feed.
Step 4: Generate feed
This is the final step in creating the feed.
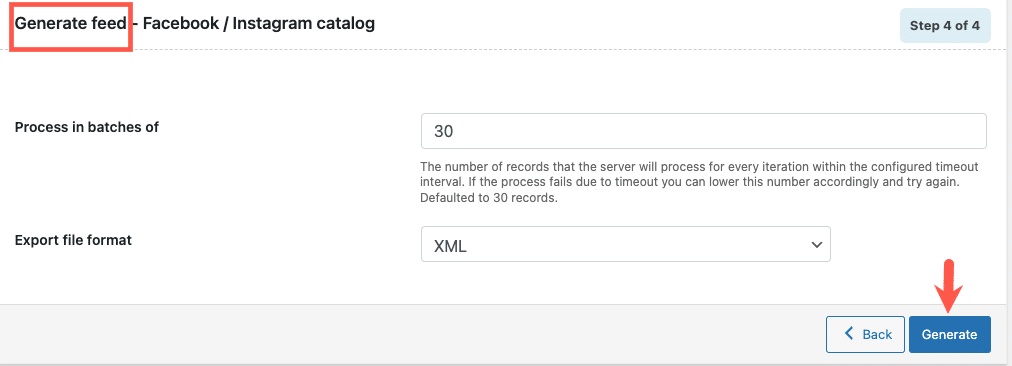
The image shows the final step configurations which generate the feed. Here we specify:
- Process in batches of – Sets the number of products to be processed at each iteration while generating the feed.
- Export file format – Supported formats are CSV/ XML, XLSX, and TXT.
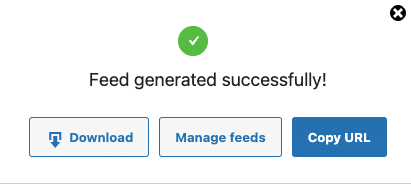
Click on Generate to finish. On successful feed generation, a pop-up will appear as shown below.
Manage Feeds
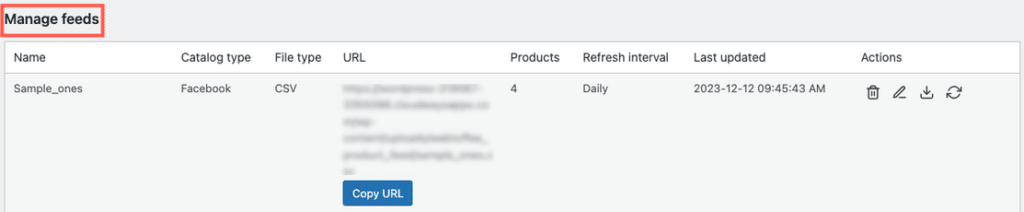
This page allows store owners to manage the existing feed and offer several other options.
- Copy URL – The URL point to the product feed created. This can be copied and pasted into the Facebook or Google business account to establish the feed.
- Refresh – This option allows refreshing the feed manually. If the intervals don’t match users’ specific requirements, they can update the feed manually whenever they want.
- Download – The feed can be downloaded by clicking this link. The files can later be uploaded to the Business account.
- Edit – The feed settings can be updated by clicking on this button. Such as feed interval.
- Delete – The feed can be deleted by clicking on this link.
Scheduled Feeds
This section lists all the scheduled processes. To reduce server load and the chances for failure of actively scheduled actions, disable or delete unwanted scheduled actions.
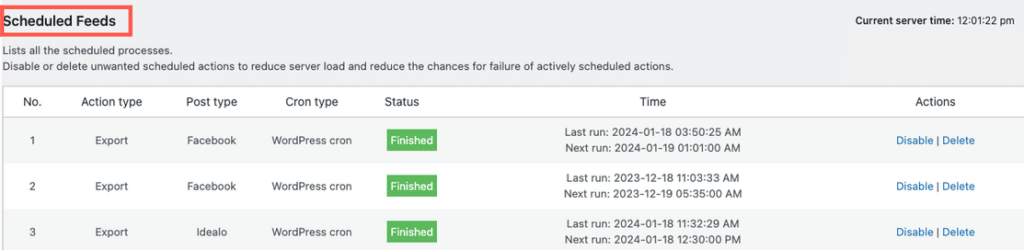
- Under Status, the current status of the action is listed. The statuses include Not Started, In Progress and Finished.
- Under Time, the Last run and Next run details are listed.
General settings
This sub menu allows setting the default options. The three tabs are:
- General
- Other Solutions
- Licence
General
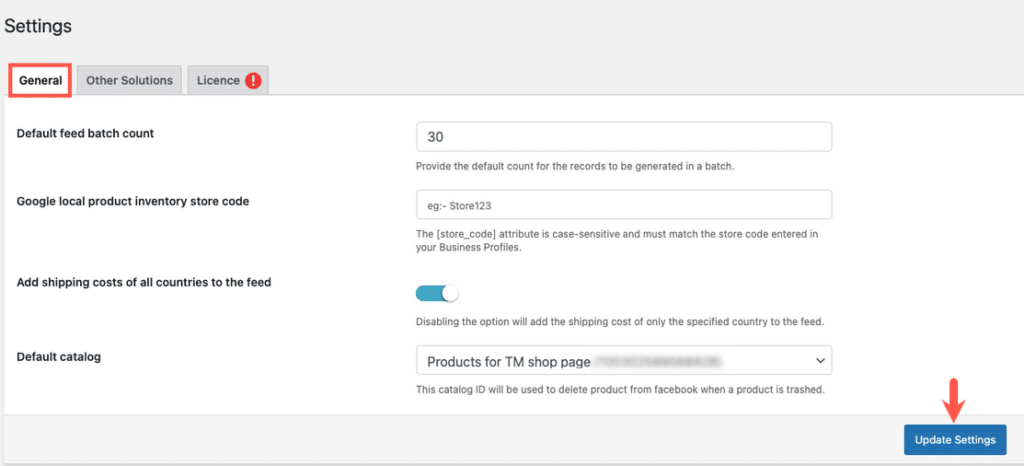
- Default feed batch count – Sets the default number of products to be processed at each iteration while generating the feed.
- Google local product inventory store code – Specify the store code of Google local product inventory. The [store_code] attribute is case-sensitive and must match the store code entered in your Business Profiles.
- Add shipping costs of all countries to the feed – By default, its enabled. To add shipping cost of the specified county to the feed, disable this option.
- Default catalog – Specify the ID of the catalog using which you can delete the products from Facebook/Instagram when a product is trashed.
Other Solutions
Here, explore among various plugins that perfectly caters your WooCommerce needs.
Licence
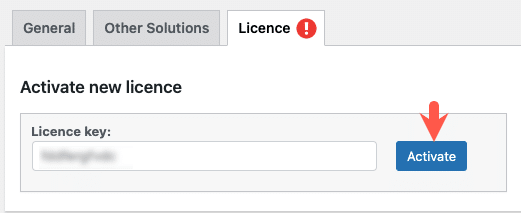
After installing and activating the plugin on your website, you need to activate the plugin license to get notified about the plugin updates.
To do so, from the WordPress admin dashboard:
- Click WebToffee Product Feed > General Settings > Licence.
Here, specify the Licence key and click on Activate.
Facebook/Instagram Catalog Sync
In this section, the connection to the Facebook/Instagram business center takes place. This is the place where we perform Facebook/Instagram catalog synchronisation. To learn about connection and synchronisation, refer to this article.
Comments (3)
Angelo Sleebos
November 30, 2023
how does this plugin handle an existing catalog that was used by the facebook for woocommerce plugin, when you migrate to woocommerce product feed sync manager from wegtoffee, do you get a situation that you suddenly have duplicate products in your facebook catalog?
Arjun
December 1, 2023
Hi Angelo,
Thank you for reaching out to us. You can easily migrate from Facebook for WooCommerce to WebToffee Product feed and sync manager, as we keep the same item ID for products when syncing with Facebook catalog. Therefore, there will be no issues of duplication when migrating to our plugin. If you have further queries you can reach us via support.
Brucewayne321
February 24, 2023
Thanks for the post and effort! Please keep sharing more such blog. Now I saved it to my bookmarks so that I can keep me in touch with you.