Share:


Table of Contents
Importing and exporting WooCommerce products using Excel significantly enhances the efficiency of managing product data in an online store. This method allows store owners to perform bulk updates, streamline product management, and maintain organized records, making it essential for effective eCommerce operations.
- Excel facilitates faster bulk updates for prices, stock quantities, and product descriptions, saving valuable time.
- The structured format of Excel helps keep product data organized and reduces confusion when managing large inventories.
- A bidirectional workflow allows for seamless data transfer between WooCommerce and Excel, enabling easy updates and reviews.
- Dedicated plugins, like WebToffee's Product Import Export Plugin, simplify the import/export process by mapping Excel columns to WooCommerce fields.
- Troubleshooting common issues, such as missing data or formatting errors, ensures a smoother experience when working with Excel files.
- The premium version of the plugin supports advanced features, including scheduling automated imports and exports for ongoing data synchronization.
You can export WooCommerce products to Excel using a product export plugin that supports XLS or XLSX files. With WebToffee’s Product Import Export plugin, you can choose the products and fields you want to export, select XLS or XLSX as the file format, and download the product list as an Excel spreadsheet.
WooCommerce also includes a built-in product exporter, but it exports product data as CSV rather than a native Excel file. If you specifically need an XLS or XLSX file, you’ll need an export tool that supports those formats. This article will walk you through exporting and importing your WooCommerce products, making it easier than ever to keep your store organized and up to date with minimal effort.
Why Export WooCommerce Products to Excel?
Exporting your WooCommerce product list to Excel makes it easier to review, organize, and update product data in bulk.
You can use an Excel export to:
- Review SKUs, prices, stock levels, and other product details
- Make bulk updates to prices, inventory, descriptions, or categories
- Audit and clean up your product catalog
- Share product data with suppliers, agencies, or internal teams
- Move product information between WooCommerce stores
- Keep an offline copy of your product catalog
Once exported, you can also edit the spreadsheet and import the updated product data back into WooCommerce.
What WooCommerce Product Data Can You Export to Excel?
You can export most of the key data in your WooCommerce product catalog to Excel, including:
- Product ID and SKU
- Product name and descriptions
- Regular and sale prices
- Stock quantity and stock status
- Categories and tags
- Product images
- Attributes and variations
- Custom fields and metadata
- Product type
Having this data in Excel makes it easier to audit your catalog, make bulk changes, share product information, or prepare products for migration to another WooCommerce store.
To export WooCommerce products directly to an Excel file, you’ll need the premium version of the WooCommerce Product Import Export plugin. Before you begin, purchase and download the plugin from My Account → Downloads in your WebToffee account.
To export WooCommerce products to Excel:
- Go to WebToffee Import Export (Pro) → Export.
- Select Product.
- Choose Advanced export.
- Select the products and product fields to include.
- Choose XLS or XLSX as the export format.
- Run the export and download the Excel file.
Let’s walk through each step in detail.
Step 1: Select Product as Post Type to Export
After you have installed and activated the plugin, let’s see how the export process is carried out.
- Go to WebToffee Import Export (Pro) > Export.
- Choose the post type as Product and proceed to select the export method.

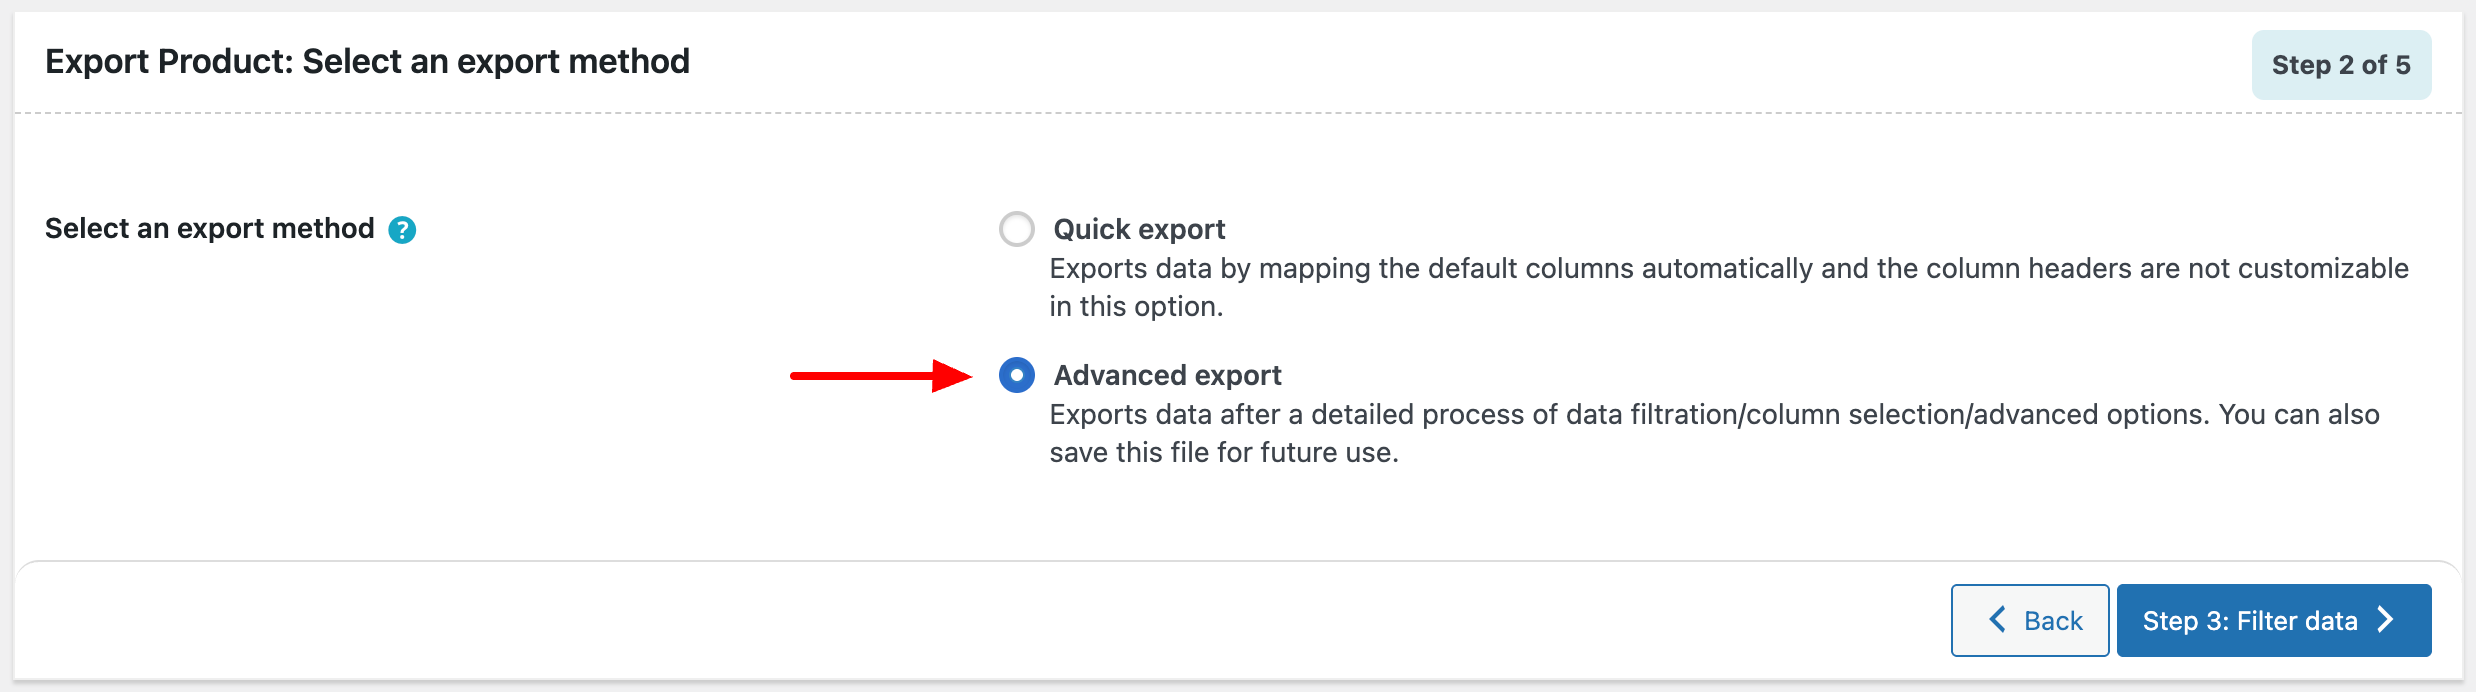
Step 2: Choose Advanced Export Method
- Now select the method for exporting the products. You will have two options: Quick export and Advanced export.
- Let’s select Advanced export and proceed to the next step.
Step 3: Filter Product Data to Export
Here, you can customize the export by selecting the number of products to be exported and specifying which products, categories, or tags to include or exclude.
However, if you want to export all products, it’s best to skip these configurations and move to the next step.

Step 4: Map and Rename Export Columns
Here, you can decide which information to export and how to organize it. You can rearrange the product fields, rename the columns, and select specific fields to appear in the output export file.
Since we have to export the whole set of products, you can skip configuring and proceed directly to the next step. If you prefer to rename or rearrange any fields, you can do so before moving forward.

Step 5: Configure Advanced Export Options
This is the final step for exporting WooCommerce product data.
- Specify a file name for the export file.
- From the export file format dropdown, choose XLS or XLSX to export to Excel.
- Select the number of products to be exported in a single batch. By default, it’s set to 30.
- In the Delimiter drop-down, choose a separator (comma, semi-colon, tab, space) that differentiates columns in the CSV file.
- Click Export to export WooCommerce product data.

Pro Tip: You can save your current export configurations as a template for future use. This way, you can quickly export your products without having to reconfigure these steps.
After completion, you will receive a prompt message to download the export file. Click the Download button to save the Excel file to your local storage.

You can see an image tab in the export file with a URL to download the images. Here is a preview of the exported Excel file:

Once you export your WooCommerce products, open the XLS or XLSX file in Excel and make the required changes to the product data.
For example, you can update prices, stock quantities, descriptions, categories, SKUs, image URLs, or other product fields directly in the spreadsheet.
When editing the file, avoid changing or removing important identifier fields such as the product ID or SKU, as these help WooCommerce match the spreadsheet rows with the correct existing products during import.
After making your changes, save the file, then continue to the next step: import the updated spreadsheet back into WooCommerce to apply the changes.
Also Read: How to Export Products from WooCommerce?
Once you’ve updated the product data in Excel, you can import the file back into WooCommerce to apply those changes to your store. To import your WooCommerce products from an Excel file easily, follow these detailed steps:
Step 1: Select Product as Post Type for Import
From the dashboard,
- Go to Webtoffee Import Export (Pro) > Import.
- Select Product as post type to import from the drop-down list,
- Proceed to the next step.

Step 2: Choose Quick Import Method
There are two import methods available: quick import and advanced import. Both methods support the .xls file format for importing products.
- Let’s go with the Quick import option.
- Upload the .xls file to import and click the Import button.

After completing the import, review your products by going to Products > All Products. Ensure all the details have been correctly imported, and make any necessary adjustments.
Troubleshooting WooCommerce Excel Export Issues
If your WooCommerce Excel export is not working as expected, the issue is often related to file format, product data, plugin settings, or server limits. Here are common problems and how to fix them.
1. Export File Is Not Downloading
If the Excel export file does not download, try the following:
- Check whether the export process completed successfully.
- Reduce the export batch count and try again.
- Make sure your website has enough server memory for large exports.
- Disable conflicting plugins temporarily and test the export again.
- Check whether your browser is blocking downloads.
Large product catalogs may need smaller export batches to avoid timeout issues.
2. Exported Excel File Has Missing Product Data
If some fields are missing from the exported Excel file, review the export column mapping step.
Make sure you have selected the fields you want to export, such as:
- SKU
- Product name
- Price
- Stock
- Categories
- Images
- Attributes
- Variations
If you renamed or removed columns in a saved export template, update the template before exporting again.
3. Product Images Are Not Showing in the Excel File
WooCommerce product images are usually exported as image URLs, not embedded image files.
If product images are missing:
- Confirm that image fields were selected during export.
- Check whether the products have featured images or gallery images assigned.
- Make sure the image URLs are accessible.
- Verify that the image column was not removed during column mapping.
When importing products back into WooCommerce, image URLs should be valid and publicly accessible.
4. Variable Product Data Is Incomplete
Variable products require parent product data and variation data. If variations are missing or incomplete in the export file:
- Confirm that variation fields were included in the export.
- Check that attributes are properly configured in WooCommerce.
- Make sure parent and child variation relationships are preserved.
- Use an advanced export method rather than a minimal, quick export.
For stores with many variable products, always test with a small export before running a full catalog export.
5. Excel File Opens with Formatting Issues
If the exported file opens incorrectly in Excel or another spreadsheet tool:
- Confirm that the file format is XLS or XLSX.
- Try opening the file in a different spreadsheet application.
- Avoid manually changing file extensions.
- Re-export the file using the correct format.
- Check whether special characters or delimiters are affecting the file.
Using XLSX is usually recommended when working with modern versions of Excel.
Importing and exporting products are essential for any eCommerce store, and having the right tools can make all the difference. Plugins simplify these tasks, particularly when your product data is stored in an Excel file.
We hope this guide has given you a clear understanding of using the Product Import Export plugin for your needs. While the free version supports basic CSV imports and exports, the premium version is perfect for stores with large catalogs and complex variations.
If you have any questions or feedback, feel free to leave a comment below, and we will be happy to assist.
Here are some common questions users have about importing and exporting WooCommerce products using Excel.
To export WooCommerce products to Excel, go to WebToffee Import Export (Pro) > Export, select Product as the post type, choose the advanced export method, select the fields you want to export, choose XLS or XLSX as the file format, and click Export.
Go to the product export section, select Products, choose the product fields you want to include, and run the export. The resulting file can contain details such as product names, SKUs, prices, stock, categories, images, attributes, and variations.
WooCommerce’s built-in product exporter creates CSV files. To export products directly to XLS or XLSX, you need a plugin that supports Excel file formats.
Yes. You can export your entire WooCommerce product catalog in a single file, including simple products, variable products, and their associated data.
Yes. Product exports can include image URLs along with the rest of the product data, making it easier to review or migrate product images between stores.
Yes. Variable products and their individual variations can be exported to Excel, including variation SKUs, prices, stock details, and attributes.
Yes. The premium version of the WebToffee plugin allows you to schedule automated imports and exports, keeping your store data synced without manual effort.
Yes. Just download your spreadsheet as an .xls or .xlsx file before importing it with the WebToffee plugin.
The plugin lets you map Excel columns to WooCommerce fields during import, ensuring that your product data aligns correctly even if the headers differ.
Yes. The Advanced Export option lets you filter products by categories, tags, or specific product attributes, giving you full control over what gets exported.
Excel is often easier for users who prefer working with spreadsheets, while CSV is a common format for data transfer. If your plugin supports Excel files, XLS or XLSX can be more convenient for reviewing, editing, and organizing product data.


Subcribe to our newsletter