



Share:


Table of Contents
- Shopify provides native bulk editing tools for various collection properties, including templates and metafields.
- The built-in bulk editor offers a spreadsheet-like interface for quick updates across selected collections.
- For larger updates, CSV files can be utilized through import-export apps, enabling extensive changes in a single workflow.
- Automatic product assignment can be achieved using collection conditions based on predefined rules, simplifying management.
- Bulk actions allow users to add or remove products from collections efficiently, enhancing inventory organization.
- Choosing the right method—native tools for small changes or CSV workflows for larger updates—optimizes collection management.
Managing Shopify collections one by one can quickly become time-consuming as your catalog grows. A small change across dozens of collections can mean opening each collection, making the update, saving it, and repeating the same process again.
Fortunately, there are several ways to handle collection updates in bulk. Shopify offers native bulk actions and a bulk editor for certain collection properties, while larger changes can be handled through CSV files using import-export apps.
In this guide, we’ll look at the different ways to bulk edit Shopify collections and when each method makes the most sense.
The answer depends on what you want to change. Shopify’s native tools can currently handle several collection-related bulk tasks, including:
- Applying a theme template to multiple collections
- Editing collection metafields in bulk
- Making multiple collections available or unavailable
- Deleting multiple collections
- Adding or removing multiple products from a collection using product bulk actions
Shopify specifically documents the bulk editor for applying collection templates and editing collection metafields. Other details, such as collection titles, descriptions, SEO fields, images, handles, sorting, and collection conditions, are generally edited from the collection itself or managed through another workflow.
For large-scale changes to collection details, a CSV-based import-export app can be more practical because you can edit many records together in a spreadsheet.
Shopify has a built-in bulk editor that lets you update multiple collections from one screen. This is useful when you need to make the same type of change across several collections without opening each one separately.
The bulk editor works in a spreadsheet-like layout, with each collection shown as a row and editable properties shown as columns. Shopify also lets you bulk edit collection metafields.
Step 1: Select the Collections You Want to Edit
From your Shopify admin, go to: Products > Collections
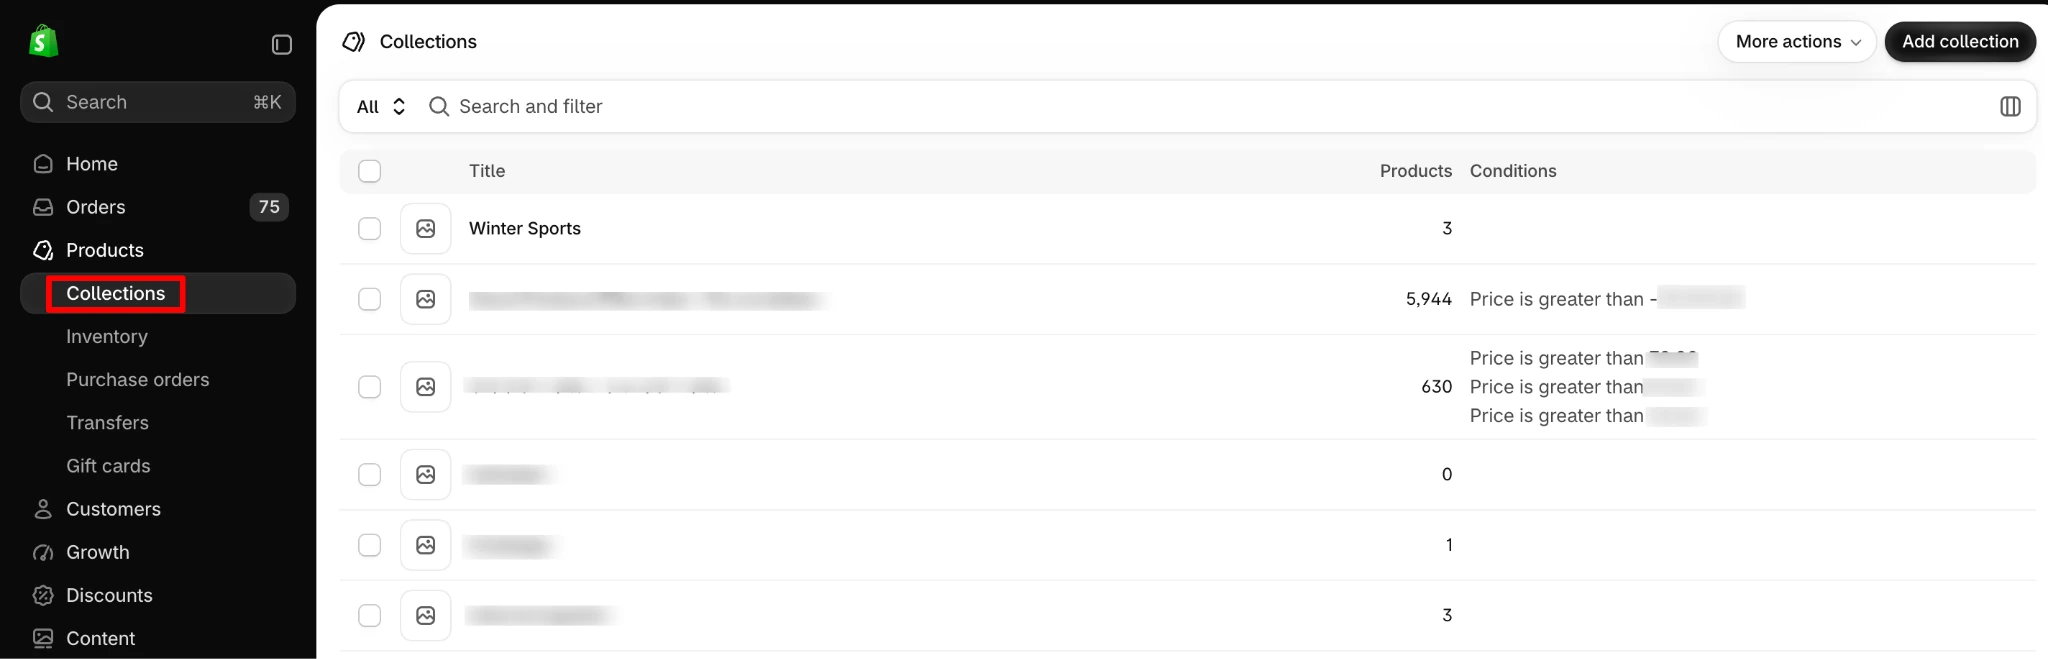
Here, you’ll see all the collections in your store. You can use the search and filter options to narrow down the list if you only want to update a specific group of collections.
Use the checkboxes beside the collections you want to update. Once the required collections are selected, click Bulk edit.
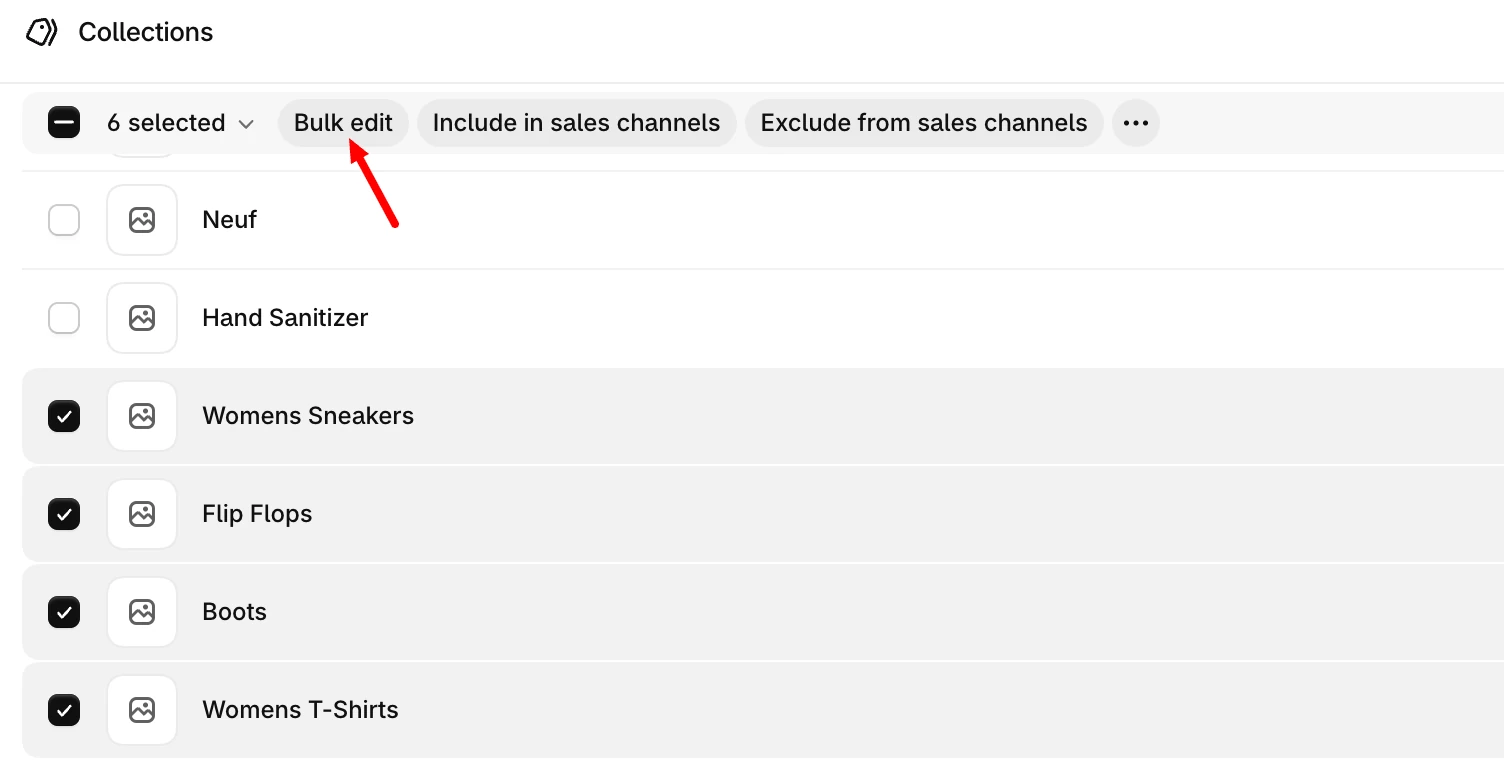
Step 2: Edit the Required Fields
The selected collections will open in Shopify’s bulk editor. The interface works much like a spreadsheet. Each row represents a collection, while the columns represent the collection properties you can update.
- Click the Columns option in the bulk editor to choose which collection properties you want to display.
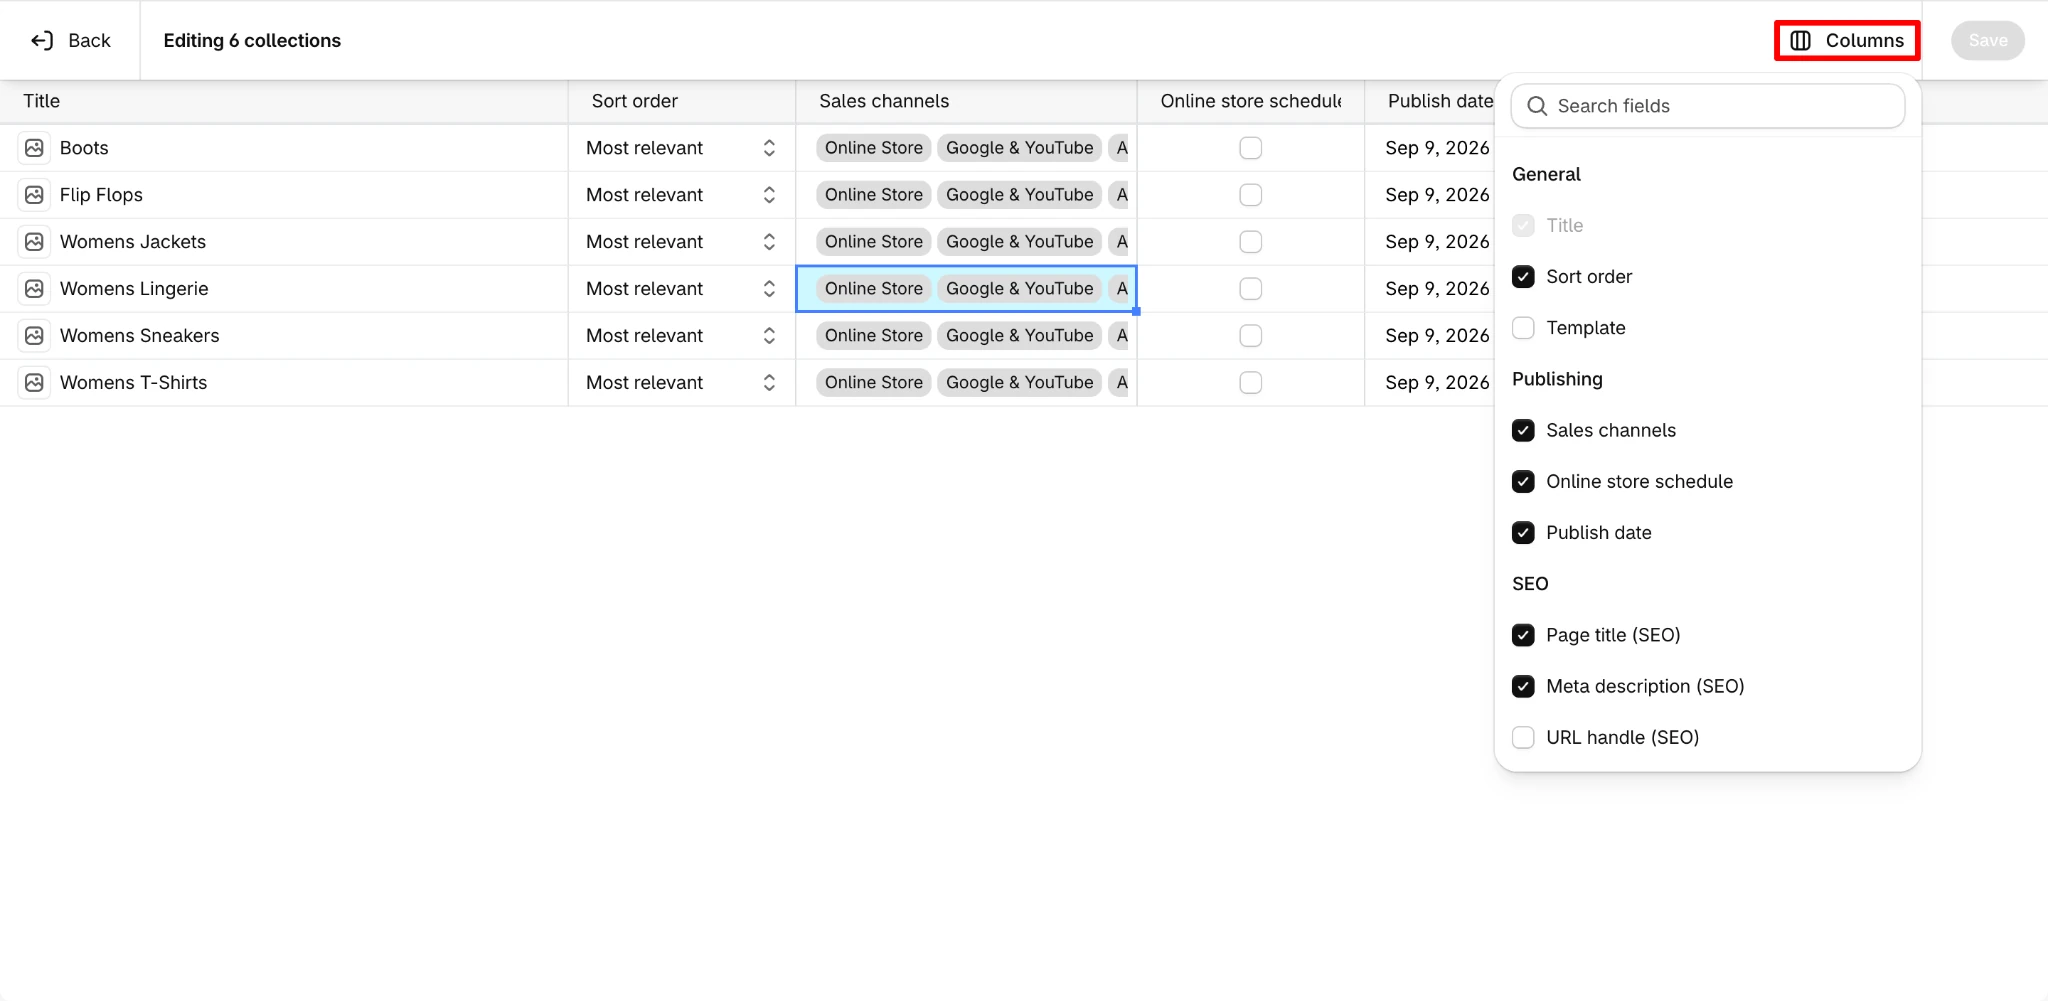
Depending on the available fields in your store, you can add relevant columns and edit their values directly. For example, Shopify lets you apply a theme template to multiple collections from the bulk editor, and you can also edit collection metafields in bulk.
You can remove unnecessary columns as well, which helps keep the editor focused on the fields you actually need to update.
Step 3: Make the Changes and Save
Click the relevant cells and enter or select the new values.
For some fields, you can also select several cells at once and apply the same value across multiple collections. This is particularly useful when assigning the same theme template or updating a shared property.
Once you have reviewed the changes, click Save.
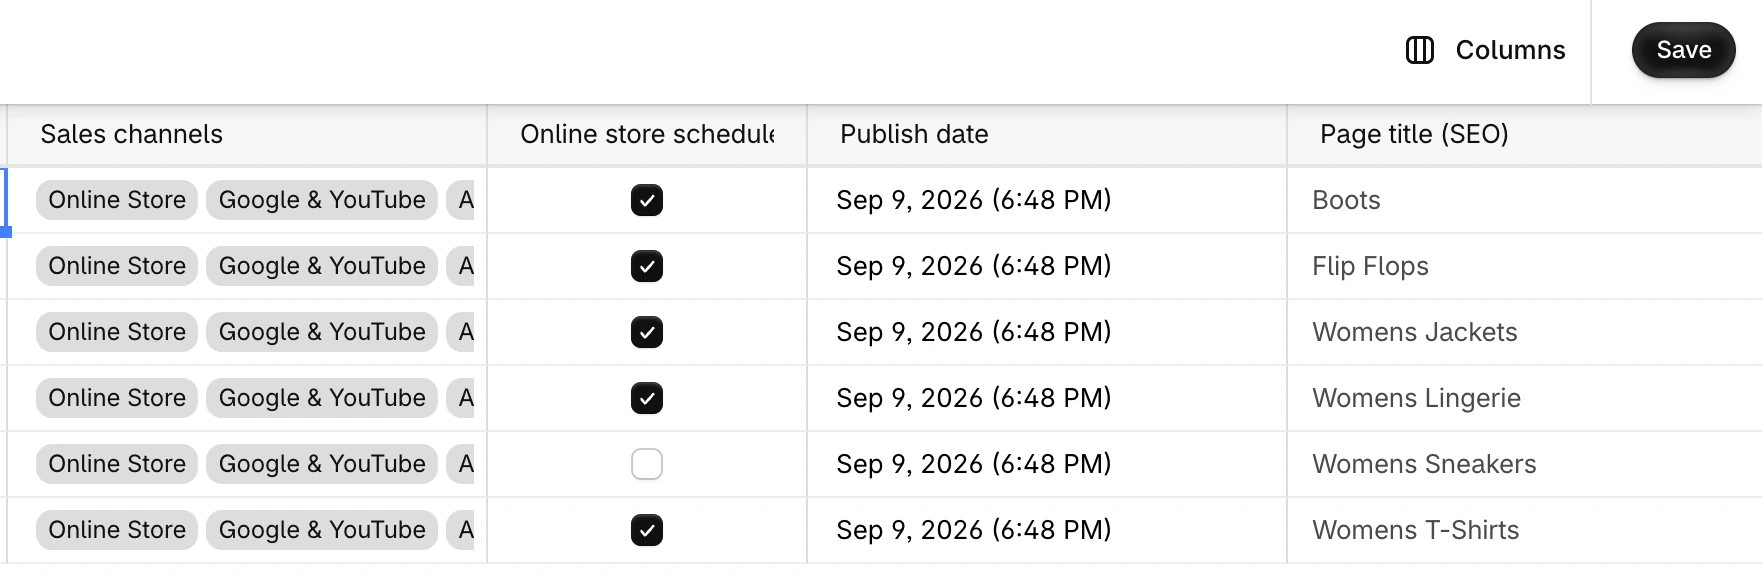
Shopify’s bulk editor is useful when you only have a few straightforward changes to make.
However, not every collection field is available in the bulk editor. Details such as collection rules, product assignments, and some other collection properties may need to be managed separately.
Method 2: Bulk Add Products to Shopify Collections
Editing the collection itself is different from changing which products belong to it.
Shopify provides bulk product actions specifically for adding or removing products from collections.
Bulk Add Products to a Collection
If you want to add a group of specific products to a collection, you can do this directly from Shopify Admin.
Go to Products, select the items you want to add, and from the actions menu choose Add to Collections. Then, select the collections where you want to add the products.
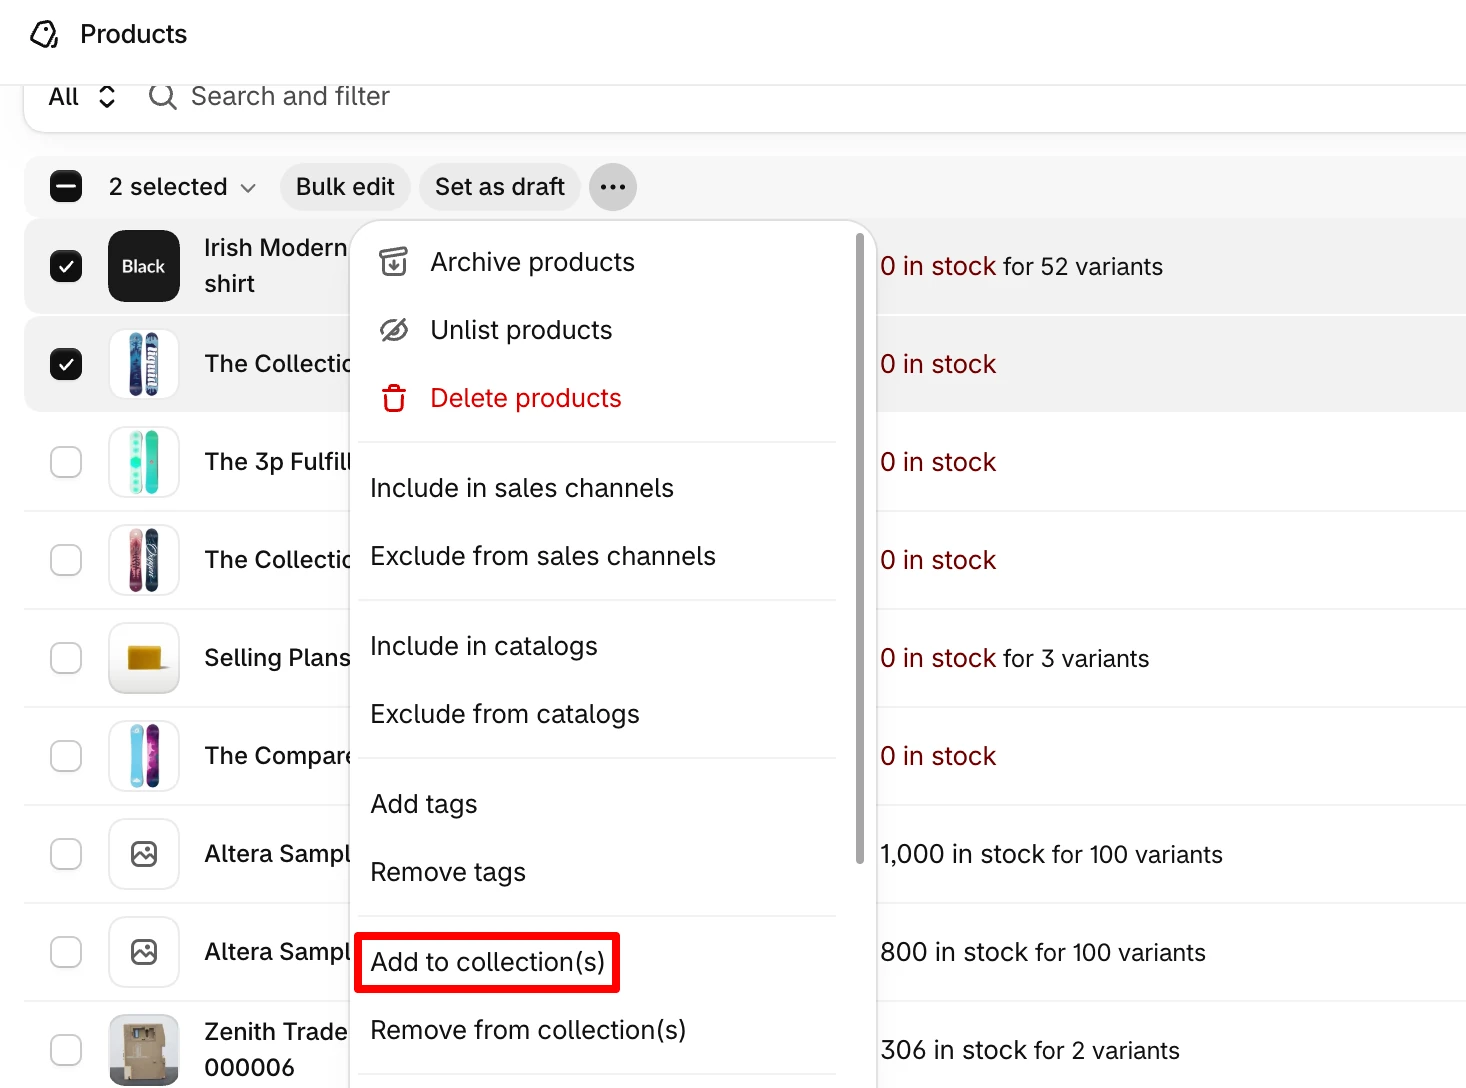
Manually added products remain in the collection until you remove them manually. This method works well when you know exactly which products should belong to a collection, such as:
- Featured products
- Seasonal collections
- New arrivals
- Best sellers
- Limited-time promotions
You can also work with individual variants instead of entire products. This is useful when only certain sizes, colors, or other variants should appear in a collection.
Shopify also provides a corresponding Remove from collection bulk action.
This is a product bulk action rather than a bulk edit of collection properties, but it is often the quickest native method when your goal is simply to change collection membership.
You can also open an individual collection and manually select multiple products or variants to include.
Use Collection Conditions for Automatic Product Assignment
For larger catalogs, manually adding and removing products can quickly become difficult to maintain.
Instead, you can create conditions that automatically decide which products or variants should appear in a collection. When a product matches the conditions you set, Shopify adds it to the collection automatically. If the product later stops matching those conditions, the collection updates accordingly.
You can create conditions based on product information such as:
- Product or variant title
- Vendor
- Product type
- Tags
- Price
- Inventory quantity
- Product category
- Metafields
For example, you could create a Summer Sale collection that automatically includes products tagged summer and priced below a certain amount.
This is much easier than manually updating the collection every time your catalog changes.
Conditions work best when your product information is already well organized. If your tags, product types, or metafields are inconsistent, you may still need to clean up your product data first.
Method 3: Bulk Edit Shopify Collections Using CSV or Excel
For larger catalog updates, migrations, backups, or repeated changes, working with collection data in a spreadsheet can be more efficient than editing collections one by one in Shopify.
With StoreRobo Import Export App, you can export Shopify collection data, make bulk changes in CSV or Excel, and then import the updated file back into your store.
Step 1: Export Shopify Collections
Start by exporting the collections you want to update.
From your Shopify admin,
- Open the StoreRobo Import Export App and go to the Export section.
- Select Shopify CSV as the export template and click Proceed.
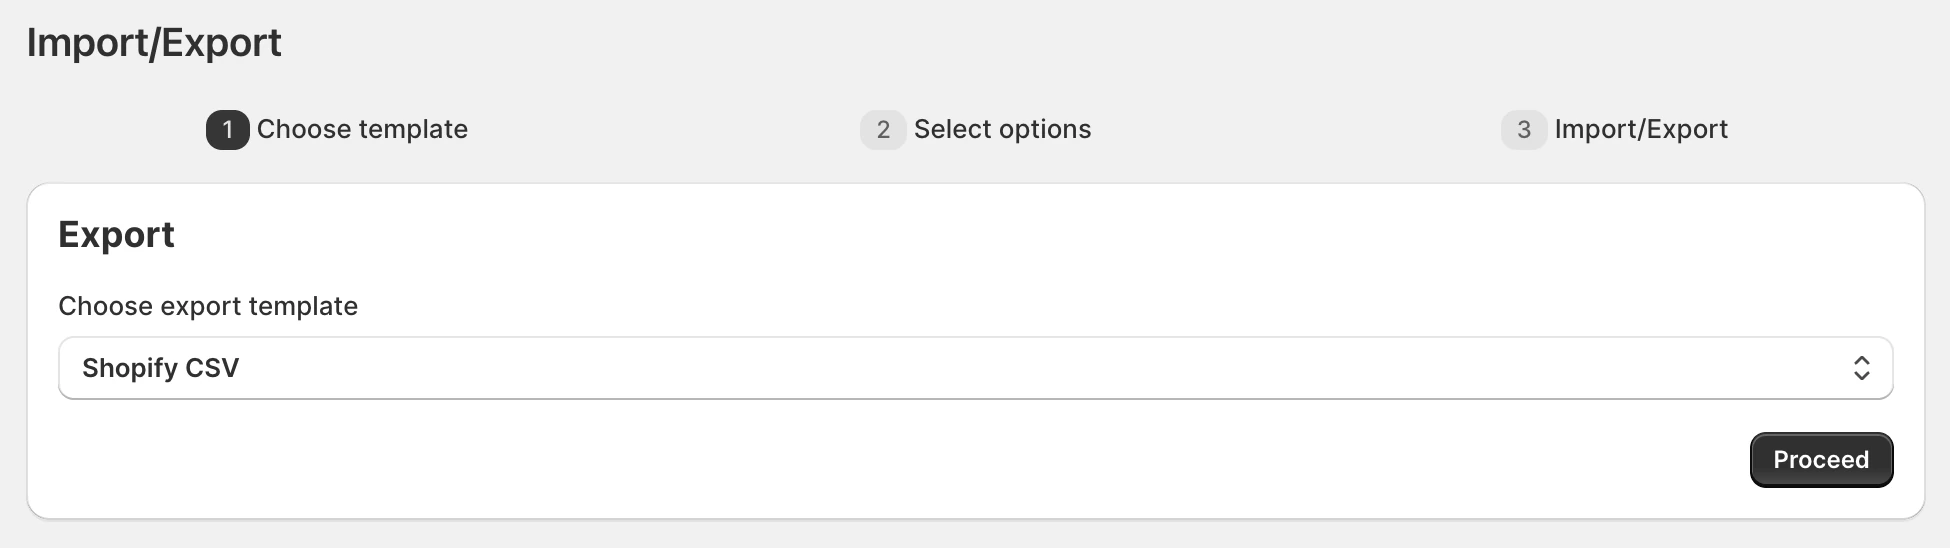
- Choose the collection type you want to export: Smart Collections or Custom Collections
- Expand the selected data type to choose which collection fields you want to include in the file.
- If you only want to edit specific collections, apply filters.
- Click Export to start the export.
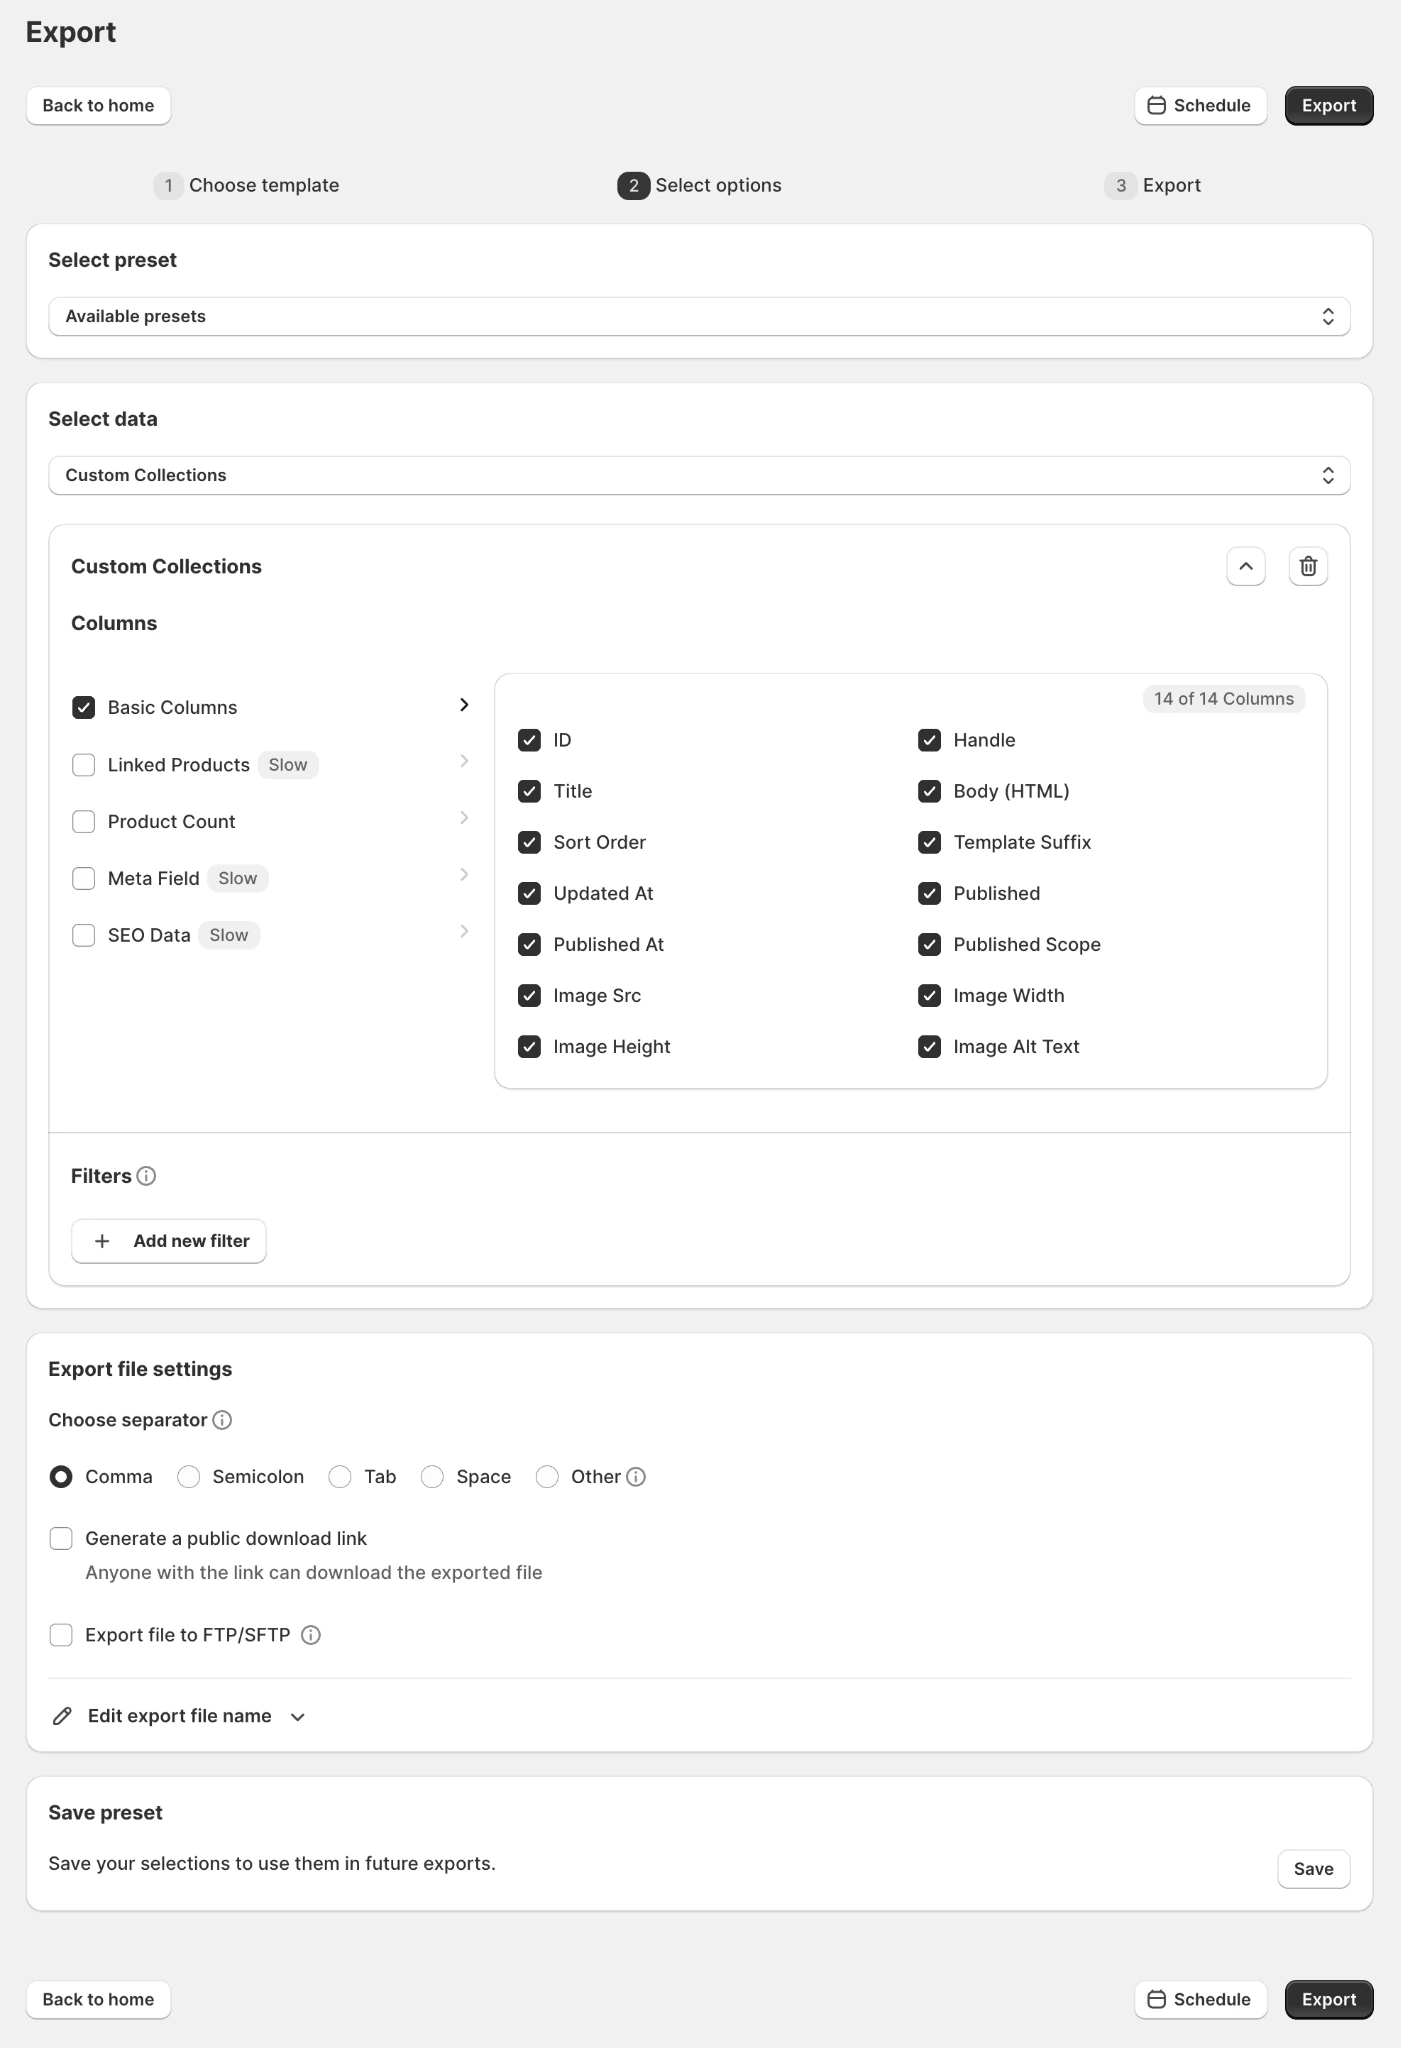
The exported file gives you a structured view of your collection data, which you can then edit in a spreadsheet.
Also Read: How to Import Export Shopify Collections?
Step 2: Edit the Collections in a Spreadsheet
Open the exported file in Excel, Google Sheets, or another spreadsheet tool.
From there, you can update multiple collections at once. Common changes include:
- Editing collection titles
- Updating handles
- Changing descriptions
- Modifying collection rules
- Updating SEO titles and meta descriptions
- Making other collection-level changes
This is especially useful when the same type of update needs to be applied across many collections.
Step 3: Import the Updated Collections Back to Shopify
Once your edits are complete, return to StoreRobo.
- Go to the Import section on the StoreRobo Home page.
- Choose how you want to provide the file. StoreRobo supports imports from local storage, URL, FTP/SFTP, and WooCommerce API. For a simple bulk edit, select the local upload option.
- Upload the edited CSV file.
- Select either Smart Collections or Custom Collections, depending on the type of data in the file.
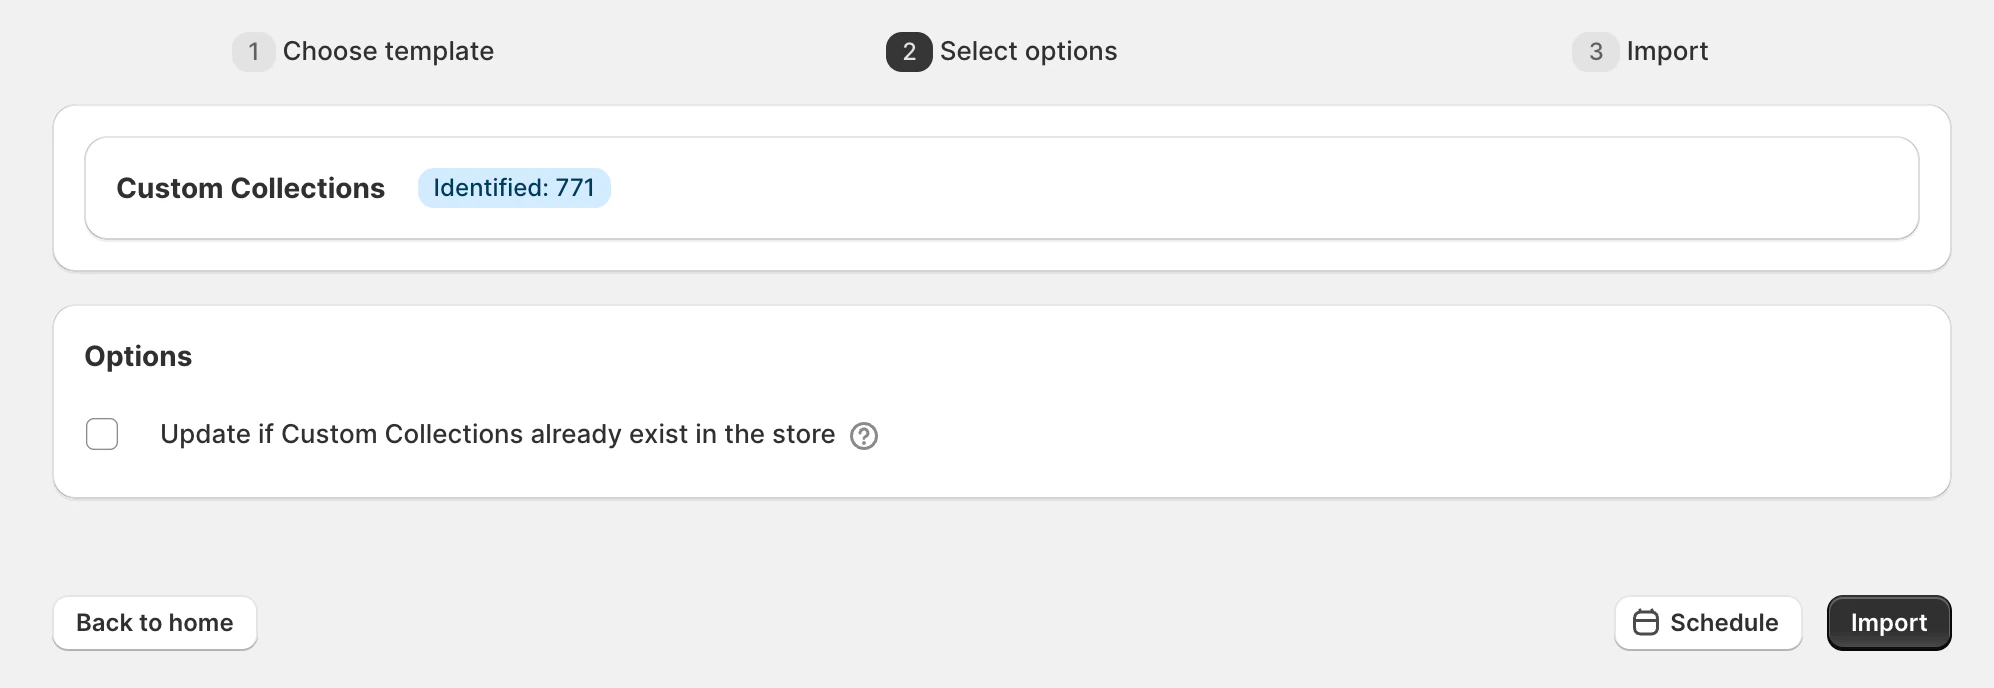
- Upload the file and review the import settings.
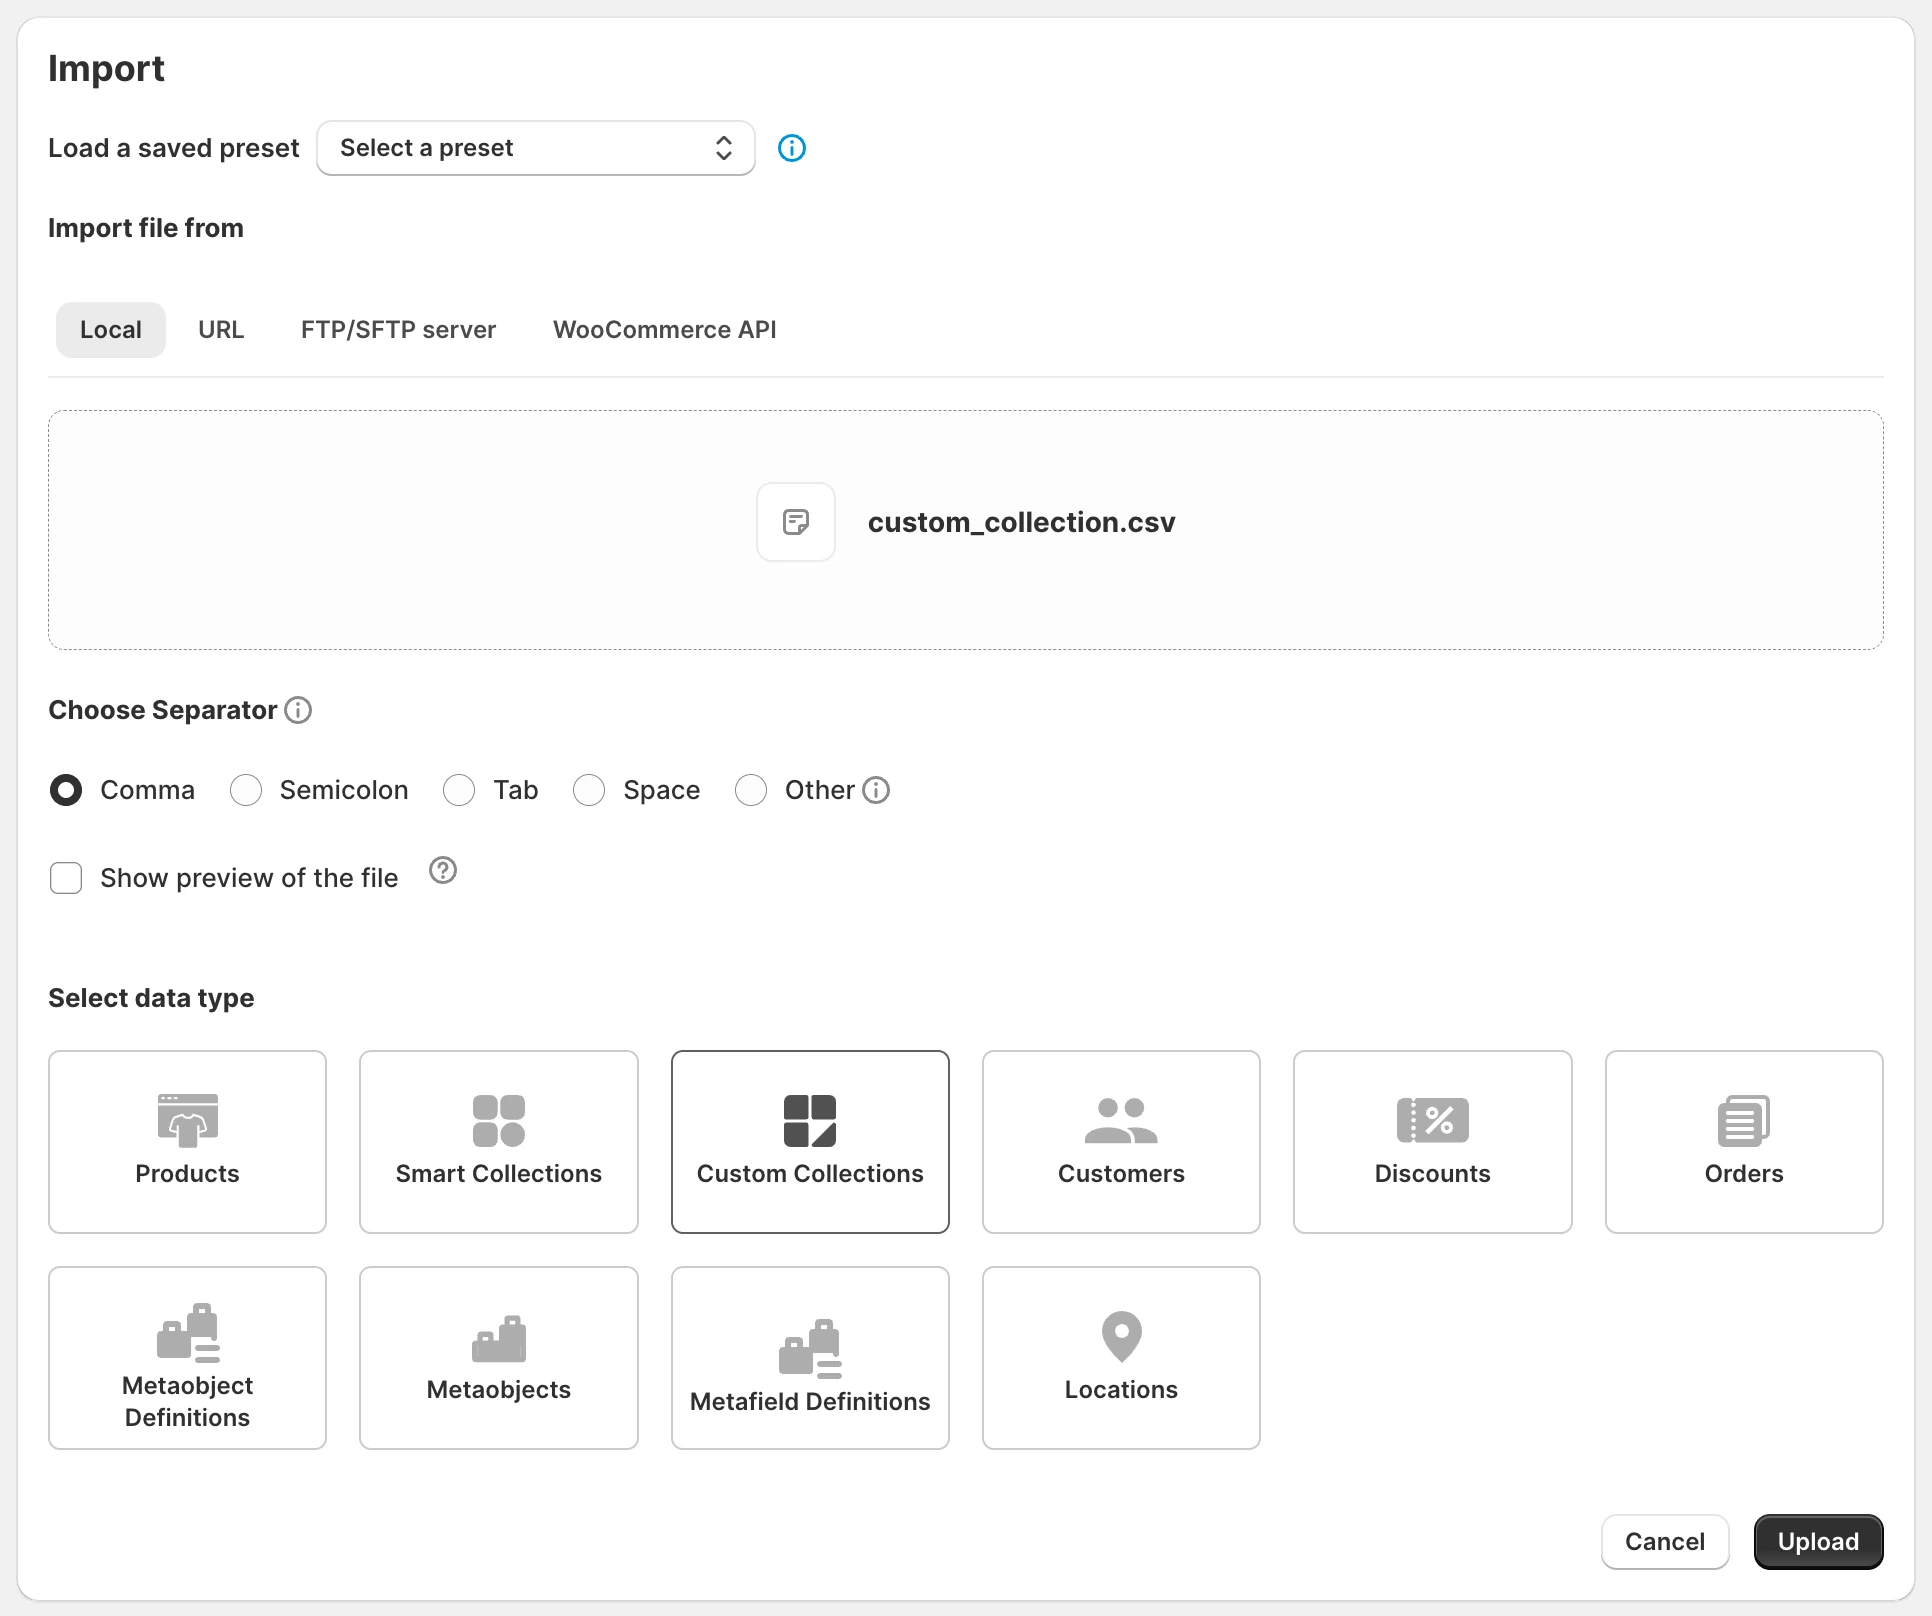
- Choose the appropriate update options so existing collection records are updated rather than recreated.
- Click Import to run the update immediately, or Schedule if you want the job to run later.
After the import finishes, StoreRobo displays a summary of the job so you can check whether the collections were successfully updated.
This export-edit-import workflow is especially useful when you need to make the same type of change across many collections, reorganize a large catalog, maintain collection backups, or move collection data between Shopify stores.
Shopify Bulk Editor vs CSV: Which Method Should You Use?
The best method depends on the type and scale of the update.
For quick changes to a small number of collections, Shopify’s built-in tools are usually the easiest option. If you are working with many collections, need a backup, or want to move collection data between stores, a CSV-based workflow can be more practical.
| Scenario | Best method |
|---|---|
| Update a few collection titles or SEO fields | Shopify Bulk Editor |
| Change collection templates | Shopify Bulk Editor |
| Add several products to a collection | Shopify Admin |
| Automatically group products based on rules | Collection conditions |
| Edit many collections in a spreadsheet | StoreRobo |
| Back up collection data | StoreRobo export |
| Migrate collections between Shopify stores | StoreRobo |
| Run repeated import/export workflows | StoreRobo |
In simple terms, use Shopify’s native tools for smaller, direct changes and a CSV-based workflow for larger or repeatable updates. This helps you avoid unnecessary manual work while still using the simplest method for each task.
Yes. Shopify provides native bulk tools for certain collection properties and actions. For larger updates, you can also export and edit collection data using an import-export app.
Yes. Select multiple products from the Products page and use the Add to collection bulk action.
Yes. Shopify’s product bulk actions can also be used to remove selected products from collections.
Yes, for many basic tasks. Shopify’s native tools can handle collection bulk actions and certain bulk-editable fields. An app becomes more useful when you want to edit large amounts of collection data in a spreadsheet, create backups, migrate collections, or repeat the same workflow regularly.
Shopify’s standard product CSV has limited collection support. For more complete collection imports and exports, you can use an import-export app such as StoreRobo.
Yes. You can select multiple collections from the Collections page and use Shopify’s bulk actions to delete them.
Use a custom collection when you want to manually choose the products. Use a smart or condition-based collection when you want Shopify to automatically include products based on rules such as tags, vendor, product type, price, or other product information.
Conclusion
Bulk editing Shopify collections can save a lot of time when you are managing a growing product catalog. For simple changes, Shopify’s built-in bulk editor and collection tools are usually enough.
For larger updates, migrations, backups, or repeated edits, working with collection data in CSV or Excel gives you more flexibility. Using an import-export app like StoreRobo makes it easier to update multiple collections in one workflow and move collection data between stores when needed.
The right method depends on the size and type of update, but choosing the right workflow can make collection management much faster and easier.


Subcribe to our newsletter


