



Share:


Table of Contents
- SKUs help differentiate between product variants, facilitating better inventory tracking and restocking decisions.
- They reduce fulfillment mistakes by providing a clear identifier for each product variant during order processing.
- Consistent SKU usage improves sales reporting, allowing for better analysis of product performance across different variants.
- Shopify allows for custom SKU creation, enabling store owners to develop a unique naming convention that suits their inventory needs.
- Bulk editing tools and import/export apps like StoreRobo simplify the management of SKUs for stores with large inventories.
- Maintaining a consistent and clear SKU system is vital for future product additions and overall operational efficiency.
Managing a few products in Shopify is fairly straightforward. But as your catalog grows, keeping track of different products, sizes, colors, and stock levels can become challenging.
For example, imagine selling the same T-shirt in five sizes and four colors. That’s 20 different variants to keep track of. Without a proper system, identifying the right product, updating inventory, and fulfilling orders can become confusing.
That’s where Shopify SKUs come in. SKUs help you organize products, identify individual variants, and manage inventory more accurately.
In this guide, we’ll explain what Shopify SKUs are, how to create and assign them to products, and how to manage SKUs in bulk as your store grows.
A Shopify SKU (Stock Keeping Unit) is a unique code that store owners assign to products or product variants to identify and manage them internally.
SKUs usually contain a combination of letters and numbers representing product details such as category, style, color, or size. For example, suppose you sell a black T-shirt in three sizes.
You could assign the following SKUs:
| Product variant | SKU |
|---|---|
| Black T-shirt – Small | TSH-BLK-S |
| Black T-shirt – Medium | TSH-BLK-M |
| Black T-shirt – Large | TSH-BLK-L |
Each SKU identifies a specific version of the product. This makes it easier to find the correct item when updating inventory, processing orders, or organizing products in your warehouse.
Are SKUs the Same as Barcodes?
No. Although both help identify products, they serve different purposes.
An SKU is an internal identifier created by your business. A barcode is a machine-readable representation of an identifier that can be scanned to identify a product. Retail barcodes often encode standardized identifiers such as UPCs or EANs.
For example, you might use TSH-BLK-M as your internal SKU while the same product has a separate UPC barcode.
Shopify provides separate fields for SKUs and barcodes, so you can use both.
Shopify doesn’t require you to assign SKUs to every product. However, using them consistently makes managing your store much easier, especially when you have a large catalog.
Here are a few reasons why SKUs are useful.
Better Inventory Tracking
SKUs help you distinguish between products and their variants.
For example, if you sell a shirt in multiple sizes, you can identify exactly which size needs restocking instead of checking each product manually.
Fewer Fulfillment Mistakes
When an order comes in, your fulfillment team can use the SKU to identify the correct item.
This is especially helpful when several products look similar but differ in size, color, or specifications.
More Organized Sales Reporting
Consistent SKUs make it easier to identify products across inventory records, exports, and sales reports. You can compare product performance and see which variants are selling well.
Easier Integration With Other Systems
Many inventory management, warehouse, shipping, and multichannel selling tools use SKUs to identify or match products.
Having consistent SKU values across these systems can help prevent inventory mismatches and synchronization issues.
Before adding SKUs to Shopify, it’s worth creating a simple naming system. Shopify allows you to create your own SKU format. There isn’t a universal structure that every store must follow.
The important thing is to make your SKUs unique, consistent, and easy to understand.
Step 1: Choose a SKU Naming Format
Start by deciding which product attributes you want your SKUs to represent.
A simple structure could be:
Product type – Style – Color – Size
For example: TSH-CRW-BLK-M
Here’s what each part represents:
- TSH – T-shirt
- CRW – Crew neck
- BLK – Black
- M – Medium
This format immediately tells your team what product the code represents.
You don’t have to include every product attribute. Choose the details that help you distinguish between products in your catalog.
Step 2: Create SKUs for Different Product Variants
Each variant should have its own SKU.
Here are a few examples of how you could structure Shopify SKUs for different product categories.
| Product | Example SKU |
|---|---|
| Black crew-neck T-shirt, Medium | TSH-CRW-BLK-M |
| Black crew-neck T-shirt, Large | TSH-CRW-BLK-L |
| White running shoes, Size 42 | SHO-RUN-WHT-42 |
| Black wireless headphones, Model 01 | HDP-WLS-BLK-01 |
These are example formats, not codes generated by Shopify. Notice how the structure stays consistent within each product category while the relevant attributes change.
A clear naming convention is especially useful when your catalog has hundreds or thousands of variants.
Step 3: Check Your SKUs for Duplicates
Before assigning SKUs, check whether the codes are already being used. For example, if you have already assigned TSH-BLK-M to one shirt, avoid assigning the same code to another unrelated product.
Duplicate SKUs can cause confusion in reporting, fulfillment, and third-party inventory integrations.
If you’re creating SKUs in a spreadsheet, you can use duplicate detection tools to identify repeated values before importing them into Shopify.
Once you’ve created your SKU naming system, you can start assigning the codes to products in your Shopify store.
Shopify lets you add or edit SKUs directly from the product editor.
How to Add an SKU to a Shopify Product
Follow these steps to add an SKU to a product that doesn’t have multiple variants.
- Log in to your Shopify admin and navigate to Products.
- Select the product you want to edit. If you’re creating a new product, click Add product.
- Scroll down to the Inventory section of the product editor.
- Find the SKU (Stock Keeping Unit) field and enter your SKU code. For example, you could enter MUG-CER-WHT-01 for a white ceramic mug.
- Click Save to apply the changes.
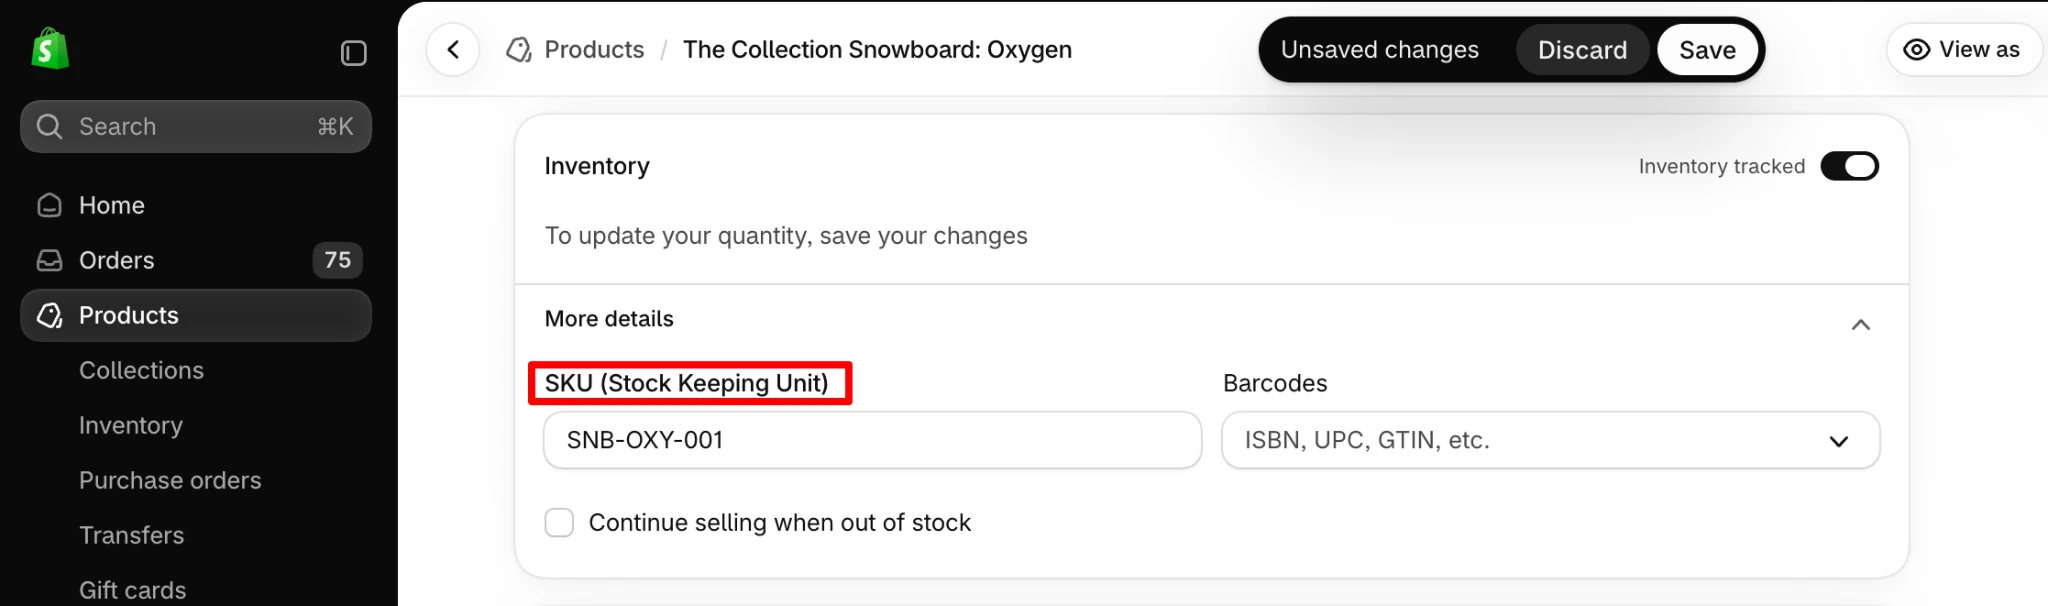
That’s it. Your product now has an SKU that you can use to identify it throughout your store.
You can also return to this section whenever you need to update an existing SKU.
How to Assign SKUs to Shopify Product Variants
If your product has multiple variants, such as different sizes or colors, you’ll need to assign an SKU to each variant.
For example, if you sell a T-shirt in black and white, with small and medium sizes, you could assign these SKUs:
| Variant | SKU |
|---|---|
| Black – Small | TSH-BLK-S |
| Black – Medium | TSH-BLK-M |
| White – Small | TSH-WHT-S |
| White – Medium | TSH-WHT-M |
Here’s how:
- Go to Products and open the product you want to edit.
- Scroll down to the Variants section.
- Click the variant you want to update.
- In the variant’s Inventory section, enter the SKU in the appropriate field.
- Click Save and repeat the process for the remaining variants.
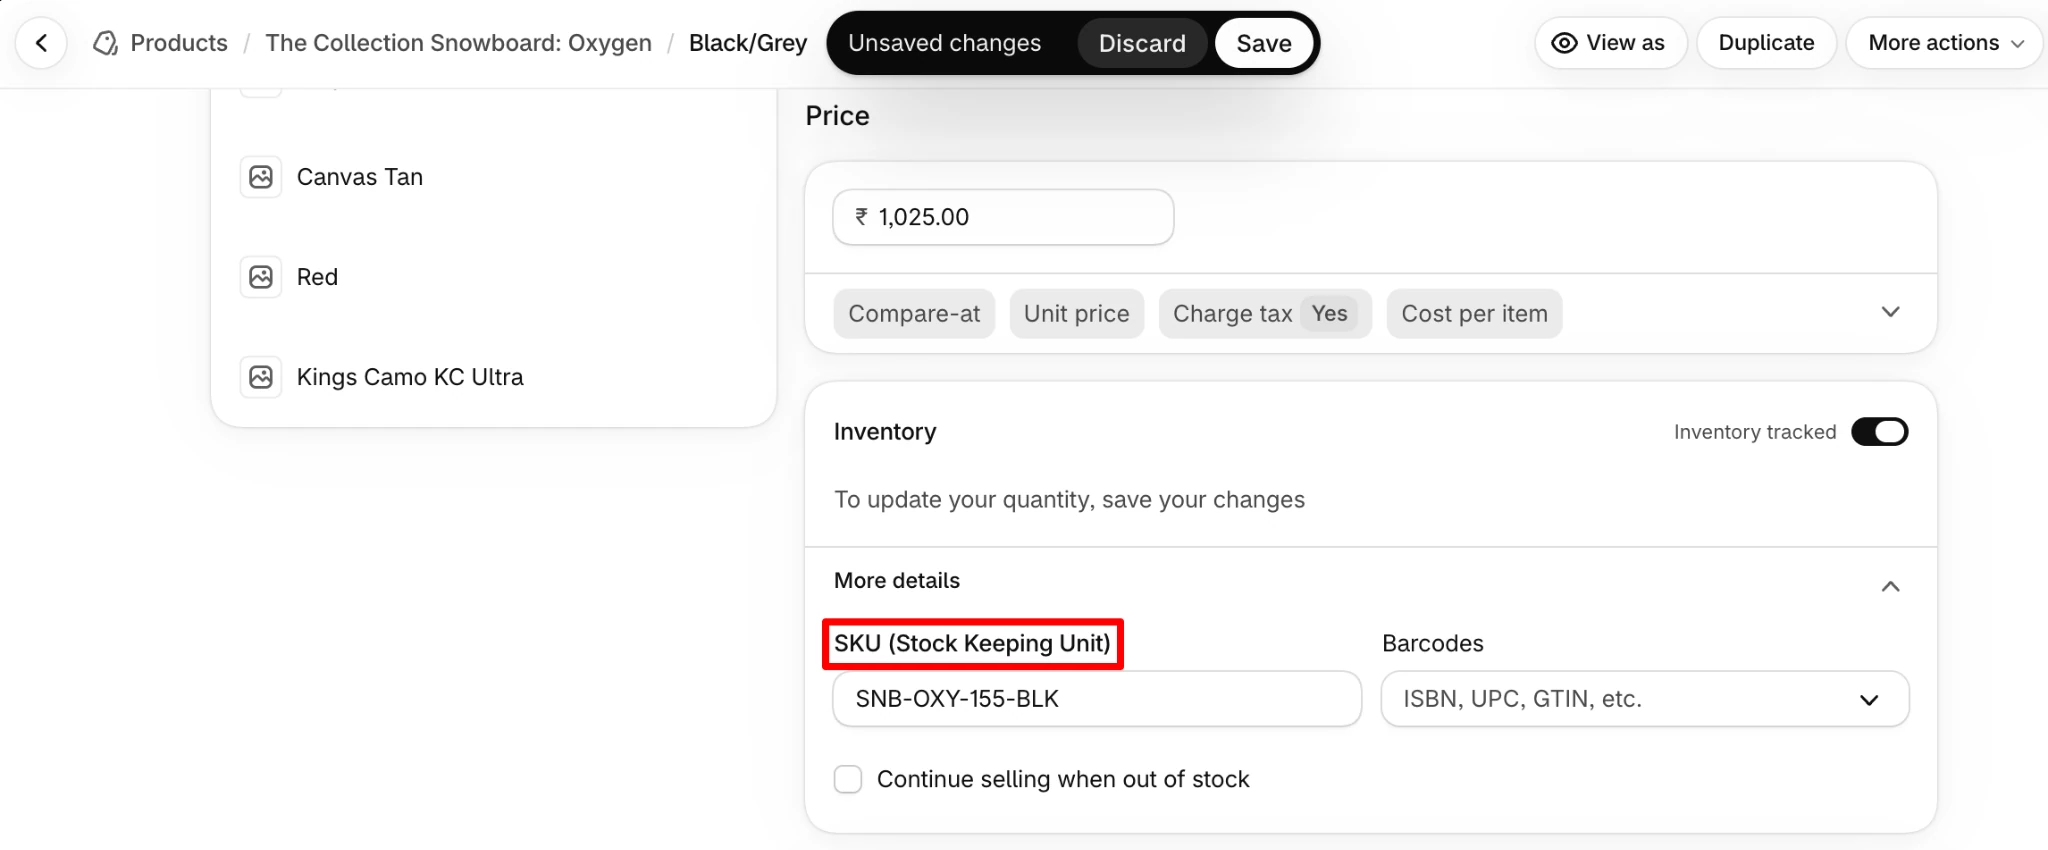
Remember that SKUs identify variants; they don’t automatically enable inventory tracking. If you want Shopify to track stock quantities, make sure inventory tracking is configured for the relevant products.
You can also use the Shopify admin search bar to find products using their SKUs.
Adding SKUs manually works well when you have a small catalog. But updating hundreds of products individually can take considerable time.
Fortunately, Shopify provides several ways to manage SKUs in bulk.
Method 1: Use Shopify’s Bulk Editor
Shopify’s built-in bulk editor allows you to update SKUs for multiple products or variants without opening each one individually.
Here’s how to use it.
- From your Shopify admin, navigate to Products.
- Select the products whose SKUs you want to update using the checkboxes.
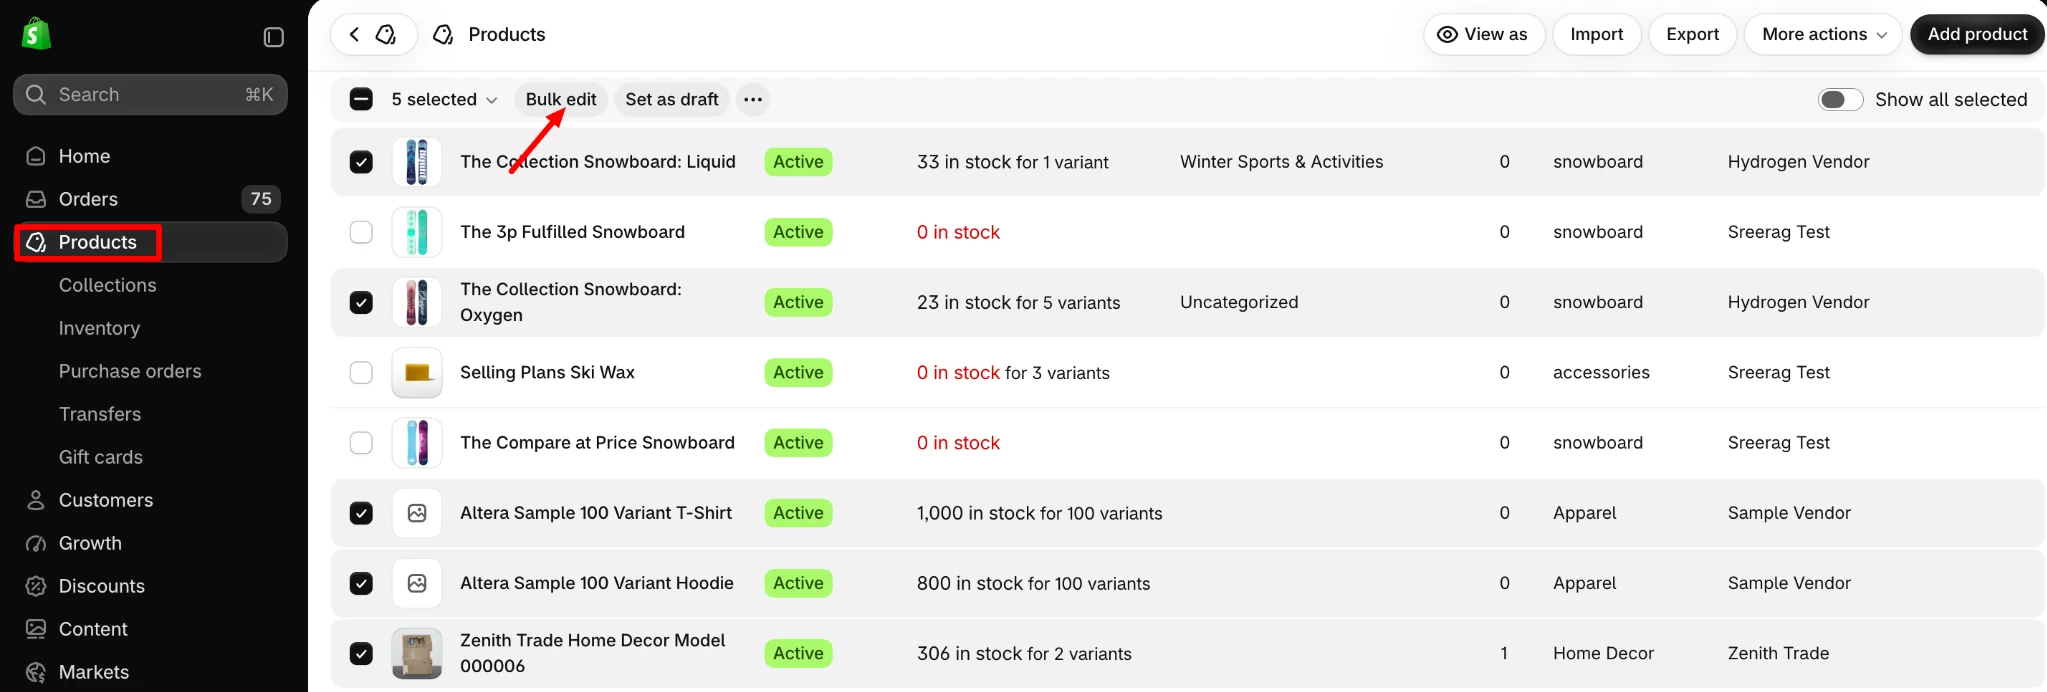
- Click Bulk edit.
- In the bulk editor, click Columns and select SKU to display the SKU column.
- Enter or update the SKU values for the selected products and variants.
- Click Save.
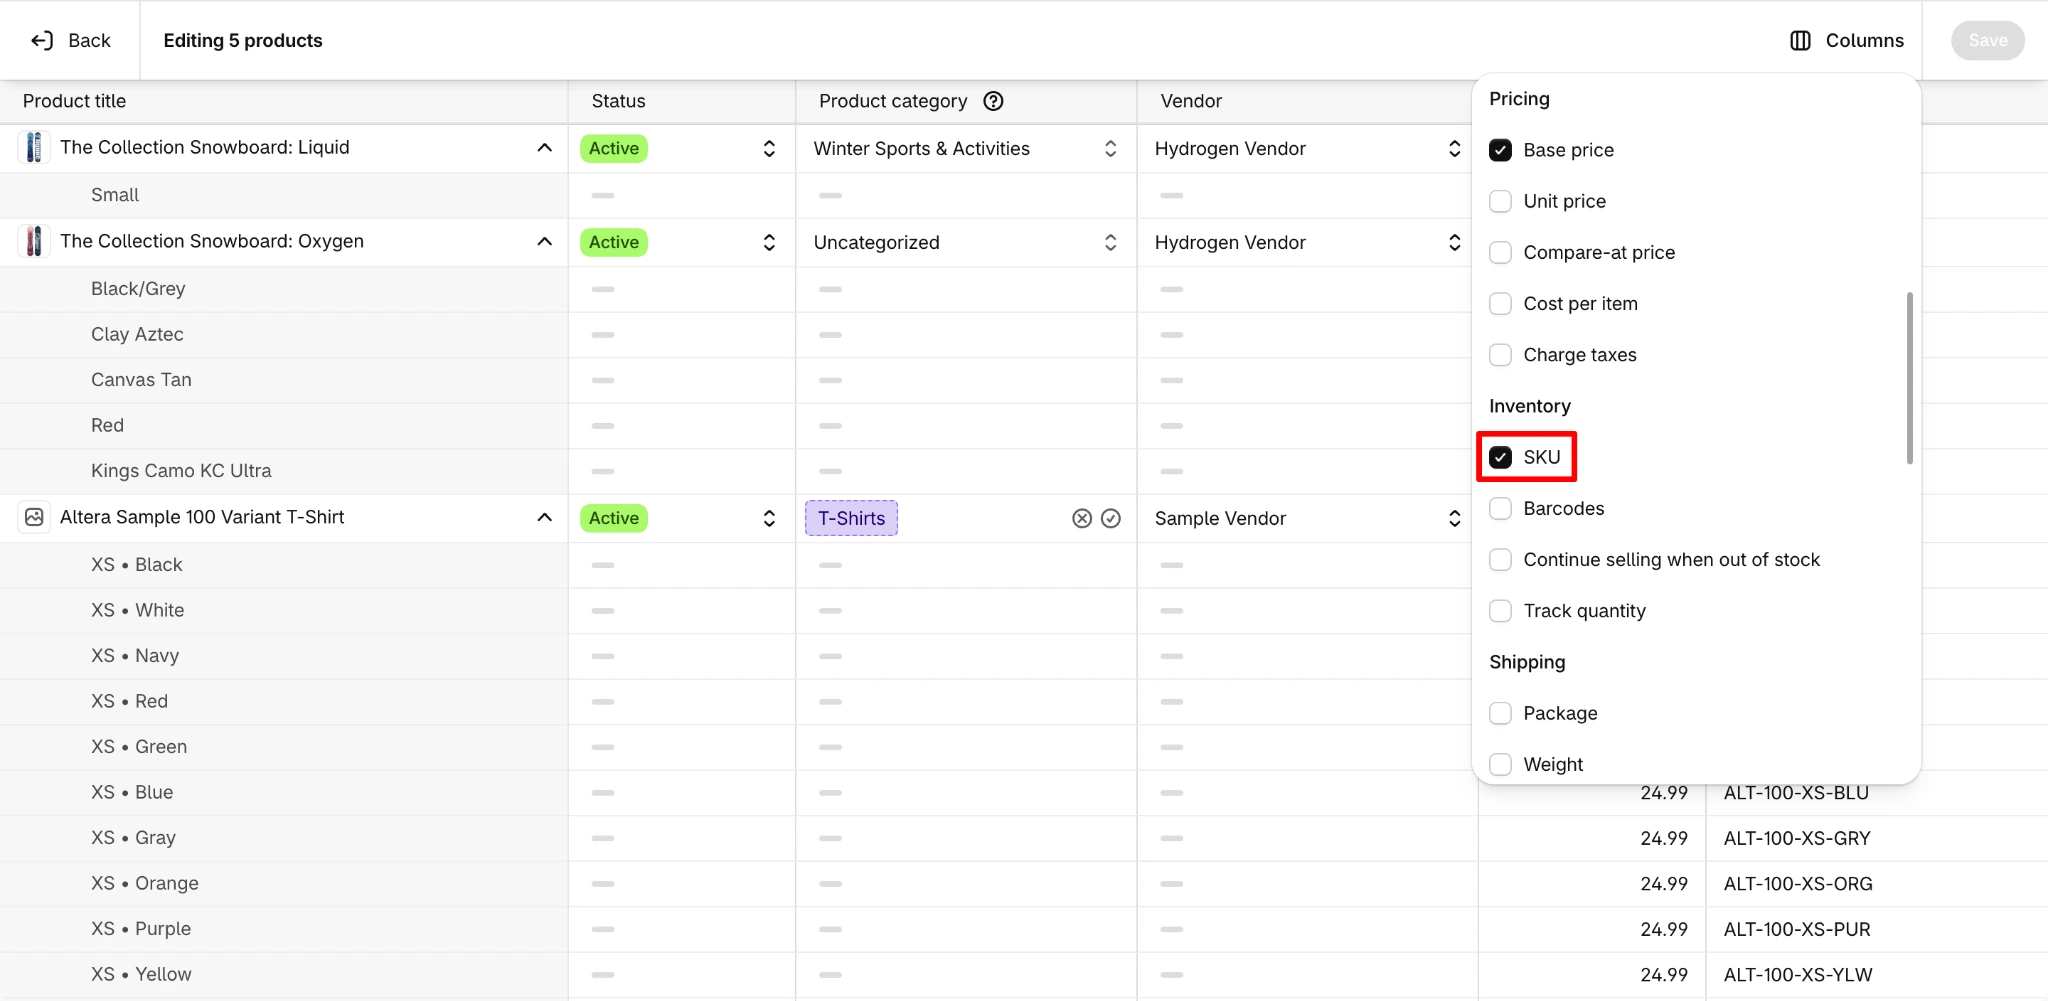
The bulk editor displays product information in a spreadsheet-like table, making it easier to update multiple values.
For products with several variants, you can also open the product, select the relevant variants, and use Bulk edit to update their details together.
The built-in bulk editor is a good choice when you need to update a manageable number of products and don’t want to work with external files.
Method 2: Bulk Update Shopify SKUs Using StoreRobo Import Export
If you have hundreds or thousands of product variants, updating SKUs manually can take a lot of time.
A Shopify import/export app like StoreRobo Import Export can simplify the process. It lets you export product data, update SKU values in a spreadsheet, and import the modified file back into Shopify.
Here’s how to bulk update Shopify SKUs using StoreRobo.
Step 1: Export Your Shopify Products
- Install and open the StoreRobo Import Export app from your Shopify admin.
- Under the Export section, select Shopify CSV as the export template and click Proceed.
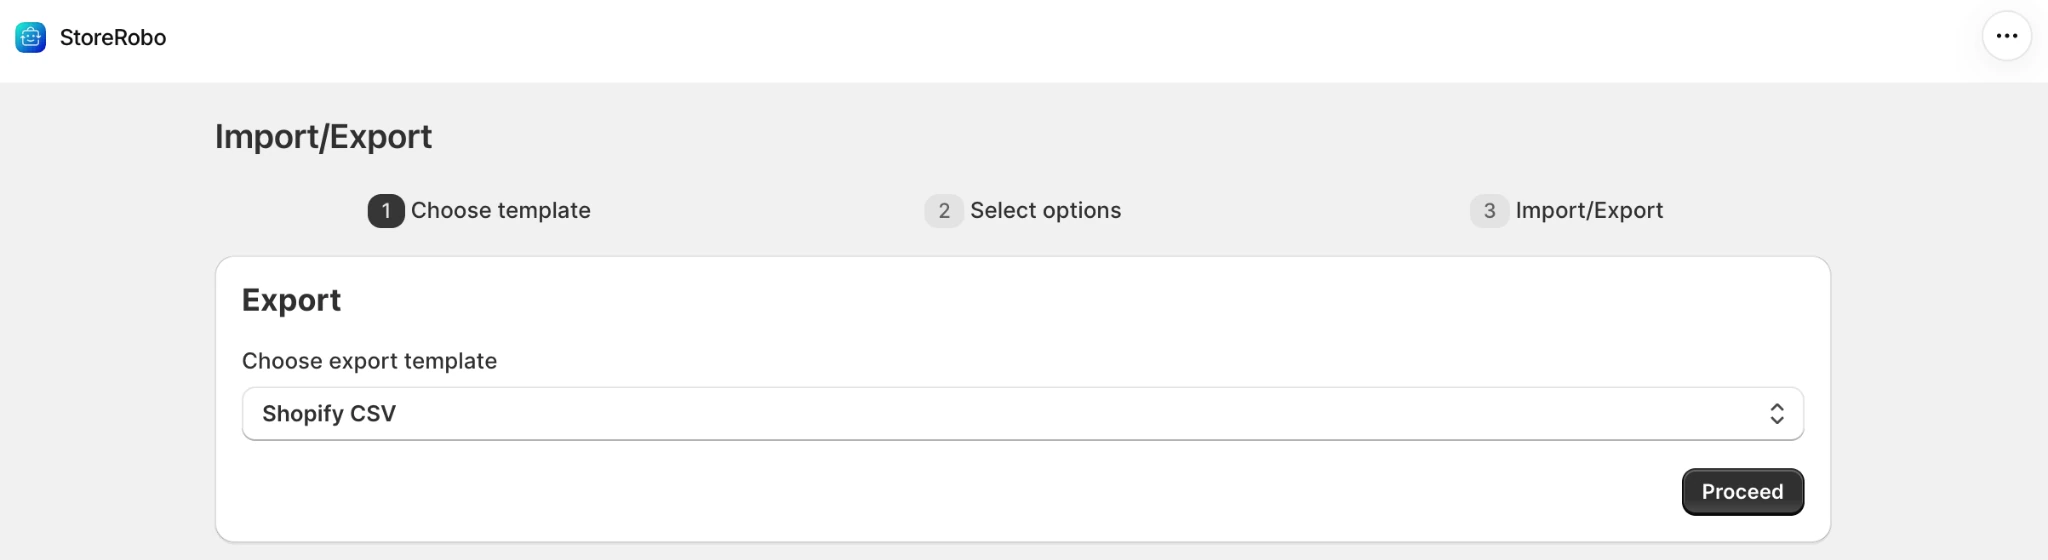
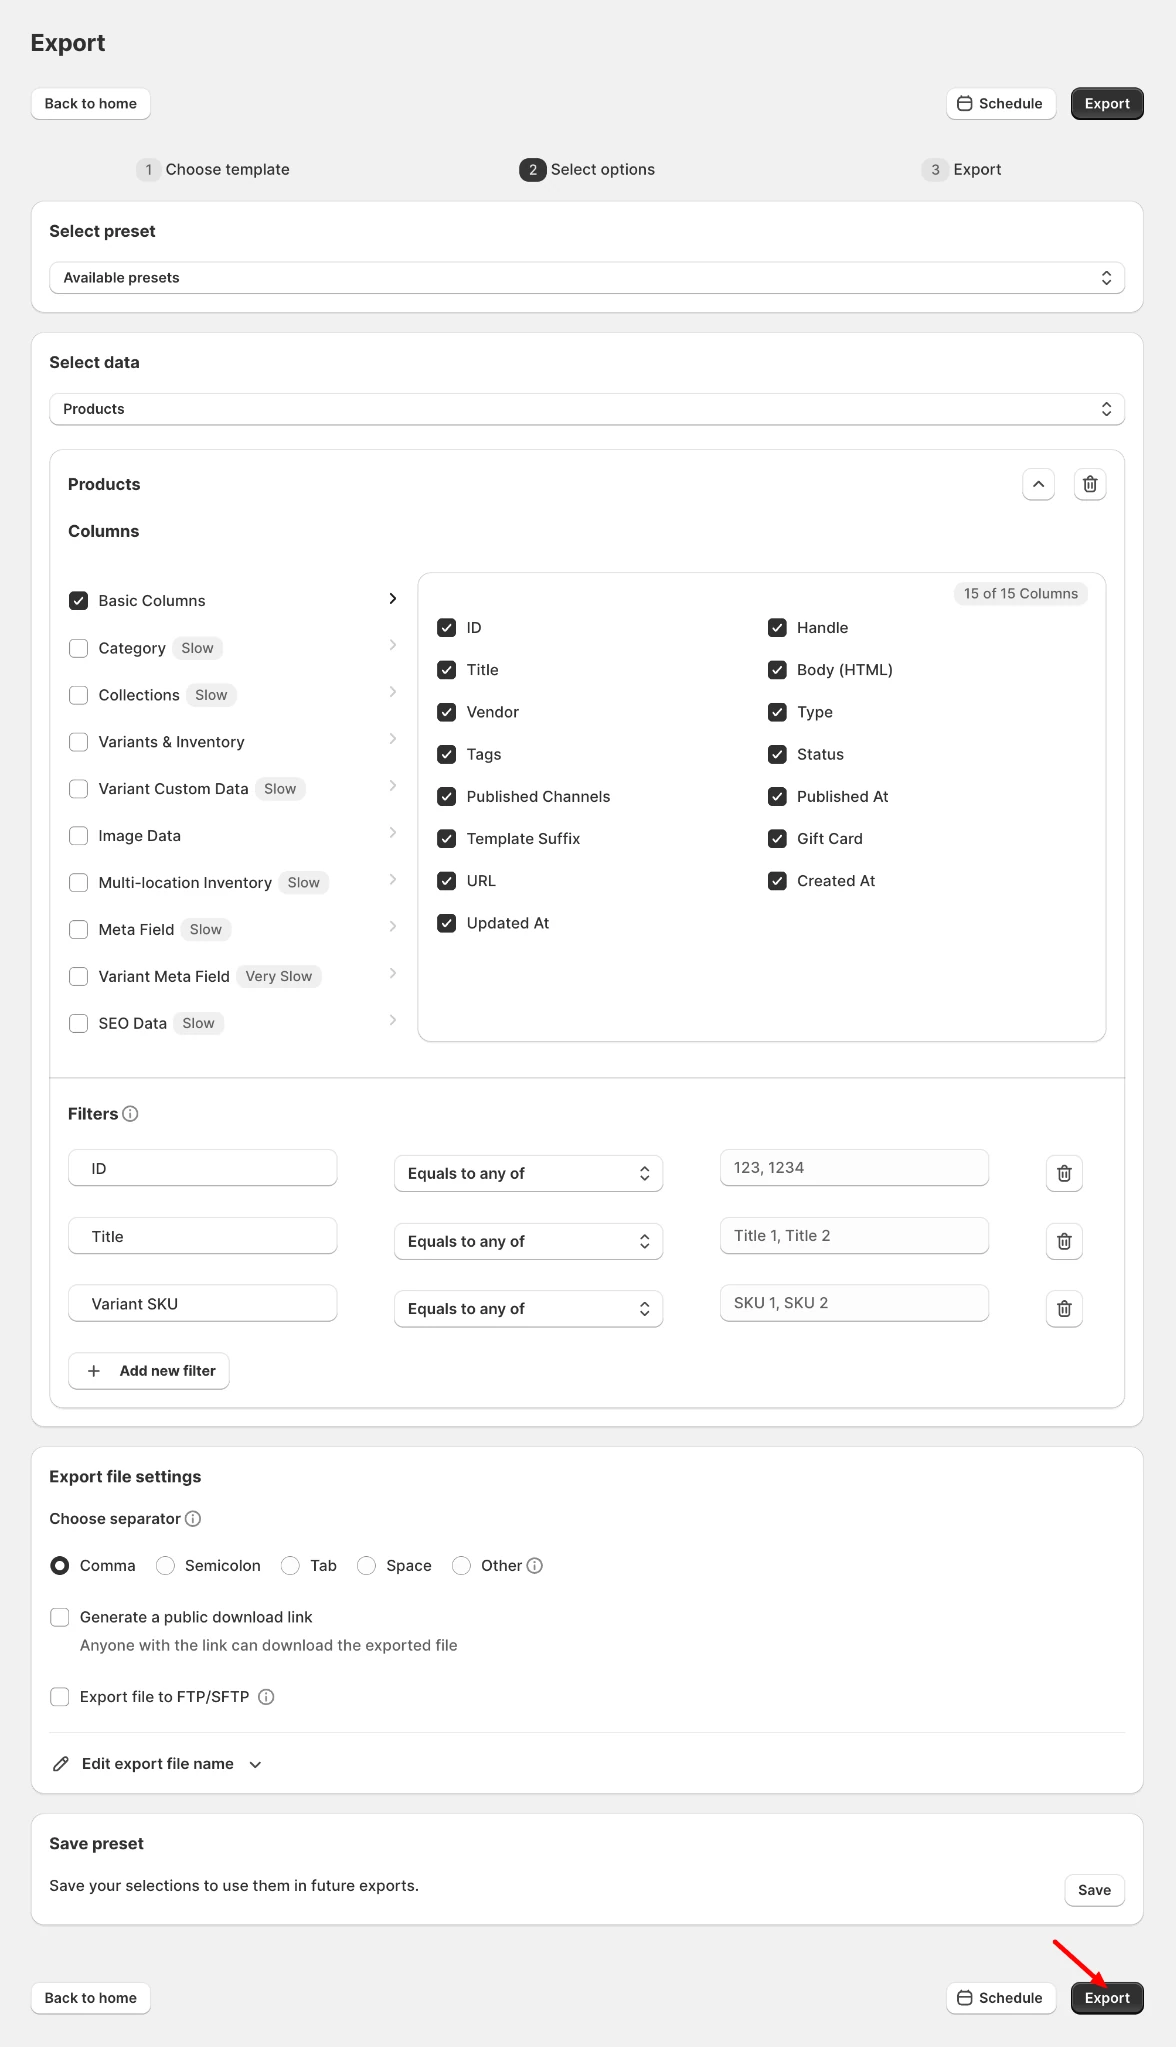
- Choose Products as the data type. You can also use filters to export only specific products or collections instead of downloading your entire catalog.
- Click Export and download the file.
Step 2: Update the SKU Values in the Spreadsheet
Open the exported CSV file in Excel or Google Sheets.
Find the Variant SKU column and enter the new SKU codes for the products or variants you want to update. For example, you could replace an existing SKU like SHIRT001 with TSH-BLK-M to follow your new naming convention.
Keep the product IDs, handles, and variant-identifying information intact so the app can match the records to the correct products.
Once you’ve finished making changes, save the updated CSV file.
Step 3: Import the Updated File Using StoreRobo
- Return to Apps > StoreRobo > Home in your Shopify admin.
- Under the Import section, choose Local as the import source and upload your modified CSV file.
- Select Product as the data type and click Upload.
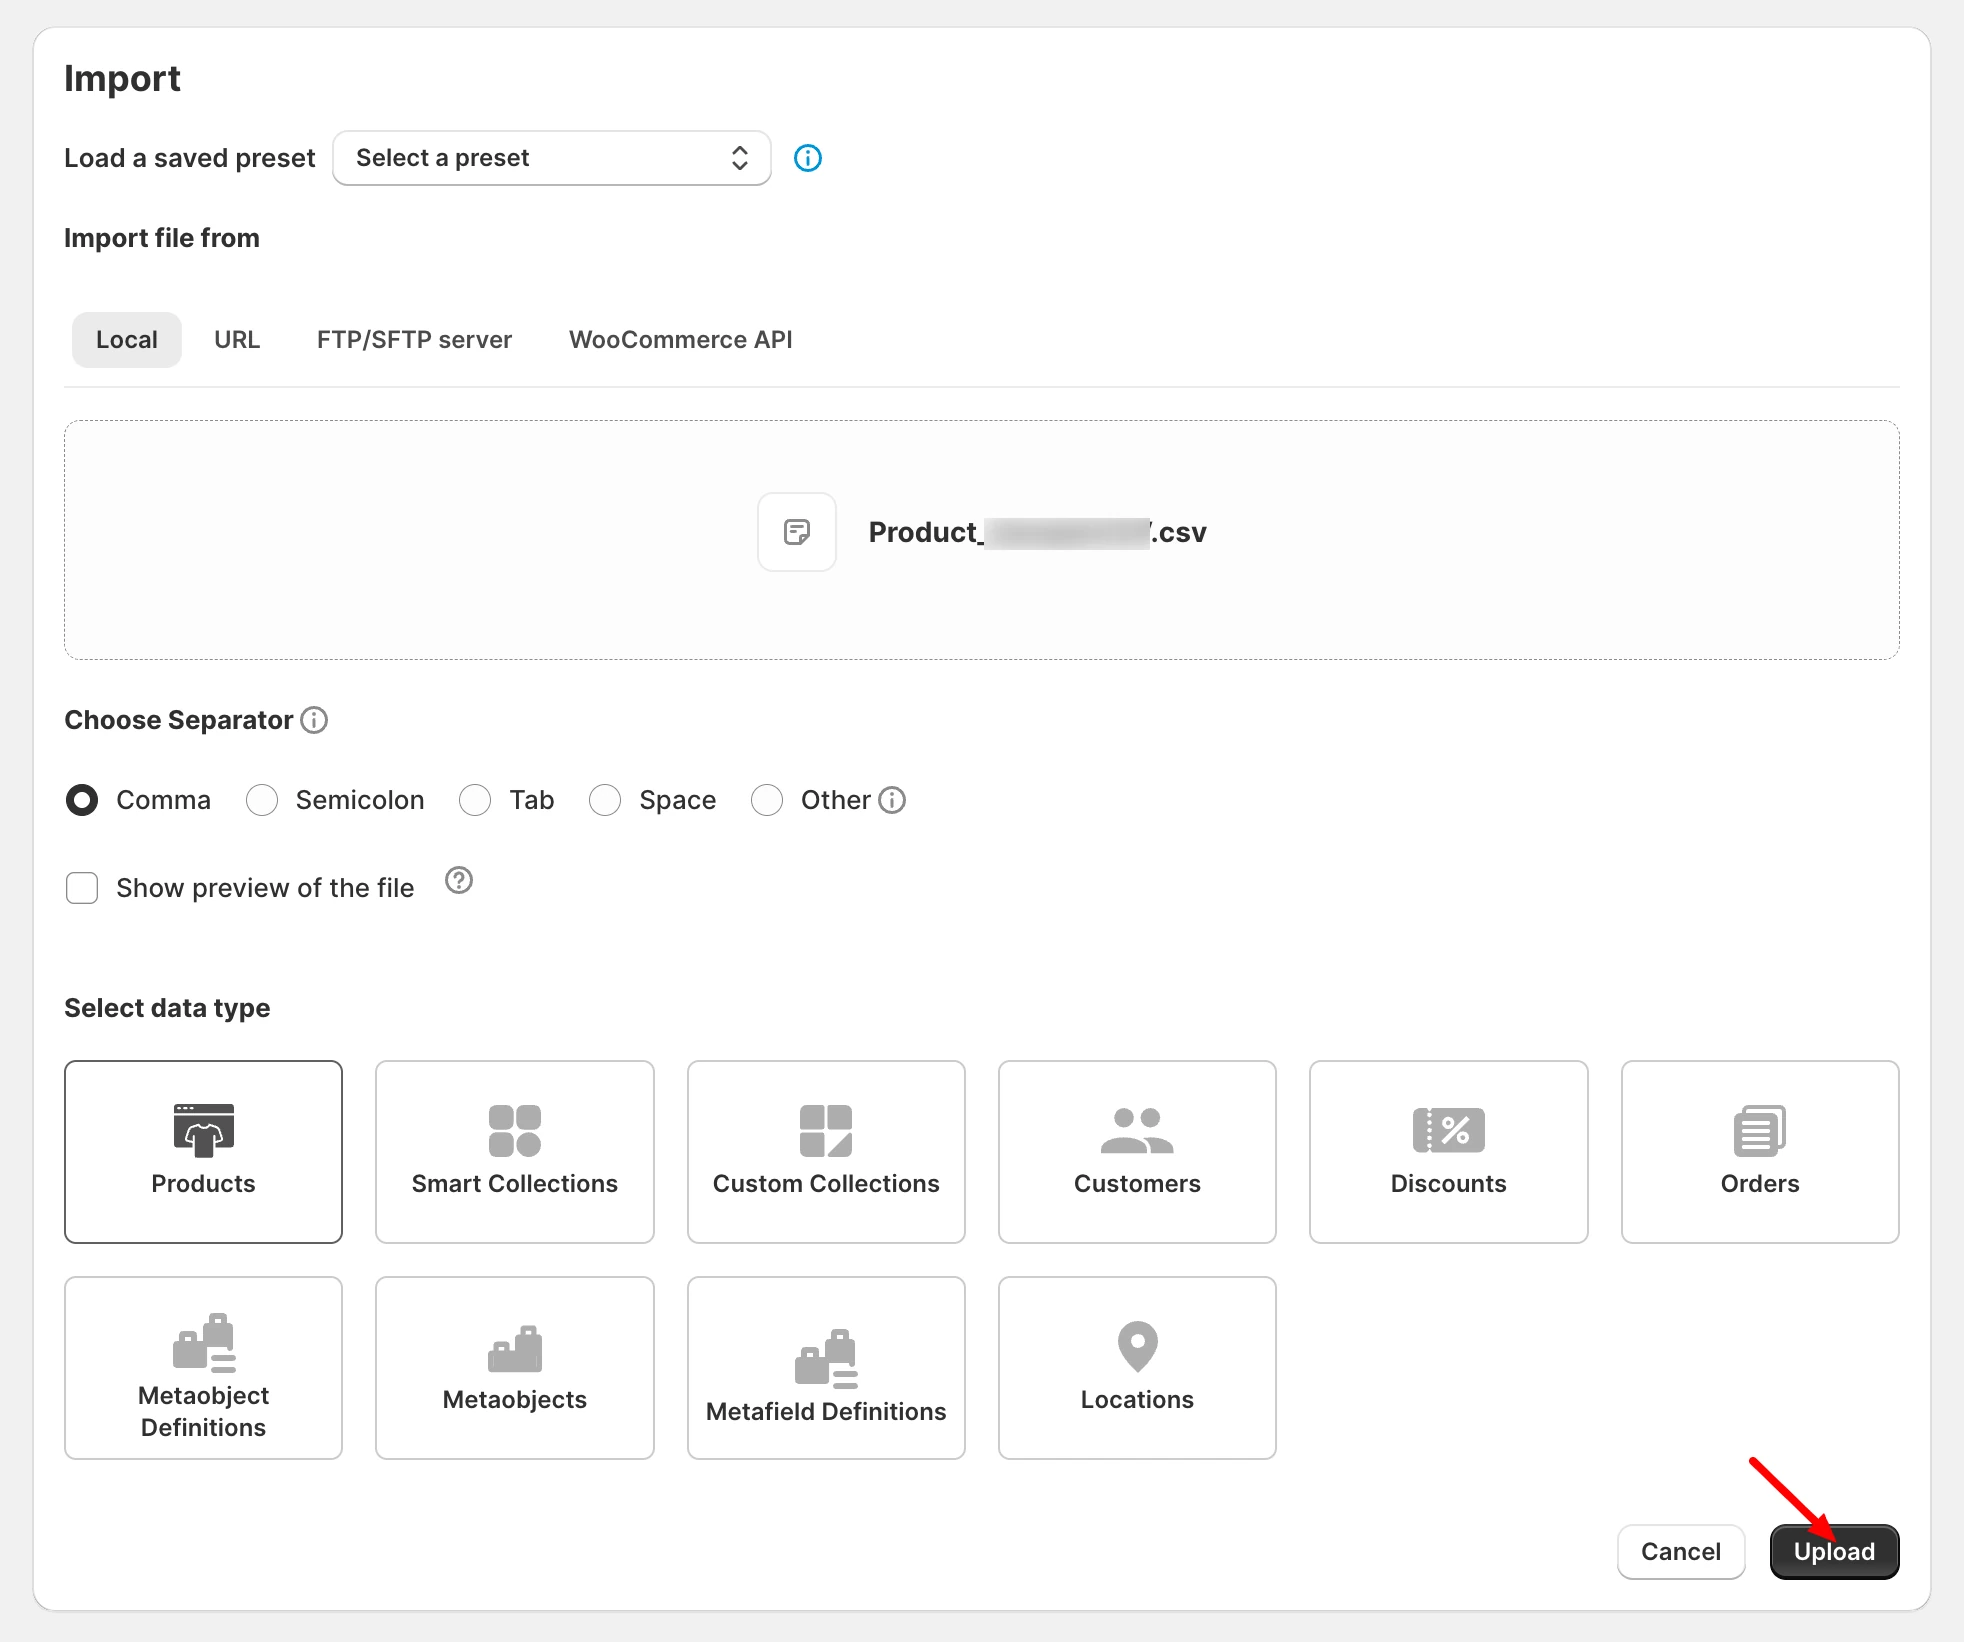
StoreRobo will detect the file format. Make sure the correct import template is selected and review the recognized columns.
Step 4: Configure the Update Settings
In the import options, enable Update If products exist in the store. This tells StoreRobo to update matching products rather than creating new ones.
When importing a Shopify CSV, StoreRobo uses product IDs to identify existing products. If you enable Ignore ID, it uses product handles instead. Make sure the relevant SKU fields are included in the import and that the variant information matches the existing products.
Click Import to start the update.
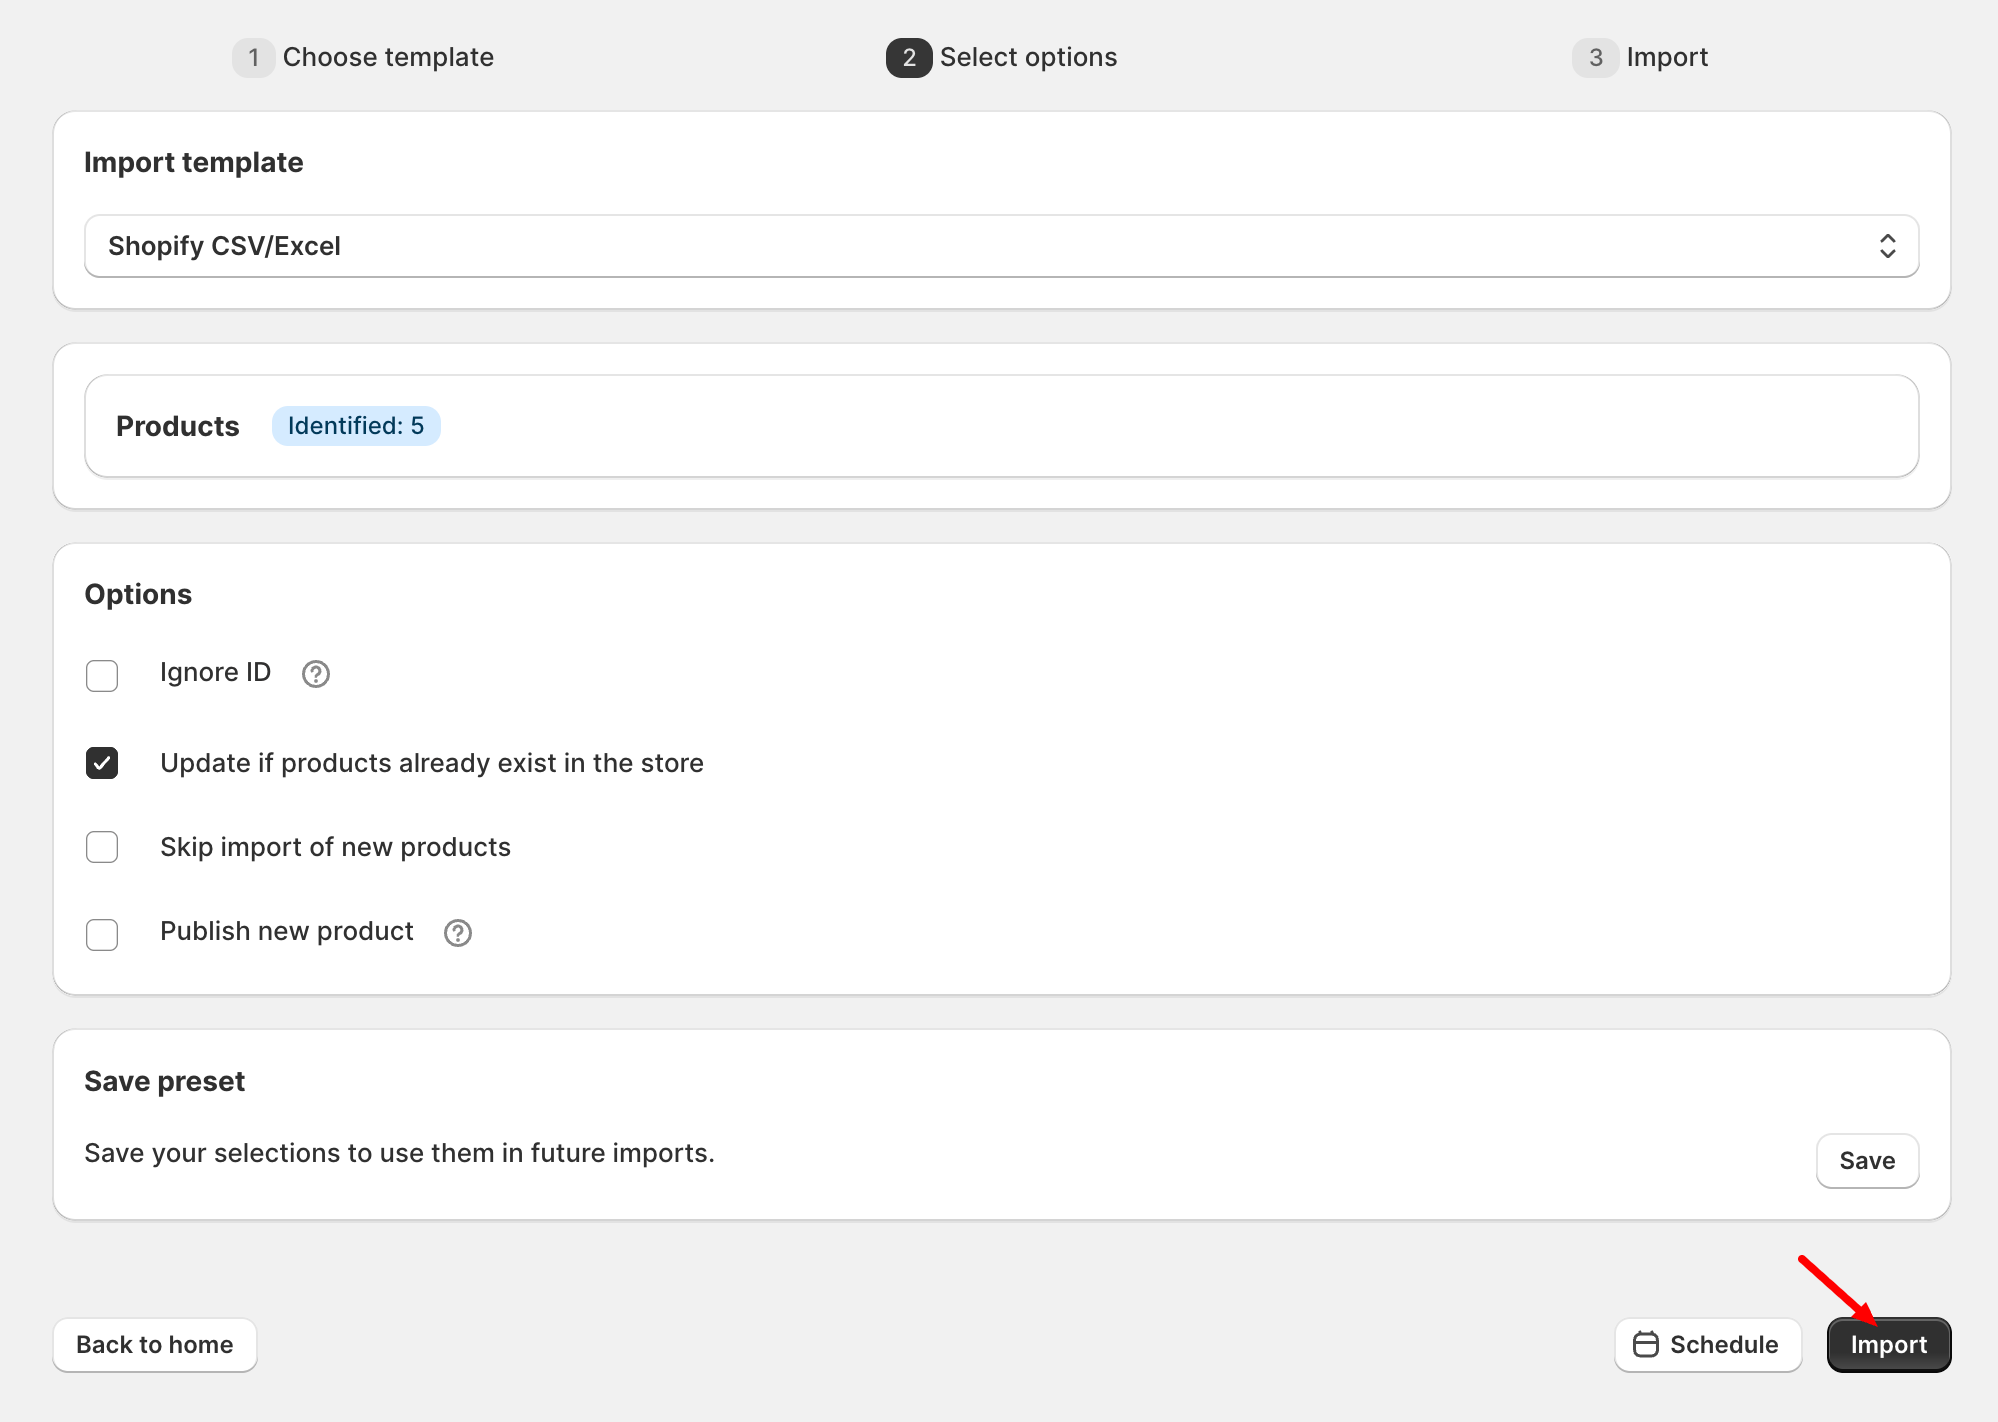
Once the process finishes, check the import status and review the log for any errors. Open a few products in your Shopify admin to confirm that the SKU values have been updated correctly.
Important: Before making large SKU changes, keep a backup of your original product data and test the import with a few products. Be particularly careful with custom CSV formats, as incorrect SKU mappings can cause import errors.
StoreRobo also supports product filtering, CSV column mapping, and scheduled import/export jobs, making it useful for stores that regularly manage large product catalogs.
Shopify lets you create and assign your own SKUs, but it doesn’t automatically generate custom SKU codes for every product using a built-in naming system.
If you want SKUs to follow a particular format, you’ll generally need to create them manually or use an SKU generator app.
For example, suppose you sell 500 clothing products with multiple size and color variants. Instead of creating every SKU individually, an SKU generator can help generate codes based on predefined rules, such as product type, color, size, or a sequential number.
Several third-party SKU generator apps are available in the Shopify App Store. Depending on the app, you may be able to:
- Generate SKUs for products with missing values.
- Create SKUs using custom naming rules.
- Assign unique codes to product variants.
- Detect duplicate SKUs.
- Generate SKUs automatically for newly added products.
Before using an SKU generator, review how it handles existing SKUs. You don’t want to accidentally replace codes already used by your inventory or fulfillment systems.
Remember that SKU generation and bulk SKU editing are different tasks. An SKU generator creates new codes, while a bulk editor or import/export tool helps you assign or update the codes in Shopify.
Creating SKUs is only the first step. Having a consistent system helps keep your inventory organized as your catalog grows.
Here are some useful practices to follow.
Keep SKUs Short and Easy to Understand
Avoid unnecessarily long codes.
For example, TSH-BLK-M is easier to read and enter than a lengthy code containing the full product name, description, and other details.
Shopify recommends keeping SKUs relatively short, suggesting 16 characters or fewer as a useful guideline.
Use a Consistent Naming Convention
Decide how you’re going to represent product attributes and use the same format throughout your catalog.
For example, if BLK represents black, don’t switch between BLK, BLACK, and BK for different products.
Inconsistent naming makes it harder to identify products and manage inventory.
Assign Unique SKUs to Individual Variants
A shirt in size small should generally have a different SKU from the same shirt in size large.
Even if the variants belong to the same product, they represent different inventory items.
However, if the same variant is stocked at several Shopify locations, use the same SKU across those locations and manage the stock quantities separately.
Avoid Spaces and Complicated Characters
Stick to letters, numbers, hyphens, and underscores wherever possible.
Avoid special characters that could create problems when searching for SKUs or exchanging data with other systems.
Also, be careful with easily confused characters such as the number 0 and the letter O.
Plan for Future Products
Your SKU system should accommodate new categories, variants, and products.
For example, if you’re starting with 100 products but expect to add thousands more, choose a naming structure that won’t run out of usable combinations.
Most importantly, document your SKU naming rules so everyone managing your store follows the same system.
Go to Shopify admin > Products and open the product you want to check. You’ll find its SKU in the Inventory section. For products with multiple variants, select the individual variant to view its SKU.
You can also search for products using their SKU codes from the Shopify admin search bar.
Yes. Shopify generally allows duplicate SKUs, although it may display a warning. However, using the same SKU for unrelated products can cause problems with inventory tracking, reporting, and third-party integrations.
It’s best to assign a unique SKU to each product variant unless you have a specific reason to reuse one.
Shopify doesn’t publish a general limit on the number of different SKUs you can assign across your store. However, Shopify has separate limits for product variants. A product can have up to 2,048 variants and three product options. These are product configuration limits, not SKU-number limits.
You can create your own SKU using a combination of product attributes such as type, color, size, or model. For example, SHO-BLK-42 could represent a black shoe in size 42.
Once you’ve created the code, open the product or variant in Shopify and enter it in the SKU field.
Yes. You can edit an existing SKU directly from the product or variant editor, through Shopify’s bulk editor, or using a product CSV import.
However, if your store connects to external inventory, warehouse, or fulfillment systems, make sure those systems are updated too. Changing an SKU without updating connected systems can cause product-matching problems.
Conclusion
Shopify SKUs may seem like small details, but they can make a significant difference in how efficiently you manage your products and inventory. A consistent SKU system makes it easier to identify variants, fulfill orders, track stock, and keep product information organized across different systems.
If you have a small catalog, Shopify’s built-in product editor and bulk editor should be enough to manage SKUs. For larger catalogs or frequent product updates, CSV imports and a dedicated import/export tool like StoreRobo can help reduce manual work.
The most important thing is to create a simple SKU naming system, use it consistently, and keep your product identifiers accurate as your store grows.


Subcribe to our newsletter


