Share:


Table of Contents
A comprehensive backup strategy for a WooCommerce store is vital for safeguarding data and minimizing downtime in the event of issues such as accidental deletions, security breaches, or technical failures. Utilizing automated backup plugins like WebToffee’s WP Backup and Migration not only streamlines the backup process but also ensures that critical store data, including products, orders, and customer information, is consistently protected, thereby maintaining business continuity and customer trust.
- A complete WooCommerce backup includes both the database and the files stored on the server, ensuring full recovery capabilities.
- Automated backup plugins are more reliable than manual methods, reducing the risk of human error and ensuring regular backups without additional effort.
- The frequency of backups should be determined by the store's activity level, with higher-traffic stores requiring more frequent backups to minimize potential data loss.
- Off-site storage solutions, such as cloud services, are essential for protecting backups from local server failures.
- Regular testing of backup restorations is crucial to ensure the reliability of the backup process and the integrity of the data.
- Utilizing a plugin like WebToffee’s WP Backup and Migration simplifies the backup and restoration process, making it accessible for users of all technical levels.
A robust WooCommerce backup and restore strategy is essential to reduce your store downtime and protect your reputation. Learn how to effectively use WebToffee’s WP Backup and Migration plugin to keep your store safe.
Your WooCommerce store data could be at risk for several reasons. These can include accidental mistakes, unexpected security threats, or technical glitches. Imagine the impact of losing your products, orders, customer information, or store settings. It could seriously affect your business in terms of time and revenue.
This is where having a backup plan becomes essential. A robust backup and restore strategy is not just about protection; it’s a wise business decision. It ensures that if something goes wrong, you can quickly restore your store and minimize downtime, helping you maintain your reputation and customer trust.
While manual backups are an option, let’s be honest. They can be tedious, time-consuming, and susceptible to human error. Fortunately, technology offers a better solution: backup plugins. These tools automate the entire process, making it reliable and highly efficient.
In this article, we will guide you on how to use a backup plugin like WebToffee’s WP Backup and Migration to protect and restore your WooCommerce store. Keep reading to learn more!
Before choosing a backup method, it’s worth understanding what you’re protecting.
A complete WooCommerce backup has two components:
The database stored in MySQL. This contains everything transactional and configurational:
- Products (titles, descriptions, prices, attributes, stock levels)
- Orders and order history
- Customer accounts and addresses
- WooCommerce settings and configurations
- WordPress posts, pages, and comments
- Plugin and theme settings
The files stored on your server’s file system:
- WordPress core files
- Your active theme and child theme
- All installed plugins
- Uploaded media (product images, documents)
- The wp-config.php configuration file
A database-only backup won’t restore your theme or plugin files. A files-only backup won’t restore your orders or customer data. You need both for a full recovery. This matters most during major store changes or migrations, where missing even one component can lead to downtime or data loss. A complete eCommerce replatforming, which involves moving an store from its current platform or technology setup to a new one should therefore include a reliable backup strategy that protects every part of your store before the migration begins.
Your database changes constantly — every order, customer signup, and stock update gets written there. If you only remember one thing from this section, make it this: a files-only backup will not save your orders. If you need to protect just the database, for example, before a plugin update or a risky change, here are your options.
Method 1: Export via phpMyAdmin
Most hosting control panels (cPanel, Plesk, etc.) include phpMyAdmin, a free tool for managing your MySQL database directly.
To export your database:
- Log in to your hosting control panel and open phpMyAdmin.
- Select your WordPress/WooCommerce database from the left-hand sidebar.
- Click the Export tab at the top.
- Choose Quick export method and SQL as the format.
- Click Go to download the .sql file.
Note: This exports only the database — not your theme, plugins, or media files. Keep the exported .sql file somewhere safe, ideally off your server.
Method 2: Export via WP-CLI
If you’re comfortable with the command line, WP-CLI offers a fast way to export your database, and it’s easy to script or automate with a cron job.
wp db export backup-$(date +%F).sql
This creates a timestamped .sql file in your current directory. You can pair this with a cron job to run it automatically on a schedule, then push the file to remote storage with a follow-up command.
This is the preferred method for developers managing multiple stores or building custom backup automation, but it’s not practical for non-technical store owners.
Method 3: Using Your Host’s Built-In Backup Tool
Many managed WordPress/WooCommerce hosts include automatic daily database and file backups as part of your plan, along with a dashboard for manual, on-demand backups.
If you’re on managed hosting, check your hosting dashboard first — you may already have automatic backups running without needing any additional plugin. A few tradeoffs to watch for:
- Retention windows vary (often 14–30 days) unless you pay for longer storage.
- Restoring may require contacting hosting support or using a limited self-service tool.
- Downloading the raw backup for off-site storage isn’t always straightforward.
Method 4: Database-Only Backup via a Plugin
If you want scheduled, database-only backups without touching phpMyAdmin or the command line, a backup plugin gives you the most control with the least manual effort. Most WooCommerce backup plugins, including WebToffee’s WP Backup and Migration, let you select Database only in the export settings, which is useful when you want frequent database snapshots without repeatedly backing up unchanged theme and plugin files.
We’ll walk through the full plugin setup below. If you just need database-only exports: in the plugin’s Configuration tab, deselect Files and keep Database selected under “what to backup,” then schedule it independently from your full-site backup.
There’s no universal answer here. It depends entirely on how much data you can afford to lose. A useful way to frame it:
“If I lost every order, review, and account signup from the last few hours or days, how much of a problem would that be?”
For a store with a handful of orders a week, losing a day’s data might be a minor annoyance. For a busy store processing dozens of orders daily, losing even an hour could mean lost revenue and support headaches.
Scheduled vs. Real-Time (Incremental) Backups
Scheduled backups run at fixed intervals — hourly, daily, or weekly. Simple to set up and sufficient for lower-traffic stores.
Real-time (incremental) backups capture changes as they happen. A new order triggers an immediate, small backup of just that change, rather than a full re-backup of the entire database. This minimizes data loss to seconds or minutes rather than hours, but it typically requires a premium plugin or hosting add-on.
Suggested Starting Points by Store Activity
- Low activity (a few orders/week): Daily backups
- Medium activity (several orders/day): Every 6 hours, or daily with a real-time add-on
- High activity (dozens+ orders/day): Hourly or real-time incremental backups
Treat these as starting points, not rules. Adjust based on how disruptive losing that window of data would actually be for your business.
Using backup plugins like WP Backup and Migration for backing up and restoring a WooCommerce store is preferred for several key reasons:
- Automation and Convenience: Backup plugins automatically take care of the entire process, so you don’t have to stress about setting reminders or remembering to back up your store regularly. You can schedule automatic backups at intervals that work for you, ensuring your data is always current without any effort.
- Reliability: Unlike manual backups, which can be susceptible to human error, backup plugins offer a dependable and consistent way to secure your data. They are built to manage all the technical details of backup, reducing the likelihood of mistakes or overlooked files.
- Ease of Use: Most backup plugins are designed to be user-friendly and don’t require technical knowledge to set up or operate. You can back up and restore your store with just a few clicks, making it accessible for everyone, regardless of their technical abilities.
- Comprehensive Backups: Backup plugins guarantee that all essential data is backed up, including products, orders, customer information, and settings. Some even provide options for selective backups, allowing you to choose which parts of your store to back up based on your specific needs.
- Security Features: Many backup plugins have enhanced security features such as encryption and off-site storage options (like cloud backups), safeguarding your data from theft, loss, or corruption. Keeping an additional copy in secure cloud storage can further reduce the risk of losing both the live store and its backups.
Let’s now look into how the backup and restoration are carried out.
To back up your WooCommerce store — files and database together — you have two options:
- The basic exporter that comes with WordPress
- A manual FTP + database export
- Specialized backup plugins like WebToffee’s WP Backup and Migration.
These methods differ in their features, ease of use, and adaptability.
Backup Using WordPress Built-in Export
This is the most basic way of exporting site data to serve as backups.
Note: This method will only export the WordPress database. It will not export other content, such as plugins or theme files.
To export site data for backup:
- Go to Tools > Export from the WordPress admin panel.
- Select All Content from the Choose what to export option.
- Click Download Export File.
This exports all the posts, pages, comments, custom fields, categories, tags, navigation menus, and custom posts.

A copy of your site is made in XML format, which you can save as a backup. To restore the content to your current site or a new one, simply use the Import function.
This is the simplest option, but also the most limited: no theme, plugin, or media files, and no full database dump. Treat it as a lightweight content export, not a real disaster-recovery backup.
Manual FTP + Database Export
For a fully manual full-site backup without a plugin:
Connect to your server via FTP/SFTP and download your entire wp-content folder (themes, plugins, uploads) plus wp-config.php.
Export your database separately using phpMyAdmin or WP-CLI (see above).
Store both the files and the .sql export together, labeled with the date.
This works, but it’s slow, entirely manual, and easy to get wrong — a missed folder, or forgetting to repeat it next week. Best treated as a one-time or emergency method, not a recurring backup strategy.
Comparing WooCommerce Backup Plugins
For anyone who wants backups to actually happen on schedule without manual effort, a dedicated backup plugin is the practical choice. Here’s how the popular options compare:
| Plugin | Free tier | Real-time backups | Storage options | Starting price | Best for |
|---|---|---|---|---|---|
| WP Backup and Migration (WebToffee) | Yes, fully functional free version. | No real-time (scheduled only) | Local, FTP/SFTP, Google Drive, Amazon S3 | Free | Store owners who want an easy setup with flexible scheduling and multiple storage destinations. |
| UpdraftPlus | Yes, fully functional free version. | No real-time (incremental scheduling) | Amazon S3, Google Drive, Dropbox, FTP, and more | Free / $70+ for premium. | Users comfortable configuring their own schedule, including via cron/WP-CLI. |
| Jetpack Backup | No free tier | Yes, on higher plans | Automattic’s own cloud | From ~$96/year | Stores wanting a fully managed, real-time solution with minimal setup. |
| BlogVault | No free tier | Yes, on the Advanced plan | BlogVault cloud | From ~$89/year | Higher-traffic stores that want real-time backups plus staging/restore tools bundled in. |
| WP Time Capsule | No free tier | Yes | Your own cloud storage (S3, Google Drive, Dropbox, etc.) | From ~$49/year plus storage costs | Users who want real-time backups but prefer to control their own storage. |
A quick way to decide: if you’re just getting started or run a lower-traffic store, a free plugin with scheduled backups (WP Backup and Migration or UpdraftPlus) will cover you well. If your store processes a high volume of orders and every hour of data matters, it’s worth the cost of a real-time backup solution.
For the rest of this guide, we’ll walk through setup using WP Backup and Migration, since it covers both database-only and full-site backups with flexible storage options at no cost to get started.
Using WP Backup and Migration Free Plugin
Using the WP Backup and Migration Plugin makes it easy and efficient to back up and restore your WooCommerce store.
First, let’s see how to back up your site’s content.
Backing Up WooCommerce Site
Step 1: Install & Activate WP Backup and Migration Plugin
From your WordPress dashboard,
- Go to Plugins > Add New Plugin.
- Search for ‘webtoffee wp backup and migration’ in the search bar.
- Install and activate the plugin.

Step 2: Customize Configuration Options
Once the plugin is installed,
- Click WordPress Migration from your dashboard.

In the Create Backup subsection, you can create a backup in two ways:
Quick Export/Backup

By clicking the Export/Backup Now button, the plugin will package all your WordPress files and database into a zip file for you to download and store offline.
However, if you need to export only specific content or want to save the backup to an external storage option, you can easily set these preferences in the plugin’s settings under the Configuration tab.
Configuration Options
This section allows you to customize your export settings to fit your needs. You’ll have the option to:
- Choose the specific data you want to export, such as WordPress databases and files.
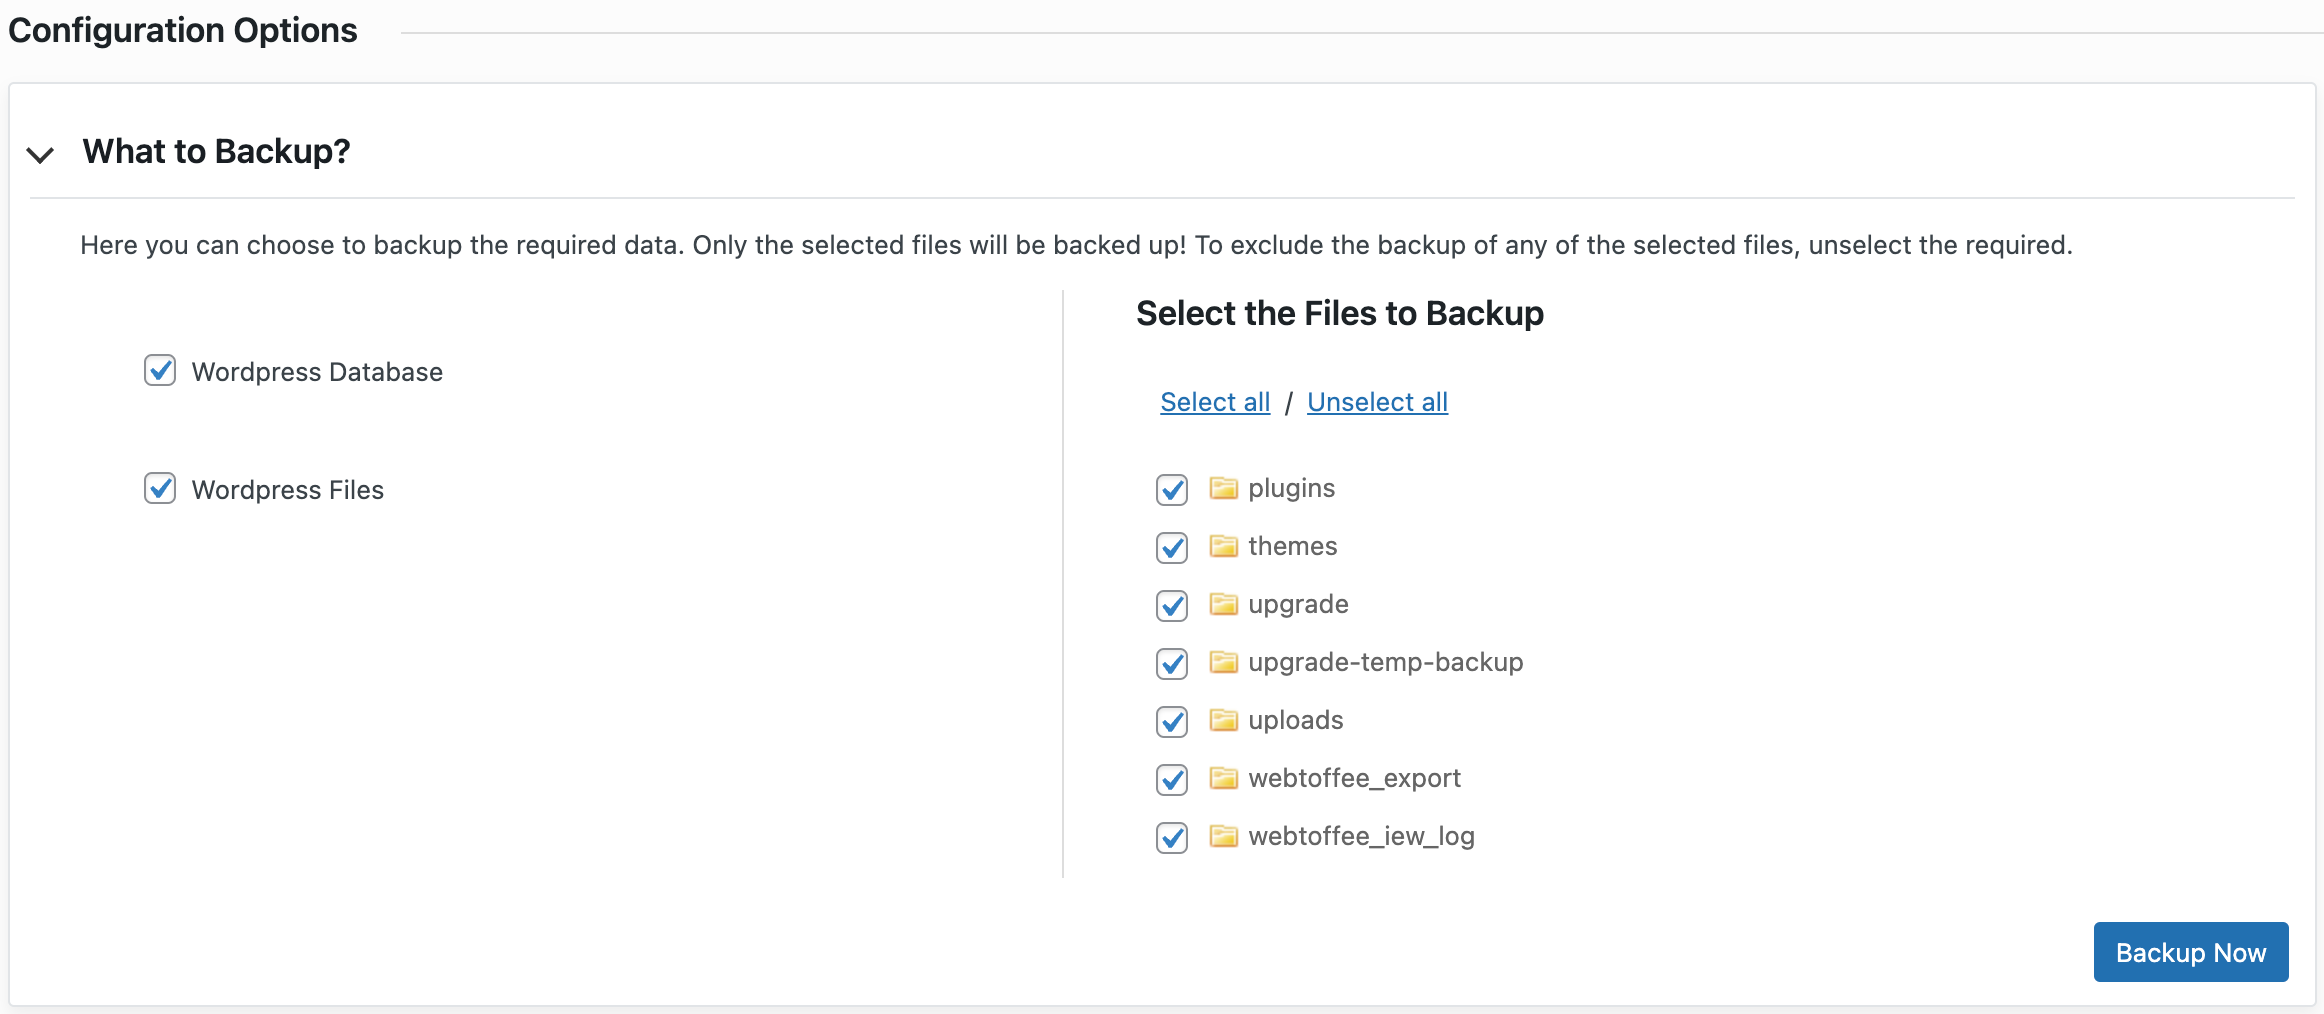
- Select the backup storage location – Local, FTP/SFTP, Google Drive, or Amazon S3.

- Adjust the export speed based on your server’s performance.

After configuring each setting, you can back up the data by either clicking Backup Now in the corresponding column or using the Export/Backup Now button.
Step 3: Schedule Backup
You can also schedule the backup to occur at a specific time.
For this, in the backup schedule section, click Schedule Backup.

Next, you can configure the automatic backup schedule settings.
- Select Save Location: Choose where to save your backup from the Export File Into dropdown.
- Set Backup Interval: Pick a schedule – Every Day, Every Week, or Every Month.
- Start Time: Set when the backup should start.
- Choose Content: Select Database, Files, or both under Export Content.
- Select Files: Mark the files to include in the backup under Select the Files to Backup.
Once done, click Schedule.

Also Read: How to Export a WordPress Site
Restoring WooCommerce Site
To restore your WooCommerce site data, you need to install the WebToffee Backup and Migration plugin on the target site.
Once it’s done.
- Go to the Import/Restore sub-section.
- Under the Quick Import, use the Import From dropdown to select the zip file’s location.
- Drag and drop or upload the file and click Import.
The plugin will effortlessly transfer all files, including theme and plugin files, while updating the database.

You can configure advanced restore options such as Data Size Limit and Number of Database Files to optimize the process based on your server’s performance.
Once selected, click Save and proceed to import.

Restoring to a Staging Site First
Before restoring a backup directly to your live store, it’s worth restoring to a staging site first, whenever possible — even though a backup should represent your store exactly as it was, it’s still worth confirming there are no surprises before your customers see it.
Most hosts (and some backup plugins) let you spin up a staging copy of your site. The general process:
- Create a staging site through your host’s dashboard, or use a staging plugin.
- Import your backup file to the staging site using the same Import/Restore steps described above.
- Check that products, orders, stock levels, and settings all look correct.
- Once verified, push the restored version live — either by repeating the restore on your live site, or using your host’s “push staging to live” feature if available.
This extra step costs a few minutes but can save you from restoring a corrupted or incomplete backup straight to a live, customer-facing store.
Verifying the Restore
After any restore — staging or live — run through a quick checklist before considering it complete:
- Recent orders are present and show the correct status
- Product stock levels match what you expect
- Customer accounts and stored addresses are intact
- Site settings (payment gateways, shipping zones, taxes) are unchanged
- Theme and plugins are active and functioning as expected
Here are some best practices while using the WP Backup and Migration plugin to secure your WooCommerce store data:
- Schedule Regular Backups – Set up automated, recurring backups at regular intervals (daily, weekly, or monthly) to ensure that your store’s data is always up to date. The frequency of backups depends on how often you update your store (new products, orders, or customer data).
- Backup All Critical Data – Ensure that the plugin is configured to include all essential WooCommerce data, such as products, orders, customers, settings, themes, and plugins. A comprehensive backup guarantees that you can fully restore your store in case of any issues.
- Store Backups Off-Site – Store backups in a secure off-site location such as cloud storage (Google Drive, Dropbox, Amazon S3, etc.) or external servers. This protects your backups from being lost if your server or hosting environment fails.
- Test Restores Regularly – Conduct test restores periodically to ensure your backup system works appropriately. Verifying that your backups are fully functional will give you peace of mind, knowing that data recovery will be smooth when needed.
- Keep Multiple Backup Versions – Retain a history of backups, ideally keeping several versions of your store’s data (e.g., backups from the last week, month, and three months). This helps if a recent change causes issues and you must roll back to an earlier version.
- Update Your Backup Plugin – Keep the plugin up to date to ensure it works with the latest versions of WooCommerce and WordPress. Developers often release updates that include new features, improvements, and security patches.
- Testing Your Backups Periodically – A backup you’ve never tested is a backup you can’t fully trust. Set a monthly or quarterly reminder, depending on how critical your store is, to restore a recent backup to a staging site and confirm it works. This is the only way to know for certain that your backup process, storage connection, and restore process are all functioning correctly before you actually need them in an emergency.
By following these best practices, you’ll ensure that your WooCommerce store’s data is securely backed up and can be quickly restored in case of emergencies.

The WP Backup and Migration plugin by WebToffee simplifies the process of backing up, storing, and restoring your WordPress site. Creating and restoring backups is just a click away, thanks to its intuitive interface. You also have the option to customize your backups, allowing you to choose exactly what to include.
You can schedule automatic backups to occur daily, weekly, or at specific intervals and store them securely on cloud services like Dropbox, OneDrive, Amazon S3, Google Drive, or through FTP/SFTP.
Planning to relocate your site? The plugin’s import and export features make migrating between WordPress installations a breeze.
You can export the database on its own using phpMyAdmin, WP-CLI, or by selecting “Database only” in your backup plugin’s export settings — no need to back up theme or plugin files if you only want a database snapshot.
It depends on your order volume. Low-traffic stores are often fine with daily backups, while high-traffic stores handling frequent orders should consider hourly or real-time incremental backups to minimize potential data loss.
Yes, you can manually export your database via phpMyAdmin or WP-CLI and download your files via FTP. This works but requires manual repetition each time and is easier to get wrong than using a scheduled plugin.
Follow the 3-2-1 rule: keep at least one local copy and one off-site copy (cloud storage such as Google Drive, Amazon S3, or Dropbox), in addition to your live site, so a single point of failure can’t wipe out both your store and your backups.
Restore to a staging site first to verify the backup is complete and correct, then push the verified version live. Always check that recent orders, stock levels, and customer data are intact after any restore.
In the fast-moving world of eCommerce, protecting your WooCommerce store is crucial. Utilizing a trustworthy tool like WebToffee’s WP Backup and Migration plugin lets you easily secure your store’s data and prepare for any unexpected challenges.
A robust backup plan offers peace of mind and helps you avoid downtime and disruptions. Start implementing a backup solution today to keep your store safe and functioning seamlessly!


Subcribe to our newsletter