Share:


Table of Contents
Offering a withdrawal option for guest users in WooCommerce is a legal necessity for businesses operating within the European Union, ensuring compliance with the EU Consumer Rights Directive. Guest customers must have the same rights as registered users, including the ability to cancel orders within 14 days without creating an account, making it crucial for store owners to implement a straightforward withdrawal process.
- Guest users are entitled to a 14-day right of withdrawal, regardless of account status.
- Compliance requires an accessible withdrawal method that does not mandate account creation.
- Refunds must be processed within 14 days of receiving a valid withdrawal request, including standard shipping costs.
- The WebToffee EU Order Withdrawal Plugin facilitates a compliant and user-friendly withdrawal process for guest users.
- Common compliance pitfalls include hiding withdrawal options behind account logins and miscalculating the start date for the withdrawal period.
- Proper configuration can enhance customer satisfaction and streamline the post-purchase experience while maintaining legal compliance.
If you sell to customers in the European Union, offering a compliant right of withdrawal process isn’t optional; it’s a legal requirement. Under the EU Consumer Rights Directive, eligible customers have the right to cancel their purchase within 14 days, regardless of whether they created an account or checked out as a guest.
While many WooCommerce plugins let registered users submit withdrawal requests through the My Account page, guest customers are often overlooked. Requiring customers to register just to exercise their withdrawal rights can leave your store non-compliant with EU regulations.
This creates a common question among WooCommerce store owners: Do guest customers also need access to a withdrawal request option?
The short answer is yes.
In this guide, you’ll learn why guest users are entitled to the same withdrawal rights as registered customers, what your store needs to do to remain compliant, and how to configure a guest-friendly withdrawal process in WooCommerce using the WebToffee EU Order Withdrawal Plugin.
Yes. A guest checkout doesn’t reduce a customer’s rights in any way. If someone buys from your store without registering, they still get the full 14-day cancellation window to return goods or cancel a service, no penalty involved.
The EU Consumer Rights Directive doesn’t tie withdrawal rights to account status. Whether someone logs in or checks out as a guest has no bearing on what they’re legally owed.
This catches a lot of store owners off guard because most WooCommerce withdrawal solutions on the market are built around a “my account” experience. If a customer needs to log in to submit a cancellation request, you’re already non-compliant for every guest order you process.
What Guest User Compliance Actually Requires
Before you touch any settings, it helps to know exactly what the law is asking for. Five things matter here:
- No forced registration: You can’t require a guest to create an account just to cancel an order. If account creation is the only path to a withdrawal request, that’s a compliance gap.
- An accessible withdrawal method: Guests need a way to submit a withdrawal request without logging in, usually a public-facing link or form accessible from an order confirmation email, an invoice, or a dedicated page on your site.
- A full 14-day window: The clock starts from the date of delivery (for goods) or the date the service contract is concluded (for services). Customers get 14 calendar days to cancel without giving a reason.
- Refund within 14 days of the request: Once a valid withdrawal is submitted, you have 14 days to refund the customer in full, including standard shipping costs. Not from delivery. From the date you receive the withdrawal request.
- Standard exemptions still apply: Guest orders follow the same exemption list as registered ones: perishable goods, unsealed hygiene products, and services that were fully performed with the customer’s prior consent and acknowledgment that they’d lose the right to withdraw.
To set up the withdrawal option for guest users in WooCommerce, you need an order withdrawal plugin that supports guest withdrawal.
Follow the below steps to set up guest withdrawal on your WooCommerce store:
Step 1: Install and Activate WebToffee EU Order Withdrawal Plugin
- From your WordPress dashboard, go to Plugins > Add Plugin.
- Search for the EU Order Withdrawal Plugin for WooCommerce.
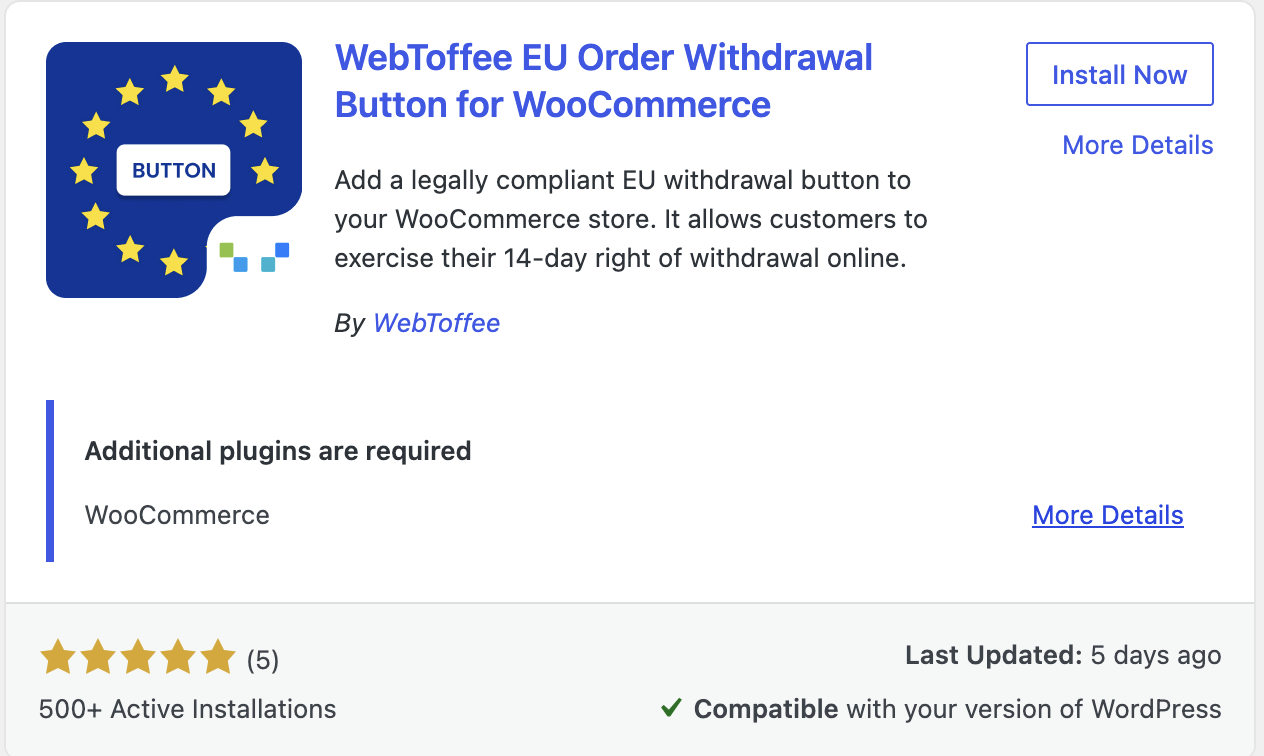
- Install and activate the WebToffee EU Order Withdrawal Button plugin on your website.
Step 2: Configure the Withdrawal Settings
Go to WooCommerce > Withdrawals and select Settings. From here, you can configure the withdrawal settings.
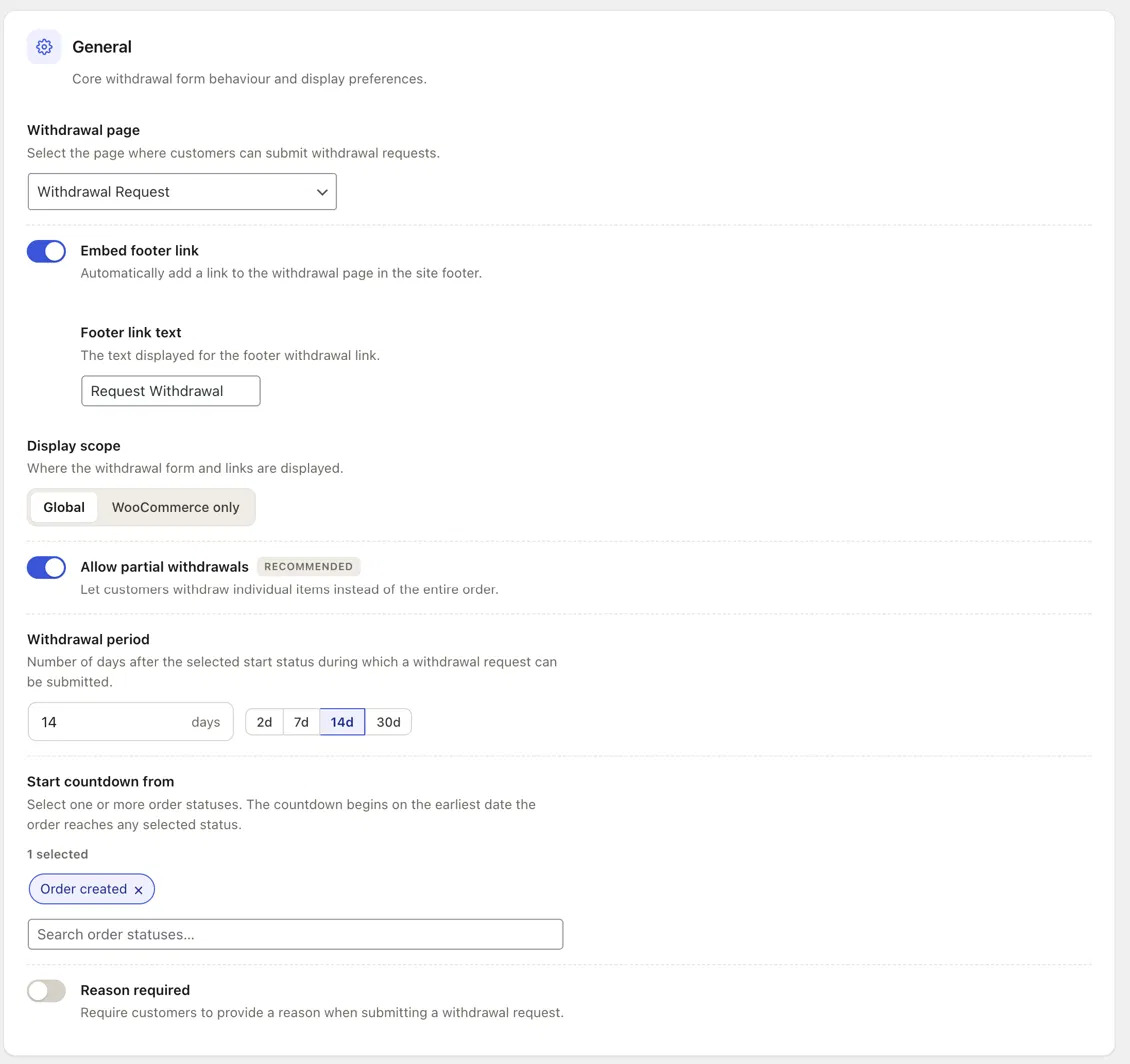
- Withdrawal page: Select the page where the withdrawal form lives. The plugin generates one for you (“Withdrawal Request”), so most stores can leave this as is.
- Embed footer link: Turn this on so the withdrawal page is reachable from every page on your site, not just the confirmation email. This is the setting that makes the option accessible to guests who never log in anywhere.
- Footer link text: Customize what the link says (“Request Withdrawal” works fine for most stores).
- Display scope: Choose Global if you want the link visible site-wide, or WooCommerce only to limit it to shop-related pages.
- Allow partial withdrawals: Keep this on if you want customers to withdraw individual items instead of the whole order. Recommended for stores with multi-item carts.
- Withdrawal period: Set this to 14 days to match the statutory window.
- Start countdown from: Select the order status that should trigger the countdown, for example Order created. This is what determines the actual start date of the 14-day window, so get this right rather than leaving it on a default that doesn’t match how your orders move through statuses.
- Reason required: Leave this off. The law doesn’t require customers to justify a withdrawal, so forcing a reason field adds friction without any legal upside.
Step 3: Set Product Exclusions
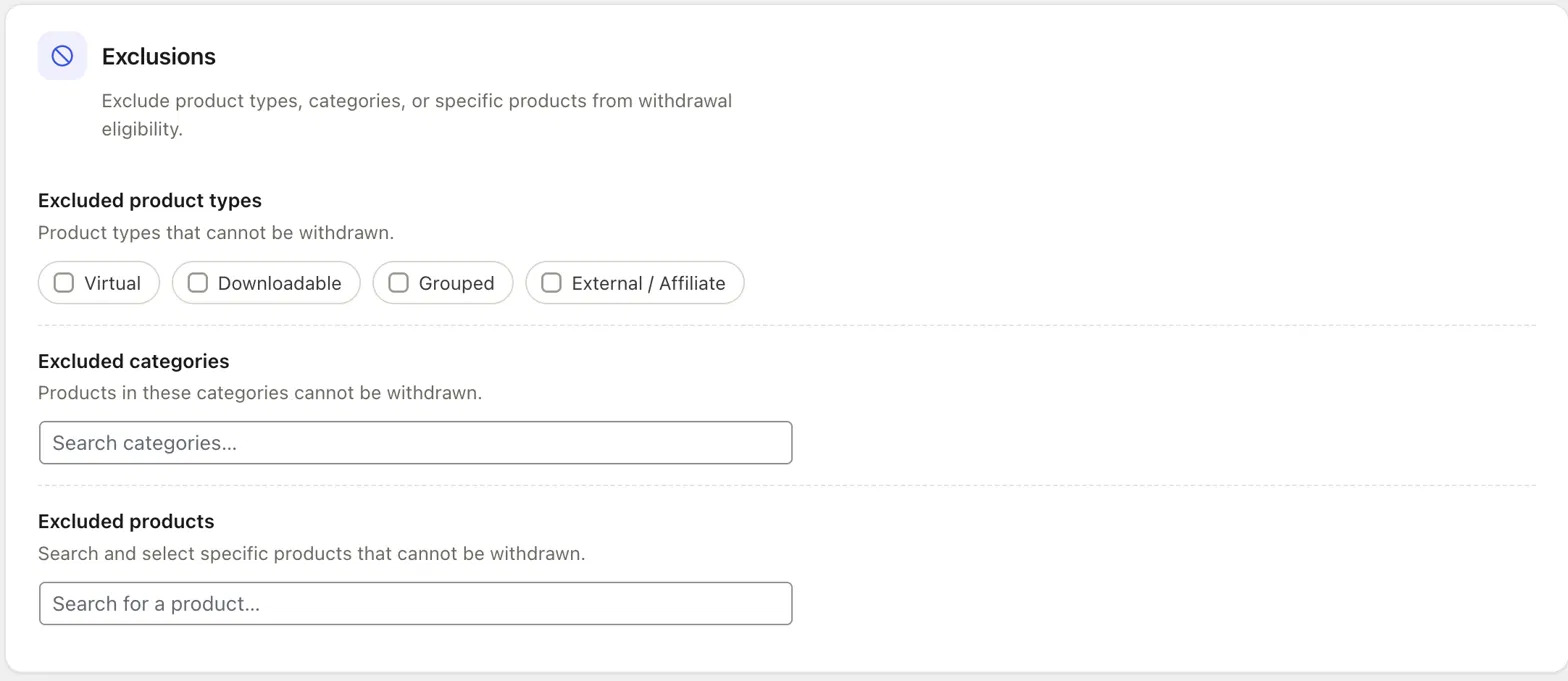
Go to the Exclusions tab to block withdrawal requests for items that fall under the standard exemptions:
- Excluded product types: Check off Virtual, Downloadable, Grouped, or External/Affiliate products as needed. Downloadable and virtual products are the most common exclusions, since these often count as digital services consumed immediately.
- Excluded categories: Search and add any product category that shouldn’t be eligible, such as perishables or made-to-order items.
- Excluded products: Search for individual products that need a one-off exclusion, useful for items like unsealed hygiene products that lose withdrawal eligibility once opened.
Step 4: Set Up Order Status Automation
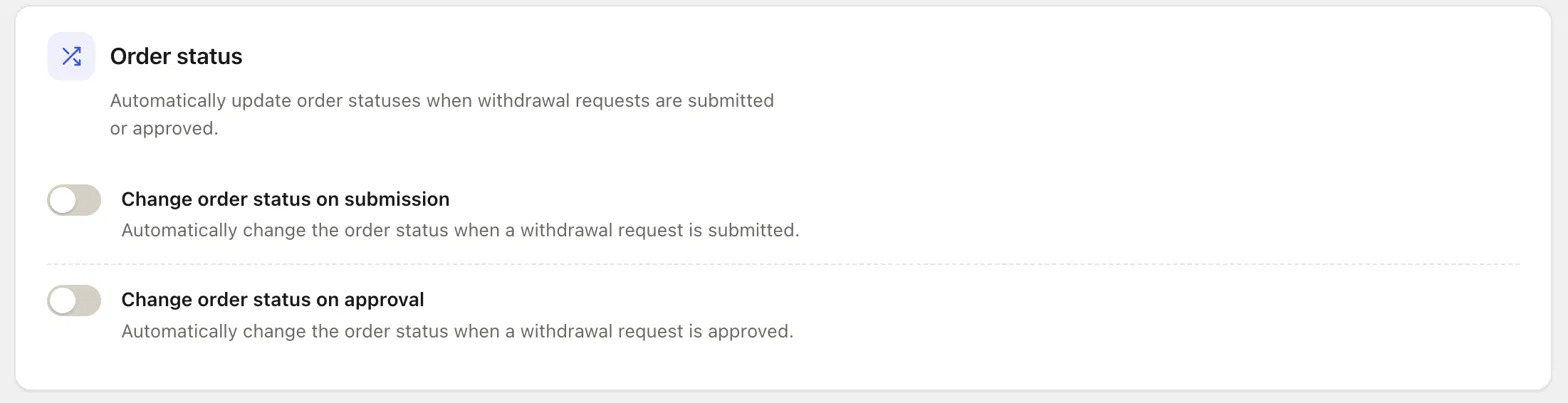
Go to the Order status tab to decide whether order statuses should update automatically as requests move through your workflow:
- Change order status on submission: Turn this on if you want the order to flip to a specific status (like “Withdrawal Requested”) the moment a customer submits a request. This makes pending requests easy to spot in your orders list without checking a separate queue.
- Change order status on approval: Turn this on if you want the order status to update again once you approve the withdrawal, separating “requested” from “approved” at a glance.
Leaving both off still works, but you’ll be relying on the withdrawal requests log alone to track where things stand.
Step 5: Set Up Email Notifications
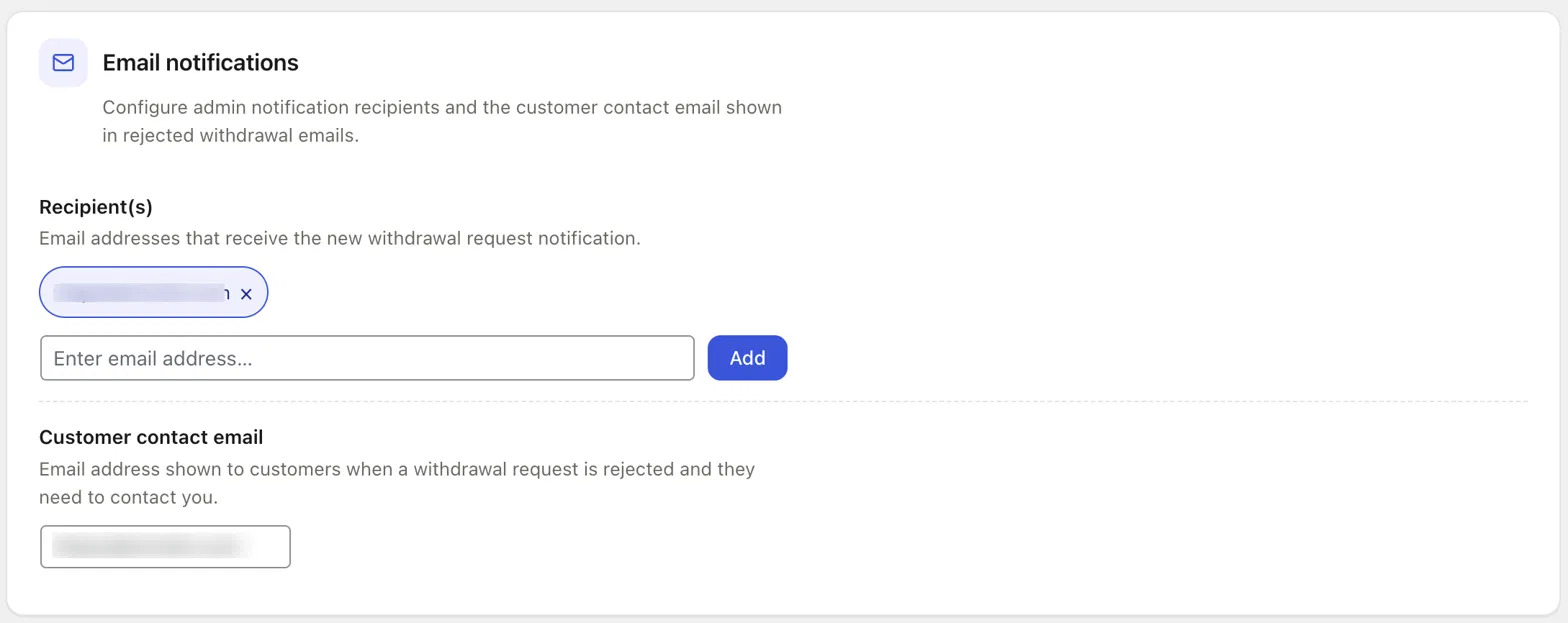
Go to the Email notifications tab to control who hears about new requests and what customers see if one gets rejected:
- Recipient(s): Add the email addresses that should get notified the moment a new withdrawal request comes in. Add whoever actually processes refunds, not just a general admin inbox that nobody checks daily. Missing this step is how requests sit unanswered until they blow past the 14-day refund deadline.
- Customer contact email: Set the address shown to customers when a request is rejected. This gives them a direct way to follow up instead of leaving them stuck with no next step.
Here’s how the withdrawal form appears on your website.
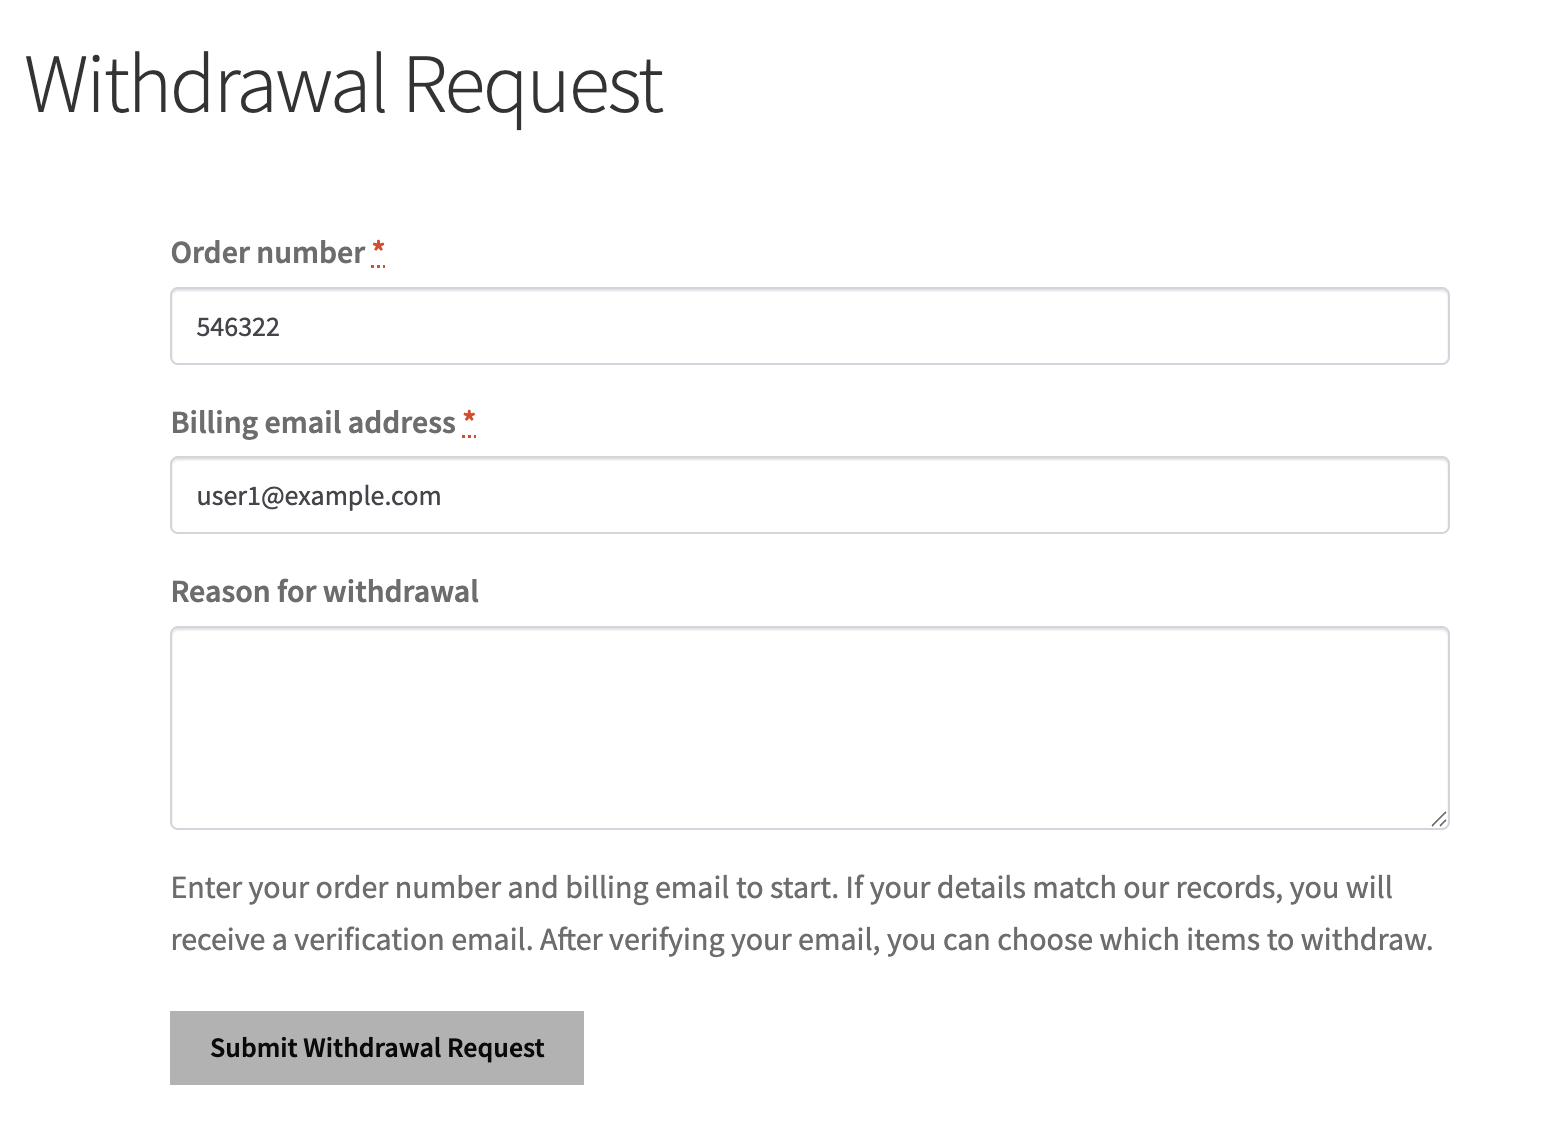
The plugin adds a Request Withdrawal link to the footer of your store website. Upon clicking the link, a user will reach the withdrawal request form page, where they can submit the withdrawal requests.
A few patterns show up again and again in WooCommerce stores that think they’re compliant but aren’t:
- Hiding the withdrawal option behind My Account: If a guest has to register to find the cancel button, the option doesn’t exist for them in any practical sense.
- Starting the 14-day refund clock from the wrong date: Some stores count from the original order date instead of the date the withdrawal request came in. That’s two different clocks, and using the wrong one means refunds go out late even when the team thinks they’re on schedule.
- Refunding the product but not shipping: Standard shipping costs are part of the refund obligation. Leaving them out, even unintentionally, is a partial refund and doesn’t satisfy the requirement.
- No written confirmation that a request was received: Without a confirmation, customers have no proof they submitted on time, and you have no record of when the 14-day refund clock actually started.
Providing guest users the option to withdraw is an essential part of complying with the EU Consumer Rights Directive. Since withdrawal rights apply equally to registered customers and guest shoppers, your WooCommerce store should provide a simple, accessible way for every eligible customer to submit a withdrawal request without requiring an account.
With the WebToffee EU Order Withdrawal Plugin, you can easily set up a dedicated withdrawal page, make it accessible across your store, configure the statutory 14-day withdrawal period, exclude ineligible products, automate order status updates, and manage notifications.
Taking a few minutes to configure these settings can help you stay compliant, streamline your withdrawal process, and improve your customers’ post-purchase experience. If your store serves customers in the EU, now is the right time to ensure your withdrawal process works just as smoothly for guest users as it does for registered customers.


Subcribe to our newsletter