


Share:


Table of Contents
Importing WooCommerce products with images is essential for efficiently managing an online store, especially during migrations or updates. The process can be executed using WooCommerce's built-in CSV importer for simpler tasks or through specialized plugins like WebToffee's Product Import Export for more complex requirements, ensuring that product images are correctly associated with their respective items.
- WooCommerce supports importing products and images via a built-in CSV importer or dedicated plugins, each catering to different needs.
- Properly formatted CSV files are crucial, with specific columns required for product names, SKUs, and image URLs.
- Images must be hosted at publicly accessible URLs to be imported successfully; local files or private links will not work.
- The built-in importer is suitable for small catalogs, while plugins like WebToffee are designed for larger inventories and advanced features like variation images and scheduled imports.
- Common issues during import often stem from incorrect URL formatting or mapping errors, which can lead to missing images or improper associations.
- Image metadata, such as alt text and captions, can also be imported to enhance SEO and accessibility when using compatible workflows.
Importing WooCommerce products with images can save hours when you are creating a new store, migrating products, or updating an existing catalog.
WooCommerce includes a built-in CSV importer that can import product details, featured images, gallery images, and variations. For more advanced requirements—such as scheduled imports, XML or Excel files, image metadata, and recurring catalog updates—you can use a product import plugin.
In this guide, we will show you how to import WooCommerce products with images using:
- The built-in WooCommerce product importer
- The WebToffee Product Import Export plugin
We will also explain how to format image URLs, import variation images, update existing product images, and fix common image-import problems.
To import products with images into WooCommerce:
- Prepare a CSV file containing your product details.
- Add public image URLs or existing Media Library filenames to the image column.
- Separate multiple images using the format required by your importer.
- Upload the CSV through the WooCommerce importer or a product import plugin.
- Map the image column correctly.
- Run the import and verify the images on your product pages.
The first image listed for a product is generally used as its featured image. The remaining images are added to the product gallery. The most important detail is the image separator:
| Import method | Separator for multiple images |
|---|---|
| WooCommerce built-in importer | Comma , |
| WebToffee Product Import Export plugin | Pipe | |
Using the wrong separator can cause gallery images to be skipped or imported incorrectly.
Sample CSV for Importing WooCommerce Products With Images
Your CSV file should include the information required to create or update each product.
At a minimum, it may contain:
- Product name
- SKU
- Product type
- Regular price
- Description
- Image URLs
WooCommerce Built-In Importer Example
When using the native WooCommerce importer, separate multiple image URLs with commas.
Type,SKU,Name,Regular price,Images simple,TSHIRT-001,Blue T-Shirt,29.00,”https://example.com/images/blue-shirt-front.jpg, https://example.com/images/blue-shirt-back.jpg”
In this example:
- blue-shirt-front.jpg becomes the featured product image.
- blue-shirt-back.jpg is added to the product gallery.
Because commas are also used to separate CSV columns, place the complete image value inside quotation marks when adding multiple URLs.
WebToffee Plugin Example
When using the WebToffee Product Import Export plugin, separate multiple images with a pipe symbol.
post_title,sku,regular_price,images Blue T-Shirt,TSHIRT-001,29.00,https://example.com/images/blue-shirt-front.jpg|https://example.com/images/blue-shirt-back.jpg
The first URL becomes the featured image, while the remaining URLs are added to the product gallery.
Before You Import Product Images
A properly formatted CSV file is only one part of a successful image import. Check the following before running the import.
Make Sure Image URLs Are Publicly Accessible
WooCommerce must be able to download each image from the URL in your CSV file.
Open every image URL in a private or incognito browser window. If the image loads without requiring a login, WooCommerce should normally be able to access it.
Avoid using:
- Password-protected URLs
- Temporary download links
- Private cloud-storage links
- URLs that expire
- Links that open a preview page instead of the image itself
A direct image URL usually ends with a file extension such as .jpg, .jpeg, .png, or .webp
An image URL does not always have to display an extension, but it must return the actual image file rather than an HTML page.
Use Complete URLs
Use the full image address, including the protocol and domain.
Correct: https://example.com/wp-content/uploads/2026/07/product-image.jpg
Incorrect: /wp-content/uploads/2026/07/product-image.jpg
Check Whether the Images Already Exist
If the images are already available in your WordPress Media Library, WooCommerce can match them using their filenames in supported workflows.
For example: blue-shirt-front.jpg
The filename must match an existing Media Library item. A local path from your computer, such as the following, will not work: C:\Users\Name\Pictures\blue-shirt.jpg
Back Up Your Store
Create a backup before performing a large product import or updating existing products.
For an established store, test the import on a staging website first. This is especially important when updating product images, SKUs, variations, prices, or custom fields.
WooCommerce includes a product CSV importer, so you do not need an additional plugin for a straightforward import.
The native importer is suitable when:
- Your data is available in a CSV file.
- You are performing a one-time import.
- Your product and image structure are relatively simple.
- You do not need scheduled imports.
- You do not need advanced image metadata or custom mapping.
WooCommerce’s importer supports products, variations, attributes, categories, and images.
Step 1: Prepare the CSV File
Create a UTF-8-encoded CSV file containing your product data. For product images, use an Images column.
Example:
Type,SKU,Name,Regular price,Images simple,MUG-001,Ceramic Coffee Mug,18.00,”https://example.com/mug-front.jpg, https://example.com/mug-side.jpg”
For multiple images, remember to:
- Separate URLs with commas.
- Place the entire field inside quotation marks.
- List the featured image first.
Step 2: Open the WooCommerce Importer
From your WordPress admin dashboard, go to Products > All Products.
Click the Import button at the top of the page.

Step 3: Upload Your CSV File
On the Import Products screen, click Choose File, then select your prepared CSV file.
WooCommerce also provides an option to update existing products. Enable Update existing products only when your CSV contains products already available in the store, and you intend to modify them.
WooCommerce typically matches existing products by their ID or SKU, depending on the data in the file.
Click Continue.

Step 4: Map Columns
WooCommerce will show a column mapping screen. Standard fields like product name, SKU, and price are usually detected automatically.
Find your image column and make sure it is mapped to Images. If WooCommerce does not detect it automatically, select Images manually from the dropdown.
This step is important. If your image column is mapped to the wrong field, WooCommerce will import the product data but ignore the images.

What WooCommerce does with your image URLs at this stage:
| What you put in the images column | What WooCommerce does |
|---|---|
| Single URL | Downloads it and sets it as the featured image |
| Multiple URLs pipe-separated | First URL = featured image, remaining URLs = gallery images |
| Filename only (e.g. tshirt.jpg) | Filename only (e.g., tshirt.jpg) |
| Local file path | Look for a matching file already in your Media Library |
Important: For the native WooCommerce importer, separate multiple image URLs with commas, not pipes. Use pipes only when importing with WebToffee Product Import Export.
Important: WooCommerce does not give you a preview of how images will be assigned before you run the import. Double-check your images column in the CSV before this step. Fixing it after a bad import is more time-consuming than getting it right before.
Step 5: Run the Importer
Once you’re satisfied with the column mappings, click Run Importer. WooCommerce will begin processing your CSV row by row, downloading each image URL and attaching it to the corresponding product.

For a small catalog, this typically takes under a minute. For larger files, the page needs to stay open until the progress bar completes. Closing it mid-import will leave your catalog partially imported.
Step 5: Verify Imported Product Images
When the import finishes, click View Products or go to Products > All Products. Check that:
- Each product shows a thumbnail in the product list
- Opening individual products shows the correct featured image
- Products with multiple images show the full gallery thumbnails
Also, visit your live shop page and click through to a product page to confirm images display correctly for customers, not just in the admin.
Importing Variation Images With the Built-In WooCommerce Importer
WooCommerce can import variable products and their variations through CSV.
Each variation should have its own row and should reference its parent variable product. An image placed in the variation row’s image field can be assigned to that variation. A simplified file may look like this:
Type,SKU,Name,Parent,Attribute 1 name,Attribute 1 value(s),Images variable,TSHIRT-100,Classic T-Shirt,,Color,”Blue, Red”, variation,TSHIRT-100-BLUE,,TSHIRT-100,Color,Blue,https://example.com/blue-shirt.jpg variation,TSHIRT-100-RED,,TSHIRT-100,Color,Red,https://example.com/red-shirt.jpg
In this example:
- TSHIRT-100 is the parent variable product.
- TSHIRT-100-BLUE is the blue variation.
- TSHIRT-100-RED is the red variation.
- Each variation has its own image URL.
The native importer is sufficient when you need one primary image for each variation.
Stores using an extension that adds multiple gallery images to individual variations may need additional fields or a compatible import workflow.
Limitations of the Built-In WooCommerce Importer
The native importer handles straightforward imports well, but you’ll run into its limits quickly in specific situations:
The native importer works well for standard CSV imports, but it may not suit every workflow.
Consider using a product import plugin when you need:
- Imports from XML, Excel, or Google Sheets
- FTP or SFTP imports
- Recurring scheduled imports
- Advanced column mapping
- Product filtering before import
- Image title, alt text, caption, or description imports
- Better control over batch processing
- Custom fields or third-party plugin data
- Reusable import templates
- More detailed import logs
The decision should be based on the complexity of the workflow rather than the number of products alone.
The Product Import Export Plugin for WooCommerce provides a guided import process with column mapping and advanced import options.
The free version can import products and their images from CSV files. The premium version adds support for more advanced sources, file formats, product types, and automated workflows.
Check the current plugin feature list before selecting a version, particularly when importing specialized product types or data created by third-party extensions.
For the complete workflow, including preparing your file, mapping product fields, and configuring import settings, see our WooCommerce product import guide.
Need help? – Refer to our detailed installation guide for more information.
Step 1: Choose Product as Import Post Type
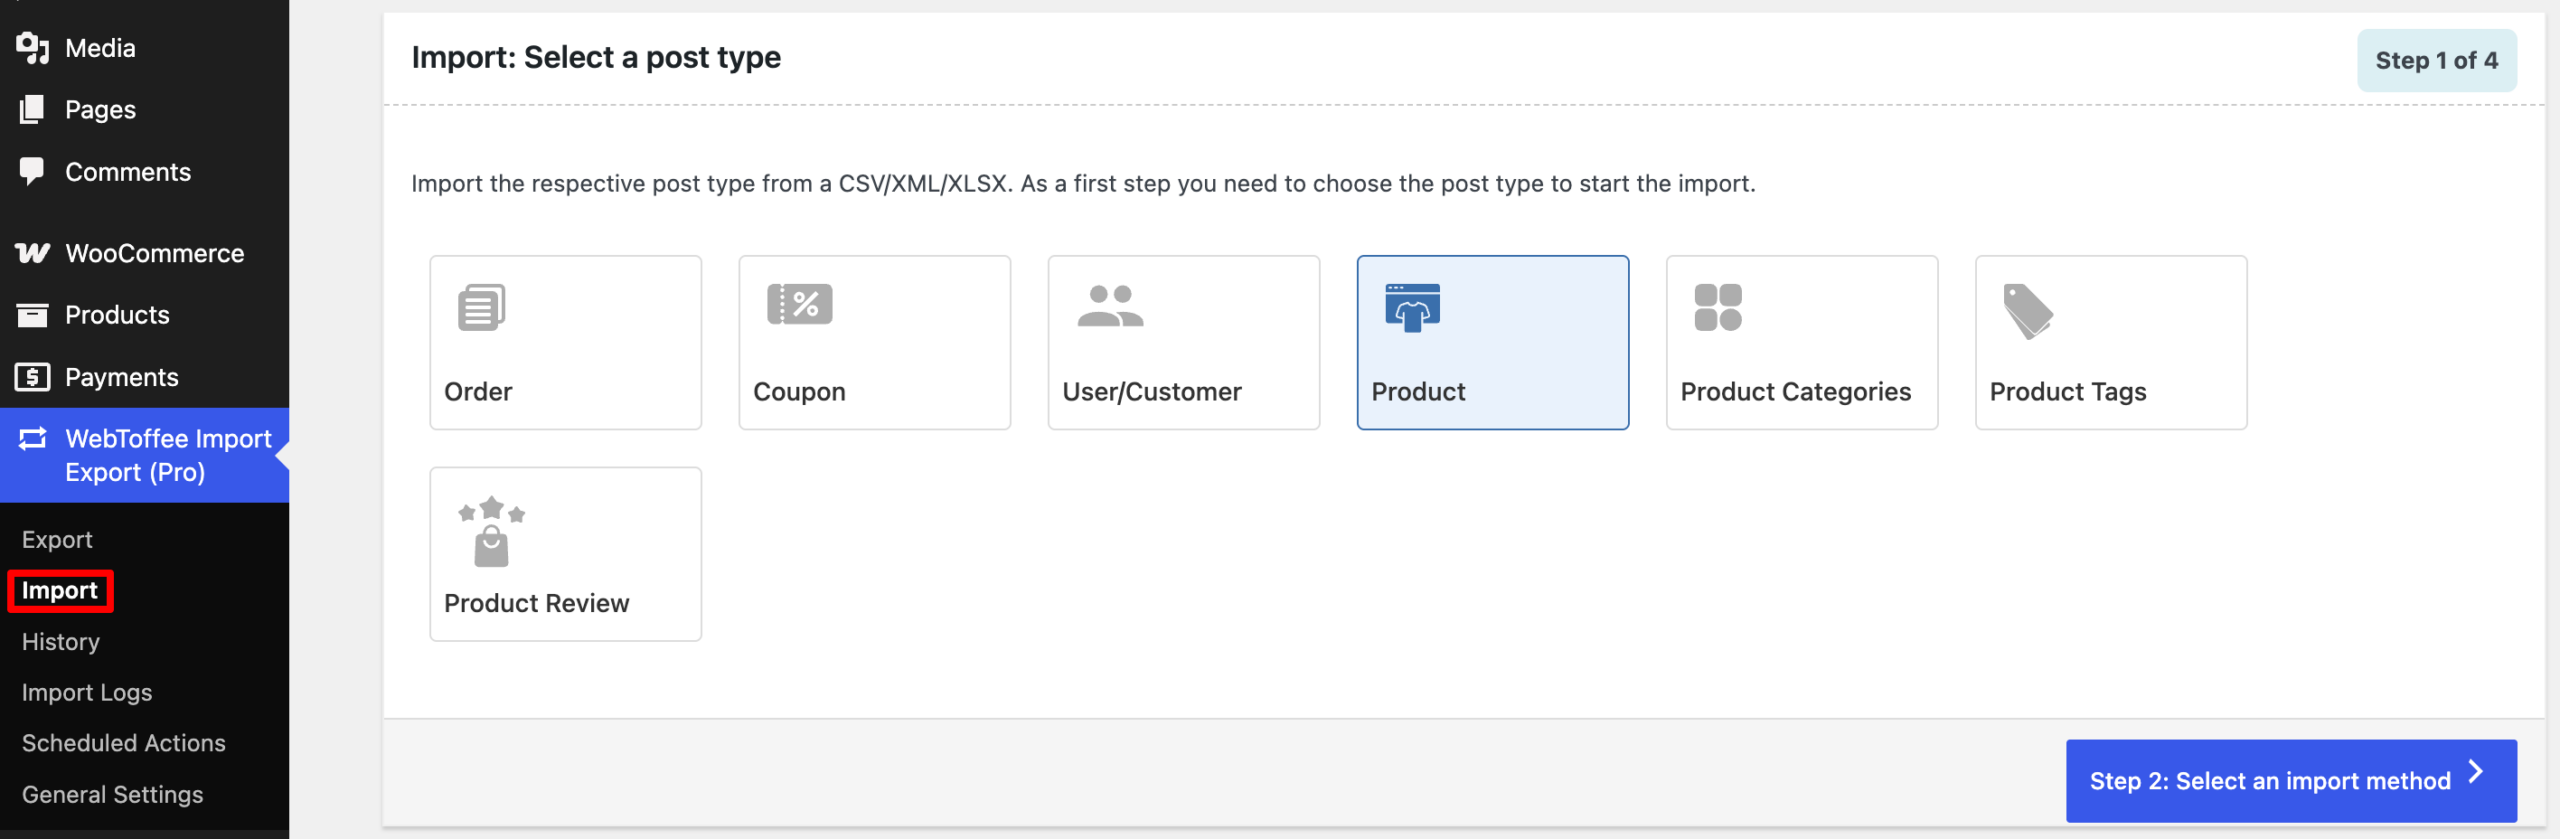
From your WordPress dashboard, go to WebToffee Import Export > Import from your WordPress dashboard.
The menu label may include Basic or Pro, depending on the installed version.
- Choose Product as the post type and click Select import method.
Step 2: Select the Import Method
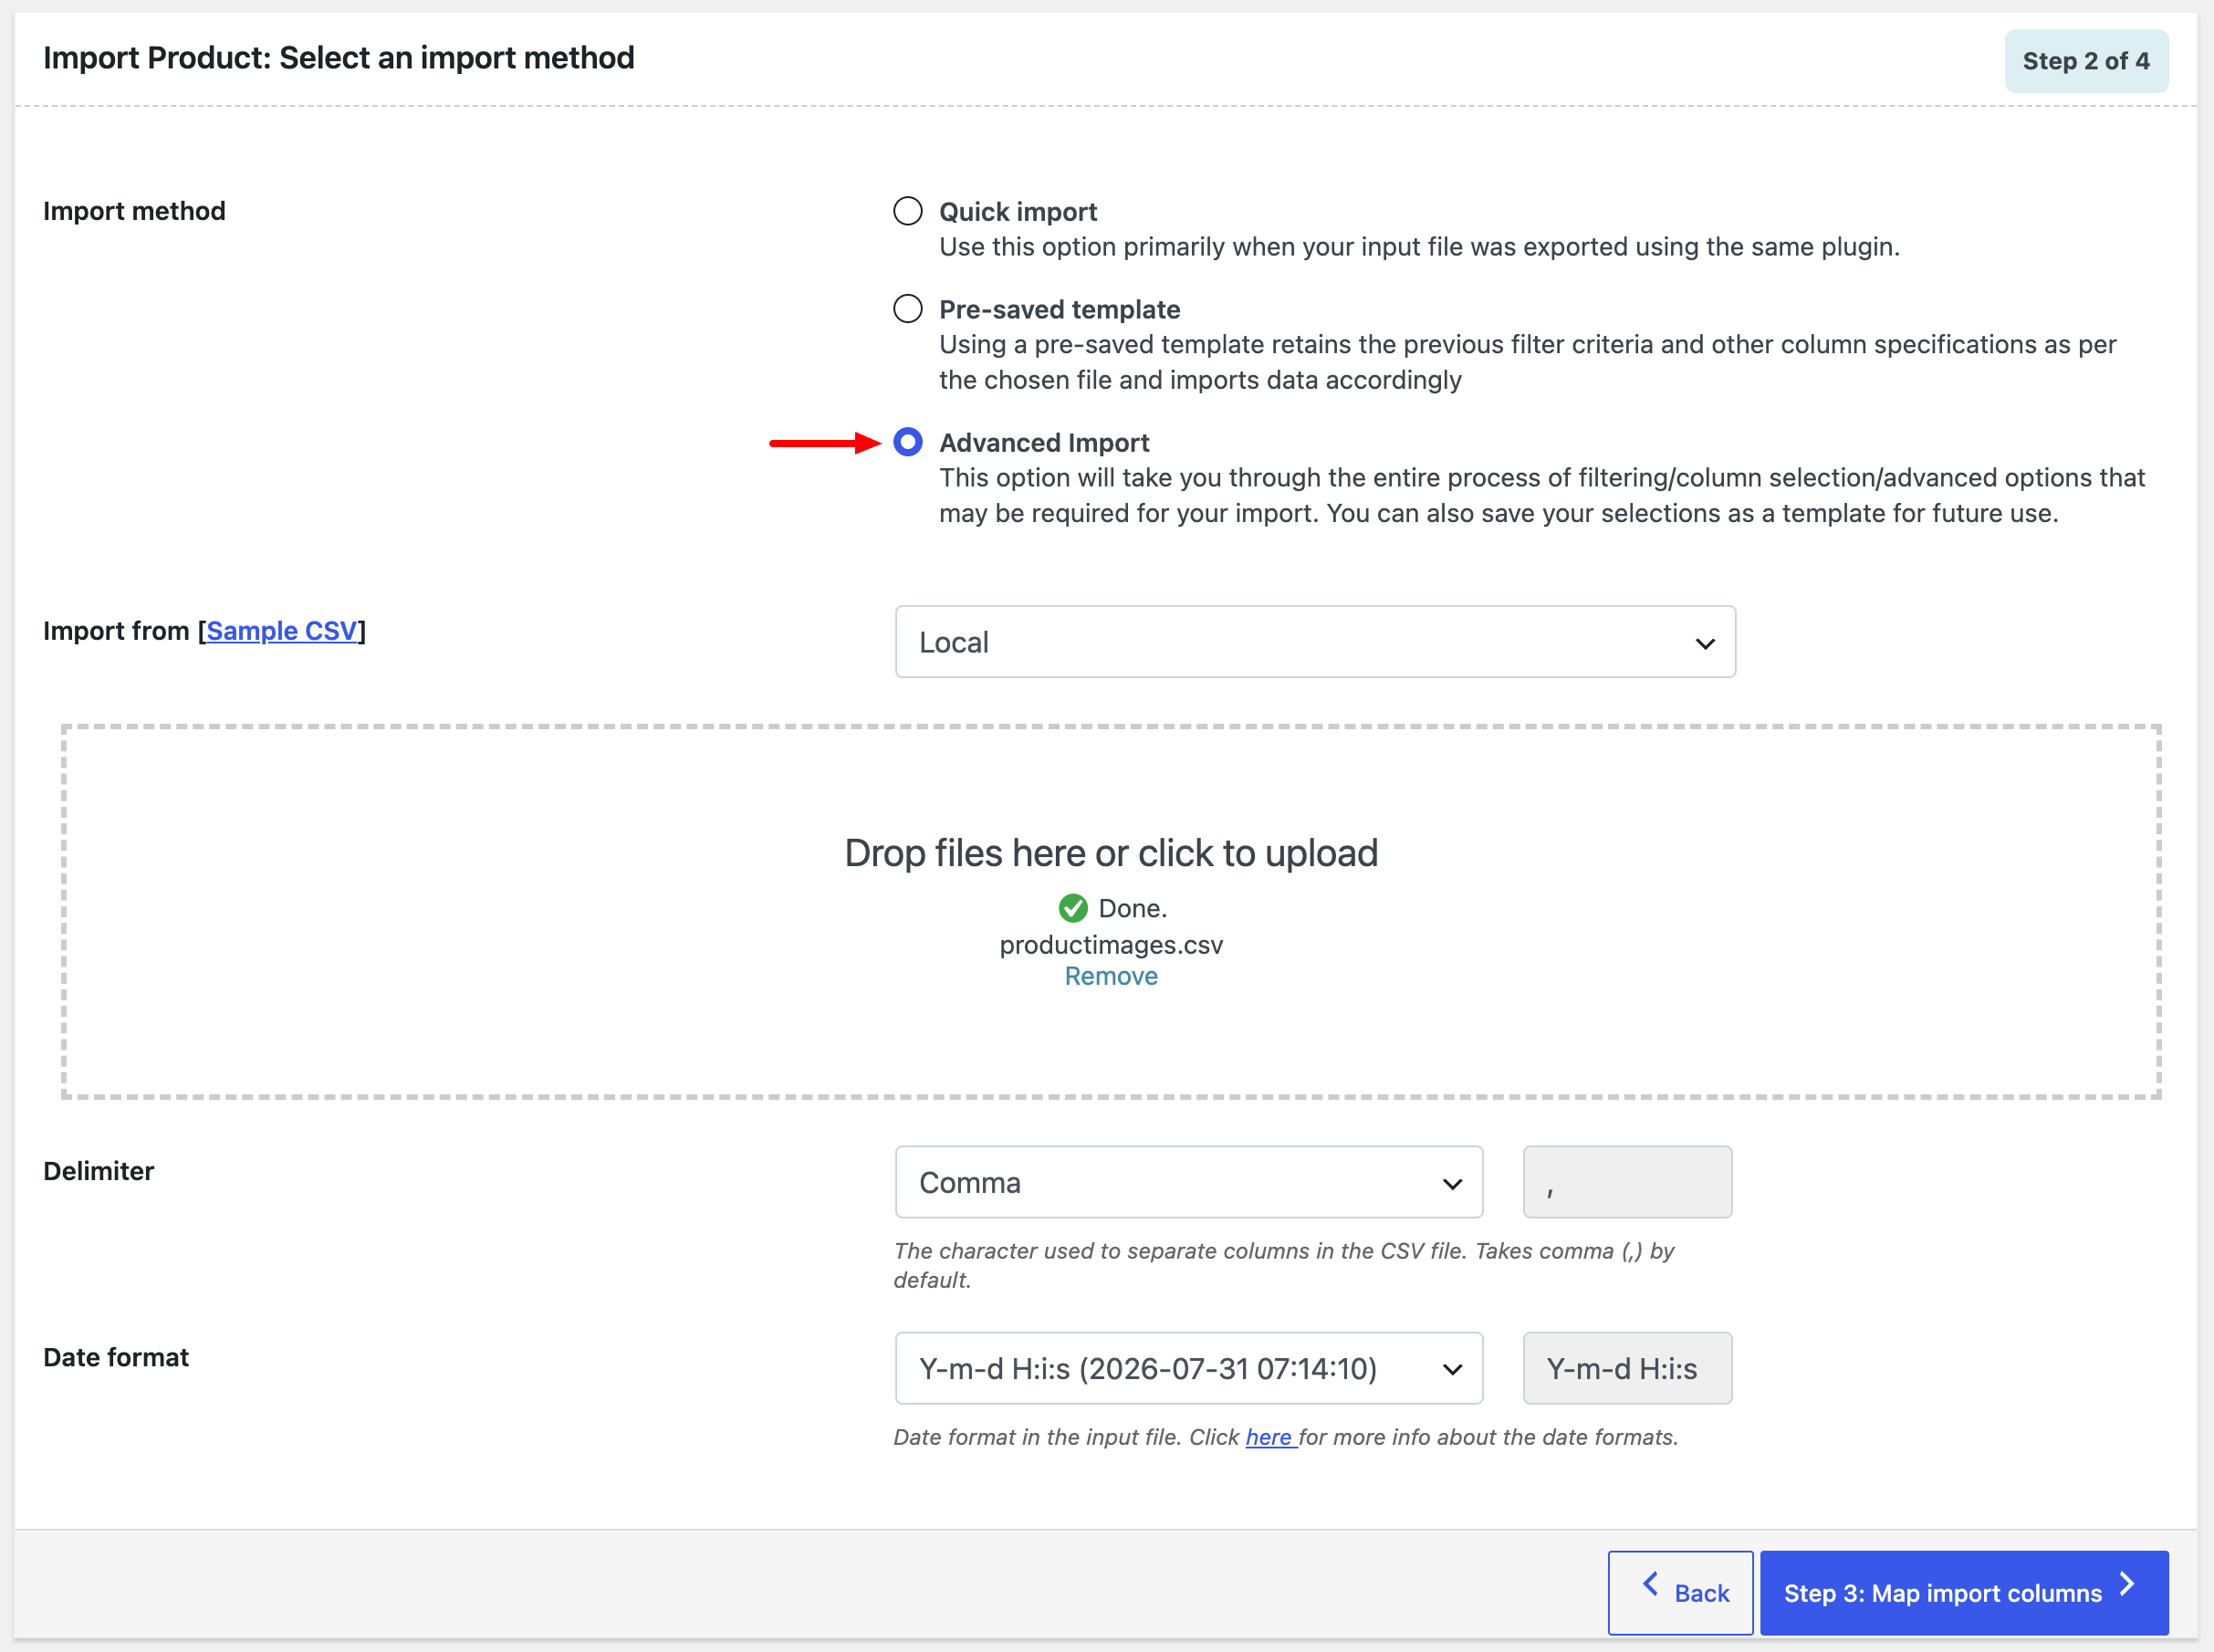
Depending on the plugin version, you may see options such as:
- Quick import
- Pre-saved template
- Advanced import
Use Quick import when the file was previously exported using the same WebToffee plugin and its column structure has not changed. Use Advanced Import when your CSV comes from another platform, uses different column names, or requires manual field mapping. It is also useful when you want to import only selected product fields or configure additional import settings.
Depending on the plugin version, supported sources may include:
- Local file upload
- Remote URL
- Existing file
- FTP or SFTP
- Google Sheets
Confirm the delimiter and date format settings before continuing.
Step 3: Map Import Columns
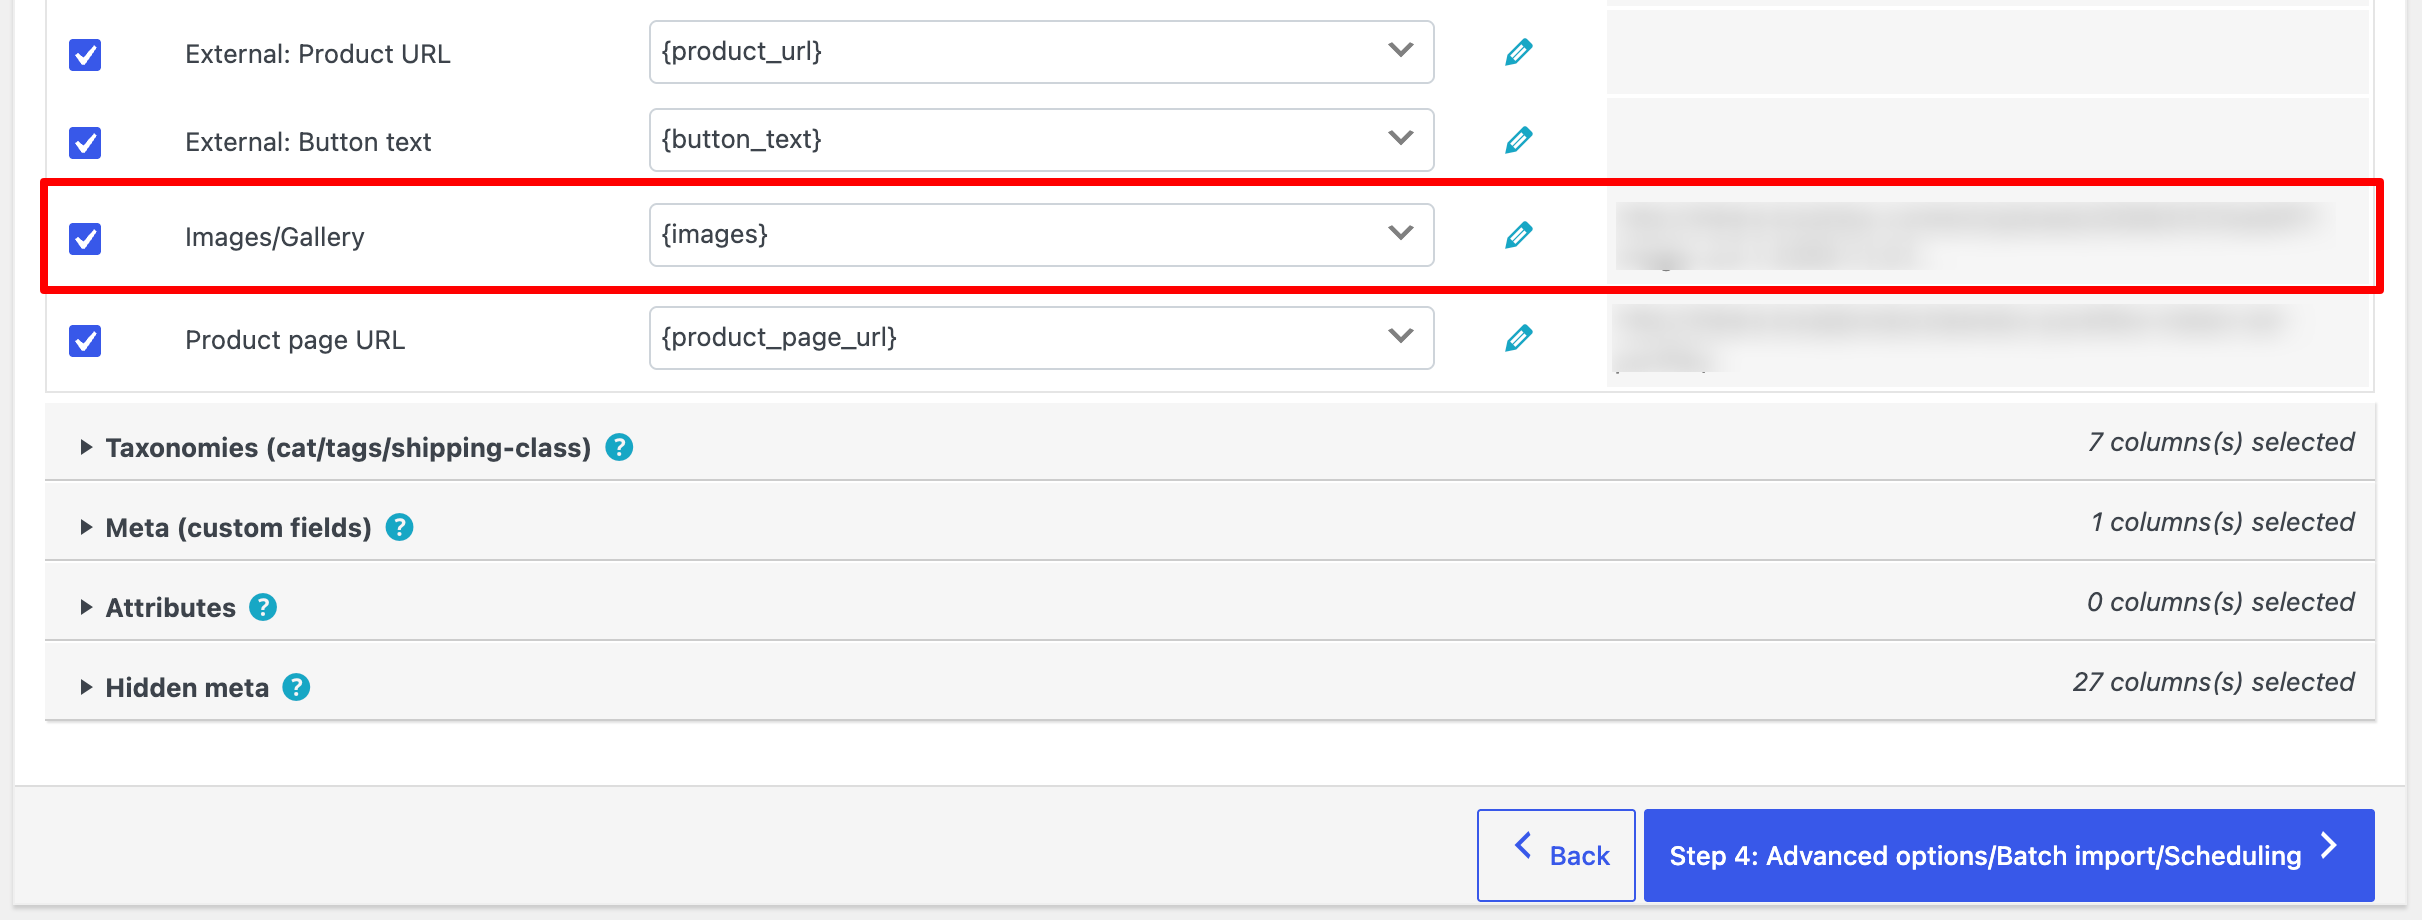
On the mapping screen, connect the column containing your image URLs to the corresponding WooCommerce image field.
The exact field name may vary depending on the file and plugin version, but it is commonly labeled as an image or product-image field.
Make sure that:
- The image column is mapped.
- URLs are complete and accessible.
- Multiple image values use the pipe separator.
- The featured image appears first.
- Gallery images follow in the intended order.
WebToffee uses the first image as the featured image and adds the remaining images to the product gallery.
Step 4: Configure Advanced Import Options
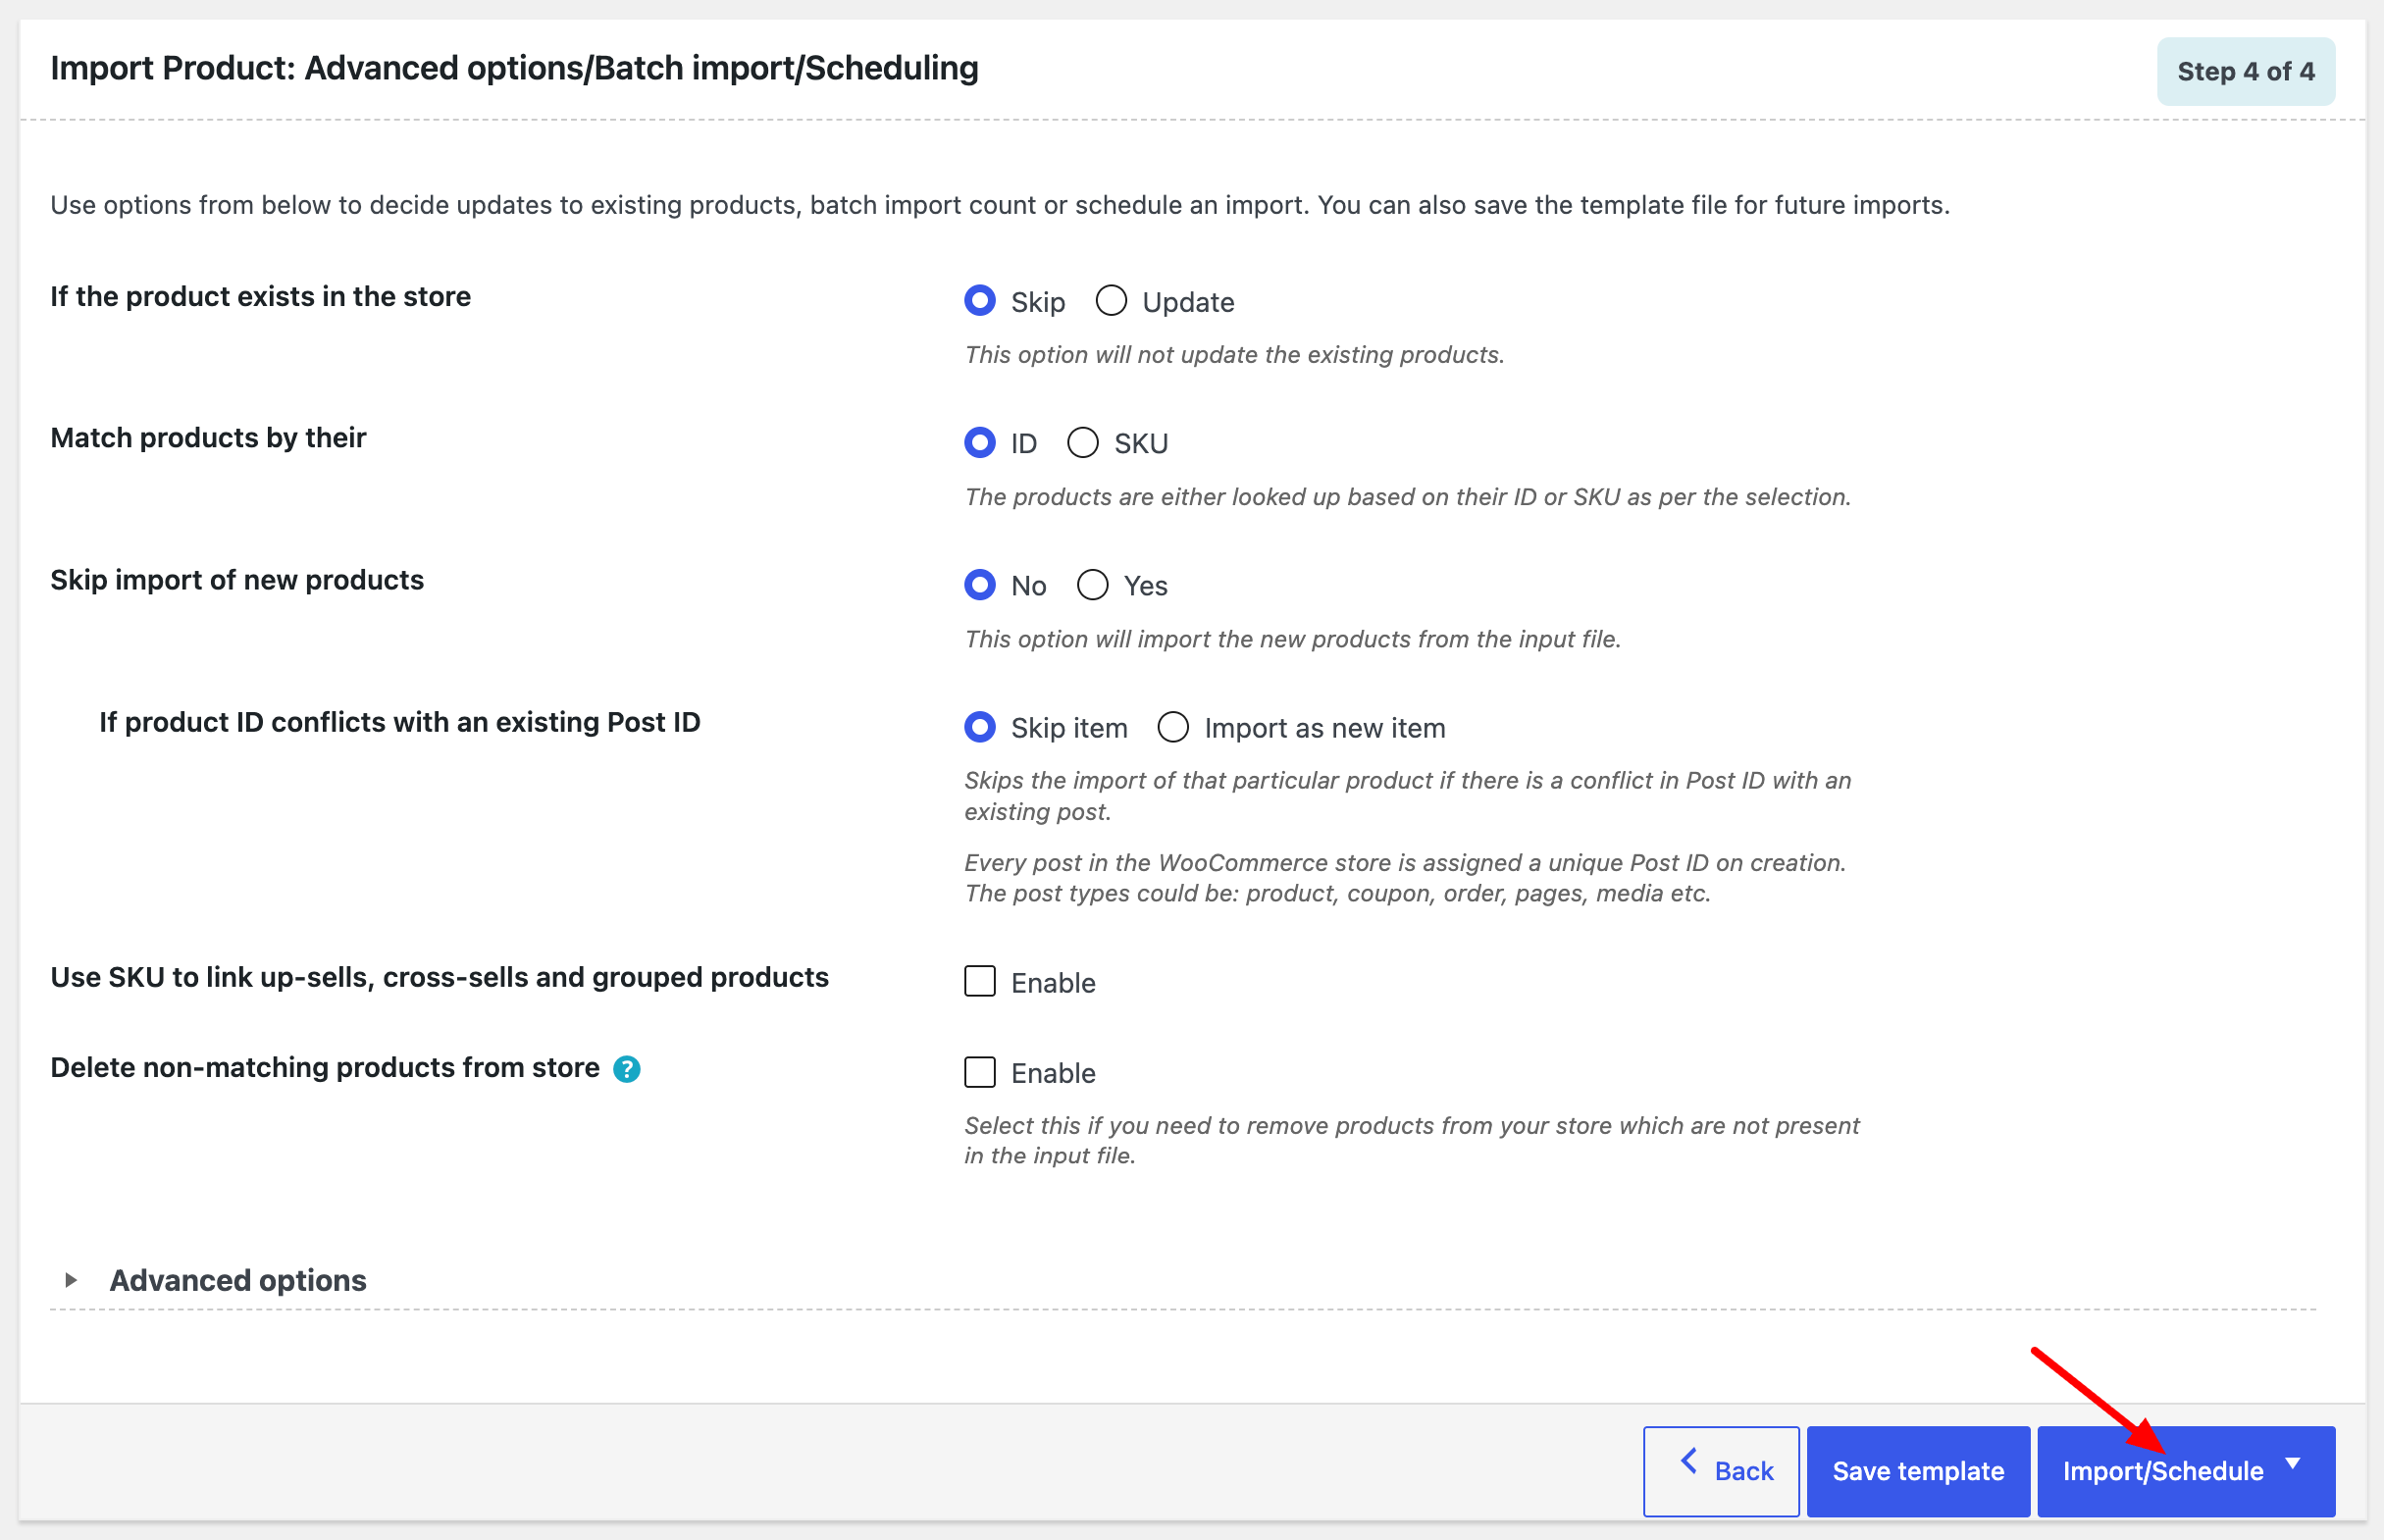
This is the final step in the import process. Here, you will find several advanced import options that you can apply.
The available options may include:
- Whether existing products should be updated
- How existing products should be matched
- Whether images should be downloaded
- Whether existing images should be reused
- Batch size
- Import filters
- Conflict-handling options
- Saved templates
When updating products, matching by SKU is generally more dependable than matching by product name because names can change or be duplicated.
Quick Tip: Save your current import configurations as a template for next time. This way, you can quickly import your products without setting everything up again!
You can also schedule the import to happen at a later time using WordPress or Server Cron jobs.
After selecting the import options, click the Import button to start the process.
Step 5: Verify Your Imported Products and Images
When the import finishes, the plugin displays a summary showing how many products were imported, updated, or skipped, and flags any rows that encountered errors.

Click View Log for a line-by-line report. If any images failed to import, the log will show which rows were affected and why, typically a URL that couldn’t be fetched or a column that wasn’t mapped correctly.
To confirm the import worked as expected, check three places:
- Products > All Products: Check product listings: You should now see all imported products, each with its corresponding image displayed in the product thumbnail column.
- Preview individual products: Click on a few products to ensure the main product image and gallery images are correctly linked and displaying as expected.
- Live product page: Open your store’s front end to verify that product images appear properly on category and product pages.

That’s it! Your WooCommerce store now has all your products and images perfectly imported and ready to go live!
Also Read: How to Import WooCommerce Products via CSV
Create a smaller CSV containing:
- A unique product identifier, preferably SKU
- The new image URLs
During the import:
- Simply uncheck all other product fields and select only the Images/Gallery field.
- Enable the option to update existing products.
- Avoid mapping unrelated columns unless they should also be updated.
- Run a test with a few products first.
Carefully review options related to replacing, merging or preserving existing gallery images. The exact result can depend on the importer’s update settings.
Image import failures in WooCommerce almost always come down to one of five causes. Each one has a specific fix. Work through the relevant issue below before re-running your import.
1. Images Aren’t Showing After Import
The import completes without errors, but products show a placeholder or no image on the product page and in the admin product list.
Cause: The image URL wasn’t publicly accessible at the time of import. WooCommerce fetches images by sending a request to each URL during the import process. If the URL redirects, requires a login, or returns anything other than the image file directly, WooCommerce silently skips it rather than throwing an error, which is why the import appears to succeed.
Fix:
- Copy one of the image URLs from your CSV and paste it directly into a browser address bar
- If the image loads and displays in the browser, the URL is valid
- If you see a login screen, a redirect to a homepage, a Google Drive viewer, or a download prompt, the URL will not work for import
- Replace the URL with one that serves the image file directly, then re-import
Note: WooCommerce will not retry failed image URLs after an import. If images are missing after a completed import, you need to correct the URLs in your CSV and run the import again with Update existing products checked.
2. Dropbox or Google Drive Image URLs Aren’t Working
Images from Dropbox or Google Drive fail to import even though the URLs appear valid and the files are set to public sharing.
Cause: The default sharing URLs for both services point to a viewer page, not the image file itself. WooCommerce receives an HTML page instead of an image and discards it.
Fix for Dropbox:
Take your standard Dropbox share URL:
https://www.dropbox.com/s/abc123/product-image.jpg?dl=0
Change dl=0 to dl=1 at the end.
https://www.dropbox.com/s/abc123/product-image.jpg?dl=1
The dl=1 parameter forces Dropbox to serve the raw file instead of the preview page.
Fix for Google Drive:
Take your standard Google Drive share URL:
https://drive.google.com/file/d/FILE_ID/view?usp=sharing
Replace it with this direct download format:
https://drive.google.com/uc?export=download&id=FILE_ID
Replace FILE_ID with the long string of characters from your original URL — it’s the part between /d/ and /view.
3. Only the First Image Imports — Gallery Images Are Missingg
Products import with a featured image, but the gallery is empty even though the images column in your CSV contains multiple URLs.
Cause: The pipe separator between image URLs is either missing, incorrectly formatted, or has spaces around it. WooCommerce and the WebToffee plugin both use the pipe character (|) to identify where one image URL ends and the next begins. Any deviation from the exact format causes everything after the first URL to be ignored.
Fix:
Your images column should look exactly like this:
https://yoursite.com/product-front.jpg|https://yoursite.com/product-back.jpg|https://yoursite.com/product-detail.jpg
Common formatting mistakes that break gallery import:
| What’s in your CSV | Problem | Correct format |
|---|---|---|
| url1, url2, url3 | Comma separator instead of pipe | url1|url2|url3 |
| url1 | url2 | url3 | Spaces around the pipe | url1|url2|url3 |
| url1; url2; url3 | Semicolon separator | url1|url2|url3 |
| “url1|url2|url3” | Quotes wrapping the cell value | Remove the surrounding quotes |
Open your CSV in a plain text editor (not Excel — Excel sometimes adds invisible formatting) to confirm the exact characters in your images column before re-importing.
4. The Wrong Image Is Set as the Featured Image
Products import with images, but the featured image is one of the gallery images, or the gallery contains the image that should be the featured image.
Cause: Either the images column is mapped to the wrong WooCommerce field during import, or the URL order inside the cell is not what you intended.
Fix:
1. Check the column mapping first:
In the built-in importer, confirm the images column is mapped to Images — not to any custom field or meta field. In the WebToffee plugin, confirm it’s mapped to Images / Gallery, not to a standalone gallery field if one exists.
2. Check URL order in the cell:
The first URL in the images column is always assigned as the featured image. Every URL after the first pipe separator becomes a gallery image. If your featured image is appearing in the gallery, your URLs are in the wrong order in the CSV.
Correct order: https://yoursite.com/FEATURED-image.jpg|https://yoursite.com/gallery-1.jpg|https://yoursite.com/gallery-2.jpg
Edit your CSV to move the intended featured image URL to the first position in the cell, then re-import with Update existing products enabled.
Yes. WooCommerce includes a built-in CSV importer that can import products with featured images, gallery images and variation images. You can also use a product import plugin for advanced mapping, additional file formats, scheduled imports and other complex requirements.
The native WooCommerce CSV schema uses the Images column.
When using another importer, the field may have a different name. Map your source column to the importer’s corresponding product-image field.
Yes. The free version supports importing product images with products from a CSV file. More advanced sources, file formats, automation and product types may require the premium version.
Add all the image URLs to the product’s image field.
For the native WooCommerce importer, separate them with commas. For the WebToffee plugin, separate them with pipes. The first image is used as the featured image. The remaining images are added to the gallery.
Yes. Supported import workflows can match images using their filenames when they already exist in the WordPress Media Library. Use the exact filename and verify that the image is available on the destination site.
No. WooCommerce cannot access a local path on your computer.
Upload the images to WordPress or another publicly accessible server, and then use their URLs or Media Library filenames.
Yes. Add each variation as a separate CSV row and provide the appropriate image for that variation.
The variation must reference its parent product and use the correct attributes.
WooCommerce core supports an individual image for a variation. Multiple gallery images for each variation generally require a variation-gallery extension and an import workflow compatible with that extension’s custom fields.
Yes. Create a CSV containing the SKU or product ID and the new image data. Enable the option to update existing products and map only the fields you intend to change.
The most common causes are:
– Private or invalid image URLs
– Incorrect image separators
– Broken CSV formatting
– Unmapped image columns
– Remote-server restrictions
– Server timeouts
– Incorrect product matching
Test the URLs directly and review the import log.
Use consistent image URLs or filenames and enable the appropriate setting to reuse existing Media Library images where available.
Always test the behavior before updating a complete catalog because duplicate handling can vary depending on filenames, attachment records and import settings.
WooCommerce’s built-in importer does not include scheduling.
A premium import plugin can be used to schedule recurring product and image imports from supported remote sources.
You can import WooCommerce products with images using either the built-in CSV importer or a dedicated product import plugin.
For a simple one-time import, WooCommerce’s native importer is usually enough. Add the image URLs to the Images column, separate multiple images with commas and map the field correctly.
For a plugin-based CSV workflow, the free WebToffee Product Import Export plugin can import products with their images. Use pipes to separate multiple images.
More advanced stores may benefit from the premium plugin when they need scheduled imports, XML or Excel files, Google Sheets, FTP/SFTP, advanced mapping, reusable templates or complex product data.
Whichever method you choose, test a small sample first. Confirm that the featured images, gallery images and variation images appear correctly before importing or updating the entire product catalog.

Got any query? Please leave a comment or reach out to our support
Got any query? Please leave a comment or reach out to our support

Subcribe to our newsletter





Comment (1)
Nano Banana API
May 29, 2026
Very practical guide. The tip about formatting image URLs for bulk import is a lifesaver. For high-volume stores, automating visual content generation (like product banners) via API before importing can significantly speed up the ‘gallery vs featured’ image setup.