


Share:


Table of Contents
WooCommerce product import is a crucial process that allows store owners to efficiently add or update large quantities of products using structured files like CSV. This method significantly reduces the time and potential errors associated with manual product entry, making it essential for growing eCommerce businesses.
- WooCommerce product import enables bulk management of product data, streamlining the addition and updating of items in an online store.
- Importing products can be done using WooCommerce’s built-in importer or third-party plugins, each offering varying levels of complexity and functionality.
- Proper preparation of the import file, including clear headers and unique SKUs, is vital to ensure a smooth import process.
- The built-in importer is best for simple products and one-time imports, while advanced plugins offer features for variable products and automated imports.
- Common import issues include missing images, incorrect attribute mapping, and duplicate entries, often arising from formatting errors or server limitations.
- Utilizing plugins like WebToffee’s Product Import Export Plugin enhances control over the import process, allowing for scheduled imports and support for multiple file formats.
Managing products manually in WooCommerce works when you have only a few items. But once your store starts growing, adding or updating products one by one can quickly become time-consuming and error-prone.
This is where WooCommerce product import becomes useful. Instead of creating each product manually, you can prepare your product data in a CSV or spreadsheet file and import it into your store in bulk. This helps you add new products, update existing products, migrate catalog data from another store, or manage seasonal product changes more efficiently.
In this article, we’ll explain two ways to import products into WooCommerce:
- Using the built-in WooCommerce product importer
- Using the Product Import Export Plugin for WooCommerce by WebToffee
By the end, you’ll know which method is better suited for your store and how to use each one.
What Is WooCommerce Product Import?
WooCommerce product import is the process of adding or updating products in your WooCommerce store using a structured file, such as a CSV. Instead of entering product details manually from the WordPress dashboard, you can upload a file that contains product information like names, SKUs, prices, descriptions, categories, stock details, images, attributes, and more.
A typical WooCommerce product import file may include columns such as:
- Product name
- SKU
- Regular price
- Sale price
- Stock quantity
- Product category
- Product tags
- Short description
- Full description
- Product images
- Product type
- Attributes
- Variations
- Shipping details
- Custom metadata
WooCommerce reads the file, matches each column to the right product field, and imports the data into your store. This makes bulk product management much easier, especially for stores with large catalogs.
When Should You Import Products in WooCommerce?
WooCommerce product import is useful in many situations, including:
- Migrating products from another WooCommerce store
- Moving from another eCommerce platform to WooCommerce
- Adding a large number of new products at once
- Updating prices, stock, or product descriptions in bulk
- Importing supplier product data
- Adding product images in bulk
- Creating or updating variable products
- Managing seasonal product updates
- Restoring products from a backup file
If you are dealing with more than a handful of products, importing them from a file is usually faster and more reliable than manual entry.
Before You Start: Prepare Your Product Import File
Before importing products, make sure your product file is properly prepared. A clean and structured file reduces import errors and helps WooCommerce map the data correctly.
Here are a few things to check before starting the import:
- Add clear column headers: Your file should include column names such as Name, SKU, Regular price, Sale price, Categories, Images, and Stock. Clear headers make it easier for the importer to identify and map each field.
- Use unique SKUs: SKUs are important when importing and updating products. They help WooCommerce identify products correctly and prevent duplicate entries.
- Check image URLs: If you are importing product images, ensure the URLs are publicly accessible. If the images are not accessible, WooCommerce may not be able to download and attach them to your products.
- Back up your store: Before running a large import, always back up your website. This is especially important if you are updating existing products.
- Test with a small file first: If you are importing hundreds or thousands of products, start with a small sample file. This helps you confirm that the mapping, images, prices, and product data are working correctly before running the full import.
WooCommerce includes a built-in CSV product importer that lets you add or update products without installing an additional plugin. This method is suitable for simple product imports and basic catalog updates.
You can use this method if you have a properly formatted CSV file and your import requirements are straightforward.
Step 1: Go to the Import Tool
From your WordPress dashboard, go to Products > All Products.
At the top of the Products page, you’ll see the Import button next to the Add New button.
Click Import to start the product import process.

This opens the WooCommerce product import wizard.
Step 2: Upload Your CSV File
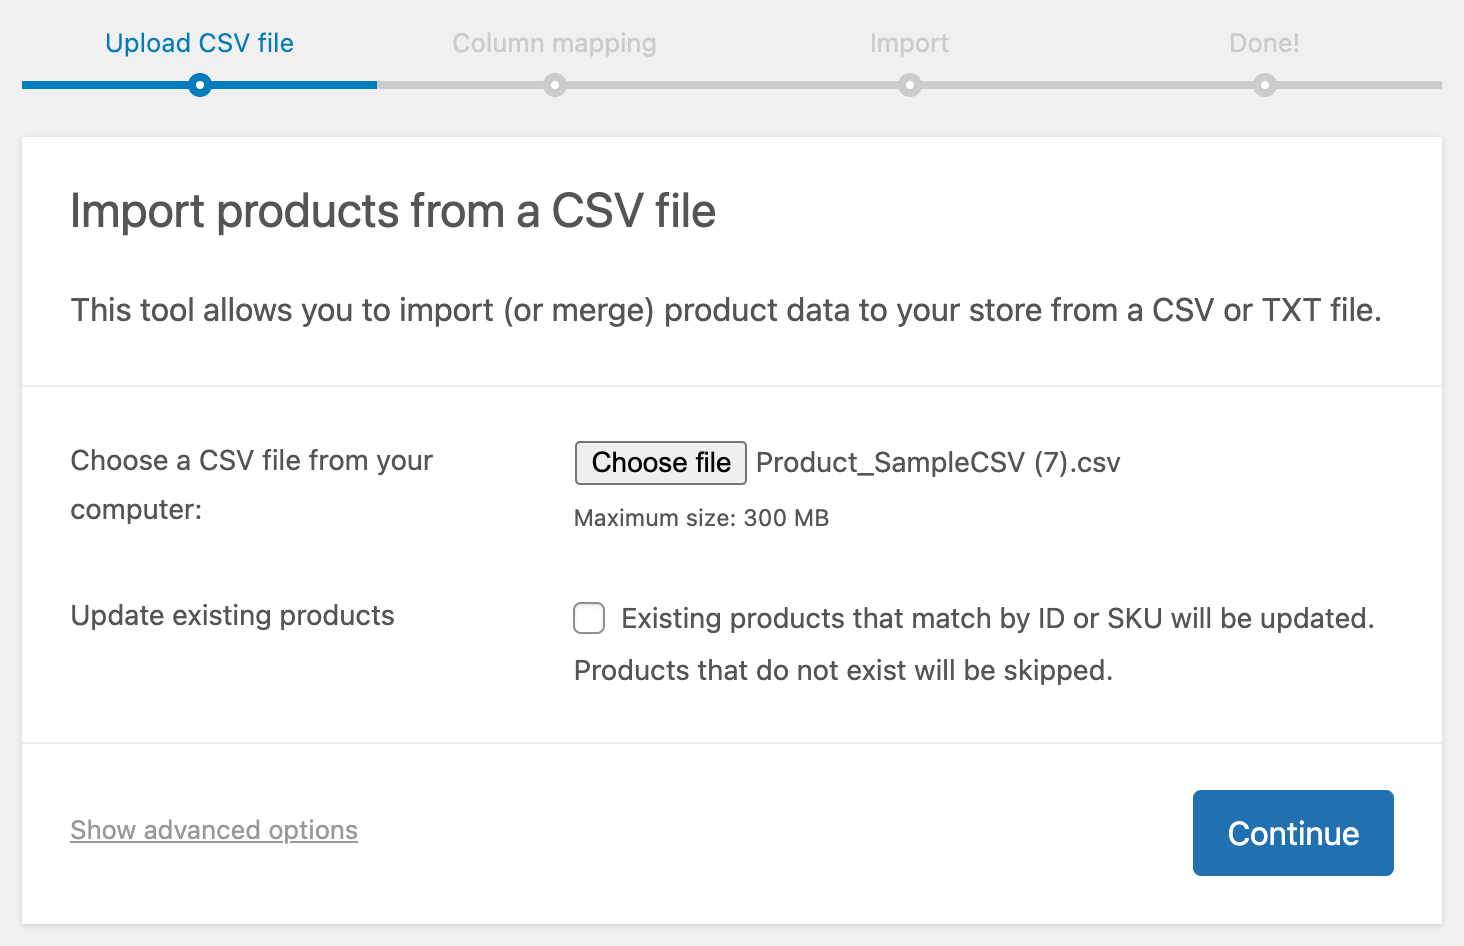
On the upload screen, click Choose File and select the CSV file from your computer.
If you are importing new products, simply upload the file and continue.
If you want to update existing products, enable the option to update existing products. WooCommerce will use matching product IDs or SKUs to identify which products should be updated.
After selecting the file, click Continue.
Step 3: Map CSV Columns to WooCommerce Fields
WooCommerce will now show the column mapping screen. Here, it attempts to automatically match the columns in your CSV file with WooCommerce product fields.
You’ll see a screen where:
- Each CSV column is listed on the left
- Each WooCommerce field is matched on the right via dropdowns
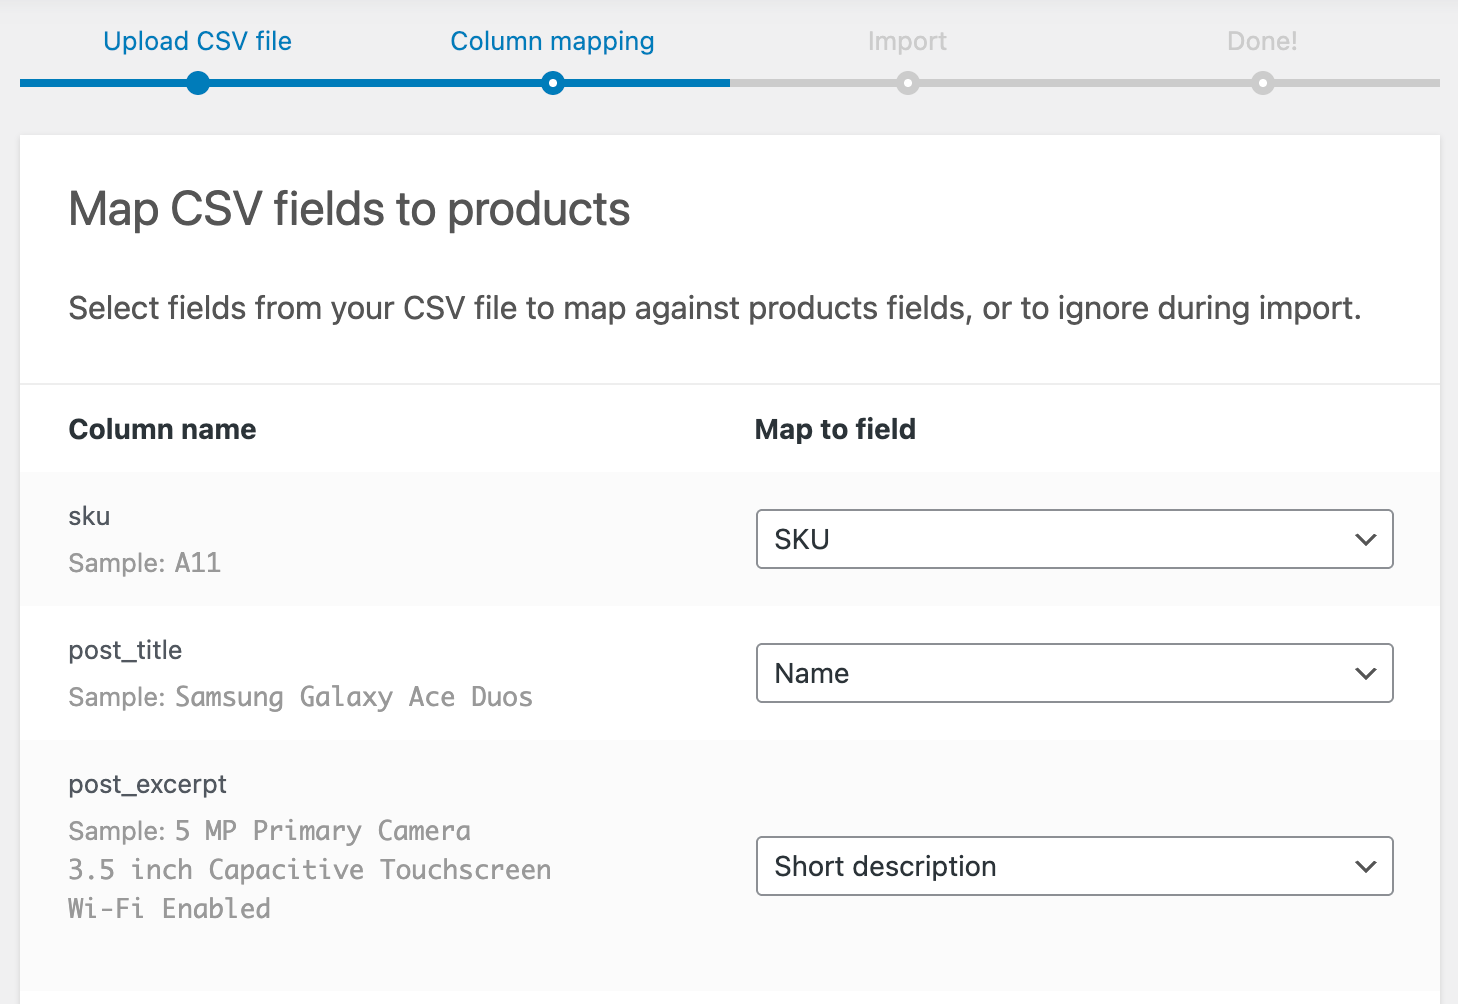
If everything is formatted correctly, most fields will be auto-mapped. If not, you can manually adjust them.
What to look for:
- Ensure SKU → SKU, Name → Name, Regular Price → Regular Price, etc.
- Unmapped fields can be ignored or manually assigned
- Incorrect mapping can lead to missing or misplaced data
Once the mapping is complete, click Run the Importer.
WooCommerce will now import your products. Do not refresh the page or close the browser tab while the import is running.
Note: This is where most import issues happen. Double-check before proceeding.
Step 4: Review Imported Products
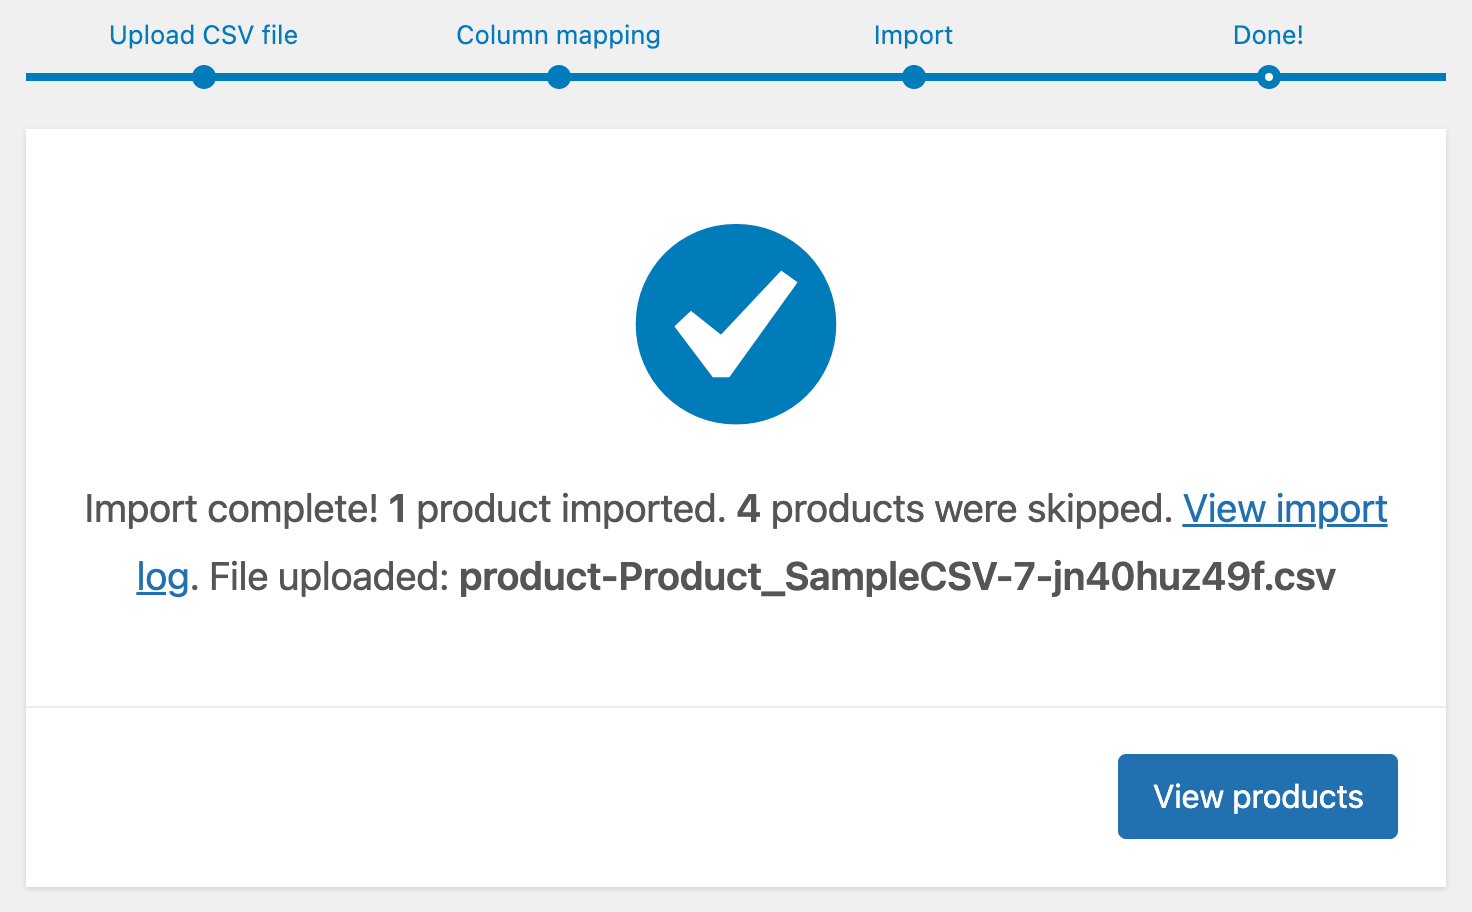
Once complete, you’ll see a success message with the number of products imported. You can then go to Products > All Products to review the imported products.
If something is missing or incorrect, update your CSV file and run the import again.
Limitations of the Native Importer
While convenient, the built-in importer has several important limitations:
- Best suited for simple products: Handling variable products and complex attributes is limited and often error-prone
- No scheduling or automation: Imports must be run manually each time
- No FTP or external file support: You must upload the CSV manually. No fetching from URLs or servers
- Limited file format support: Only supports CSV (no XML, TSV, or Excel files)
- Basic update capabilities: Bulk updates can be restrictive compared to advanced tools
When Should You Use It?
Use the native importer if:
- You’re uploading a small catalog
- Your products are simple and straightforward
- You only need a one-time import
What’s Next?
If you only need to import a simple CSV file once, the built-in importer may be enough. But if you regularly import product data, work with different file formats, or need more control, a dedicated product import plugin is a better option.
If you need to import variable products, handle bulk updates, or automate recurring imports, the built-in tool may not be enough.
In the next section, we’ll walk through how to use a plugin to handle these advanced scenarios more efficiently using the free WooCommerce product import export plugin.
The Product Import Export Plugin for WooCommerce by WebToffee provides a more advanced way to import WooCommerce products. It supports CSV, XML, and Excel files and gives you more control over how product data is imported.
This method is suitable for store owners who need to import large product catalogs, update existing products, import custom fields, handle variable products, import digital products, use saved templates, or automate product imports.
Note: When using our Product Import Export Plugin, make sure your input CSV file is encoded in UTF-8 format for a flawless and accurate import of your products. For more info, check out our documentation on UTF-8 encoding of CSV files.
Step 1: Install & Activate WebToffee Product Importer Plugin
- From your WordPress dashboard side panel, go to Plugins > Add New Plugin.
- In the search bar, enter “Product Import Export for WooCommerce.”
- Click Install. Once done, Activate the plugin on your WordPress dashboard.

Step 2: Select Product as Post Type
Now that the plugin is active, a new menu, WebToffee Import Export (Basic), will appear on your admin panel’s sidebar.
So, let’s look at how to import products to your store. For this:
- Go to – WebToffee Import Export (Basic) > Import in the admin side panel.
- Select the post type as Product and click Select import method.

Step 3: Choose an Import Method
The plugin provides different import methods depending on your requirement.
You can choose from:
- Quick import
- Pre-saved template
- Advanced import
Quick Import
Quick Import is useful when you want to import basic product fields quickly. It is especially helpful when the input file was exported using the same WebToffee plugin.
You can import the file from different sources such as:
- Local computer
- URL
- FTP
This method is useful for simple imports where the column structure is already compatible.
Pre-Saved Template
The pre-saved template method is useful for recurring imports.
If you have previously created and saved an import template, you can select it from the template dropdown. The plugin will apply the saved column mapping, filters, and import settings automatically.
This is helpful when you regularly import product data from the same supplier, marketplace, or external system.
Advanced Import
Advanced Import gives you more control over the import process. It is useful when you need to map custom fields, configure advanced options, update existing products, handle large files, or save the settings as a template for future imports.
For most detailed WooCommerce product import tasks, Advanced Import is the recommended option.
Depending on the method you choose, upload your product file or provide the file source.
- Now, drag and drop or upload the input CSV file.
- From the Delimiter drop-down, select a character (e.g., comma, semi-colon, tab) to separate columns in the CSV file.
- Then click the Map import columns button to proceed.

Step 4: Map Import Columns
In the mapping step, match the columns in your import file with the correct WooCommerce product fields.
The plugin allows you to map product data under different field groups, such as:
- Default fields
- Taxonomies
- Meta/custom fields
- Attributes
- Hidden metadata
If the column headers in your input file match the expected WooCommerce fields, the plugin can map them automatically. If not, you can manually select the correct fields from the dropdown options.
This step is important because it controls where each piece of product data will be imported.
For example:
- Product title should map to product name
- Product SKU should map to SKU
- Product price should map to regular price or sale price
- Product category should map to product categories
- Product image URL should map to product images
- Product attributes should map to attributes
- Custom data should map to meta fields
Once done, click on Advanced options/Batch import.

You can also fix and update a particular mapping field for your products. To learn more, check out our documentation.
Note: It’s important to map the different product fields correctly and in the right format. Verify that all the necessary fields are correctly mapped to avoid any errors or issues during the import process.
Step 5: Use the Transform Option if Needed
The plugin also includes an evaluate field option. This lets you modify or transform values during import.
For example, you can use expressions to adjust values from your input file before importing them into WooCommerce.

This can be helpful when you want to:
- Increase product prices during import
- Modify stock values
- Append text to existing values
- Combine values from different columns
- Apply simple calculations to imported data
This is useful for stores that receive supplier files but need to adjust the data before adding it to WooCommerce.
Step 6: Configure Advanced Import Options
Next, configure the advanced import options.
These settings give you more control over how the plugin handles existing products, new products, conflicts, and large imports.
You can configure options such as:
- Whether to skip or update existing products
- Whether to match products by ID or SKU
- Whether to skip importing new products
- Whether to delete non-matching products from the store
These options are especially useful when you are updating an existing catalog instead of importing products for the first time.
Batch Import Settings
Large product imports may fail if the server cannot process the entire file at once. To avoid this, the plugin lets you configure batch import settings.
- Set the number of records to process for each iteration.
Note: If your import fails because of timeout issues, you can reduce the batch count and try again.
You can choose to skip these and proceed to the next step. You can also save the steps that you used to import products as a template.
- Click Save template to save your import configuration for future use. This way, you can reuse the template without setting it up manually the next time.
- Once done, click Import to import your WooCommerce products from a CSV file.

That’s it. After the import is completed, a pop-up will appear showing the import status, such as the number of successful imports and any failed imports.

Why Use This Method?
Compared to the native WooCommerce importer, this plugin gives you:
- More accuracy with complex product data
- More efficiency for large catalogs
- More flexibility for repeated or scheduled imports
This method is ideal if you’re managing a growing store or frequently updating product data.
Even with a well-prepared CSV file, import issues can still happen. Most errors stem from formatting issues, server limits, or mismatched data. Here’s how to quickly identify and fix the most common problems.
1. Images are missing after import
If your products import successfully but images don’t show up, it usually means WooCommerce couldn’t access or download the image URLs during import.
This typically happens when image links are not publicly accessible, use redirects (e.g., shortened or CDN-protected URLs), or when your server blocks external requests.
How to fix it:
- Use direct image URLs that open in a browser without login
- Avoid redirected links. Paste the final image URL
- Make sure your hosting allows external image fetching
- Test a few URLs in your browser before importing to confirm they load correctly
2. Only some products are imported (e.g., stops at 10)
If your import runs but only a small number of products get imported, your server is likely hitting resource limits during processing.
This usually happens due to low PHP memory, execution timeouts, or processing large files in one go.
How to fix it:
- Increase server limits like memory_limit and max_execution_time
- Reduce the batch size in plugin settings (try 10–20 per batch)
- If needed, ask your hosting provider to raise these limits
3. Product attributes aren’t showing or mapping correctly
If your products import but attributes (like size, color) are missing or incorrect, it’s usually a formatting issue in your CSV.
WooCommerce expects a very specific structure, and even small differences can break mapping.
How to fix it:
Use the correct column format:
- Attribute 1 Name → Size
- Attribute 1 Value(s) → S | M | L
- Always separate multiple values with a pipe (
|), not commas - Make sure attribute names match any existing global attributes exactly
3. Featured products are not marked as featured
If your products are imported but aren’t marked as featured, the visibility field is likely not set correctly.
How to fix it:
Use the correct column and value:
- Column: tax:product_visibility
- Value: featured
This ensures WooCommerce recognizes the product as featured during import.
4. Duplicate products created on re-import
If running the import again creates duplicate products instead of updating existing ones, WooCommerce isn’t able to match them properly.
This usually happens when SKUs are missing or import settings are incorrect.
How to fix it:
- Ensure every product has a unique SKU
- Enable “Update existing products” during import
- Avoid settings that always create new products unless intended
- Use SKU as the primary matching field
5. Text looks broken or shows strange characters
If product names or descriptions appear with garbled or incorrect characters, it’s likely an encoding issue.
This commonly happens with CSV files saved from Excel.
How to fix it:
- Save your file using UTF-8 encoding
- In Excel, use “Save As > CSV UTF-8 (Comma delimited)”
- Avoid copying content from sources that add hidden formatting
Quick Tip: If something goes wrong, start by testing with a small sample file (5–10 products). This makes it much easier to isolate and fix issues before running a full import.
Import WooCommerce Products Using the Product Import Export Plugin (Pro)

Opting for the pro version of the WooCommerce Product Import Export plugin unlocks more advanced features for exporting your product data than those offered in the free version.
Although the steps for the import process remain the same, the premium version gives you more control over product import with features like:
- Support for importing variable and subscription products
- Import custom fields (meta), third-party plugin fields, and hidden meta
- Ability to import files from Excel, CSV, XML, and TSV formats
- Advanced filtering and customization options
- Support for product import via FTP/SFTP
- Schedule automatic imports using WordPress/Server Cron
The plugin accepts CSV files saved in standard UTF-8 format. Your file should include column headers such as product name, SKU, price, description, and category. You can also include optional fields like stock quantity, attributes, or product images. If your file is already organized in Excel or Google Sheets, simply export it as a CSV and it will work.
The free version supports importing simple products. If you need to import variable, grouped, subscription, or other advanced product types, you’ll need the Pro version of the plugin. This ensures that stores with complex catalogs can still manage everything without manual entry.
Yes. You can include product image URLs in your CSV file. The plugin will fetch and attach them automatically to the correct product. If you have multiple images for a product, you can add them in the CSV separated by a delimiter. For best results, make sure image URLs are publicly accessible before running the import.
If a product with the same SKU already exists, the plugin gives you options. You can choose to:
– Skip duplicates
– Update existing products with new data
– Overwrite fields completely
This flexibility means you can safely use CSV import for both new uploads and bulk updates without risking duplicate records.
There is no fixed limit set by the plugin. However, very large product catalogs (thousands of items) can be affected by your server’s PHP and memory settings. To handle big catalogs smoothly:
– Split your CSV into smaller files (e.g. 2,000–3,000 rows each).
– Use the batch import option if available.
For high-volume stores, the Pro version offers advanced features like scheduled imports and faster processing.
Wrapping Up
When moving to another platform, you must import products and all their particulars into your online store. If you have a large product catalog, these import migrations can be laborious and time-consuming.
That’s where the right plugin makes all the difference. Our Product Import Export Plugin for WooCommerce is built to simplify this task, making your product import smoother and quick.
We hope this article has provided you with a clear understanding of the steps involved in importing your products. We also encourage you to share your thoughts in the comments below and join the conversation.
You can refer to our detailed documentation for more information.

Got any query? Please leave a comment or reach out to our support
Got any query? Please leave a comment or reach out to our support

Subcribe to our newsletter





Comments (15)
Khalid Siddiqui
July 26, 2020
Hello
I used free version, but somehow its not picking up all the attributes mentioned in my CSV, but only few 3-4 out of total 13 attributes I have.
Can anyone help me why this is happening? If I buy premium version, so will that pick up ALL OF THE attributes?
Alan
July 27, 2020
Hi,
Could you please share with us your importing CSV file via support so that we can check it. Our support team will follow you up from there.
Steve
May 9, 2020
Hello, Steve here again,
i used free version and imported csv files nicely, featured import also solved, but now i want to know how to import Upsell Related products (i assume SKU separated by something, but i dont know what).. Can you give me advice?
Also, i have noticed that premium version can delete all products that are present in the product list but not present in the csv file. Am i correct? If so, i would gladly buy it.
Everything else works fine, if anyone else wants to know, for the free plugin.
Thanx again
Alan
May 14, 2020
Hi,
Importing upsells using SKU is one of our premium features. You may have a look at the premium version of the plugin for it. To separate the SKU in the upsell column you may please use the pipe symbol( | ).
Yes, using the premium version of the plugin you can delete the existing products that are not present in the CSV file.
Steve
April 22, 2020
Hello
when i try to import products, i run into problem with Featured mark… it sets all to Non featured, and it is the same when i set Featured to 1 or Yes…. Is there any other option i do not know about, since its visibility thing, or i have to buy premium for that?
Alan
April 23, 2020
Hi,
Please use the column tax:product_visibility to import the products as featured. You may please specify “featured” in the tax:product_visibility column in order to import a product as a featured product.
Santiago
July 3, 2020
We are specifying “featured” in the tax:product_visibility and when the Import or Merge is done, none of the products are Featured. When we export the products again, the tax:product_visibility column on the “featured” products reads “exclude_from_catalog|exclude_from_search”
Alan
July 8, 2020
Hi,
Please reach us via support. Our support team will follow you up from there.
Juan Pedro
August 27, 2019
Hi,
I am using the free plugin for testing in my new web.
When i try to import a cvs aroun 400 itme, it only import me 10 items. Is this fixed on premiun?
Alan
August 27, 2019
Hi,
There is no limit on the number of products that can be imported using the basic version of the plugin. The issue you are facing might be due to some issue on the site or with the importing CSV file. Please share us the CSV file you are importing via support.
Our support team will follow you up from there.
Lena
July 10, 2019
I am also thinking about making a purchase of this product. However, I can’t get my images to import with the csv records.
https://www.cabochonsandmore.com/wp-content/uploads/2018100a
Alan
July 11, 2019
Hi,
Using both the premium/basic version of the plugin you can import images to the products using CSV file. Kindly make sure that the image URL specified in the CSV file is publically accessible and points directly to the image. If you are still having any issues with importing product images please share us the CSV file via support.
Gary
May 18, 2019
I am thinking of purchasing this plugin but I have two very important questions:
1) I use Polylang. Each product has an English and Chinese version. Is your plugin compatible with PolyLang? FOr example, when I import products, can I select which language each product belongs to?
2) One product could belong to multiple categories. When I import, can I assign multiple categories to this product?
Alan
May 19, 2019
Hi,
1. Yes, using the plugin you can import the products to English and Chinese language. You can import the products under a particular language by specifying the language code in the CSV file. You can go through the documentation on how to import multilingual products.
2. Yes, you can import a product under multiple categories by separating the categories using the pipe symbol. eg: Clothing|T-shirt|Mens.
Bob Woolnough
December 7, 2018
Hi, I have a plugin that gives a field in the inventory section of my products for a Barcode. This field does not appear in the import mapping section when attempting to import products.
Why is this please?