Share:


Table of Contents
Running multiple WooCommerce stores necessitates an efficient method for synchronizing product data to prevent redundancy and ensure consistency. Synchronization is crucial for maintaining accurate listings across various storefronts, especially when managing regional variations or distinct retail and wholesale operations.
- Synchronizing WooCommerce products reduces the need for repetitive manual updates across multiple stores.
- Different synchronization methods exist, including manual CSV imports, WordPress Multisite, custom coding with the WooCommerce REST API, and dedicated import/export plugins.
- Key product data that can be synced includes titles, descriptions, prices, stock levels, categories, images, and attributes.
- Automated workflows can be established using plugins to schedule regular updates, enhancing efficiency and reducing the risk of outdated information.
- One-way synchronization is generally preferred to minimize conflicts, while two-way sync can complicate data management.
- Using consistent identifiers like SKUs is essential to avoid duplicate products during synchronization.
Running multiple WooCommerce stores often means managing the same or similar product information in multiple places. Without a reliable way to sync that data, even small updates can turn into repetitive work.
For example, if you change a product price, description, image, or stock quantity in one store, you may need to make the same change manually in every other store. Over time, that can lead to outdated listings, mismatched product details, and unnecessary maintenance.
Product synchronization keeps shared product data aligned across your stores while still giving you flexibility where needed. There are several ways to do this, depending on how your stores are set up and how frequently product data changes. In this guide, we’ll walk through these methods and help you choose the right approach to keep products consistent across multiple WooCommerce stores.
Managing Regional or Country-Specific Stores
If you run separate WooCommerce stores for different regions, such as the US, UK, and EU, much of your catalog may be the same.
Instead of recreating each product for every regional store, you can sync common product data such as titles, descriptions, images, categories, and attributes. At the same time, each store can still use its own pricing, currency, tax settings, or availability rules.
Running Wholesale and Retail Stores
Many businesses maintain separate storefronts for retail and wholesale customers.
The products themselves may be largely identical, but prices, minimum order quantities, or stock availability may differ. Synchronization allows you to keep shared product information consistent while maintaining separate pricing or purchasing rules for each store.
Managing Multiple Branded Storefronts
You may also operate several branded WooCommerce sites that sell products from the same catalog.
In this case, one store can act as the main source for product information, while selected data is distributed to the other storefronts. This makes it easier to maintain a large catalog without updating every site individually.
Reducing Duplicate Product Management
Without synchronization, adding or updating a product can mean repeating the same work across several stores. You may need to manually recreate or update:
- products
- descriptions
- prices
- SKUs
- images
- categories
- attributes
- variations
Syncing this information can significantly reduce duplicate work, especially when you manage hundreds or thousands of products.
Keeping Product Information Consistent
Consistency is another major reason to sync WooCommerce products between sites.
When you update product data manually, it is easy for one store to fall behind. A product image may be replaced on one site but not another, or an outdated description may remain live in a regional store.
By synchronizing shared product data, you can reduce these differences and keep your catalogs more accurate across all your WooCommerce sites.
When you sync WooCommerce products between sites, you are not limited to basic product information. Depending on the method or plugin you use, you can transfer or update most of the data associated with a WooCommerce product.
This can include:
- Product titles and descriptions – Keep product names, short descriptions, and full descriptions consistent across stores.
- SKUs – Maintain matching product identifiers, which is especially important when updating existing products instead of creating duplicates.
- Regular and sale prices – Sync pricing information across stores that use the same pricing structure.
- Stock quantity and stock status – Update inventory levels and availability between connected stores.
- Categories and tags – Keep product organization consistent across multiple storefronts.
- Product images and galleries – Transfer featured images and additional gallery images along with the product.
- Attributes – Sync details such as size, color, material, or other product attributes.
- Variable products and variations – Transfer parent products along with their individual variations, SKUs, prices, stock, and attributes.
- Custom fields and product metadata – Depending on the tool, you may also be able to sync additional product data added by WooCommerce extensions or custom configurations.
There are several ways to move or synchronize product data between WooCommerce stores. The right method depends on how often your catalog changes, how many stores you manage, and whether you need a one-time transfer or an ongoing workflow.
Method 1: Manual CSV Export and Import
WooCommerce includes built-in tools to export and import products using CSV files.
You can export products from one store, download the CSV file, and then import it into another WooCommerce site. This works well for one-time migrations or occasional bulk updates.
However, it is still a manual process. Every time your products change, you need to export a new file and import it into the other store again. As the number of products, updates, or stores grows, this approach quickly becomes difficult to manage.
Method 2: WordPress Multisite
WordPress Multisite lets you manage multiple WordPress sites from a single WordPress installation.
This can make administration easier because your sites can share the same WordPress core installation, themes, and plugins. However, WooCommerce products are still stored separately for each individual site in the network.
In other words, creating or updating a product on one WooCommerce site does not automatically update that product on another site. You will still need an additional synchronization method if you want product catalogs to stay aligned.
Method 3: Custom Code With the WooCommerce REST API
For stores with development resources, the WooCommerce REST API offers a more flexible way to synchronize products.
Developers can build a workflow that detects product changes on one store and sends those changes to another. This lets you control exactly what gets synchronized and when.
The trade-off is that you need to build and maintain the integration yourself. Authentication, product matching, API errors, conflicting updates, and changes to WooCommerce or other extensions all need to be handled over time.
For most store owners, this approach suits highly customized synchronization requirements.
Method 4: Use a Dedicated Import/Export Plugin
For most stores, a dedicated WooCommerce import/export plugin offers a more practical way to manage product synchronization without writing custom code.
Instead of manually exporting and importing files each time, you can create reusable import and export configurations, choose exactly which product data to transfer, update existing products based on identifiers such as SKUs, and automate recurring jobs.
Depending on the plugin, you may also be able to work with remote files or locations such as FTP/SFTP, URLs, or Google Sheets, making it possible to build a scheduled workflow between multiple WooCommerce stores. This approach gives you more control and automation than WooCommerce’s basic CSV tools without the ongoing development work required by a custom REST API integration.
In the next section, we’ll look at how to set up this workflow using a WooCommerce product import/export plugin.
A practical way to sync products between WooCommerce sites is through an import/export workflow:
Source store → Export product data → Transfer file/data → Import into destination store
This works well when one store serves as the main product source and other stores need regular catalog updates. With WebToffee’s Product Import Export Plugin for WooCommerce, you can transfer product data manually or schedule recurring imports and exports across formats such as CSV, XML, Excel, TSV, and Google Sheets.
Start by installing and activating the plugin on both the source and destination stores. Use the source store to export product data, then use the destination store to import and update it.
Export Products From the Source WooCommerce Store
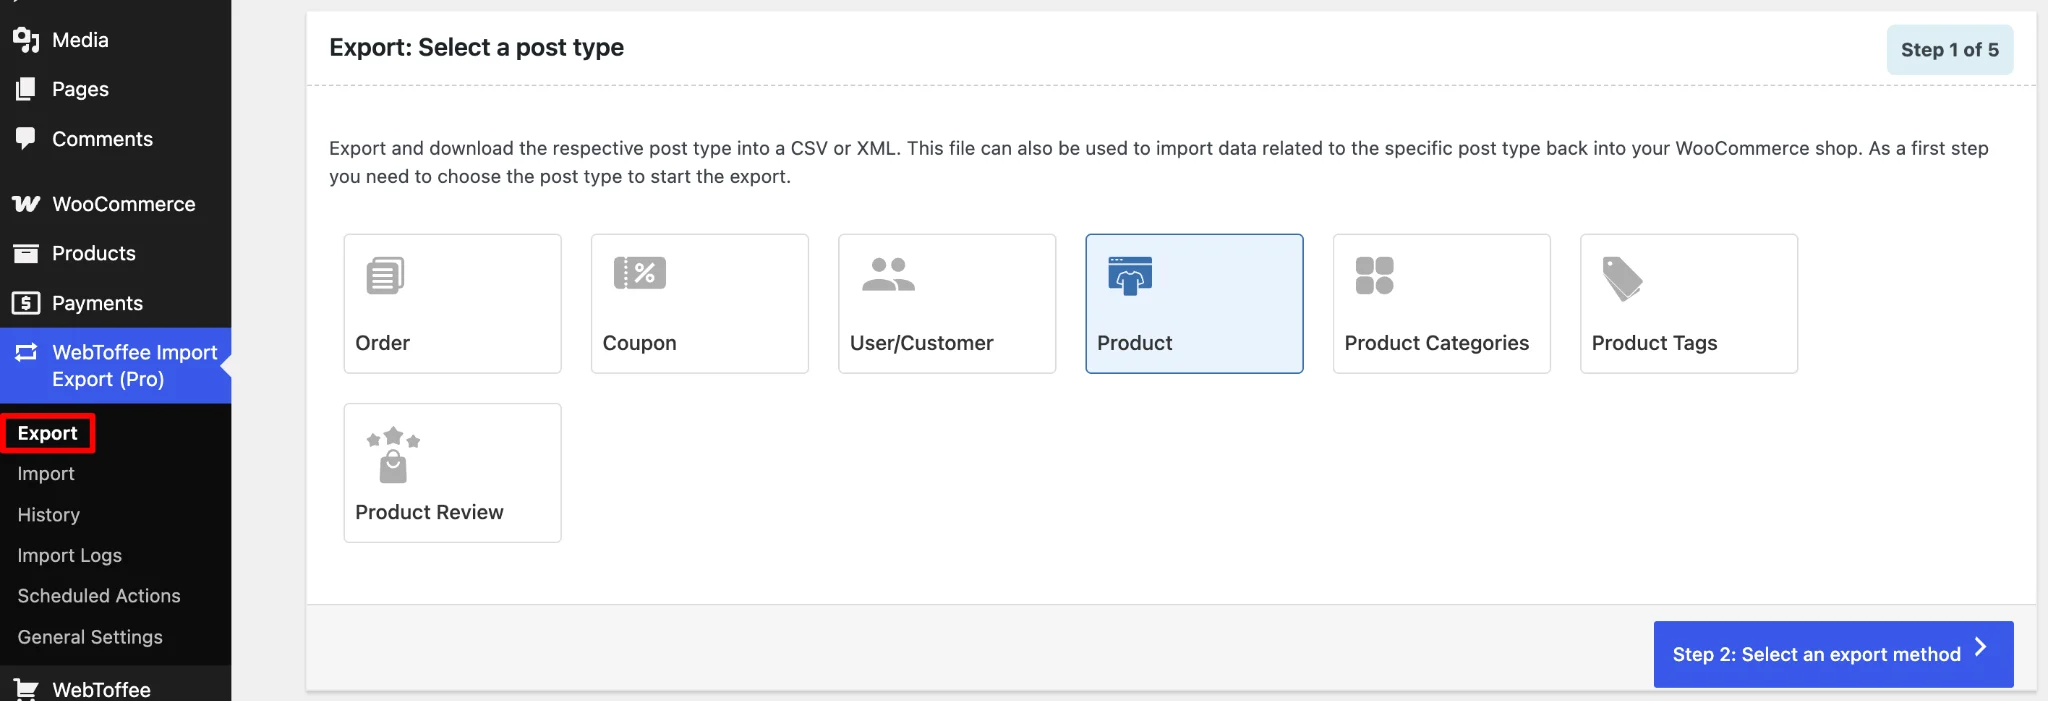
Step 1: Select Product as the Post Type
- From the source store, go to: WebToffee Import Export > Export
- Select Product as the post type you want to export.
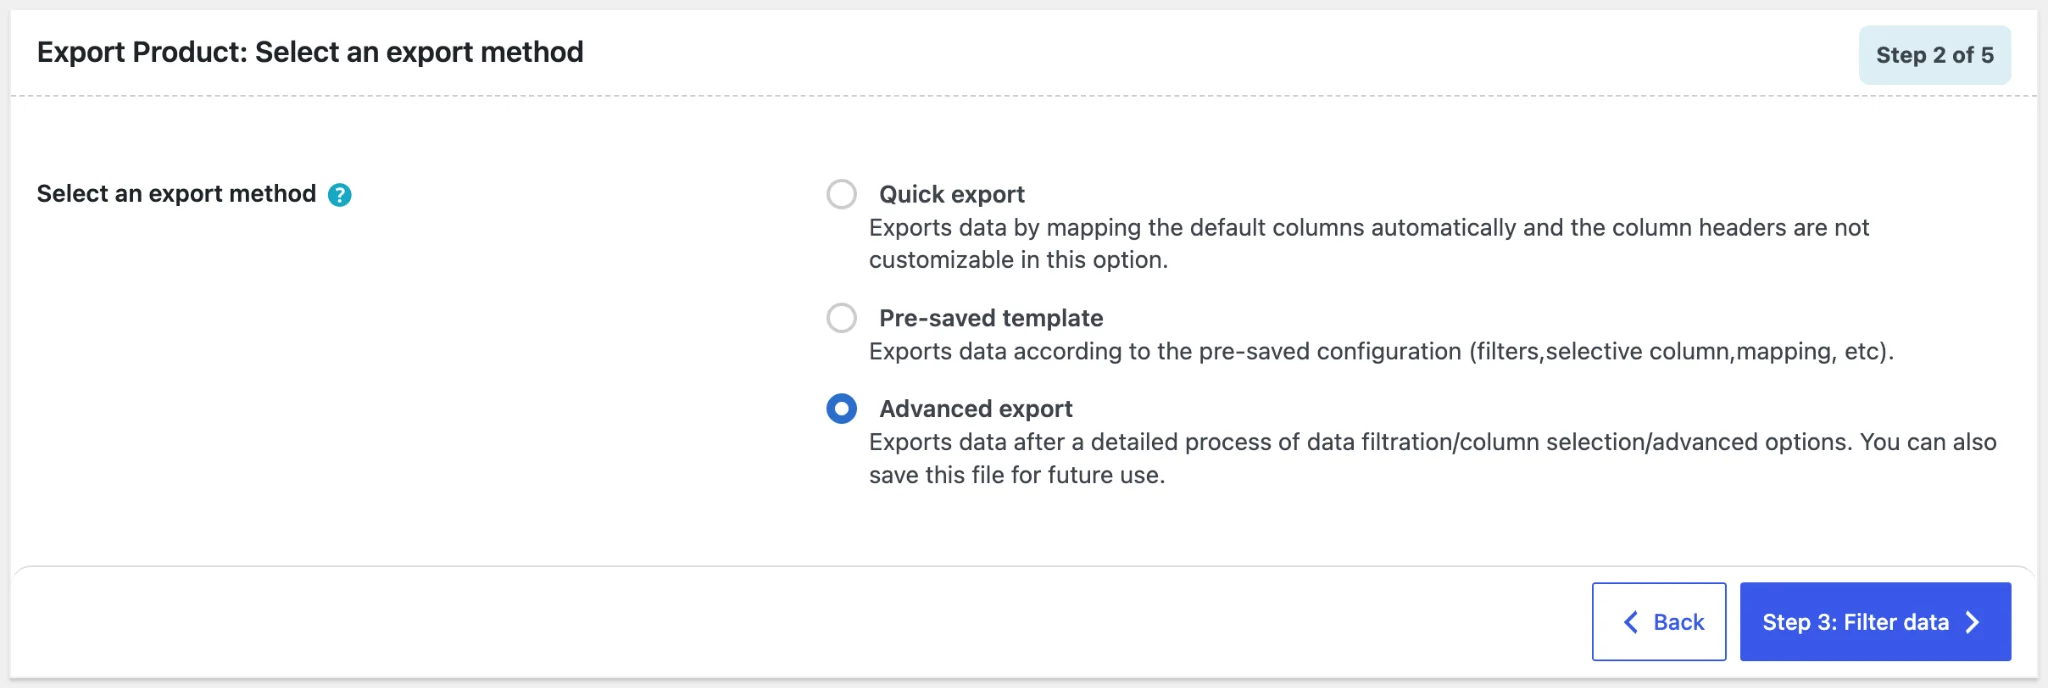
Step 2: Choose Export Method
Then choose between a Quick export and an Advanced export. Quick export uses the default settings, while Advanced export gives you more control over which products and fields are included.
Step 3: Filter the Products to Export
Next, choose which products should be included in the export. The plugin lets you narrow down the product list using filters such as:
- Total number of products to export
- Skip first n products
- Product type
- Specific products
- Stock status
- Product categories
- Product tags
- Product status
- Products to exclude
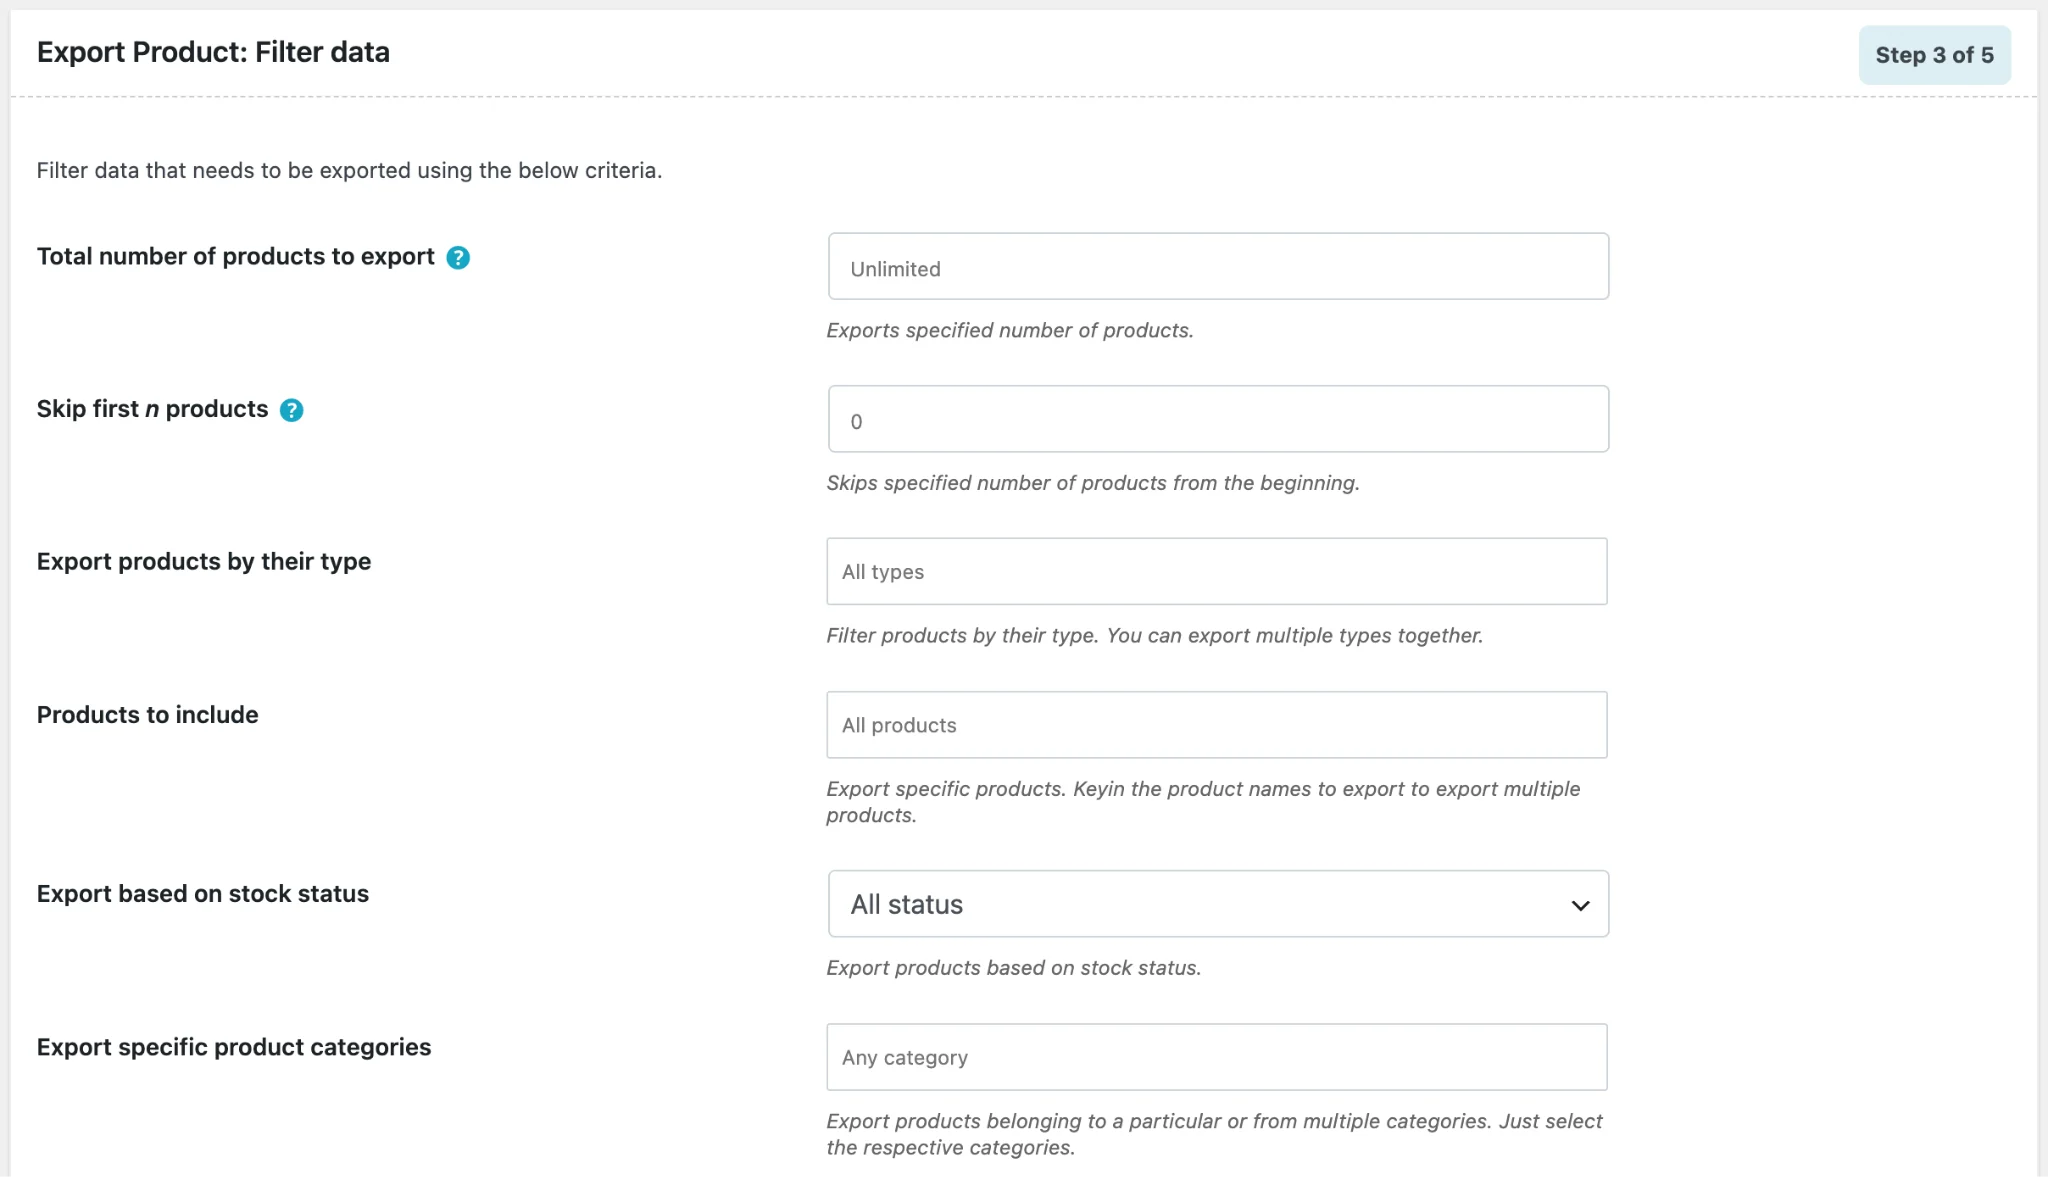
You can also choose how the exported products are sorted, for example by Product ID, and set the order to ascending or descending.
These filters are useful when you only want to sync a specific part of your catalog instead of exporting every product. For example, if a regional WooCommerce store only sells products from selected categories, you can export just those categories. Likewise, you can limit the export to in-stock products, specific product types, or a handpicked set of products.
Step 4: Select and Map the Product Fields
Choose which product fields should be included in the export, such as SKU, title, description, price, stock, images, categories, attributes, and custom fields.
You can also rename or reorder the export columns if needed.
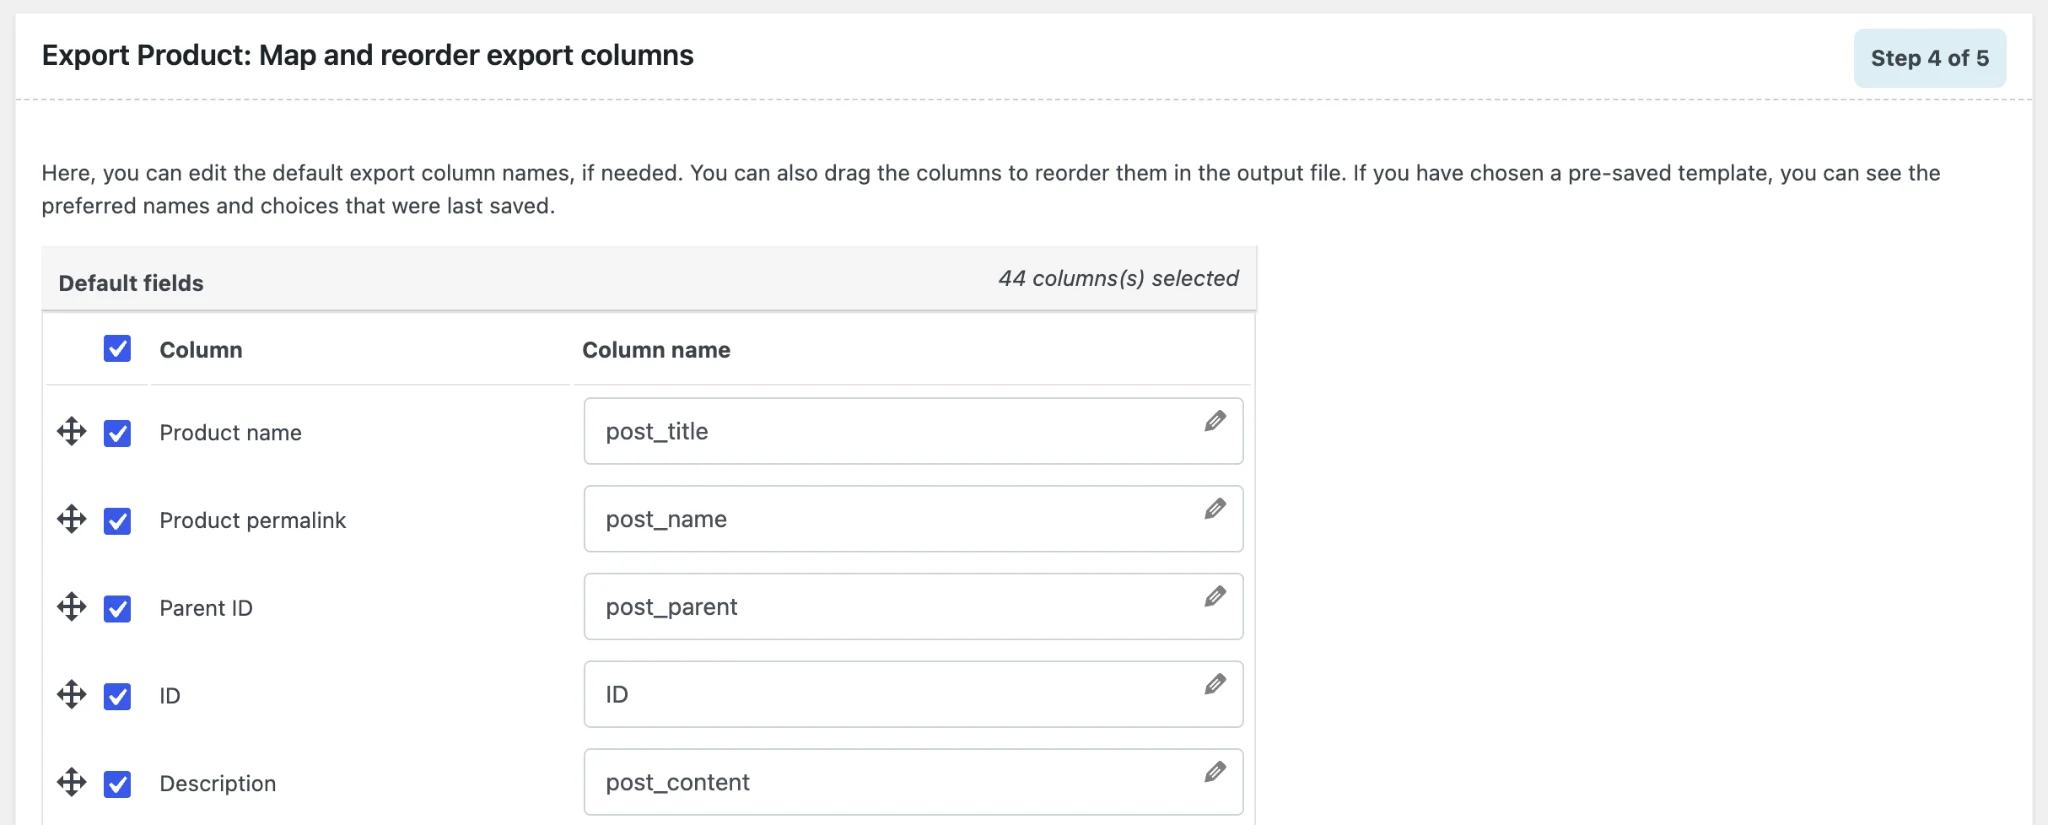
Once you’ve filtered the required products, proceed to the next step to map and order the product fields to include in the export.
Step 5: Configure Export and Download the File
In the final step, configure the export settings and generate the product file.
You can:
- enter an export file name
- choose whether to email the export file
- upload the file to an FTP server
- select the export file format
- choose the CSV delimiter
- enable advanced options if needed
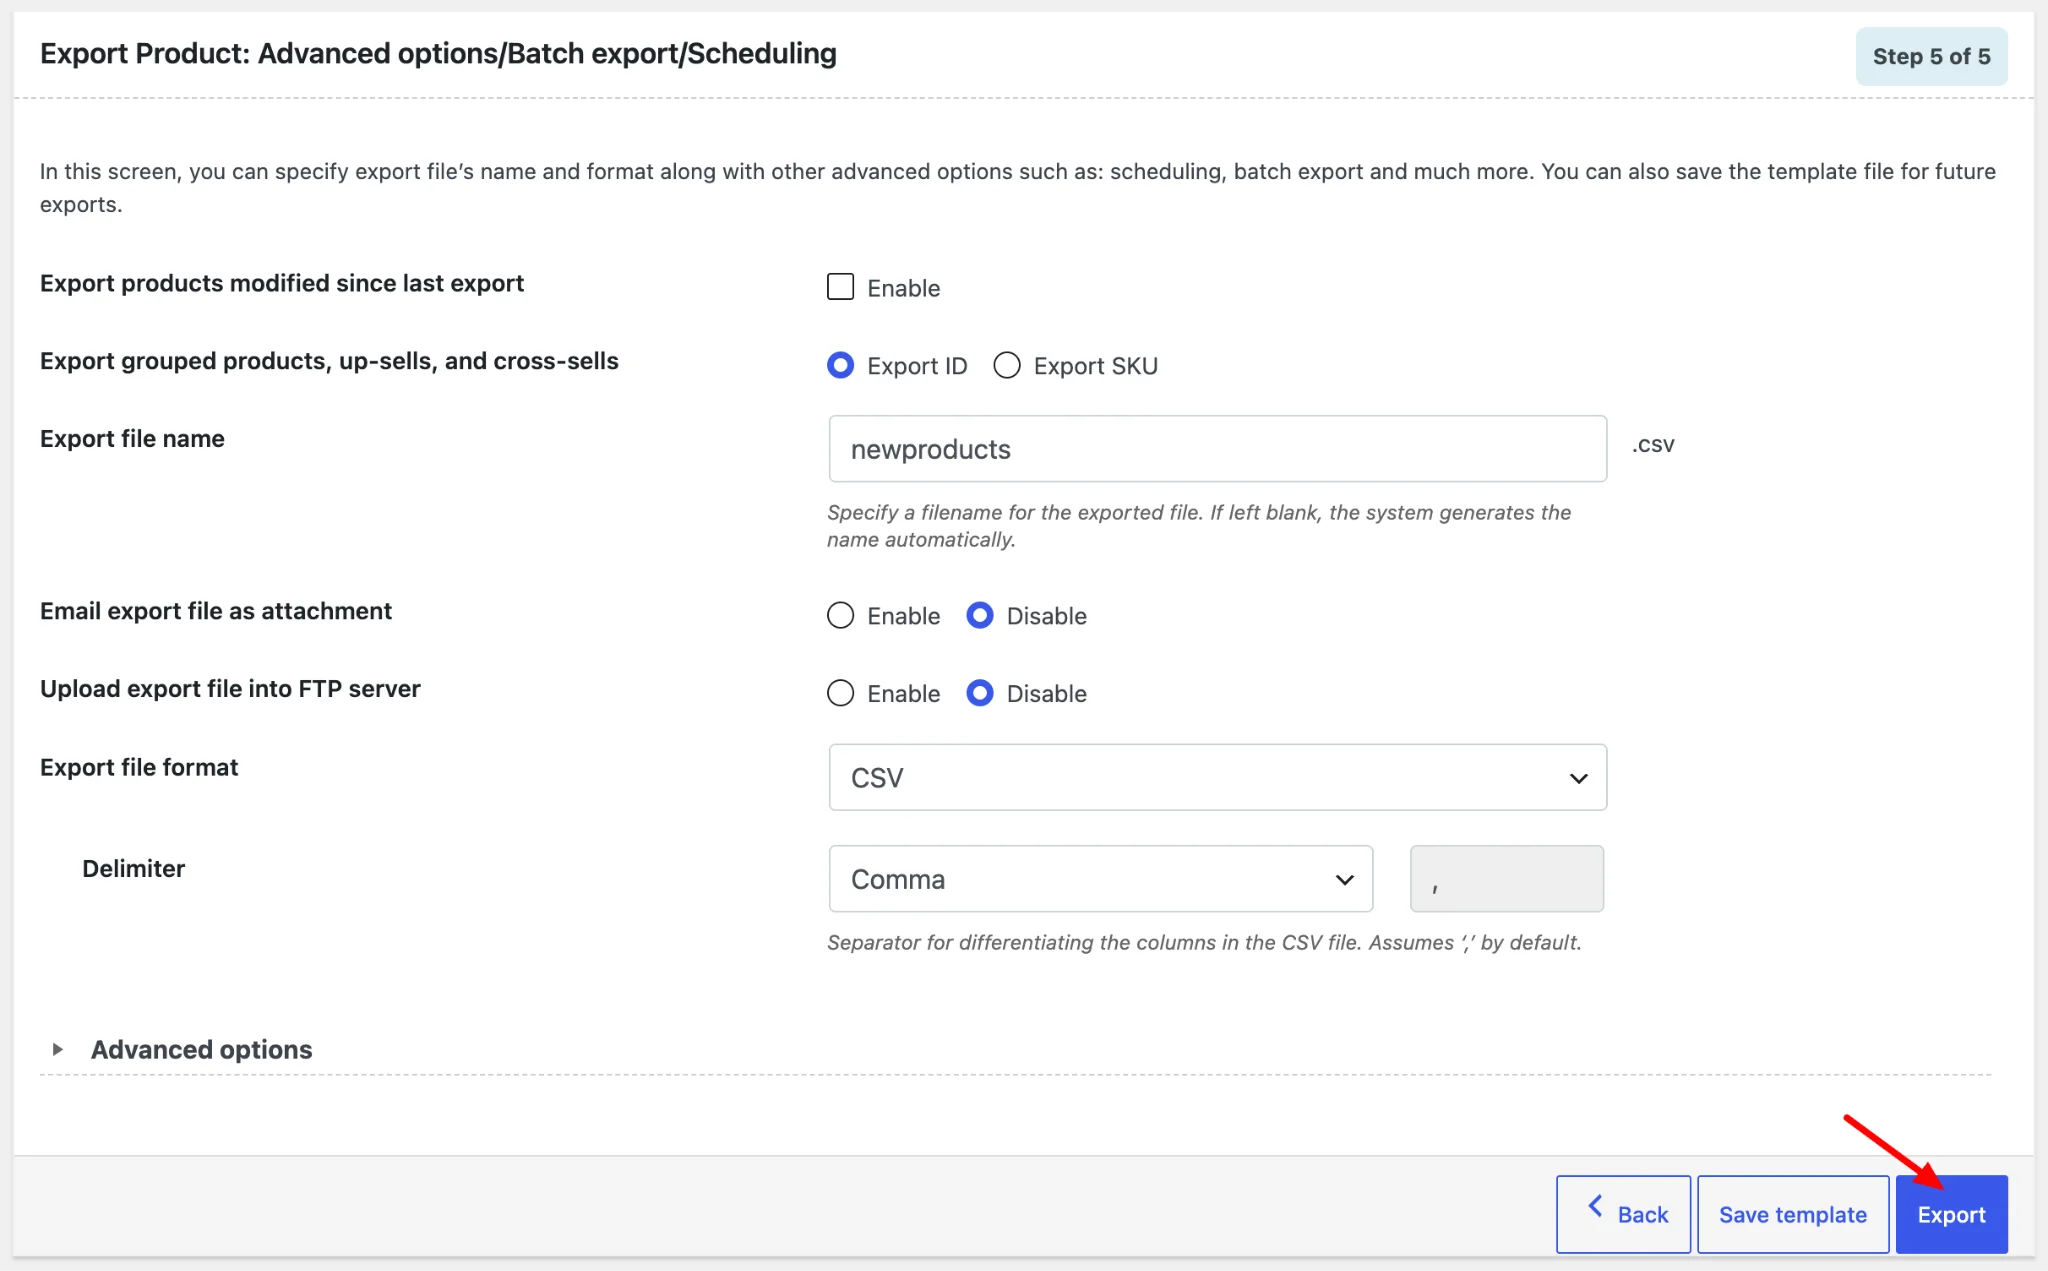
For a simple manual sync, you can keep the default settings, select CSV as the file format, and click Export.
The exported file will then be ready to import into the destination WooCommerce store.
Import Products Into the Destination WooCommerce Store
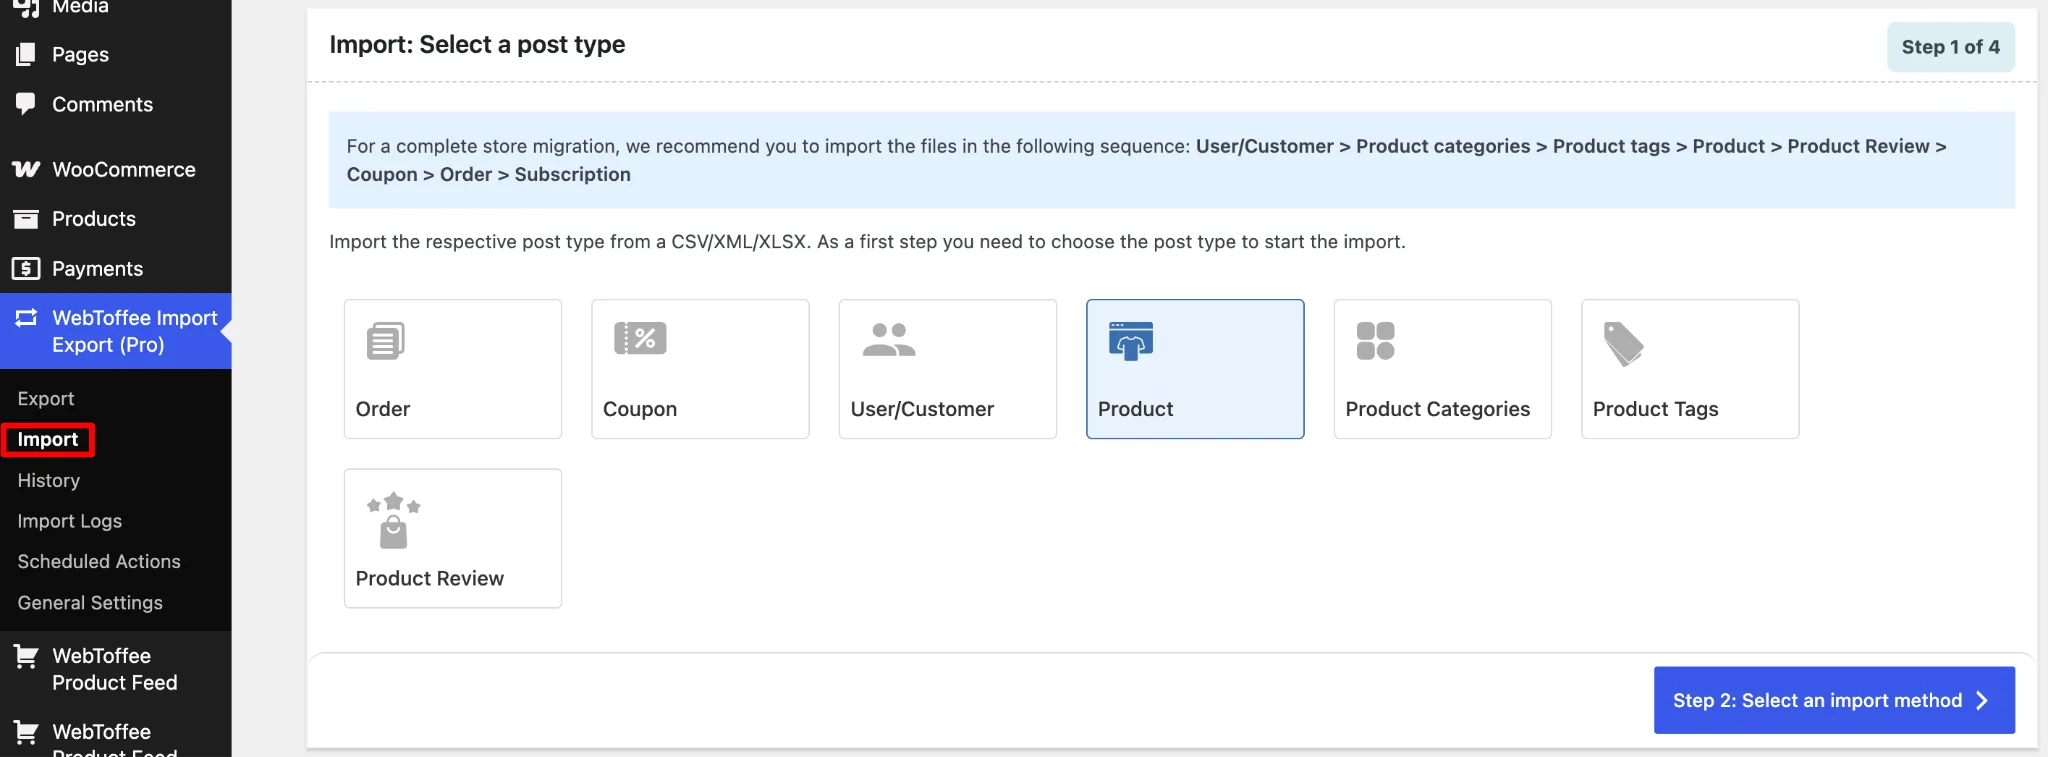
Step 1: Choose the Import Source
- Go to WebToffee Import Export > Import and select Product as the post type.
Then choose where the product data should come from. For a manual sync, upload the file exported from the source store. You can also import from sources such as a remote URL, FTP/SFTP, or Google Sheets.
Step 2: Choose Import Method
If the file was created using the same WebToffee plugin, you can use Quick import. For files with a different structure, use Advanced import.
Next, choose where the product data should be imported from.
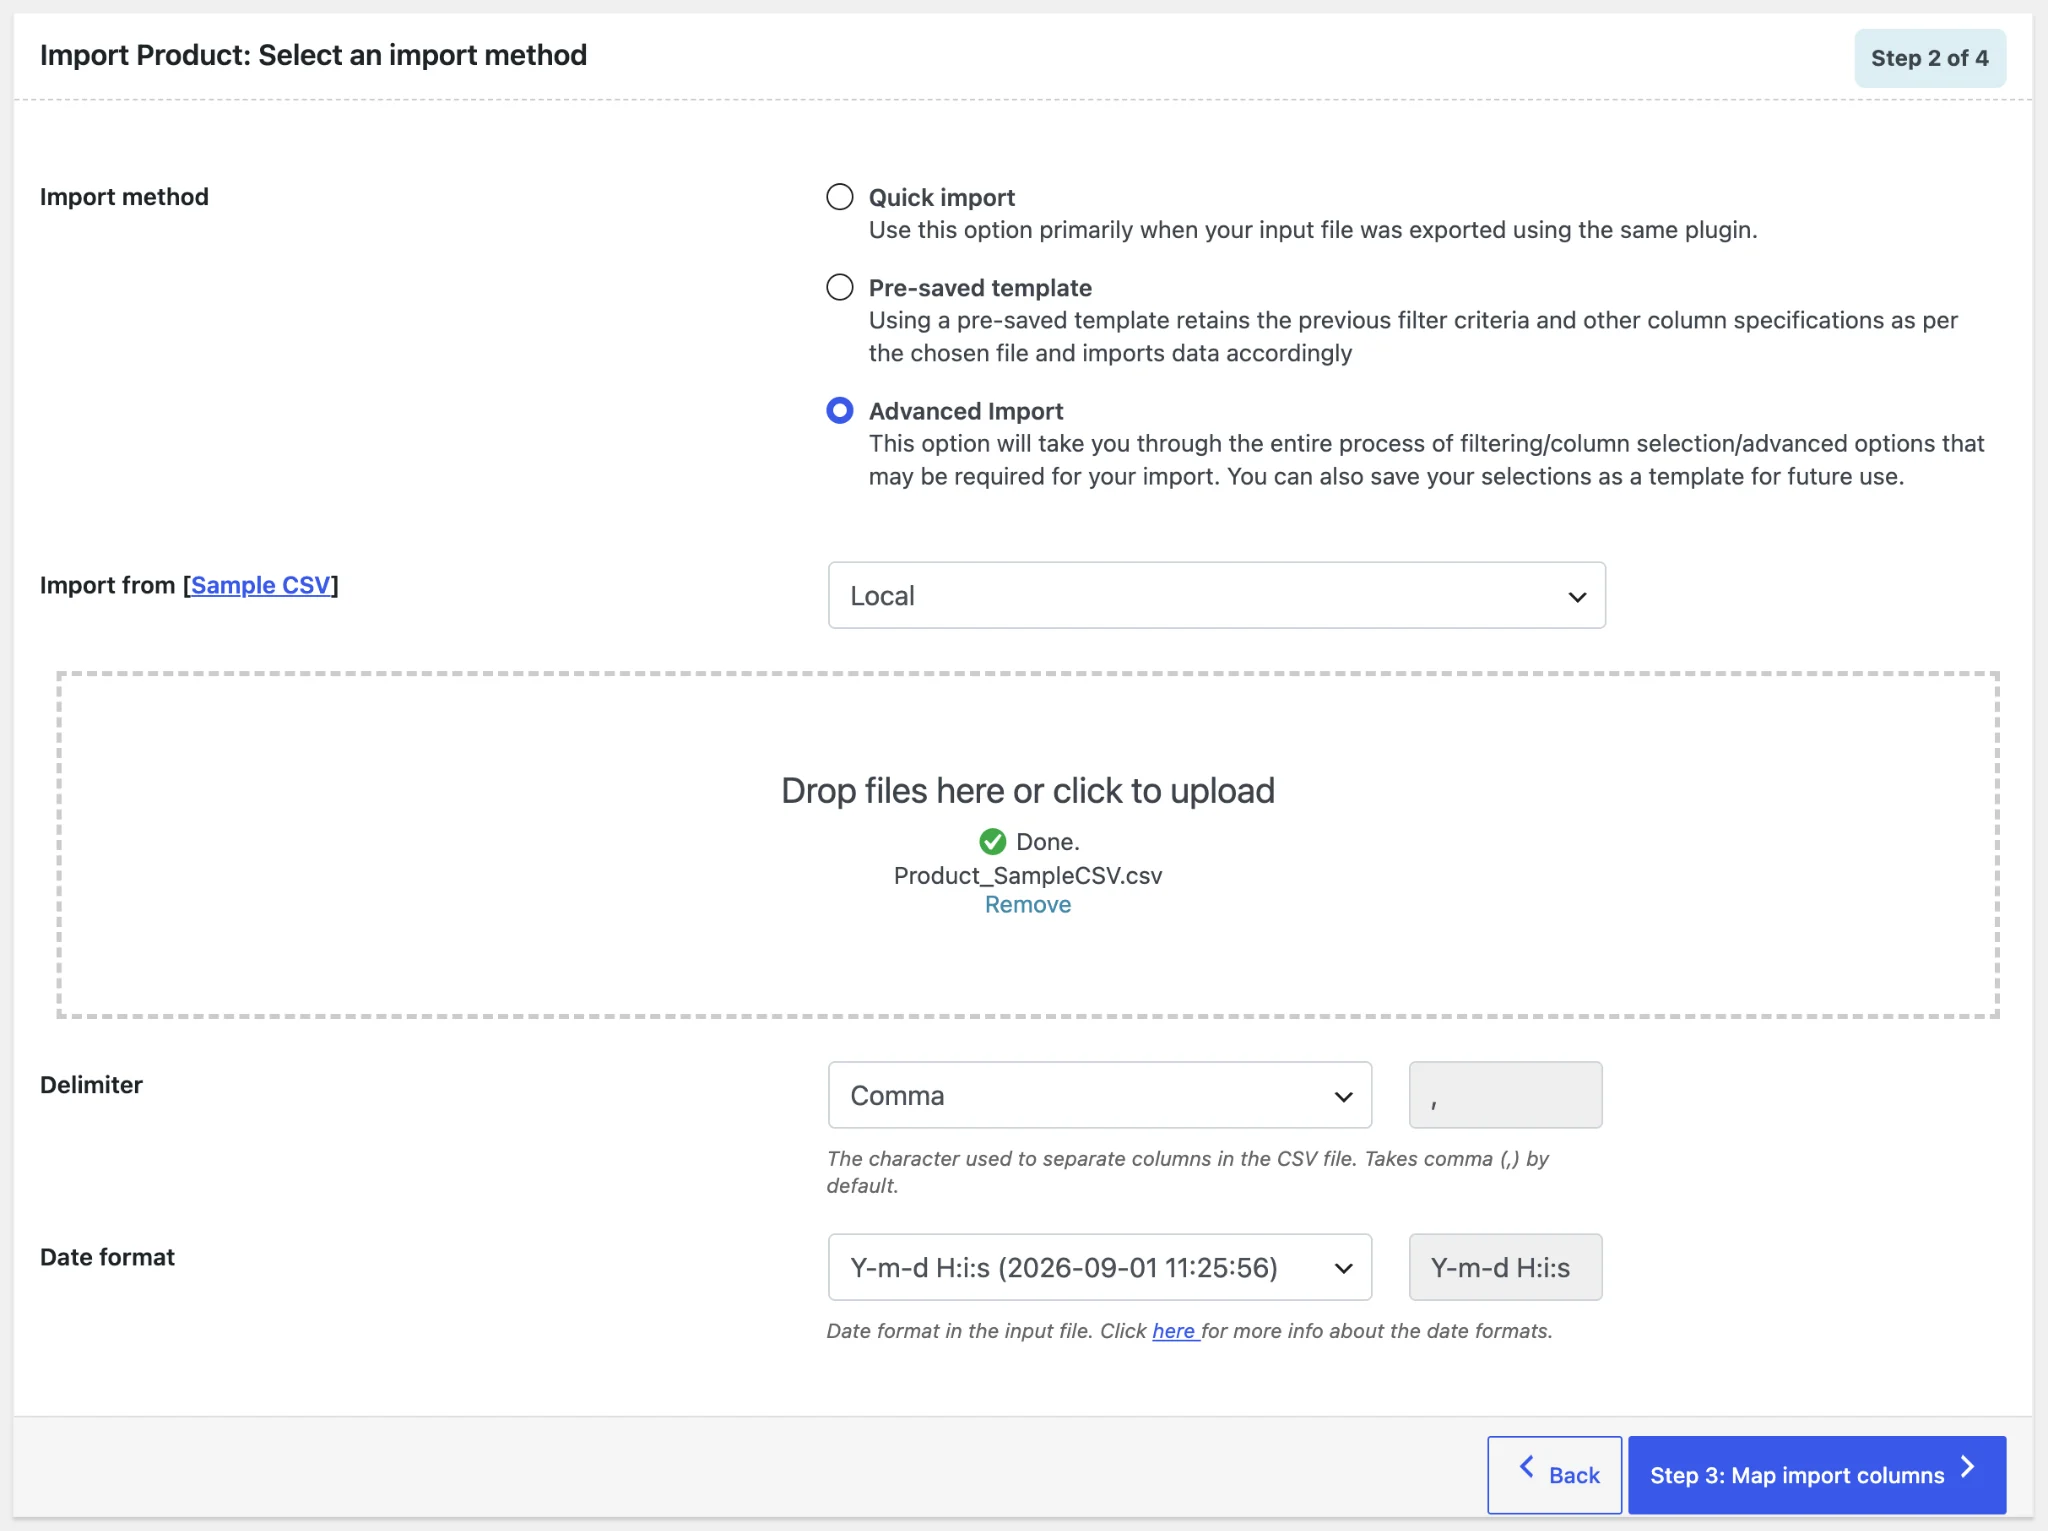
For a manual transfer, upload the file you exported from the source store. The plugin can also import product data from other sources, including a remote URL, FTP/SFTP location, or Google Sheets, depending on how your workflow is configured.
If you are importing a file that was previously generated by the same WebToffee plugin, you can use the quick import option. For files with a different structure, the advanced import option gives you more control over mapping and other import settings.
Step 3: Map the Product Fields
Next, map the columns in your import file to the corresponding WooCommerce product fields.
Matching fields are usually mapped automatically for files exported with the same plugin, but you can review and adjust them if needed.
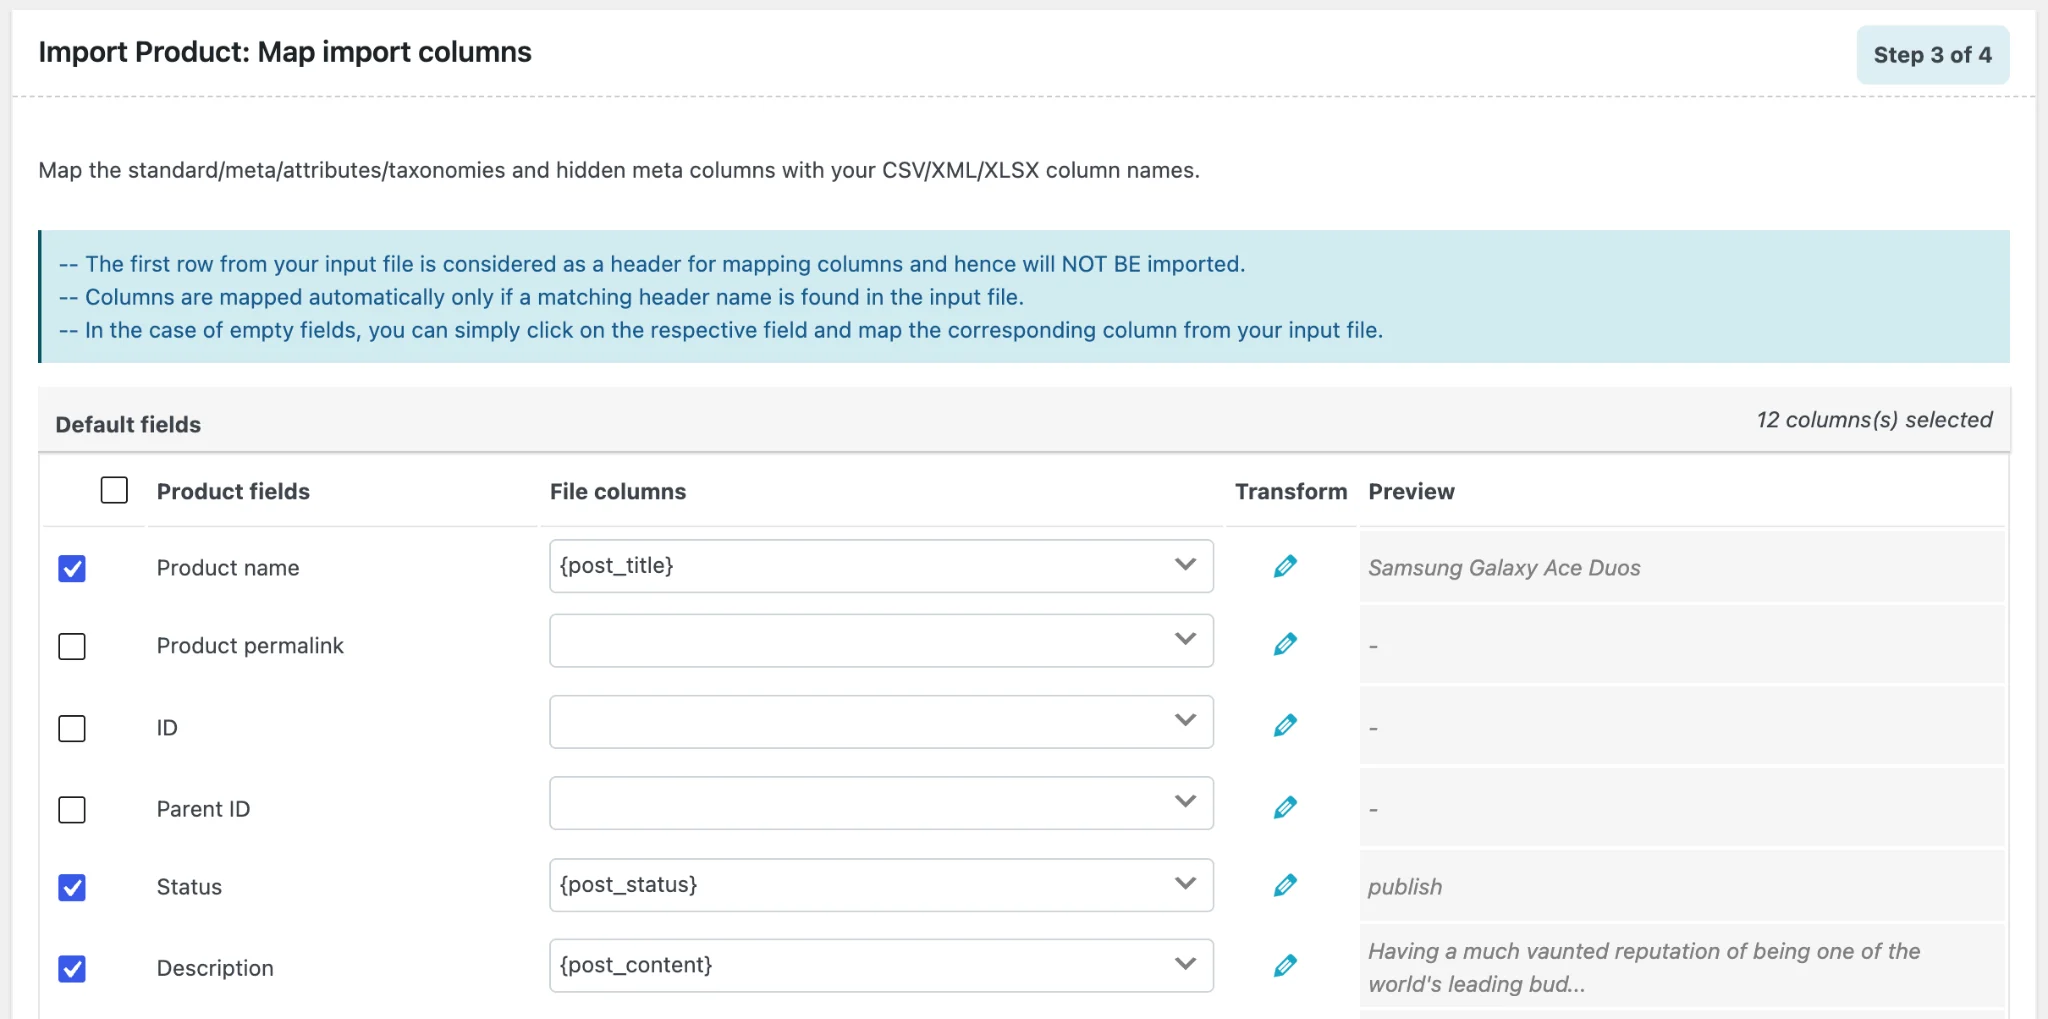
You can also map additional data under sections such as:
- Taxonomies
- Meta (custom fields)
- Attributes
- Hidden meta
Use the preview to confirm that values such as SKU, price, stock, and images are mapped correctly.
Step 4: Configure Product Update Settings
Choose how the plugin should handle existing and new products. For recurring syncs, select Update and match products by SKU, since product IDs may differ between stores.
You can also control whether to:
- import new products
- handle ID conflicts
- link related products by SKU
- remove products missing from the source file
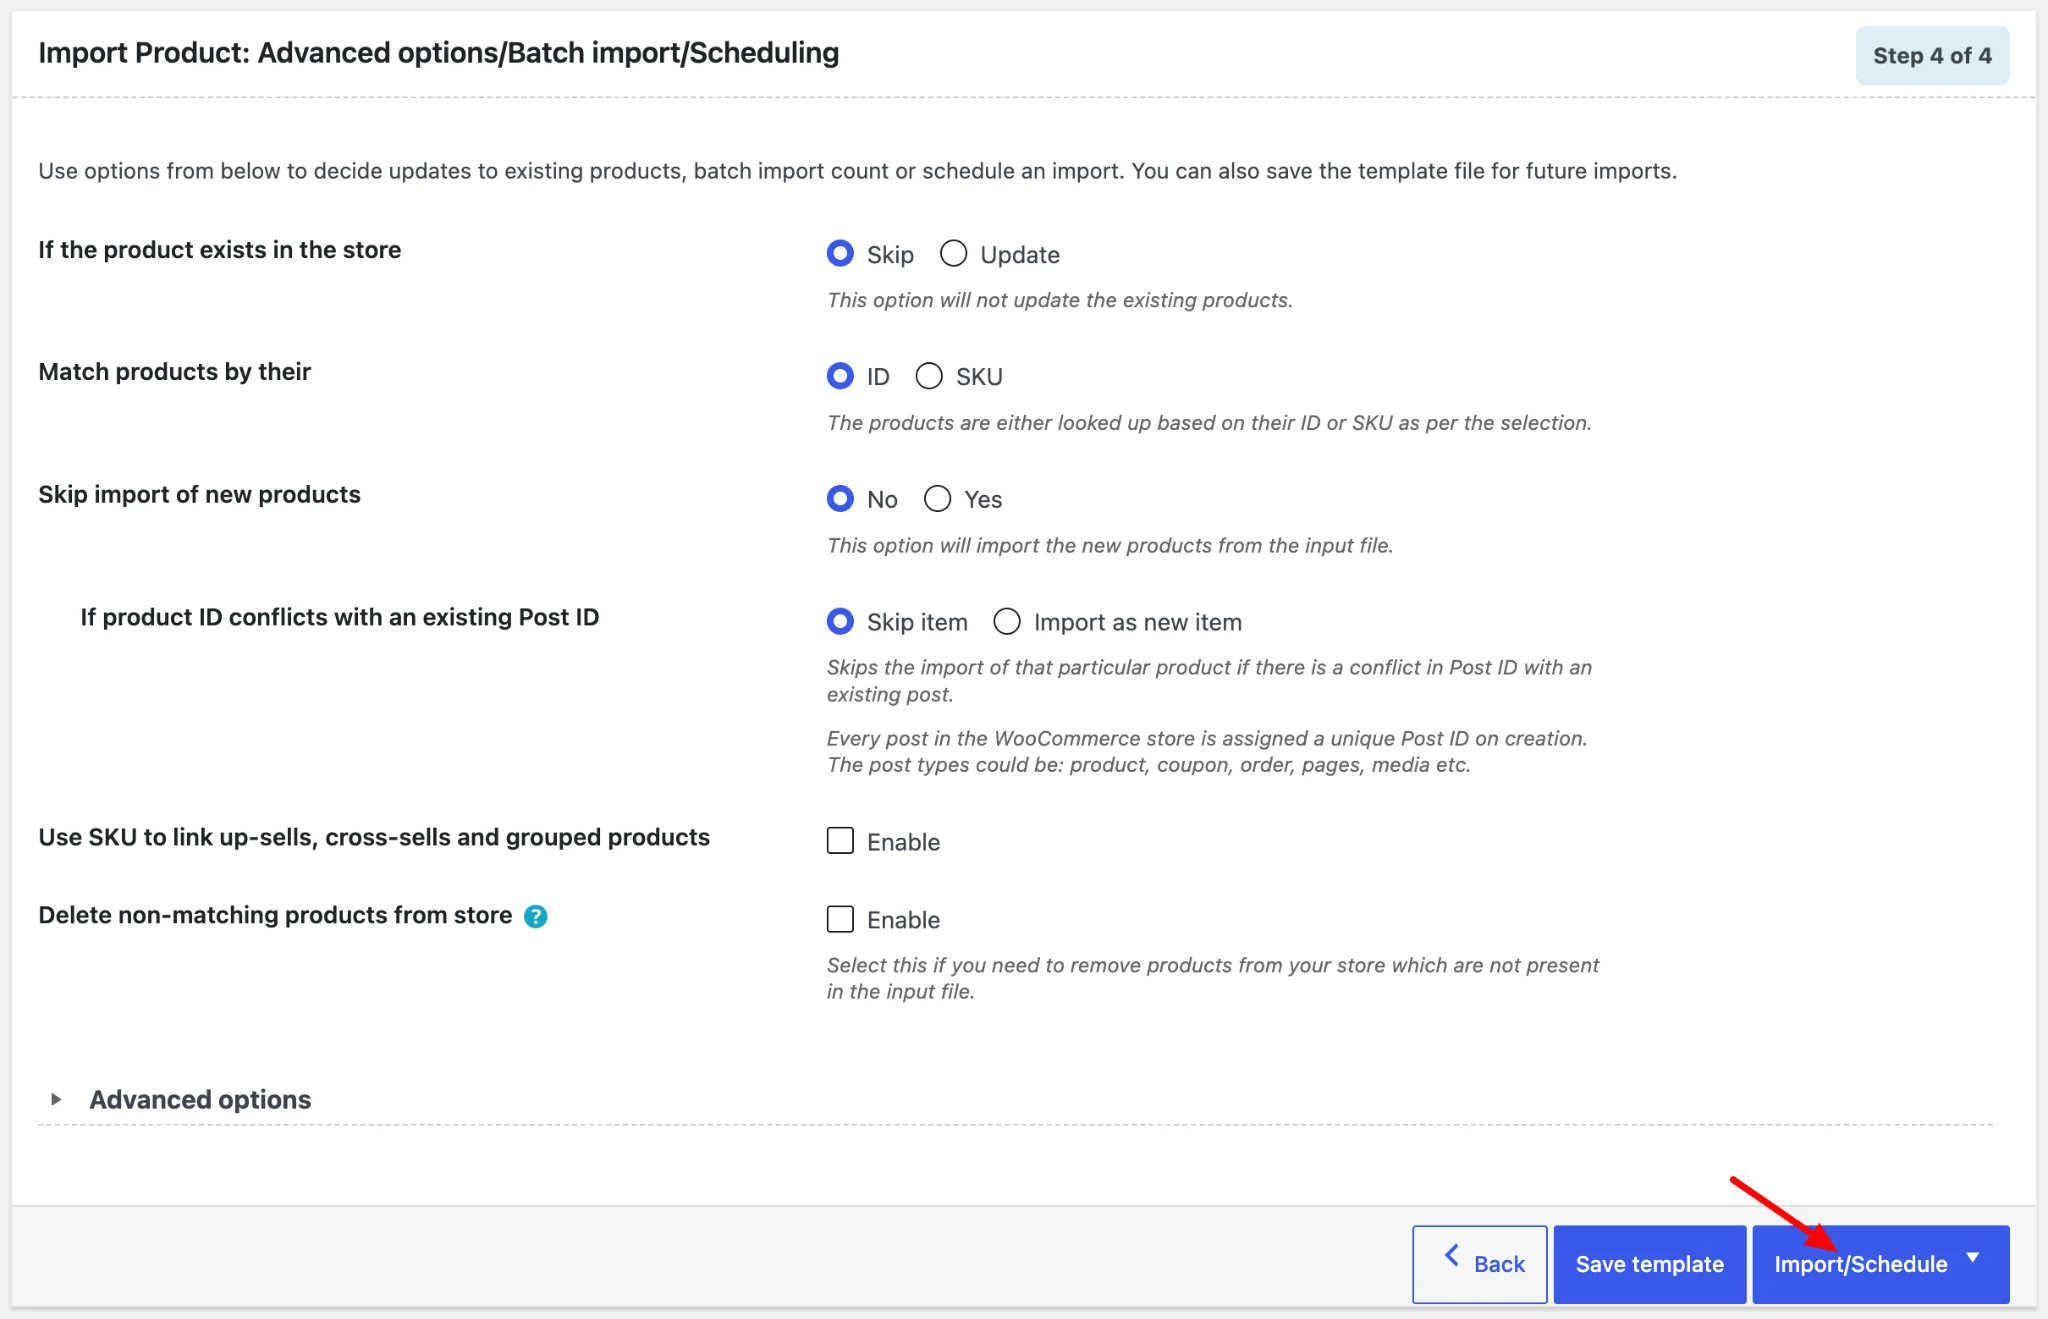
Click Import/Schedule to run the import immediately or schedule it for later.
After the import, verify key product details such as prices, stock, images, categories, attributes, and variations. For the first sync, test the workflow with a small batch of products before importing the full catalog.
If your catalog changes frequently, you can automate the sync instead of manually exporting and importing product files each time.
A typical workflow looks like this:
Main Store → Scheduled FTP Export → Remote File → Scheduled Import → Destination Store(s)
Schedule Product Exports via FTP
On the source store, configure the export and enable FTP/SFTP delivery. This allows the plugin to automatically generate the product file and upload it to a remote server on a set schedule.
You can also limit the export to products modified since the previous run, reducing the amount of data processed.
Schedule the Import
On the destination store, use the same FTP/SFTP location as the import source and schedule the import to run at regular intervals.
You can choose:
- WordPress Cron or Server Cron
- daily, weekly, monthly, or custom intervals
- a specific start time
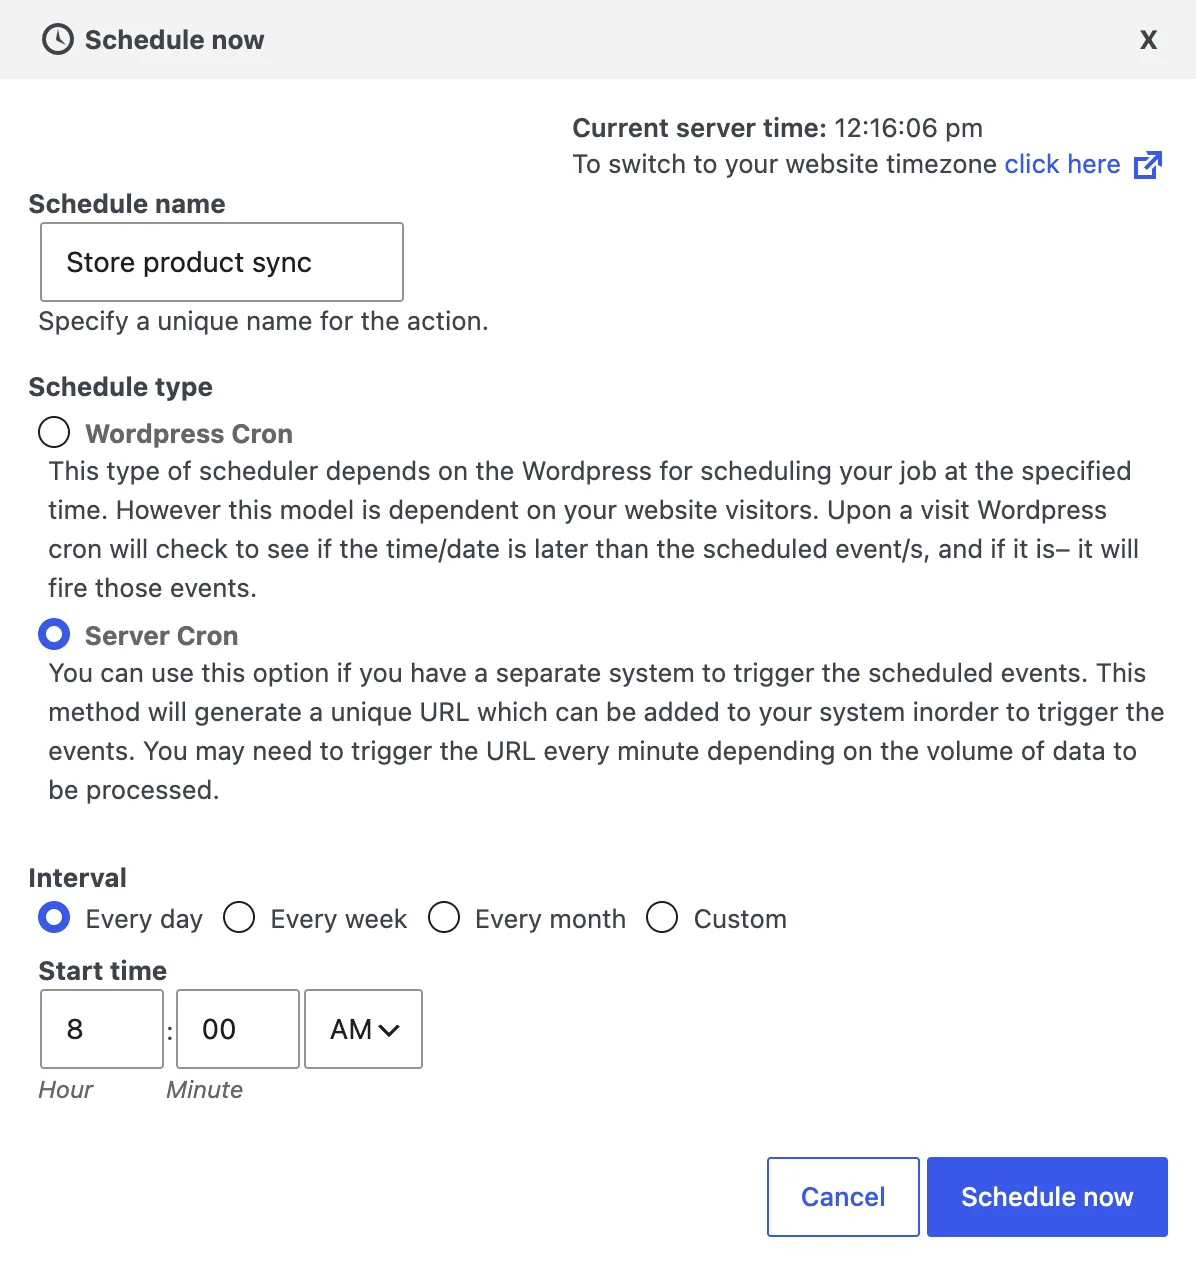
This creates an automated workflow where the source store periodically exports updated product data to FTP, and the destination store imports that file based on its schedule.
Note: Scheduled import/export sync is not real-time inventory synchronization. If stock must update immediately after every order, a dedicated real-time sync solution may be more suitable.
One-Way Sync
Store A > Store B / Store C
One store acts as the main source of product data, and updates flow only to the connected stores.
This is usually the simpler option because it reduces conflicting changes, makes troubleshooting easier, and gives you a clear source of truth.
Two-Way Sync
Store A ↔ Store B
Two-way sync allows product updates to move in both directions and can be useful when multiple stores are managed independently.
However, it can also create issues such as:
- conflicting edits
- older data overwriting newer changes
- stock discrepancies
Where possible, it is better to use one store as the primary source and rely on one-way synchronization.
Yes. You can use a WooCommerce import/export plugin to move and update product data between sites without writing code. These tools can transfer details such as titles, SKUs, prices, stock, images, categories, attributes, and variations, and can also support scheduled imports and exports for recurring updates.
Use a consistent product identifier, preferably the SKU, across all connected stores. During import, configure the plugin to match existing products by SKU and update them instead of creating new products. Since product IDs can differ between separate WooCommerce sites, SKUs are generally more reliable for store-to-store synchronization.
Not necessarily. An import/export-based workflow typically syncs products according to a schedule, such as daily or every few hours. This works well for catalog updates, but it is different from real-time synchronization. If inventory needs to update immediately across stores after every sale, you will usually need a dedicated real-time inventory sync solution.
Yes. With a plugin such as WebToffee’s Product Import Export Plugin for WooCommerce, you can schedule product exports and send the generated files to an FTP/SFTP location. The destination store can then retrieve the file and run its own scheduled import, creating an automated product synchronization workflow between WooCommerce stores.
Managing multiple WooCommerce stores does not have to mean updating every catalog separately. The right synchronization method depends on how often your product data changes and how much control you need. Scheduled import/export is a practical option for keeping catalogs aligned at regular intervals, while dedicated sync tools are better suited to real-time product or inventory updates.
For highly customized workflows, the WooCommerce REST API offers the most flexibility, but it also requires more technical setup and maintenance.
If you want a no-code way to automate WooCommerce product import and export between stores, WebToffee’s Product Import Export Plugin for WooCommerce lets you schedule transfers, update existing products by SKU, and control exactly which product data is moved. It is a practical way to keep multiple WooCommerce catalogs consistent without having to repeat the same updates manually.


Subcribe to our newsletter