Share:


Table of Contents
Handling partial withdrawal requests in WooCommerce is essential for compliance with EU consumer rights legislation, which allows customers to withdraw from individual items in an order rather than the entire purchase. The absence of a native withdrawal button in WooCommerce complicates this process, making the WebToffee EU Withdrawal Button plugin a vital tool for store owners to manage these requests effectively.
- The EU Consumer Rights Directive mandates that customers can withdraw from individual items, not just entire orders.
- WooCommerce supports partial refunds, but lacks a built-in mechanism for customers to submit partial withdrawal requests.
- The WebToffee EU Withdrawal Button plugin enables customers to specify items for withdrawal, ensuring compliance with legal requirements.
- Store owners can configure settings for product exclusions, withdrawal periods, and automated order status updates to streamline the process.
- Clear communication regarding return shipping costs and refund policies is crucial to avoid disputes and ensure customer satisfaction.
- Testing the withdrawal process with multiple products helps ensure that the system functions correctly and meets customer needs.
Ever since the EU withdrawal button requirement came into effect on June 19, 2026, store owners have had plenty of questions about what compliance actually looks like in practice. One that keeps coming up is how to handle partial withdrawal requests, where a customer wants to withdraw from part of an order instead of all of it. It gets trickier when you consider that WooCommerce doesn’t offer a withdrawal button natively.
Our EU Withdrawal Button plugin has been helping WooCommerce store owners meet that requirement since launch, and it’s now running on over 1000 stores.
We built it around what store owners actually run into when they try to stay compliant with the EU withdrawal law, partial requests included.
In this article, we’ll show you how to handle partial withdrawal requests in WooCommerce using the WebToffee EU Withdrawal Button plugin.
Let’s get started.
Most orders aren’t single-item orders. A customer buys a jacket, two T-shirts, and a pair of shoes in one checkout; the jacket doesn’t fit, and everything else is fine. All-or-nothing withdrawal leaves them with two bad options: keep a jacket they don’t want, or send back the whole order. Neither is what they asked for, and neither is what the law requires. The withdrawal right applies to the goods, not to the order ID.
Mixed orders make it harder. Under Article 16 of the Consumer Rights Directive, some items are excluded from withdrawal entirely:
- Custom-made or personalized goods
- Sealed goods unsealed after delivery for hygiene reasons
- Perishable goods
- Digital content already delivered with the customer’s express consent
So an order containing a standard hoodie and a personalized name print forces one of two wrong outcomes. Either you accept a return you’re not obliged to take, or you reject a withdrawal the customer is entitled to on the hoodie.
The refund math differs too. Full withdrawal means refunding the goods plus standard outbound delivery. Withdraw from two items out of five, and the delivery cost usually stays with you, since the parcel still shipped. Treating every request as a full cancellation means refunding shipping you didn’t owe.
Here’s what catches store owners off guard. WooCommerce already handles partial refunds fine. Go to WooCommerce → Orders → [order] → Refund, and you can refund individual line items and restock what came back.
The gap isn’t on the refund side. It’s on the request side: the customer needs a way to specify which items they’re withdrawing, and that request needs to land against the right line items before you open the refund screen.
Follow the steps below to set up the withdrawal option and handle partial withdrawals.
Step 1: Install WebToffee EU Withdrawal Plugin
- From your WordPress dashboard, go to Plugins > Add New.
- Search for the EU Withdrawal Button plugin by WebToffee.
- Once you find the plugin, click on Install Now and then activate it on your website.
- After activation, a new Withdrawals menu appears under WooCommerce.
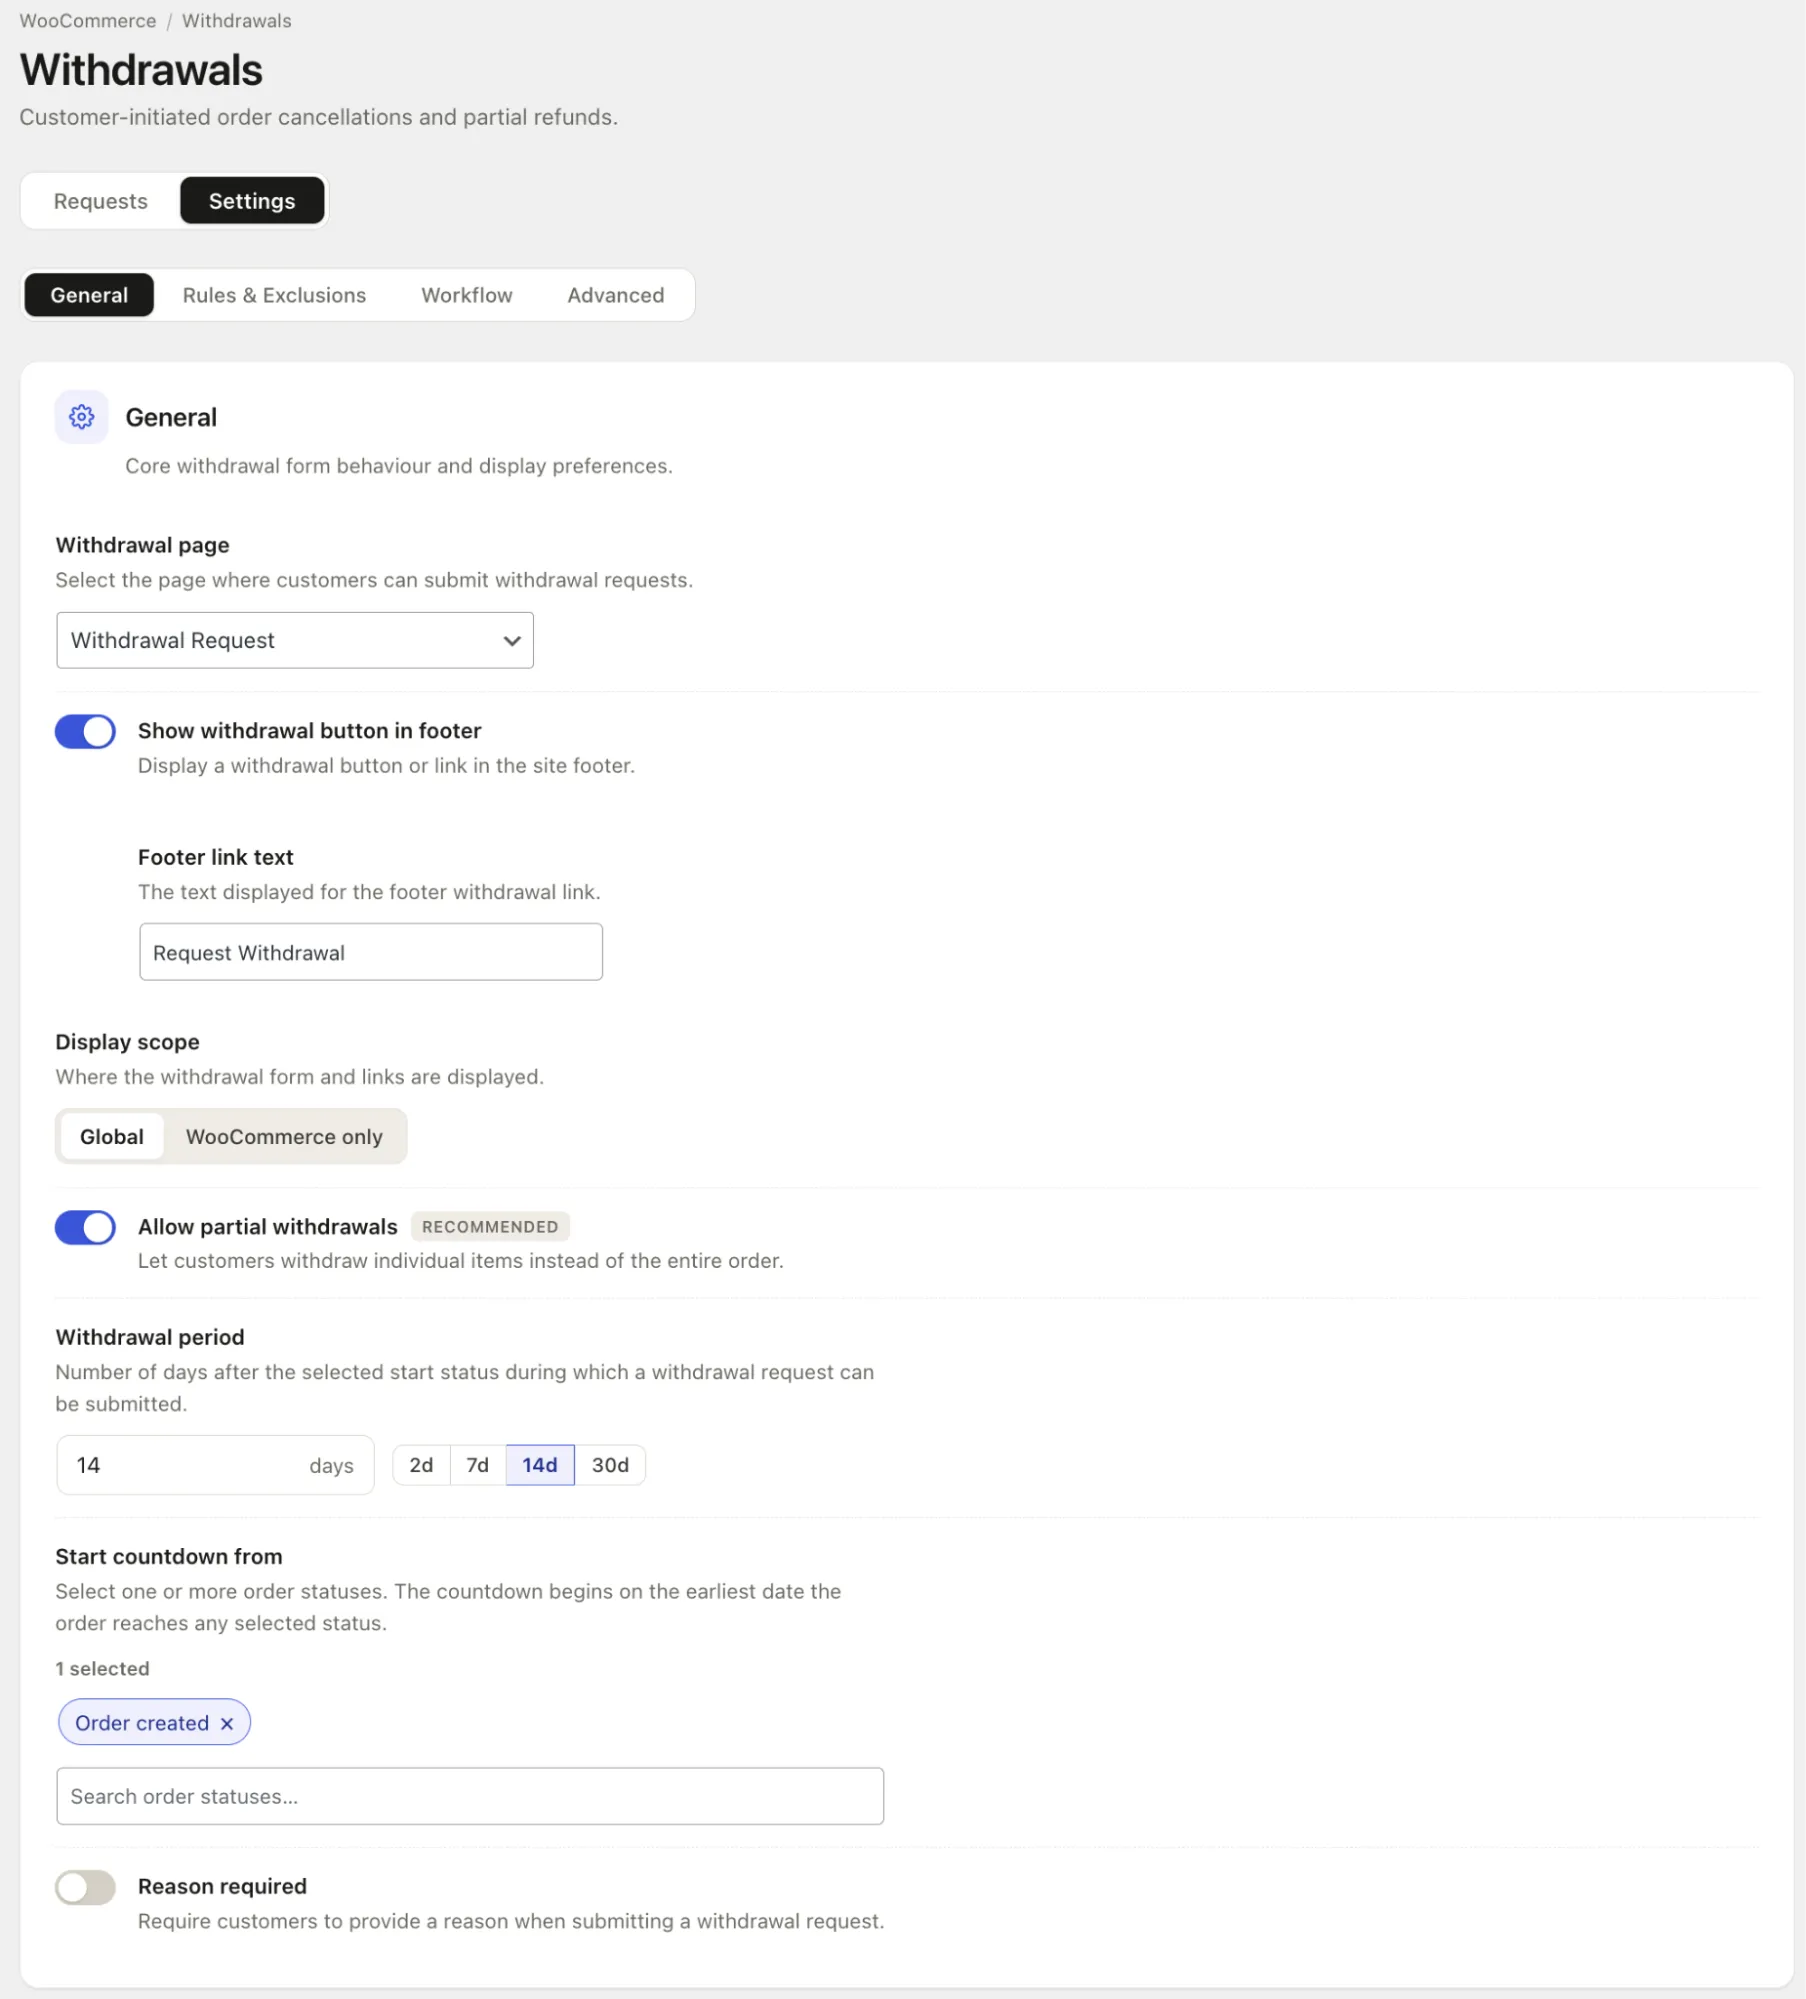
Step 2: Configure General Withdrawal Settings
Go to WooCommerce → Withdrawals → Settings → General and work through the options:
- Select the page where customers will submit their requests from the Withdrawal page dropdown.
- Toggle on the footer withdrawal button so the option stays reachable from any page during the cooling-off window, not just the account area. You can edit the link label below it, though Request Withdrawal is clear enough for most stores.
- Set the display scope to Global if you want the form and links across your whole site, or WooCommerce only to keep them on WooCommerce pages like order details and My Account.
- Turn on Allow partial withdrawals. This is what lets customers withdraw individual line items instead of the entire order, and everything that follows in this guide depends on it.
- Enter your withdrawal period in days. It defaults to 14, matching the EU statutory period, with quick-select buttons for 2d, 7d, and 30d if your policy runs longer.
- Choose one or more order statuses under Start countdown from. The clock begins on the earliest date the order reaches any status you select, so you can tie it to delivery rather than payment.
Step 3: Set Product Exclusions
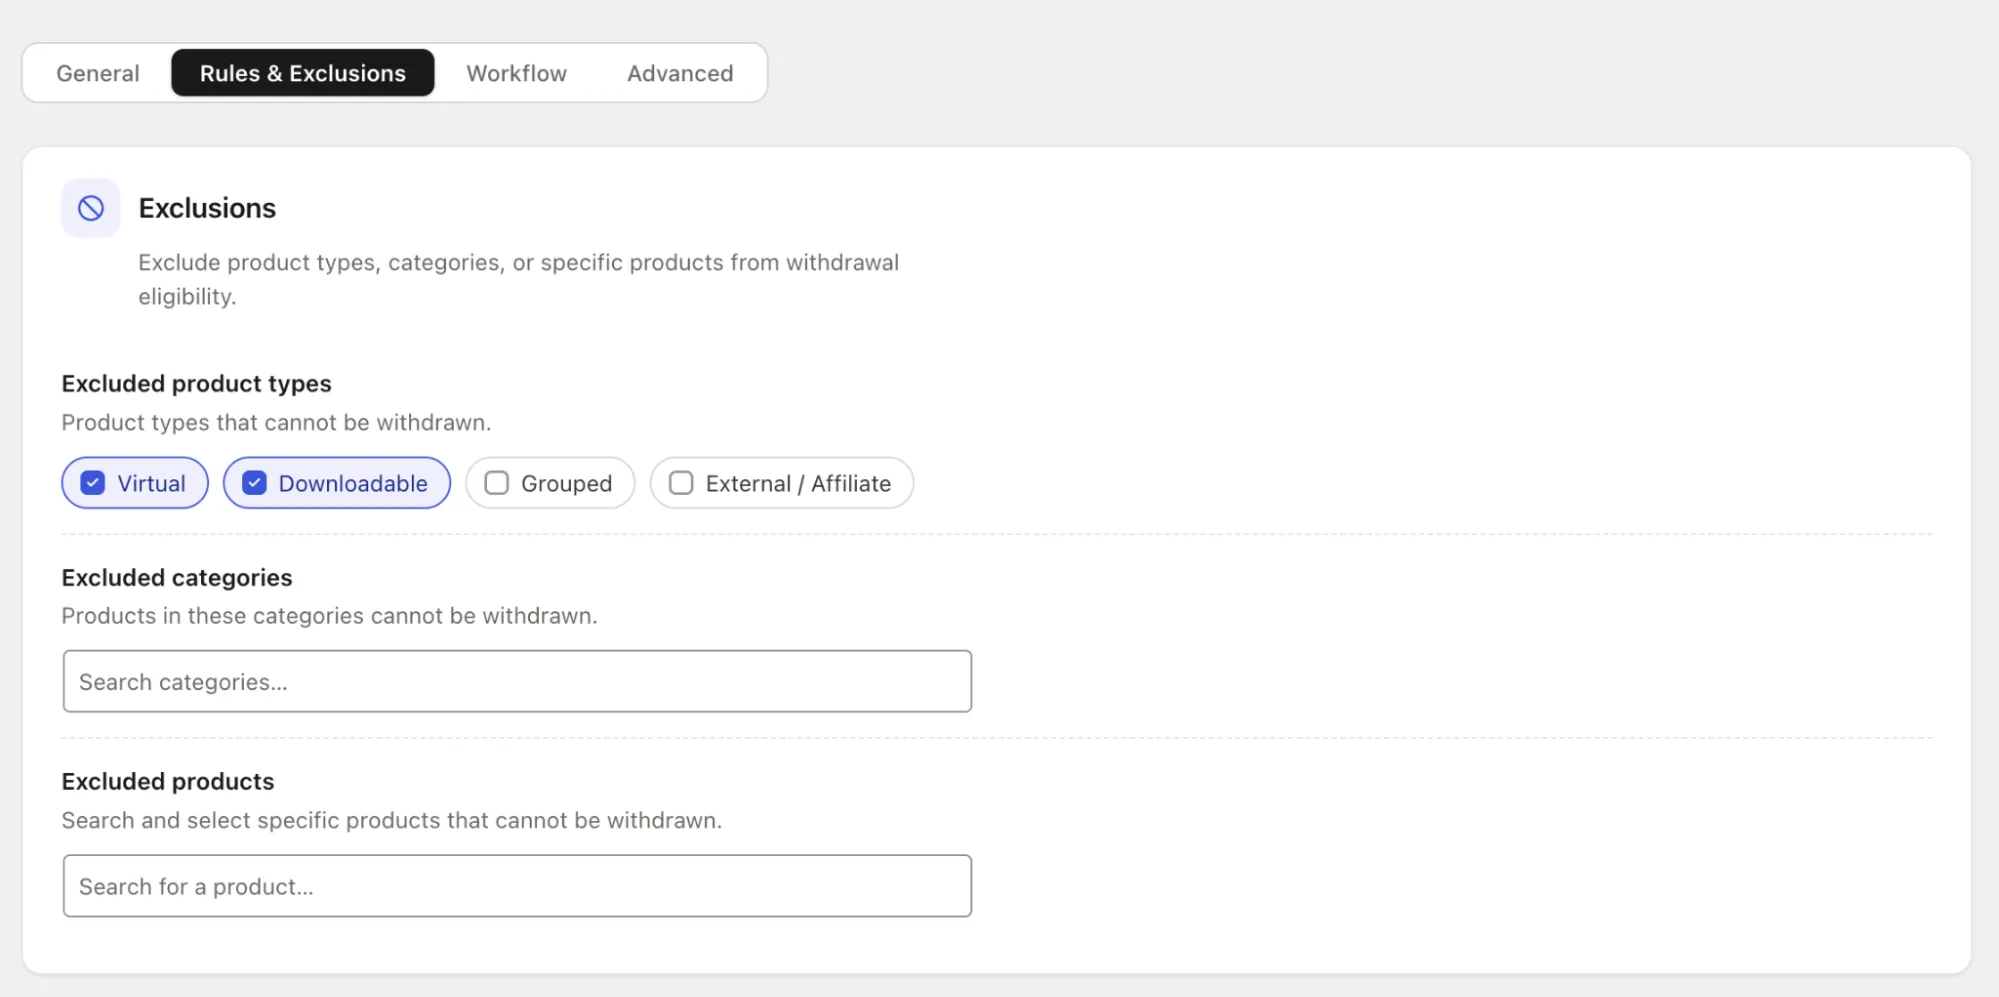
Not everything in an order can be withdrawn. Article 16 of the Consumer Rights Directive carves out custom-made goods, perishables, sealed hygiene products, and digital content the customer has already accessed. This tab is where you keep those items off the withdrawal form in the first place.
Open the Rules & Exclusions tab and set the following:
- Check the product types that can’t be withdrawn. Virtual and Downloadable are the usual picks, since digital delivery starts the moment the order completes. Grouped and External / Affiliate are there if your catalog uses them.
- Search and select any categories whose products should be ineligible. This is the rule that scales, since anything you add to that category later inherits the exclusion without another settings visit. Perishables, personalized items, and hygiene products belong here.
- Add individual products for one-off cases that don’t fit a type or category rule. A single made-to-measure item in an otherwise standard category is the typical example.
Step 4: Automate Order Status Updates
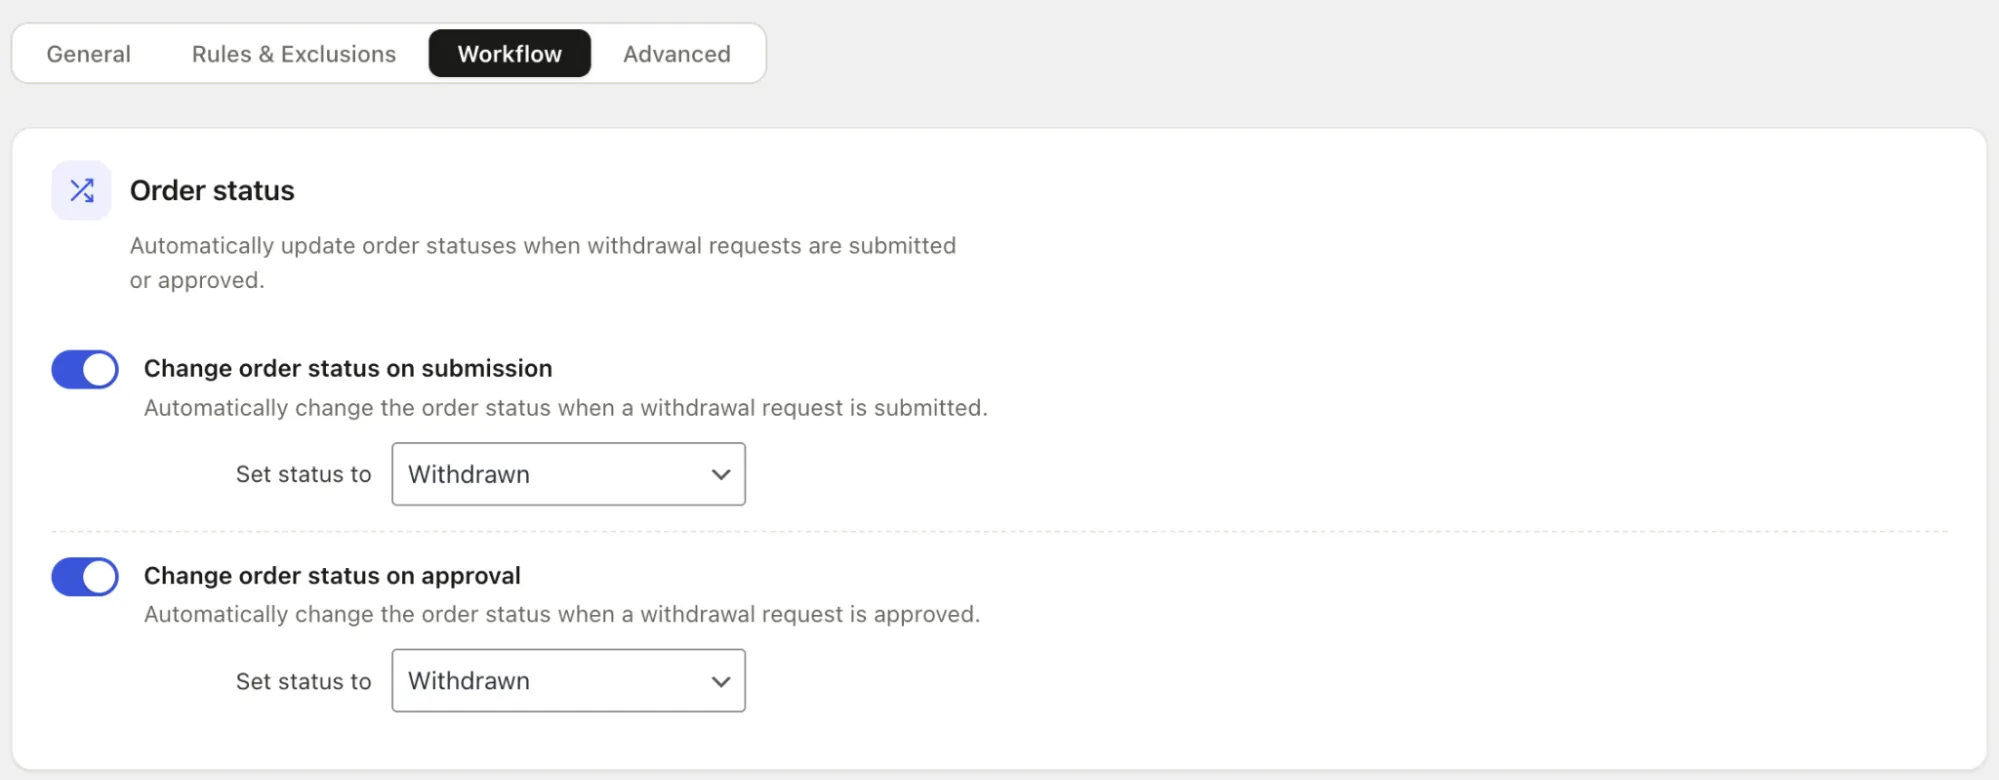
Open the Workflow tab. These two toggles decide whether the order status updates on its own as a withdrawal request moves through your queue.
- Turn on Change order status on submission if you want the order flagged the moment a request comes in. Pick the status from the dropdown next to it. This is what stops a warehouse team from shipping an item a customer has already asked to withdraw from.
- Turn on Change order status on approval to update the order once you’ve accepted the request. Set the status you want it to land on.
Step 5: Set Email notification Recipients

Scroll down to the Email notifications section and set the following:
- Add the addresses that should get the new request notification. It defaults to your admin email, but withdrawals rarely belong in one inbox. Add whoever handles refunds and whoever pulls orders in the warehouse, since a partial request on an unshipped order needs to reach fulfillment before the parcel goes out. Type an address and click Add for each one.
- Set the customer contact email. This is the address shown to customers when you reject a request, and they need to follow up. Point it at a monitored support inbox rather than a no-reply address, because a rejected withdrawal is the request most likely to turn into a dispute.
- Click on Save settings.
Step 6: Test Partial Withdrawal Requests
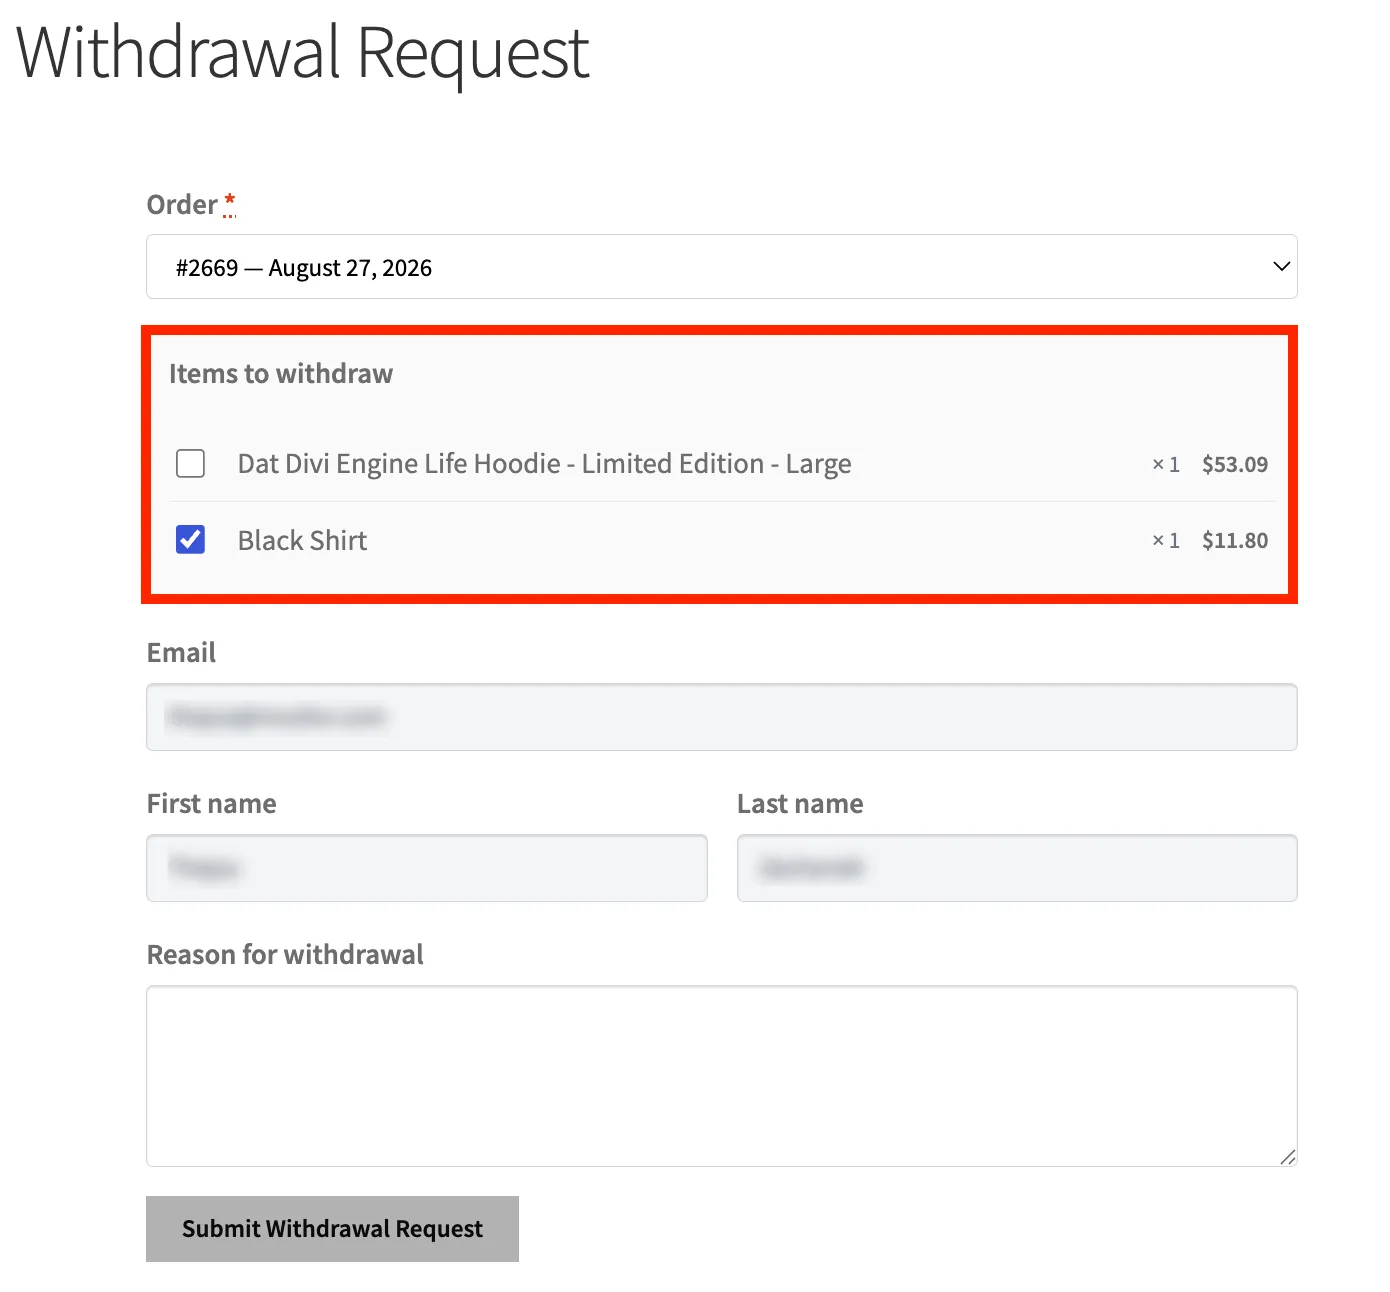
Open your store front end and place a test order with multiple products. You will see a withdrawal button with a partial withdrawal option.
Are stores legally required to allow partial withdrawals?
The directive gives consumers a withdrawal right over the goods they bought, not over the order as a single unit. A customer can withdraw from one item and keep the rest, so a store that only accepts full-order withdrawal is narrowing a right the customer already has. Nothing in the law dictates the UI you use, but refusing a valid partial request is a compliance problem regardless of how your form is built.
Who pays return shipping on a partial withdrawal?
The customer does, provided you told them so before they ordered. If your terms are silent on it, the cost falls to you. This applies to partial and full withdrawals, so make sure your withdrawal policy states it clearly.
Do you refund the original delivery charge when a customer withdraws from part of an order?
Generally no, since you still shipped the parcel and the customer still received it. On a full withdrawal, you refund the standard outbound delivery cost, and you’re never obliged to refund a premium shipping upgrade the customer chose. The directive doesn’t spell out the partial case as cleanly as the full case, so document whichever approach you take and apply it consistently.
How long do you have to issue the refund?
Fourteen days from the date you were informed of the withdrawal. You can hold the refund until you’ve received the returned goods or the customer has provided proof of return, whichever comes first. The clock starts at the request, not at your approval, so a request sitting unread in an inbox is still burning days.
Wrapping Up
Partial withdrawals are an important part of handling EU withdrawal requests correctly, especially when customers order multiple products or when some items are excluded from the right of withdrawal.
While WooCommerce supports partial refunds, it doesn’t provide a built-in way for customers to submit partial withdrawal requests. The WebToffee EU Withdrawal Button plugin fills this gap by letting customers select individual items, while giving store owners control over exclusions, withdrawal periods, order statuses, and notifications.
With the right settings in place, you can manage partial withdrawals more efficiently while providing customers with a clear and compliant withdrawal process.


Subcribe to our newsletter