Share:


Table of Contents
Do you need to export just one or two products from your WooCommerce store? Whether you’re updating information, sending details to a vendor, or managing a small set of listings, a complete export may not be necessary.
WooCommerce comes with built-in tools that let you export products directly from your store, making it easy to download your data without any additional plugins. For many users, these default export options are sufficient for basic needs, such as exporting all products or filtering by simple criteria.
In this article, we’ll first walk through how to use WooCommerce’s native export settings. Then, for cases where you need more precise control or advanced filtering, we’ll show you how to export selected WooCommerce products using the free version of the WooCommerce Export Products plugin.
Key Takeaways:
- While WooCommerce offers built-in export features, they lack precise filtering options for exporting specific products.
- Using a dedicated plugin like the WooCommerce Product Export gives you the flexibility to export only the products you need.
- This plugin lets you export products based on specific criteria like name, category, tags, and more, giving you complete control over what gets exported.
You can export WooCommerce products using either the built-in tool or a plugin, depending on your needs:
1. Using Default WooCommerce Export
- Go to Products > All Products
- Click Export
- Select product data and basic filters (category, type, etc.)
- Click Generate CSV to download the file
Best for: Quick exports with basic filtering (CSV only)
2. Using a Product Export Plugin
- Go to WebToffee Import Export > Export
- Select Product as the post type
- Choose Advanced Export
- Apply filters (stock status, category, tags, brand, exclude products, etc.)
- Export selected products as CSV
Best for: Exporting specific products, advanced filtering, and better control
Export Specific Products Using Default WooCommerce Export Settings
Yes, you can selectively export WooCommerce products to a CSV file using the built-in export tool. However, the filtering options are limited and may not cover all use cases.
For instance, you cannot manually select individual products for export. Instead, you can only filter products based on predefined conditions such as product type and category.
Here’s how to export products using the default WooCommerce export option:
- From your WordPress dashboard, navigate to Products > All Products.
- Click on Export.

- Select the Product types that you want to export.
- Choose the Product Categories you want to include. All products within these categories (that meet your other selected criteria) will be exported.
- Once you’ve configured your export settings, click Generate CSV to download the file.

This will initiate the download of a CSV file to your system.
Here is the preview of the sample CSV file with simple products and variable subscriptions belonging to a specific (clothing) category.

Why the Default Export Option Falls Short
While WooCommerce’s built-in export tool is useful for simple tasks, it has several limitations when it comes to more advanced requirements.
For example, you cannot:
- Select individual products manually
- Filter products by SKU, custom attributes, or detailed conditions
- Export based on advanced criteria like stock status or modification date
- Generate exports in formats other than CSV
- Schedule or automate exports
These limitations can make it difficult to export exactly the data you need, especially for tasks like syncing with external platforms or managing large product catalogs.
To overcome this, you’ll need a plugin that offers advanced filtering, multiple export formats, and automation capabilities.
The Product Import Export for WooCommerce plugin by WebToffee provides more control over how you export product data. It allows you to apply detailed filters, select specific products, and customize the export structure.
Let’s walk through how to export selected products using the free version of the plugin.
Step 1: Install & Activate the WebToffee Product Export Plugin
- From your WordPress dashboard, go to Plugins > Add New Plugin.
- Search for “product import and export.”
- Install and activate the Product Import Export for WooCommerce plugin.
Step 2: Select Product as Post Type for Export
The plugin lets you download products, product reviews, and product categories.
- Once the plugin is installed, go to WebToffee Import Export (Basic) > Export.
- Choose Product as the export post type to ensure you’re exporting only product data and related details.

Step 3: Choose an Export Method
Select Advanced export as the export method to choose specific products from the WooCommerce store.

Step 4: Filter Product Data for Export
This is the most important step when exporting selected WooCommerce products, as it allows you to precisely control which products are included in your export file.
Instead of exporting your entire catalog, you can apply filters to generate a targeted export based on your specific goal, saving time and avoiding manual cleanup later.
Suppose you want to export:
- Only published clothing products
- From a specific brand
- That are currently in stock
- While excluding a few specific items
Using the available filters, you can create this exact export in just a few clicks, without editing the CSV
Available Filtering Options
Use the following filters individually or in combination:
- Product brand: Filter products by brand (useful for vendor-specific exports)manually.
- Total number of products to export: Limit the number of products (useful for batch exports or testing)
- Stock status: Filter by availability (e.g., in stock, out of stock)
- Exclude products: Remove specific products even if they match other filters
- Product categories: Export products from selected categories (e.g., clothing, accessories)
- Product tags: Refine selection using tags (e.g., seasonal, promotional)
- Product status: Export based on status (e.g., published, draft)
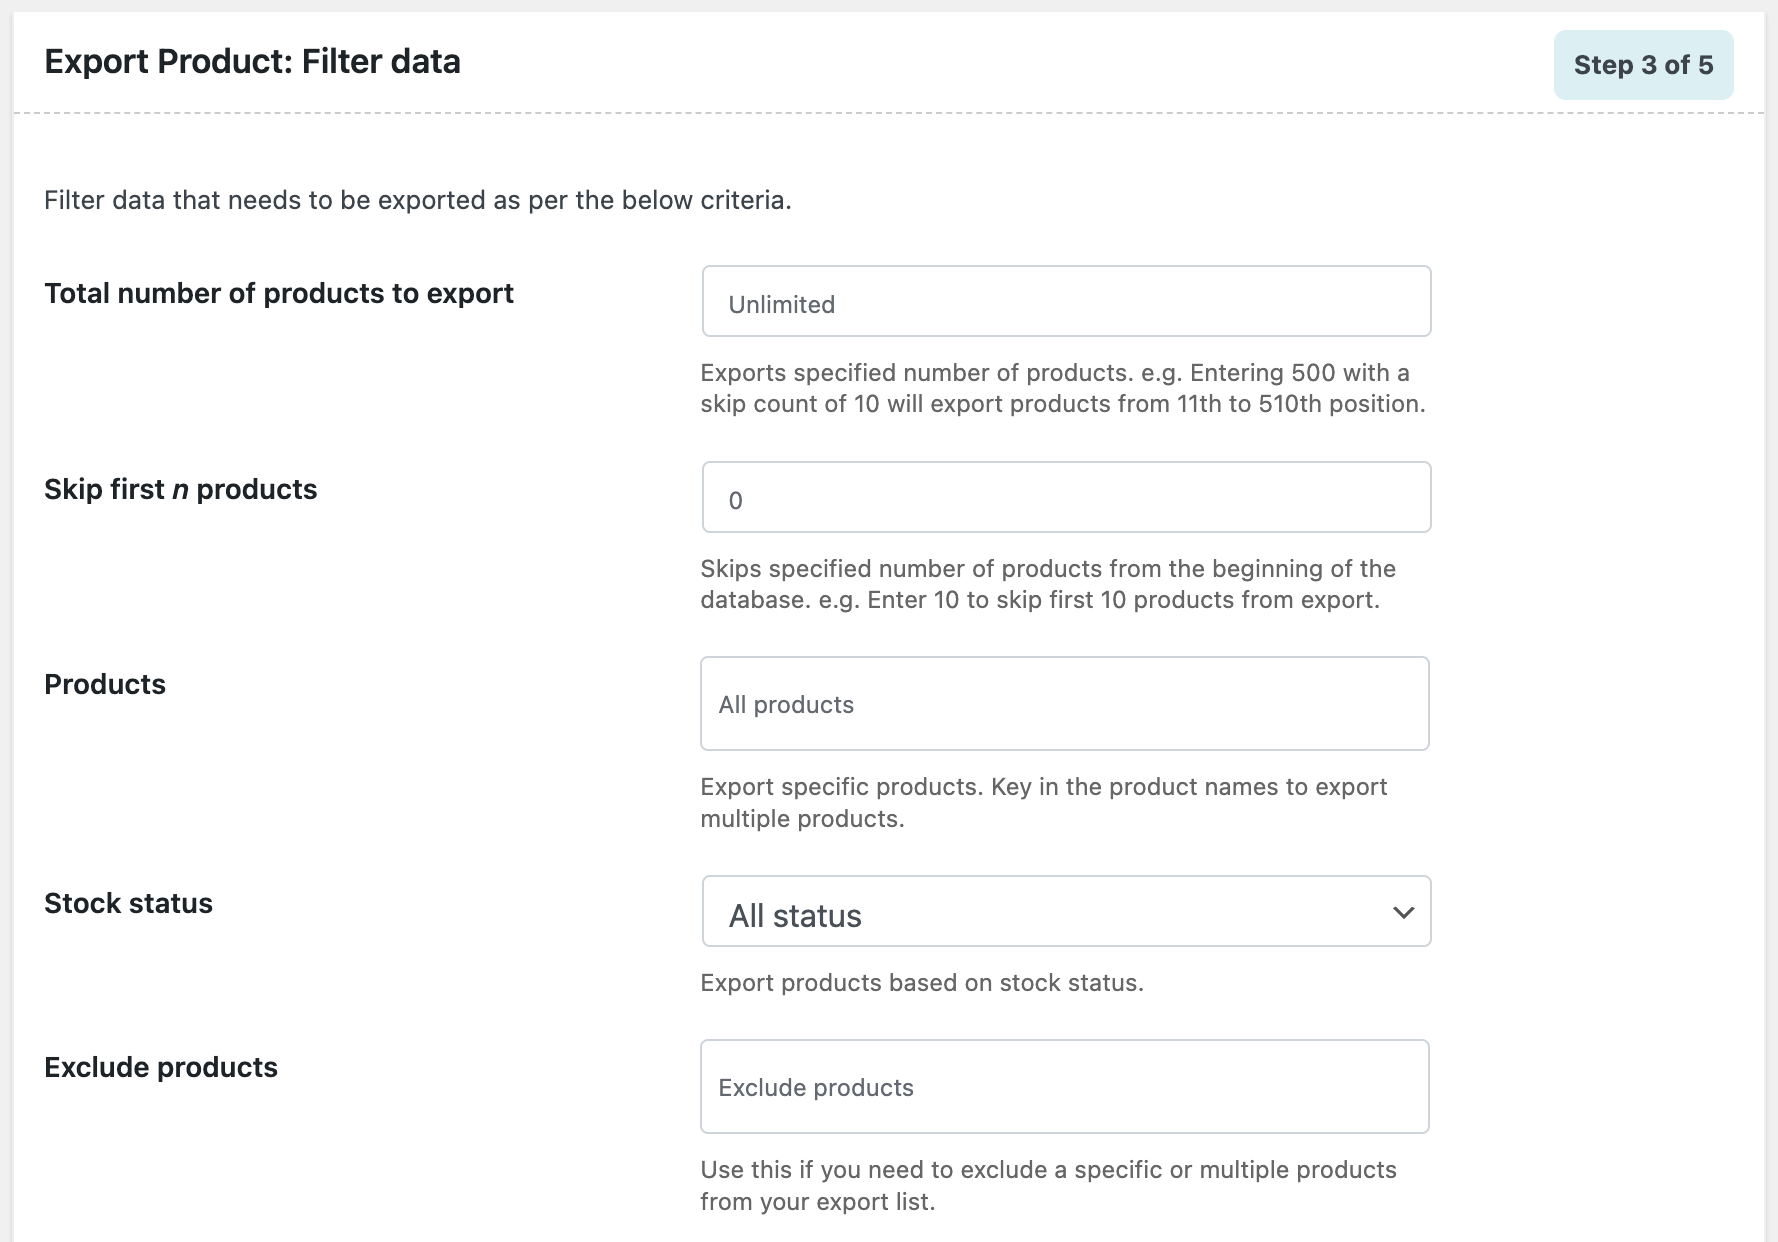
By combining these filters, you can generate a highly targeted export file that matches a real business use case, rather than downloading your full product catalog and cleaning it up manually afterward. This saves time, reduces errors, and makes the export process much more efficient.
Step 5: Rename and Reorder Export Columns
This page offers features for deciding which data corresponding to the selected products should be exported. This step is optional, so you can skip it and proceed to the next step.

Step 6: Export Selected Products
This is the final step in exporting products.
- Enter an export file name to easily identify the downloaded CSV file.
- Set the export batch count – this defines how many records the server processes per iteration.
- Choose a delimiter to separate columns in the export file (e.g., comma, semicolon, tab).
- Click the Export button to start the process and download your CSV file.

Pro Tip: You can save your current export configurations as a template for future use. This way, you can quickly export your products without having to reconfigure these steps.
Take a look at the sample CSV file, which includes export product details.

Advanced Export Capabilities (Premium Version)
For more complex workflows, the premium version of the WooCommerce Product Import Export plugin offers additional features such as:
- Support for Advanced Product Types – Individually export variable products, subscription products, and products with custom product types.
- Include Custom Fields – Options to select additional product columns, such as third-party plugin product fields.
- Export Recently Modified Products – Option to export products that have been modified since the last export.
- Export Product Images Separately – Export the images of the selected products in a separate .zip file.
- Schedule Automated Exports – Scheduled automatic product export at a later date or time.
- Sort Exported Products – Sorting selected products in ascending or descending order based on their name, ID, type, etc.
Did you know: Our Import-Export Plugin boasts an impressive 4.8-star rating and is trusted by a thriving community of over 90,000 active users.
Yes, WooCommerce includes a built-in export tool that allows you to export products without using a plugin. You can export product data as a CSV file and apply basic filters such as product type and category. However, for advanced filtering or exporting specific products, a plugin may be required.
To export products from WooCommerce, go to Products > All Products in your WordPress dashboard and click the Export button. Choose the product data you want to export, apply filters if needed, and click Generate CSV to download the file. For more advanced export options, you can use plugins such as WebToffee.
No, WooCommerce’s built-in export tool only supports CSV format. To export products in XML or other formats like XLS or XLSX, you can use plugins such as WebToffee’s Product Import Export plugin.
A plugin provides advanced features that are not available in the default export tool, such as exporting specific products, applying granular filters (SKU, stock status, date), supporting multiple file formats, and automating exports. Tools like WebToffee’s plugin make it easier to handle complex export requirements efficiently.
Conclusion
You no longer have to manually sort through the entire list to identify the required products. Specific products in your WooCommerce store can be easily exported using a simple, free plugin: Product Import Export for WooCommerce.
With this plugin, you can filter specific products and choose what product data you want to export. One of the biggest advantages is that, whatever your export requirement, you can achieve it with just a few clicks.
Hope you have learned how to export selected WooCommerce products using a plugin. Drop your thoughts and comments about this article below.


Subcribe to our newsletter