
Adding your brand name and logo to your WooCommerce emails is essential to establish a strong brand identity. This blog provides a step-by-step guide to customize your email templates to include your brand name and logo. By following the strategy outlined in this blog, you can improve brand recognition, credibility, consistency, aesthetics, and drive more engagement and sales for your business.
It’s important to reinforce your brand value consistently. One way to accomplish this is to customize all your emails with the brand name and logo to match the brand image.
WooCommerce email templates are so generic and plain, this may affect your brand’s credibility and perception. So how do you make sure that you give a good impression of your store every time you send an email?
Decorator – WooCommerce Email Customizer plugin lets you add your logo to emails without doing any complicated processes.
Get started with WooCommerce Email Customizer
Let me explain how to install and navigate to the customization page of the plugin.
- Download the latest version of Decorator – WooCommerce Email Customizer zip file.
- Log into your admin account and from the sidebar menu, navigate to Plugins > Add New > Upload Plugin.
- Select the downloaded plugin ZIP file and click the button Install Now.
- Activate the plugin.
- From the dashboard, navigate to WooCommerce > Decorator. You will be taken to the customization page.
How to add a brand logo to WooCommerce emails?
Give maximum exposure to your brand through all the emails by adding your logo to them. So let’s see how to do that.
- Click on the Header sidebar menu.
- Navigate to Header Image sub-menu.
- Click on the Change image and select your logo from the media library/ your computer
- You can also adjust other aspects of your header images like alignment, placement, background color, etc., from the same pane.
- Then, click on the drop-down button near the Save Draft button at the top right-hand corner of the top of the customized email editor and click on Publish.
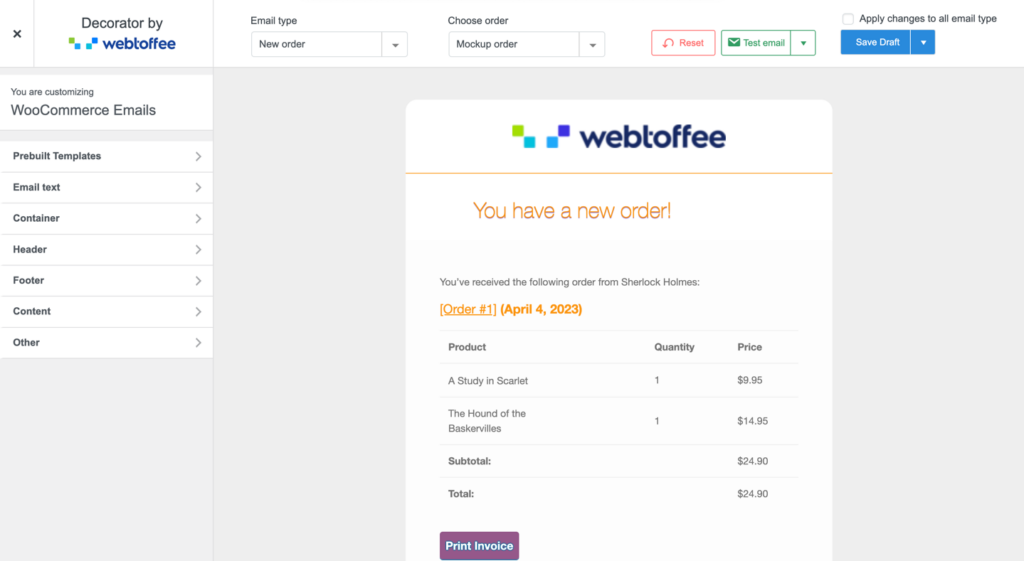
Below is an image of the completed order transactional email that was created to give the business a more professional look.
Now, you can see the selected logo with the brand name, and it is added to the header section of your email. You can change or remove the image whenever you want. It is simple as that.
Conclusion
When communicating with your customers, it is important to ensure that your brand identity is consistent and that you are communicating in a positive and welcoming manner.
By default, the transactional emails that are sent through WooCommerce are not editable. By using the Decorator – WooCommerce Email Customizer, you can easily add a brand name and logo to your WooCommerce transactional emails.


Comments (8)
Alexander Smith
March 30, 2024
Hi my image is not showing on top of the emails on gmail. I tried everything possible but no , do you know why ? Thank you for answer
Arjun
April 1, 2024
Hi Alexander,
Thank you for getting in touch. To add images at the top, simply navigate to the header section. If you encounter any difficulties, feel free to reach out to our customer support team.
giath fowze
April 20, 2023
after downloading the plugin, and configuring it, the header image I am using its not showing in the test emails.
Hema
May 3, 2023
Hello Giath,
Kindly save the template before generating the test emails. Changes are reflected only when the templates are saved. If this doesn’t help kindly contact customer support for further assistance.
Ryan
May 27, 2022
Hello!
Am I able to use a custom font in the emails? I see the short list of web safe fonts. But accessing a Google Font would be great!
Mike
May 30, 2022
Hi Ryan,
Thank you for reaching out. We understand your requirement. However, our plugin presently doesn’t offer any options to add google fonts in email templates.
David
February 17, 2022
It would be great if you could have a width control option for the email header logo.
Mark
February 28, 2022
Hi David,
Greetings from Webtoffee!
We have added a width control option for header images and many more features in the latest version of the plugin. Please update the plugin.