Share:


Table of Contents
Itemized receipts and invoices are essential documents that provide a detailed breakdown of purchases, including item descriptions, quantities, prices, and applicable taxes. They are particularly important for B2B transactions, as they facilitate expense reimbursement, tax deductions, and transparent financial record-keeping. Automating the generation of these documents in WooCommerce enhances customer service and ensures compliance with accounting standards.
- Itemized invoices and receipts offer clarity by listing each purchased item separately, including relevant financial details.
- WooCommerce does not generate PDF invoices by default, necessitating the use of plugins for this functionality.
- The WebToffee WooCommerce PDF Invoices plugin automates the creation and emailing of itemized invoice PDFs, improving efficiency for businesses.
- Itemized documents are crucial for expense reimbursement, tax documentation, and resolving disputes, making them a requirement for many businesses.
- Customization options in the plugin allow businesses to tailor invoices and receipts to meet specific needs, including tax IDs and payment methods.
- Automating PDF invoice generation reduces manual effort and enhances documentation accuracy, benefiting both sellers and buyers.
The core WooCommerce only provides an on-screen order summary and automated order confirmation emails. B2B customers can’t submit these default summaries to their finance teams for expense reimbursement, as they lack essential accounting details like invoice numbers, seller tax IDs, and proper PDF formatting.
This is where itemized receipts and invoice PDFs come in. These numbered documents provide a clear breakdown of every purchased item, including quantities, prices, taxes, and the total amount in a PDF format.
WooCommerce already stores most of these order details, but its default output doesn’t meet business requirements.
In this guide, we’ll explain what itemized invoices and receipts are, what details to include, and how to generate and send itemized PDF invoices automatically using the WebToffee WooCommerce PDF Invoices, Packing Slips and Credit Notes plugin.
An itemized invoice is a request for payment that breaks down every charge before the customer pays. The itemized invoice meaning comes down to transparency: the buyer sees each product, quantity, and unit price, instead of one lump sum. Tax, shipping, and discounts follow as their own lines.
An itemized bill is the same document viewed from the buyer’s perspective. The seller issues an invoice, which the buyer receives and processes as a bill. The term is very common in healthcare, where patients request itemized medical bills to see exactly what they’ve been charged for, including individual treatments, services, and their costs.
Itemized invoices are standard for B2B and wholesale orders, custom quotes, and any sale paid on terms such as Net 30.
Itemized invoice example:
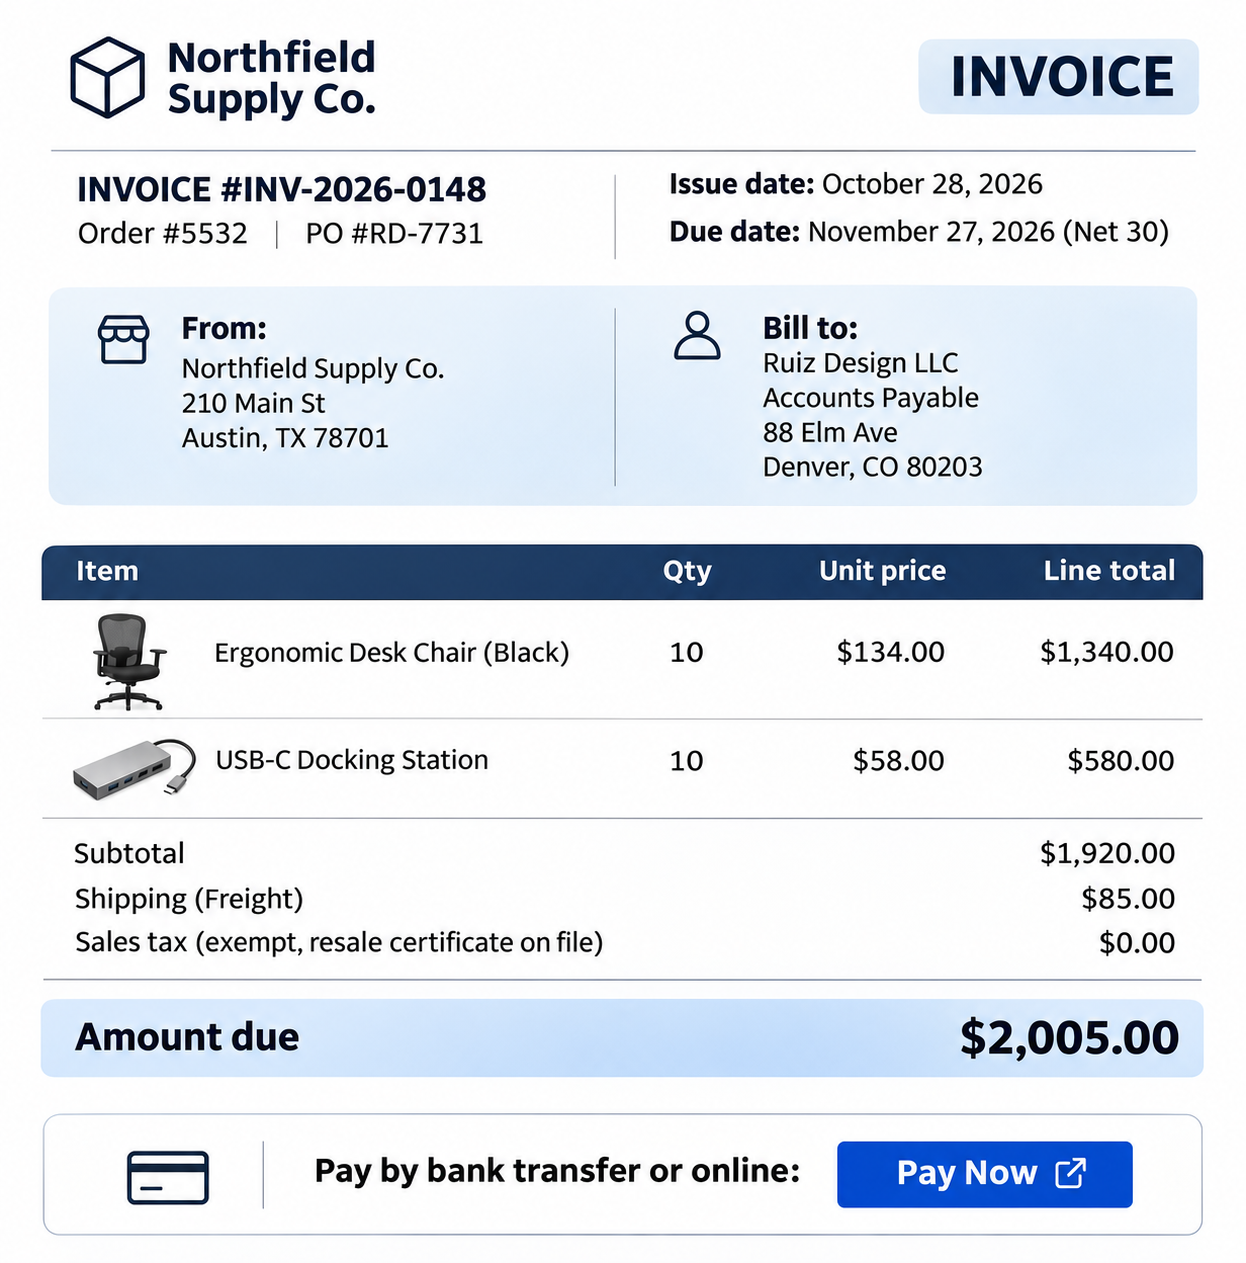
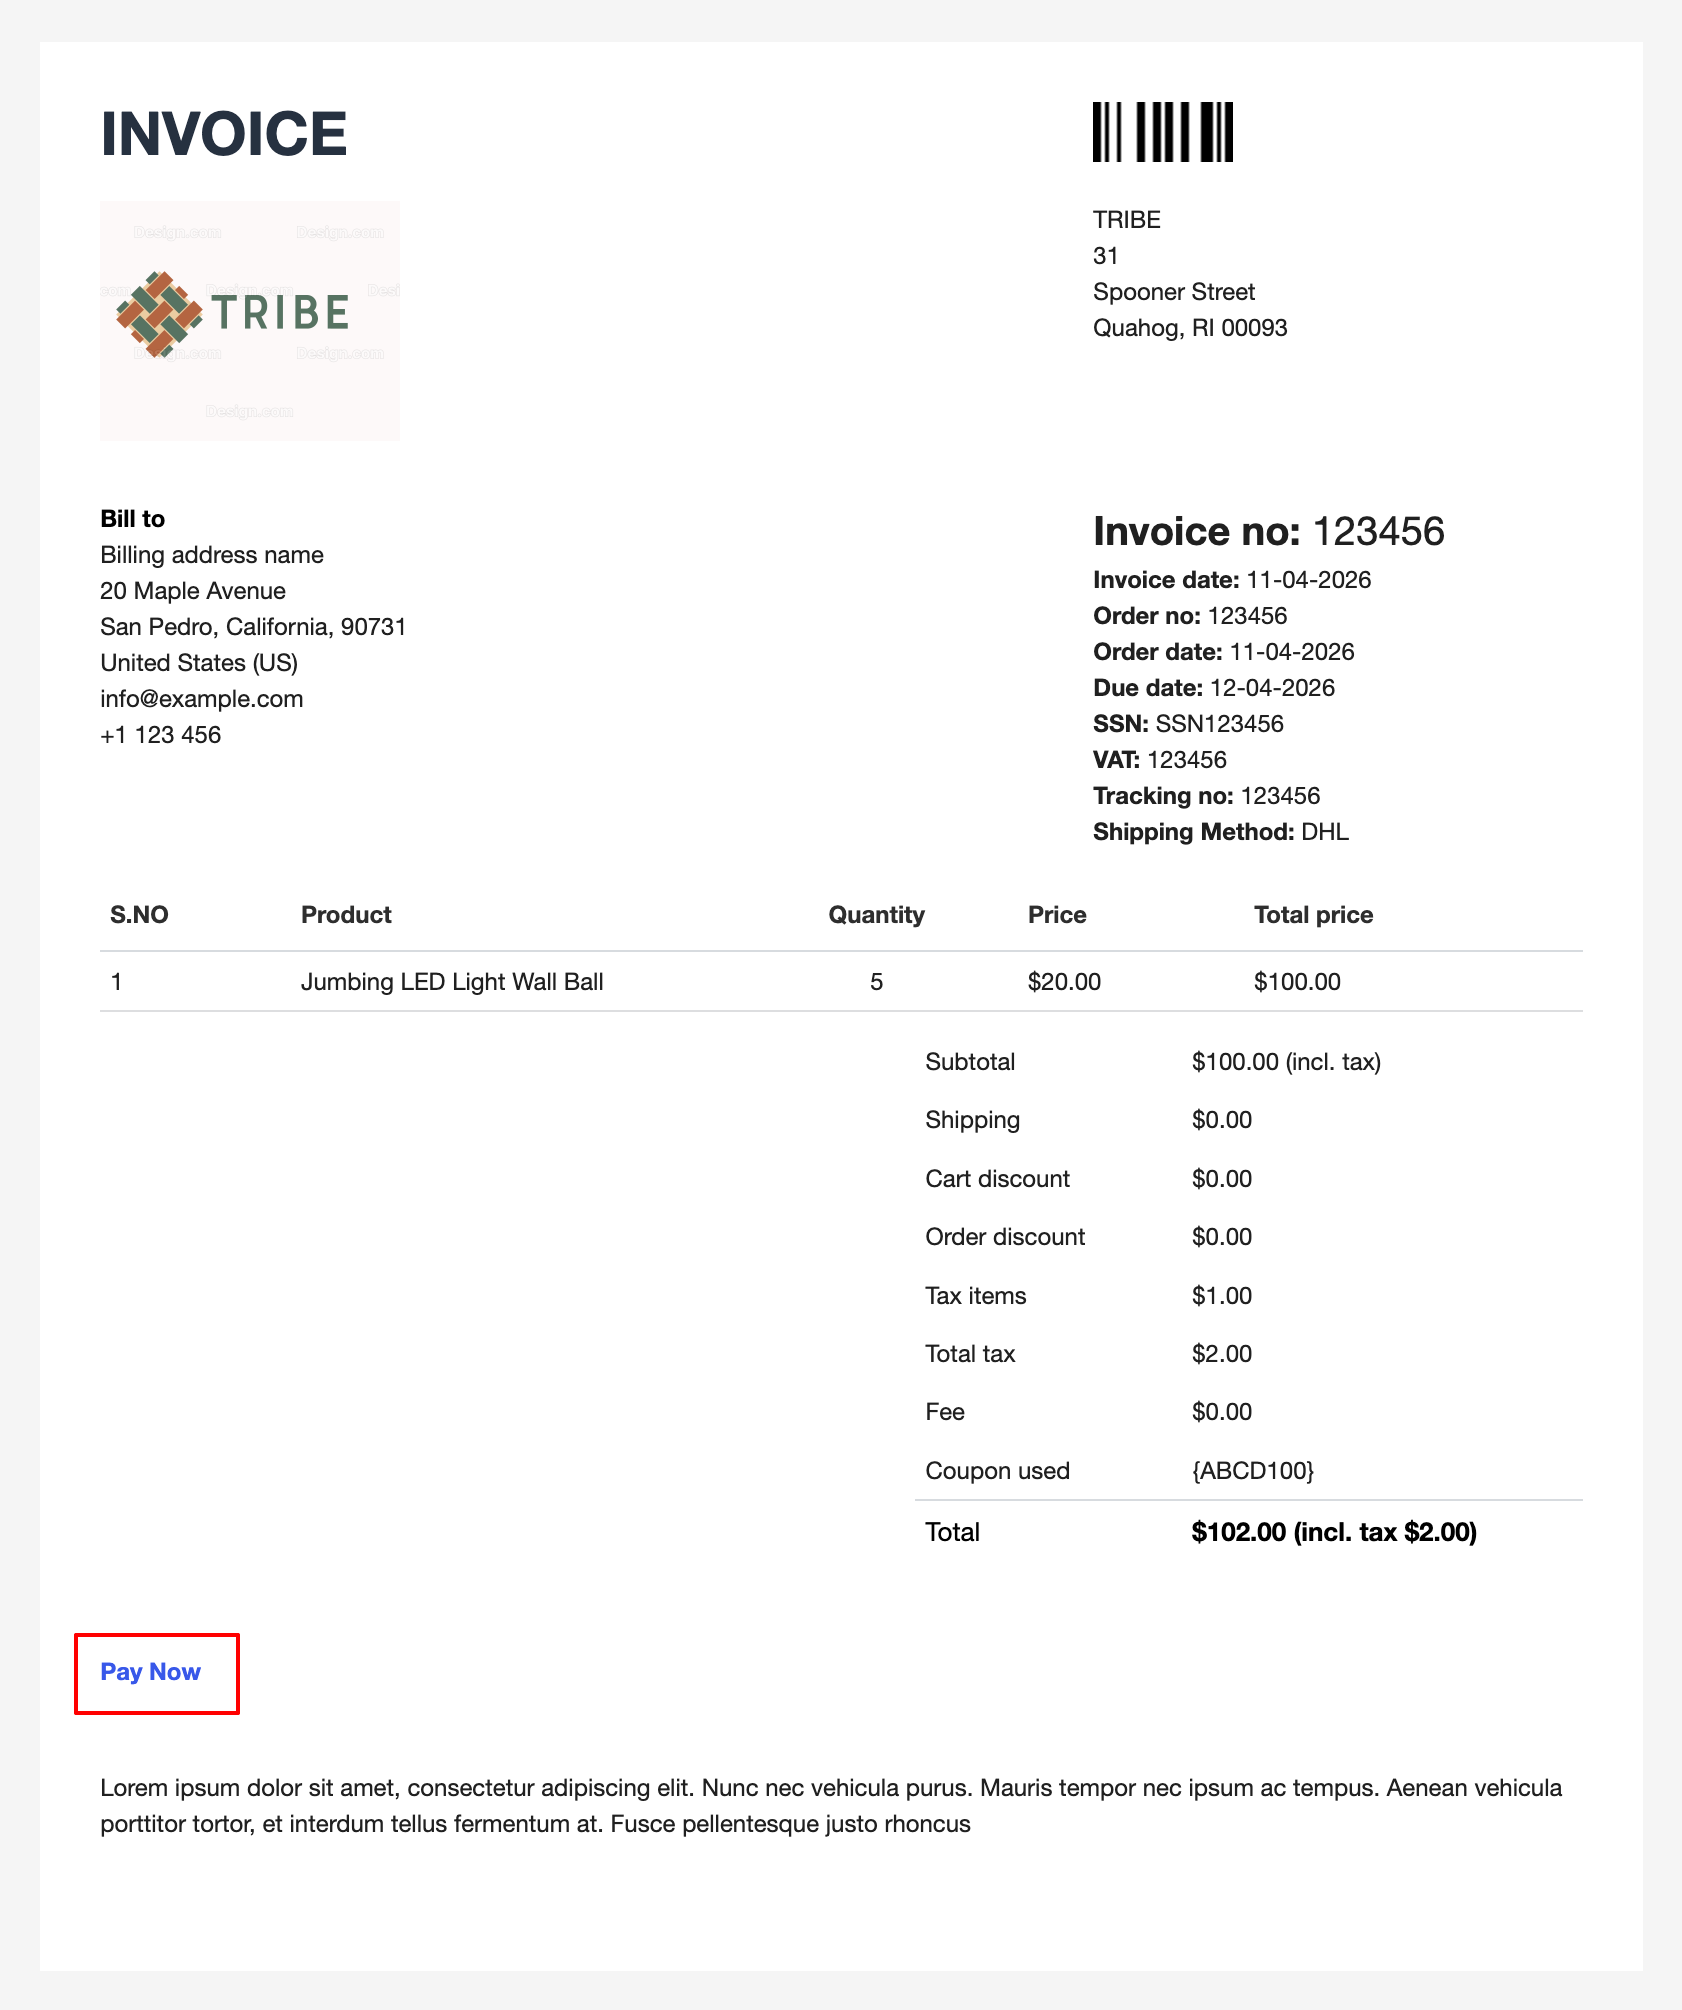
This is what an itemized bill looks like: a numbered document with both parties’ details, every line item, the amount due, due date, and payment link.
An itemized receipt is proof of payment that lists every product in a purchase on its own line. Each line shows the product name, quantity, unit price, and line total. Tax, shipping, discounts, and the final amount paid appear as separate entries below.
The meaning of an itemized receipt is in the word “itemized”: broken down item by item. A regular receipt might say “Total paid: $184.50.” An itemized one lists the three products with their unit prices, the $12.40 in sales tax, and the $8.00 shipping charge that add up to that $184.50.
People ask for itemized receipts to file expense reports, claim business deductions, return one product from a larger order, or check whether they were charged the right amount.
Itemized receipt example:
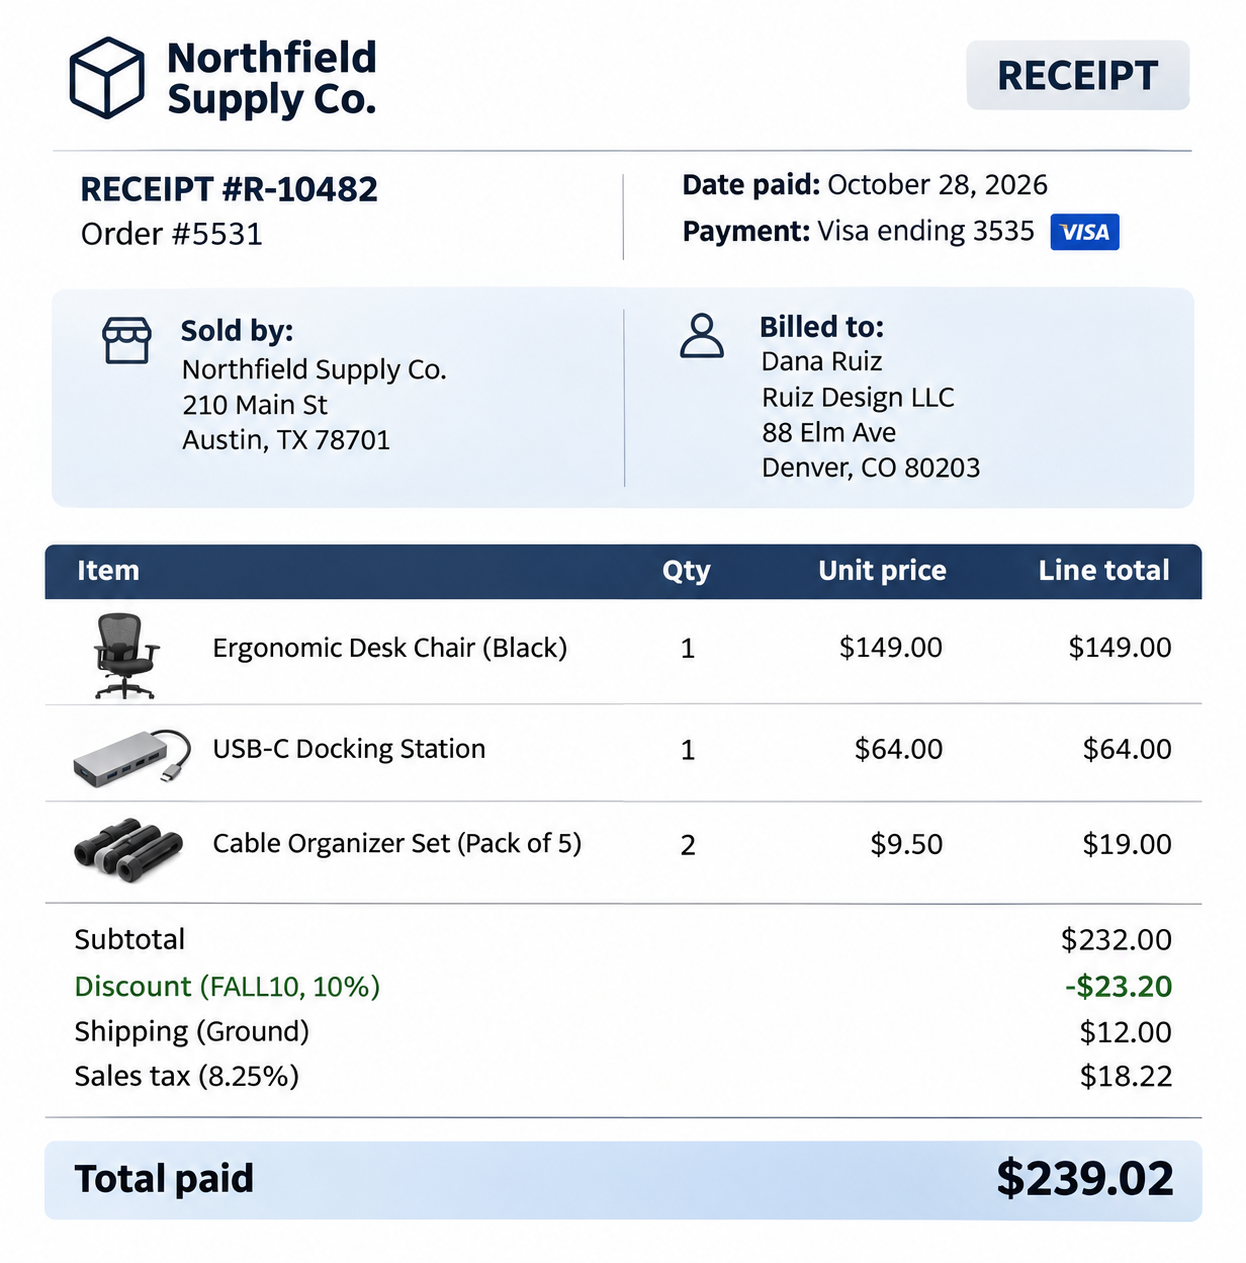
In this example, the customer can see each item with its quantity, the tax rate applied, the payment method, and the date the payment was received.
The difference between an itemized receipt and a regular (non-itemized) receipt is the level of detail.
Here’s one WooCommerce order seen both ways. A customer buys three items from your store and pays by card.
The regular receipt is what the payment gateway or card statement shows:
- Paid to: A&B Supply
- Date: November 3, 2026
- Card: Visa ending 4242
- Amount: $179.60
The itemized receipt is built from the WooCommerce order record:
- Receipt #INV-2026-0412 for Order #5871, paid November 3, 2026 by Visa
- 2 × Desk Mat (Gray, SKU DM-02) at $35.00 = $70.00
- 1 × Wireless Keyboard (Black, SKU KB-11) at $59.00 = $59.00
- 1 × USB-C Hub (SKU HB-07) at $31.00 = $31.00
- Subtotal: $160.00
- Shipping (Flat rate): $8.00
- Sales tax (7.25%): $11.60
- Total paid: $179.60
Both versions confirm that a payment of $179.60 was made. Only the second one tells a finance team what that money bought, how much of it was tax, and which order it belongs to.
Your WooCommerce store already holds every detail in the second list. The order email shows most of it too. What’s missing is a PDF the customer can file, which is where an invoice plugin comes in.
What is an Itemized Statement?
An itemized statement provides a summary of a customer’s transactions over a specific period, usually a month. It lists invoices, payments, and credits, along with the running balance. B2B sellers send these statements to customers who place multiple orders and pay on credit.
Customers and their employers ask for itemized receipts in a few common situations.
- Employee expense reimbursement: Most companies require one before paying back an employee. The finance team needs to see what was bought to confirm it’s a valid business expense.
- Business tax deductions: According to IRS Publication 463, business travel and gift expenses need documentary evidence, such as receipts. The evidence should show the amount, date, place, and what the expense was for.
- Audits and grants: Auditors and grant funders review expenses line by line.
- Returns and disputes: An itemized receipt makes it simple to refund one item from a multi-product order. Similarly, if a billing dispute arises over a specific component, having an itemized record prevents ambiguity.
So, do receipts need to be itemized? Not always. But if a customer needs to claim an expense, request reimbursement, or provide proof of purchase for an audit, an itemized receipt becomes a requirement.
An itemized invoice template, usually a Word, Excel, or PDF file with blank line item rows, works well for businesses sending a few invoices a month. The same goes for itemized receipt templates.
Since WooCommerce already stores every line item natively, the better route is to generate the document straight from the order.
If you want to try PDF invoice automation before paying for anything, our free WooCommerce PDF invoice plugin generates itemized invoices as PDFs from your orders at no cost.
WooCommerce order emails list every item with quantity and price, plus the subtotal, discount, shipping, tax, total, and payment method.
For most consumers, that’s enough. The gap shows up with business buyers, whose finance teams need a PDF invoice document rather than an order email. WooCommerce keeps detailed order data but doesn’t produce PDF invoices on its own.
The WooCommerce PDF Invoices, Packing Slips and Credit Notes plugin turns each order into an itemized PDF invoice and gets it to the customer without any delays. Some of the key features of the plugin are:
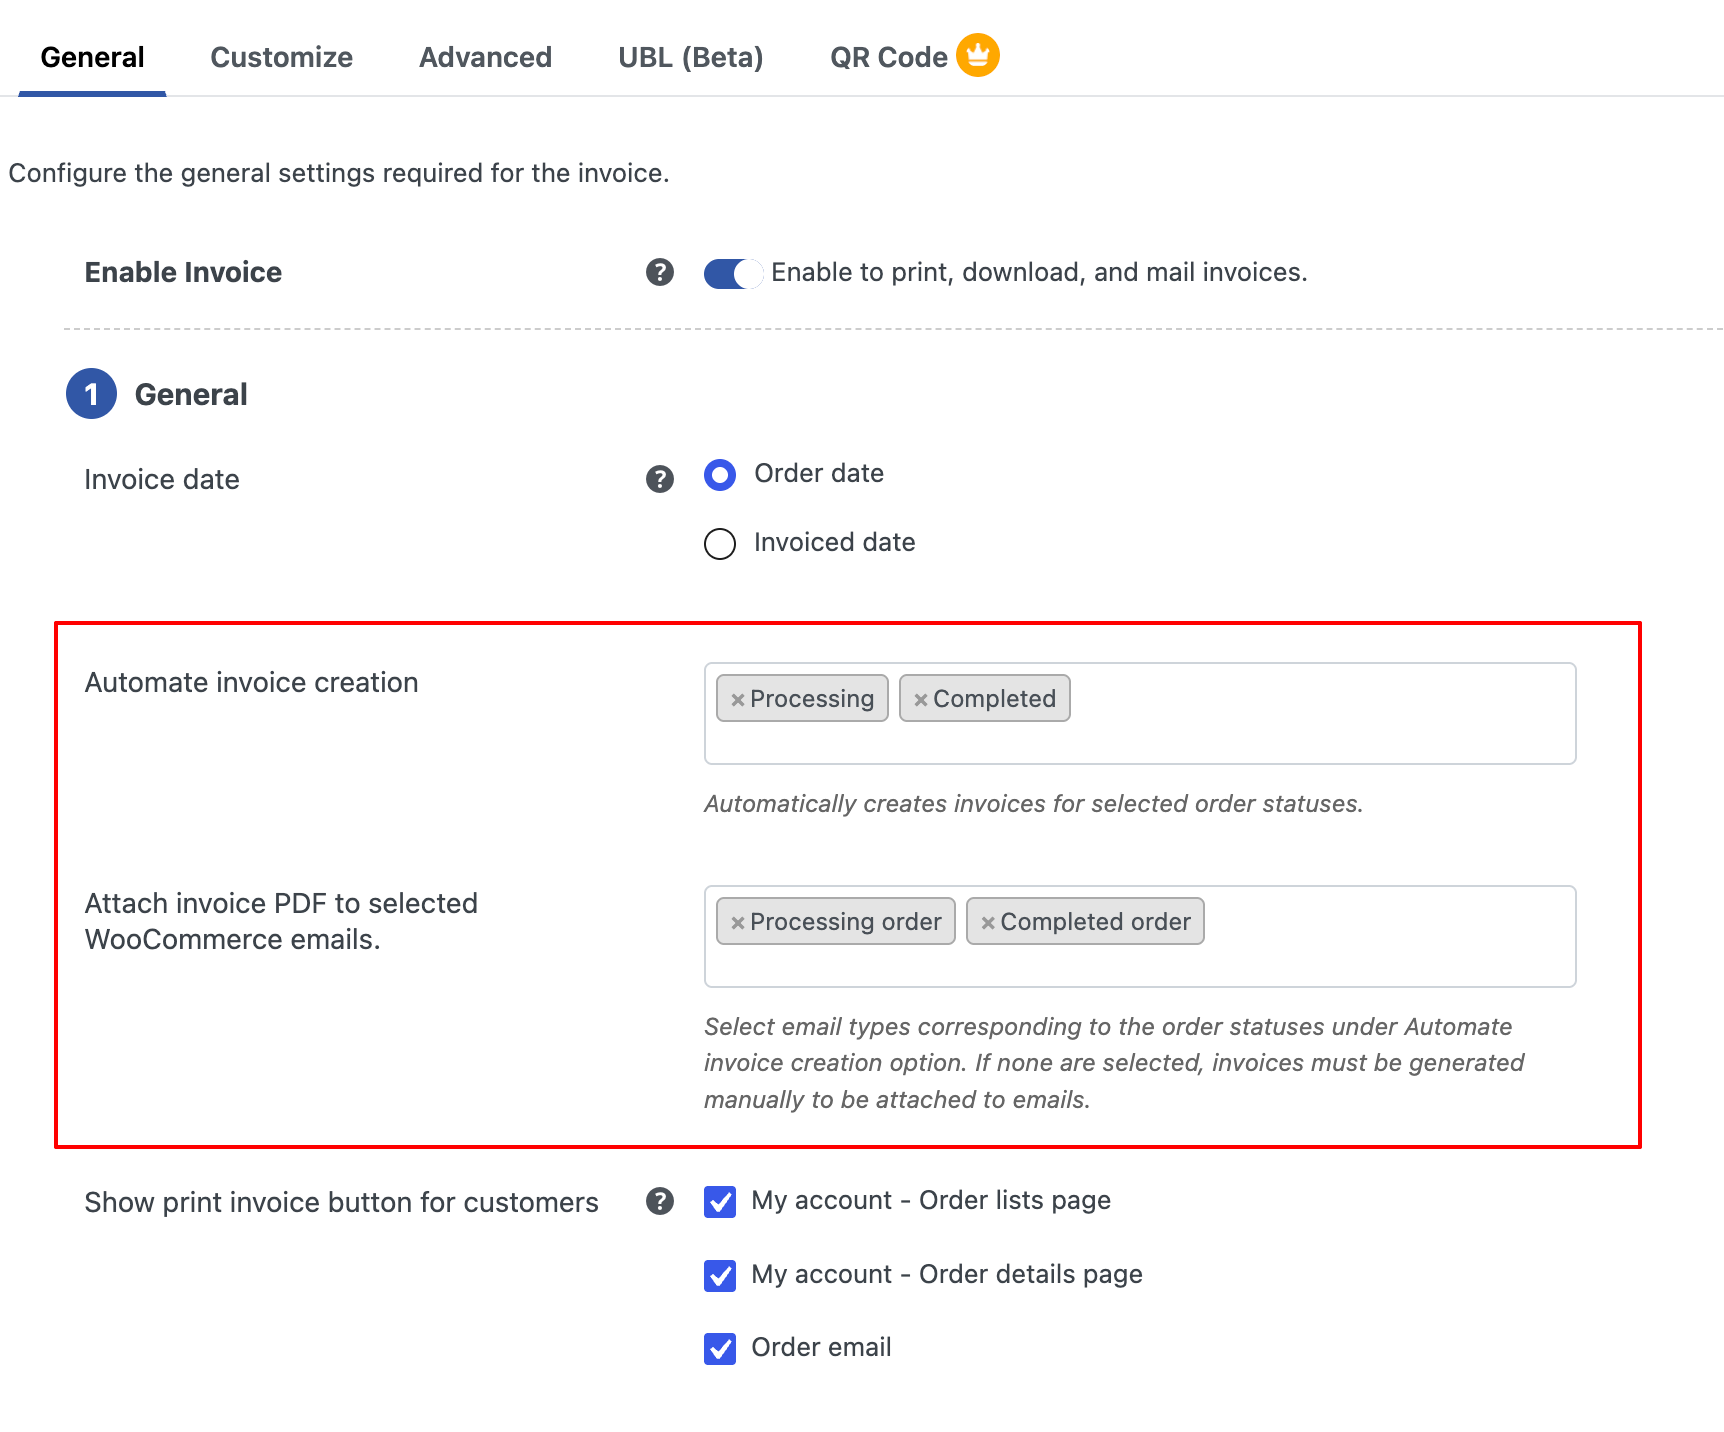
- Generate Invoices by order status: Choose which order status creates the invoice, such as Processing or Completed. For orders paid at checkout, the invoice is generated after payment and serves as an itemized record of a completed purchase.
- Automatic email attachments: The itemized PDF invoice is attached to WooCommerce order emails, and customers can download or print it from their My Account page at any time. That ends most “can you resend my receipt?” requests.
- Detailed line items: Display your VAT, GST, or sales tax ID along with the buyer’s, and show prices with tax, without tax, or both. You can also add custom order meta like a purchase order number, plus product images next to each line. Our guide on adding tax details to WooCommerce invoices walks through the tax settings.
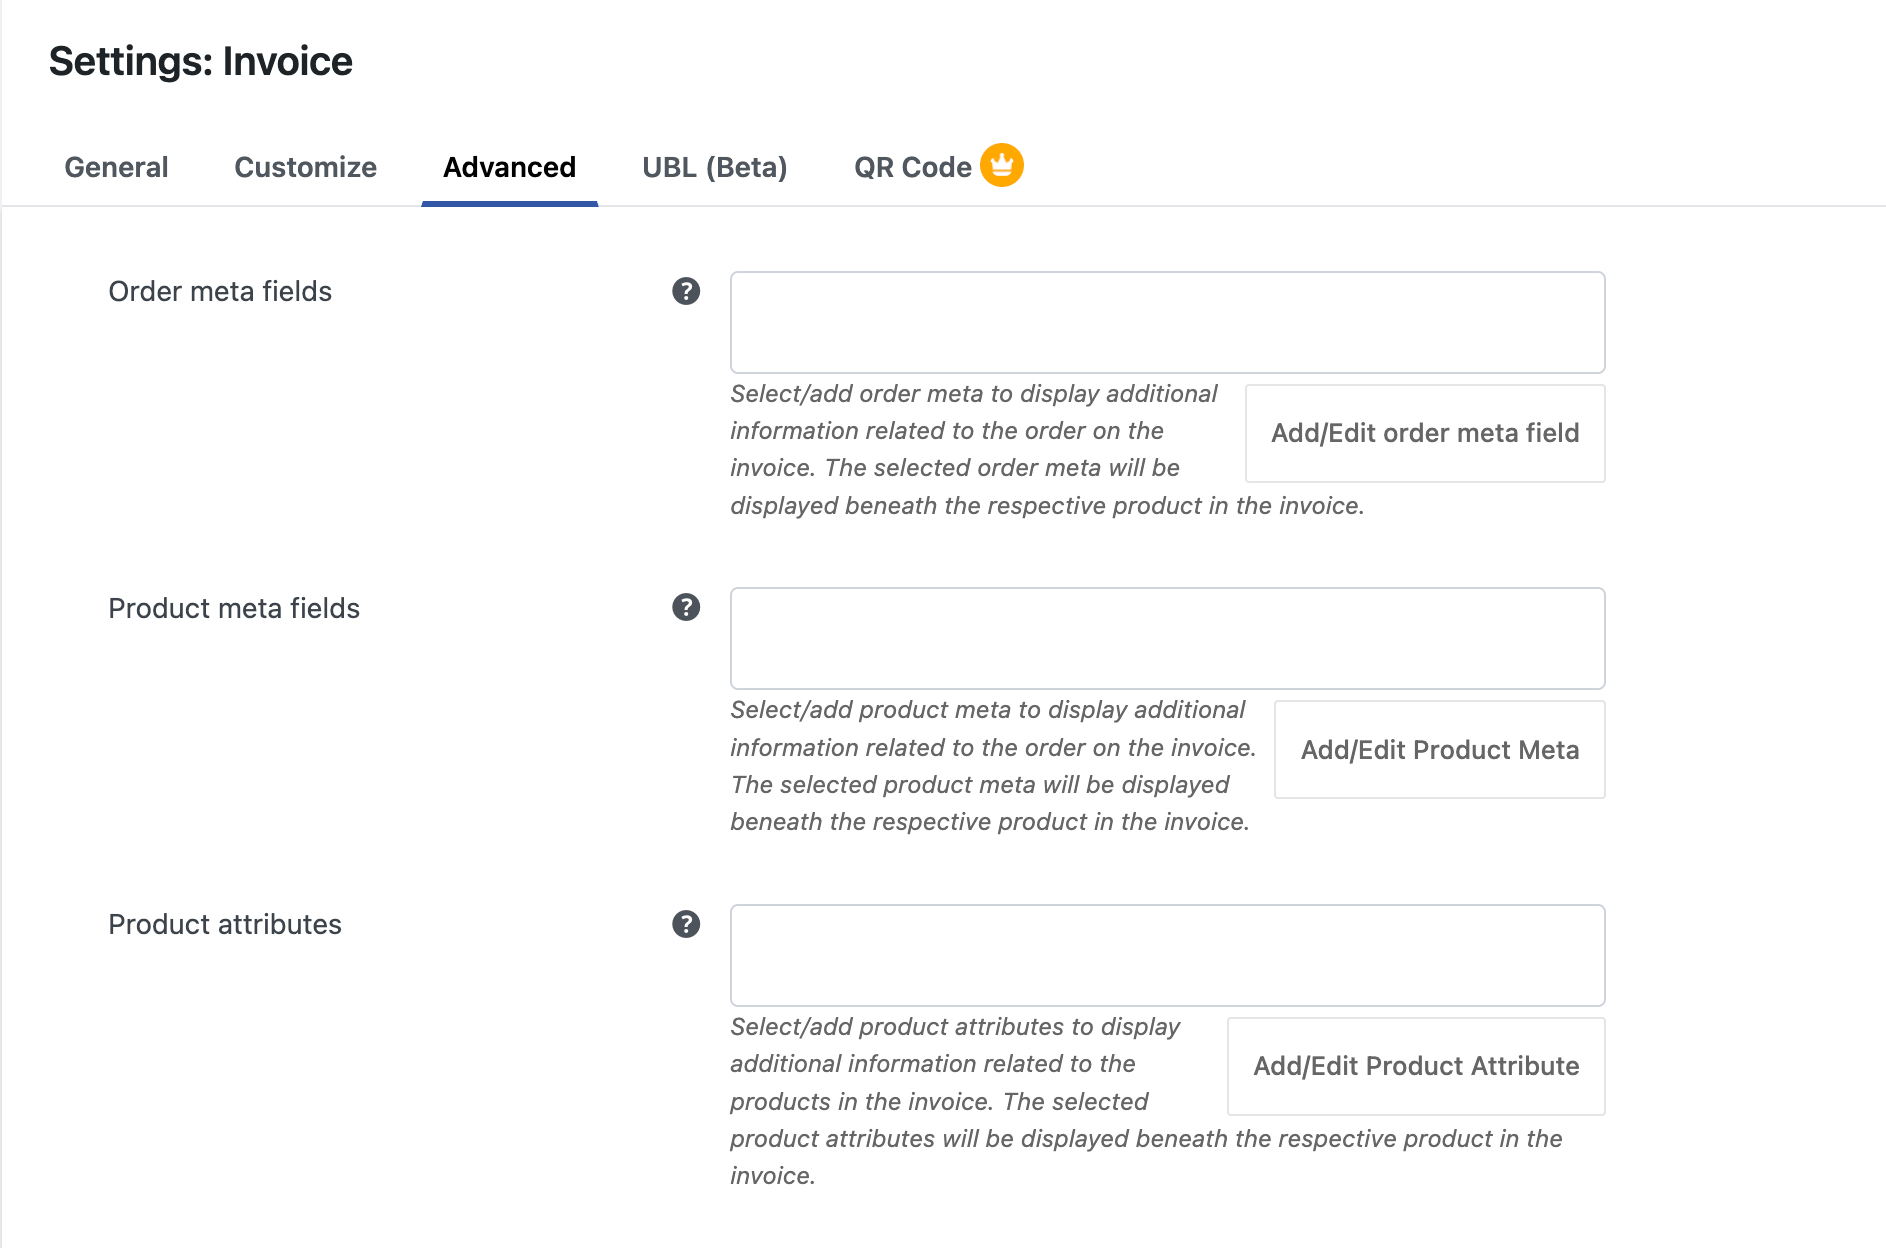
- Itemized receipts from the same invoice: Enable the “Payment received stamp” and and display the payment method on the invoice. This turns the invoice into an itemized proof of payment that includes each purchased item, taxes, payment method, and payment date.
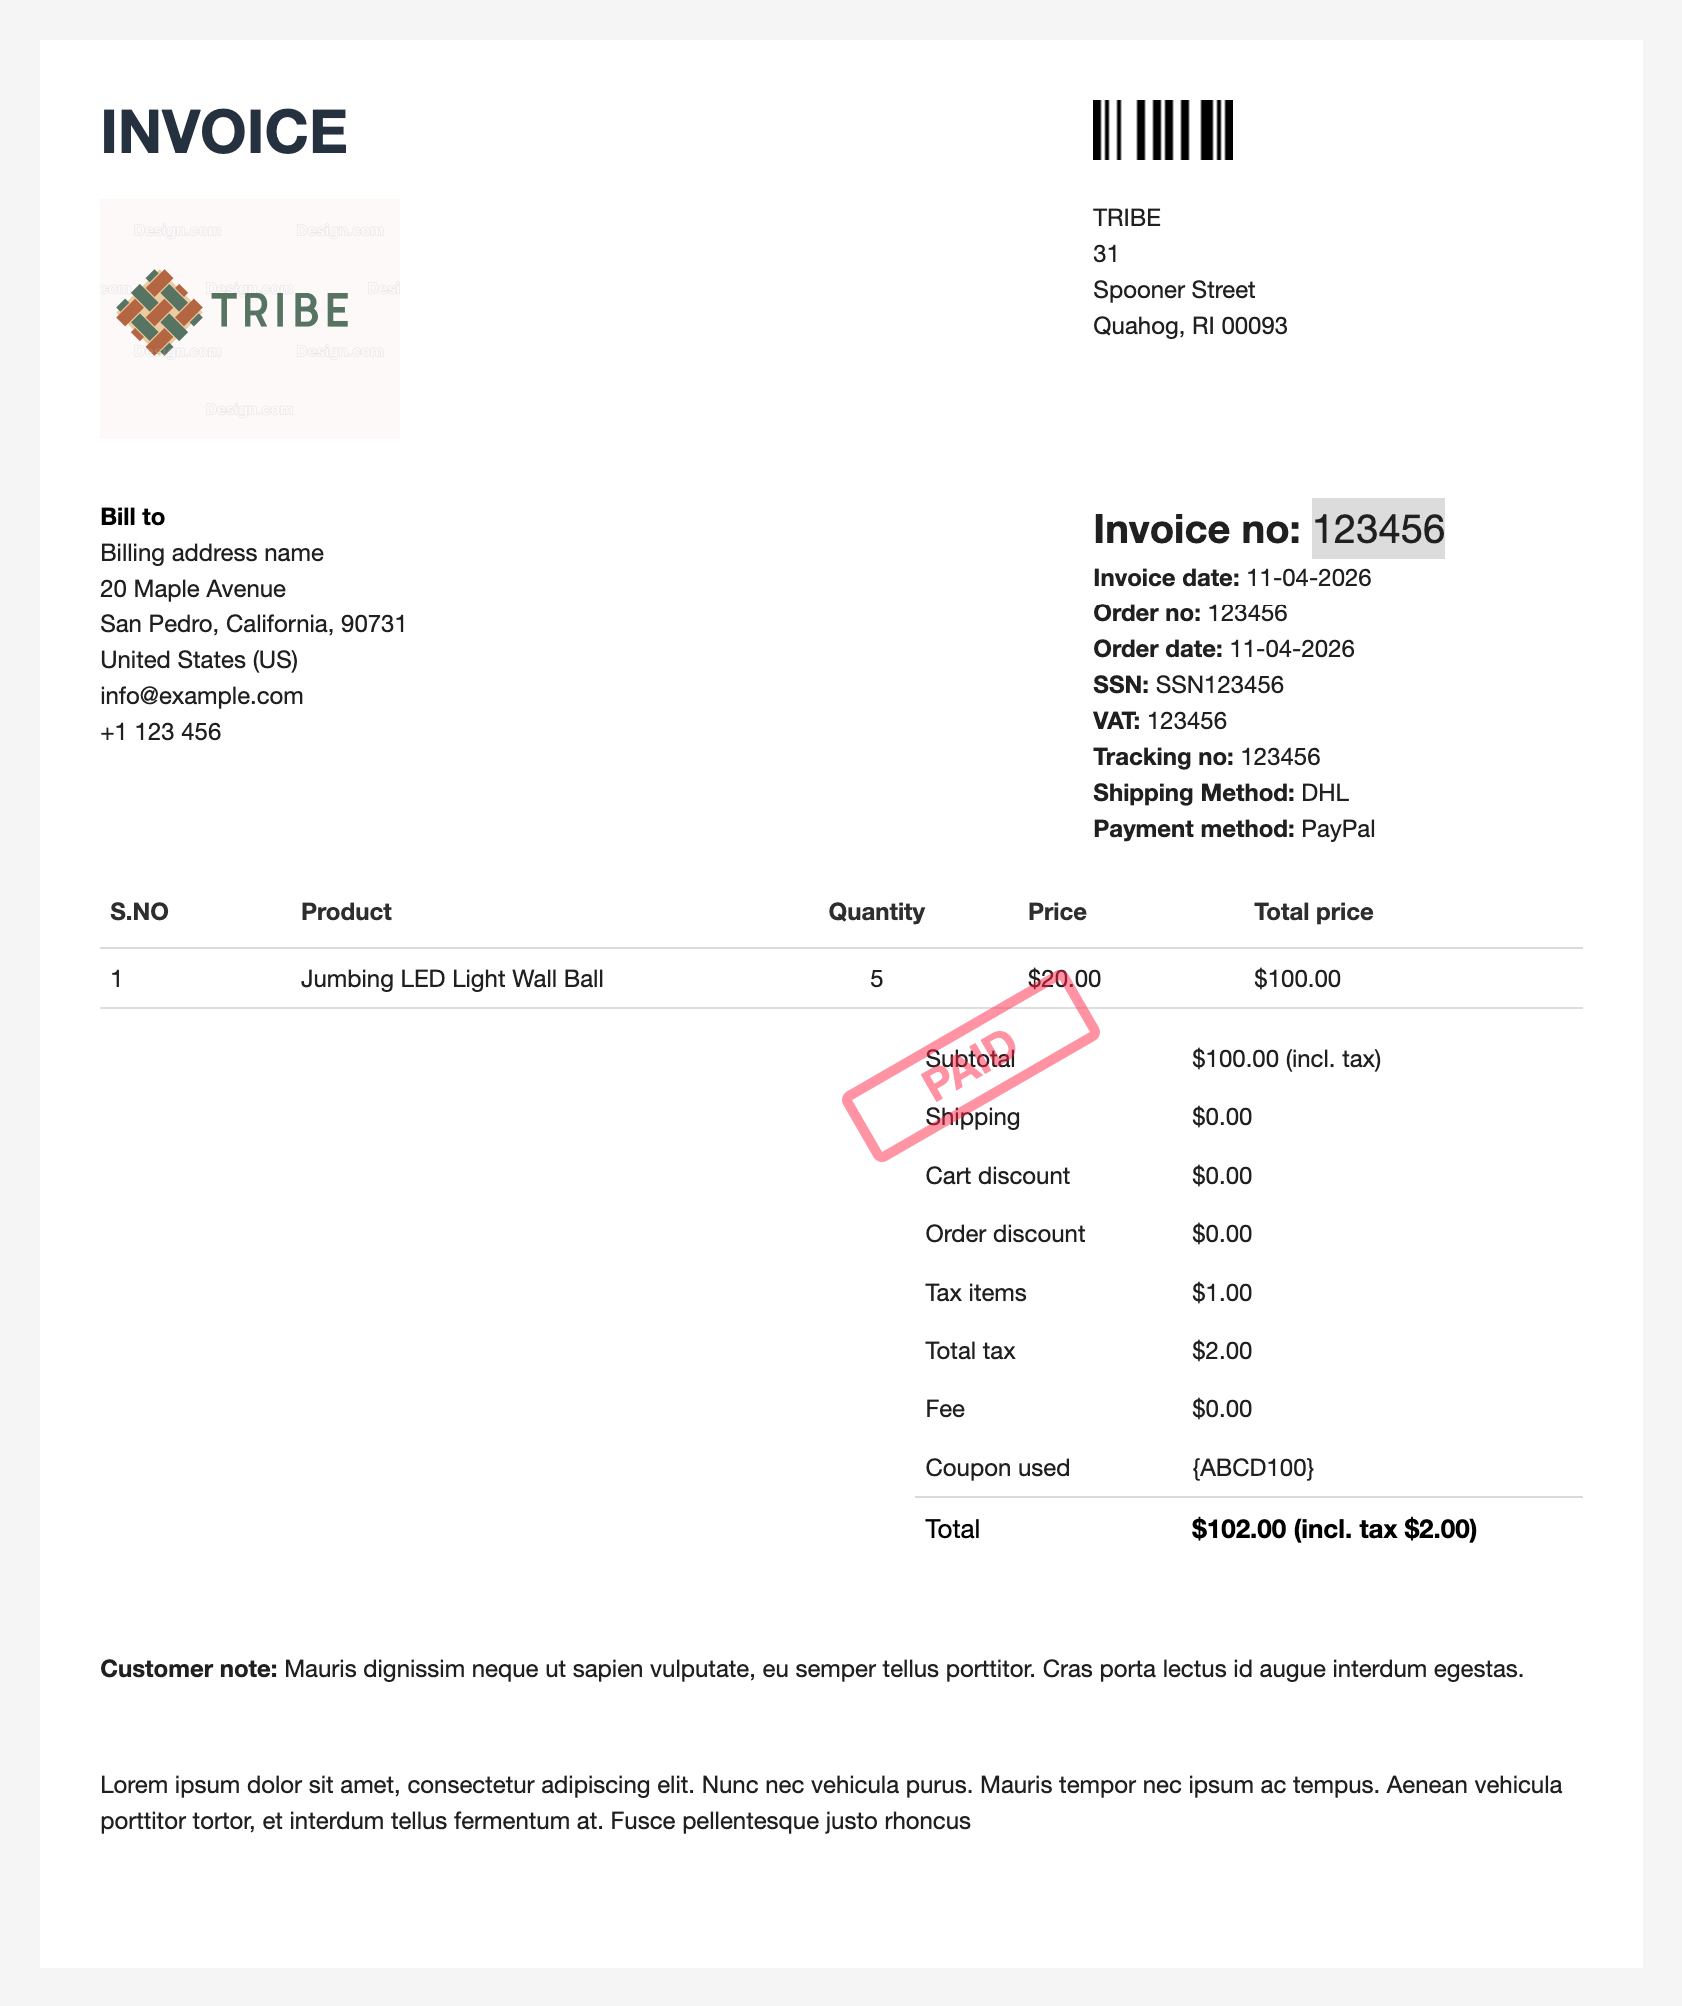
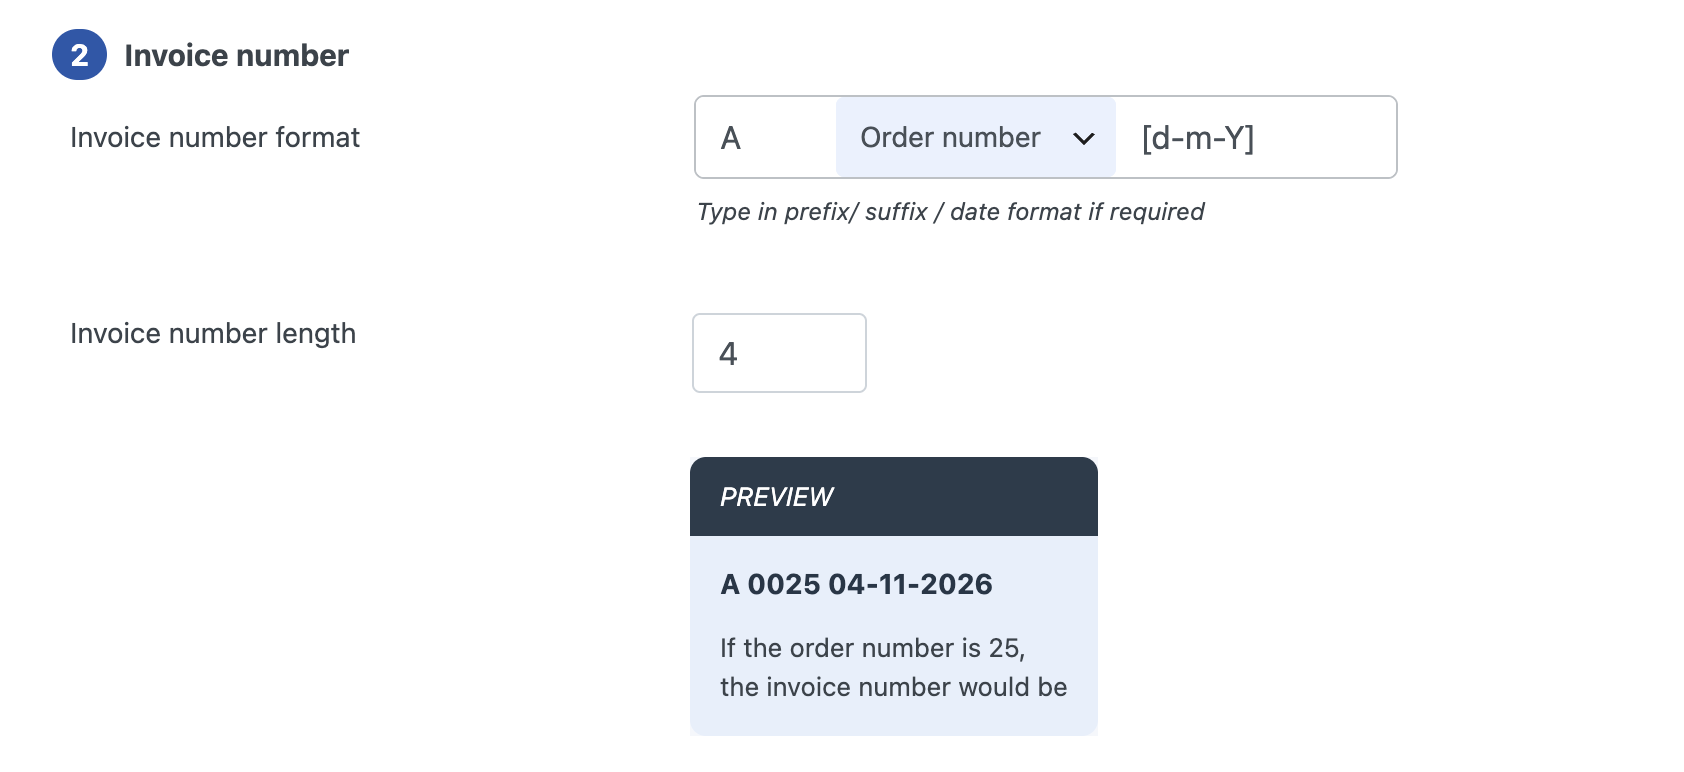
- Sequential numbering: Set prefixes, suffixes, starting numbers, and yearly resets so every invoice is traceable.
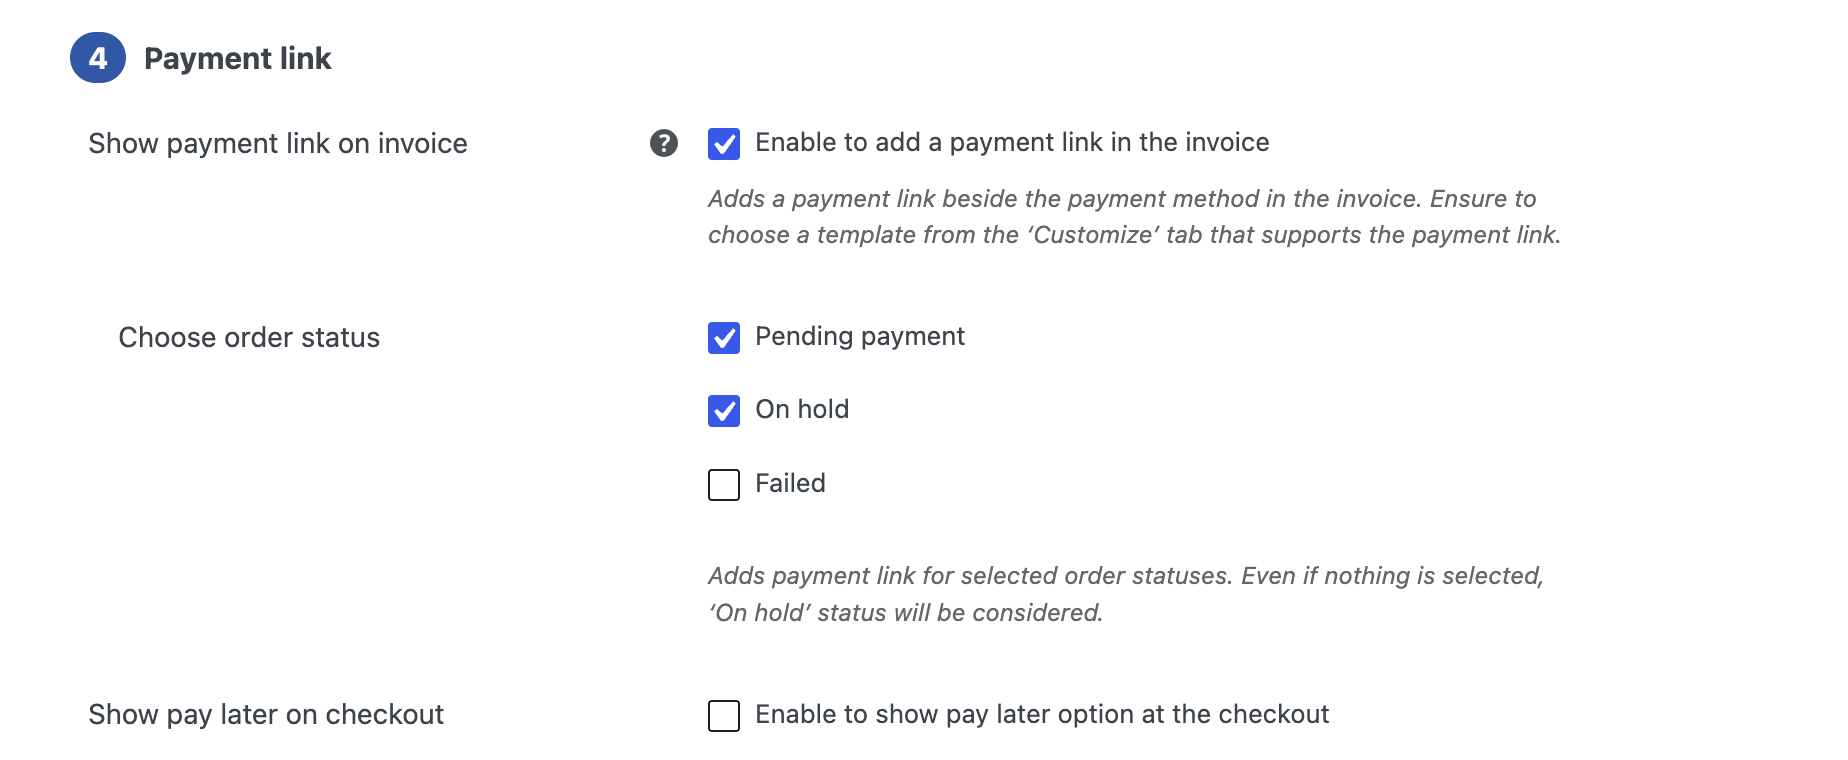
- Pay Now links for unpaid orders: For orders in “Pending Payment”, “On Hold”, or “Failed status”, add a payment link so the itemized invoice doubles as a request for payment.
- Credit notes for refunds: When an order is refunded, a credit note is created and sent automatically, so returns stay documented.
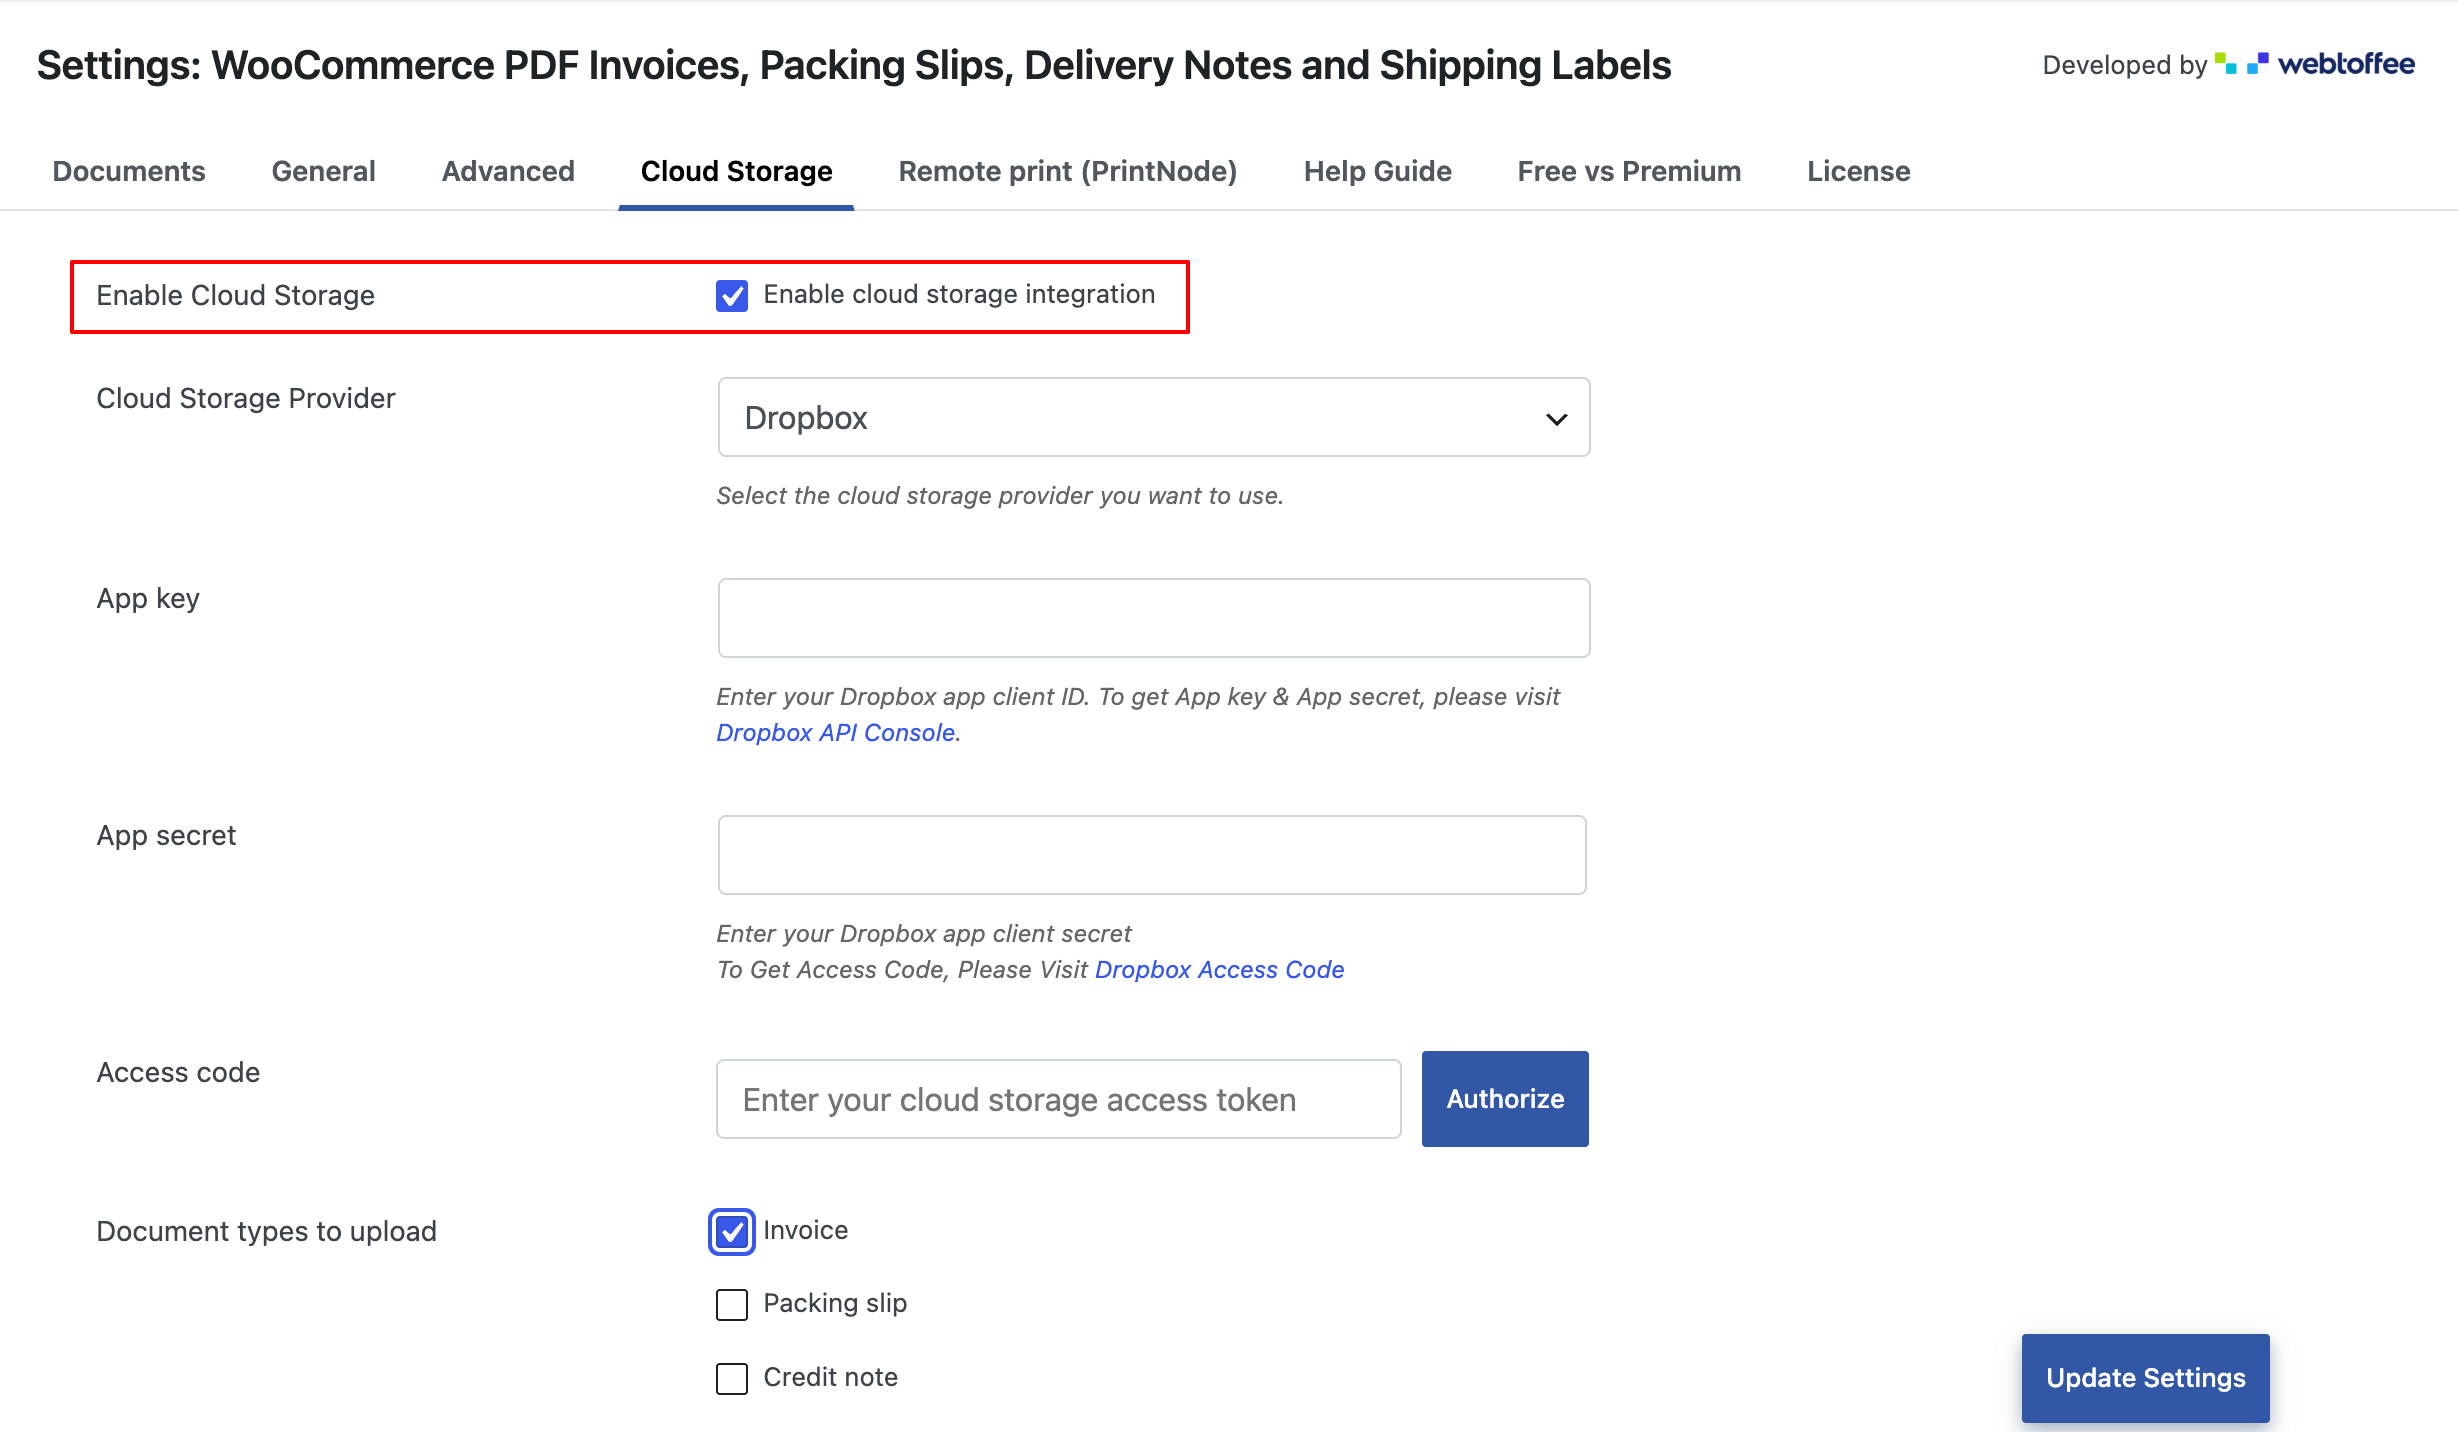
- Automatic backups: Back up invoices, packing slips, and credit notes to FTP, Dropbox, or Google Drive, so your records are safe if anything happens to your site.
Before you start, make sure you have the premium version of the WooCommerce PDF Invoices, Packing Slips and Credit Notes plugin. The setup has three parts: install the plugin, set up invoice generation, and customize the template so the same PDF can work as an itemized receipt.
Step 1: Install and Activate the Plugin
- Download the plugin’s .zip file from your WebToffee account.
- In your WordPress dashboard, go to Plugins > Add Plugin > Upload Plugin.
- Upload the .zip file, click Install Now, and then click Activate.
Step 2: Set up Itemized PDF Invoice Generation
- Go to Invoice/Packing > General Settings > General and fill in your company name, address, and tax ID. These details appear as the sender information on every invoice, receipt, and related document.
- Go to Documents > Invoice.
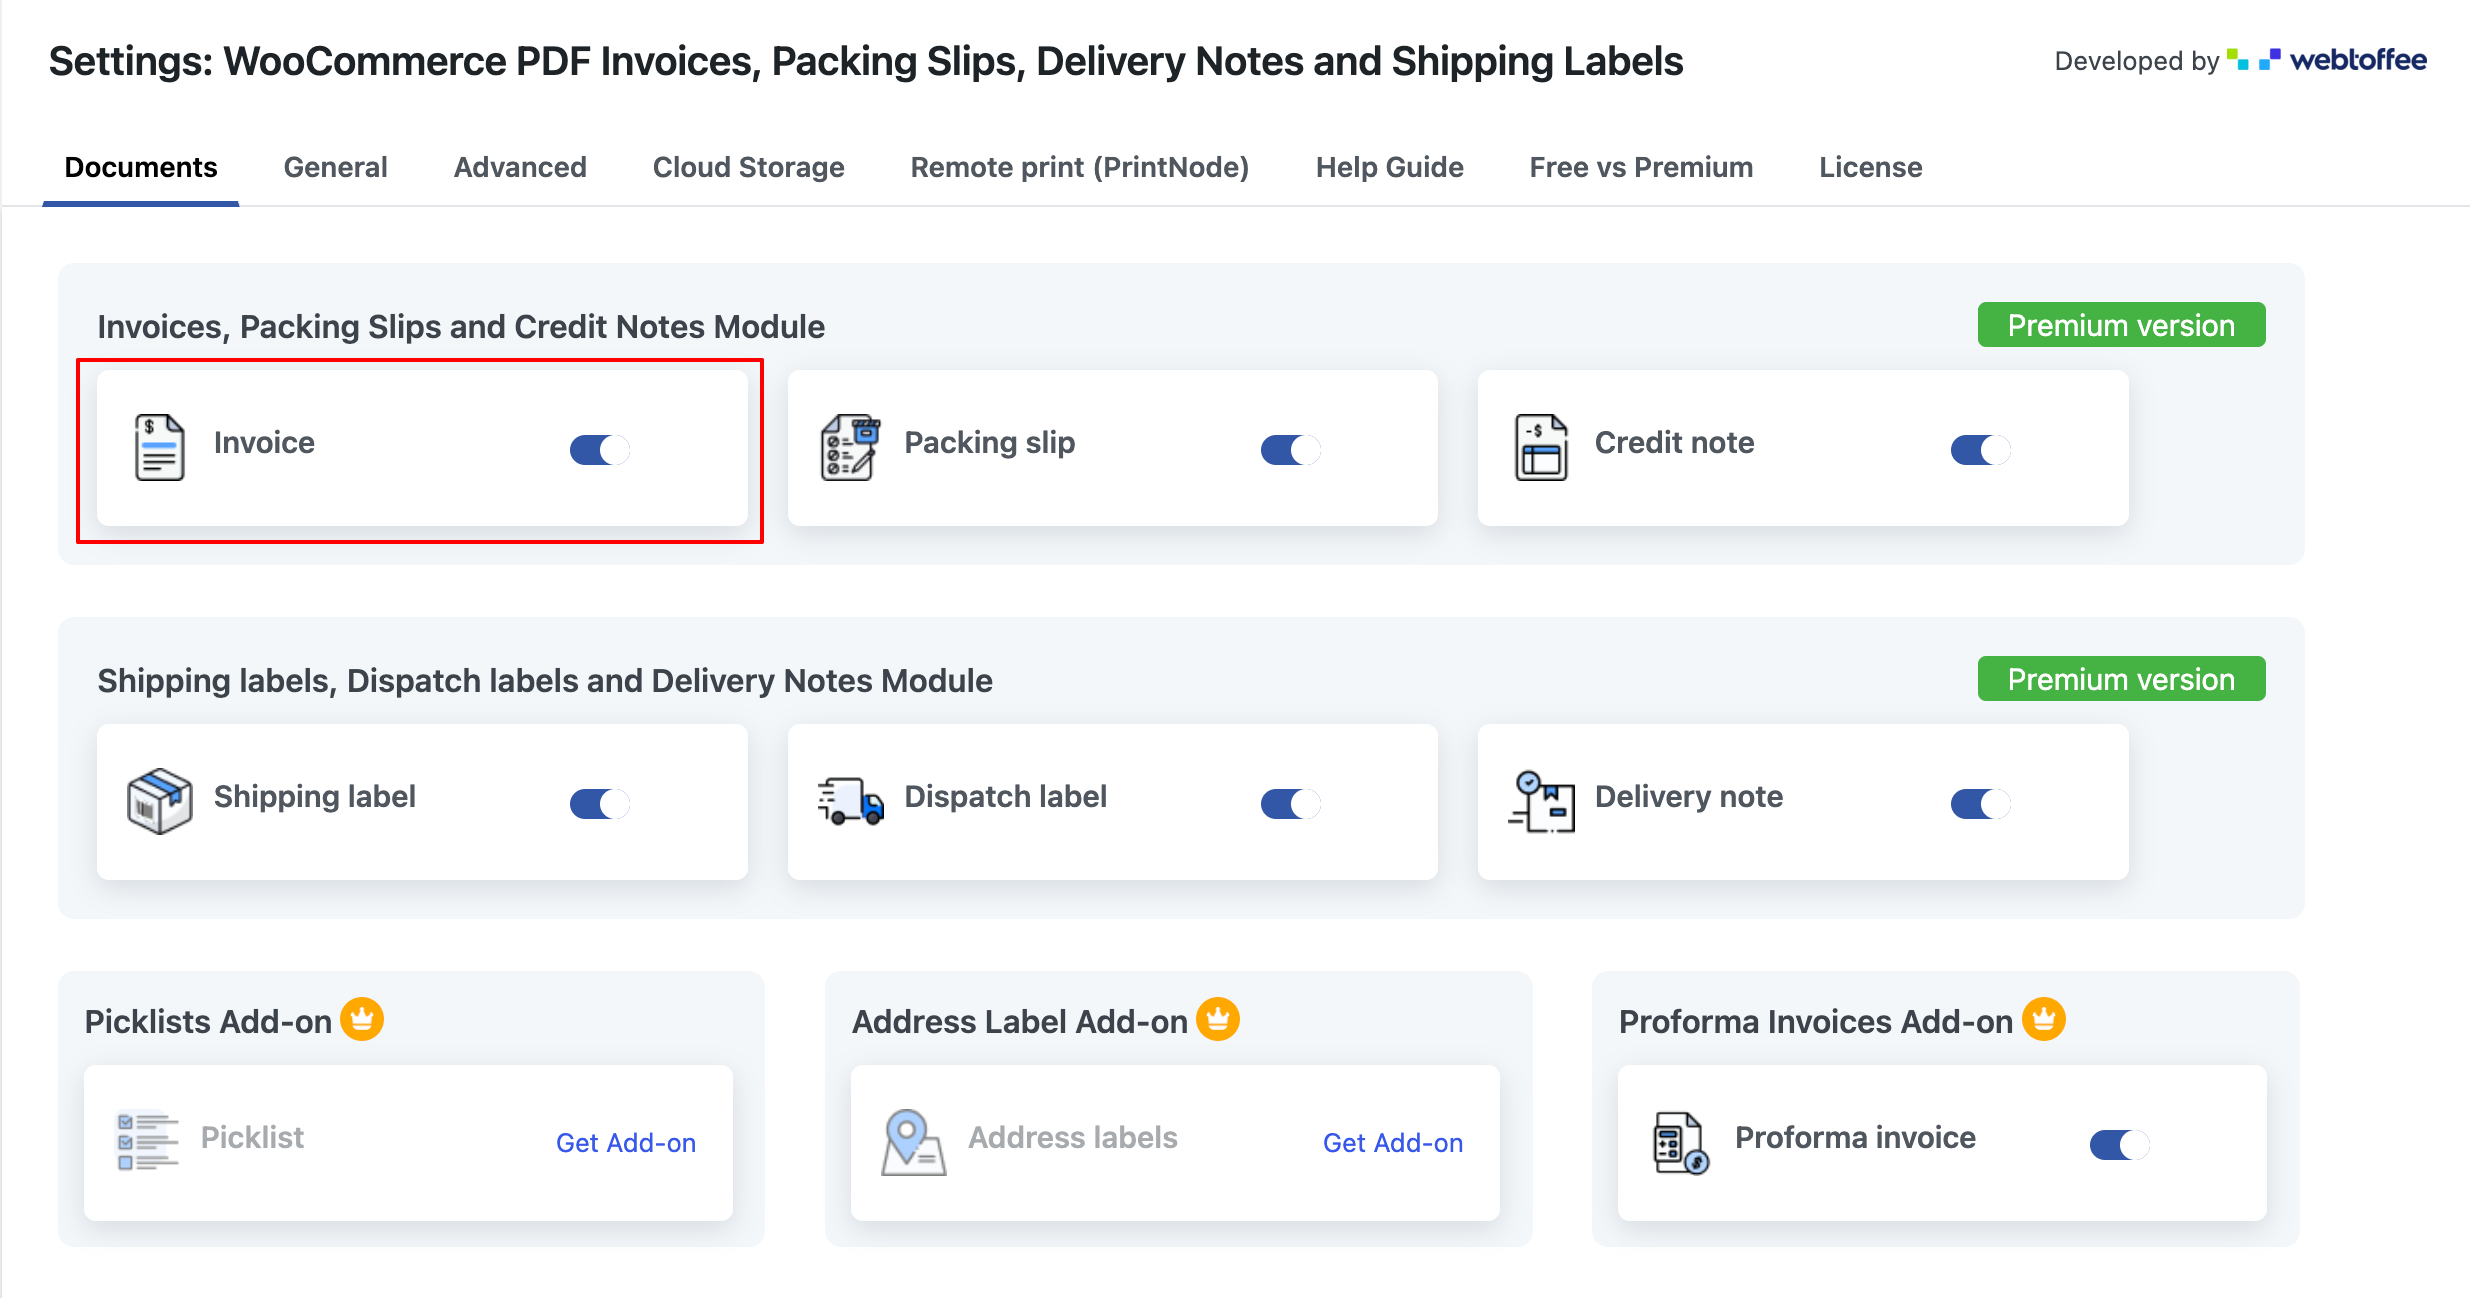
- Turn on Enable Invoice so you can print, download, and email invoices.
- Under General settings, choose the order statuses that create an invoice automatically, and the order statuses whose emails should attach the invoice as PDF.
- Set the Invoice number format.
- In the Payment link settings, enable the Show payment link on invoice. Customers with unpaid orders can then pay straight from the itemized invoice PDF.
- Click Update Settings.
Step 3: Customize Invoice and Turn It Into an Itemized Receipt PDF
- Open the Customize tab in the invoice document section.
- Click Change template and pick a premium template.
- Turn on the fields your customers need, such as product SKU, variations, the tax breakdown, and payment method.
- Enable the Payment received stamp. Paid orders then show a “Paid/Recieved” status on the PDF, so the document works as an itemized receipt with every line item, tax line, and payment method. You can also change the document title to “Receipt”.
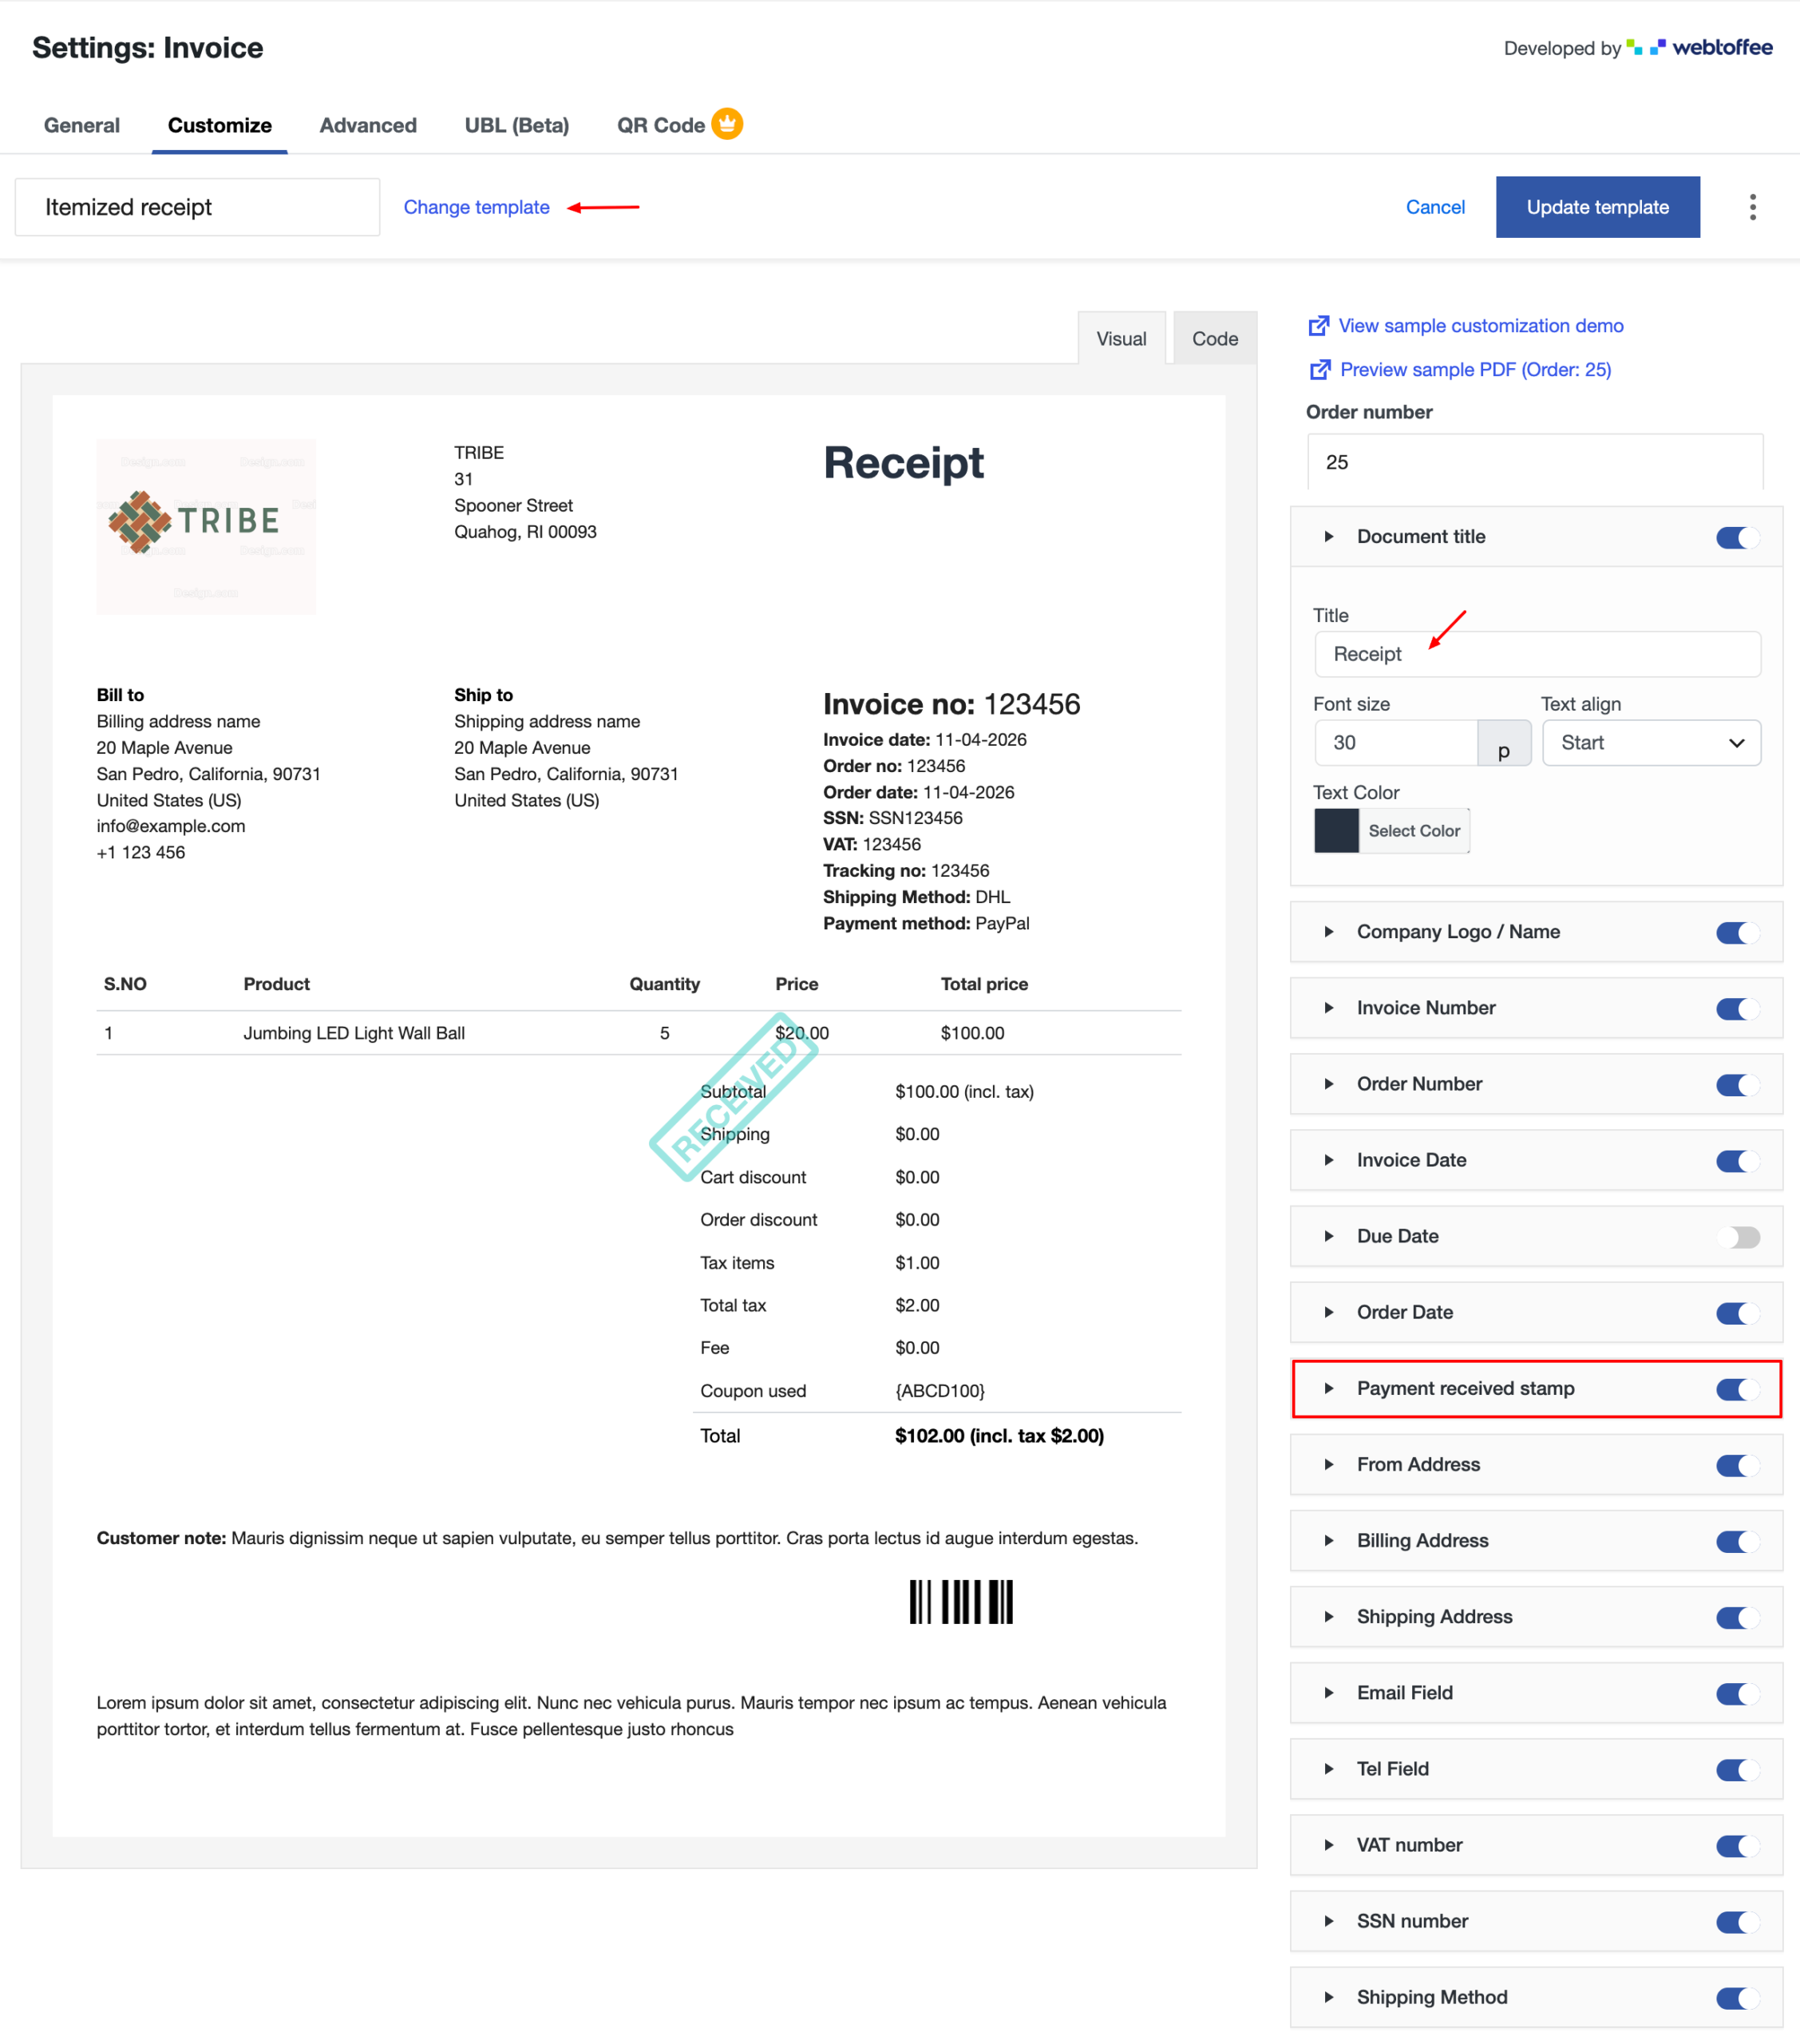
- Click Save and activate or Update Template (if already active).
That’s it! You have successfully generated itemized PDF order invoices and receipts in WooCommerce. Customers receive the PDF with their order emails and can download it again from My Account. For the full setup guide, check out our full guide on how to create PDF invoices.
Ask the seller directly, or check your account on their website. Most online stores, including Amazon, let you download an invoice or receipt from your order history. If the store only sent a total, request an itemized copy from their support team.
For business deductions, the IRS expects records that show what you bought as well as how much you spent. An itemized receipt covers that. Personal purchases you don’t deduct don’t need one.
Yes. Both list each charge separately. “Invoice” is the seller’s term, and “bill” is how the buyer usually refers to it.
It lists every item, tax, and the payment method, so it can work for personal records. Business buyers usually need a numbered PDF with tax IDs, which the default email doesn’t include.
Yes. You can create and automate itemized WooCommerce PDF invoices and receipts using the free WooCommerce PDF Invoices & Packing Slips plugin from WebToffee.
An itemized receipt or invoice gives customers a clear breakdown of their purchases. This makes it easier to verify charges and maintain accurate expense records. For your store, it means fewer support requests and better documentation during tax filing or audits.
WooCommerce already itemizes every order. The next step is turning the order data into a professional PDF invoice with the necessary tax details and payment information. Automating this process saves you from creating documents manually.
You can get started with the free WooCommerce PDF Invoices, Packing Slips, Delivery Notes & Shipping Labels plugin, trusted by more than 50,000 stores. It generates an itemized PDF invoice for every order, attaches it to order emails, and lets customers download their invoices from My Account. When you need credit notes for refunds, Pay Now links for B2B orders, automatic backups, or advanced template customization, the premium version of this PDF invoices plugin picks up from there.
Thanks for reading!


Subcribe to our newsletter