
Share:


Table of Contents
Shopify inventory management is a vital process for online retailers, enabling them to efficiently track, organize, and update stock levels as their product offerings expand. Effective inventory management is crucial for preventing stockouts, avoiding overselling, and making informed purchasing decisions, ultimately enhancing customer satisfaction and operational efficiency.
- Shopify's built-in inventory management system allows users to track stock levels, manage multiple locations, and automatically update quantities as sales occur.
- Inventory tracking is enabled at the product variant level, and Shopify categorizes stock into five states: on hand, available, committed, unavailable, and incoming.
- Accurate inventory management helps prevent overselling, reduces stockouts, and avoids excess inventory, thereby optimizing storage and fulfillment processes.
- Users can manually update inventory quantities or utilize bulk updates via CSV files for larger catalogs, making inventory management scalable.
- Shopify supports inventory tracking across multiple locations, allowing businesses to manage stock efficiently across warehouses, retail stores, and fulfillment centers.
- Advanced inventory management needs, such as demand forecasting and multichannel synchronization, may require third-party apps for enhanced functionality.
Keeping track of inventory is fairly straightforward when you have a small Shopify store with a handful of products. But as your product catalog grows, things can get complicated.
You might sell the last available unit of a product without realizing it, run out of a bestseller before your next shipment arrives, or have inventory sitting in one warehouse while another location struggles to fulfill orders.
These are common inventory management challenges, and they can affect both your sales and customer experience. Fortunately, Shopify provides built-in tools to help store owners track stock, update inventory quantities, manage multiple locations, and plan restocking.
In this guide, we’ll explain how Shopify inventory management works, how to set it up, and how to manage your stock more efficiently as your store grows.
Shopify inventory management is the process of tracking, organizing, and updating the stock available in your Shopify store.
Shopify has a built-in inventory management system that lets you monitor how many units of each product you have, track inventory across different locations, and automatically account for stock sold through your store.
For example, suppose you have 50 units of a particular T-shirt available. When a customer places an order for two units, Shopify accounts for those units so they are no longer available for another customer to purchase.
You can also manually update inventory when you receive new stock, discover damaged items, or transfer products between locations.
How Does Shopify Inventory Tracking Work?
Shopify tracks inventory at the product variant level. If you sell a T-shirt in three sizes, each size can have its own inventory quantity.
Shopify also uses five inventory states to distinguish between products physically in stock and those available for purchase.
| Inventory state | What it means |
|---|---|
| On hand | Total physical inventory at a location |
| Available | Inventory that can be sold to customers |
| Committed | Inventory reserved for orders or other commitments |
| Unavailable | Inventory set aside because it’s damaged, under inspection, or reserved |
| Incoming | Inventory expected to arrive through transfers or connected apps |
For example, you might have 100 units physically in your warehouse, but only 85 available for sale because 10 are committed to orders and 5 are held as safety stock.
Understanding these inventory states helps you avoid confusing physical stock with stock that’s actually available to sell.
Accurate inventory management helps you know which products are available, which ones need restocking, and where your stock is located.
Without it, you risk accepting orders for products you don’t have or missing sales because popular products run out unexpectedly.
Effective Shopify inventory management helps you:
- Prevent overselling: Avoid selling more products than you have available.
- Reduce stockouts: Identify products running low before they become unavailable.
- Avoid excess inventory: Prevent slow-moving products from taking up unnecessary storage space.
- Manage multiple locations: Know where products are stored and which locations can fulfill orders.
- Make better purchasing decisions: Use sales and inventory data to decide what to reorder.
For example, if a product consistently sells 20 units every week, tracking inventory helps you estimate when to place your next supplier order. The goal is to maintain enough stock to meet customer demand without spending unnecessarily on inventory that might sit unsold.
Before you can manage inventory effectively, you need to enable tracking for the products you sell.
Shopify lets you do this directly from the product editor.
Step 1: Enable Inventory Tracking for Products
- Log in to your Shopify admin
- Go to Products
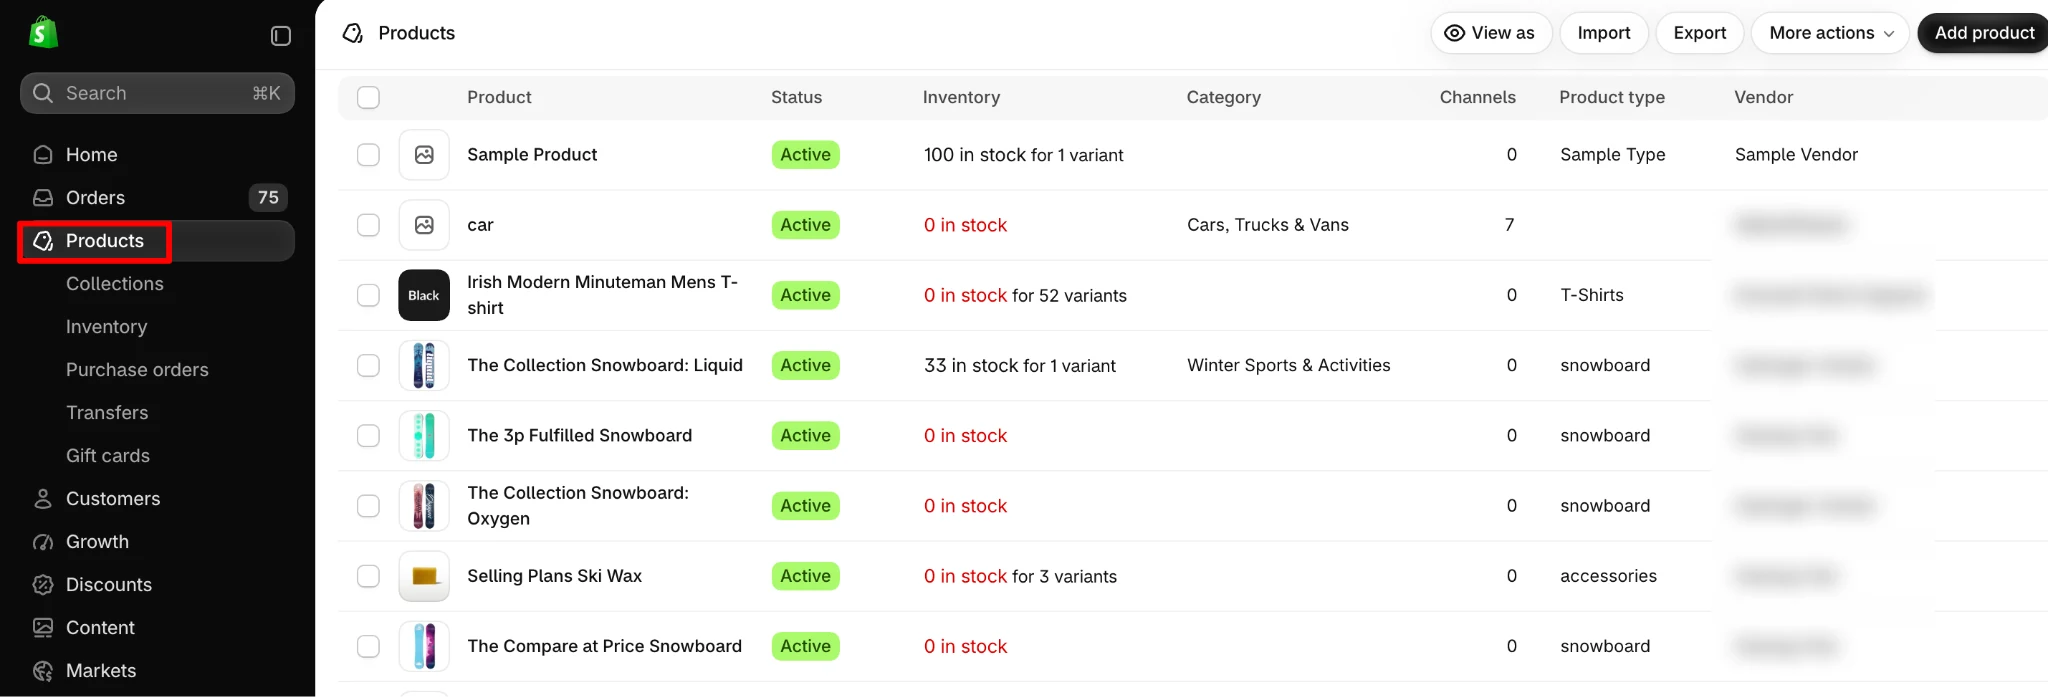
- Select the product you want to track. If the product has multiple variants, select the specific variant
- Scroll to the Inventory section
- Turn on the Inventory tracking toggle
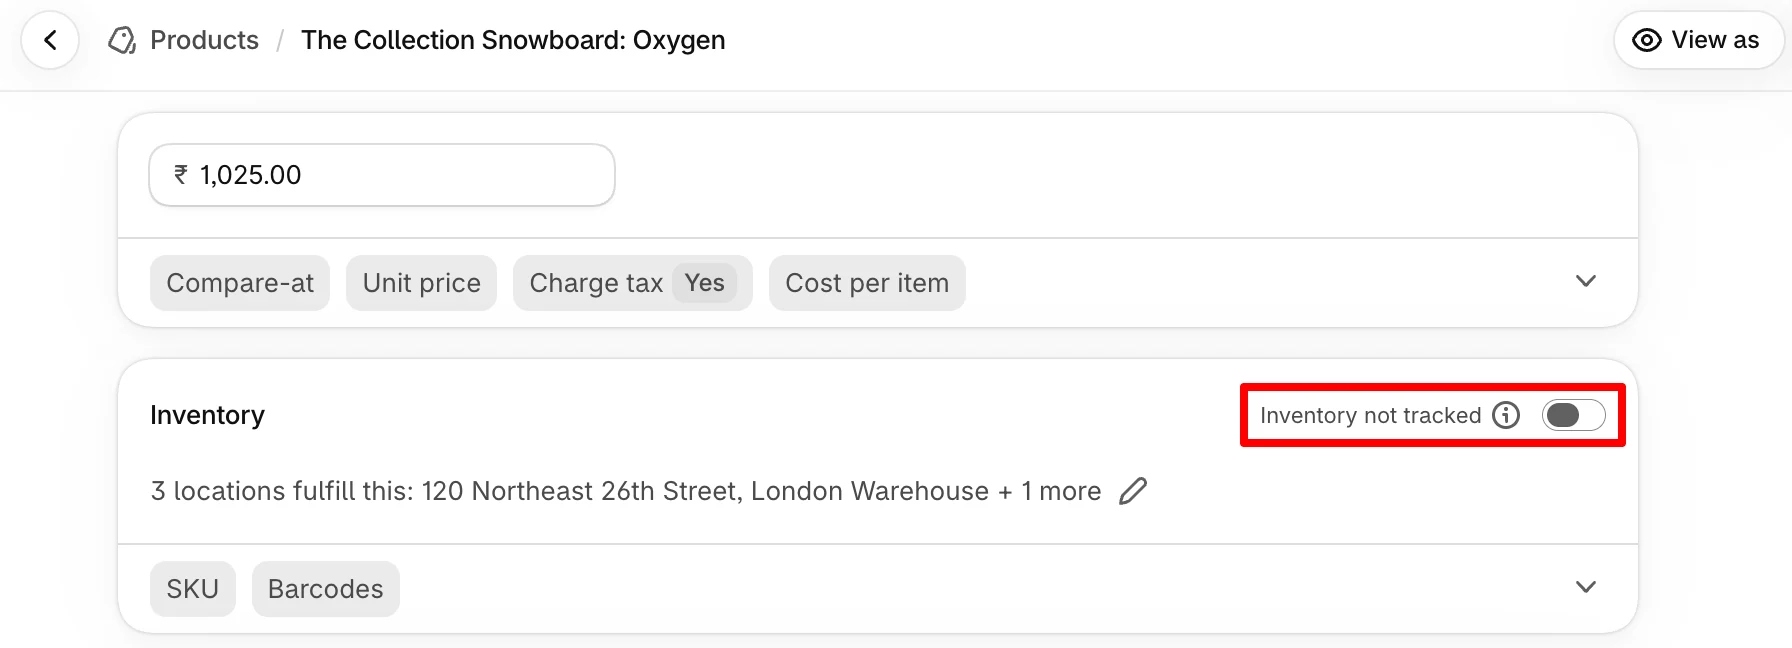
Once enabled, Shopify can track inventory changes for that product or variant.
You generally want inventory tracking enabled for physical products that you stock and ship. It may not be necessary for digital products, services, or certain made-to-order products.
Step 2: Enter the Available Stock Quantity
Next, enter the number of units currently available for sale.
In the product’s Inventory section, select the appropriate location and enter your available quantity. For example, if you have 75 units of a product in your warehouse, enter 75 as the available inventory.
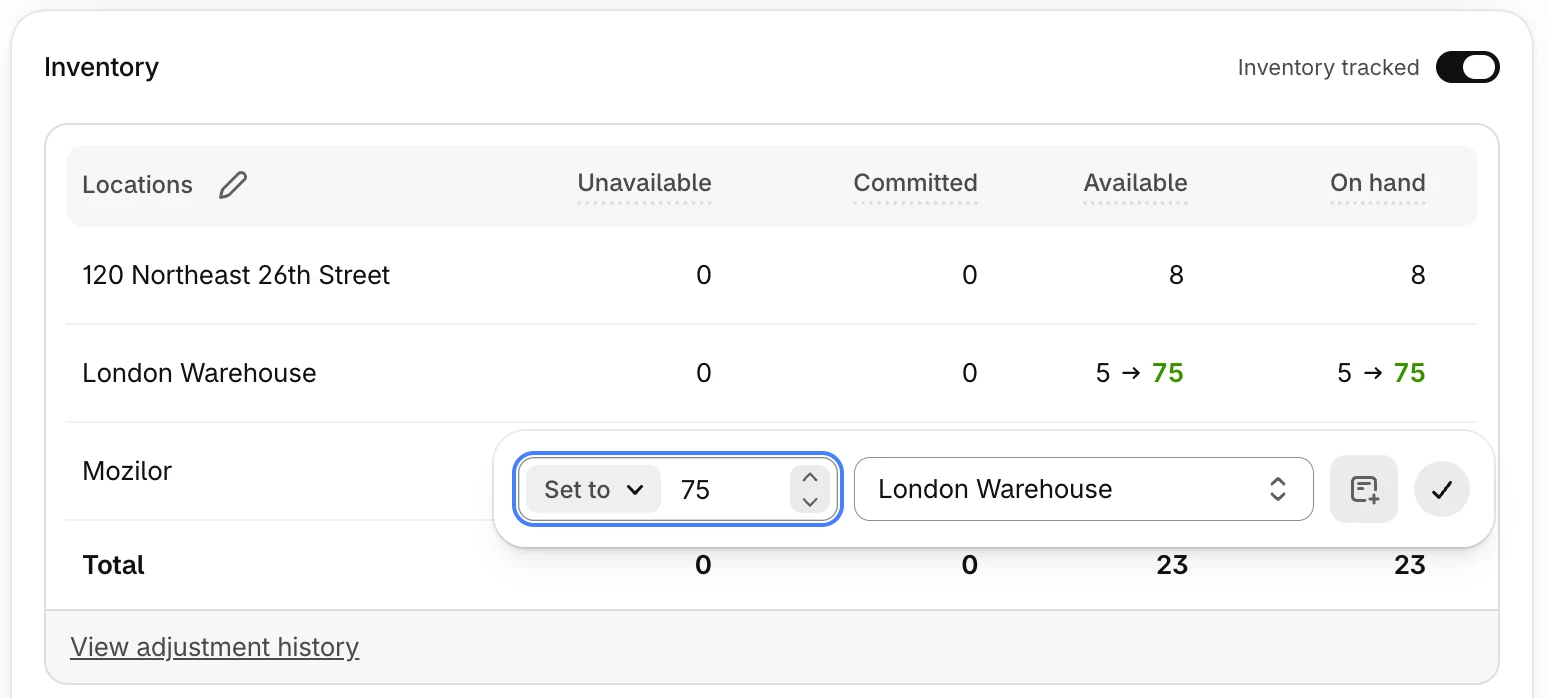
If you manage multiple locations, you’ll need to assign the appropriate quantities to each location.
Save your changes once the quantities are correct.
Step 3: Configure Out-of-Stock Settings
Shopify lets you decide what happens when a product runs out of stock.
By default, Shopify stops customers from purchasing a tracked product when its available inventory reaches zero.
However, you can enable Continue selling when out of stock if you want customers to place orders even when the product isn’t currently available.
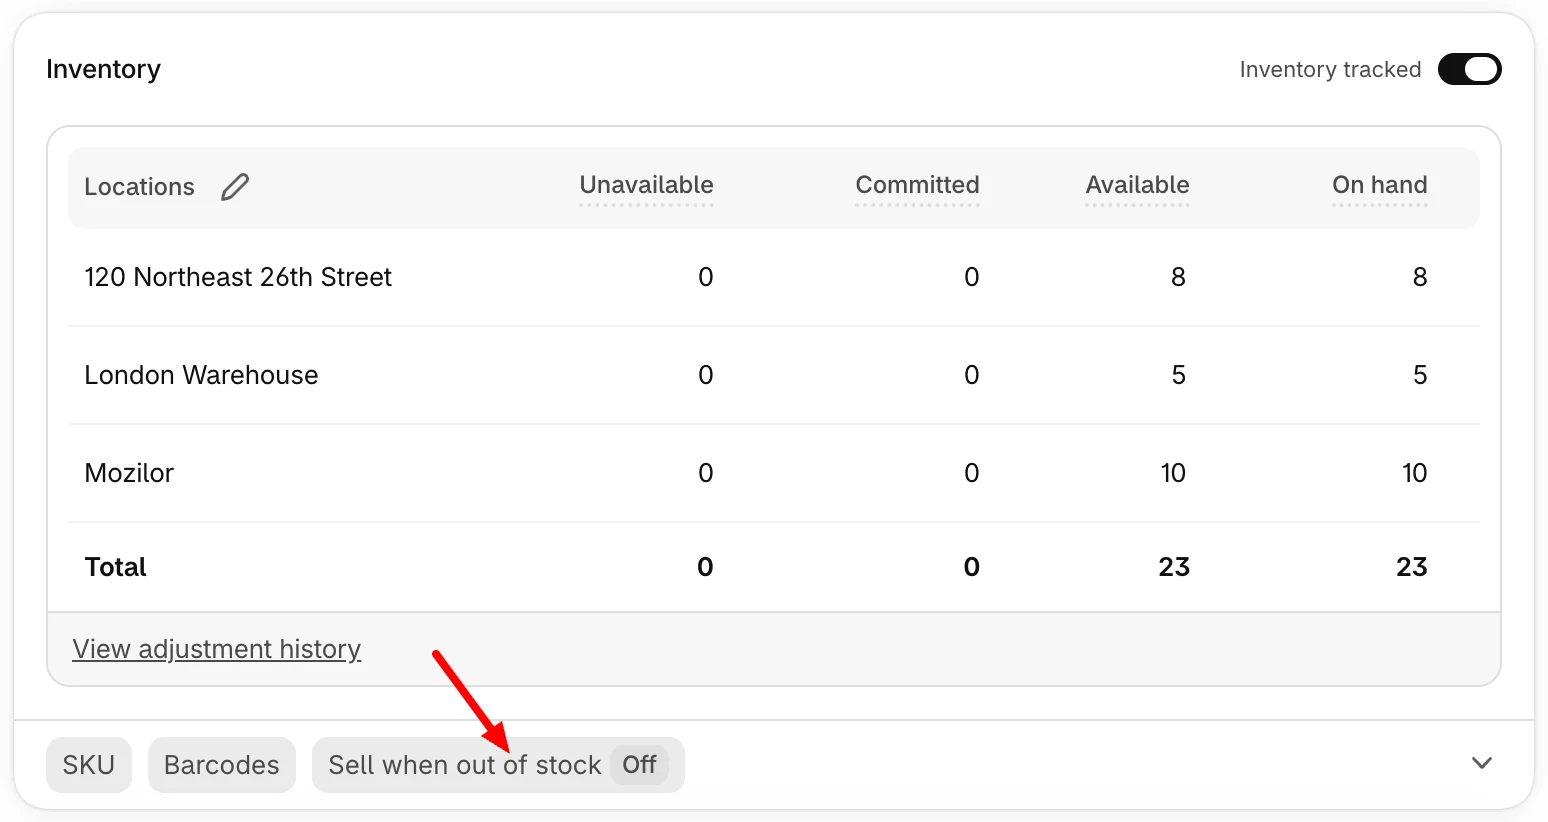
This can help with preorders, made-to-order products, or items you can restock quickly.
For most regularly stocked products, keep this option disabled to reduce the risk of accepting orders you cannot fulfill immediately.
Step 4: Verify Inventory Tracking
After setting up inventory tracking, go to Products > Inventory in your Shopify admin.
Here, you’ll find an overview of your tracked products and their quantities. Check whether your products appear with the correct quantities.

You can also place a test order to confirm that Shopify accounts for purchased units correctly.
If quantities don’t change as expected, check whether inventory tracking is enabled and whether the product is stocked at the appropriate location.
Once you enable inventory tracking, Shopify gives you several ways to manage quantities. You can update individual products, make bulk changes, or import inventory quantities from a spreadsheet.
Update Inventory Quantities Manually
If you receive new stock or discover an inventory discrepancy, you can adjust quantities directly.
- Go to Products > Inventory
- Select the relevant inventory location
- Find the product you want to update
- Click its quantity in the Available or On hand column
- Choose whether to set an exact quantity or adjust the existing quantity
- Enter the new value and add an adjustment reason if needed
- Confirm the pending adjustment and click Save
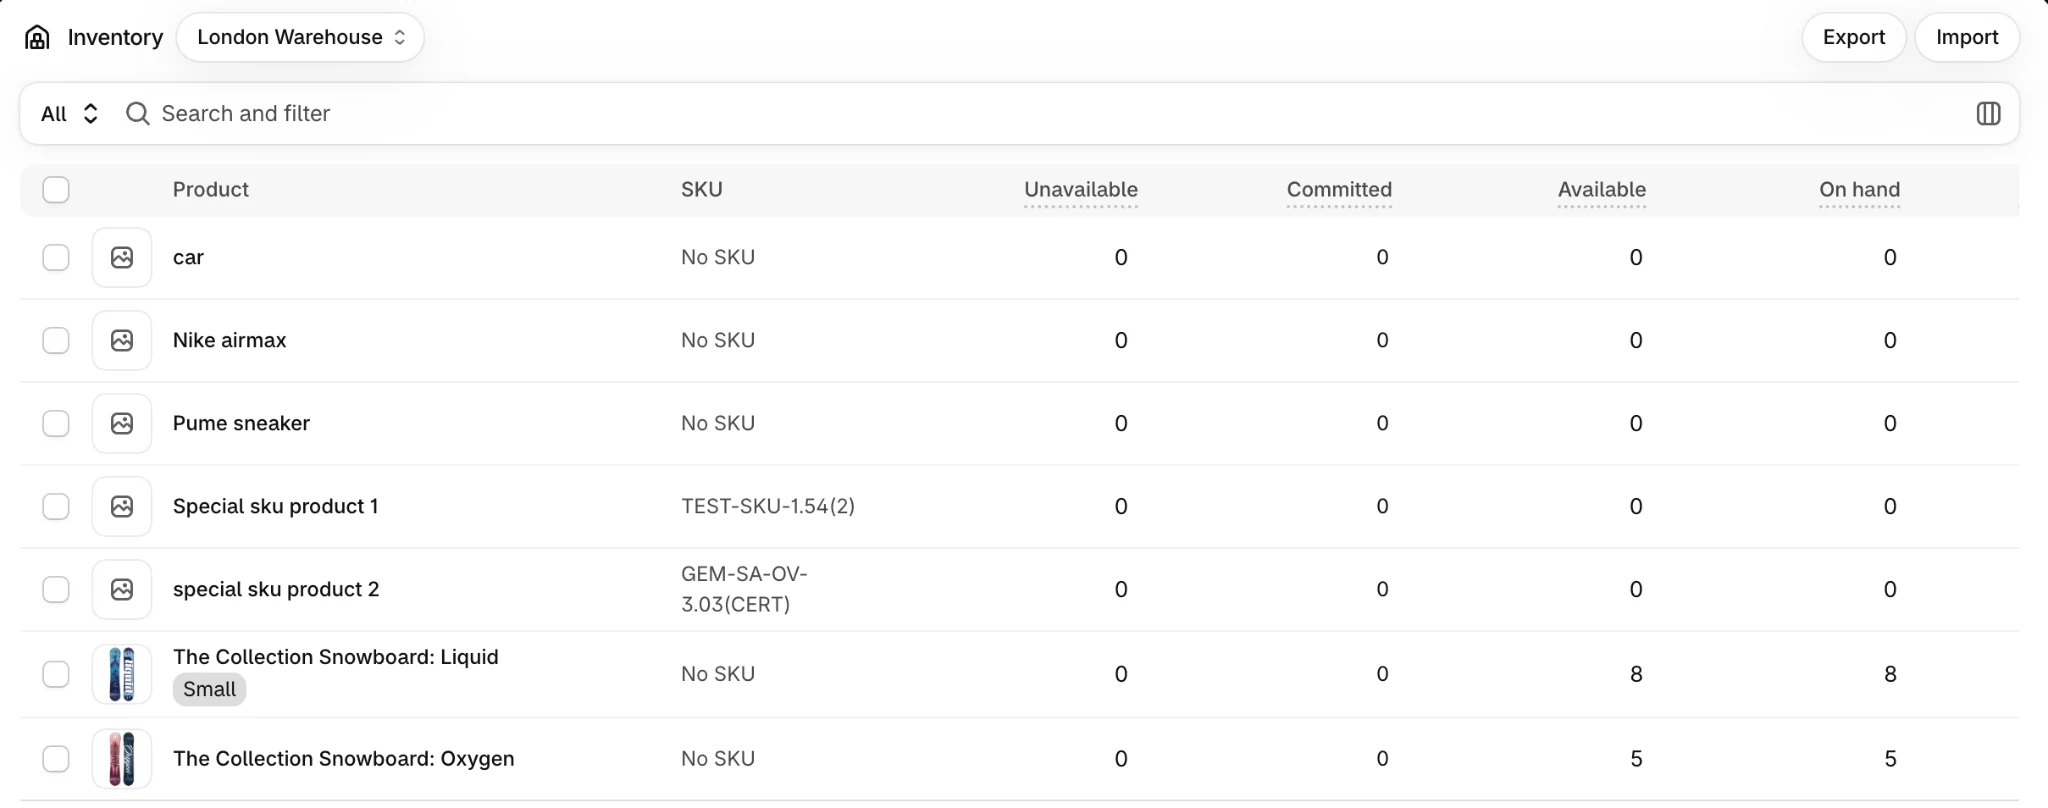
Shopify provides two adjustment methods.
Set to – Replaces the existing quantity with a specific number. For example, if a physical stock count confirms that you have 45 units, you can set the quantity to 45.
Adjust by – Adds or removes units from the existing quantity. If you receive 20 additional units, you can increase your stock by 20 without manually calculating the new total.
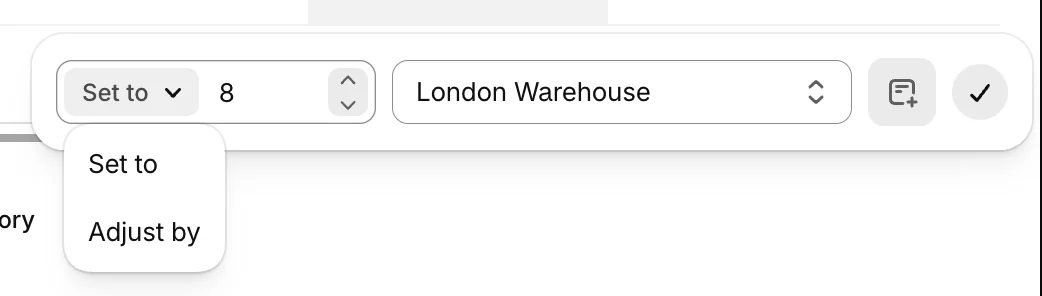
This is particularly useful when receiving stock, removing damaged goods, or correcting inventory discrepancies.
Bulk Update Shopify Inventory Using CSV
Updating inventory manually works for a few products. But what if you need to update stock quantities for hundreds or thousands of products?
Shopify supports bulk inventory updates using CSV files.
Here’s how it works:
Step 1: Export Your Inventory
- From your Shopify admin, go to Products > Inventory
- Click Export
- Select the location you want to export inventory from, or choose All locations
- Under Inventory states shown, choose All states (recommended) or Available
- Select which product variants you want to export
- In the Export as section, choose the file format and click Export variants
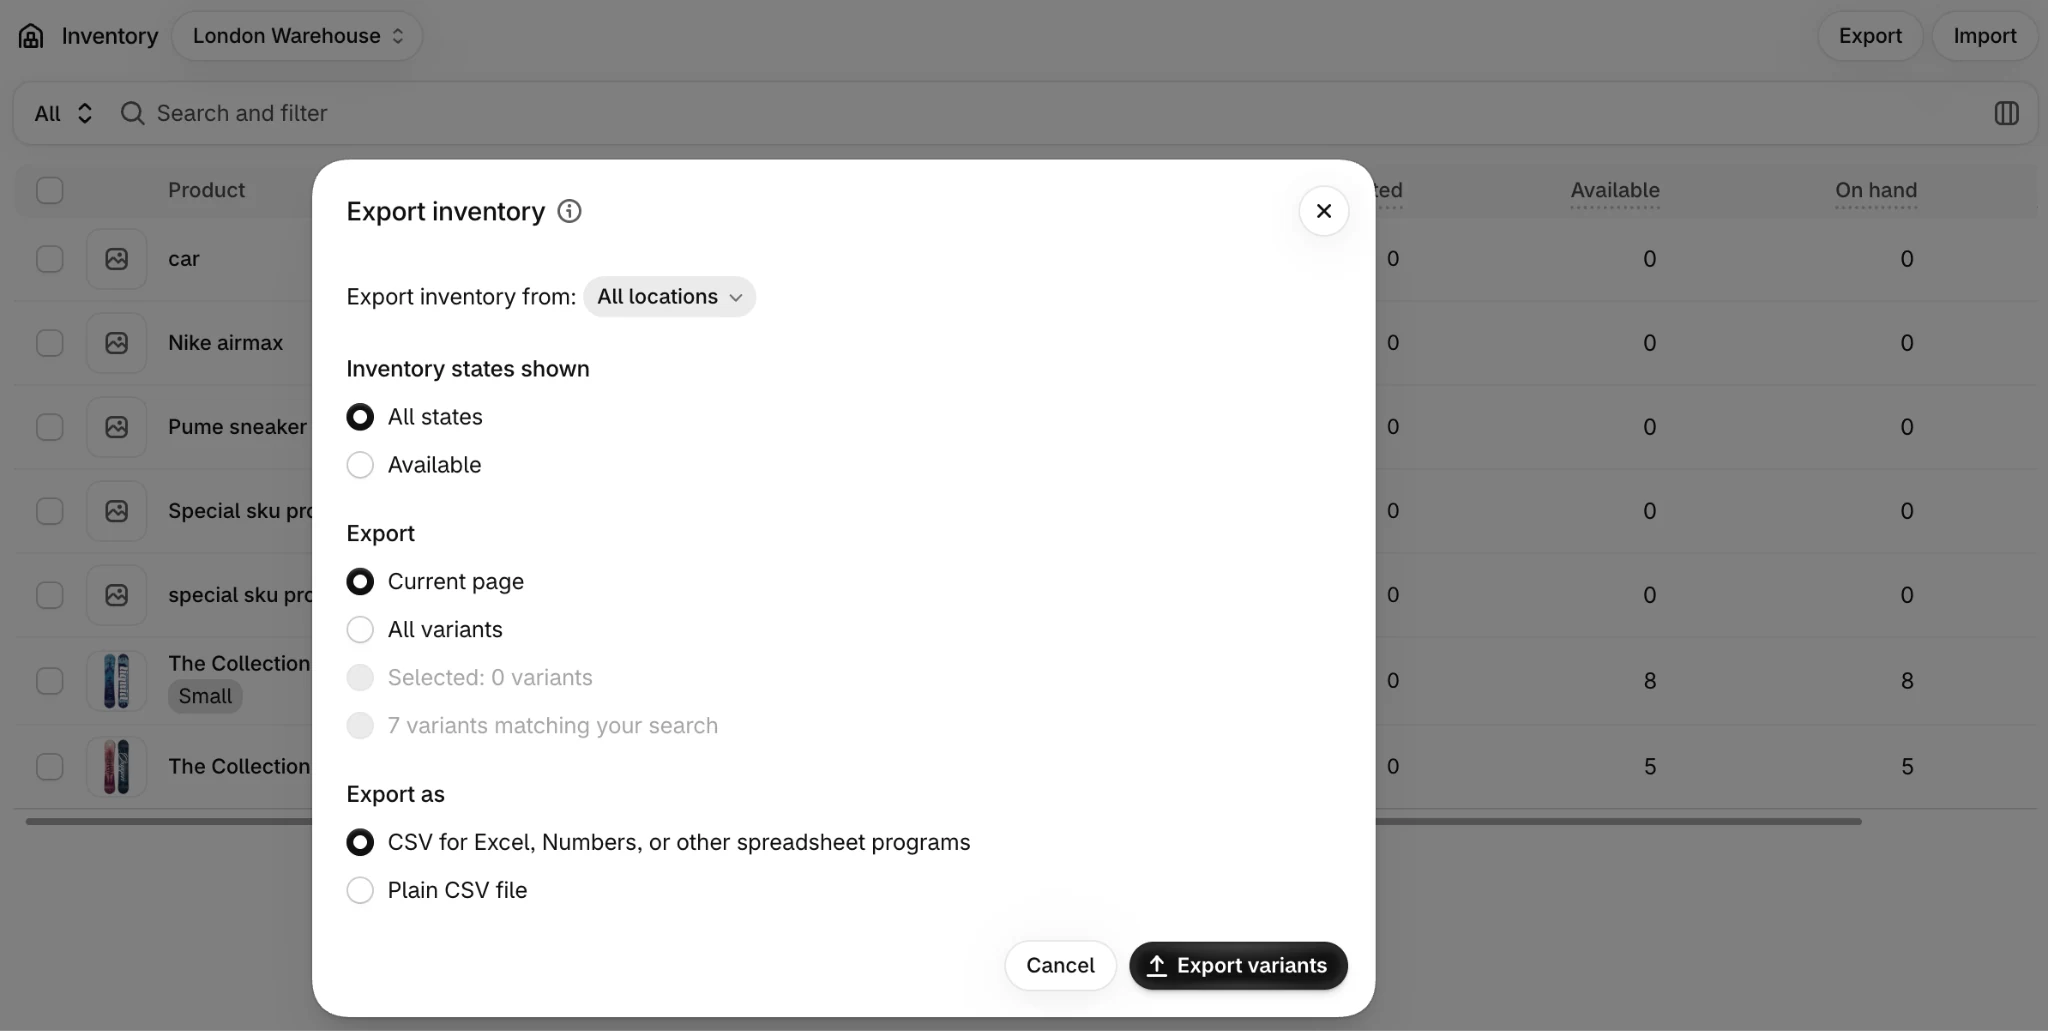
Step 2: Update Inventory Quantities
Open the exported CSV file in Excel or Google Sheets and find the products or variants you want to update.
If you exported the All states format, enter the revised quantities in the On hand (new) column. For the Available format, update the quantities under the corresponding location columns.
Once you’ve made the changes, save the file in CSV format.
Step 3: Import the Updated Inventory
- Return to Products > Inventory in Shopify
- Click Import > Add file and select your updated CSV
- Click Upload file
- Review the import summary and click Start import
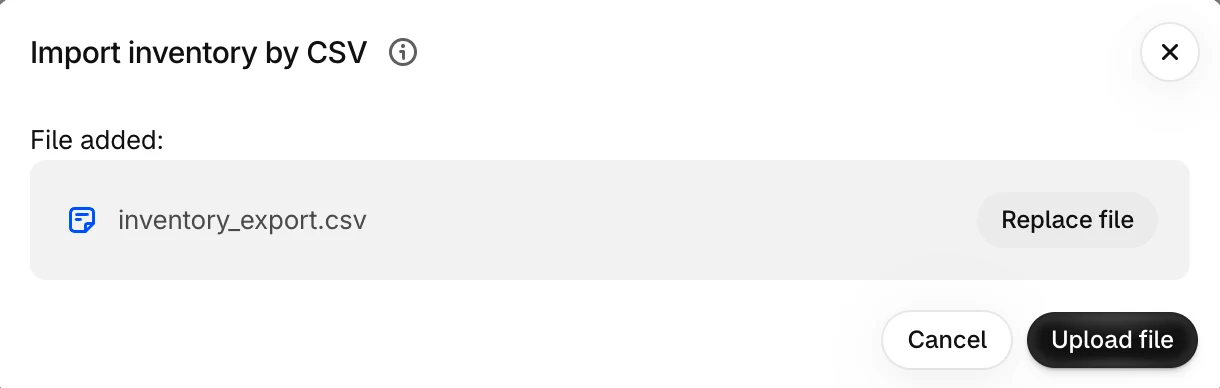
Shopify will process the file and update the inventory quantities for the selected products and locations.
Which CSV Format Should You Use?
Shopify supports two inventory CSV formats: All states and Available.
The All states format is recommended because it includes different inventory states and provides protection against accidental overwrites. For example, if stock quantities change after you export the file, Shopify can detect the difference and reject the affected updates rather than overwrite newer inventory data.
The Available format is simpler and lets you update sellable inventory quantities for each location, but it doesn’t offer the same protection.
For example, if you need to update inventory for 500 products after a warehouse stock count, you can export your inventory, enter the revised quantities, and import the file instead of updating every product individually.
Important: Keep a backup of your original CSV file and avoid changing product identifiers or location names. When using the All states format, leave the On hand (current) values unchanged to preserve Shopify’s inventory validation.
Check Inventory Adjustment History
If a product’s quantity suddenly changes, Shopify’s inventory adjustment history can help you investigate what happened.
Here’s how to check it:
- From your Shopify admin, go to Products
- Select the product whose inventory history you want to review
- If the product has multiple variants, select the specific variant
- In the Inventory section, make sure inventory tracking is enabled
- Click View adjustment history
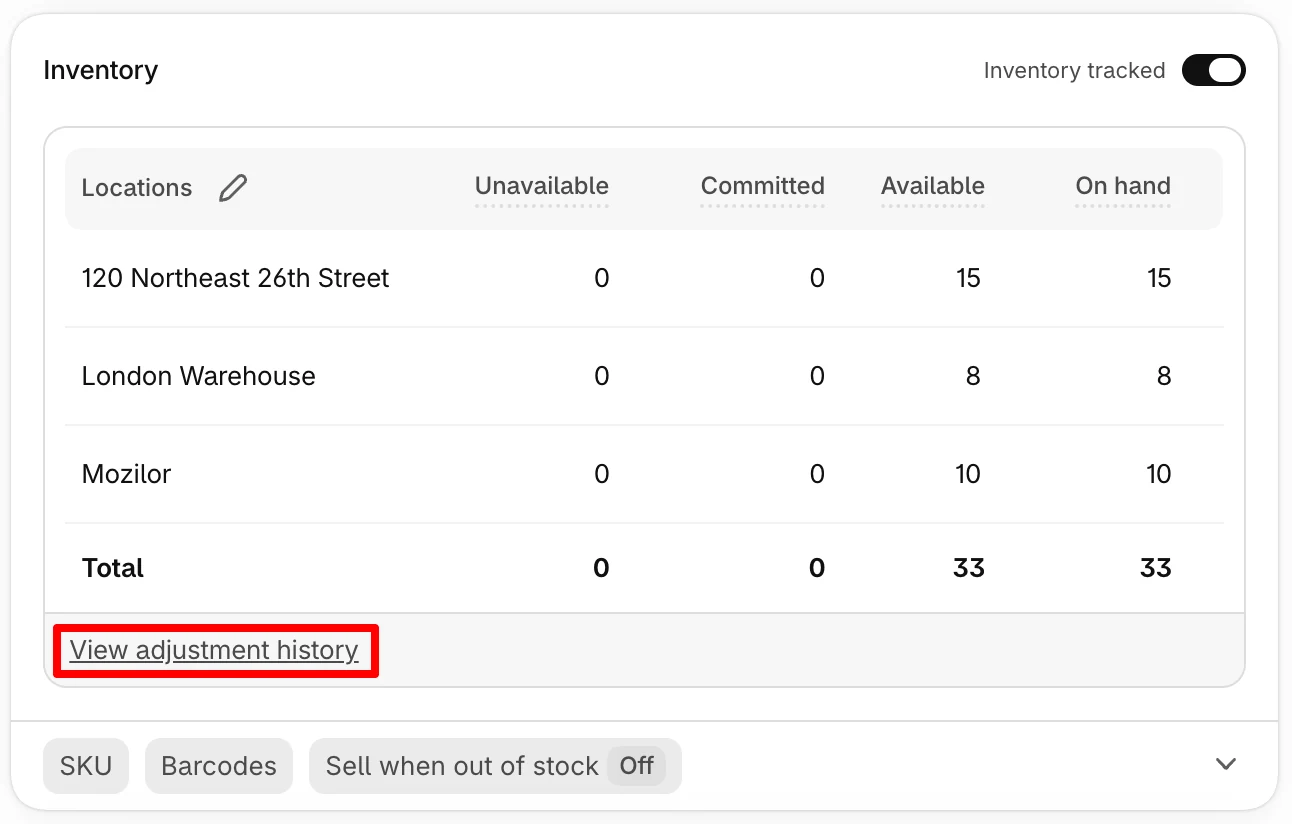
Shopify displays a record of inventory changes, including the date, adjustment activity, who or what made the change, and how the quantities were affected.
You can review the last 180 days of inventory adjustment history for a product or variant. For older records, use the Inventory adjustment changes report.
Regularly reviewing these records can help you identify incorrect manual updates, damaged or missing stock, and unexpected inventory changes, especially when multiple staff members or apps manage your inventory.
Many Shopify stores operate from more than one location.
You might have a main warehouse, a physical retail store, and a separate fulfillment center.
Shopify supports location-based inventory tracking, allowing you to maintain separate stock quantities for each location.
Set Up Multiple Inventory Locations
To add a location:
- Go to Settings > Locations in Shopify
- Click on the + location button in the top right corner
- Enter the location name and address
- Configure the relevant fulfillment settings
- Save the location
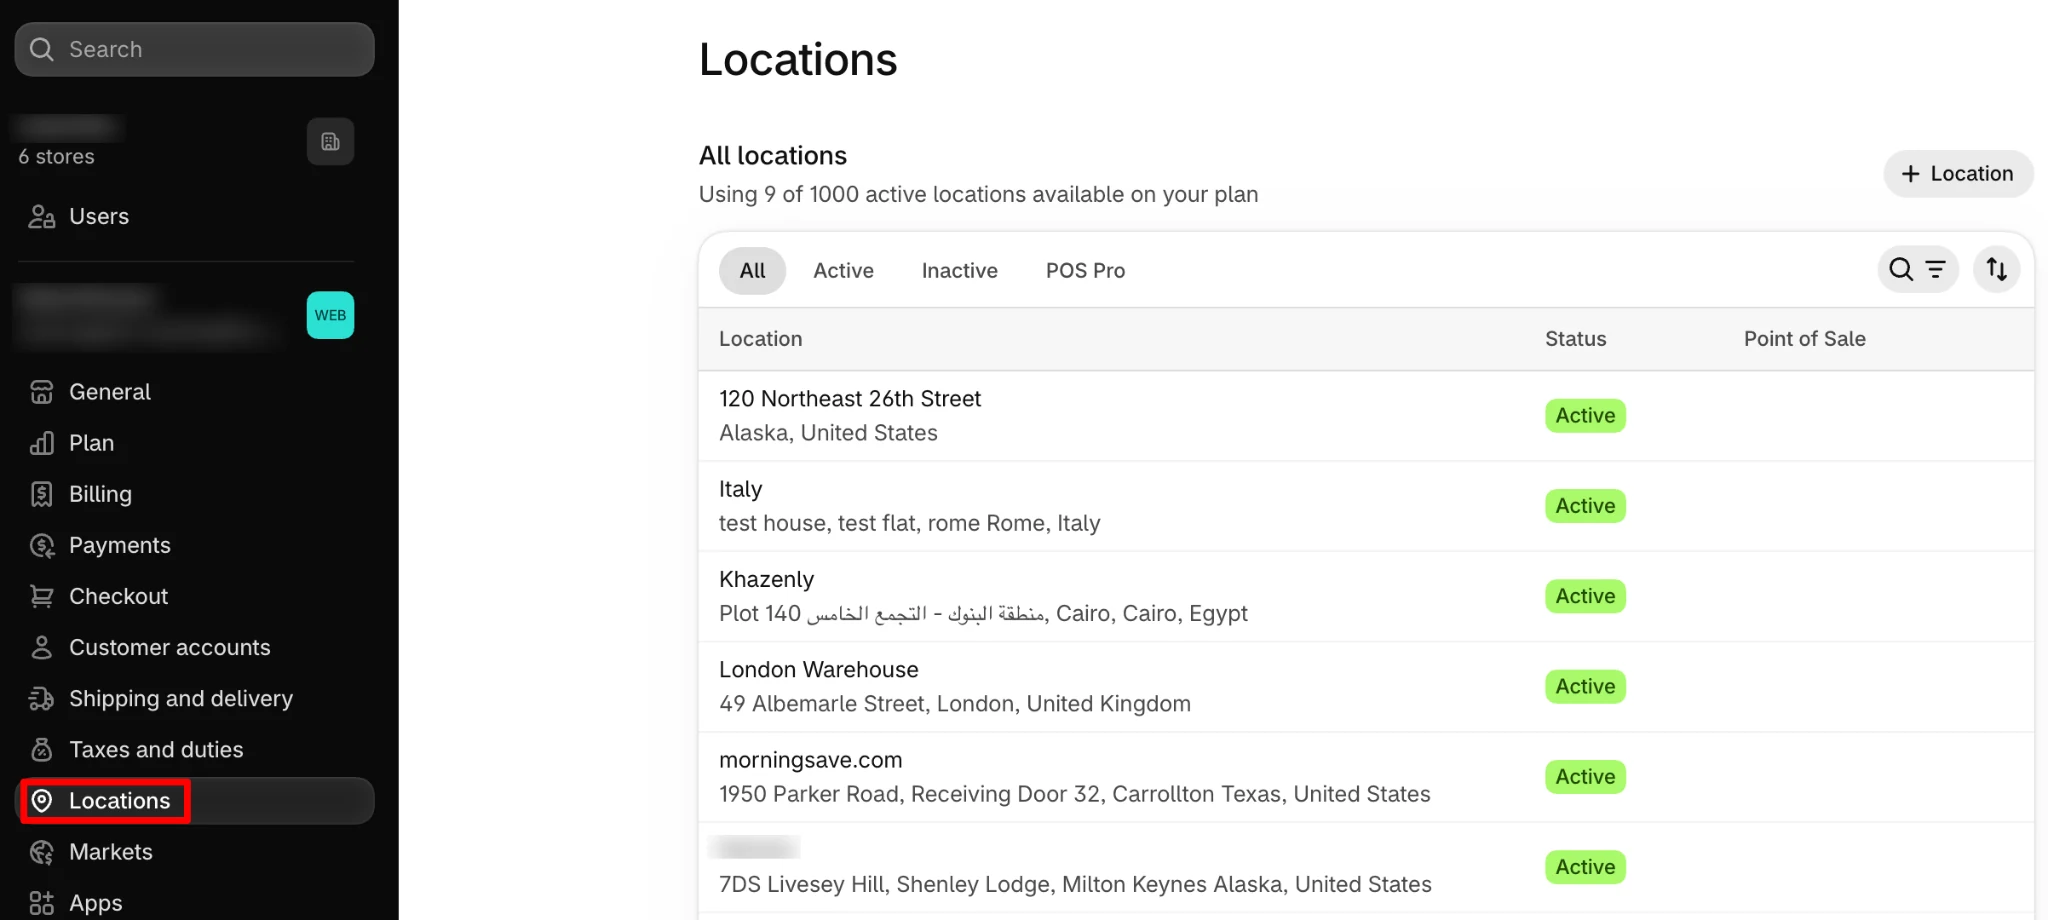
You can create locations for warehouses, retail stores, or other places where you store and fulfill products.
The number of locations you can use depends on your Shopify plan.
Assign Inventory to Different Locations
Once your locations are configured, you can assign inventory quantities to each one.
For example, suppose you have 100 units of a product distributed as follows:
- Main warehouse: 60 units
- Retail store: 25 units
- Fulfillment center: 15 units
Shopify tracks these quantities separately, so you can see where your inventory is located.
However, inventory being physically present at a location doesn’t automatically mean it’s available for online orders. The product and location must also be configured appropriately for fulfillment.
Transfer Inventory Between Locations
Shopify also supports inventory transfers between locations.
For example, suppose your retail store is running low on a popular product while your warehouse has plenty of stock. You can create a transfer to move 20 units from the warehouse to the retail store.
To do this, go to Products > Transfers, create a new transfer, select the source and destination locations, and add the products and quantities.
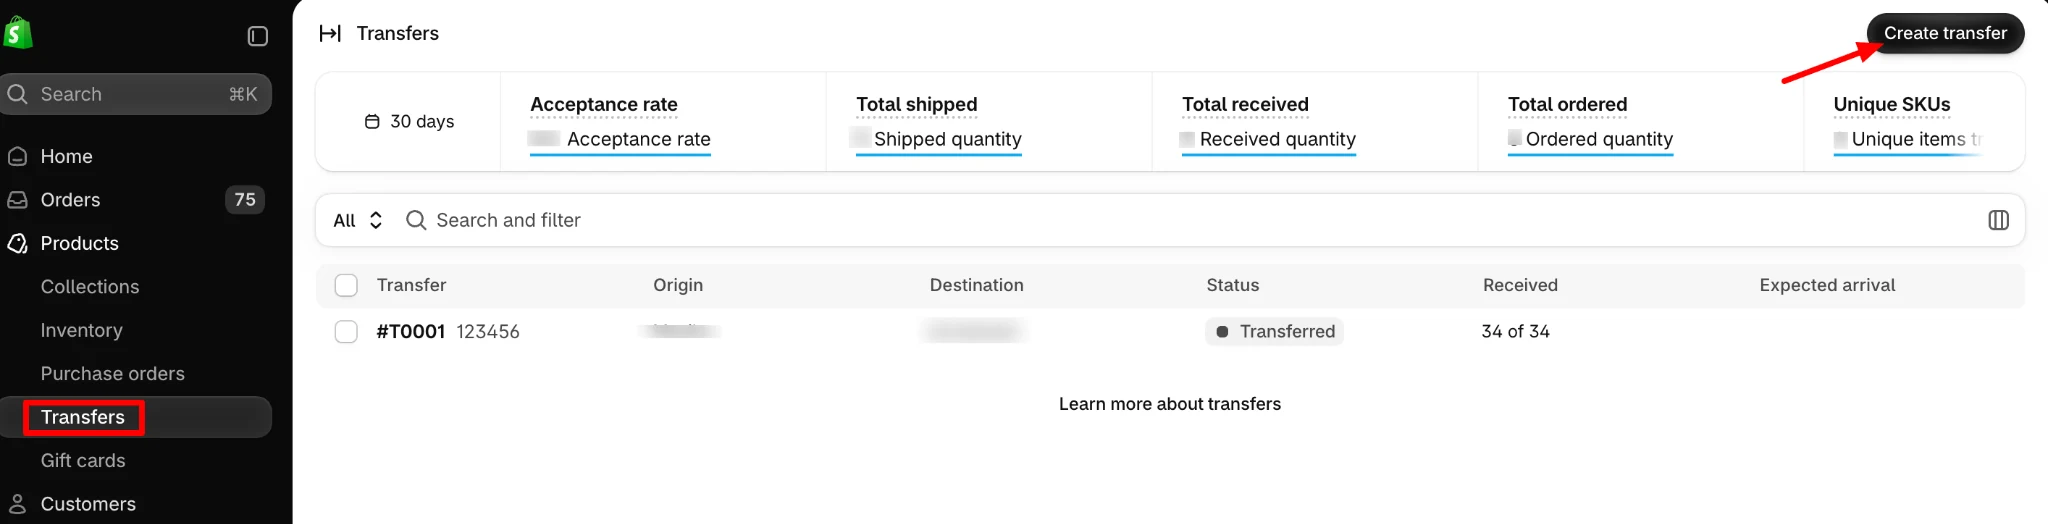
You can then process the transfer and record the items as received when they arrive.
This helps you track stock movements instead of simply subtracting quantities from one location and adding them to another.
Tracking inventory is only part of the process. You also need to make sure products are available when customers want to buy them.
An effective restocking process helps you avoid running out of popular products while limiting unnecessary inventory purchases.
Monitor Low-Stock Products
Start by identifying products that are running low.
You can review inventory quantities, use saved inventory views, and check sales reports to identify products that may need attention.
For example, a product with 15 units remaining might not seem urgent. But if you sell five units every day, that stock could run out in just three days.
For more automated monitoring, inventory management apps can provide configurable low-stock alerts and replenishment recommendations.
Create Purchase Orders and Receive Inventory
Shopify lets you create purchase orders to record products you’re ordering from suppliers.
Go to Products > Purchase orders and create a purchase order with the relevant supplier, products, quantities, and costs.
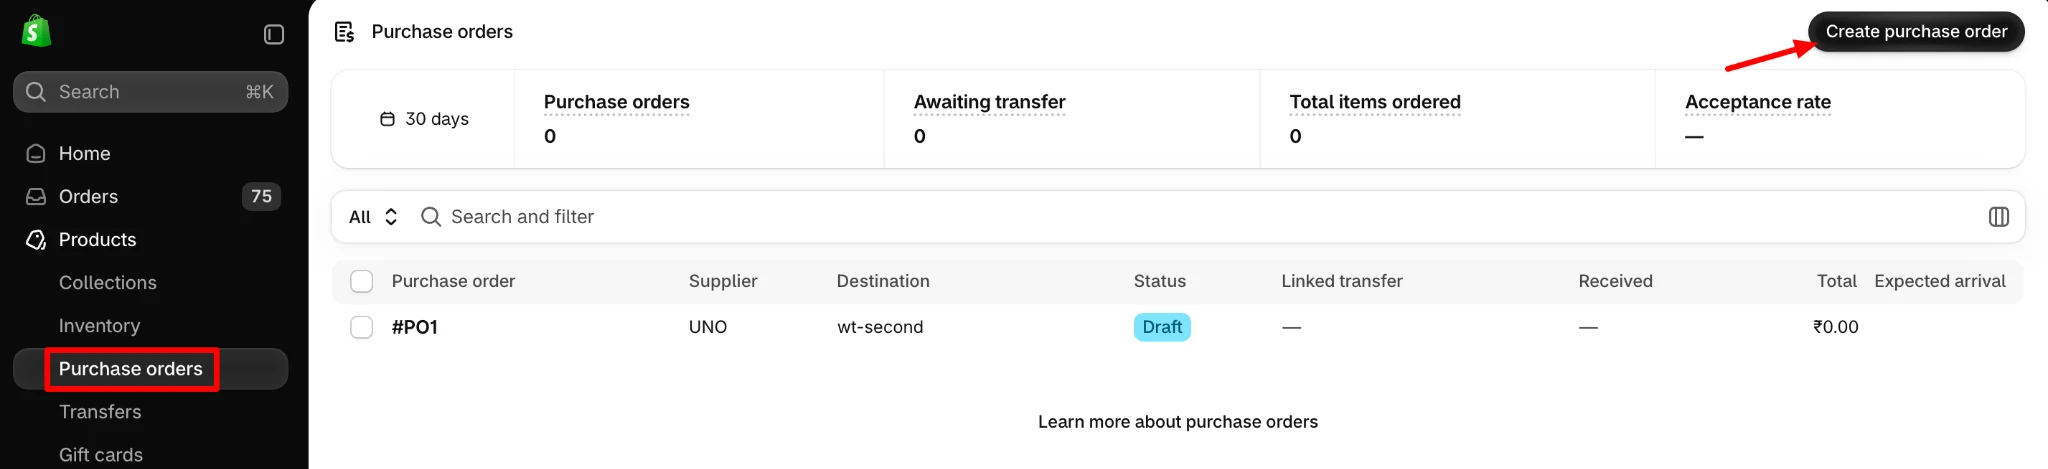
Once the supplier confirms the order, you can mark it as ordered. You can then create a linked inventory transfer to track the shipment and receive the products when they arrive.
Receiving happens through the linked transfer, where you can record accepted or rejected quantities. This helps you keep supplier orders and actual inventory movements organized.
Set a Reorder Point
A reorder point tells you when it’s time to order more stock.
A simple formula is:
Reorder point = (Average daily sales × Supplier lead time) + Safety stock
Suppose you sell five units of a product every day, your supplier takes seven days to deliver, and you want to maintain ten units of safety stock.
Your reorder point would be: (5 × 7) + 10 = 45 units
This means you should consider placing a new order when your inventory reaches 45 units. For products with unpredictable demand or supplier delays, you may need a larger safety stock buffer.
The reorder point is something you calculate using your sales and supplier data. For automatic reorder recommendations, you may need an inventory planning app.
Shopify provides inventory reports that help you understand how products are selling and how efficiently you’re managing stock.
You can access available reports through Analytics > Reports in your Shopify admin. Report availability depends on your plan.
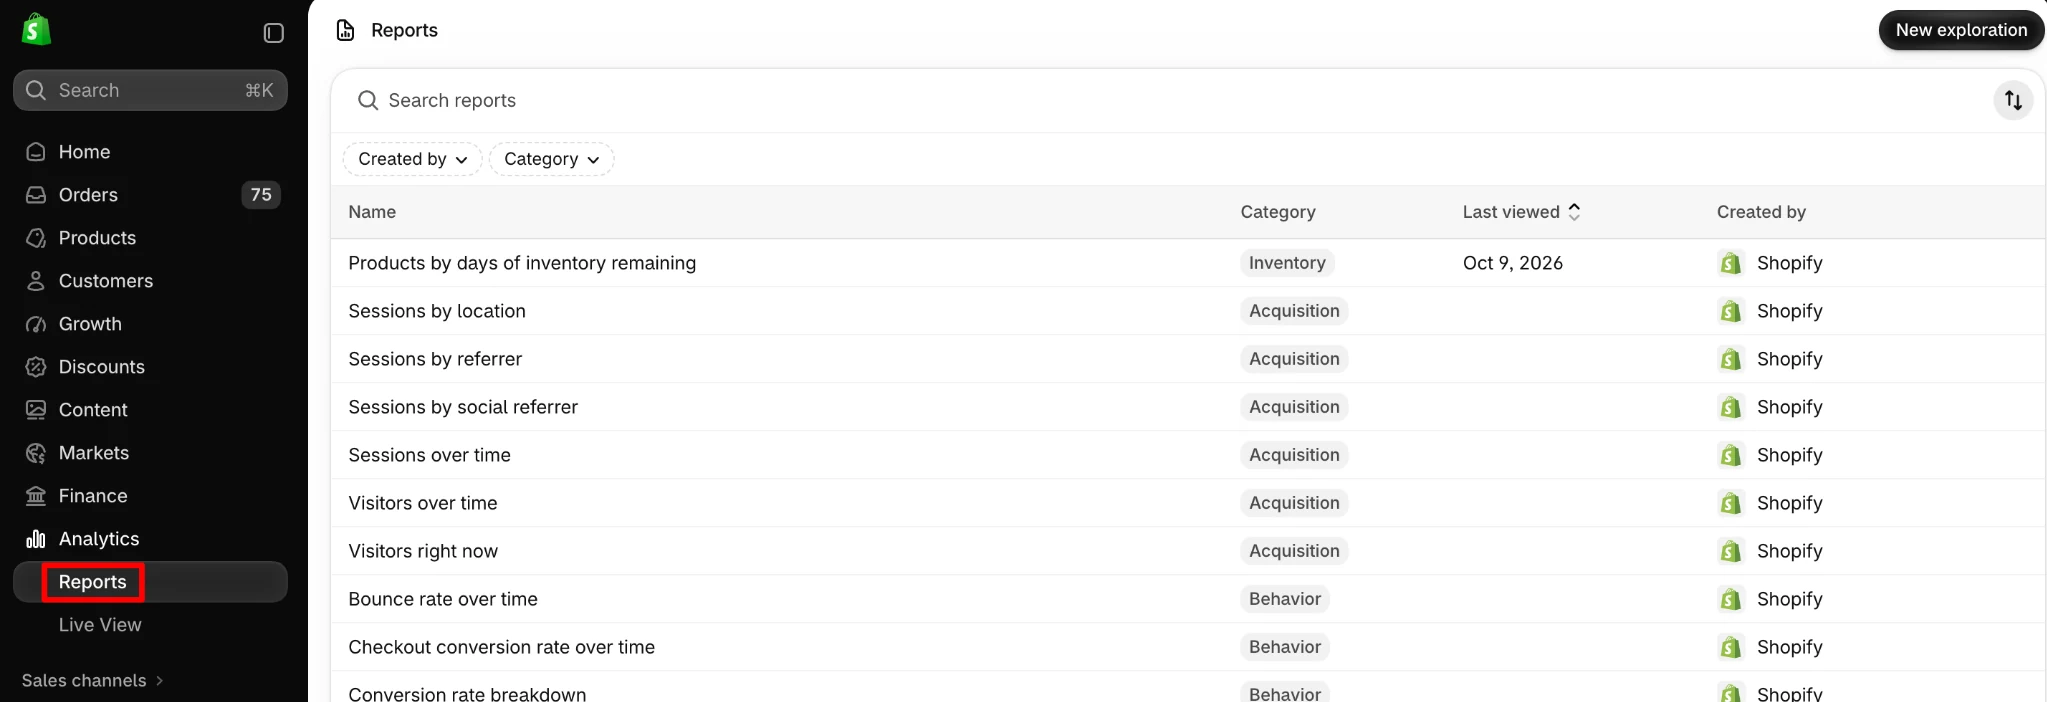
Some useful inventory reports include:
- Inventory sold daily by product: Shows how many units of each product variant sell per day on average. This can help you estimate future demand.
- Sell-through rate: Shows the percentage of inventory sold during a selected period. A low sell-through rate may indicate that a product is moving slowly.
- ABC product analysis: Groups products based on their contribution to revenue. A-grade products contribute the largest share, while C-grade products contribute the smallest.
- Inventory value: Helps you understand how much money is tied up in your current stock, based on recorded product costs.
For example, suppose you purchased 200 units of a product but sold only 20 over the last month. This could be a sign that demand is lower than expected. Instead of immediately ordering more, you might want to review its pricing, promotion strategy, or future purchase quantities.
Regularly checking inventory reports helps you make purchasing decisions based on actual performance rather than guesswork.
Shopify’s built-in inventory tools cover most everyday needs, including stock tracking, bulk updates, inventory transfers, purchase orders, and reporting.
For stores with straightforward inventory requirements, these features may be enough. However, as your product catalog grows or you start selling across multiple channels, you may need additional tools.
Here are some situations where a Shopify inventory management app can help.
1. Advanced Inventory Forecasting
Shopify provides sales and inventory data, but advanced demand forecasting and automated replenishment may require dedicated apps.
Inventory planning apps can analyze historical sales, seasonal demand, and supplier lead times to help you predict stock requirements and decide when to reorder.
2. Multichannel Inventory Synchronization
If you sell the same products on Shopify, Amazon, and other marketplaces, keeping inventory quantities consistent can become challenging.
A multichannel inventory sync app can automatically update stock levels across connected platforms whenever an order is placed. Proper SKU mapping across sales channels also helps ensure that matching products are correctly identified and their inventory quantities stay consistent. This helps reduce overselling and eliminates the need to manually adjust inventory on each channel.
3. Complex Warehouse and Inventory Operations
Businesses managing multiple warehouses, manufacturing operations, or complex product bundles may need more advanced inventory capabilities.
For example, manufacturers might need to track raw materials and calculate available finished stock based on component quantities. These requirements often call for specialized warehouse management or ERP software.
4. Large-Scale Inventory Updates
Shopify supports bulk inventory updates through CSV files. However, stores that frequently manage large product catalogs may benefit from dedicated import/export apps.
Apps like StoreRobo Import Export can help simplify bulk product and inventory updates. They also support scheduled imports and exports, making it easier to manage recurring data updates without manually uploading files each time.
Which Inventory Management Solution Should You Choose?
| Your requirement | Recommended solution |
|---|---|
| Track stock and make manual adjustments | Shopify built-in inventory |
| Bulk update inventory quantities | Shopify inventory CSV |
| Manage stock across multiple locations | Shopify built-in inventory |
| Forecast demand and automate replenishment | Inventory planning app |
| Sync stock across Shopify and marketplaces | Multichannel inventory sync app |
| Manage complex warehouses or manufacturing | Inventory or ERP software |
| Automate recurring product data updates | Bulk import/export app like StoreRobo |
If you’re selling exclusively through Shopify with a manageable product catalog, the built-in inventory tools are a good starting point.
But if you’re managing thousands of products, selling across multiple platforms, or spending too much time on manual inventory updates, a dedicated app can help streamline your operations.
Yes. Shopify has a built-in inventory management system that lets you track stock levels, manage inventory across multiple locations, update quantities, transfer stock, and review inventory reports directly from your Shopify admin.
Shopify’s built-in inventory management tools are included in its paid plans at no additional cost. However, advanced features such as demand forecasting, automated replenishment, or multichannel inventory syncing may require third-party apps with additional subscription fees.
Yes. When inventory tracking is enabled, Shopify automatically accounts for units purchased through your store. This helps prevent the same available inventory from being sold repeatedly. Inventory is generally committed when an order is placed and updated as the order progresses through fulfillment.
Yes. Shopify supports inventory tracking across multiple locations, including warehouses, retail stores, and fulfillment centers. You can assign separate stock quantities to each location and create inventory transfers to move products between them. The number of supported locations depends on your Shopify plan.
Not necessarily. Shopify’s built-in inventory tools are sufficient for many stores. However, you may benefit from an app if you need advanced demand forecasting, automated replenishment, inventory synchronization across marketplaces, or specialized warehouse management capabilities.
Conclusion
Good inventory management helps you keep products available, avoid unnecessary stock purchases, and fulfill customer orders without surprises.
Shopify provides most of the essential tools to get started, from inventory tracking and bulk updates to location management and restocking.
Start by making sure your stock quantities are accurate, use consistent SKUs, review inventory regularly, and plan reorders based on actual sales. As your store grows, you can introduce additional inventory management apps to automate more complex tasks and keep stock synchronized across multiple sales channels.


Subcribe to our newsletter