Share:


Table of Contents
Importing WordPress users from a CSV file is a crucial process for efficiently managing user data, especially during migrations or bulk updates. Utilizing dedicated plugins streamlines this task, allowing site administrators to avoid the tedious manual entry of user profiles and ensure data accuracy.
- Bulk importing users saves significant time compared to manual entry, especially for large datasets.
- The WebToffee WordPress User Import plugin is a popular choice for its ease of use and robust features.
- A properly formatted CSV file is essential, typically including fields like username, email, first name, last name, user role, and password.
- Common issues during import can include duplicate records, invalid email formats, and missing fields, which can be resolved through careful preparation and plugin settings.
- The plugin offers both quick and advanced import methods, catering to different user needs and scenarios.
- Additional features in premium versions may include custom field support, scheduled imports, and enhanced error handling.
WordPress doesn’t have a built-in option for importing users in bulk from a CSV file. The easiest way to do it is with a user import plugin.
The process is straightforward: prepare your CSV → install a user importer → upload the file → map the CSV columns to WordPress user fields → configure how existing users and passwords should be handled → run the import → verify the results.
This is especially useful when you need to add dozens, hundreds, or even thousands of users without creating each account manually.
In this guide, we’ll show you how to import WordPress users from a CSV file using the free WordPress User Import Export plugin by WebToffee. We’ll also cover CSV preparation, field mapping, existing users, passwords, import verification, and common troubleshooting steps.
What You Need Before Importing WordPress Users
Before starting the import, take a few minutes to prepare your site and source data. This can help prevent failed imports, duplicate accounts, and incorrect user information.
Back Up Your WordPress Site
Take a database or full-site backup before importing users, especially if you plan to update existing accounts.
A user import can change roles, profile information, passwords, and other account data. A backup gives you a way to restore the site if something is imported incorrectly.
Prepare Your User Data
Make sure your user data is saved as a CSV file. The free WebToffee plugin supports CSV imports.
If your data is currently in Excel or Google Sheets, export or download it as CSV before starting.
Save the file using UTF-8 encoding so names and other text containing special characters are imported correctly.
Review User Data
Before uploading the CSV, quickly check for:
- duplicate usernames or email addresses;
- missing or invalid email addresses;
- incorrect user roles;
- unnecessary or outdated user records.
If some users already exist on the destination site, you can choose whether to skip or update them during the import. We’ll cover this later in the guide.
Decide How Passwords Should Be Handled
If you’re creating new users, you can include passwords in the CSV if needed.
If you’re migrating users from another WordPress site, you may want to preserve their existing password hashes so they can continue logging in with the same credentials.
Password handling varies depending on the type of migration, so we’ll look at this in more detail later.
What Should a WordPress User CSV File Include?
Before importing users, make sure your CSV contains the information WordPress needs to create or update each account correctly.
A basic WordPress user CSV can include fields such as:
| CSV Field | Requirement | What It Does |
|---|---|---|
| user_email | Required | Sets the user’s email address. Use a valid, unique email address for each user. |
| user_login | Recommended | Sets the WordPress username. Usernames should be unique. |
| first_name | Optional | Adds the user’s first name. |
| last_name | Optional | Adds the user’s last name. |
| display_name | Optional | Controls the name displayed publicly on the site. |
| role | Optional | Assigns a WordPress role such as subscriber, customer, or editor. |
| user_pass | Optional | Sets a password for a new user or preserves a password during migration. |
| Custom user meta | Premium | Imports additional data such as phone numbers, membership IDs, billing details, or plugin-specific user fields. |
A simple CSV might look like this:
| user_login | user_email | first_name | last_name | role | user_pass |
|---|---|---|---|---|---|
| johnsmith | [email protected] | John | Smith | subscriber | password123 |
| maryjones | [email protected] | Mary | Jones | customer | password456 |
You don’t need to include every field. Only add the columns required for the accounts you’re creating or updating.
Pay particular attention to usernames, email addresses, roles, and passwords. Incorrect or duplicate values in these fields are among the most common reasons user imports fail or produce unexpected results.
Download a Sample WordPress User Import CSV
If you’re creating your import file from scratch, starting with a correctly structured template can make the process much easier.
Download Sample WordPress User Import CSV
You can open the template in Excel, Google Sheets, LibreOffice Calc, or another spreadsheet application, replace the sample data with your own user information, and save the file in CSV format before importing it.
Make sure the finished CSV is saved using UTF-8 encoding, especially if usernames or profile information contain accented characters or other special characters.
Now that the CSV is ready, let’s import the users.
The steps below use WebToffee’s free WordPress User Import Export plugin.
Prefer a video walkthrough? Watch the video below to see the user import process in action before following the detailed steps.
Step 1: Install & Activate WebToffee WordPress User Import Plugin
From your WordPress dashboard,
- Go to Plugins > Add New Plugin.
- Search for “WordPress User Import Export Plugin by WebToffee.”
- Once you have found the plugin, click ‘Install Now’ to install it, and then activate it on your WordPress dashboard.

Step 2: Select User/Customer as the Post Type
- Go to the WebToffee Import Export (Basic) and select Import.
- Choose User/Customer as the post type to import.

Step 3: Upload User CSV
Next, upload the CSV file containing your user data. The plugin provides different ways to run the import.
If the CSV was previously exported using the same WebToffee plugin and its column names have not been changed, Quick Import is the fastest option because the plugin already recognizes the expected fields.
If you’re importing a CSV created manually or exported from another system, use the Advanced import workflow so that you can review and map the CSV columns before importing.

Step 4: Map CSV Columns to WordPress User Fields
If you’re using the advanced import workflow, you’ll next see the column mapping screen.
Here, match each column in your CSV with the corresponding WordPress user field. For example:
| CSV Column | WordPress Field |
|---|---|
| user_email | |
| Username | user_login |
| First Name | first_name |
| Last Name | last_name |
| User Role | role |
| Password | user_pass |
When the CSV column headers match the fields expected by the plugin, some fields can be mapped automatically. However, if your CSV uses custom names such as Email Address, Customer Email, or Login Name, review the mapping manually.
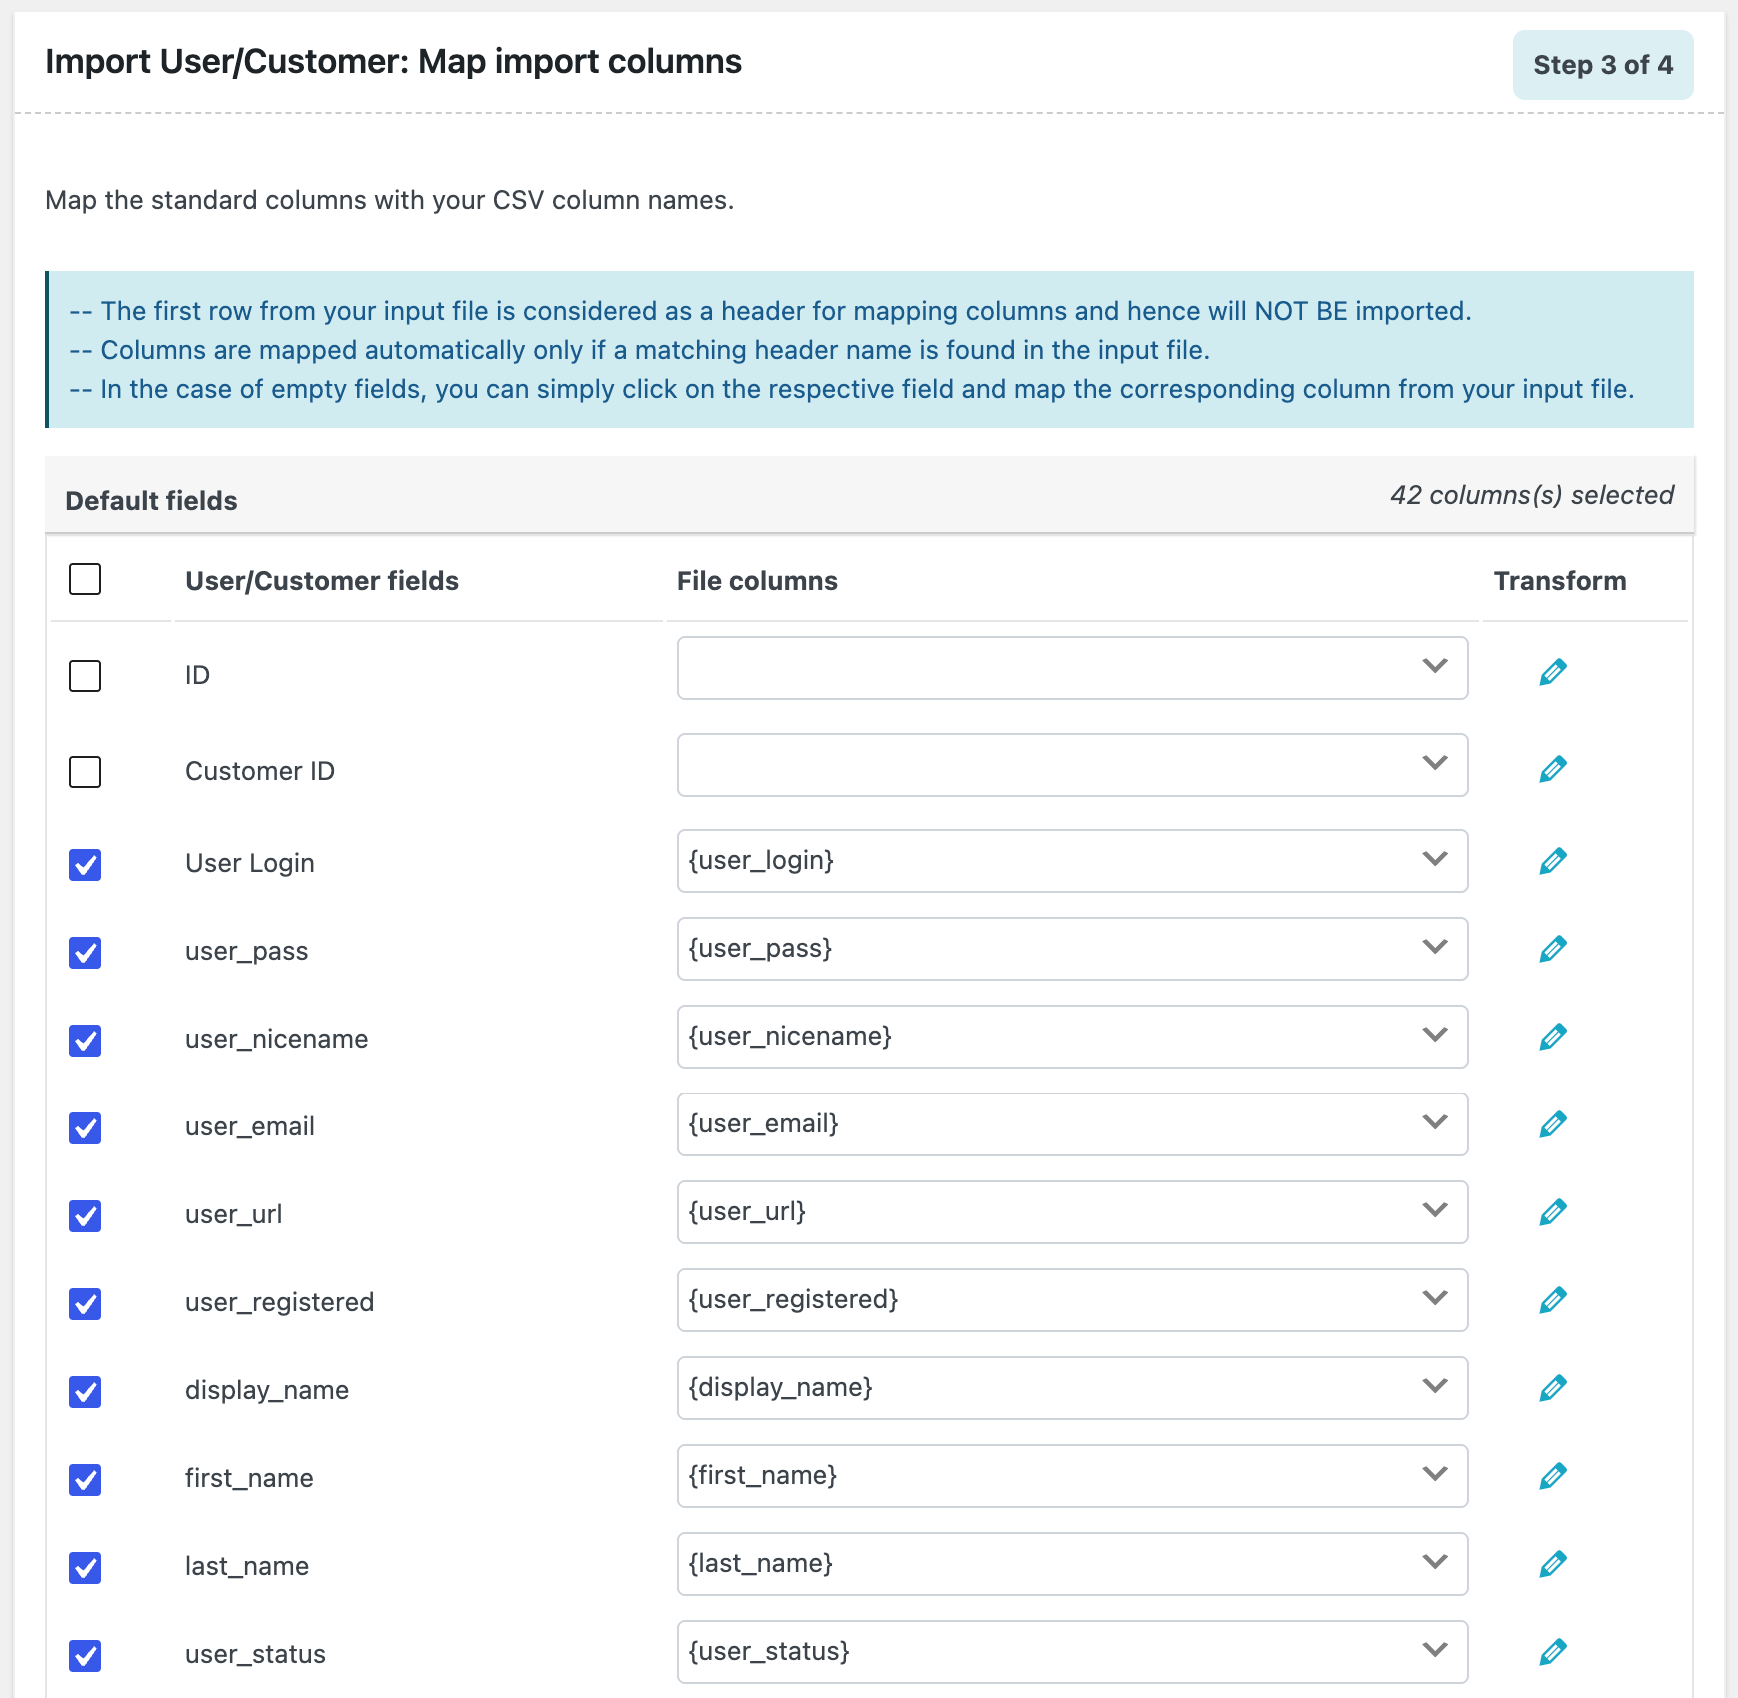
This is one of the most important steps in the import. Any column that isn’t mapped correctly may be skipped or imported into the wrong field.
Step 5: Configure Advanced Settings & Run the Import
Your CSV may contain users who already exist on the destination WordPress site. In the advanced import options, you can choose how the plugin should handle those records.
You can:
- Skip existing users to leave their current information unchanged.
- Update existing users with the values provided in the CSV.
Use Update when you’re intentionally changing existing user information, such as roles, names, or contact details. Use Skip when you only want to create new users without modifying existing accounts.
You’ll also see the Skip Guest User option. Enable this if you want to prevent guest customers in the import file from being created as registered WordPress users.
Next, configure batch import settings The plugin can process user records in batches rather than trying to import the entire CSV at once. This is especially useful for larger CSV files because server memory limits and execution time can affect long-running imports.
The default batch size can be adjusted in the advanced import settings. If a large import repeatedly times out, reducing the number of records processed in each batch may help.
Once you’ve reviewed the CSV, mapping, existing-user behavior, and batch settings, click Import.

The plugin will process the CSV and create or update the WordPress users.
After the import finishes, you’ll see the number of successful and failed records. Don’t stop at the success message, though. The next step is just as important.

Step 6: Review Import Log and Verify Users
Open the import history or log and check whether any records were skipped or failed.
Then go to: Users > All Users
Check a sample of the newly imported accounts and verify:
- usernames and email addresses;
- first and last names;
- assigned user roles;
- other profile information;
- existing-user updates, if applicable.
If passwords were imported as part of a migration, test one or two non-administrator accounts to confirm that the users can log in with their existing credentials.
At this point, your WordPress user import is complete.
How to Handle Existing WordPress Users During a CSV Import
A CSV import isn’t limited to creating new users. You can also use it to update accounts that already exist on your WordPress site.
When running an advanced import, the WebToffee plugin lets you decide whether existing users should be skipped or updated.

Handling Existing Users and User Data During Import
When importing WordPress users, the plugin uses usernames and email addresses to identify accounts. This allows it to distinguish between new users and records that already exist on the site.
If an imported row matches an existing account, you can choose whether to leave that account unchanged or update it with information from the CSV. This is useful when migrating users from another system or running repeated imports.
Managing Username and Email Conflicts
WordPress usernames must be unique, so the site cannot create another account with a username that is already registered. Email addresses can also cause conflicts when they are already associated with an existing user.
Before importing, review your CSV for duplicate usernames and email addresses. During the advanced import, choose how the plugin should handle matching records:
- Skip existing users and leave their accounts unchanged; or
- Update existing users with information from the CSV.
Updating Existing Users From CSV
Select Update if you want the import to modify existing accounts. You can use this option to update:
- names;
- roles;
- contact information;
- supported profile fields;
- custom metadata with the premium plugin.
This is particularly useful when updating hundreds or thousands of users at once.
Your field mapping determines which CSV columns are included in the update. For a targeted change, such as updating user roles, include the identifying information required to match each user along with only the fields you want to modify.
Review the mapping and source file carefully before running a bulk update.
Assigning User Roles
The value in the role column should match a valid WordPress role slug on the destination website.
Common examples include:
- subscriber
- contributor
- author
- editor
- administrator
- customer
Plugins can also create additional roles. If your CSV references a role that does not exist on the destination site, it may not be assigned as expected. Check that any plugin-generated roles are available before starting the import.
Importing Custom User Fields From CSV
The available custom-field options depend on the type of user data you are importing.
The free WordPress User Import Export plugin supports standard WordPress user fields. For more complex accounts containing custom metadata, use the premium WordPress Users & WooCommerce Customers Import Export plugin.
Custom user data can include:
- membership IDs;
- phone numbers;
- company information;
- WooCommerce billing and shipping details;
- customer metadata;
- BuddyPress profile fields;
- Ultimate Member fields;
- membership plugin data;
- other custom or hidden user metadata.
This is particularly important when migrating a WooCommerce store, membership website, community site, LMS, or another WordPress setup where accounts contain more information than a username and email address.
When importing custom fields, map each CSV column to the corresponding user metadata field on the destination website.
Importing Large WordPress User Lists
CSV imports can handle anything from a handful of users to datasets containing thousands of accounts. For larger imports, however, your WordPress hosting environment becomes more important.
Server limits such as PHP memory and maximum execution time can interrupt an import if too many records are processed in a single request.
The WebToffee plugin can process imports in batches, so the entire CSV does not need to be handled at once.
If a large import repeatedly times out:
- reduce the number of users processed in each batch;
- check your PHP memory and execution-time limits;
- split very large CSV files into smaller files if necessary;
- run the import during periods of lower site activity;
- review the import logs after each run.
When migrating a large number of users, test the process with a small sample first. This lets you confirm field mappings, user roles, passwords, and existing-user behavior before making changes to thousands of accounts.
Can WordPress Import Users From CSV Without a Plugin?
WordPress does not include a built-in tool for bulk-importing users from a CSV file.
Technically, developers can create a custom importer using WordPress APIs and functions for creating and updating users. However, that requires custom development and additional logic for handling CSV parsing, field mapping, duplicate users, roles, passwords, validation, and errors.
For most WordPress site owners, using a dedicated user import plugin is the simpler option.
A plugin provides a guided workflow where you can upload the CSV, map the columns, configure existing-user behavior, run the import, and review errors without writing custom code.
How Are WordPress User Passwords Handled During Import?
Password handling depends on where your users are coming from. For a detailed guide on exporting and importing WordPress users while preserving their passwords, checkout this blog on importing WordPress users with passwords.
Importing New Users With Passwords
For new accounts, you can include passwords in the user_pass column of your CSV.
WordPress will store the passwords securely rather than keeping them as readable plain text in the database.
Migrating Existing WordPress Users
When users are exported from another WordPress website, their passwords may appear in the CSV as long hashed values.
These hashes can be retained during import so users can continue signing in with their original passwords on the destination site. This is especially useful when migrating membership websites, WooCommerce stores, learning platforms, or other sites where forcing every user to reset their password would create unnecessary friction.
Migrating Users From a Different Platform
Passwords from another CMS or platform can be more complicated because different systems may use different password-hashing methods.
Don’t assume that a password hash from another platform will automatically work in WordPress.
Depending on the source system and migration method, you may need to assign new passwords or ask users to reset their passwords after migration.
Can You Import Custom User Fields?
Standard WordPress user fields can be handled with the free plugin.
If your user accounts also contain custom metadata created by WooCommerce, membership plugins, community plugins, or other extensions, you’ll need the premium WordPress Users & WooCommerce Customers Import Export plugin.
The premium version supports custom and hidden user metadata, making it better suited to complex migrations where the user account contains more than WordPress’s standard profile fields.
For example, custom user information may come from plugins such as BuddyPress, Ultimate Member, WooCommerce Memberships, or other plugins that store additional information against user accounts.
Also Read: How to Import WooCommerce Customers from CSV
Even with a well-prepared CSV, imports can run into issues. Here are the most common problems and how to fix them.
Import Completes, but No Users Were Added
If a particular user is missing after the import, check whether:
- the username already exists;
- the email address is already registered;
- required information is missing;
- the row was skipped because of your existing-user settings.
Open the import log to see whether the record failed or was deliberately skipped.
If the user already exists and you intended to modify the account, run the import with the existing-user Update option enabled.
User Imported but Can’t Log In
Check whether the CSV included the user_pass field. For migrations between WordPress sites, make sure the original password hashes were preserved exactly during export and import.
Avoid modifying hashed password values in spreadsheets or other tools that could alter their contents.
If you’re migrating from another CMS, remember that its password hashes may not be compatible with WordPress.
User Was Assigned the Wrong Role
Check the value in the CSV’s role column.
Use valid WordPress role slugs such as: subscriber, editor, author, or customer.
If no role is provided, WordPress may assign the site’s default new-user role. Also check whether the role came from another plugin. The same plugin may need to be installed on the destination website before that role becomes available.
Some CSV Columns Were Not Imported
This is usually a field-mapping issue.
When using Advanced Import, review the mapping screen and make sure every CSV column is connected to the correct WordPress user field.
For example:
| CSV Column | WordPress Field |
|---|---|
| Email Address | user_email |
| Username | user_login |
| First Name | first_name |
| Last Name | last_name |
| User Role | role |
| Password | user_pass |
Custom column names such as Customer Email, Login Name, or Membership ID may need to be mapped manually.
Custom User Fields Are Missing
Standard WordPress fields are supported by the free plugin.
If your CSV contains custom or hidden metadata created by WooCommerce, membership plugins, BuddyPress, Ultimate Member, or similar extensions, use the premium version that supports custom user metadata.
Also confirm that the relevant plugins and custom fields exist on the destination website.
Import Stops Halfway Through
Large CSV files can sometimes run into server memory or execution-time limits.
Try:
- reducing the batch size;
- increasing PHP memory limits;
- increasing maximum execution time;
- splitting the CSV into smaller files.
After retrying, check the import history to determine which users were successfully processed and which records still need attention.
Imported Users Received Unexpected Emails
Depending on how the import is configured, you may not want thousands of newly imported users to receive account or password-related emails immediately.
Review the user notification setting before starting the import.
If you’re migrating an existing user base, it is often preferable to complete and verify the migration first before sending any necessary communication to users.
Passwords Were Reset After Import
The import was run without password preservation enabled, or plain-text passwords were hashed differently.
Ensure the user_pass column is present in your CSV with the correct password values. For migrations between WordPress sites, use the hashed password from the source site’s export — the WebToffee plugin preserves hashes correctly. See the FAQ below for more detail.
Yes. WordPress doesn’t include a built-in bulk CSV user importer, but you can use a user import plugin such as WebToffee’s WordPress User Import Export plugin to upload a CSV and create users in bulk.
Common fields include username, email address, first name, last name, display name, user role, and password. The exact fields you need depend on the user information you want to create or update.
Use CSV for virtually all import scenarios. It’s supported by the free version, works with every spreadsheet tool, and is the most predictable format for avoiding encoding or formatting issues. Excel (.xlsx) and XML are available in the premium version and are worth using if your source data is already in one of those formats and reformatting would be time-consuming.
Yes, but custom and hidden user metadata requires the premium version of the WebToffee WordPress Users & WooCommerce Customers Import Export plugin.
Yes. With the pro version, you can schedule automatic imports at regular intervals (daily, weekly, or monthly). This helps in keeping your site in sync with external systems without manual effort.
The plugin maintains detailed logs of every import. If something goes wrong, you can use these logs to identify affected users and re-import with corrected data. For large-scale rollbacks, it’s recommended to take a database backup before importing.
User roles can be mapped directly from your CSV. If no role is specified, the plugin assigns the default role set in your WordPress settings. You can also bulk-assign a specific role during import if needed.
There’s no hard limit imposed by the plugin. However, large imports depend on your server’s memory and timeout settings. To avoid failures, the plugin automatically splits imports into smaller batches for better performance.
By default, imported users are not sent notification emails. You can enable or disable this option during import. This helps avoid flooding users with unwanted emails unless you specifically want them to be notified.
Importing WordPress users from CSV is much faster than manually creating accounts, but a successful import depends on more than simply uploading a spreadsheet.
Start with a properly formatted CSV, map the fields carefully, decide how existing users and passwords should be handled, and review the import logs once the process finishes. Finally, verify a few imported accounts to make sure roles, profile information, and login credentials work as expected.
For straightforward CSV imports, the free WebToffee WordPress User Import Export plugin provides the tools needed to get users into WordPress in bulk. For more complex migrations involving custom metadata, multiple file formats, automated transfers, or email notifications, you can move to the premium version.
If you have any questions or feedback, please drop them in the comments below. We’re here to help and will be sure to address any queries or thoughts you have!


Subcribe to our newsletter