Implementing WooCommerce exit intent banner can be a powerful strategy to reduce cart abandonment and engage customers effectively in eCommerce. Learn how to set it up with the WooCommerce Display Discounts plugin.
Exit intent banners in eCommerce are almost always implemented with the goal of reducing cart abandonment. Such offers can entice your customers and encourage them to re-examine their decision to leave.
You can attach exciting coupon codes to these exit intent banners with the help of third-party tools. Let’s understand how to do this in WooCommerce with ease.
Why Should You Offer Exit Intent Banner?
Coupons are commonplace in the eCommerce industry in the present day and age. But what most stores lack is a proper channel to let their customers know of the coupon code. Banners are a good solution for this.
A better-suited way than just randomly offering coupons would be to present the coupon in such a way as to help your users make up their minds. How can you do that? You can make the coupon banners appear only when the user is trying to exit your store.
This would catch the eye of your customers. It would also pacify the customers leaving your store because of high net payable or shipment costs.
Moreover, this would only be shown to customers who intend to exit the store and not to all users in your store. So this would not impact your profits as much as offering coupons for all users.
Display Discount Banner With WooCommerce plugin
Since WooCommerce does not offer an option to create banners, let alone exit intent banners, you will have to rely on third-party tools to help you with this process.
The WebToffee plugin Display Discounts for WooCommerce would help you add WooCommerce exit intent discount banners to your store.
In addition to this, this plugin can be used to show coupons on the product pages. Some of the core features of this plugin include,
- Show WooCommerce coupons on product pages
- Add expiry timers to coupon templates
- Multiple coupon display templates
- Customize the coupon template color palette
- Show restriction info within the coupon
- Hide offers section from guest users
- Hide coupons without restrictions
- Adjust the discounts section location
How To Create A WooCommerce Exit Intent Banner?
Once you install and activate the WebToffee Display Discounts for WooCommerce plugin, you can start setting up this intent exit banner.
- Navigate to Display Discount Banner Settings
From your WordPress dashboard, navigate to Marketing > Display discounts. Click on the Add banner/widget tab.
- Configure The Coupon Display
Click on the Create new banner/widget button to start creating the banner.
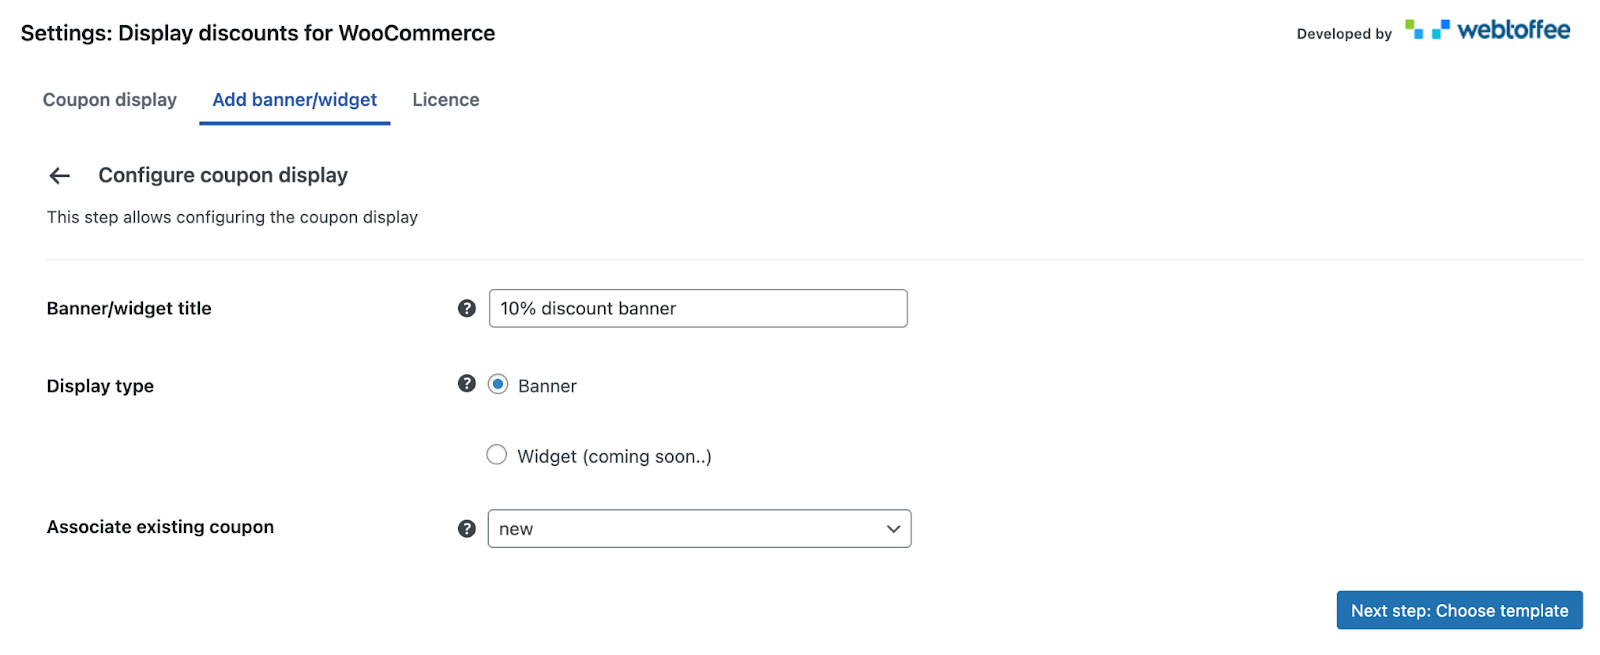
Provide the banner title and make sure the Discount type is selected as Banner.
Now choose the coupon that you want to display on the discount banner.
Once completed, navigate to the next step. - Choose The Banner Template
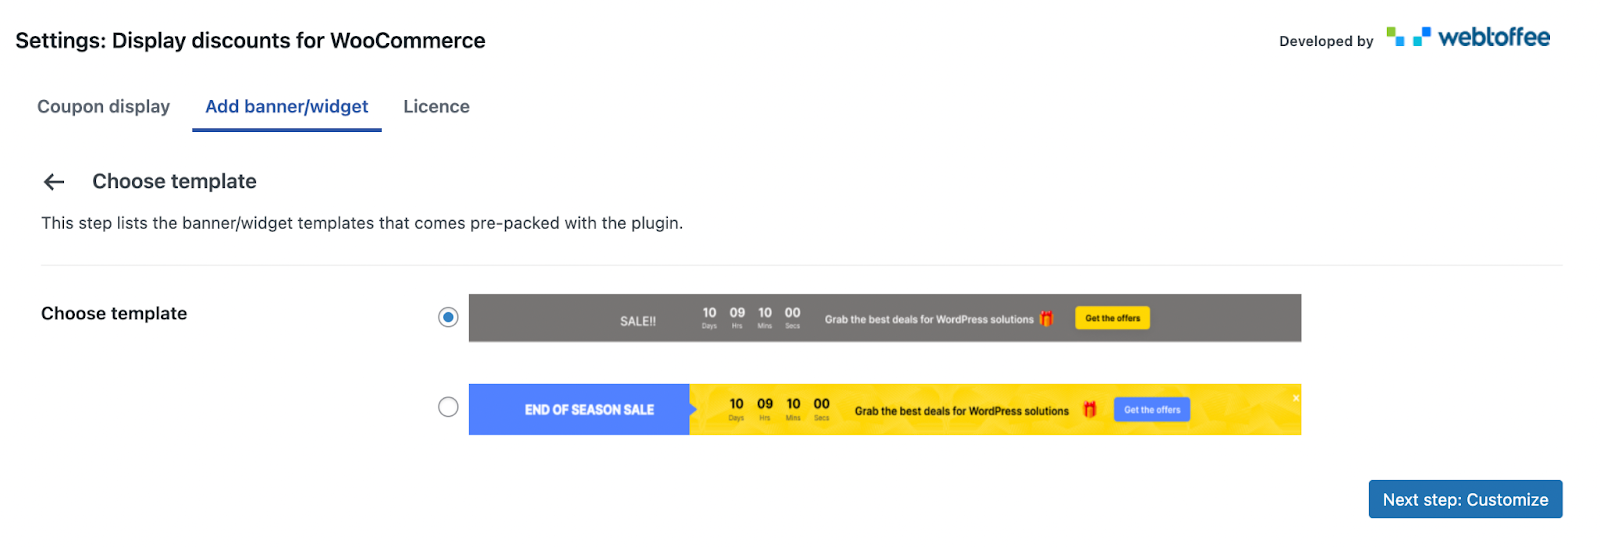
Select a template from the offered list. The banner will have this template, so choose one that suits your theme.
Navigate to the next step. - Customize The WooCommerce Exit Intent Banner
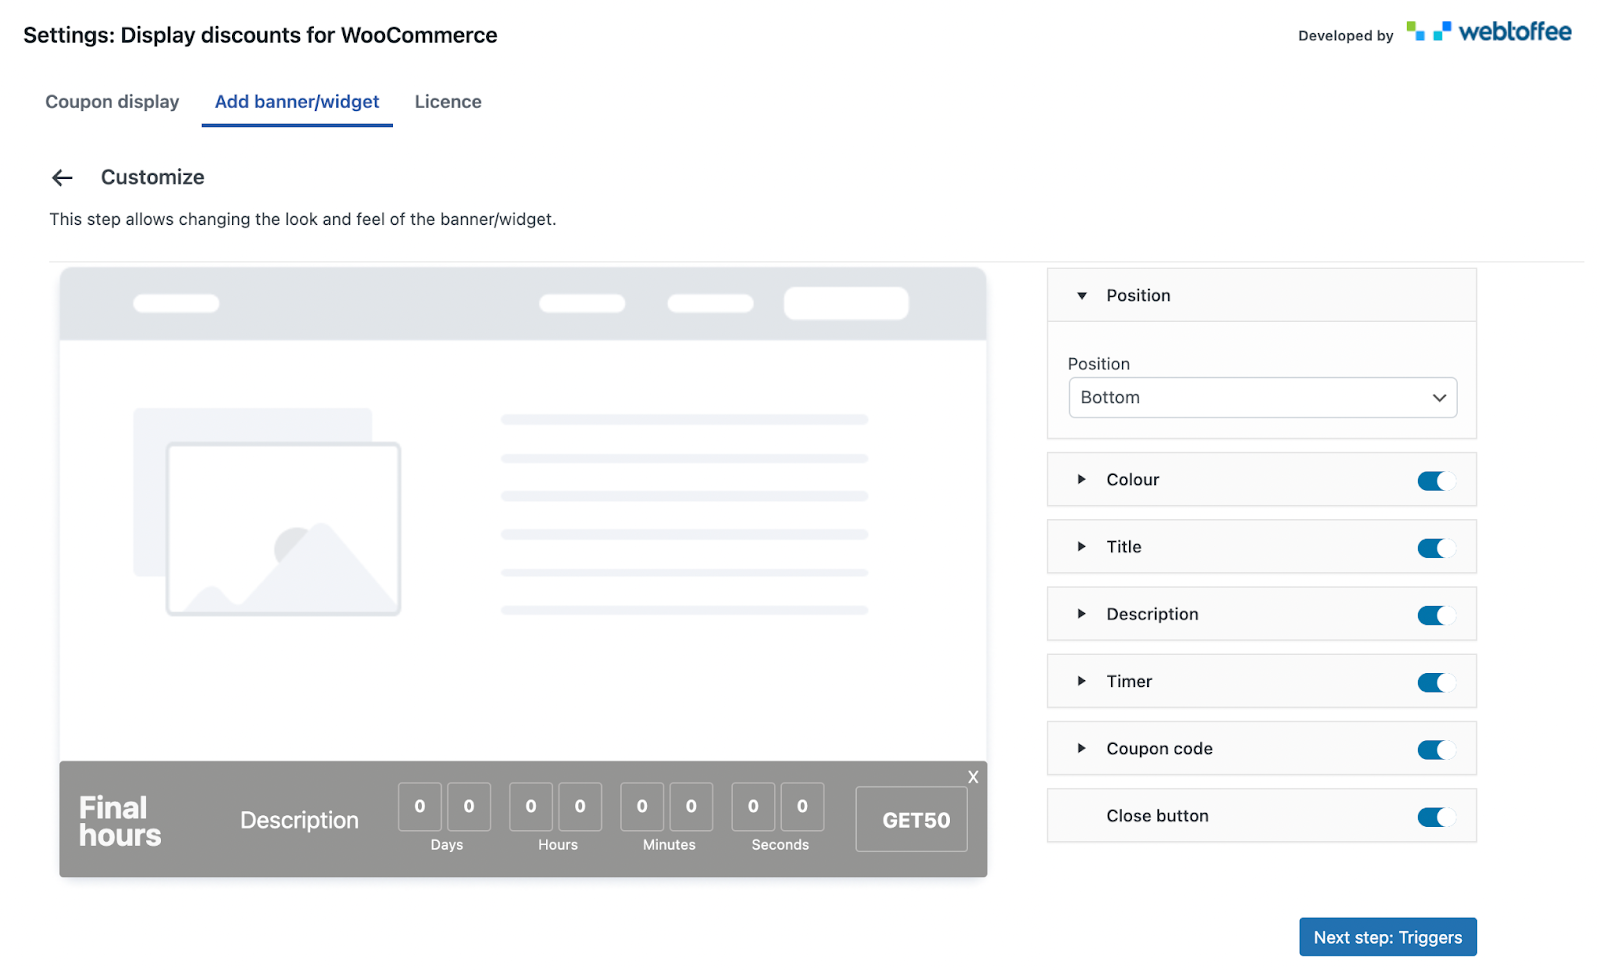
Use the available options to customize the look and content of your banner. The available options include customizing the position, color of the banner, title of the banner, and more.
Once done, proceed to the next step. - Set The Triggers
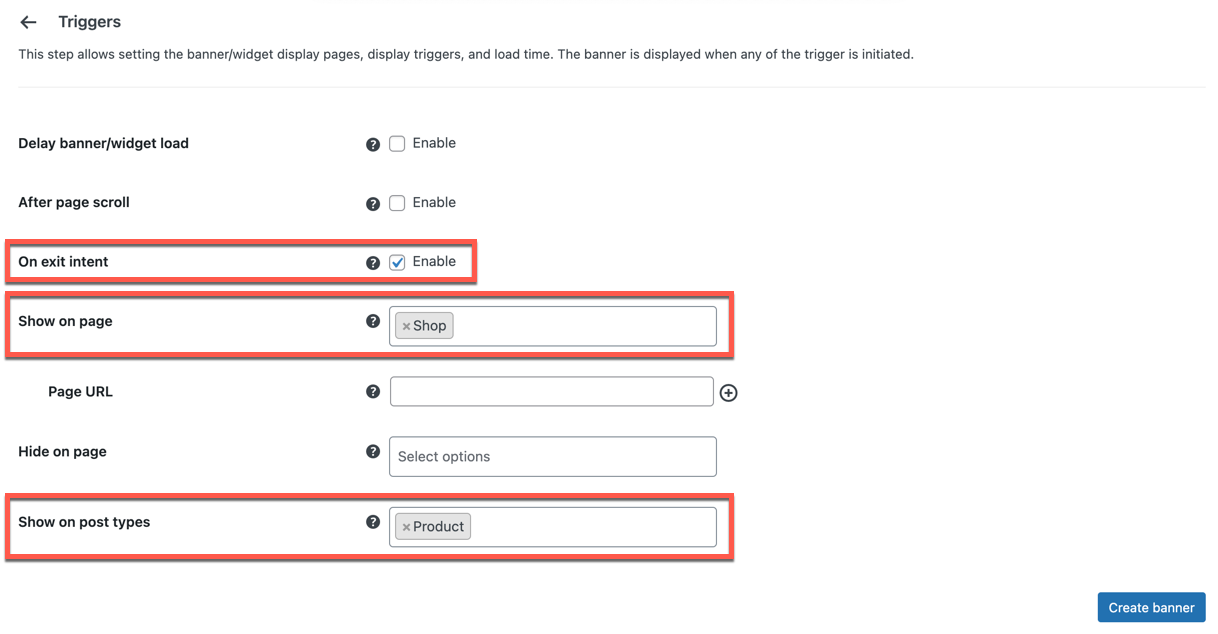
Check the box corresponding to On exit intent and choose the pages where you want the banner to appear. You may also add the URL of the page if the page you want is not available in the drop-down.
You may also define the pages where you do not want the banner to pop up. In addition to this, you can specify the type of pages where you want the banner. For example, if you want the banner to be displayed on the product pages, select Product under Show on post types.
Click on Create banner. - Activate the banner
When you create a banner, it will not get activated by default. So to activate it, toggle on the activate button on the landing page.
How Will The WooCommerce Exit Intent Banner Work?
When the user tries to exit from the shop or any of the product pages on your store, this banner will crop up at the bottom of the page with a custom text, coupon code, and coupon expiry timer.
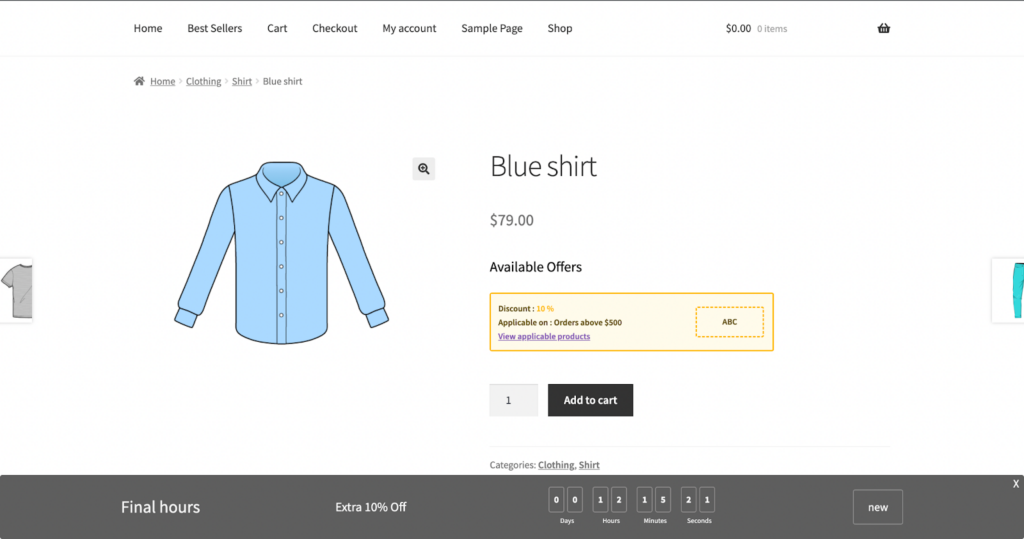
This coupon code can be used at the cart or checkout to receive the discount.
Use Case: Cart Abandonment
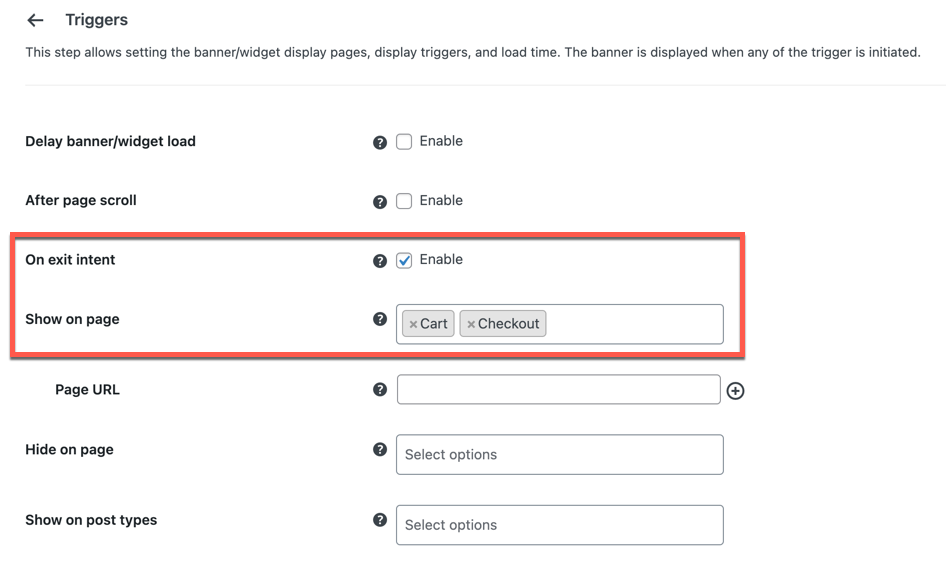
In addition to showcasing coupon banners on the product pages, you can also add them to the cart or checkout page. That way, you can specifically target users abandoning their cart.
To do this, select the trigger as exit intent and choose to show the banner on the cart and checkout pages. Follow the above steps to configure the rest.
Alternative: Cart Abandonment Coupons
Instead of adding a coupon banner at checkout, you may email customers custom coupons when they leave the store. The cart abandonment coupons can be set up with the Smart Coupons for WooCommerce plugin.
Rather than showing the coupon when the customer tries to leave, this plugin will let you define the cart abandonment interval. If the user does not return to the store within this specified interval, the plugin will automatically send a coupon code to the customer via email.
Learn how you can set up WooCommerce cart abandonment coupons.
Frequently Asked Questions (FAQs)
Exit intent banners are banners triggered when a customer tries to leave the store. These banners usually display discount coupons that would entice customers to stay and complete the purchase.
Yes, exit intent banners can be set on any page of your WooCommerce store, including cart and checkout, with the advanced WooCommerce exit intent banner plugin.
You can implement exit intent banners after creating and publishing the coupon. You only have to select which coupon you want to associate with the banner while setting it up.
Conclusion
Exit intent banners and cart abandonment coupons are valuable tools in your eCommerce arsenal.
By implementing these techniques with the help of WooCommerce plugins, you can optimize your store’s performance, enhance user experience, and ultimately increase conversions and revenue.
