Installation Guides
To get the installation and activation instructions, select the corresponding plugin name from the below list.

GDPR Cookie Consent Plugin (CCPA Ready)
Last updated on: July 19, 2023
Step 1:
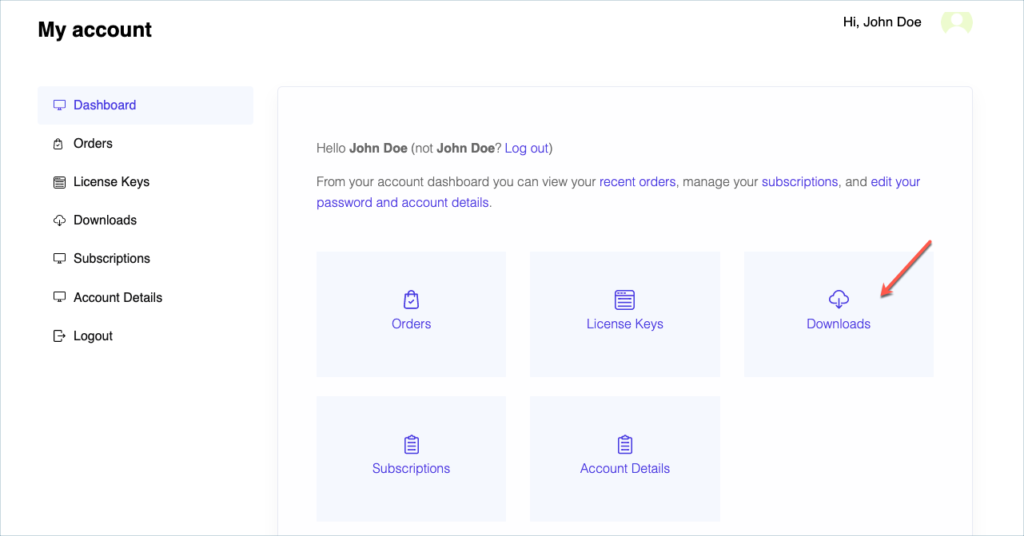
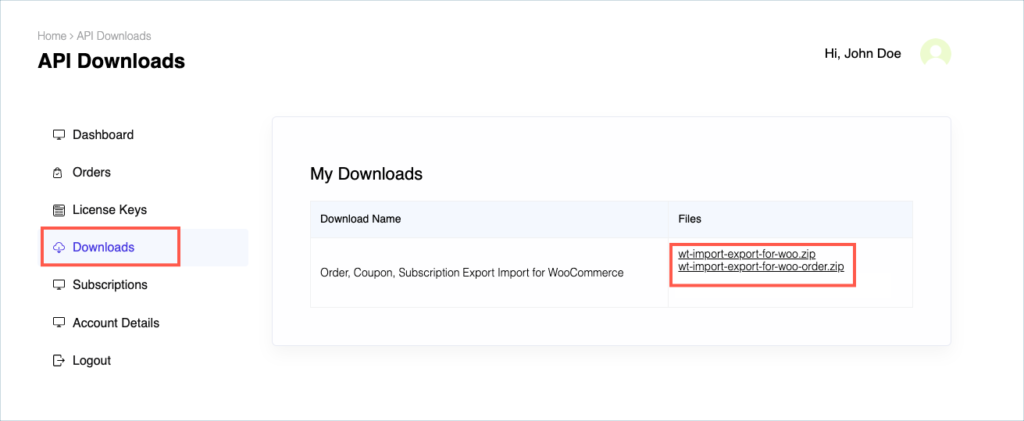
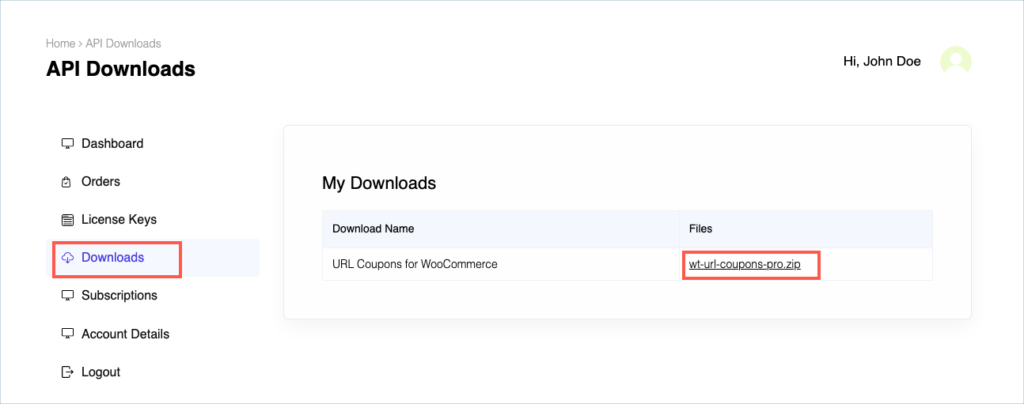
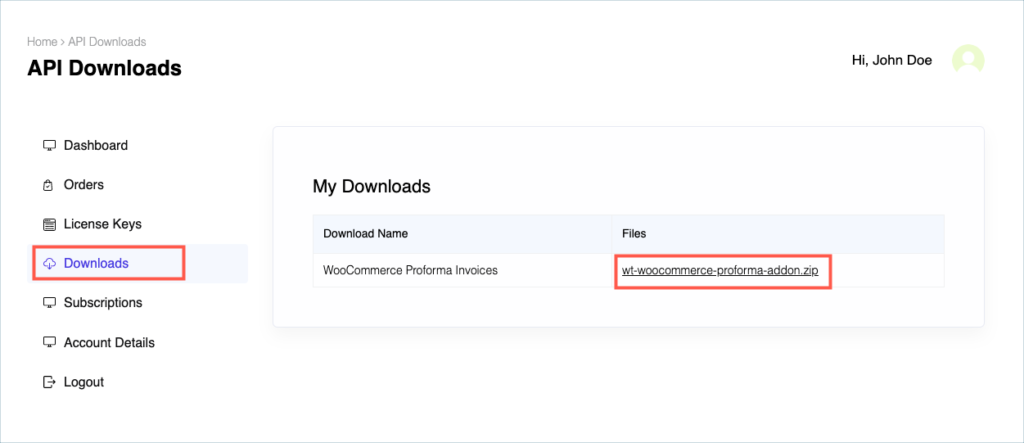
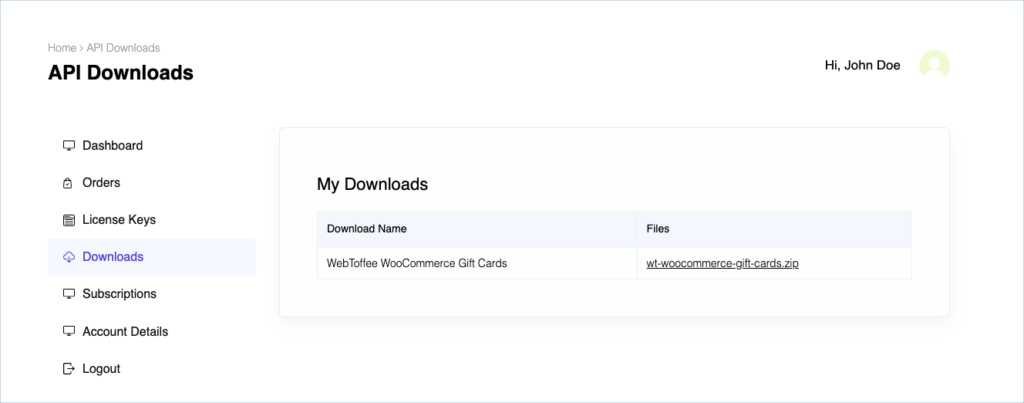
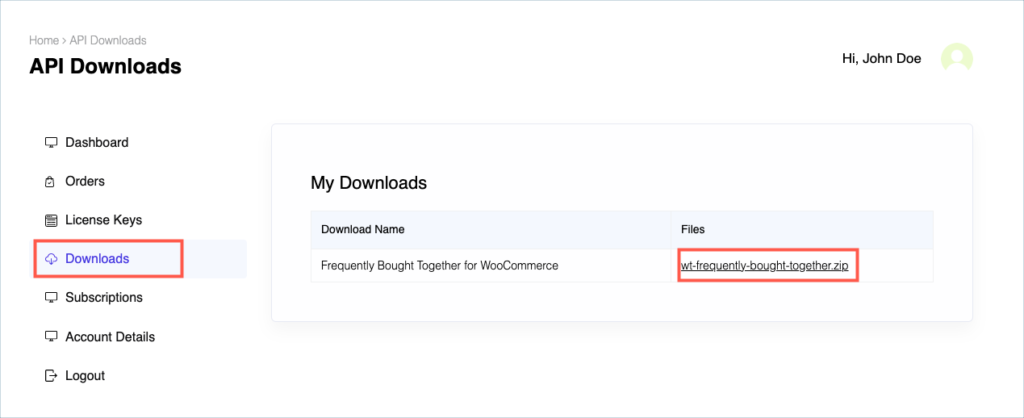
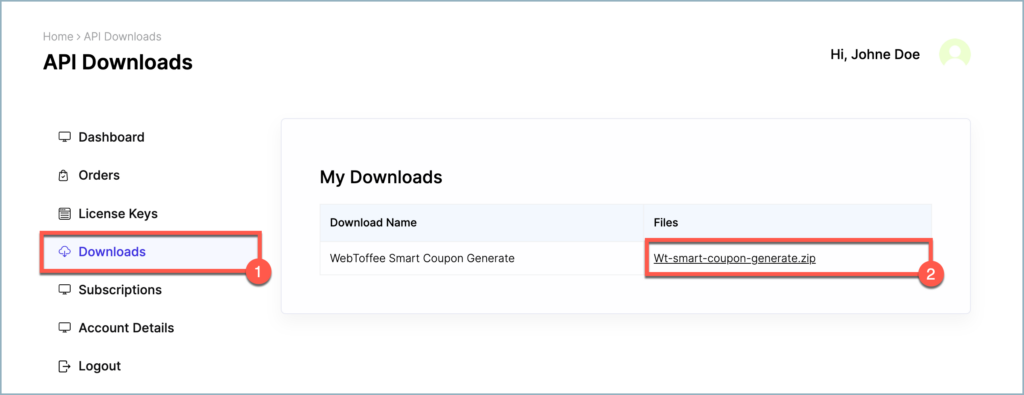
After purchasing the plugin, go to the My Account section in WebToffee. Log in with your credentials. Navigate to Downloads from the dashboard.
Step 2:
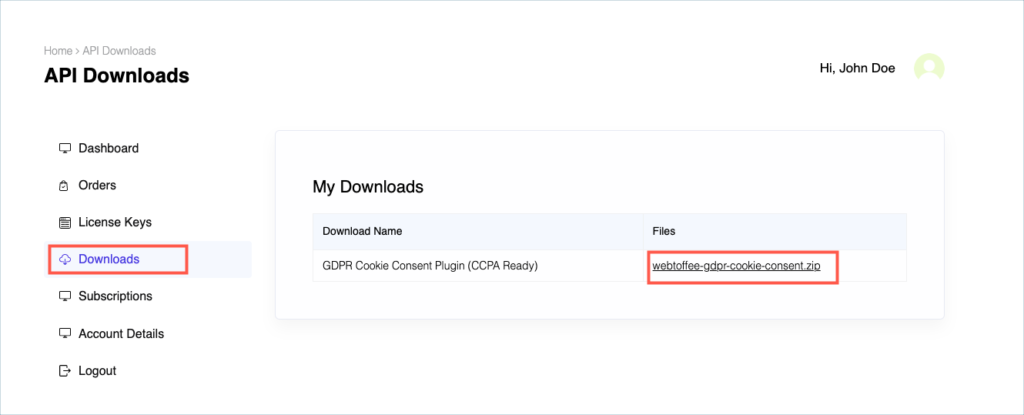
Click Downloads to get redirected to My Downloads. Click on the plugin package ZIP file to get it downloaded into your system.
Step 3:
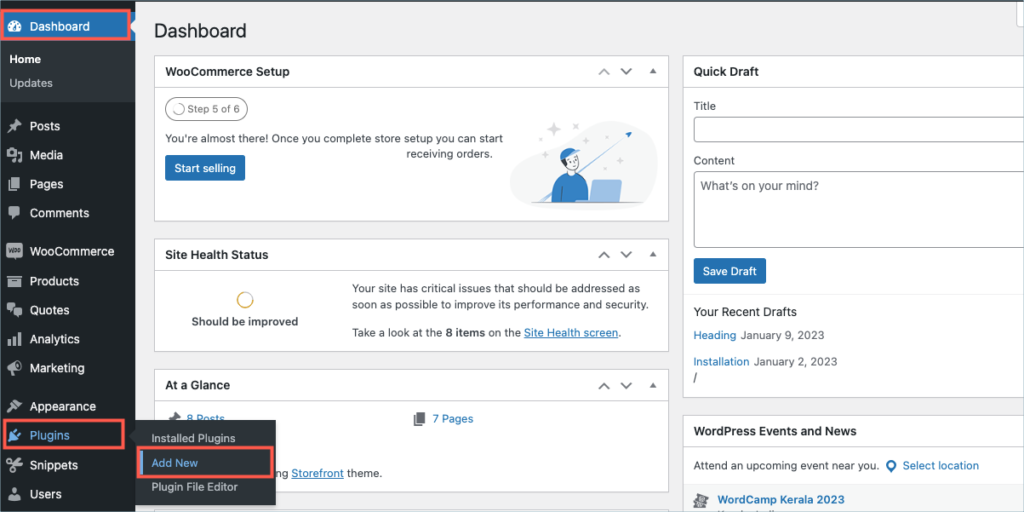
After downloading the ZIP file, navigate to Dashboard > Plugins and click on Add New.
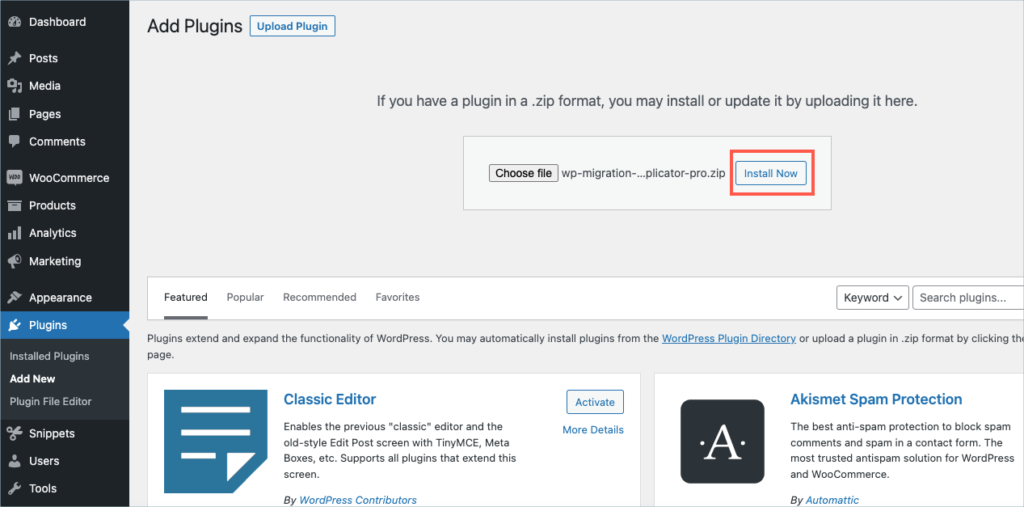
Step 4:
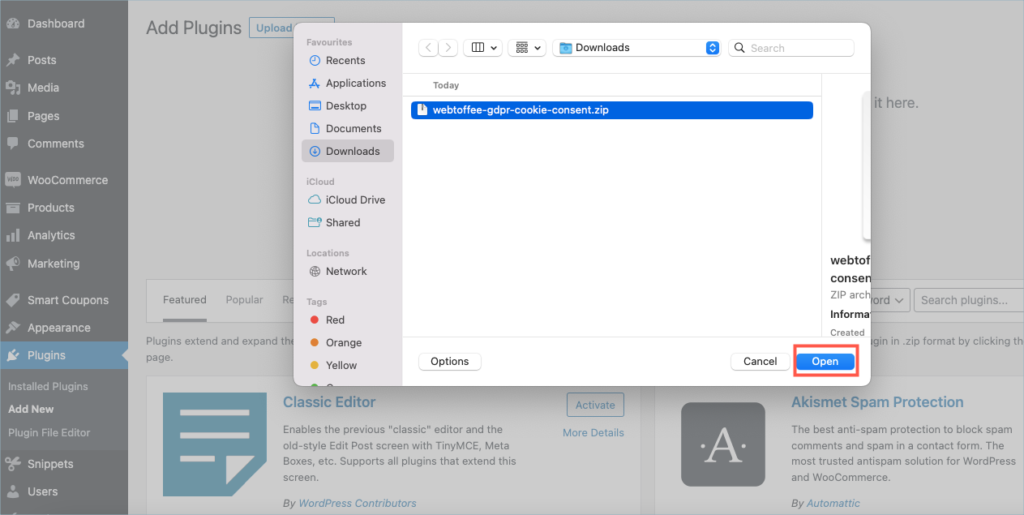
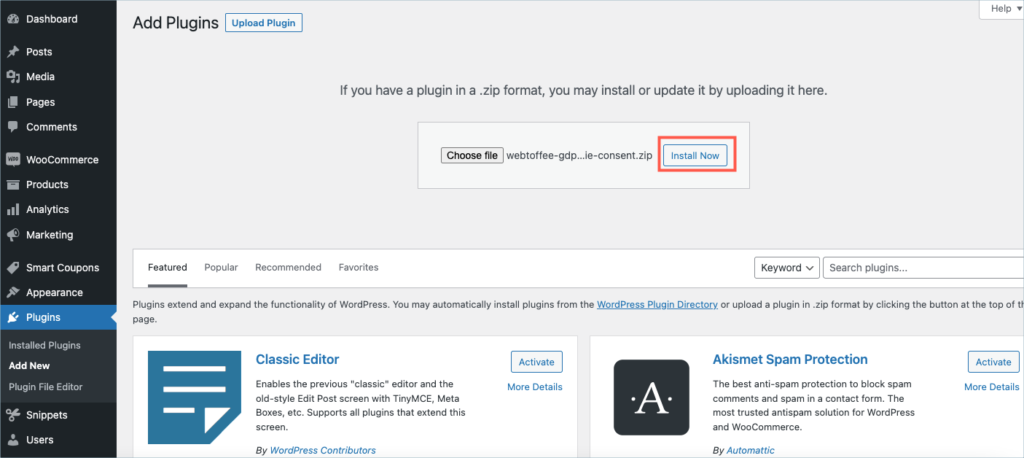
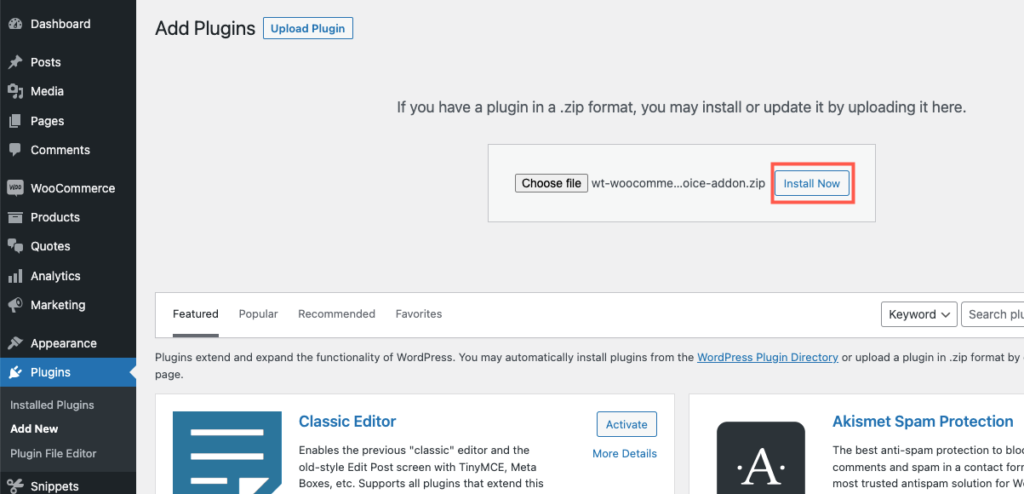
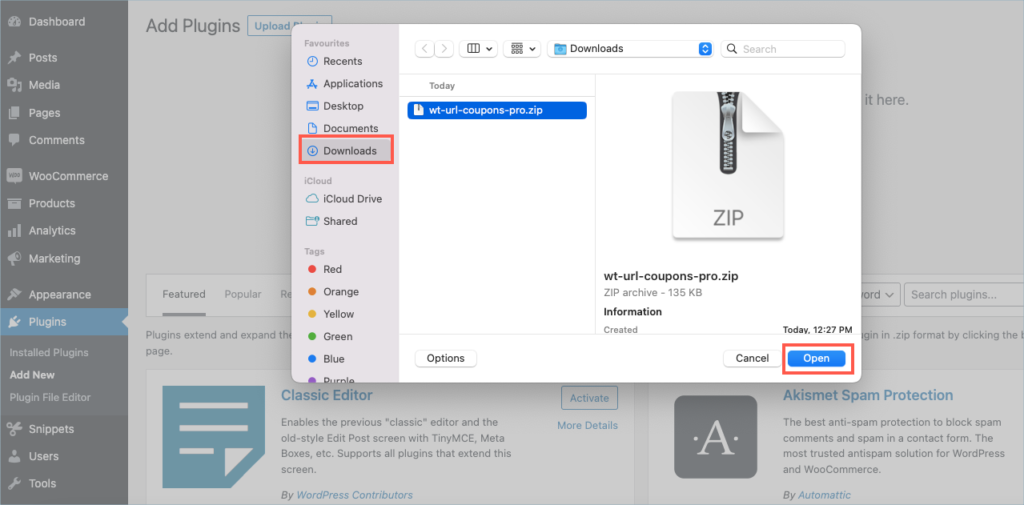
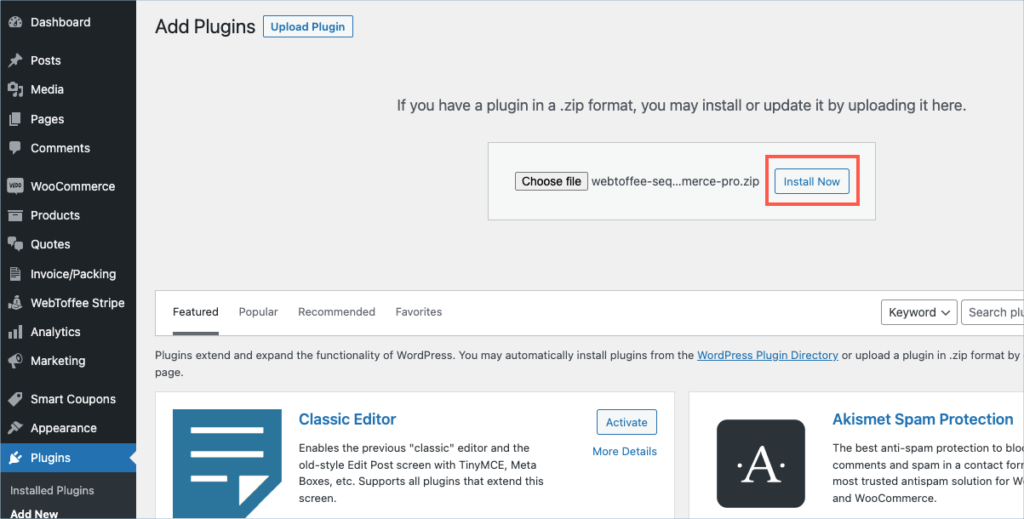
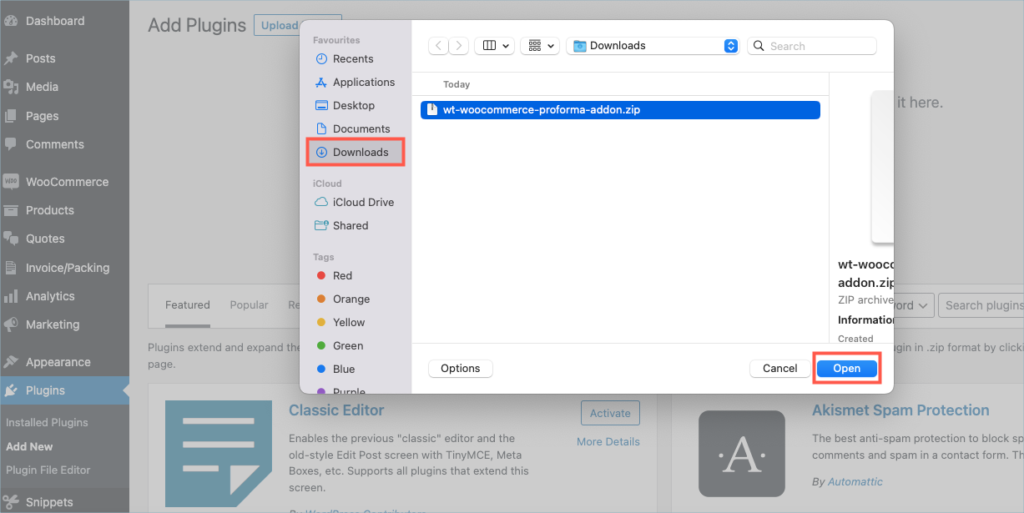
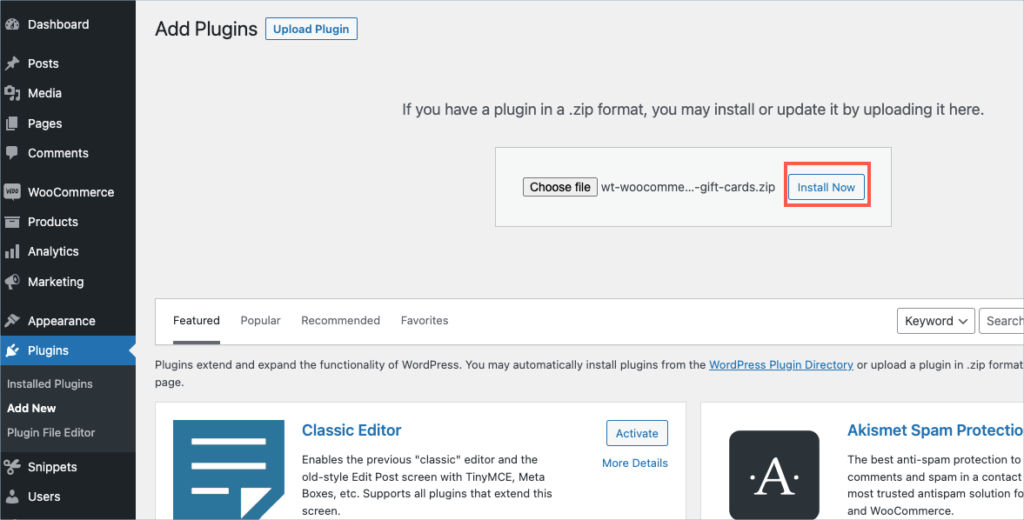
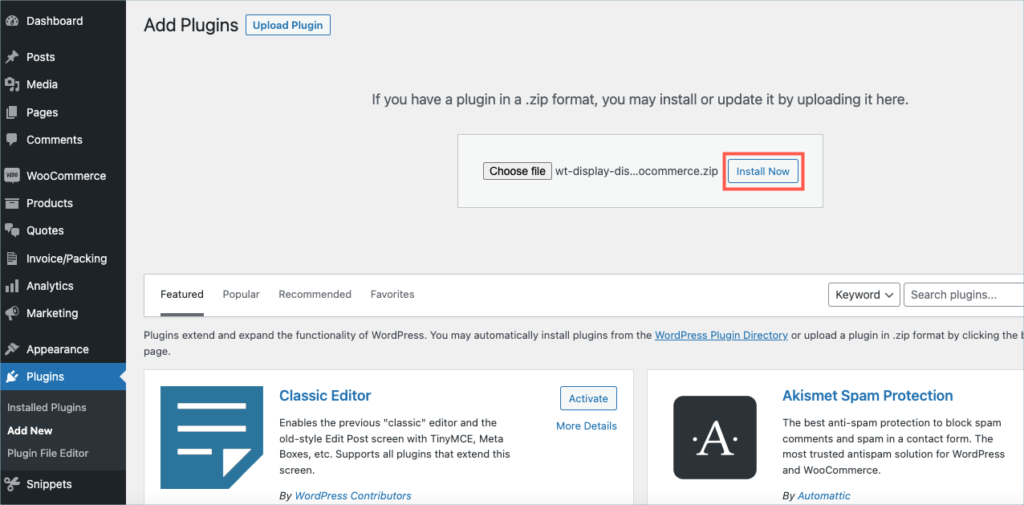
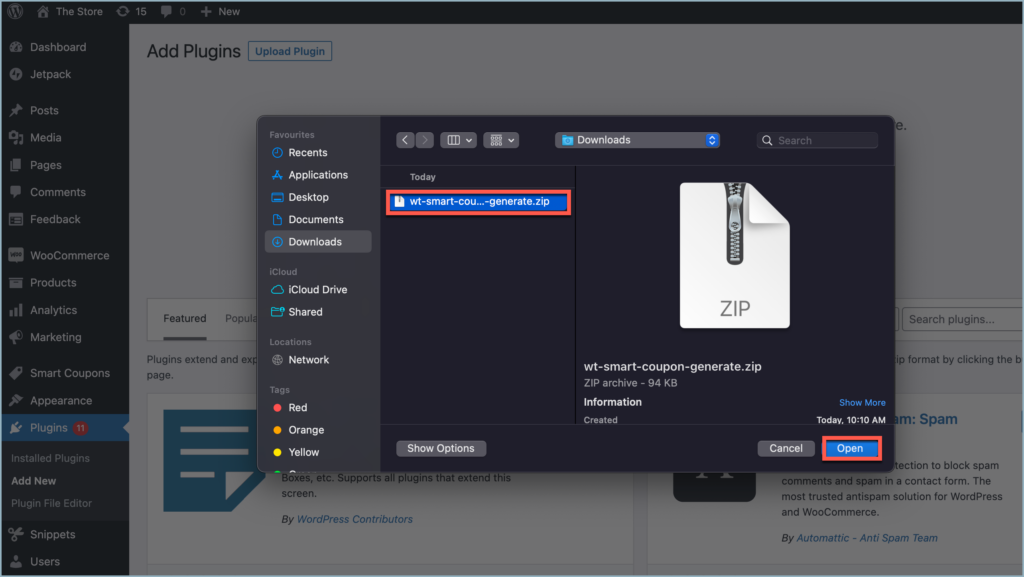
In the window that appears, Click on Choose file to browse the plugin ZIP file.

Step 5:
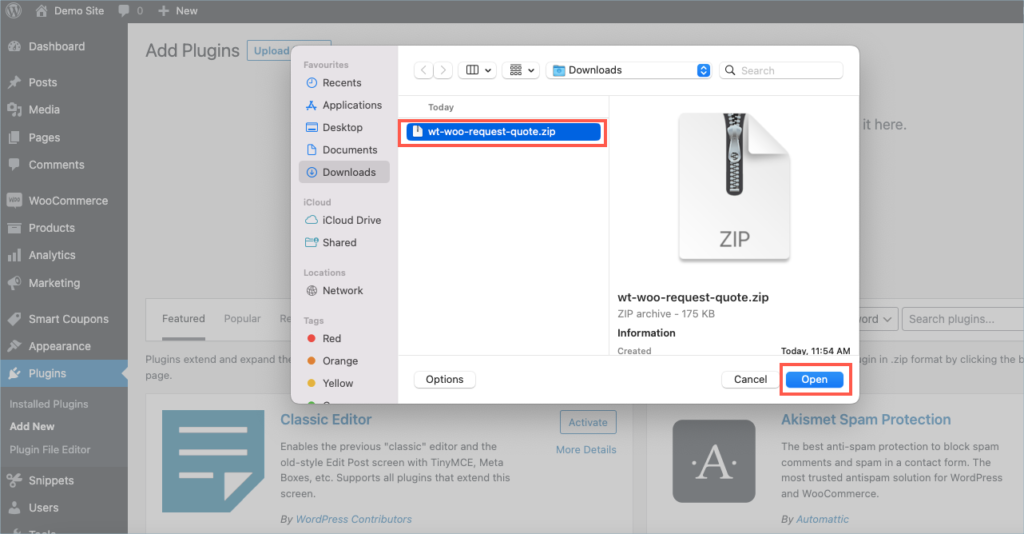
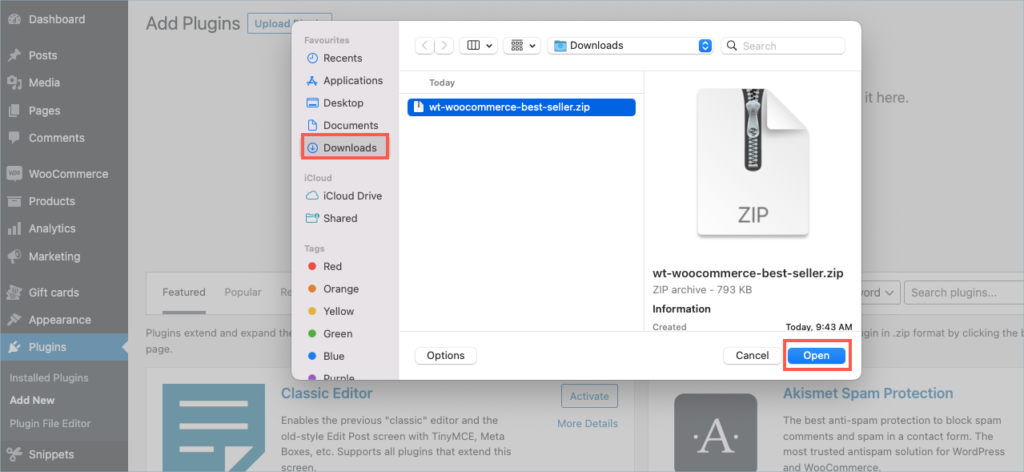
Choose the ZIP file and click open.
Step 6:
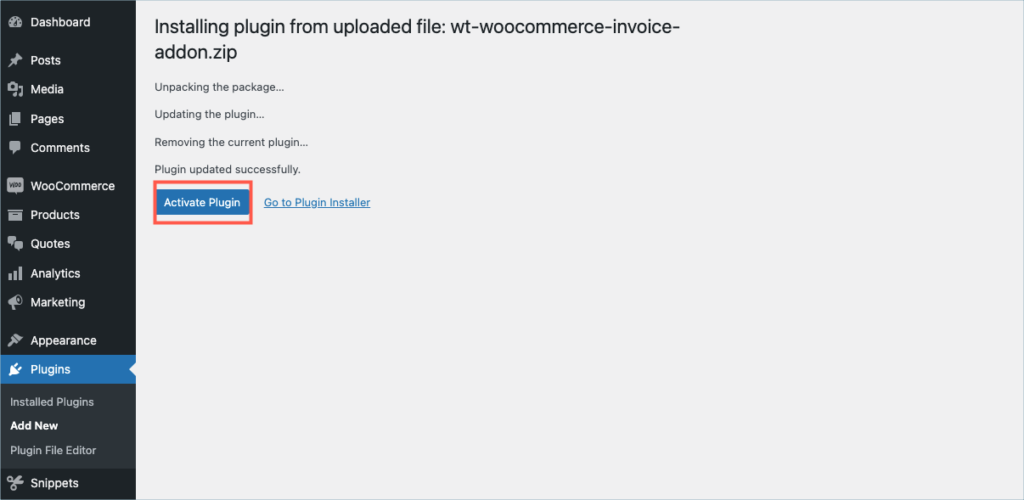
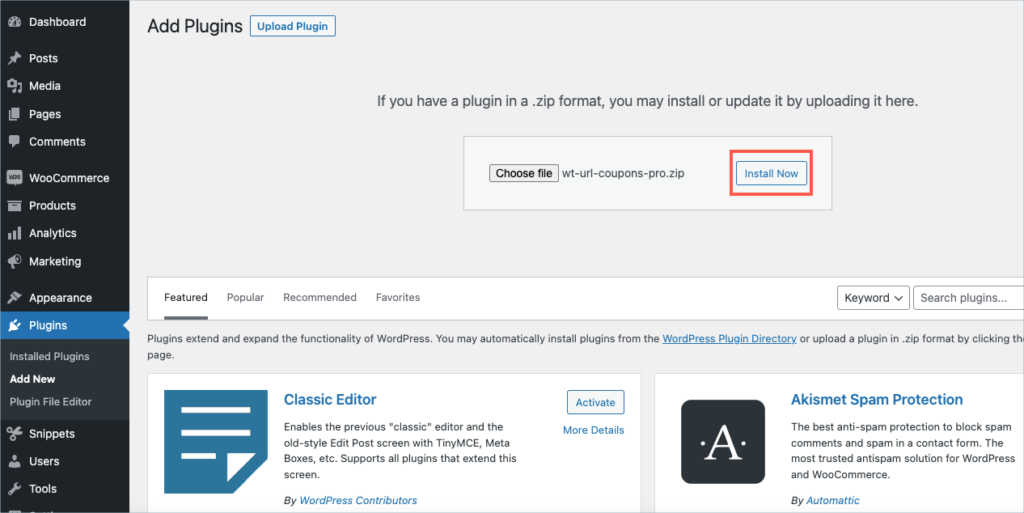
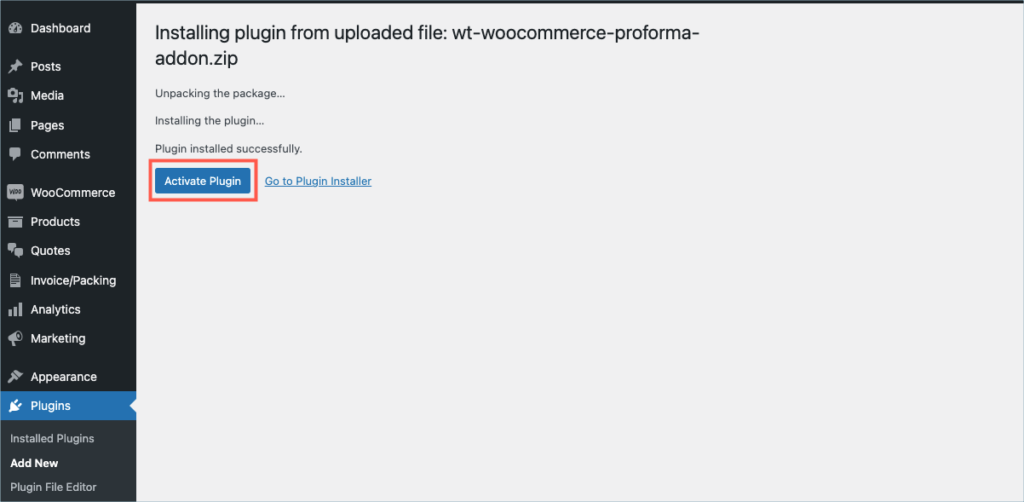
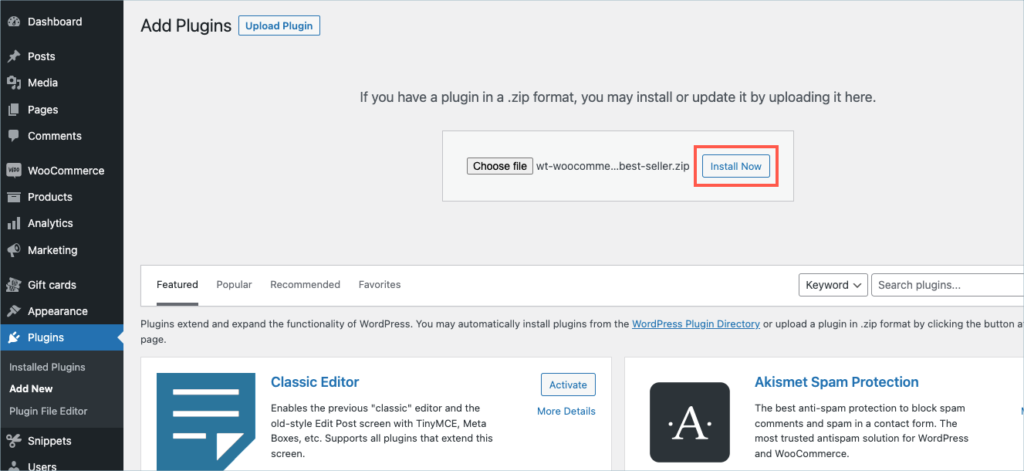
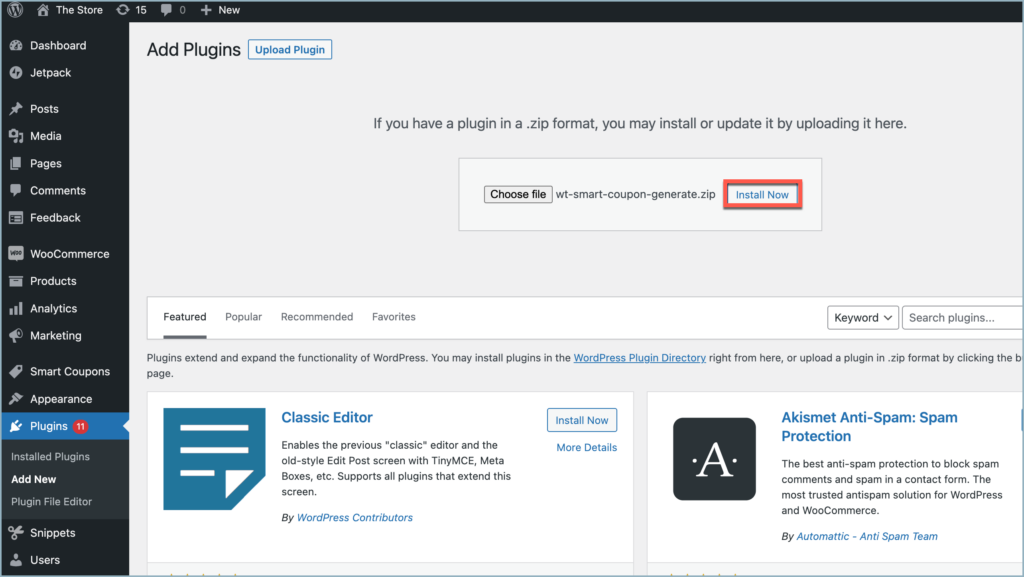
Click Install Now.
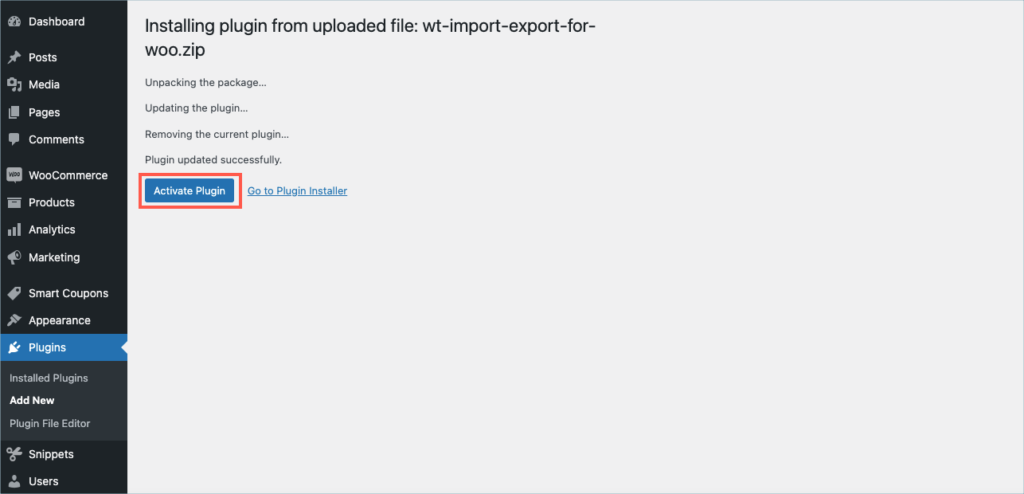
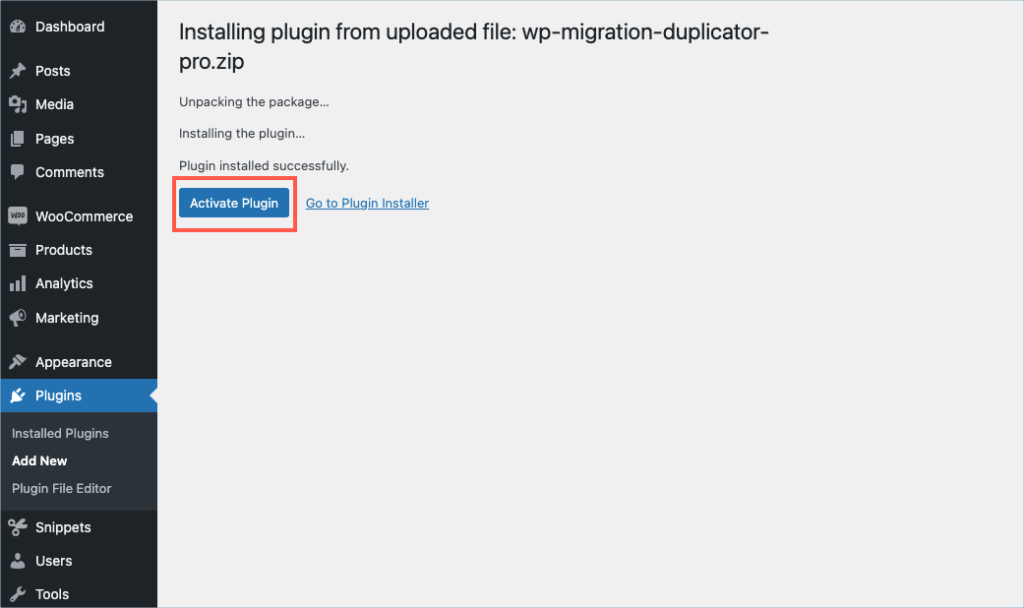
Step 7:
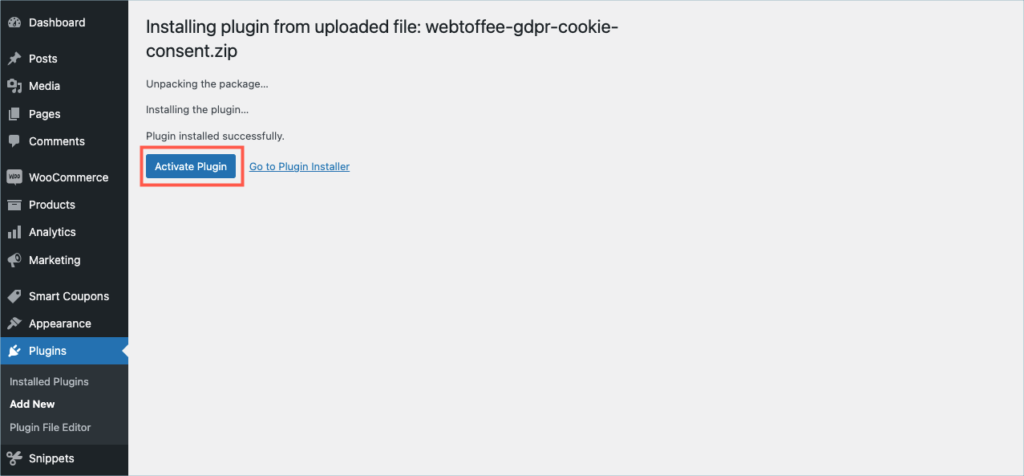
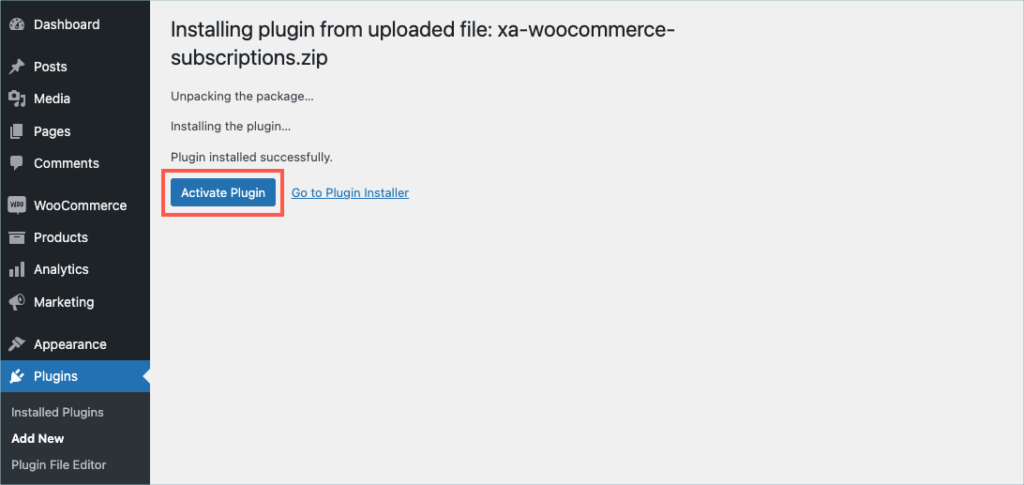
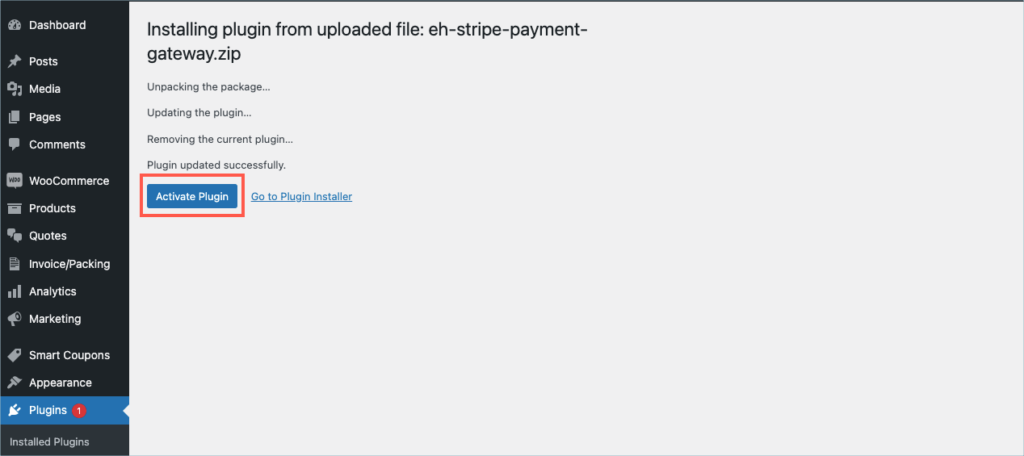
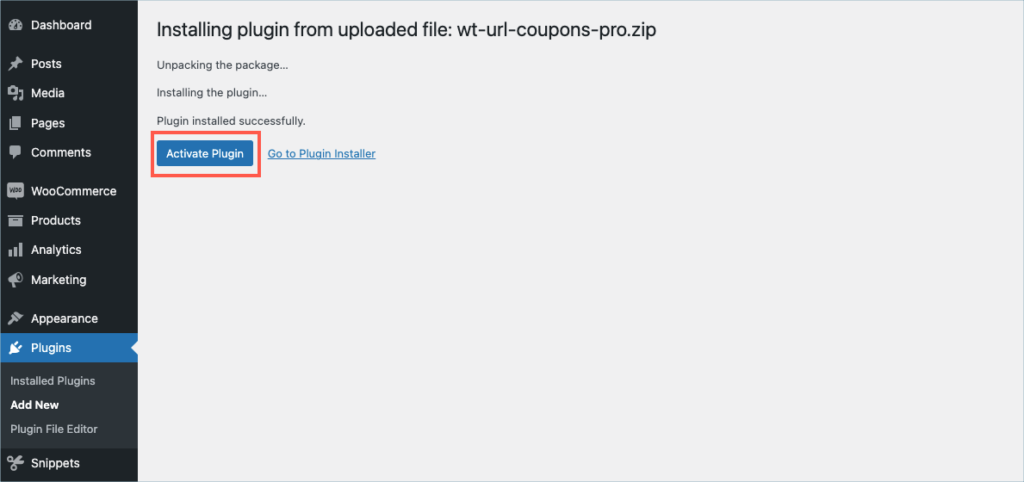
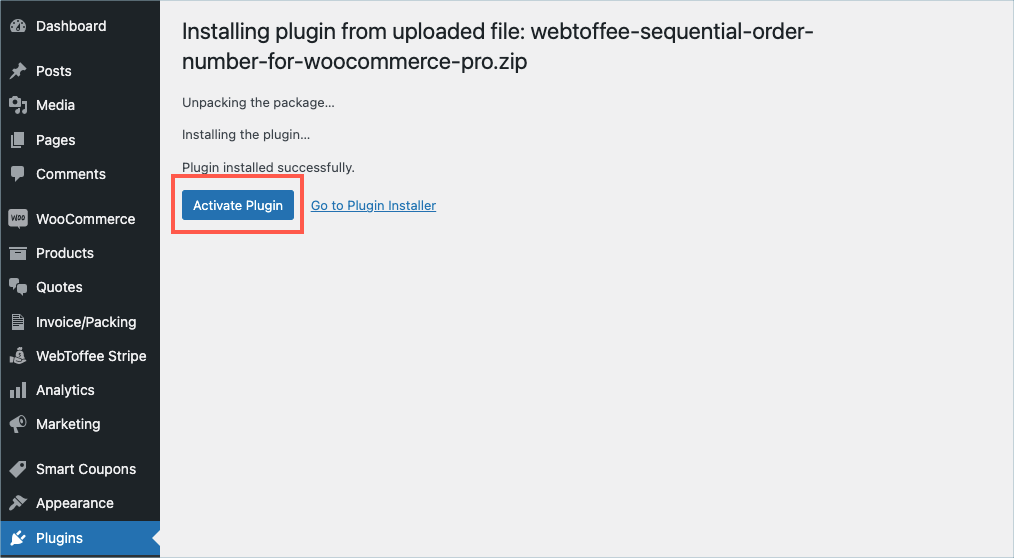
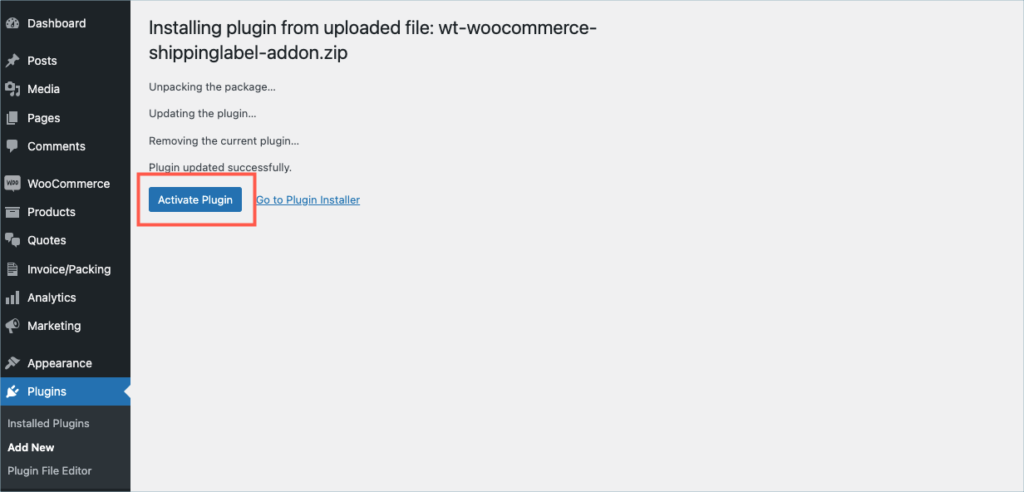
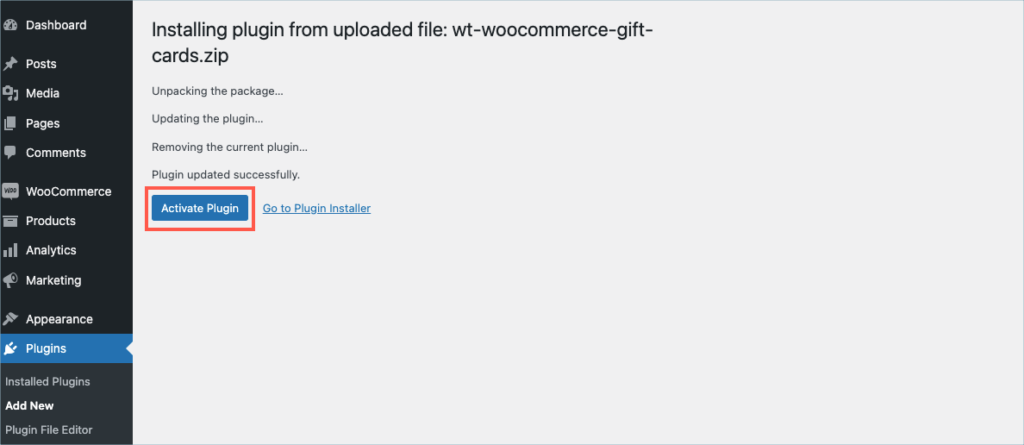
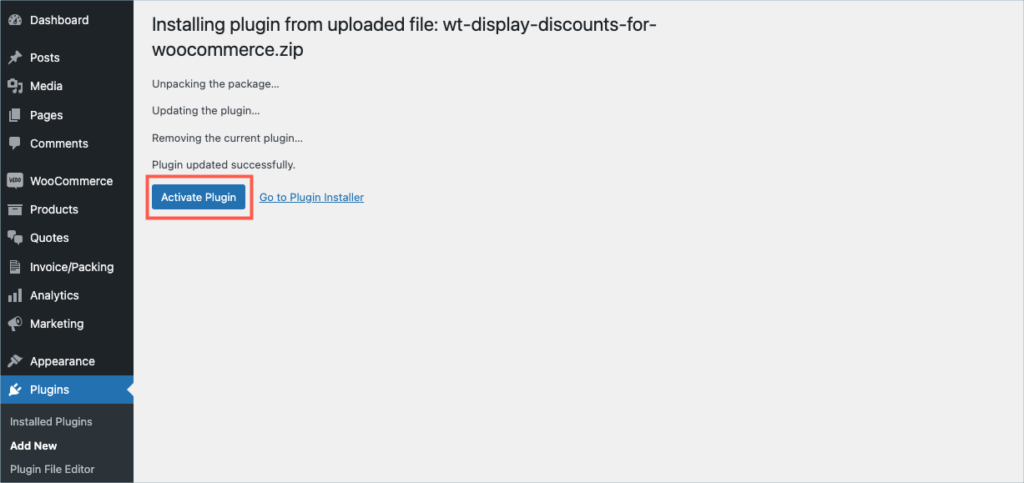
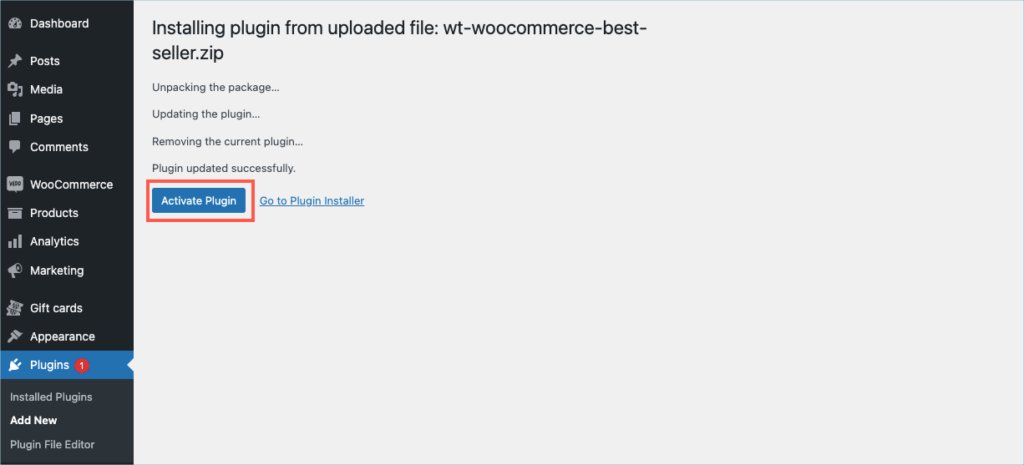
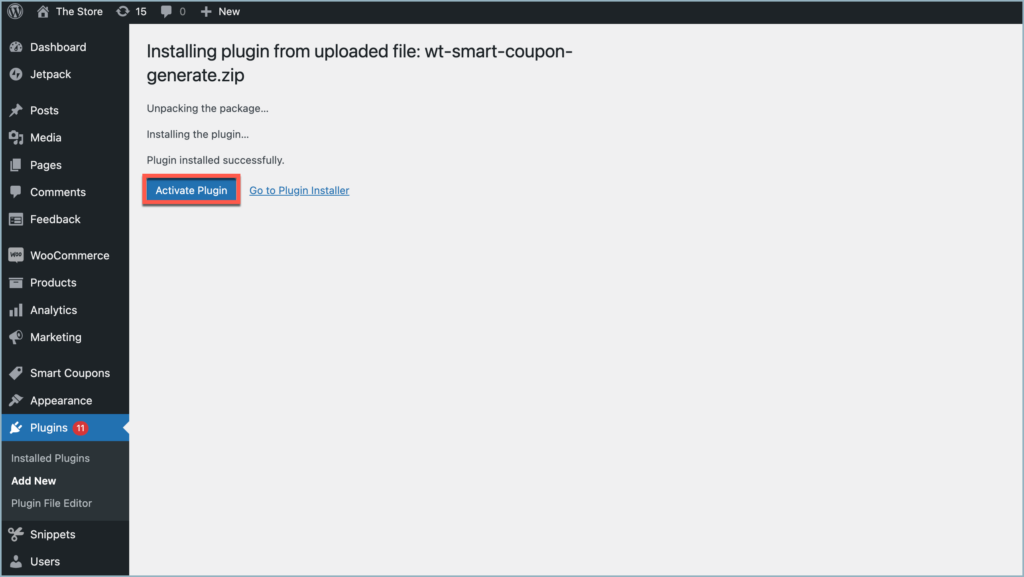
After installing, proceed to activate the plugin.
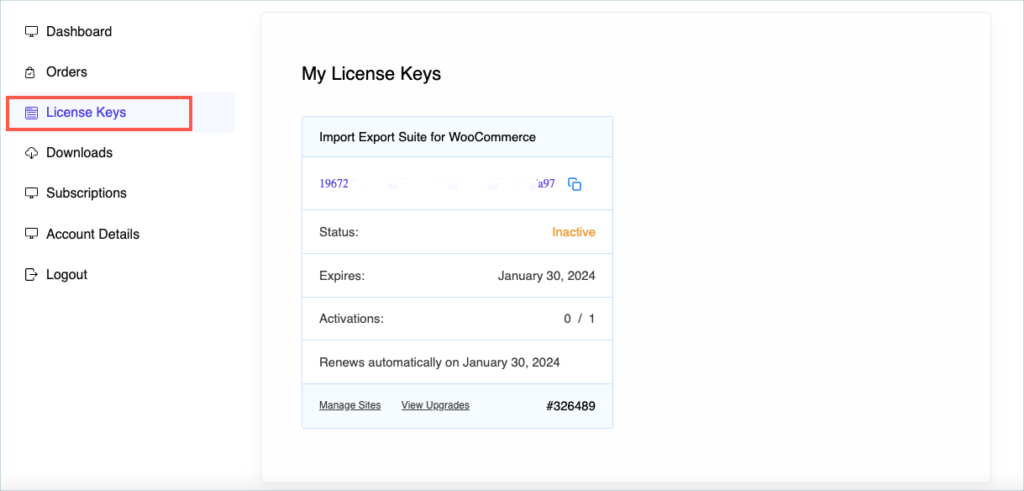
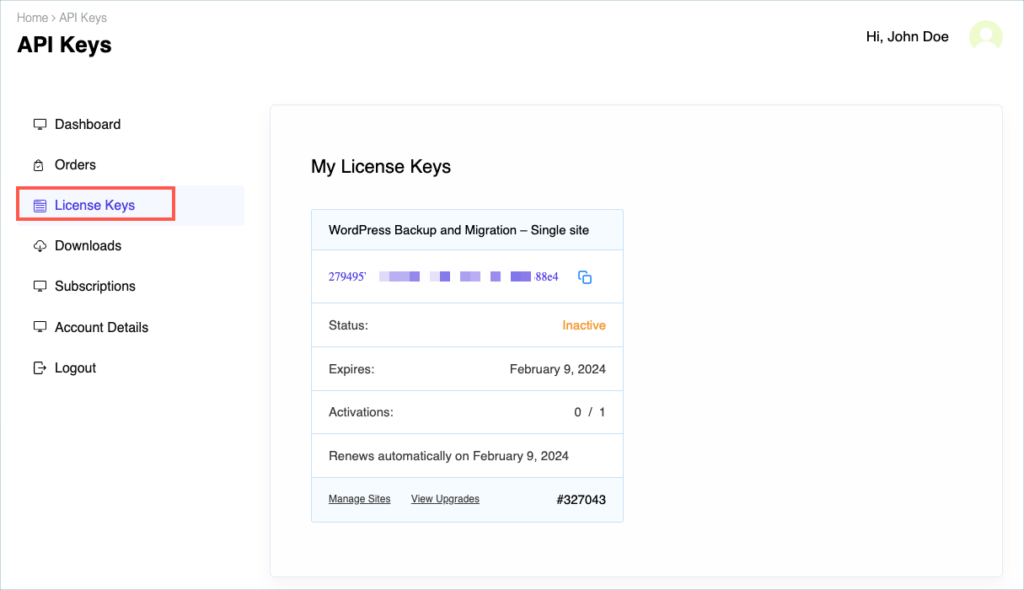
Step 8:
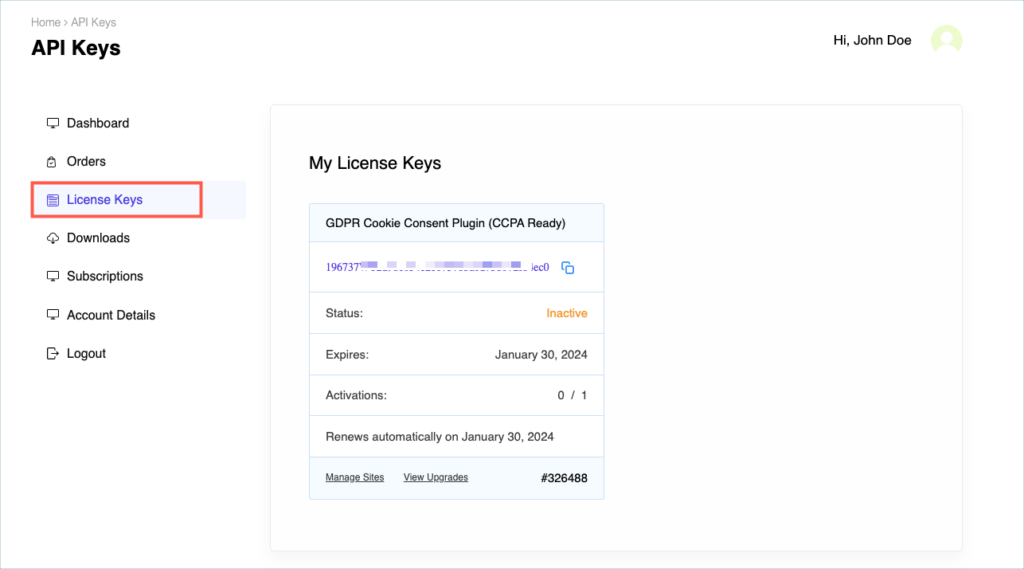
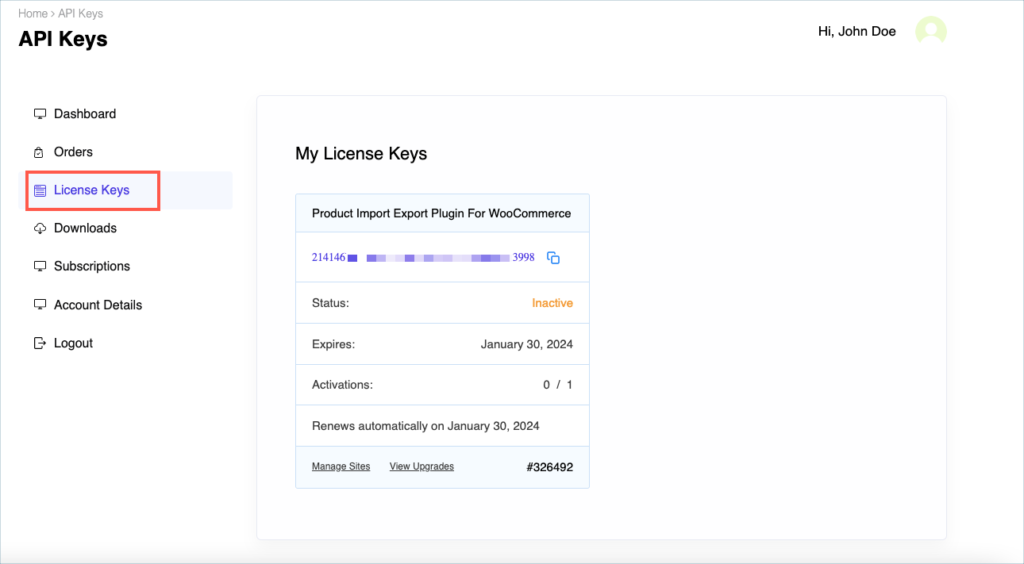
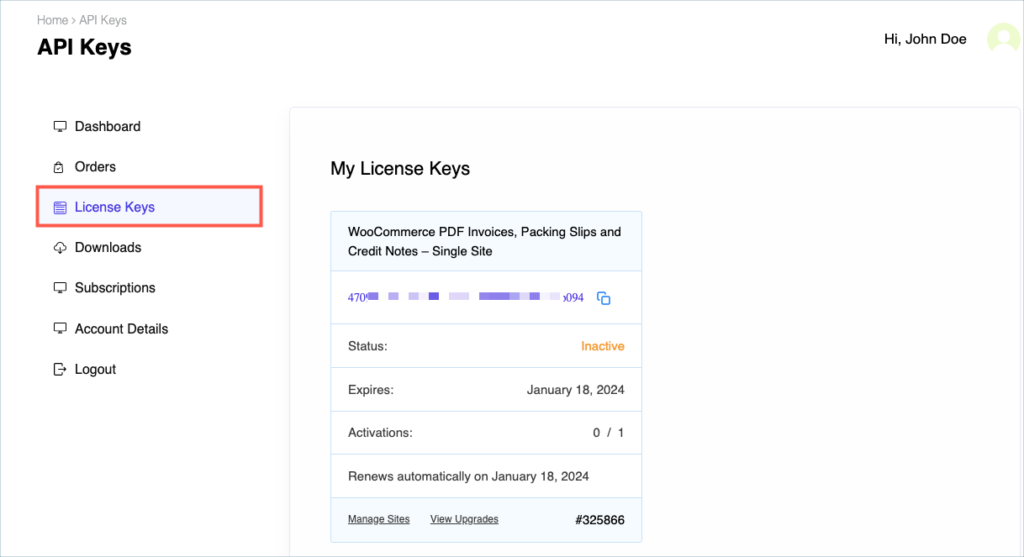
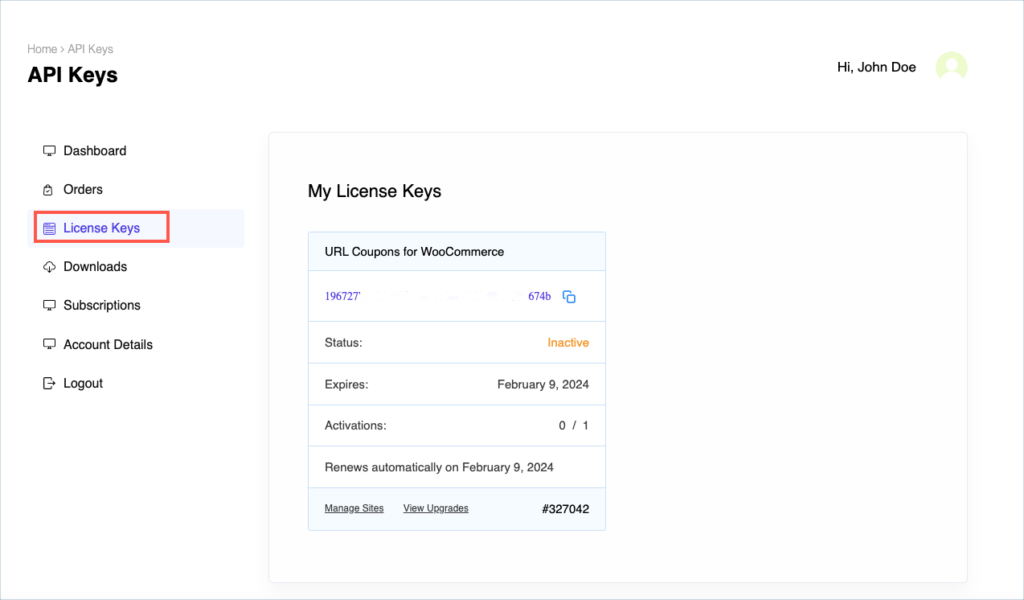
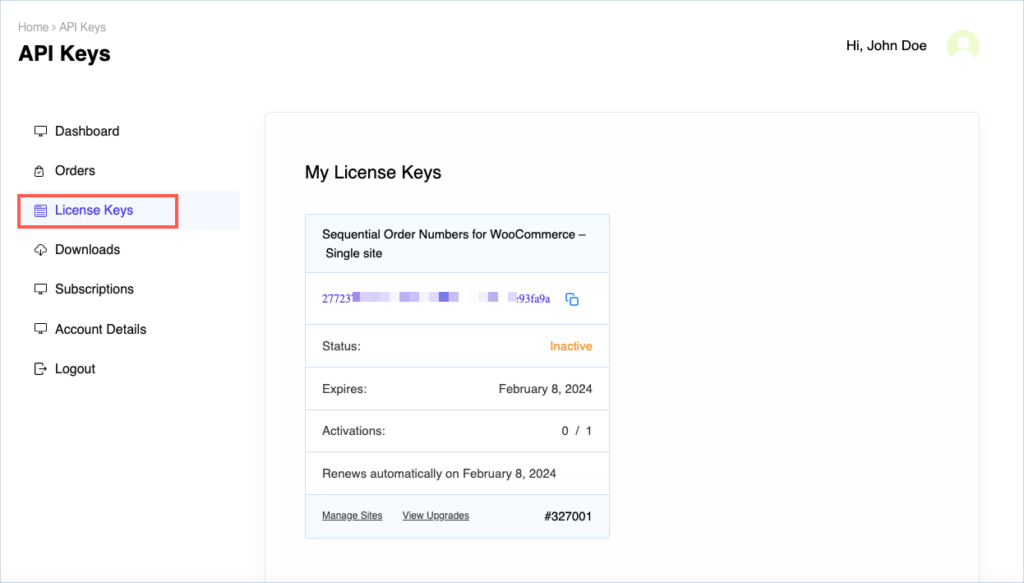
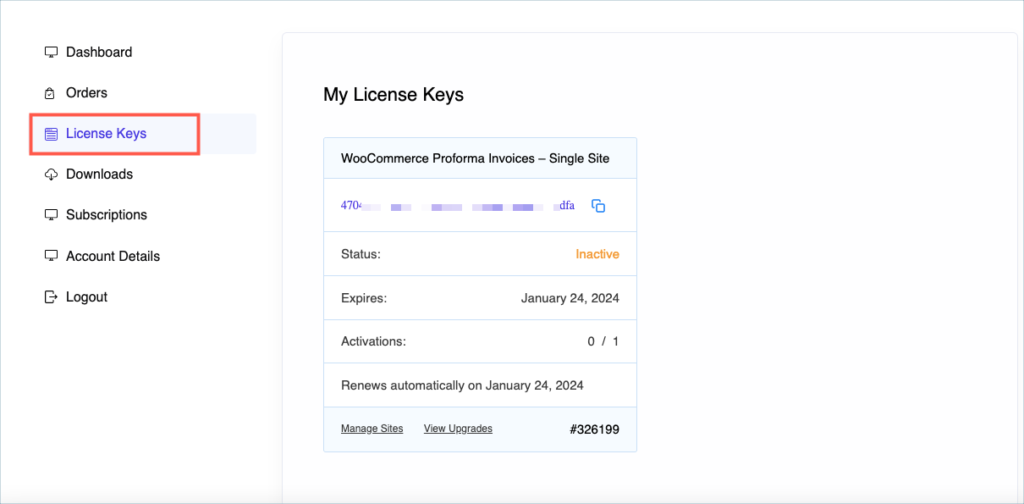
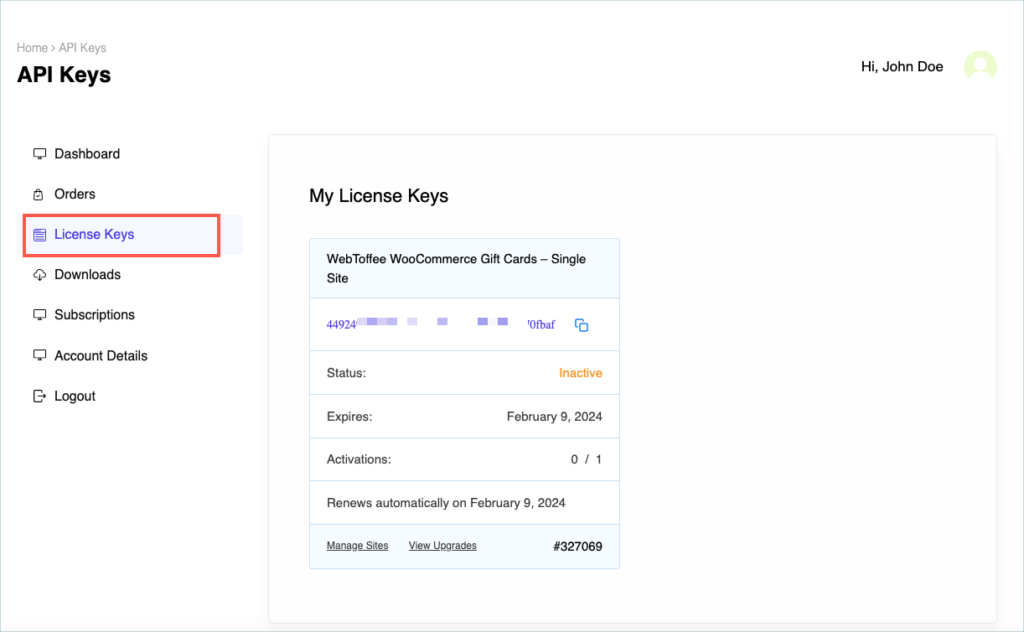
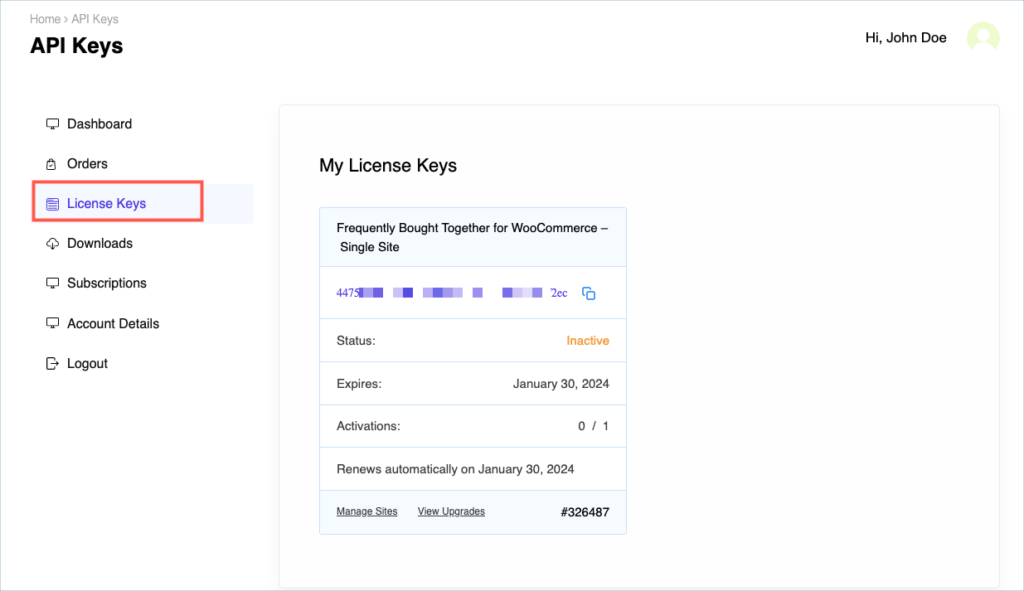
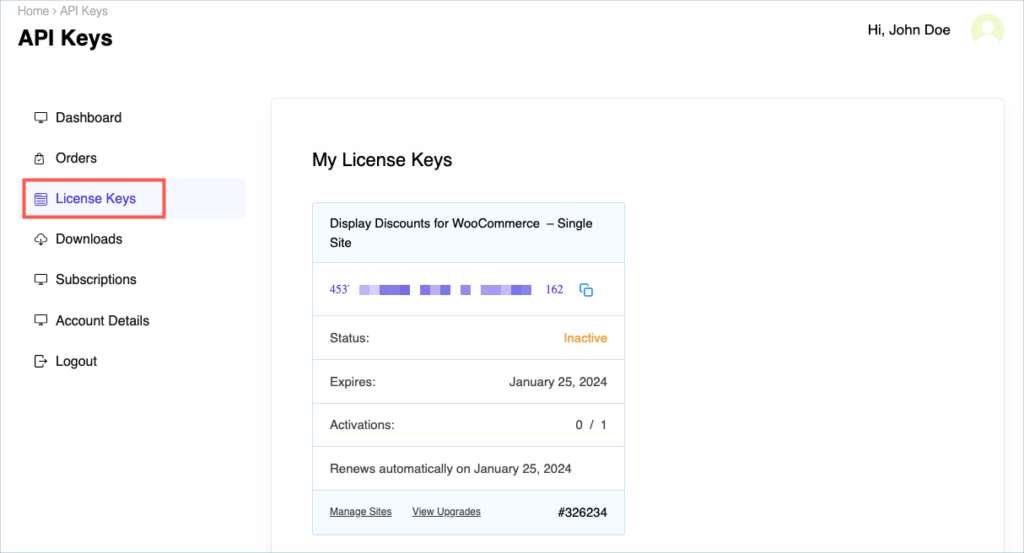
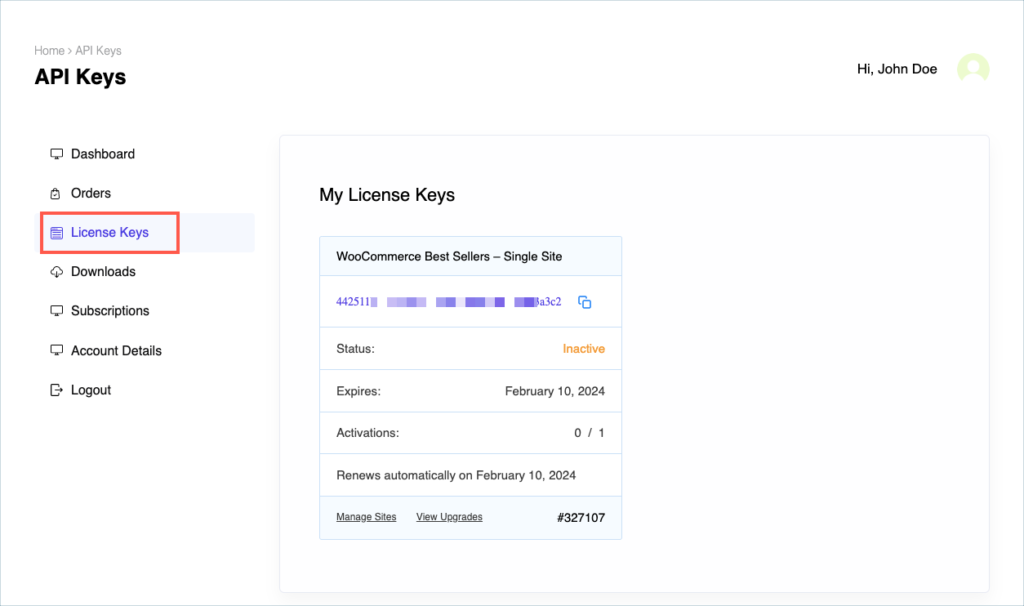
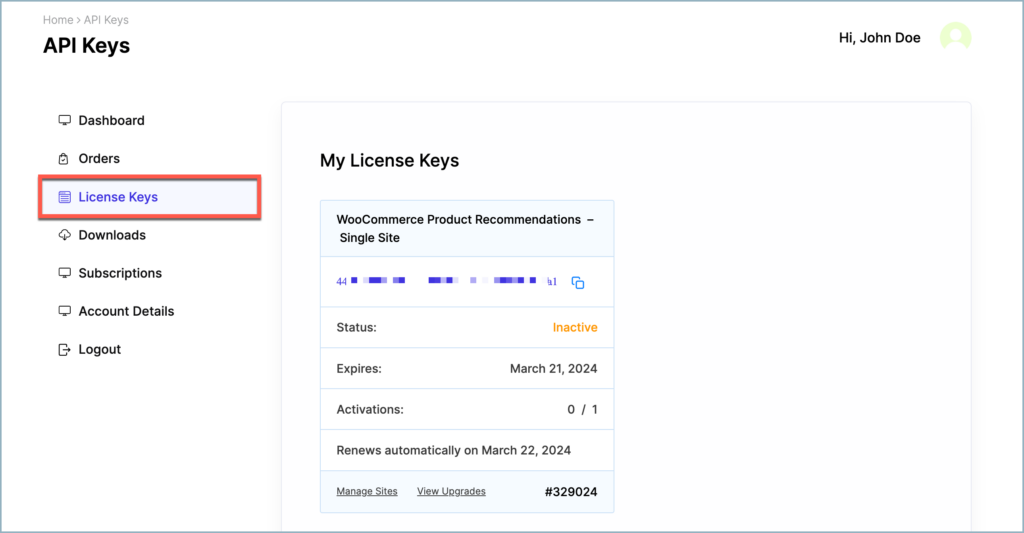
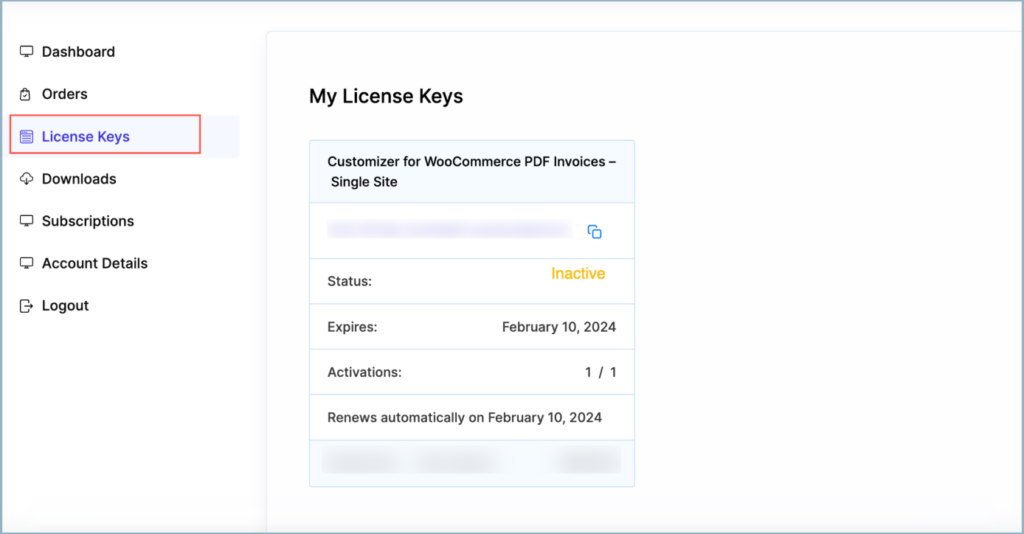
Get your API Key and API Email from the My Account > License Keys tab in WebToffee.
Step 9:
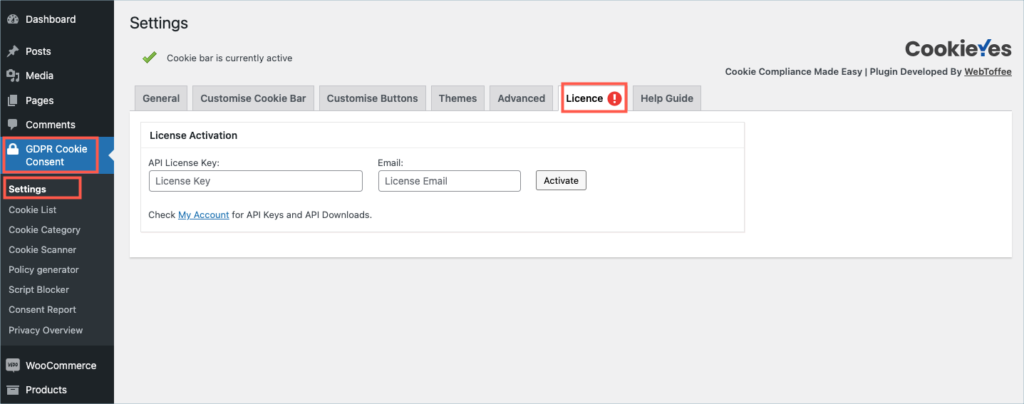
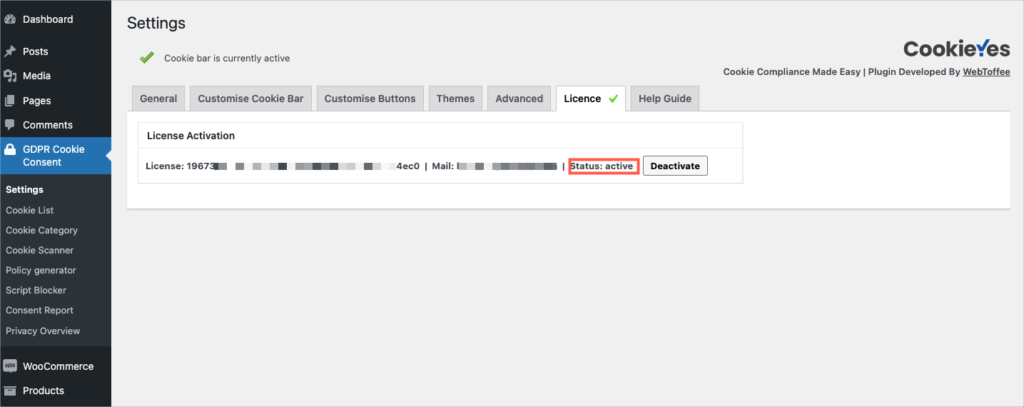
Navigate to GDPR Cookie Consent > Settings and click on the License tab.
Step 10:
Enter the API License Key and Email. Click on Activate button.
For detailed instructions, troubleshooting guides, and additional resources, please refer to our comprehensive product documentation. Click here to access the documentation and get the most out of the plugin.

Product Import Export Plugin For WooCommerce
Last updated on: July 19, 2023
Step 1:
After purchasing the plugin, go to the My Account section in WebToffee. Log in with your credentials. Navigate to Downloads from the dashboard.
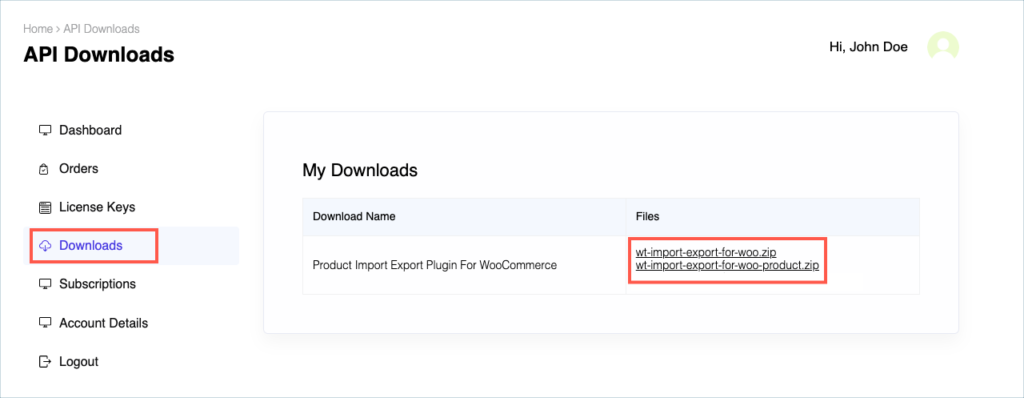
Step 2:
Click Downloads to get redirected to My Downloads. Click on the plugin package ZIP file to get it downloaded into your system.
Step 3:
After downloading the ZIP file, navigate to Dashboard > Plugins and click on Add New.
Step 4:
In the window that appears, Click on Choose file to browse the plugin ZIP file.
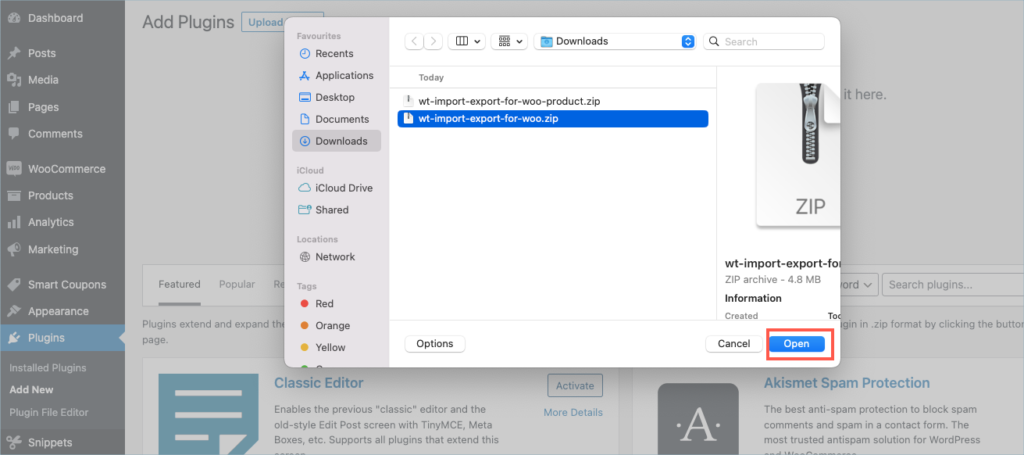
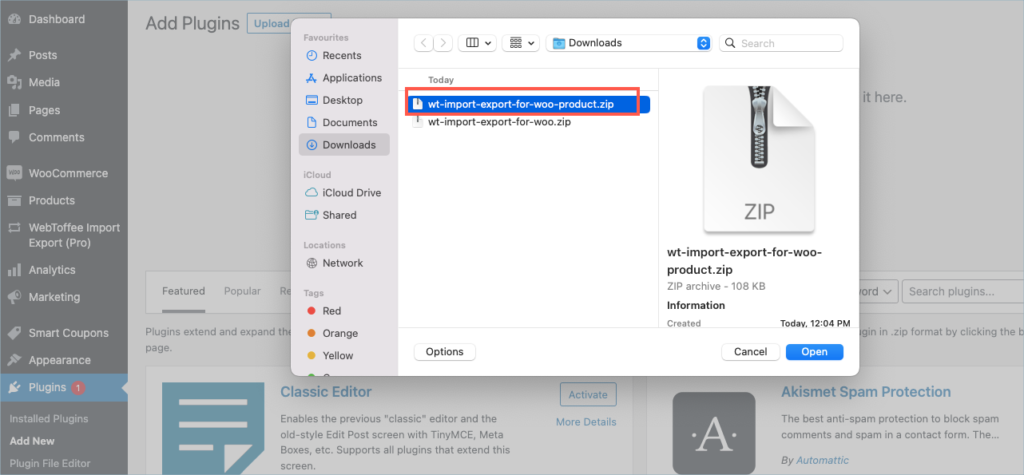
Step 5:
Choose one of the ZIP files and click open.
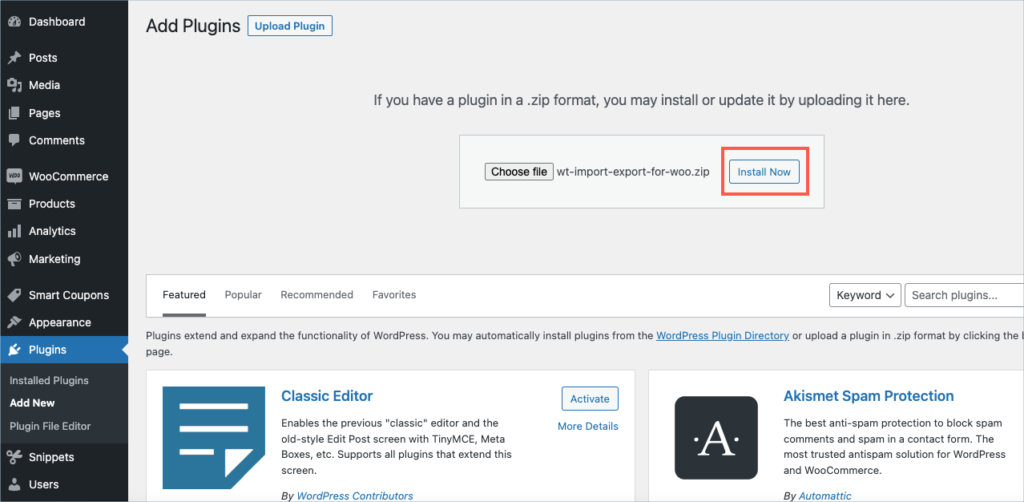
Step 6:
Click Install Now.
Step 7:
After installing, proceed to activate the plugin.
Step 8:
Repeat steps 5, 6, and 7 for wt-import-export-for-woo-product.zip
Step 9:
Get your API Key and API Email from the My Account > License Keys tab in WebToffee.
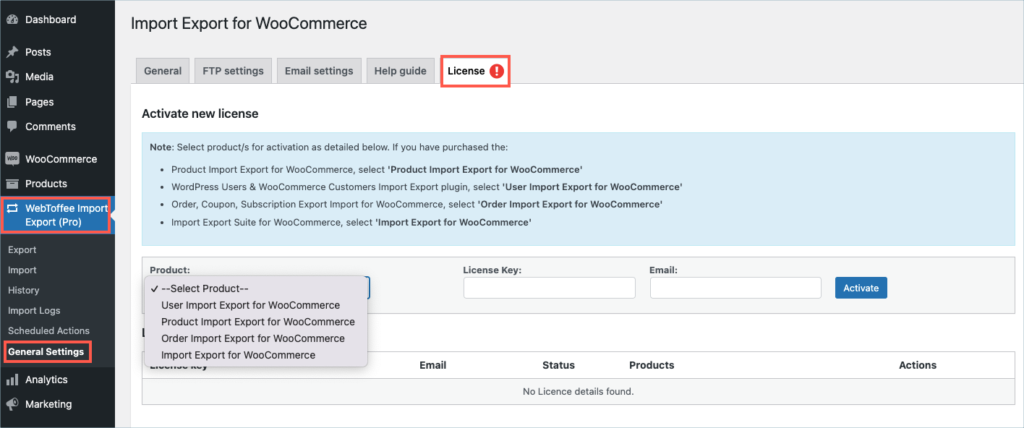
Step 10:
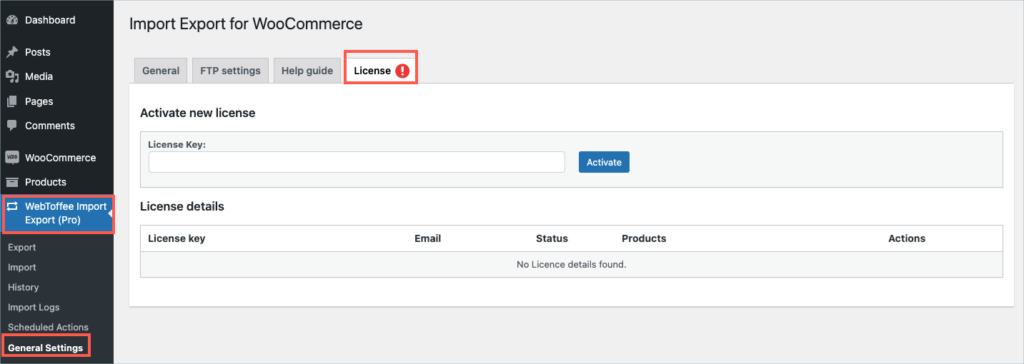
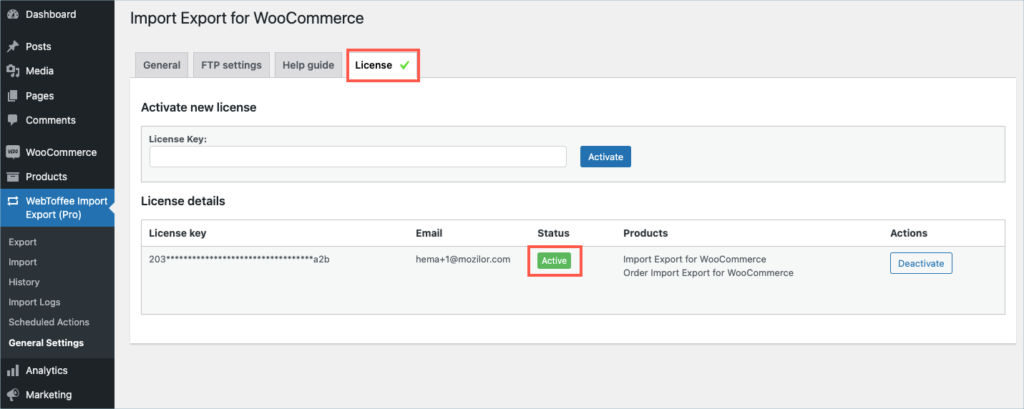
Navigate to WebToffee Import Export (pro) > General settings and click on the License tab.
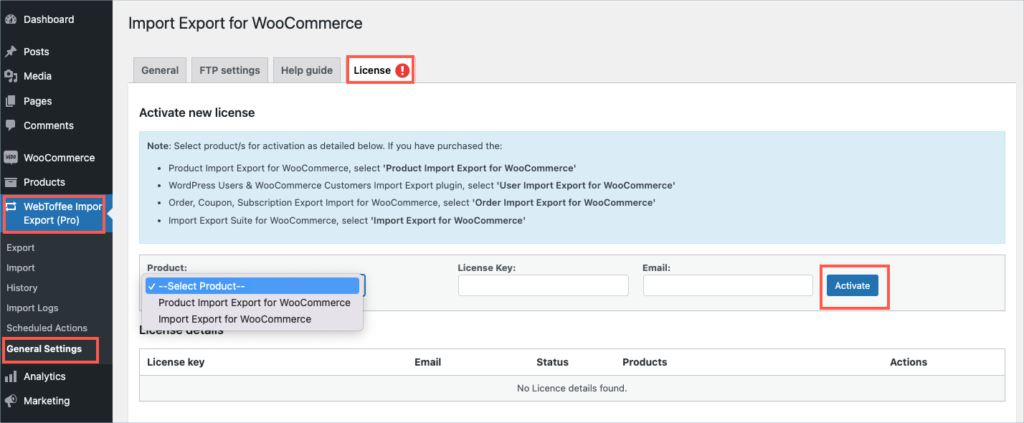
Step 11:
Enter the API License Key and Email. Click on Activate button.

For detailed instructions, troubleshooting guides, and additional resources, please refer to our comprehensive product documentation. Click here to access the documentation and get the most out of the plugin.
Comments (2)
-

Hanenberg j.
August 25, 2023
this is for the export site.
How does it work for the site to import to.? Same? -
-
Alan
March 6, 2023
Hi,
Can you please reach us via support and share the import file and the screenshots of the issue?
-
Got any query? Please leave a comment or reach out to our support. Cancel reply

Order, Coupon, Subscription Export Import for WooCommerce
Last updated on: July 19, 2023
Step 1:
After purchasing the plugin, go to the My Account section in WebToffee. Log in with your credentials. Navigate to Downloads from the dashboard.
Step 2:
Click Downloads to get redirected to My Downloads. Click on the plugin package ZIP file to get it downloaded into your system.
Step 3:
After downloading the ZIP file, navigate to Dashboard > Plugins and click on Add New.
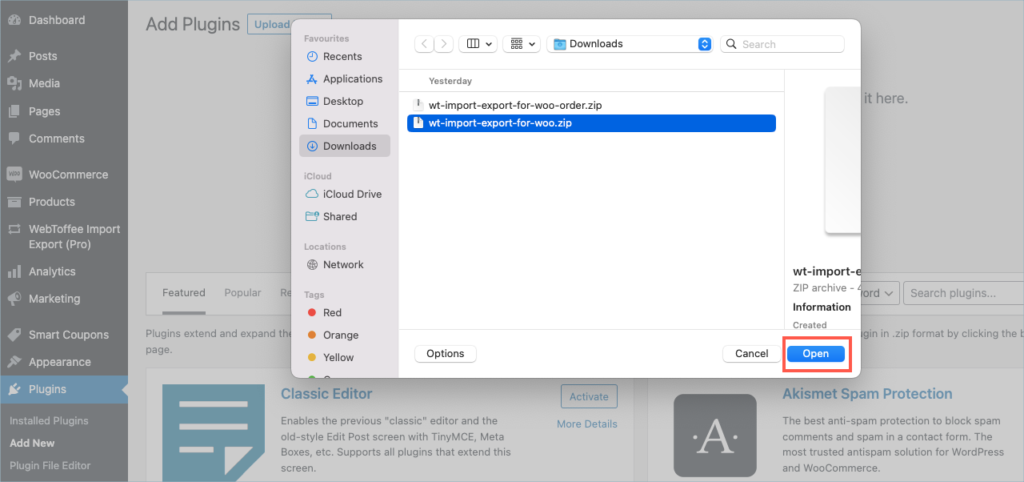
Step 4:
In the window that appears, Click on Choose file to browse the plugin ZIP file.
Step 5:
Choose one of the ZIP files and click open.
Step 6:
Click Install Now.
Step 7:
After installing, proceed to activate the plugin.
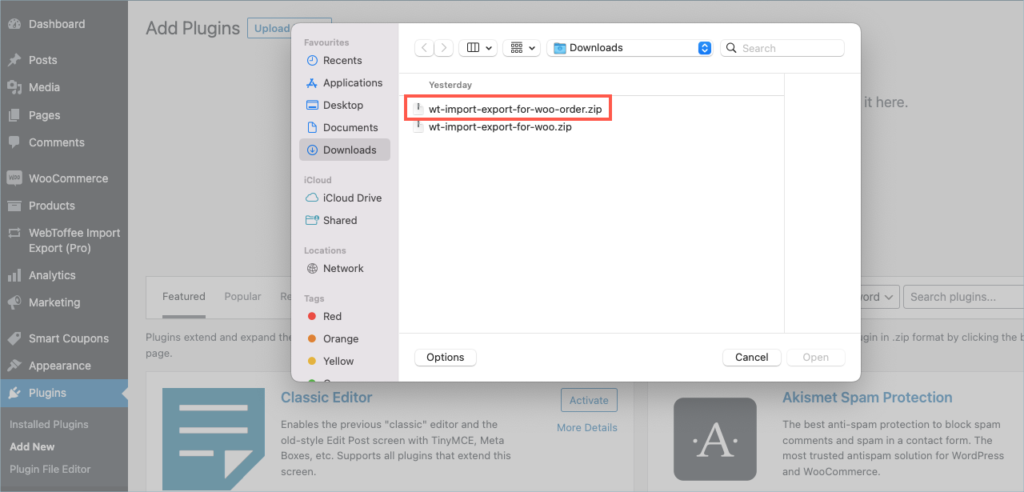
Step 8:
Repeat steps 5, 6, and 7 for wt-import-export-for-woo-order.zip
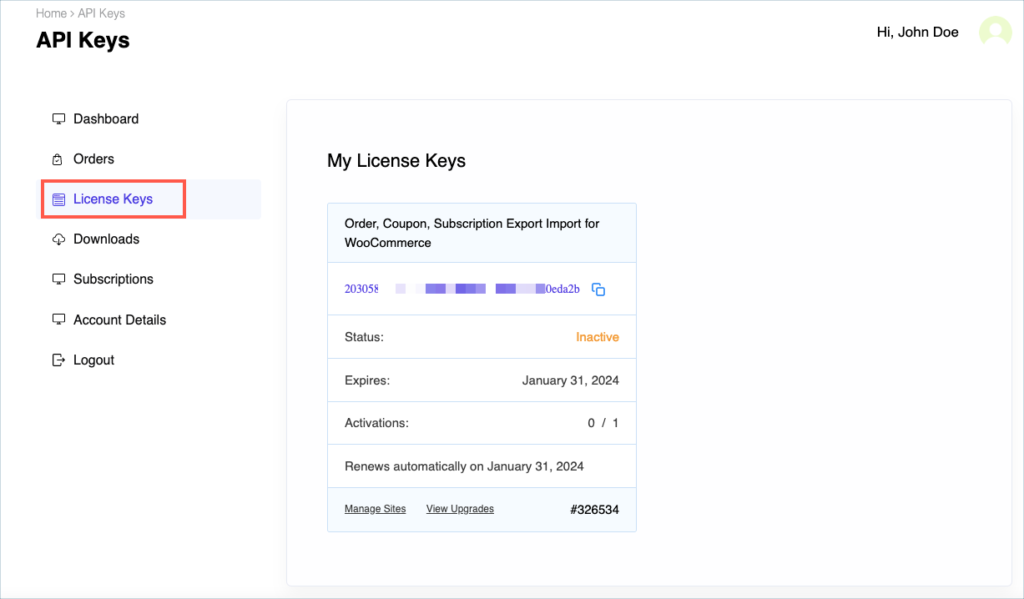
Step 9:
Get your API Key and API Email from the My Account > License Keys tab in WebToffee.
Step 10:
Navigate to WebToffee Import Export (pro) > General settings and click on the License tab.
Step 11:
Enter the API License Key. Click on Activate button.
For detailed instructions, troubleshooting guides, and additional resources, please refer to our comprehensive product documentation. Click here to access the documentation and get the most out of the plugin.
Got any query? Please leave a comment or reach out to our support. Cancel reply

WordPress Users & WooCommerce Customers Import Export
Last updated on: July 19, 2023
Step 1:
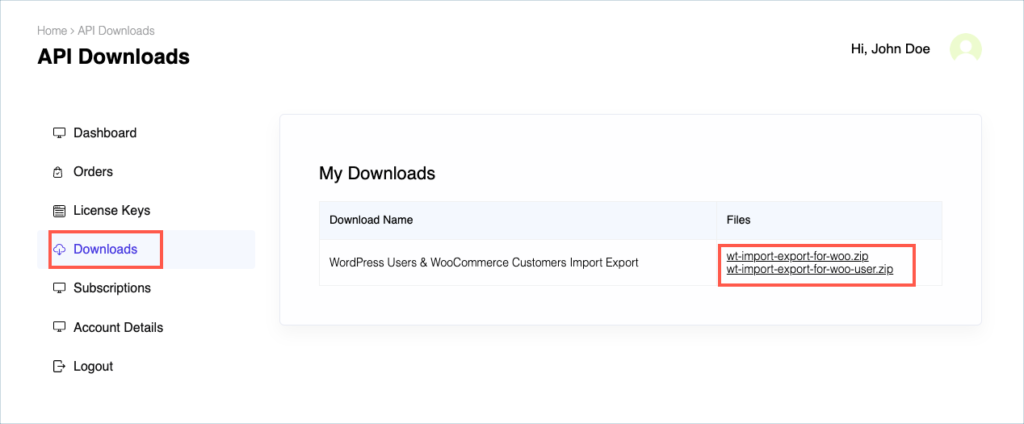
After purchasing the plugin, go to the My Account section in WebToffee. Log in with your credentials. Navigate to Downloads from the dashboard.
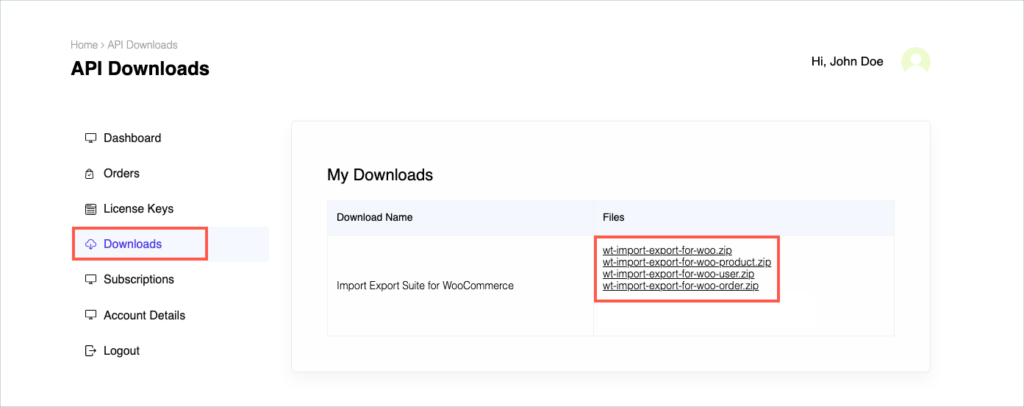
Step 2:
Click Downloads to get redirected to My Downloads. Click on the plugin package ZIP file to get it downloaded into your system.
Step 3:
After downloading the ZIP file, navigate to Dashboard > Plugins and click on Add New.
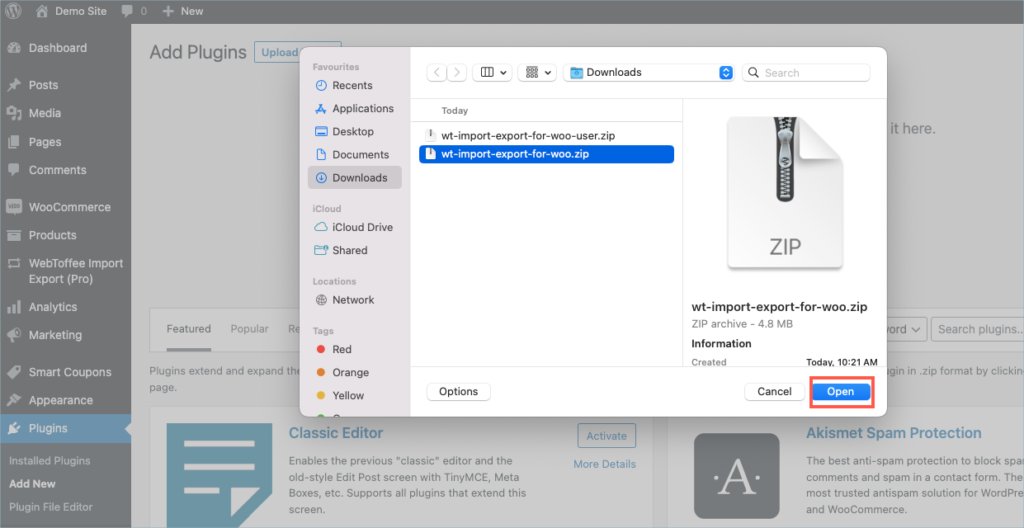
Step 4:
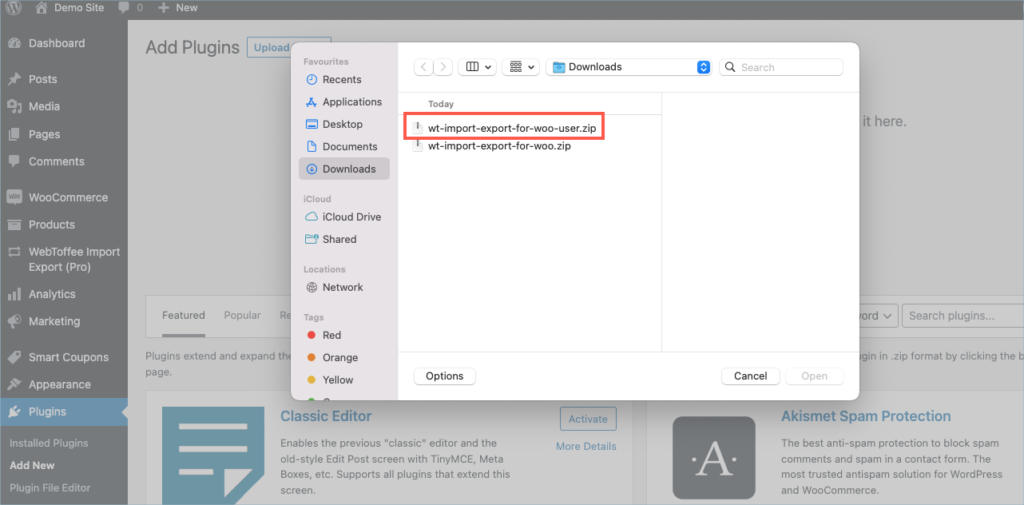
In the window that appears, Click on Choose file to browse the plugin ZIP file.
Step 5:
Choose one of the ZIP files and click open.
Step 6:
Click Install Now.
Step 7:
After installing, proceed to activate the plugin.
Step 8:
Repeat steps 5, 6, and 7 for wt-import-export-for-woo-user.zip
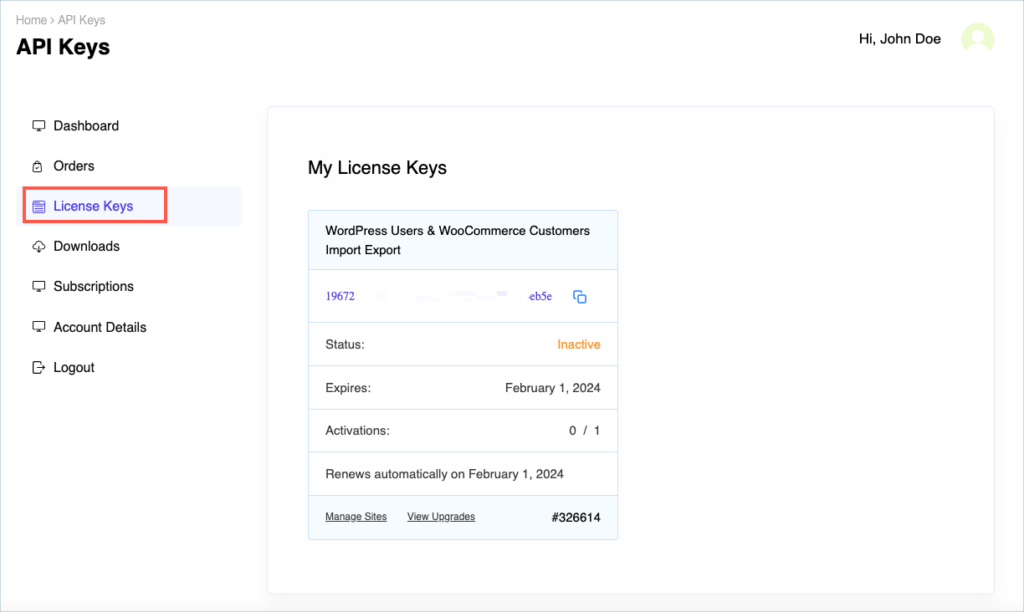
Step 9:
Get your API Key and API Email from the My Account > License Keys tab in WebToffee.
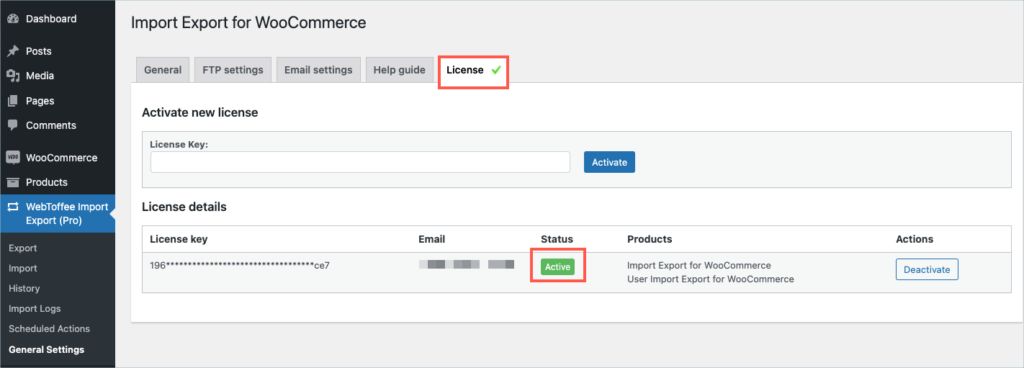
Step 10:
Navigate to WebToffee Import Export (pro) > General settings and click on the License tab.
Step 11:
Enter the API License Key. Click on Activate button.
For detailed instructions, troubleshooting guides, and additional resources, please refer to our comprehensive product documentation. Click here to access the documentation and get the most out of the plugin.
Got any query? Please leave a comment or reach out to our support. Cancel reply

Import Export Suite for WooCommerce
Last updated on: July 19, 2023
Step 1:
After purchasing the plugin, go to the My Account section in WebToffee. Log in with your credentials. Navigate to Downloads from the dashboard.
Step 2:
Click Downloads to get redirected to My Downloads. Click on the plugin package ZIP file to get it downloaded into your system.
Step 3:
After downloading the ZIP file, navigate to Dashboard > Plugins and click on Add New.
Step 4:
In the window that appears, Click on Choose file to browse the plugin ZIP file.
Step 5:
Choose wt-import-export-for woo.zip and click Open.
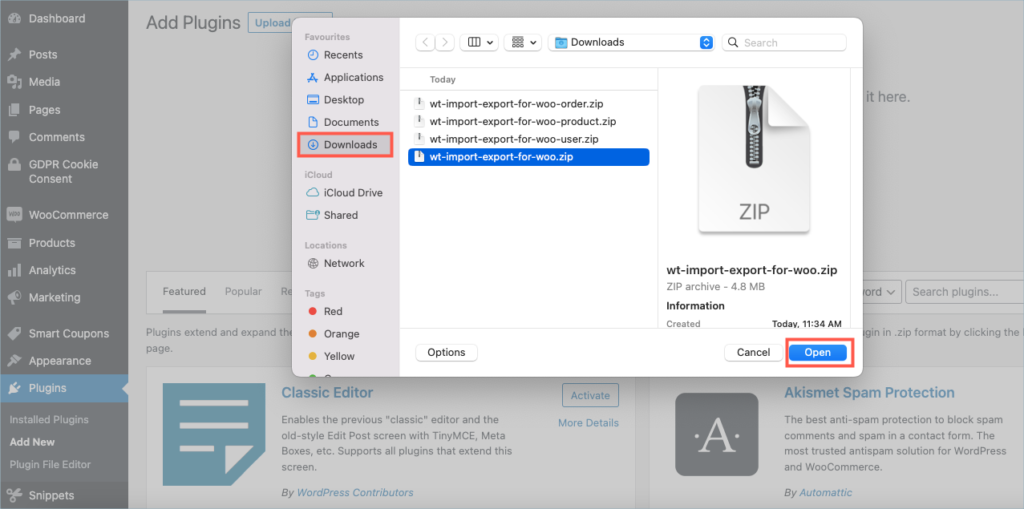
Step 6:
Click Install Now.
Step 7:
After installing, proceed to activate the plugin.
Step 8:
Repeat steps 5, 6, and 7 for all remaining Zip files that are part of the suite.

Step 9:
Get your API Key and API Email from the My Account > License Keys tab in WebToffee.
Step 10:
Navigate to WebToffee Import Export (pro) > General settings and click on the License tab.
Step 11:
Enter the API License Key and Email. Click on Activate button.

For detailed instructions, troubleshooting guides, and additional resources, please refer to our comprehensive product documentation. Click here to access the documentation and get the most out of the plugin.
Comments (1)
-
Michele Anderson
September 18, 2023
I just bought Import Export Suite for WooCommerce and uploaded the plugins to my site — but it still asks me to upgrade —and it appears to be functioning as the free version (says WebToffee Import Export (Basic) in my menu. My order number is 337924.
Got any query? Please leave a comment or reach out to our support. Cancel reply

WooCommerce PDF Invoices, Packing Slips, and Credit Notes Plugin
Last updated on: July 19, 2023
Step 1:
After purchasing the plugin, go to the My Account section in WebToffee. Log in with your credentials. Navigate to Downloads from the dashboard.
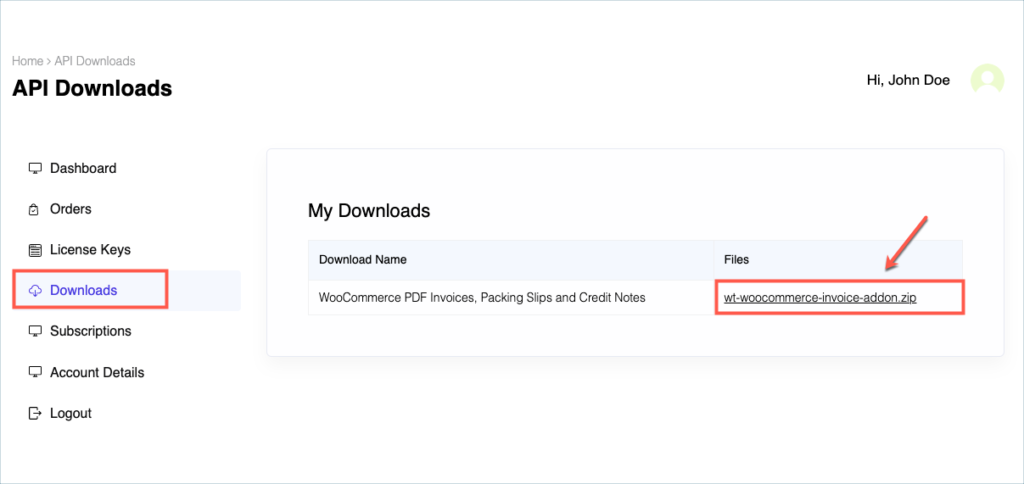
Step 2:
Click Downloads to get redirected to My Downloads. Click on the plugin package ZIP file to get it downloaded into your system.
Check:
Install the free/ basic plugin, WooCommerce PDF Invoice, Packing Slips, Delivery Notes and Shipping Labels before installing the premium add-on.
You can install the plugin directly by going to Plugins > Add New. This will take you to the Add Plugins page. From here, you can type WooCommerce PDF Invoice, Packing Slips, Delivery Notes and Shipping Labels by WebToffee in the search box.
After you have found your plugin, you can click on the Install button. As a next step, you will be shown the Activate button which you can click to activate the plugin.
For detailed instruction on how to install the free version, please refer here.
Step 3:
After downloading the ZIP file, navigate to Dashboard > Plugins and click on Add New.
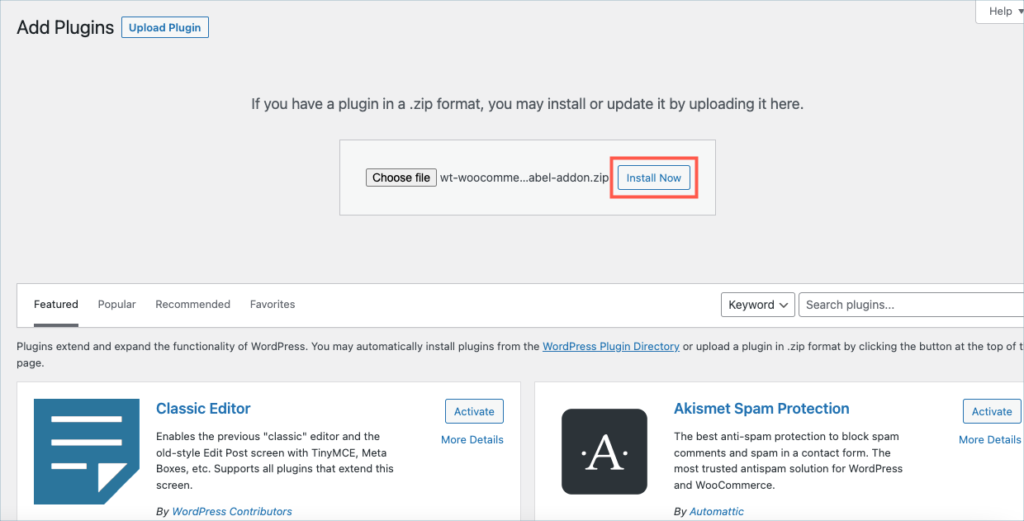
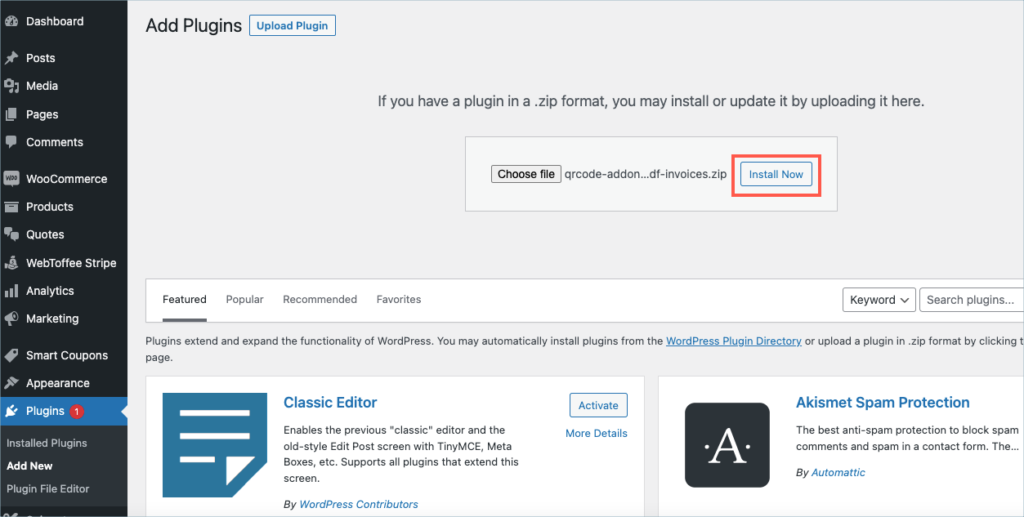
Step 4:
In the window that appears, Click on Choose file to browse the plugin ZIP file.
Step 5:
Choose the ZIP file and click open.

Step 6:
Click Install Now.
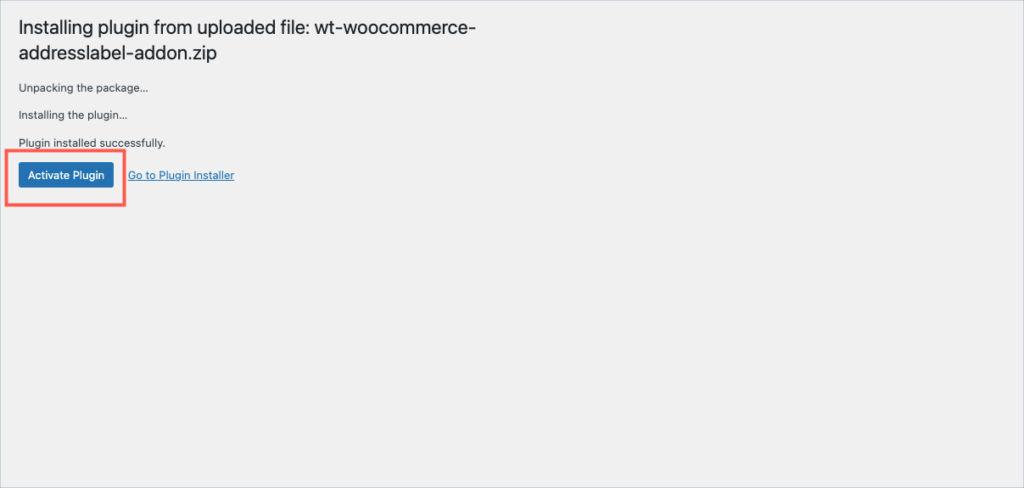
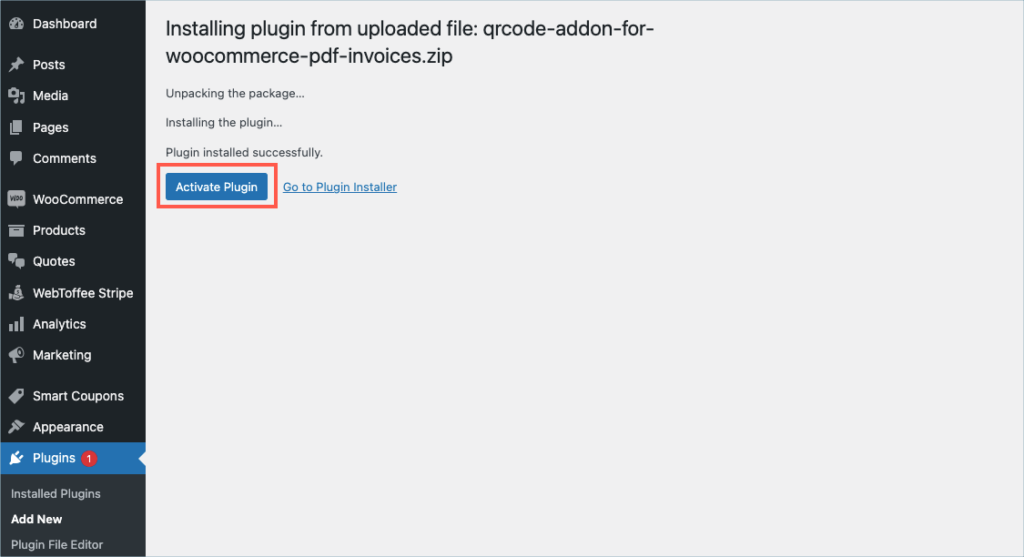
Step 7:
After installing, proceed to activate the plugin.
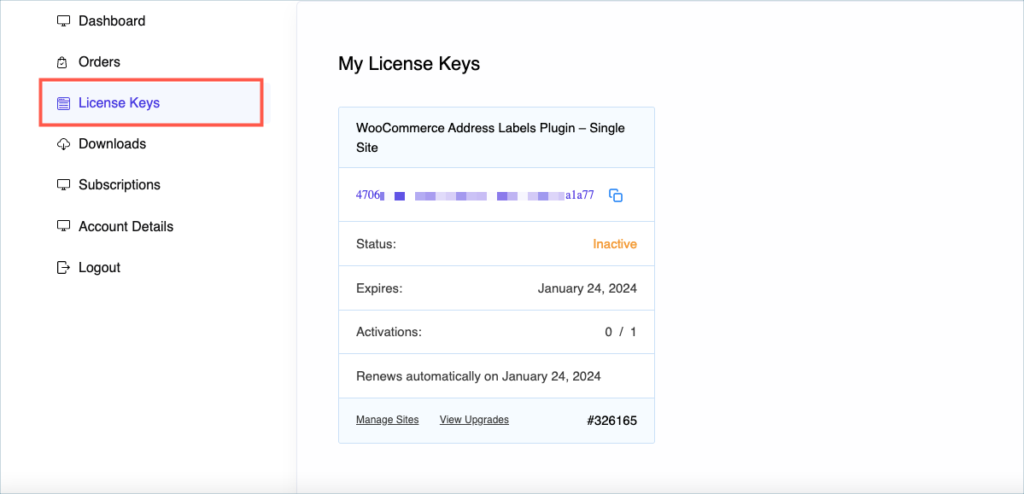
Step 8:
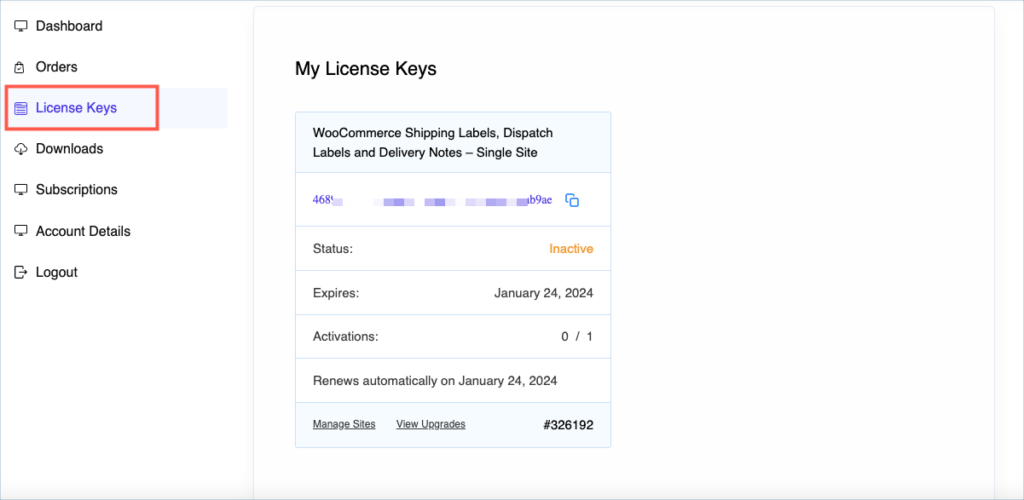
Get your API Key and API Email from the My Account > License Keys tab in WebToffee.
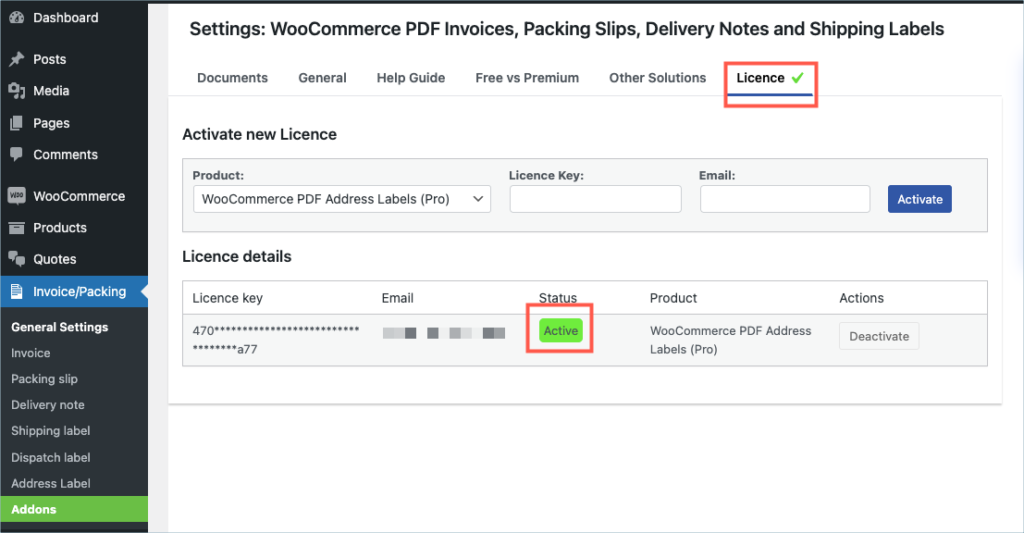
Step 9:
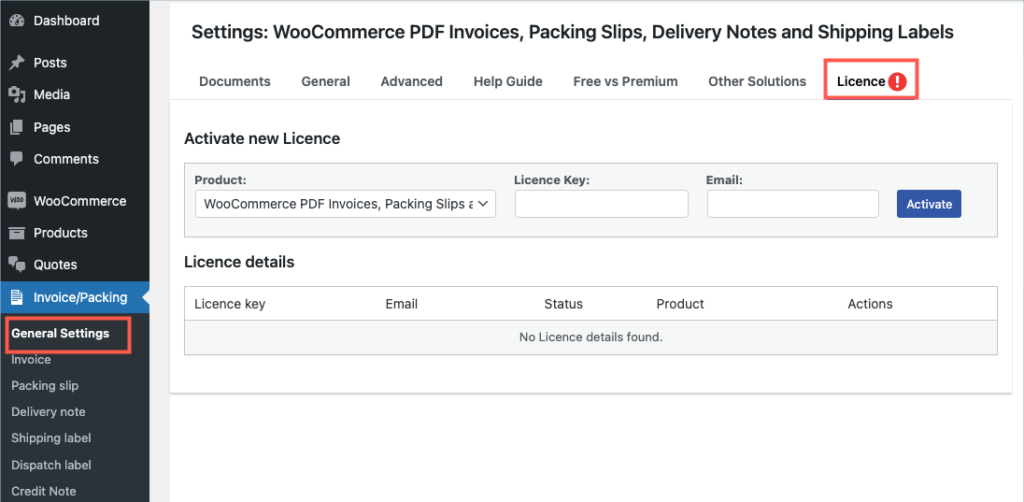
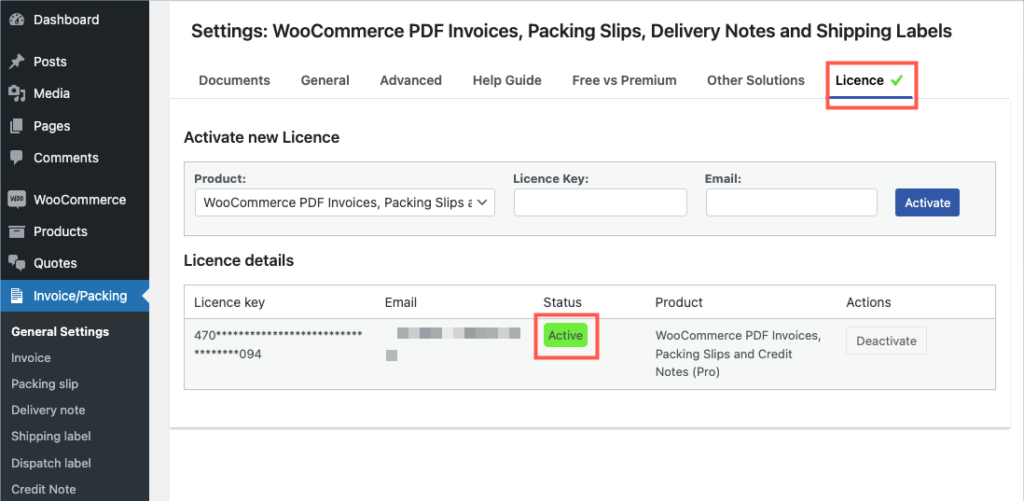
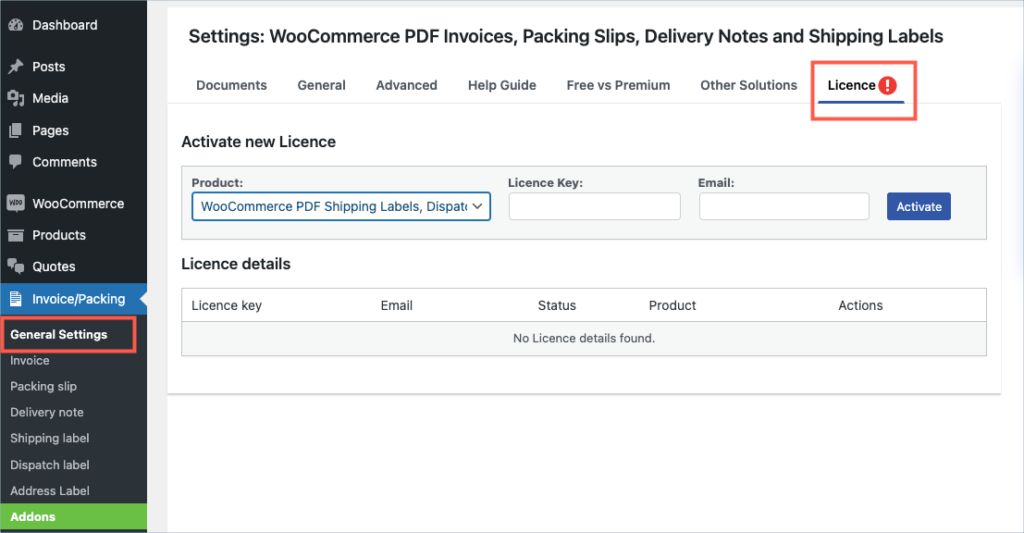
Navigate to the plugin’s general settings window. Click on the License tab.
Step 10:
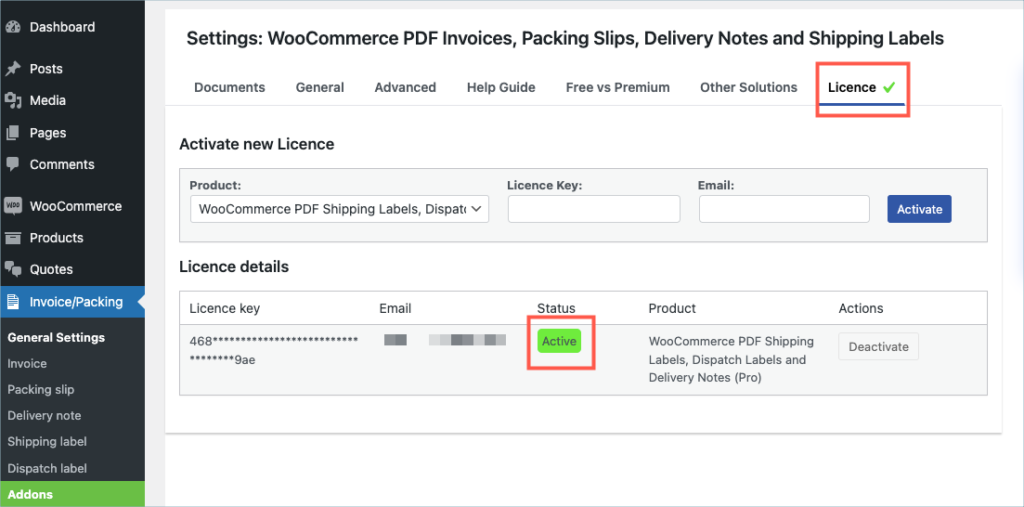
Enter the API License Key and Email. Click on Activate button.
For detailed instructions, troubleshooting guides, and additional resources, please refer to our comprehensive product documentation. Click here to access the documentation and get the most out of the plugin.
Comments (1)
-
Kelvin Lee
October 12, 2023
I have a staging site, how can I install on my staging site and test the plugins and then install it on my production site if no problem?
-
Hema
October 17, 2023
Hello Kelvin Lee,
Thanks for reaching out.
Since the license is valid per site, you can only activate it on one site at a time. During testing, you may activate in the staging site and once you decide to go live, you can deactivate from the staging site and activate it in the live site.
-
Got any query? Please leave a comment or reach out to our support. Cancel reply

Smart Coupons For WooCommerce
Last updated on: July 19, 2023
Step 1:
After purchasing the plugin, go to the My Account section in WebToffee. Log in with your credentials. Navigate to Downloads from the dashboard.
Step 2:
Click Downloads to get redirected to My Downloads. Click on the plugin package ZIP file to get it downloaded into your system.

Check:
Deactivate the free version of the Smart Coupons for WooCommerce plugin before installing the premium version.
Step 3:
After downloading the ZIP file, navigate to Dashboard > Plugins and click on Add New.

Step 4:
In the window that appears, Click on Choose file to browse the plugin ZIP file.

Step 5:
Choose the ZIP file and click open.

Step 6:
Click Install Now.

Step 7:
After installing, proceed to activate the plugin.

Step 8:
Get your API Key and API Email from the My Account > License Keys tab in WebToffee.

Step 9:
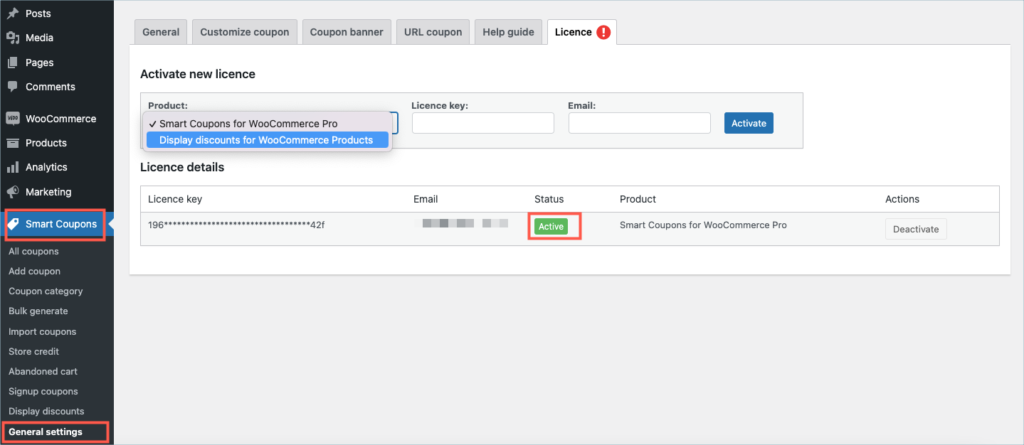
Navigate to the plugin’s general settings window. Click on the License tab.

Step 10:
Enter the API License Key and Email. Click on Activate button.

For detailed instructions, troubleshooting guides, and additional resources, please refer to our comprehensive product documentation. Click here to access the documentation and get the most out of the plugin.
Comments (4)
-
Morne Nell
February 3, 2024
Hi there.
I tried to upload the zip file so I could download the plugin but Woocommerce gave this message; The uploaded file exceeds the upload_max_filesize directive in php ini
Please e-mail me with instructions as to how to go pass this or with a new zip file to upload. Thanks
info@meatco.net.au or Mornenell76@gmail.com-
Arjun
February 5, 2024
Hi Morne,
Thank you for reaching out. To overcome the “uploaded file exceeds the max file size directive in PHP issue”, you can log in to your FTP provided by your hosting provider, locate the
.htaccessfile, and then edit it. You can then add this linephp_value upload_max_filesize 256Mat the bottom of the file. This should increase the upload file size limit to 256MB. Feel free to reach out to our support team for further assistance.
-
-
prasath
January 30, 2024
We already using free plugin, Now we bought pro version,
1. How to upgrade plugin
2. Whether we need to delete old plugin and install pro plugin?
3. Is there any way to upgrade without deleting old plugin.
4. If we delete old free plugin whether data/coupons added will also be deleted?-
Arjun
February 2, 2024
Hi Prasath,
Thank you for reaching out. Rest assured, your data is secure within the database. Feel free to uninstall the old plugin and install the new one. All your data will seamlessly transfer to the pro plugin upon installation.
-
-
-
Arjun
August 14, 2023
Hi Aurlane,
Thank you for getting in touch with us. Sounds like you need some technical assistance. Please visit our support page for technical assistance.
-
-
-
Arjun
March 30, 2023
Hi Caroline,
Thanks for reaching out. Please check if you are using the free version of the plugin. If you are, kindly deactivate the free version and install the premium version of the plugin. Then you can find the licence section in Smart Coupons > General settings > Licence.
-
Got any query? Please leave a comment or reach out to our support. Cancel reply

Subscription for WooCommerce
Last updated on: July 19, 2023
Step 1:
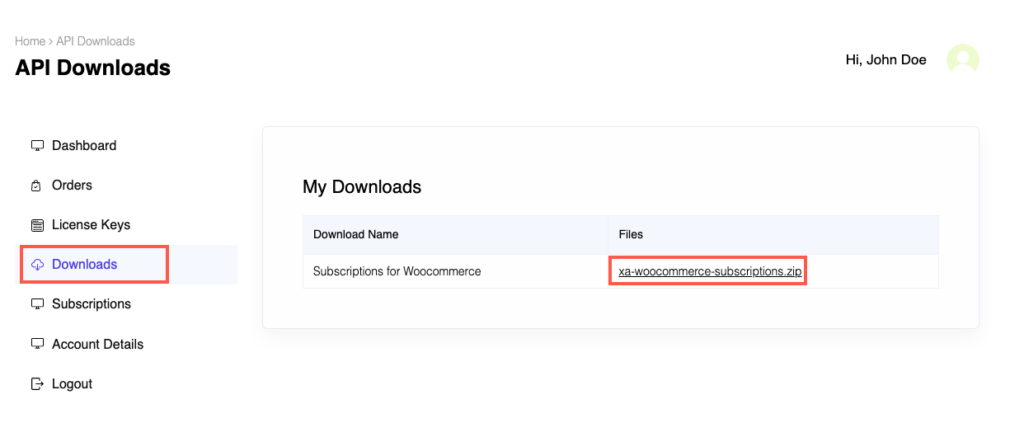
After purchasing the plugin, go to the My Account section in WebToffee. Log in with your credentials. Navigate to Downloads from the dashboard.
Step 2:
Click Downloads to get redirected to My Downloads. Click on the plugin package ZIP file to get it downloaded into your system.
Step 3:
After downloading the ZIP file, navigate to Dashboard > Plugins and click on Add New.
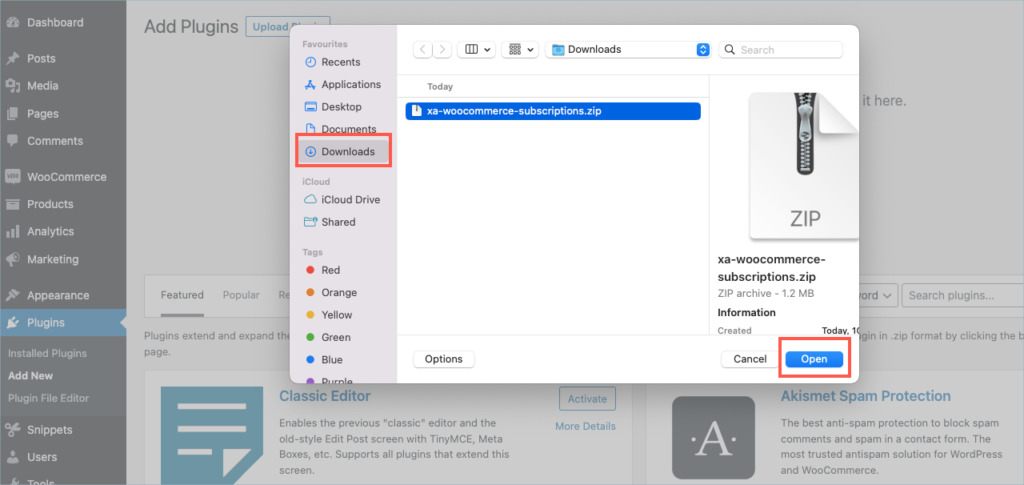
Step 4:
In the window that appears, Click on Choose file to browse the plugin ZIP file.
Step 5:
Choose the ZIP file and click open.
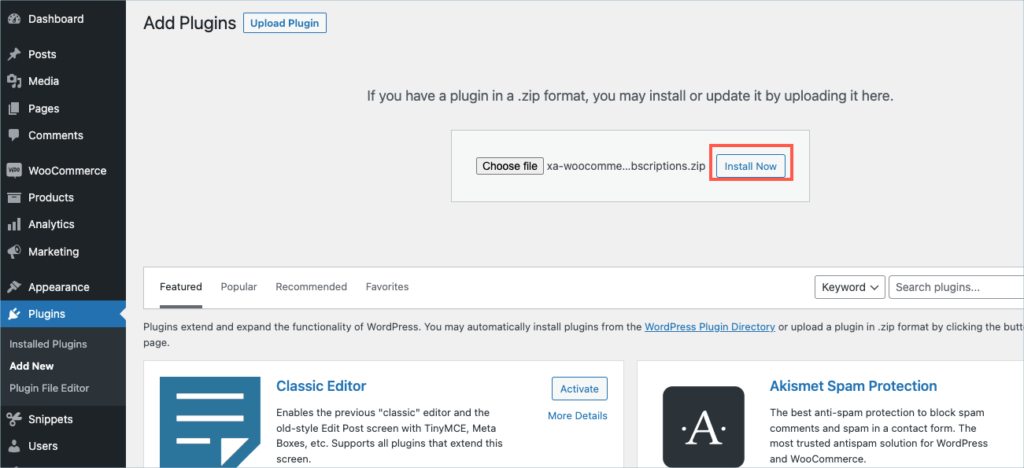
Step 6:
Click Install Now.
Step 7:
After installing, proceed to activate the plugin.
Step 8:
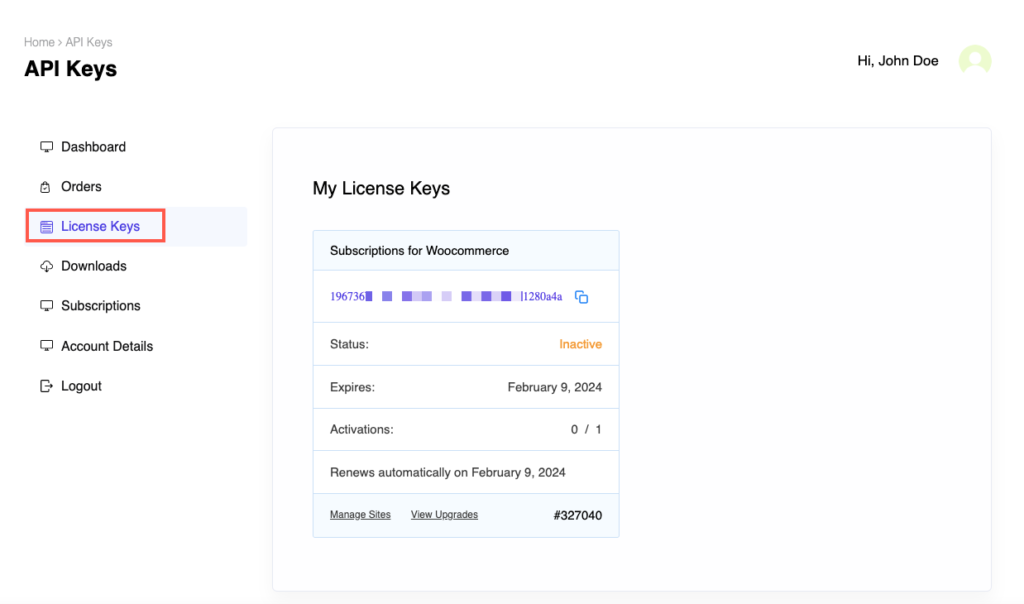
Get your API Key and API Email from the My Account > License Keys tab in WebToffee.
Step 9:
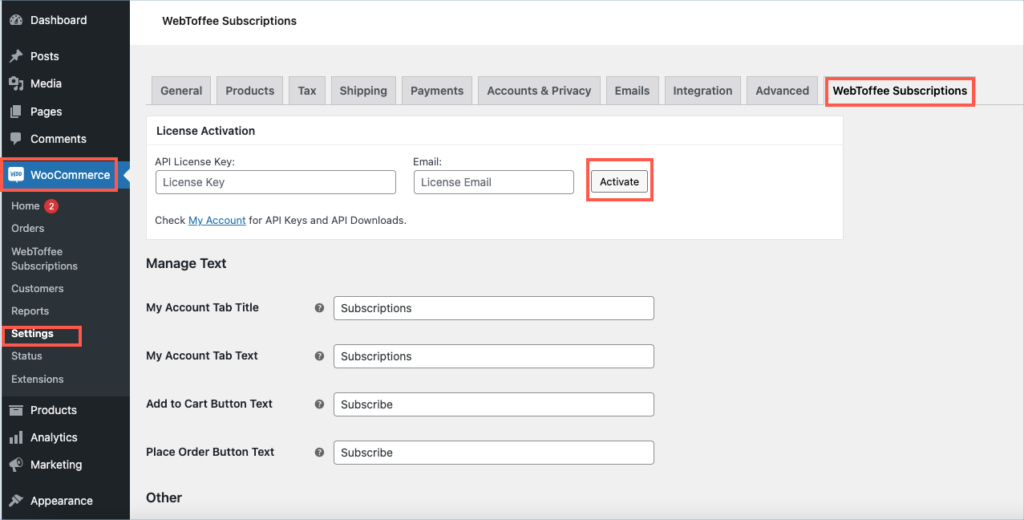
In the dashboard, navigate to WooCommerce > Settings > WebToffee Subscription. License activation section is displayed at the top of the page.
Step 10:
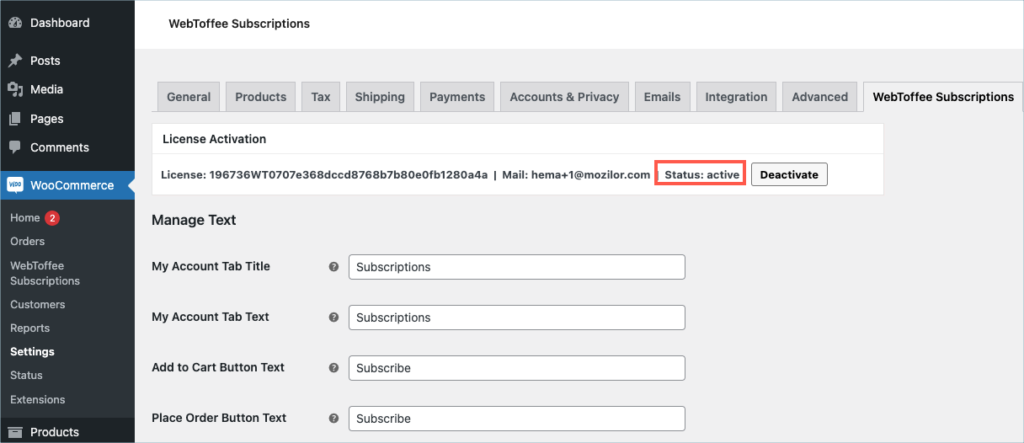
Enter the API License Key and Email. Click on Activate button.
For detailed instructions, troubleshooting guides, and additional resources, please refer to our comprehensive product documentation. Click here to access the documentation and get the most out of the plugin.
Comments (1)
-
Francisco Jose Diaz Vilches
August 31, 2023
How can enable on dev site? Is possible use the same license if the domain matches?
-
Arjun
September 1, 2023
Hi Francisco,
Thank you for getting in touch with us. If the license you have purchased is for a single site, it is not possible to use the same license for the live and staging site. However, we understand your requirement, and you can still install and use the plugin on your staging site for demo purposes. Please follow the below steps in such cases to avoid potential conflicts:
1. Keep your staging site’s payment gateways, like Stripe, in test mode. This way, you can avoid any real transactions while testing and developing.
2. Disable WooCommerce and WordPress emails on the staging site to prevent any unintended email notifications.
3. Remove live user accounts from the staging site to prevent potential issues with duplicate renewal payments or notifications.
-
Got any query? Please leave a comment or reach out to our support. Cancel reply

PayPal Express Checkout Payment Gateway for WooCommerce
Last updated on: July 19, 2023
Step 1:
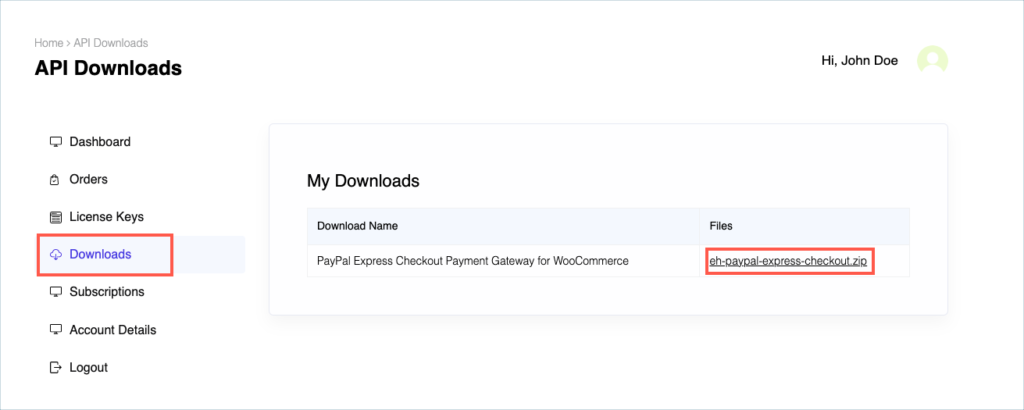
After purchasing the plugin, go to the My Account section in WebToffee. Log in with your credentials. Navigate to Downloads from the dashboard.
Step 2:
Click Downloads to get redirected to My Downloads. Click on the plugin package ZIP file to get it downloaded into your system.
Step 3:
After downloading the ZIP file, navigate to Dashboard > Plugins and click on Add New.
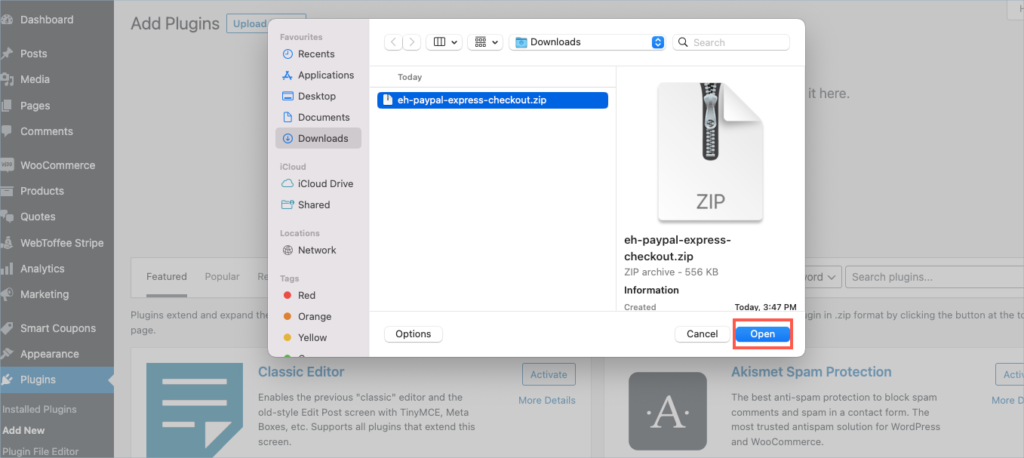
Step 4:
In the window that appears, Click on Choose file to browse the plugin ZIP file.
Step 5:
Choose the ZIP file and click open.
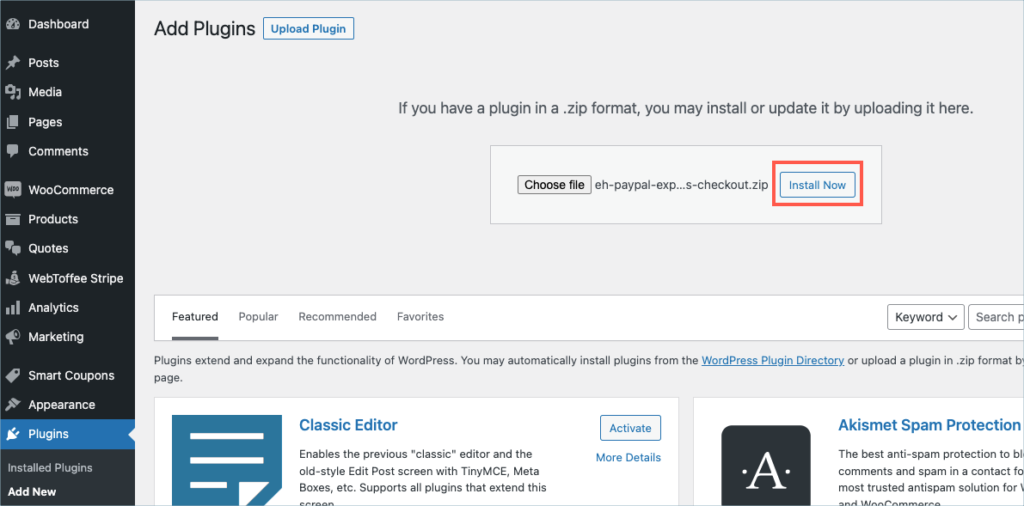
Step 6:
Click Install Now.
Step 7:
After installing, proceed to activate the plugin.

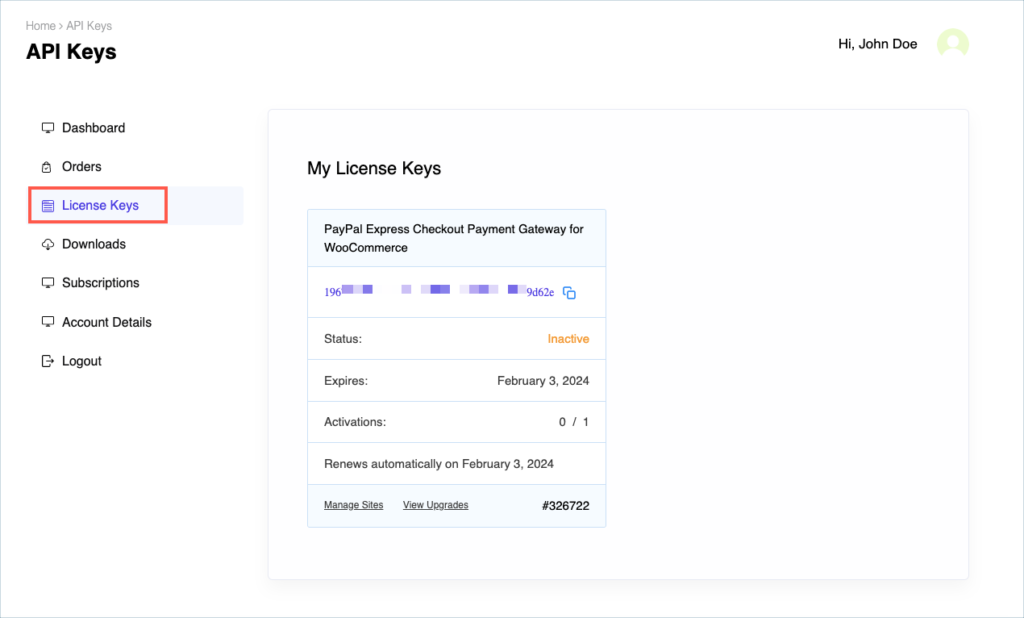
Step 8:
Get your API Key and API Email from the My Account > License Keys tab in WebToffee.
Step 9:
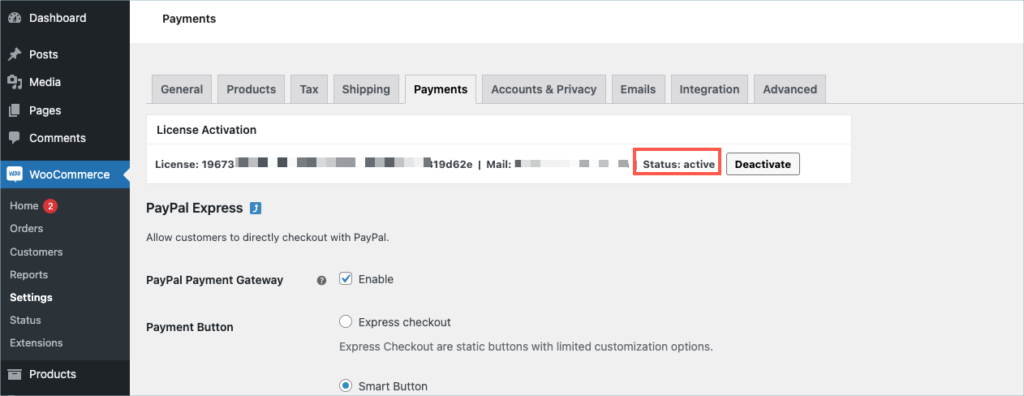
In the dashboard, navigate to WooCommerce> Settings > Payments. License activation section is displayed on top.
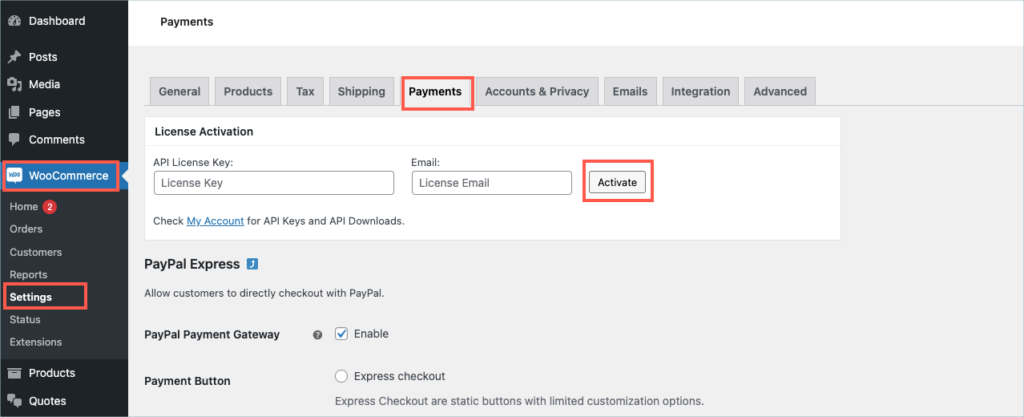
Step 10:
Enter the API License Key and Email. Click on Activate button.
For detailed instructions, troubleshooting guides, and additional resources, please refer to our comprehensive product documentation. Click here to access the documentation and get the most out of the plugin.
Comments (1)
-
Olivier NANGDA
February 23, 2023
Hello, look like there is no payment with a credit card with this plugin.
Also, I can see it is not compatible with WordPress 6.1.1 since I have misfunctioning in my web site.-
Mike
March 9, 2023
Hi Olivier,
Sounds like you need some technical assistance. Please visit our support page and submit a ticket so we can assist you better: https://www.webtoffee.com/support/
-
Got any query? Please leave a comment or reach out to our support. Cancel reply

Stripe Payment Gateway for WooCommerce
Last updated on: July 19, 2023
Step 1:
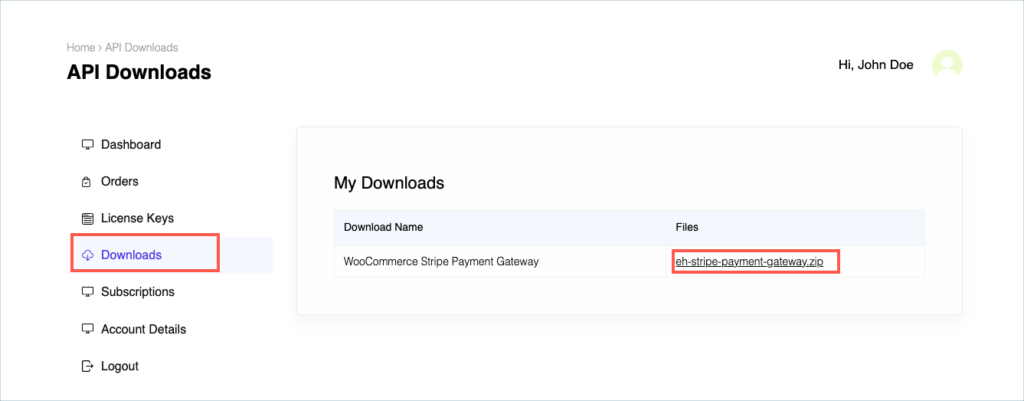
After purchasing the plugin, go to the My Account section in WebToffee. Log in with your credentials. Navigate to Downloads from the dashboard.
Step 2:
Click Downloads to get redirected to My Downloads. Click on the plugin package ZIP file to get it downloaded into your system.
Step 3:
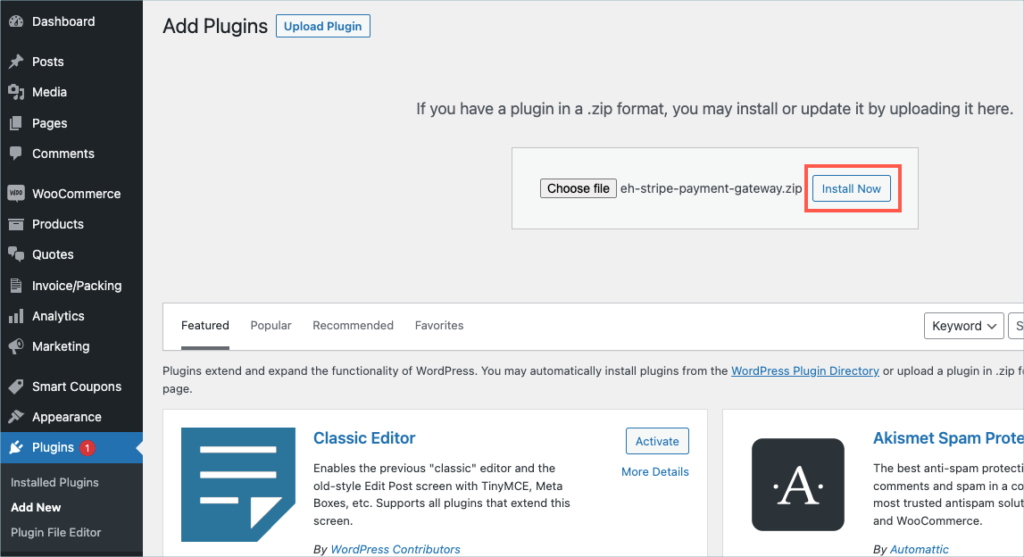
After downloading the ZIP file, navigate to Dashboard > Plugins and click on Add New.
Step 4:
In the window that appears, Click on Choose file to browse the plugin ZIP file.
Step 5:
Choose the ZIP file and click open.

Step 6:
Click Install Now.
Step 7:
After installing, proceed to activate the plugin.
Step 8:
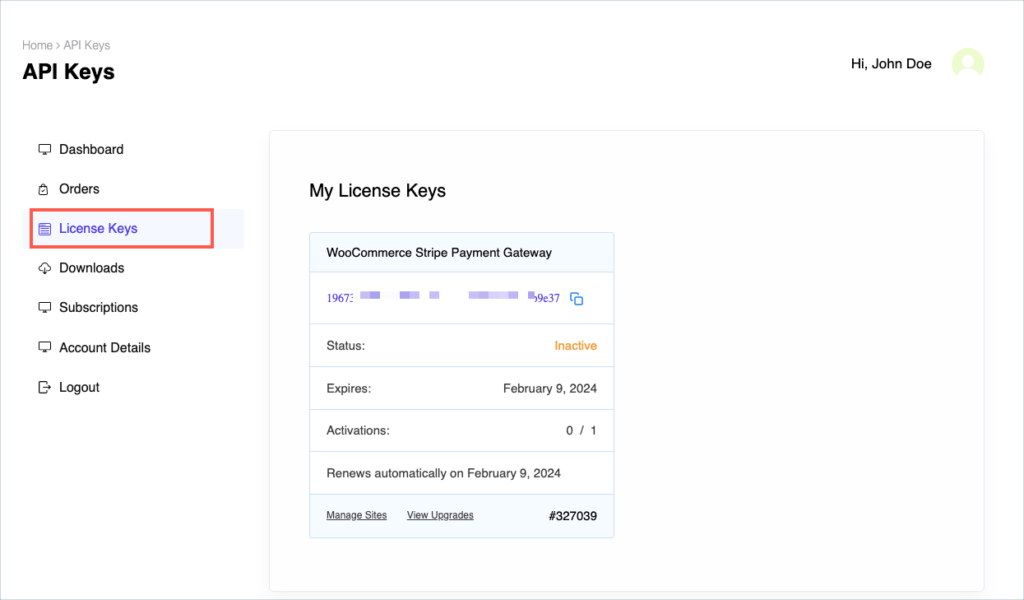
Get your API Key and API Email from the My Account > License Keys tab in WebToffee.
Step 9:
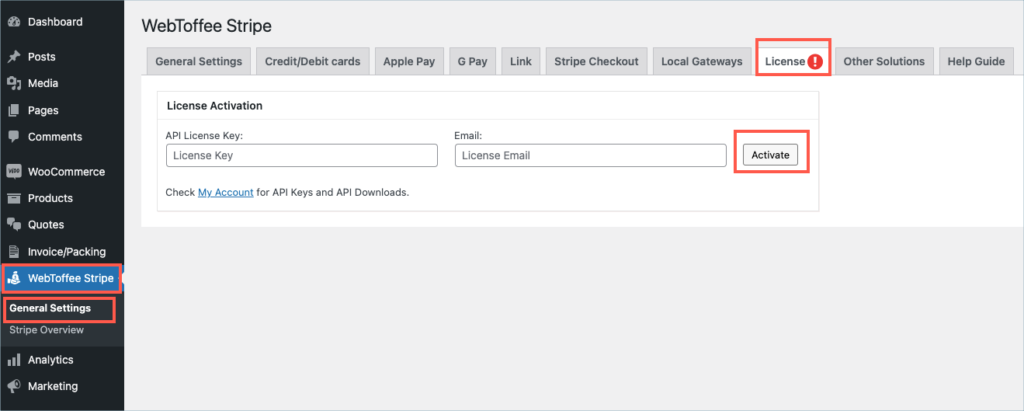
In the dashboard, navigate to WebToffee Stripe > General Settings > License. License activation section is displayed.
Step 10:
Enter the API License Key and Email. Click on Activate button.
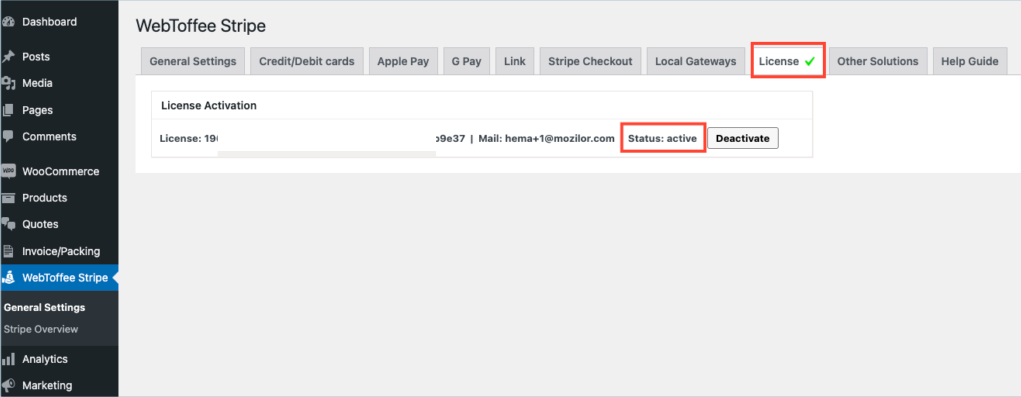
For detailed instructions, troubleshooting guides, and additional resources, please refer to our comprehensive product documentation. Click here to access the documentation and get the most out of the plugin.
Got any query? Please leave a comment or reach out to our support. Cancel reply

URL Coupons for WooCommerce
Last updated on: July 19, 2023
Step 1:
After purchasing the plugin, go to the My Account section in WebToffee. Log in with your credentials. Navigate to Downloads from the dashboard.
Step 2:
Click Downloads to get redirected to My Downloads. Click on the plugin package ZIP file to get it downloaded into your system.
Step 3:
After downloading the ZIP file, navigate to Dashboard > Plugins and click on Add New.
Step 4:
In the window that appears, Click on Choose file to browse the plugin ZIP file.
Step 5:
Choose the ZIP file and click open.
Step 6:
Click Install Now.
Step 7:
After installing, proceed to activate the plugin.
Step 8:
Get your API Key and API Email from the My Account > License Keys tab in WebToffee.
Step 9:
In the dashboard, navigate to Marketing > Coupons > URL Coupons. License activation section is displayed.
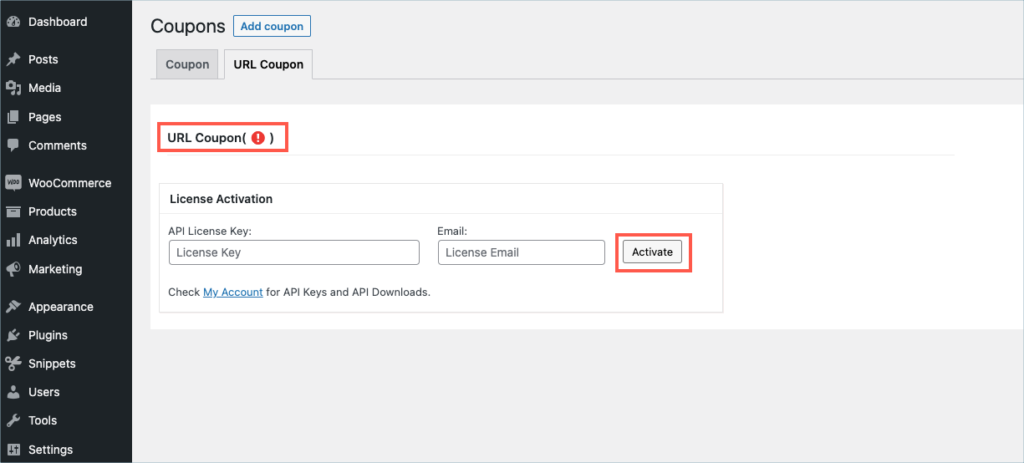
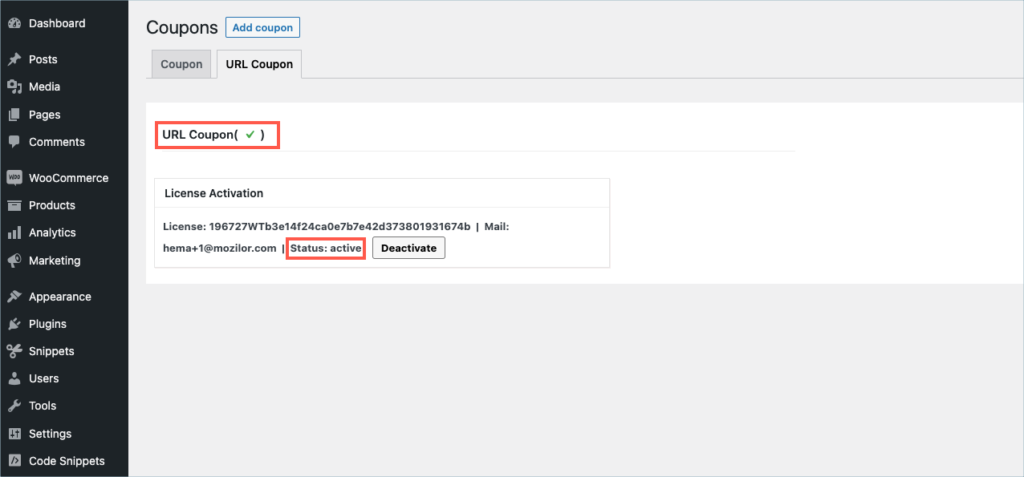
Step 10:
Enter the API License Key and Email. Click on Activate button.
For detailed instructions, troubleshooting guides, and additional resources, please refer to our comprehensive product documentation. Click here to access the documentation and get the most out of the plugin.
Got any query? Please leave a comment or reach out to our support. Cancel reply

Sequential Order Number for WooCommerce
Last updated on: July 19, 2023
Step 1:
After purchasing the plugin, go to the My Account section in WebToffee. Log in with your credentials. Navigate to Downloads from the dashboard.
Step 2:
Click Downloads to get redirected to My Downloads. Click on the plugin package ZIP file to get it downloaded into your system.

Step 3:
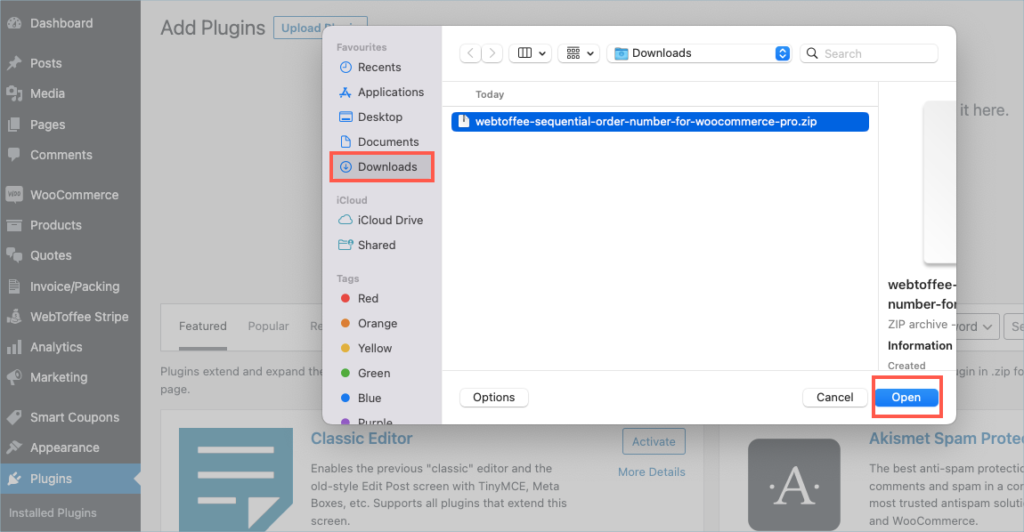
After downloading the ZIP file, navigate to Dashboard > Plugins and click on Add New.
Step 4:
In the window that appears, Click on Choose file to browse the plugin ZIP file.
Step 5:
Choose the ZIP file and click open.
Step 6:
Click Install Now.
Step 7:
After installing, proceed to activate the plugin.
Step 8:
Get your API Key and API Email from the My Account > License Keys tab in WebToffee.
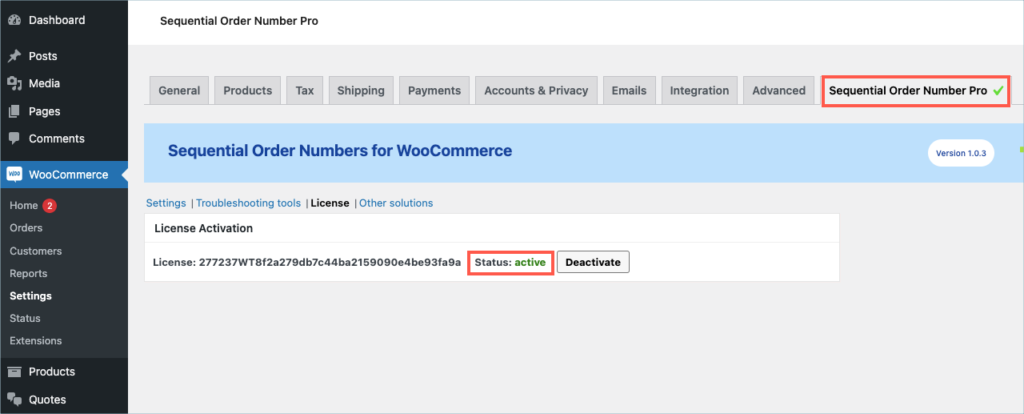
Step 9:
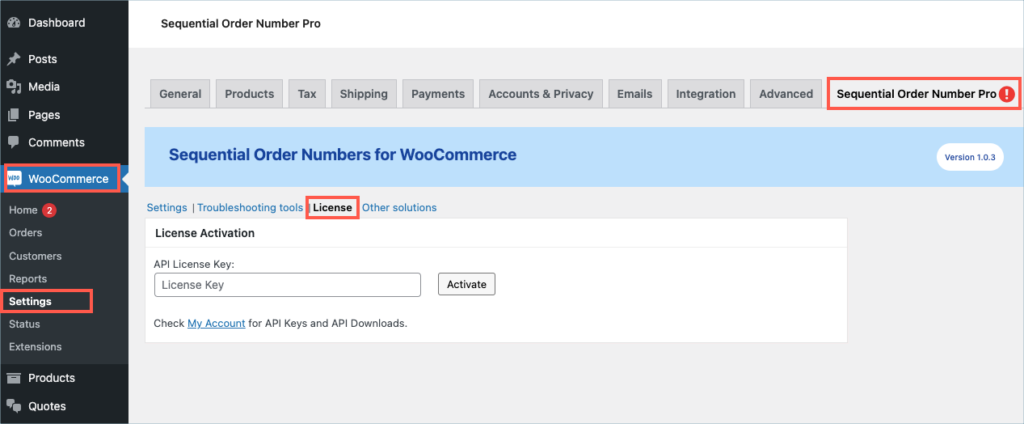
In the dashboard, navigate to WooCommerce > Settings > Sequential Order Number Pro > License. License activation section is displayed on top.
Step 10:
Enter the API License Key and Email. Click on Activate button.
For detailed instructions, troubleshooting guides, and additional resources, please refer to our comprehensive product documentation. Click here to access the documentation and get the most out of the plugin.
Got any query? Please leave a comment or reach out to our support. Cancel reply

WooCommerce Shipping Labels, Dispatch Labels, and Delivery Notes Plugin
Last updated on: July 19, 2023
Step 1:
After purchasing the plugin, go to the My Account section in WebToffee. Log in with your credentials. Navigate to Downloads from the dashboard.
Step 2:
Click Downloads to get redirected to My Downloads. Click on the plugin package ZIP file to get it downloaded into your system.
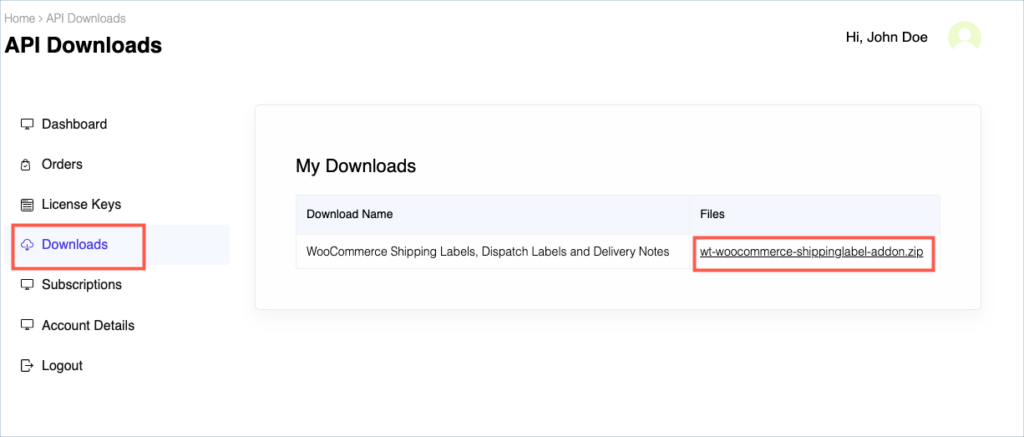
Check:
Install the free/ basic plugin, WooCommerce PDF Invoice, Packing Slips, Delivery Notes and Shipping Labels before installing the premium add-on.
You can install the plugin directly by going to Plugins > Add New. This will take you to the Add Plugins page. From here, you can type WooCommerce PDF Invoice, Packing Slips, Delivery Notes and Shipping Labels by WebToffee in the search box.
After you have found your plugin, you can click on the Install button. As a next step, you will be shown the Activate button which you can click to activate the plugin. After activation, you can configure and use the plugin on your website.
For detailed instruction on how to install the free version, please refer here.
Step 3:
After downloading the ZIP file, navigate to Dashboard > Plugins and click on Add New.
Step 4:
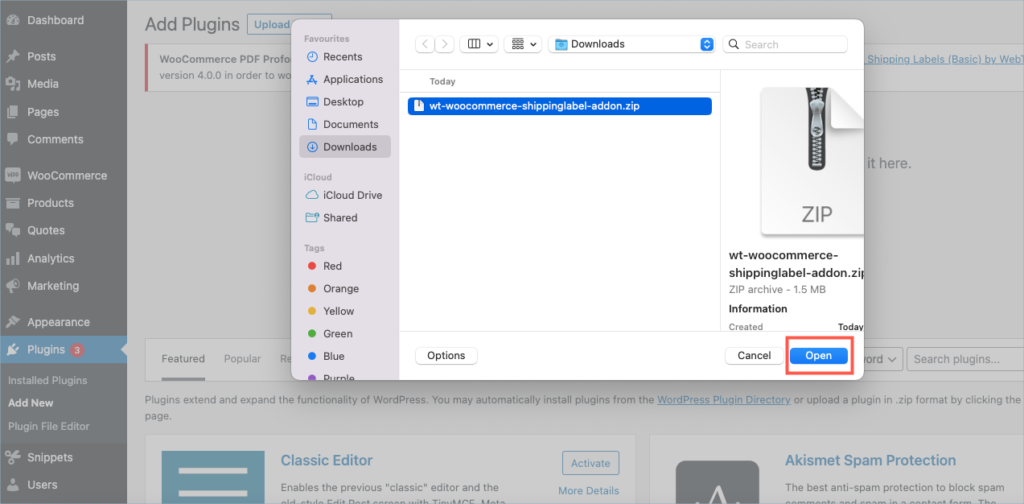
In the window that appears, Click on Choose file to browse the plugin ZIP file.
Step 5:
Choose the ZIP file and click open.
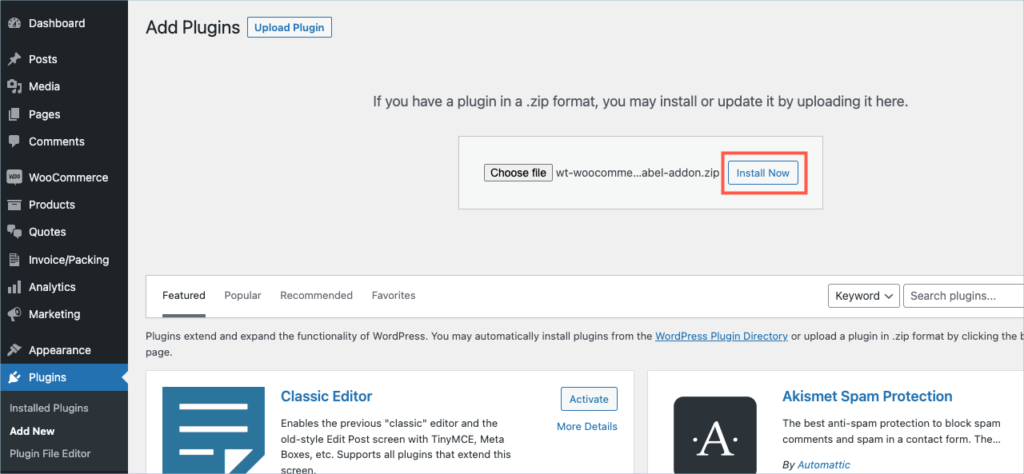
Step 6:
Click Install Now.
Step 7:
After installing, proceed to activate the plugin.
Step 8:
Get your API Key and API Email from the My Account > License Keys tab in WebToffee.
Step 9:
Navigate to the plugin’s general settings window. Click on the License tab.
Step 10:
Enter the API License Key and Email. Click on Activate button.
For detailed instructions, troubleshooting guides, and additional resources, please refer to our comprehensive product documentation. Click here to access the documentation and get the most out of the plugin.
Comments (1)
-
Ritik
March 13, 2024
Dear,
Regarding shipping label generated plugin I ask question about this plugin, It is work for Blue Dart Logistic Service Module? I am created my website in WordPress Woocommerce platform.Thanks
-
Sanjai Valsan
March 20, 2024
Hello Ritik,
Thank you for reaching out!
Given that your website is created using WordPress WooCommerce, you should indeed be able to generate shipping labels for the orders in your store using the plugin.
-
Got any query? Please leave a comment or reach out to our support. Cancel reply

WooCommerce Picklists Plugin
Last updated on: July 19, 2023
Step 1:
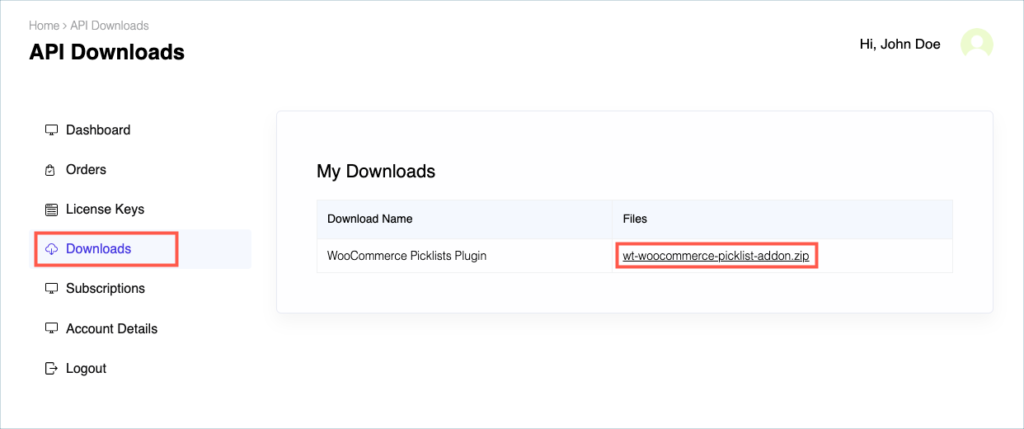
After purchasing the plugin, go to the My Account section in WebToffee. Log in with your credentials. Navigate to Downloads from the dashboard.
Step 2:
Click Downloads to get redirected to My Downloads. Click on the plugin package ZIP file to get it downloaded into your system.
Check:
Install the free/ basic plugin, WooCommerce PDF Invoice, Packing Slips, Delivery Notes and Shipping Labels before installing the premium add-on.
You can install the plugin directly by going to Plugins > Add New. This will take you to the Add Plugins page. From here, you can type WooCommerce PDF Invoice, Packing Slips, Delivery Notes and Shipping Labels by WebToffee in the search box.
After you have found your plugin, you can click on the Install button. As a next step, you will be shown the Activate button which you can click to activate the plugin. After activation, you can configure and use the plugin on your website.
For detailed instruction on how to install the free version, please refer here.
Step 3:
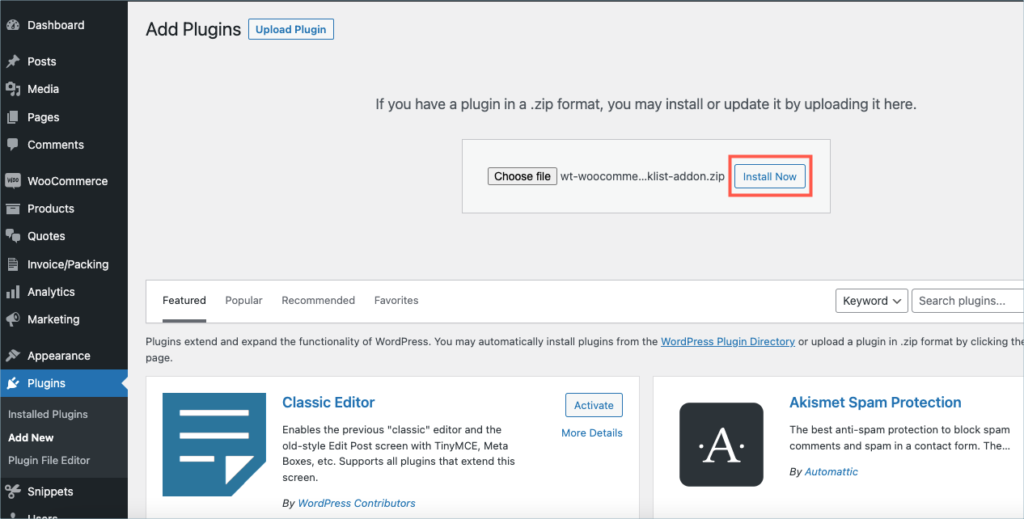
After downloading the ZIP file, navigate to Dashboard > Plugins and click on Add New.
Step 4:
In the window that appears, Click on Choose file to browse the plugin ZIP file.
Step 5:
Choose the ZIP file and click open.

Step 6:
Click Install Now.
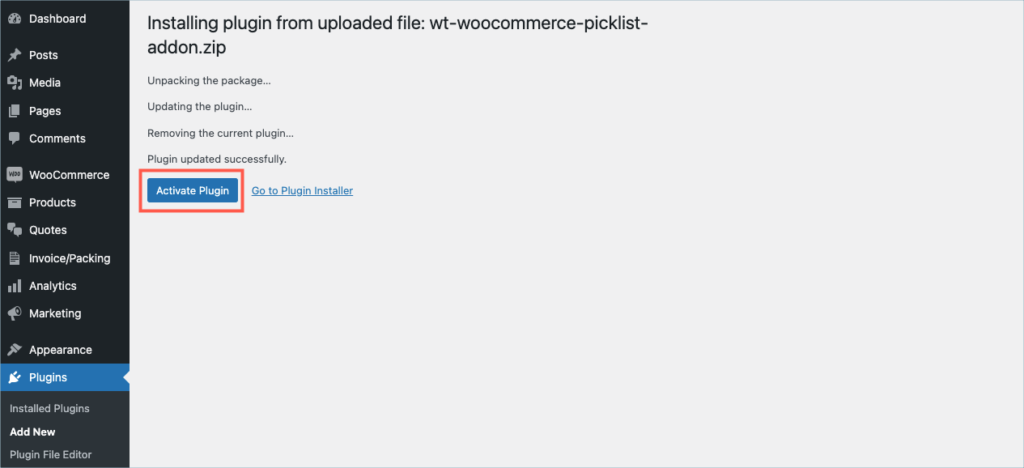
Step 7:
After installing, proceed to activate the plugin.
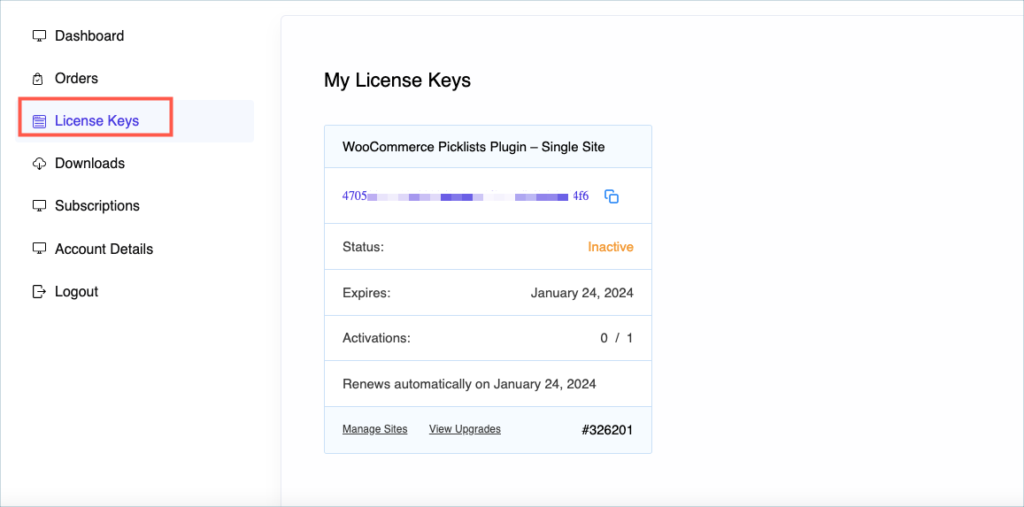
Step 8:
Get your API Key and API Email from the My Account > License Keys tab in WebToffee.
Step 9:
Navigate to the plugin’s general settings window. Click on the License tab.
Step 10:
Enter the API License Key and Email. Click on Activate button.
For detailed instructions, troubleshooting guides, and additional resources, please refer to our comprehensive product documentation. Click here to access the documentation and get the most out of the plugin.
Got any query? Please leave a comment or reach out to our support. Cancel reply

WooCommerce Address Labels Plugin
Last updated on: July 19, 2023
Step 1:
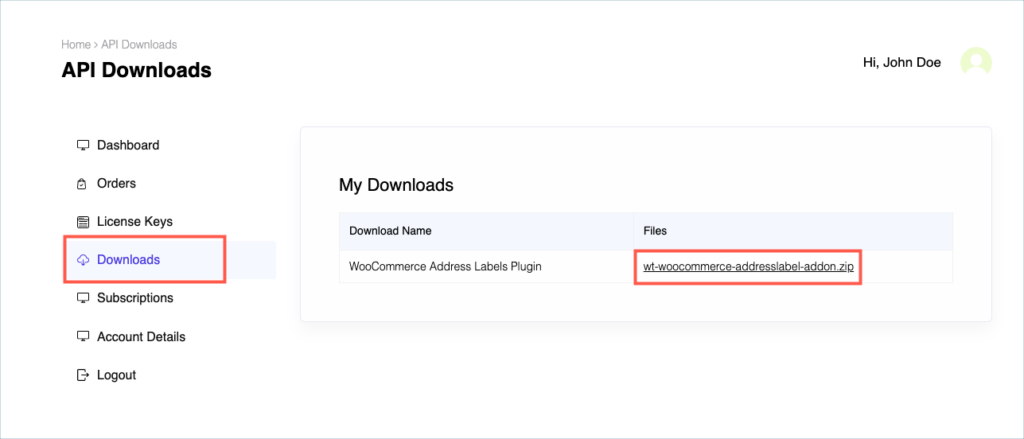
After purchasing the plugin, go to the My Account section in WebToffee. Log in with your credentials. Navigate to Downloads from the dashboard.
Step 2:
Click Downloads to get redirected to My Downloads. Click on the plugin package ZIP file to get it downloaded into your system.
Check:
Install the free/ basic plugin, WooCommerce PDF Invoice, Packing Slips, Delivery Notes and Shipping Labels before installing the premium add-on.
You can install the plugin directly by going to Plugins > Add New. This will take you to the Add Plugins page. From here, you can type WooCommerce PDF Invoice, Packing Slips, Delivery Notes and Shipping Labels by WebToffee in the search box.
After you have found your plugin, you can click on the Install button. As a next step, you will be shown the Activate button which you can click to activate the plugin. After activation, you can configure and use the plugin on your website.
For detailed instruction on how to install the free version, please refer here.
Step 3:
After downloading the ZIP file, navigate to Dashboard > Plugins and click on Add New.
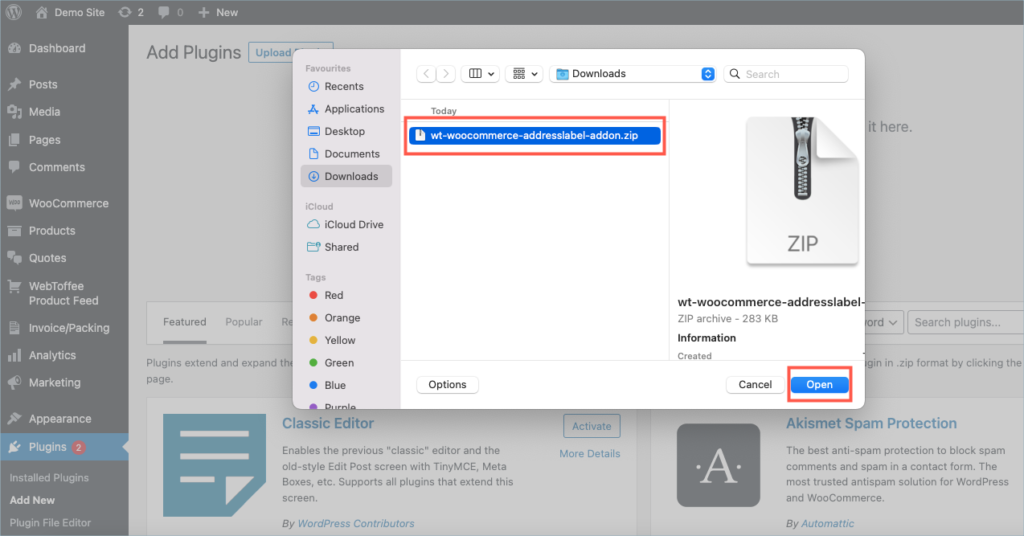
Step 4:
In the window that appears, Click on Choose file to browse the plugin ZIP file.
Step 5:
Choose the ZIP file and click open.
Step 6:
Click Install Now.
Step 7:
After installing, proceed to activate the plugin.
Step 8:
Get your API Key and API Email from the My Account > License Keys tab in WebToffee.
Step 9:
Navigate to the plugin’s general settings window. Click on the License tab.
Step 10:
Enter the API License Key and Email. Click on Activate button.
For detailed instructions, troubleshooting guides, and additional resources, please refer to our comprehensive product documentation. Click here to access the documentation and get the most out of the plugin.
Got any query? Please leave a comment or reach out to our support. Cancel reply

WooCommerce Proforma Invoices Plugin
Last updated on: July 19, 2023
Step 1:
After purchasing the plugin, go to the My Account section in WebToffee. Log in with your credentials. Navigate to Downloads from the dashboard.
Step 2:
Click Downloads to get redirected to My Downloads. Click on the plugin package ZIP file to get it downloaded into your system.
Check:
Install the free/ basic plugin, WooCommerce PDF Invoice, Packing Slips, Delivery Notes and Shipping Labels before installing the premium add-on.
You can install the plugin directly by going to Plugins > Add New. This will take you to the Add Plugins page. From here, you can type WooCommerce PDF Invoice, Packing Slips, Delivery Notes and Shipping Labels by WebToffee in the search box.
After you have found your plugin, you can click on the Install button. As a next step, you will be shown the Activate button which you can click to activate the plugin. After activation, you can configure and use the plugin on your website.
For detailed instruction on how to install the free version, please refer here.
Step 3:
After downloading the ZIP file, navigate to Dashboard > Plugins and click on Add New.
Step 4:
In the window that appears, Click on Choose file to browse the plugin ZIP file.
Step 5:
Choose the ZIP file and click open.
Step 6:
Click Install Now.

Step 7:
After installing, proceed to activate the plugin.
Step 8:
Get your API Key and API Email from the My Account > License Keys tab in WebToffee.
Step 9:
Navigate to the plugin’s general settings window. Click on the License tab.
Step 10:
Enter the API License Key and Email. Click on Activate button.
For detailed instructions, troubleshooting guides, and additional resources, please refer to our comprehensive product documentation. Click here to access the documentation and get the most out of the plugin.
Got any query? Please leave a comment or reach out to our support. Cancel reply

QR Code Add-On for WooCommerce PDF invoice
Last updated on: July 19, 2023
Step 1:
After purchasing the plugin, go to the My Account section in WebToffee. Log in with your credentials. Navigate to Downloads from the dashboard.
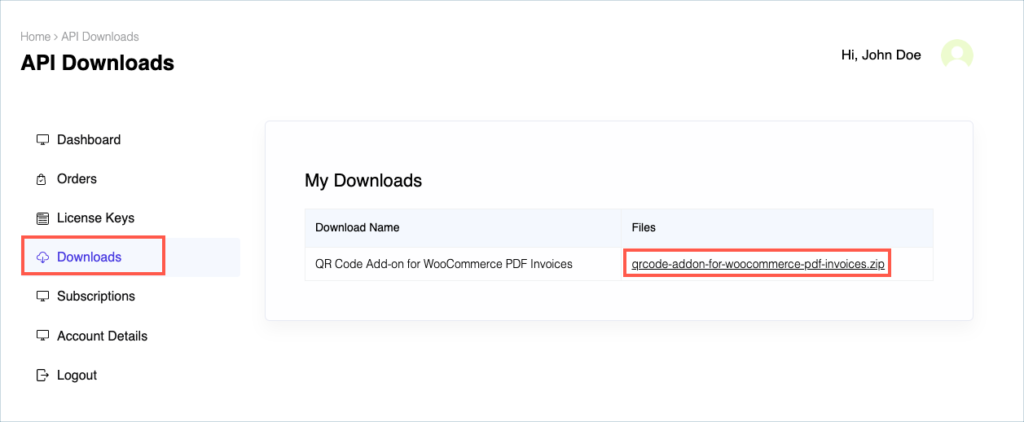
Step 2:
Click Downloads to get redirected to My Downloads. Click on the plugin package ZIP file to get it downloaded into your system.
Step 3:
After downloading the ZIP file, navigate to Dashboard > Plugins and click on Add New.
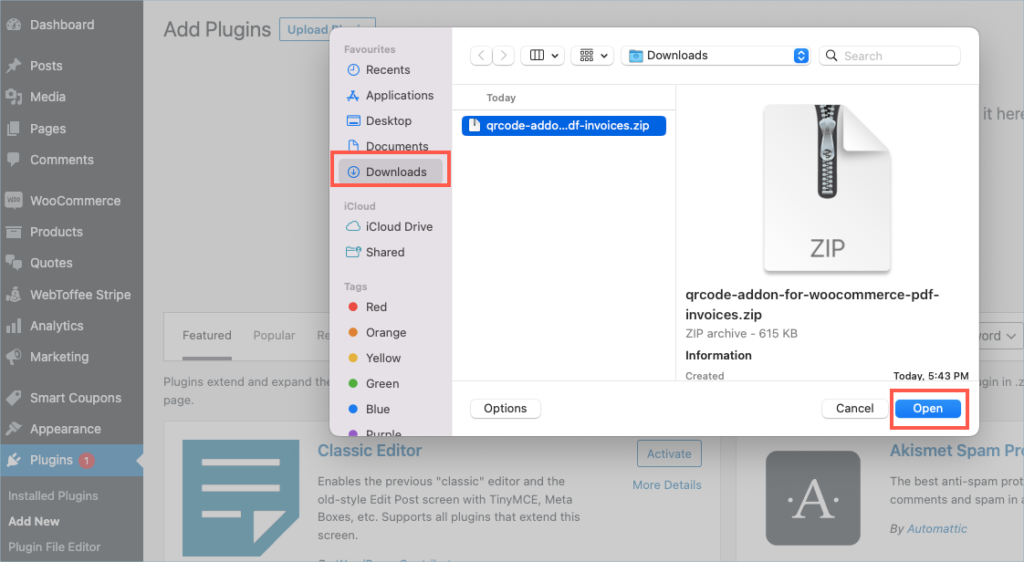
Step 4:
In the window that appears, Click on Choose file to browse the plugin ZIP file.
Step 5:
Choose the ZIP file and click open.
Check:
Install the free plugin, WooCommerce PDF Invoice, Packing Slips, Delivery Notes and Shipping Labels and WooCommerce PDF Invoices, Packing slips, and Credit Notes Plugin (pro) before installing the QR code add-on.
You can install the free plugin directly by going to Plugins > Add New. This will take you to the Add Plugins page. From here, you can type WooCommerce PDF Invoice, Packing Slips, Delivery Notes and Shipping Labels by WebToffee in the search box.
After you have found your plugin, you can click on the Install button. As a next step, you will be shown the Activate button which you can click to activate the plugin. After activation, you can configure and use the plugin on your website.
For detailed instruction on how to install the free version, please refer here.
For detailed instruction on how to install the pro add-on, please refer here
Step 6:
Click Install Now.
Step 7:
After installing, proceed to activate the plugin.
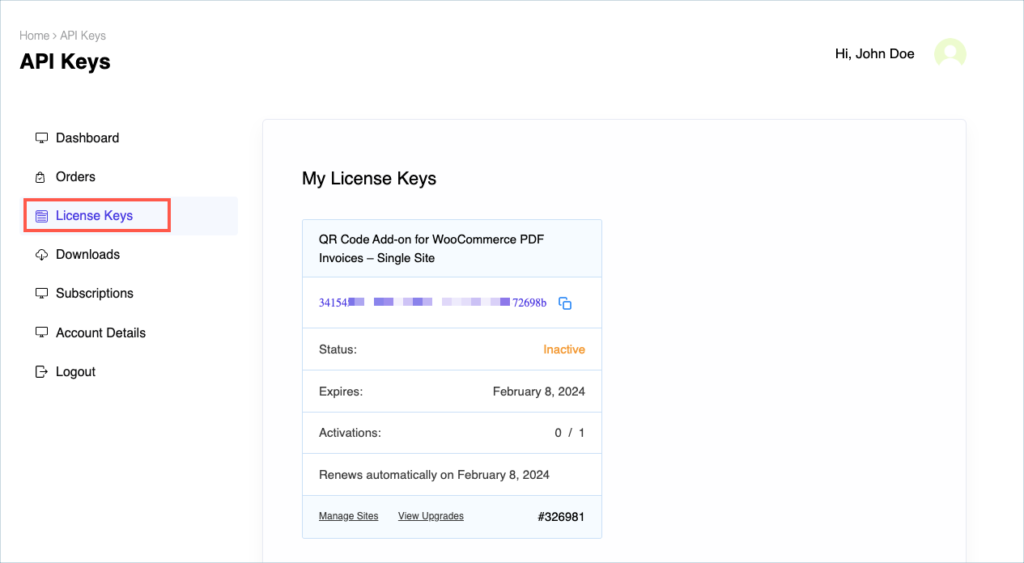
Step 8:
Get your API Key and API Email from the My Account > License Keys tab in WebToffee.
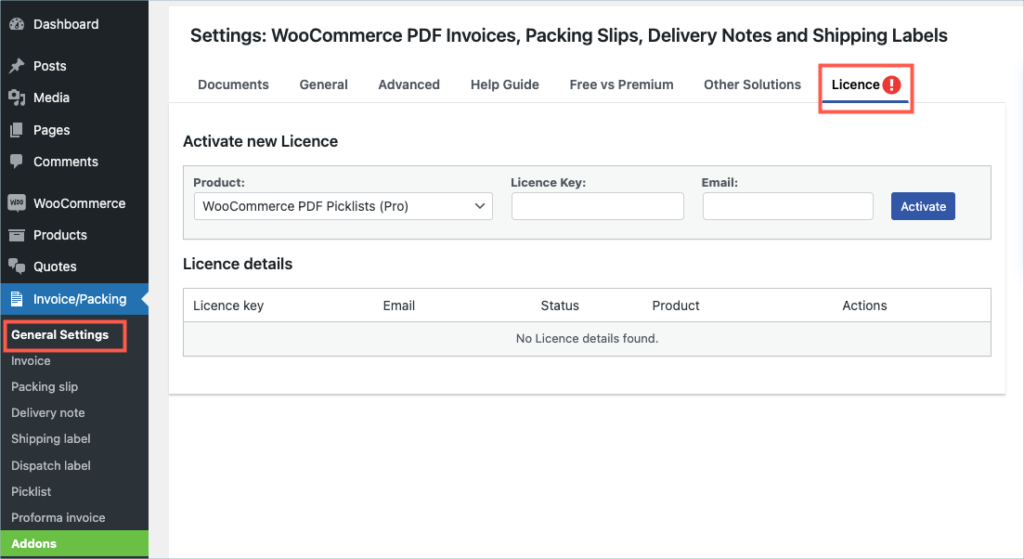
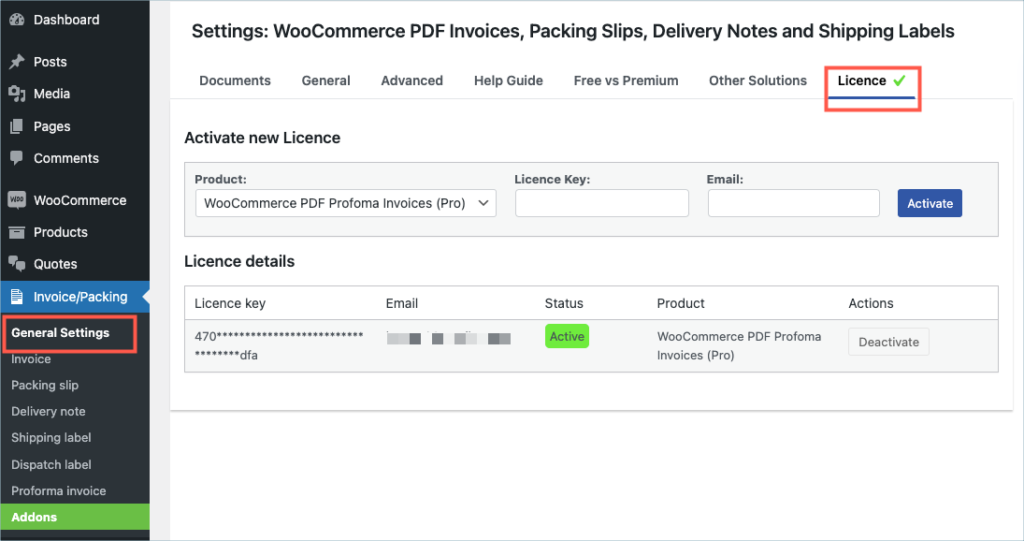
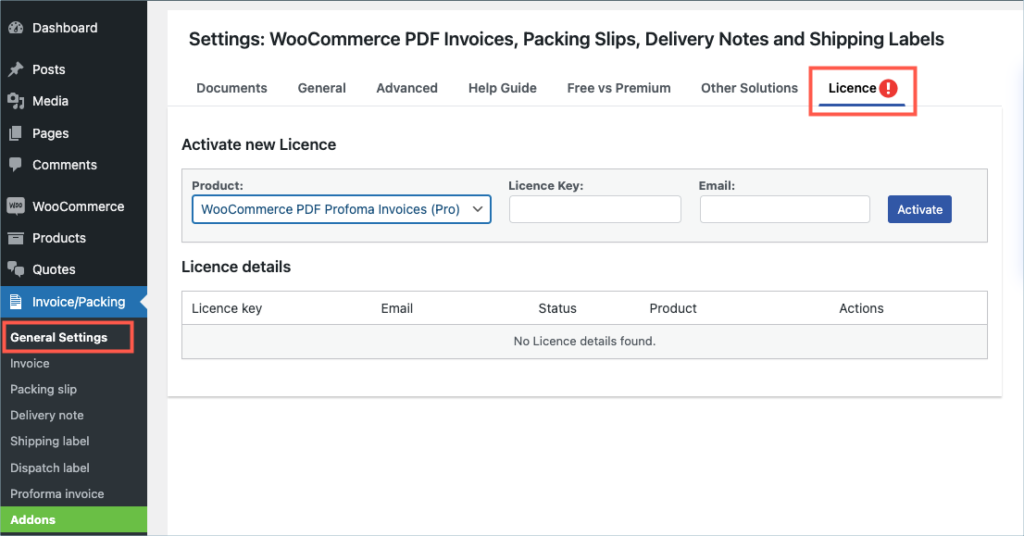
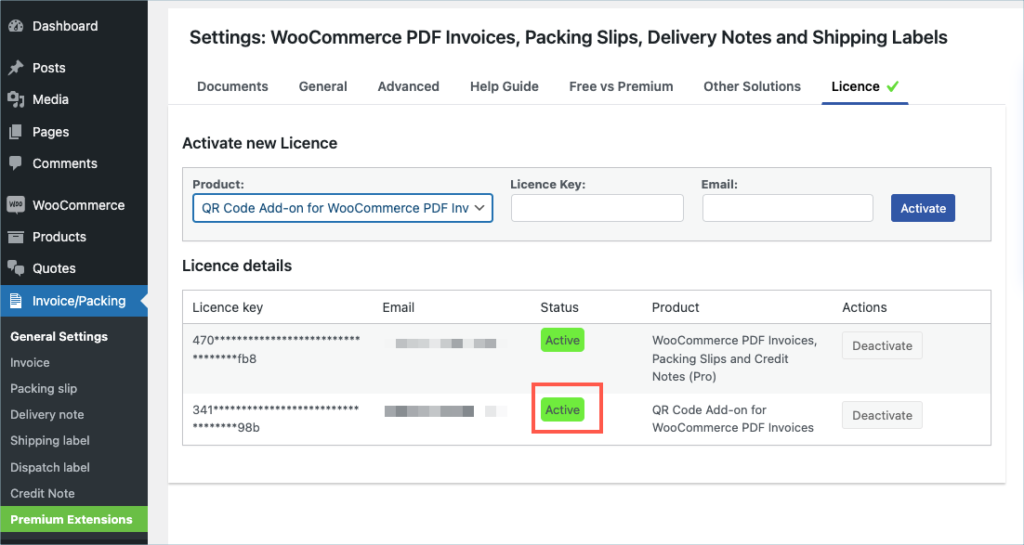
Step 9:
In the dashboard, navigate to Invoice/Packing> General settings > License. License activation section is displayed on top.
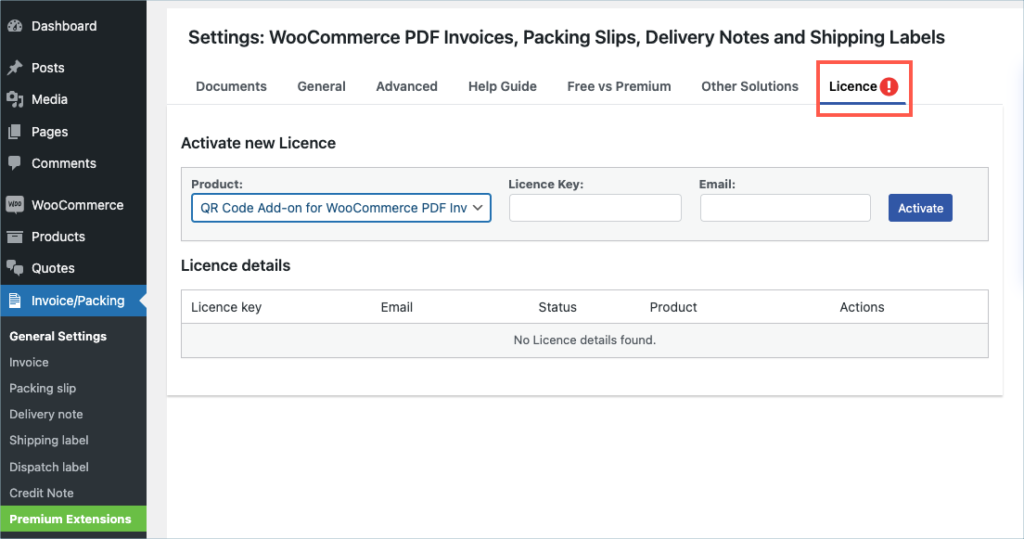
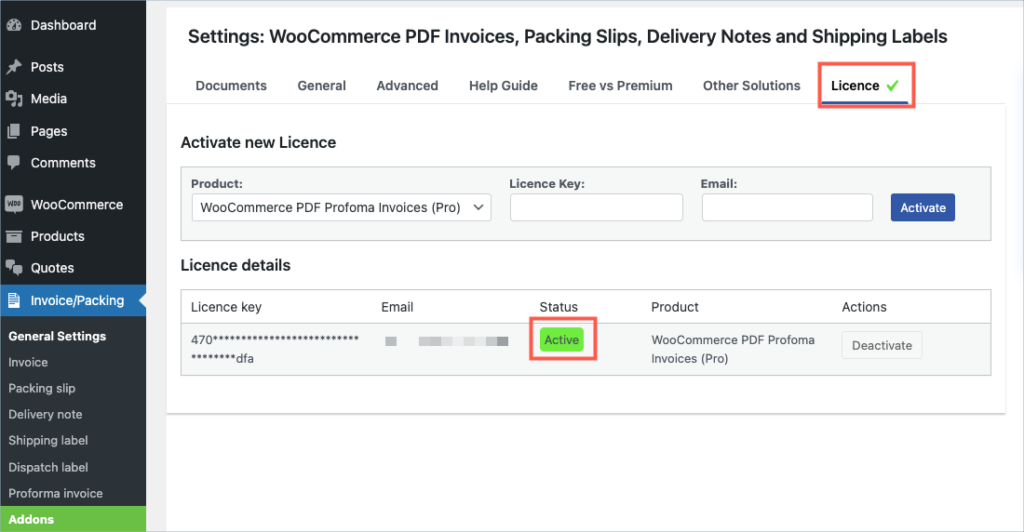
Step 10:
Select QR Code Add-on from the product drop-down list box and enter the API License Key and Email. Click on Activate button.
For detailed instructions, troubleshooting guides, and additional resources, please refer to our comprehensive product documentation. Click here to access the documentation and get the most out of the plugin.
Got any query? Please leave a comment or reach out to our support. Cancel reply

Remote Print Add-On for WooCommerce PDF Invoice
Last updated on: July 19, 2023
Step 1:
After purchasing the plugin, go to the My Account section in WebToffee. Log in with your credentials. Navigate to Downloads from the dashboard.
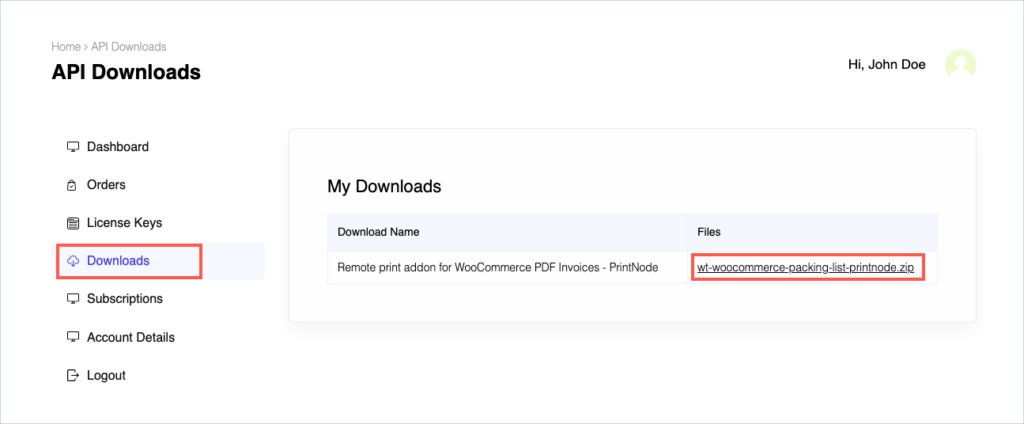
Step 2:
Click Downloads to get redirected to My Downloads. Click on the plugin package ZIP file to get it downloaded into your system.
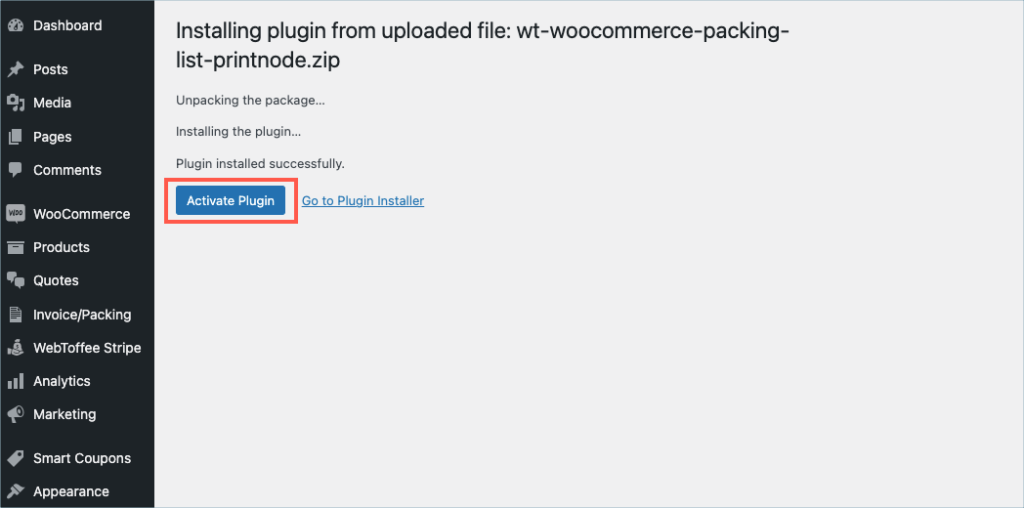
Step 3:
After downloading the ZIP file, navigate to Dashboard > Plugins and click on Add New.
Step 4:
In the window that appears, Click on Choose file to browse the plugin ZIP file.
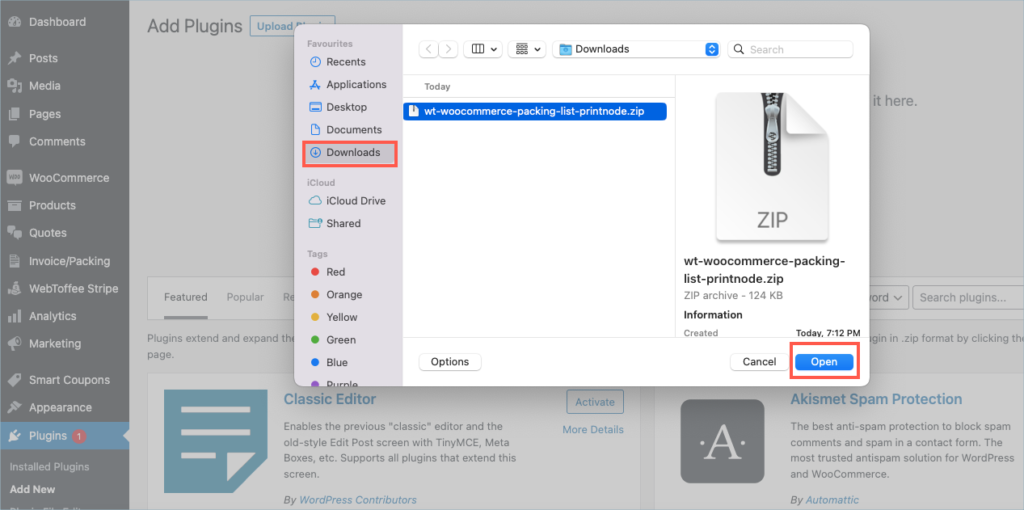
Step 5:
Choose the ZIP file and click open.
Check:
Install the free plugin, WooCommerce PDF Invoice, Packing Slips, Delivery Notes and Shipping Labels and at least one add-on from the below stated plugins list, before installing the Remote print add-on.
- WooCommerce PDF Invoices, Packing slips and Credit notes from v1.0.1
- WooCommerce Shipping labels, Dispatch labels and Delivery notes from v1.0.1
- WooCommerce Proforma Invoices from v1.0.1
You can install the free plugin directly by going to Plugins > Add New. This will take you to the Add Plugins page. From here, you can type WooCommerce PDF Invoice, Packing Slips, Delivery Notes and Shipping Labels by WebToffee in the search box.
After you have found your plugin, you can click on the Install button. As a next step, you will be shown the Activate button which you can click to activate the plugin. After activation, you can configure and use the plugin on your website.
For detailed instruction on how to install the free version, please refer here.
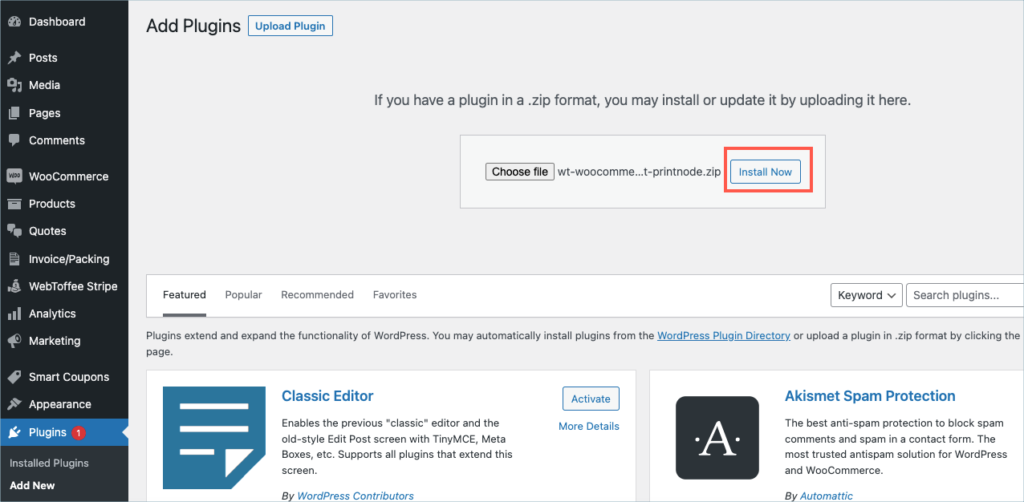
Step 6:
Click Install Now.
Step 7:
After installing, proceed to activate the plugin.
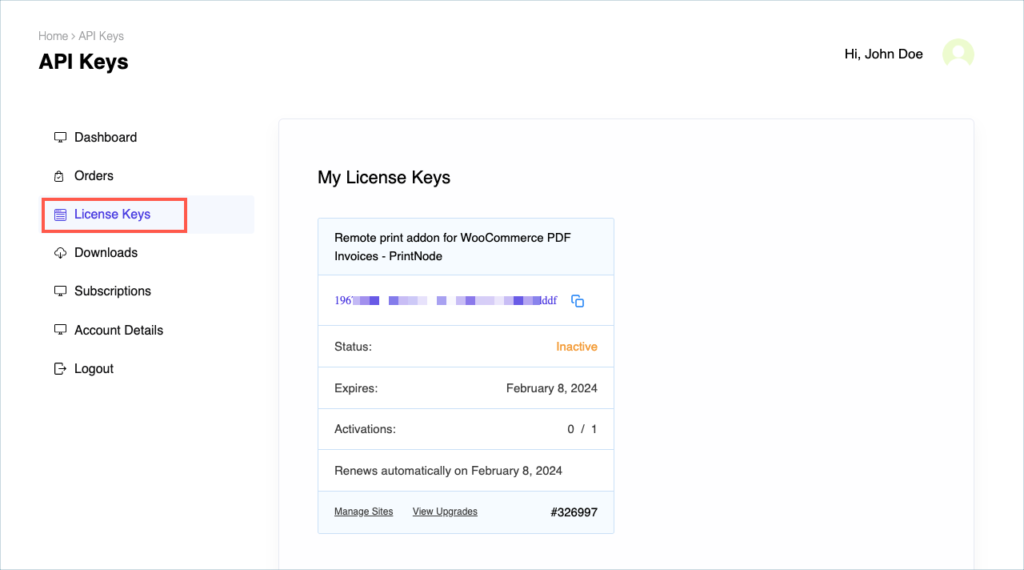
Step 8:
Get your API Key and API Email from the My Account > License Keys tab in WebToffee.
Step 9:
In the dashboard, navigate to Invoice/Packing> General settings > License. License activation section is displayed on top.
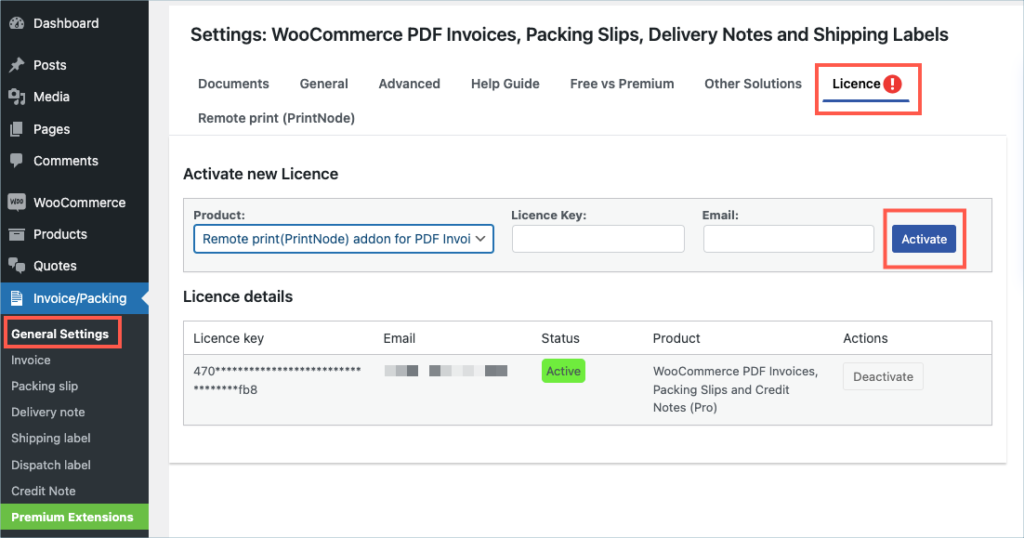
Step 10:
Select Remote Print Add-on from the product drop-down list box and enter the API License Key and Email. Click on Activate button.
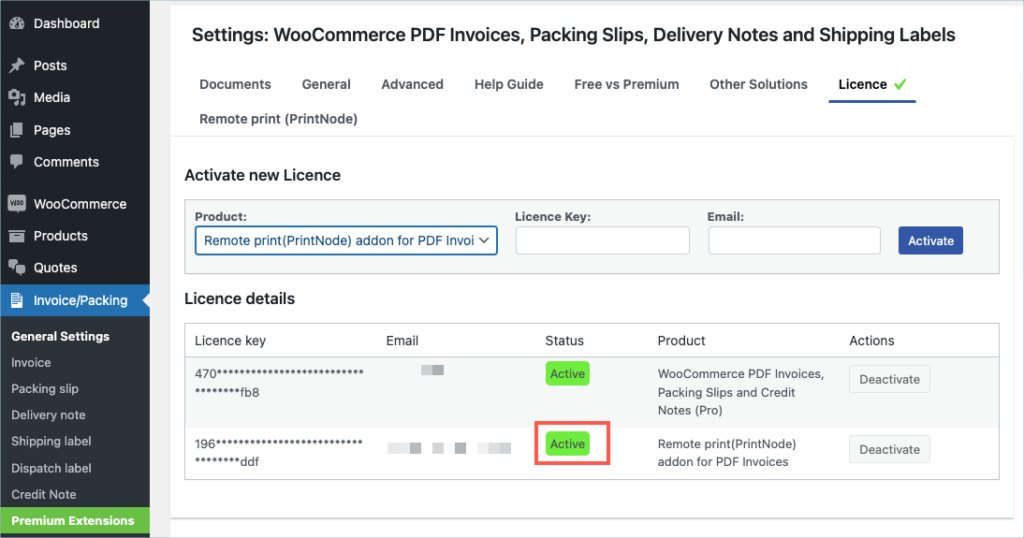
For detailed instructions, troubleshooting guides, and additional resources, please refer to our comprehensive product documentation. Click here to access the documentation and get the most out of the plugin.
Got any query? Please leave a comment or reach out to our support. Cancel reply

WooCommerce Gift Cards
Last updated on: July 19, 2023
Step 1:
After purchasing the plugin, go to the My Account section in WebToffee. Log in with your credentials. Navigate to Downloads from the dashboard.
Step 2:
Click Downloads to get redirected to My Downloads. Click on the plugin package ZIP file to get it downloaded into your system.
Step 3:
After downloading the ZIP file, navigate to Dashboard > Plugins and click on Add New.
Step 4:
In the window that appears, Click on Choose file to browse the plugin ZIP file.
Step 5:
Choose the ZIP file and click open.

Step 6:
Click Install Now.
Step 7:
After installing, proceed to activate the plugin.
Step 8:
Get your API Key and API Email from the My Account > License Keys tab in WebToffee.
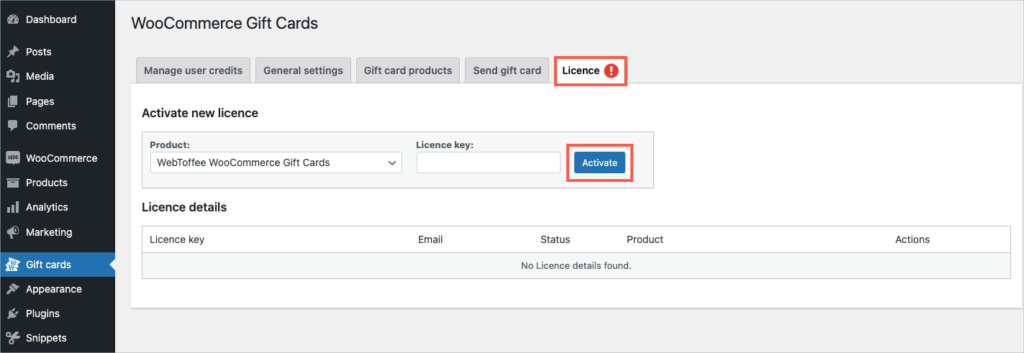
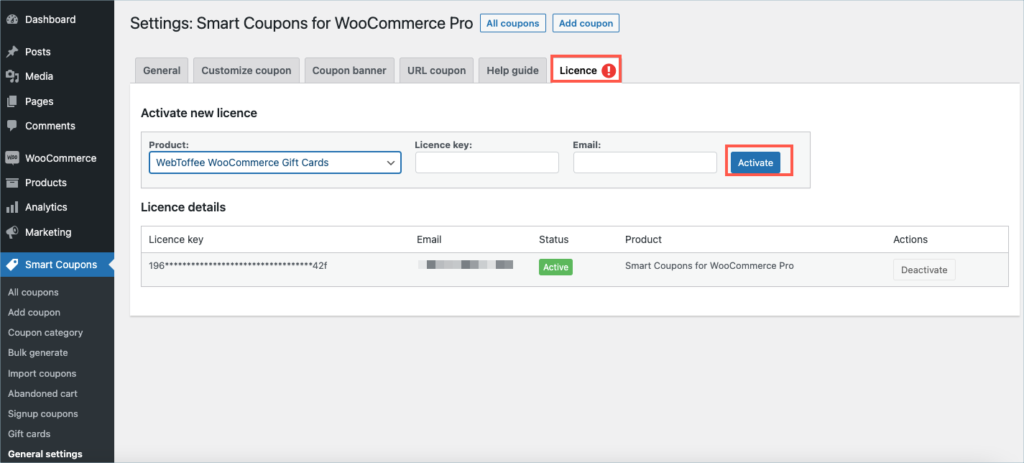
Step 9:
The license to activate WebToffee WooCommerce Gift cards is included in the License tab of the Gift Cards menu.
If Smart Coupons for WooCommerce Premium is pre-installed, then the product is activated through the existing License tab of Smart Coupon for WooCommerce.
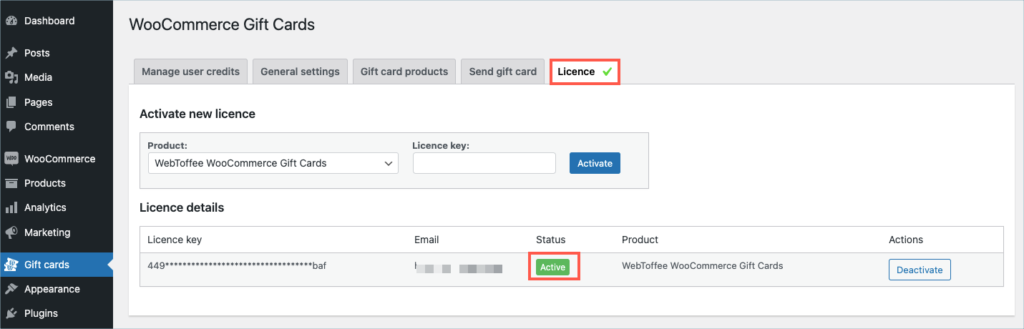
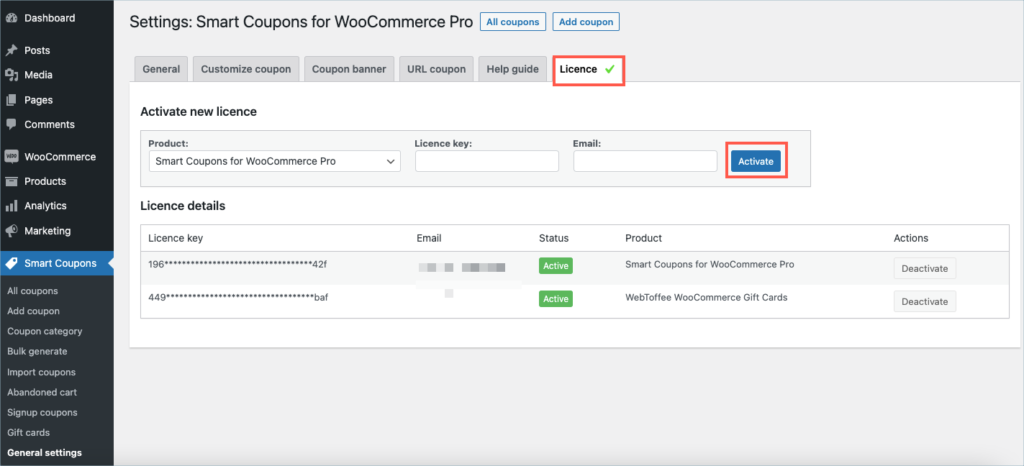
Step 10:
Enter the API License Key and Email. Click on Activate button.
For detailed instructions, troubleshooting guides, and additional resources, please refer to our comprehensive product documentation. Click here to access the documentation and get the most out of the plugin.
Got any query? Please leave a comment or reach out to our support. Cancel reply

Frequently Bought Together for WooCommerce
Last updated on: July 19, 2023
Step 1:
After purchasing the plugin, go to the My Account section in WebToffee. Log in with your credentials. Navigate to Downloads from the dashboard.
Step 2:
Click Downloads to get redirected to My Downloads. Click on the plugin package ZIP file to get it downloaded into your system.
Step 3:
After downloading the ZIP file, navigate to Dashboard > Plugins and click on Add New.
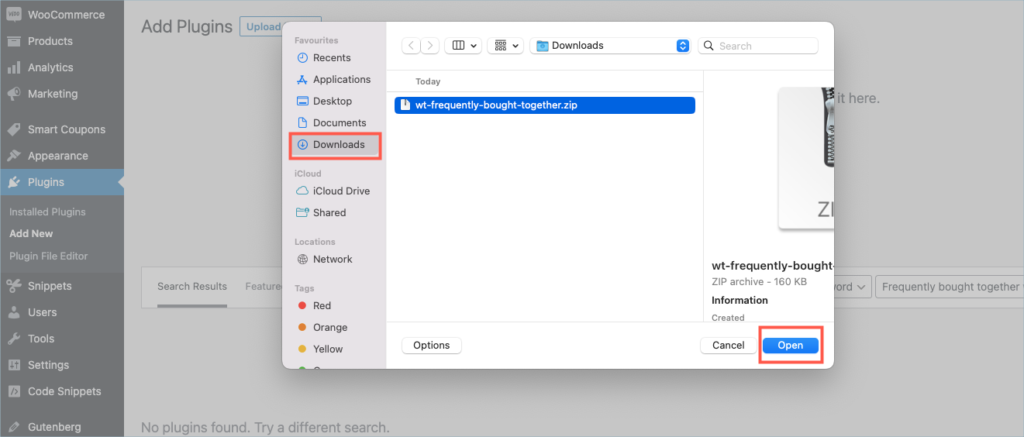
Step 4:
In the window that appears, Click on Choose file to browse the plugin ZIP file.
Step 5:
Choose the ZIP file and click open.
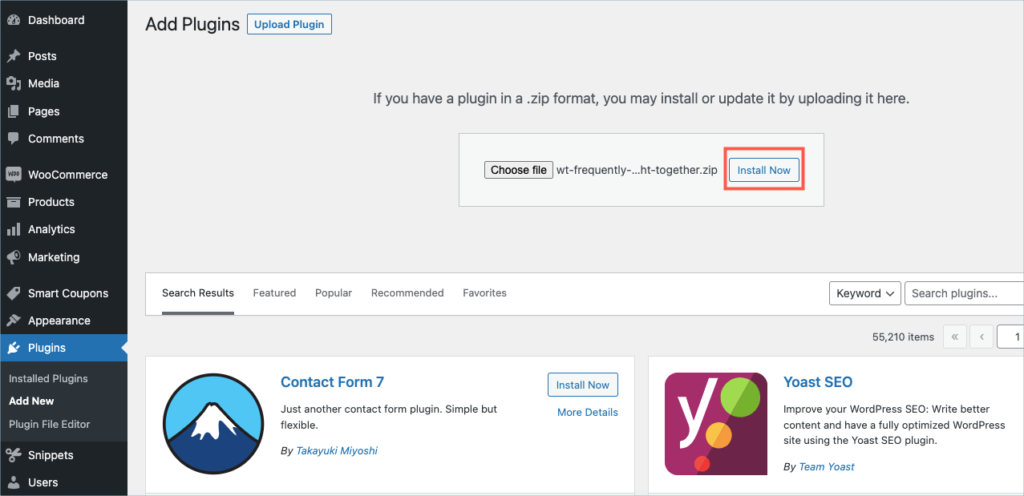
Step 6:
Click Install Now.
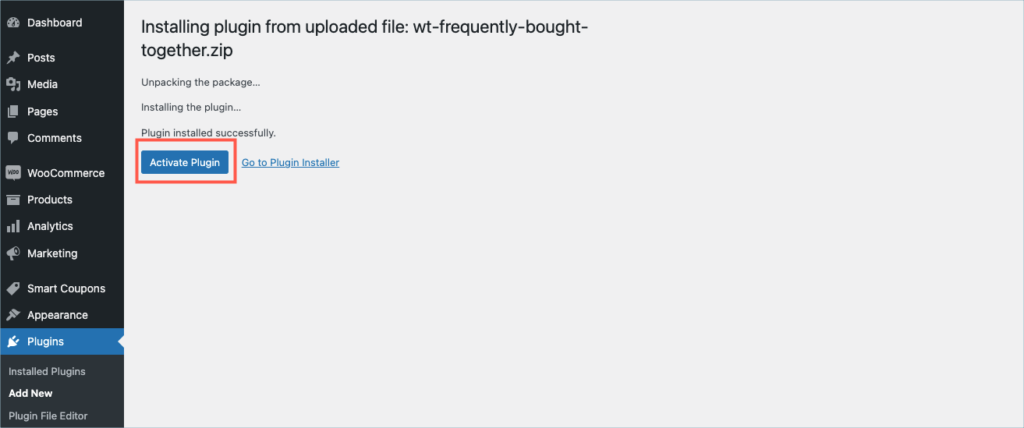
Step 7:
After installing, proceed to activate the plugin.
Step 8:
Get your API Key and API Email from the My Account > License Keys tab in WebToffee.
Step 9:
Navigate to WooCommerce > Frequently bought together and click on the License tab.
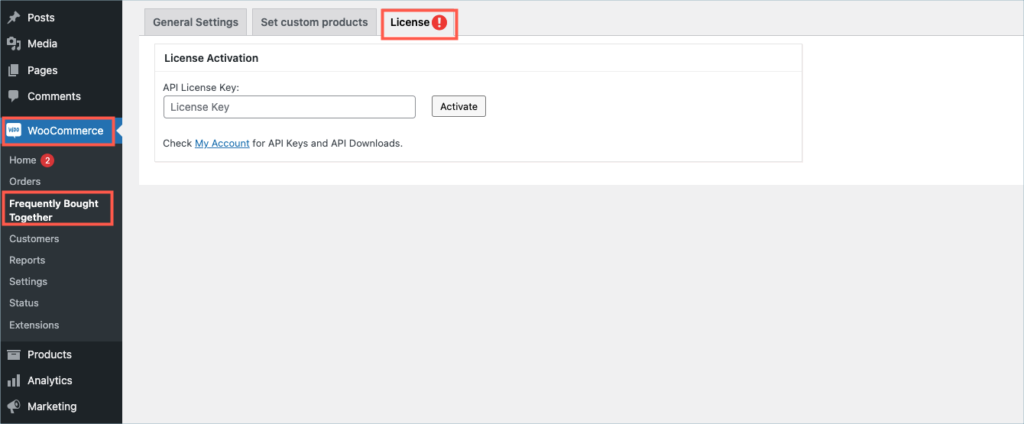
Step 10:
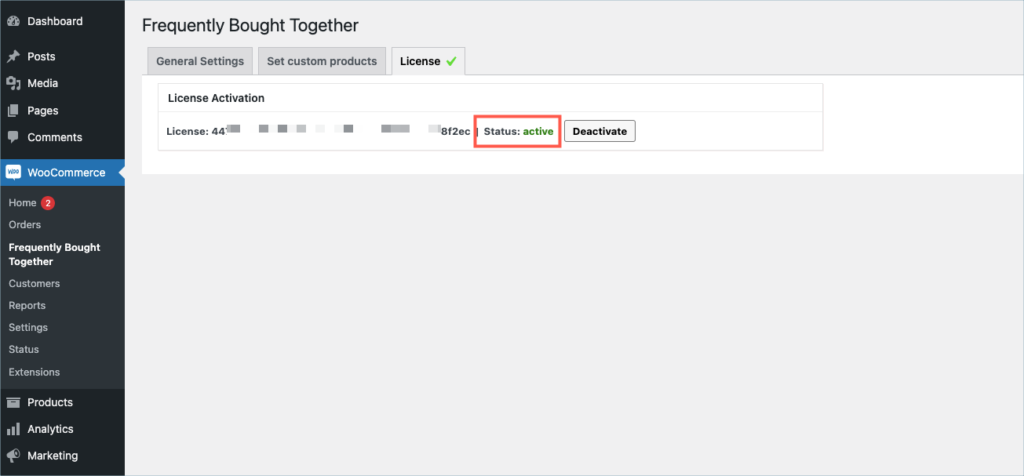
Enter the API License Key and Email. Click on Activate button.
For detailed instructions, troubleshooting guides, and additional resources, please refer to our comprehensive product documentation. Click here to access the documentation and get the most out of the plugin.
Got any query? Please leave a comment or reach out to our support. Cancel reply
WebToffee WooCommerce Request a Quote
Last updated on: July 19, 2023
Step 1:
After purchasing the plugin, go to the My Account section in WebToffee. Log in with your credentials. Navigate to Downloads from the dashboard.
Step 2:
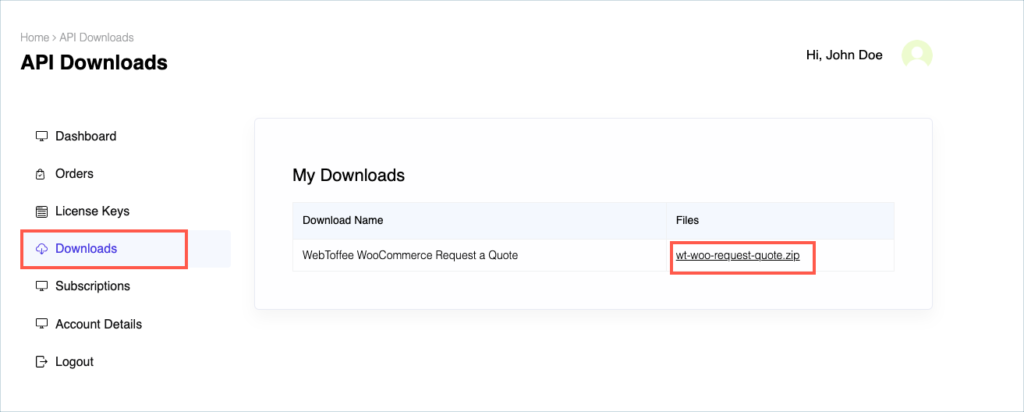
Click Downloads to get redirected to My Downloads. Click on the plugin package ZIP file to get it downloaded into your system.
Step 3:
After downloading the ZIP file, navigate to Dashboard > Plugins and click on Add New.
Step 4:
In the window that appears, Click on Choose file to browse the plugin ZIP file.
Step 5:
Choose the ZIP file and click open.
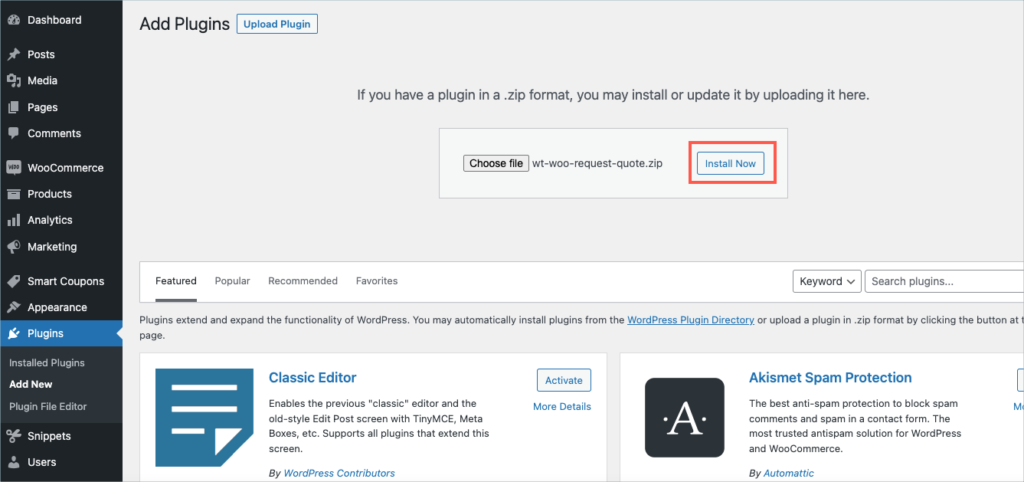
Step 6:
Click Install Now.
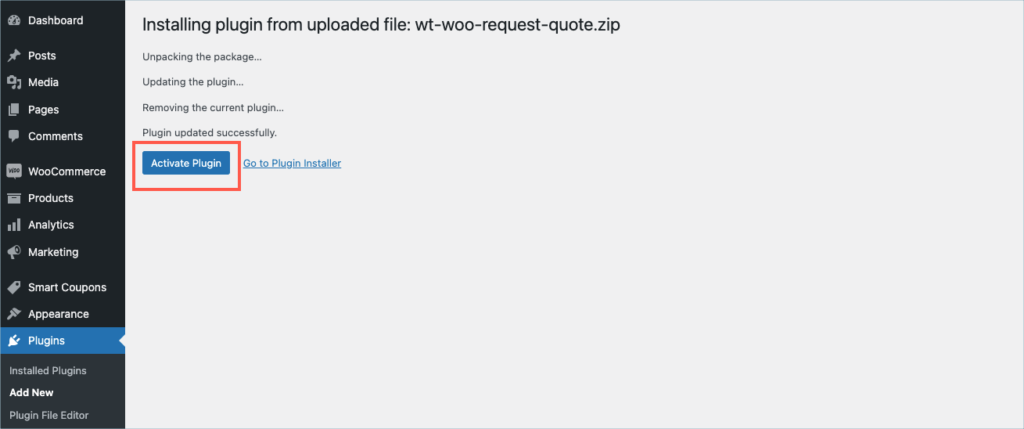
Step 7:
After installing, proceed to activate the plugin.
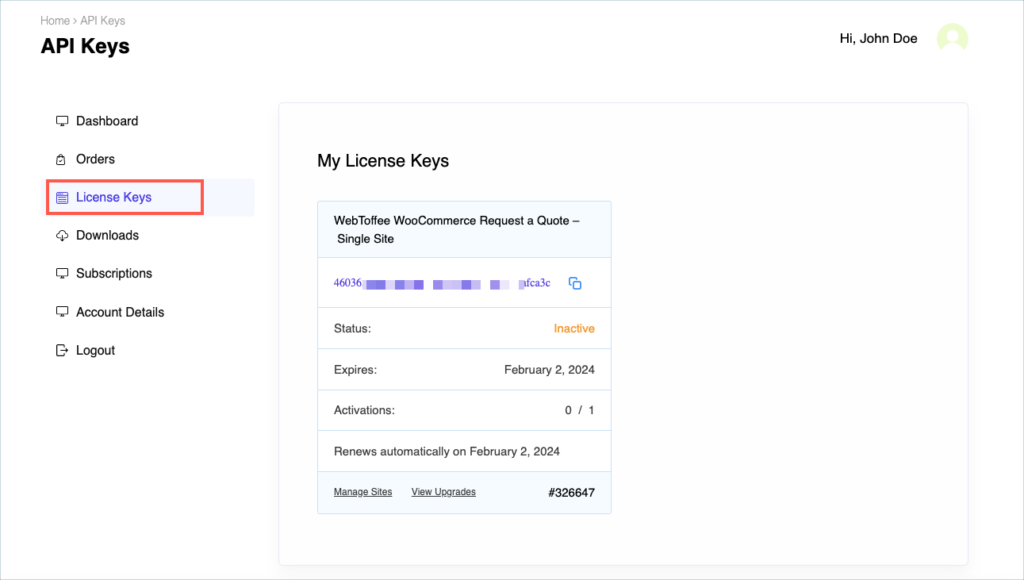
Step 8:
Get your API Key and API Email from the My Account > License Keys tab in WebToffee.
Step 9:
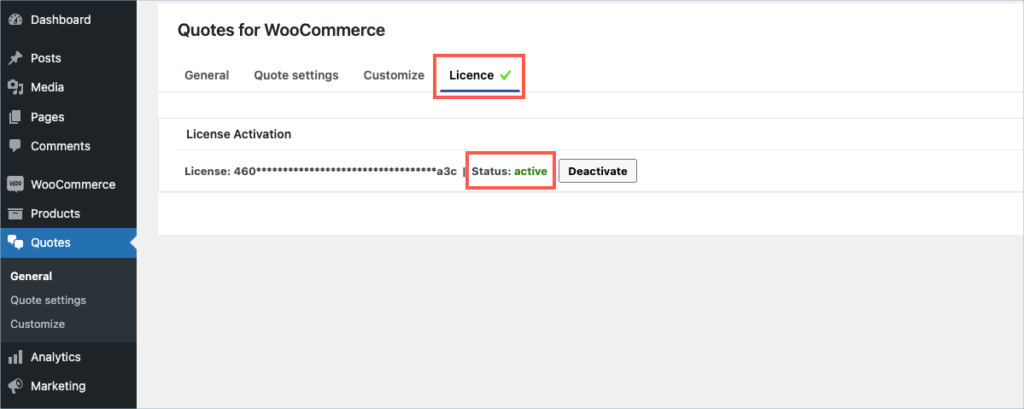
In the dashboard, navigate to Quotes > General > License and click on the License tab.
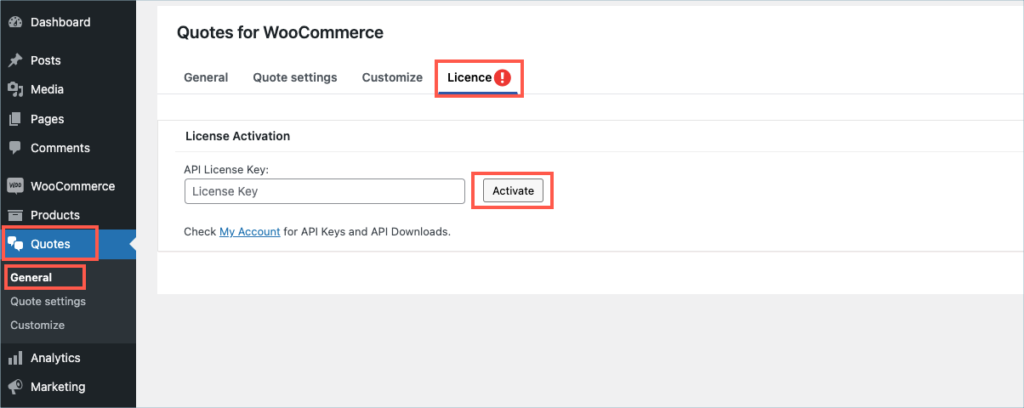
Step 10:
Enter the API License Key and Email. Click on Activate button.
For detailed instructions, troubleshooting guides, and additional resources, please refer to our comprehensive product documentation. Click here to access the documentation and get the most out of the plugin.
Got any query? Please leave a comment or reach out to our support. Cancel reply

WebToffee WooCommerce Product Feed and Sync Manager
Last updated on: July 19, 2023
Step 1:
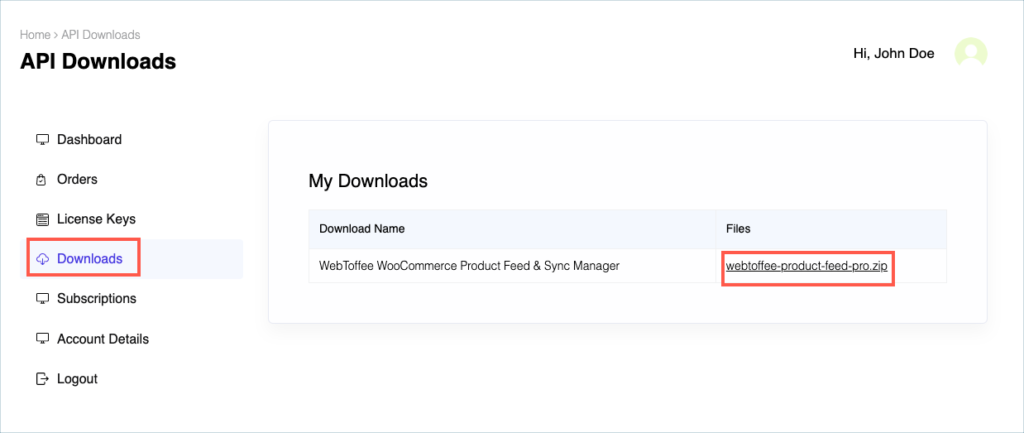
After purchasing the plugin, go to the My Account section in WebToffee. Log in with your credentials. Navigate to Downloads from the dashboard.
Step 2:
Click Downloads to get redirected to My Downloads. Click on the plugin package ZIP file to get it downloaded into your system.
Step 3:
After downloading the ZIP file, navigate to Dashboard > Plugins and click on Add New.
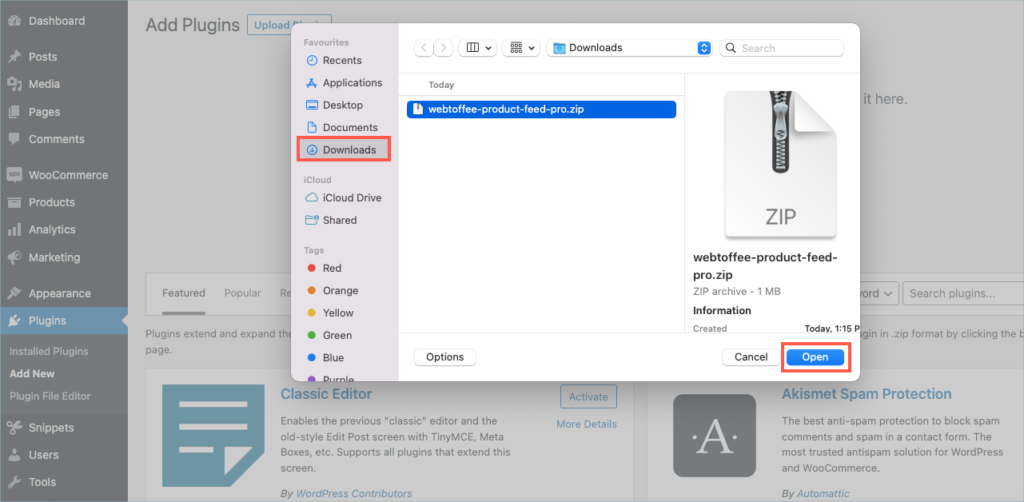
Step 4:
In the window that appears, Click on Choose file to browse the plugin ZIP file.
Step 5:
Choose the ZIP file and click open.
Step 6:
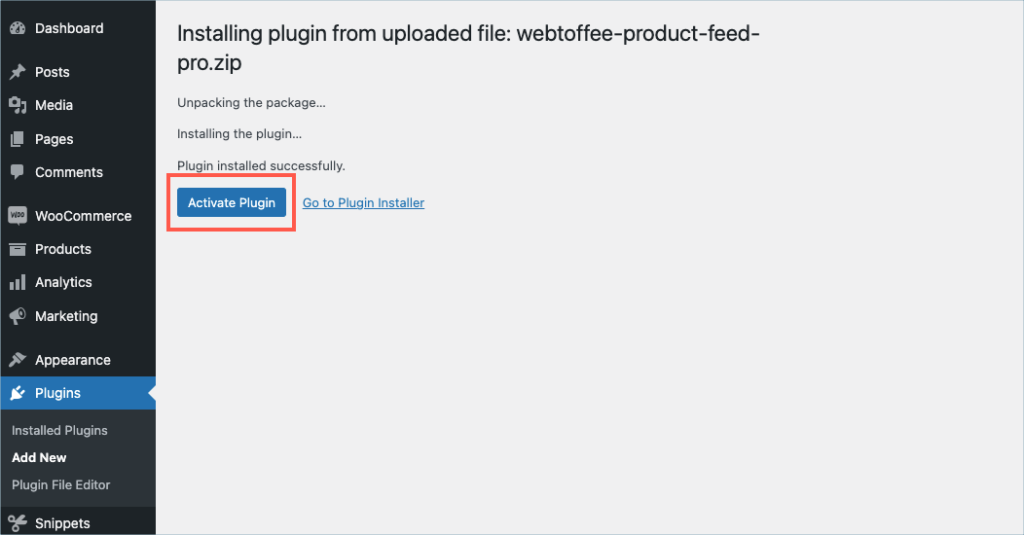
Click Install Now.

Step 7:
After installing, proceed to activate the plugin.
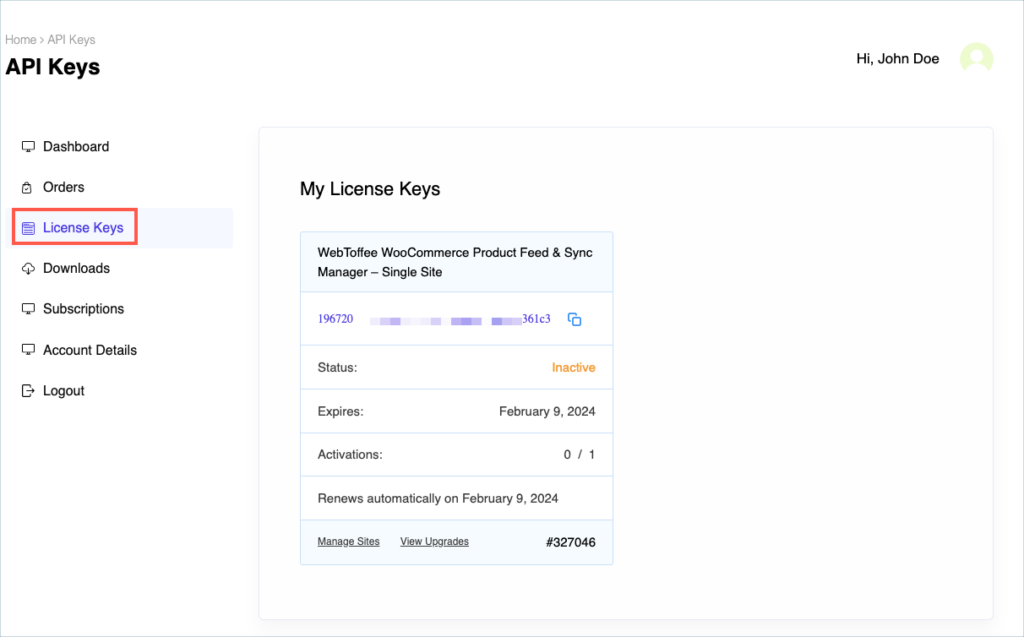
Step 8:
Get your API Key and API Email from the My Account > License Keys tab in WebToffee.
Step 9:
In the dashboard, navigate to WordPress Product Feed> General Settings > License. License activation section is displayed.
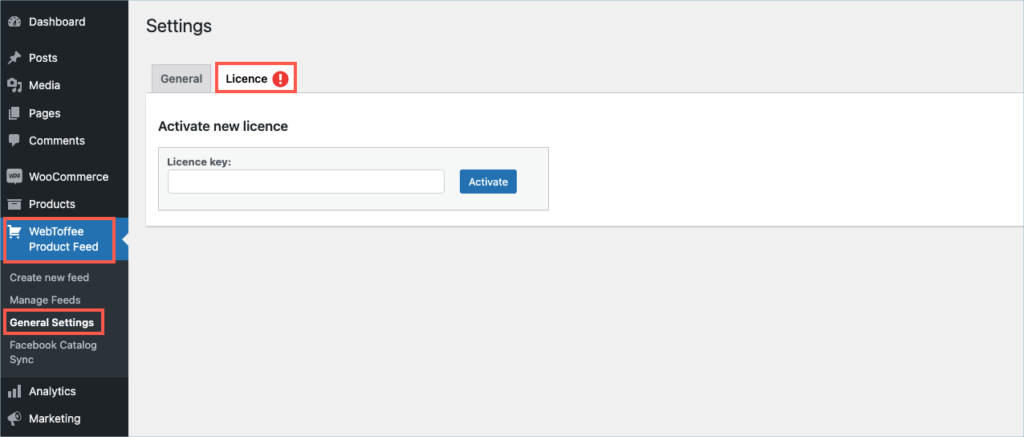
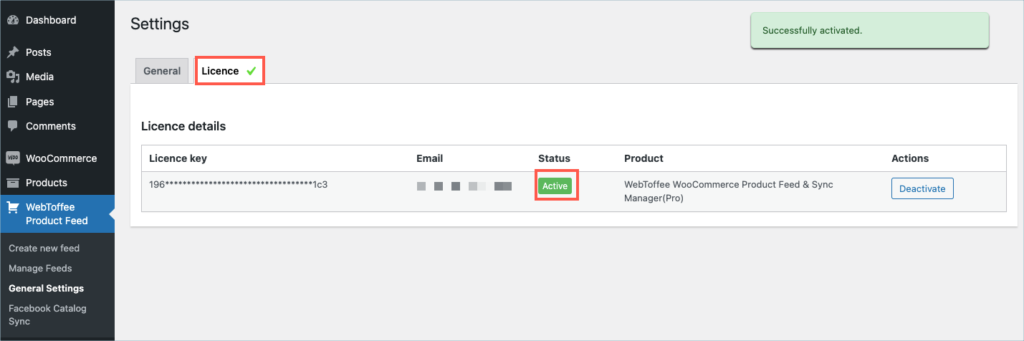
Step 10:
Enter the API License Key and Email. Click on Activate button.
For detailed instructions, troubleshooting guides, and additional resources, please refer to our comprehensive product documentation. Click here to access the documentation and get the most out of the plugin.
Got any query? Please leave a comment or reach out to our support. Cancel reply

Display Discount for WooCommerce
Last updated on: July 19, 2023
Step 1:
After purchasing the plugin, go to the My Account section in WebToffee. Log in with your credentials. Navigate to Downloads from the dashboard.
Step 2:
Click Downloads to get redirected to My Downloads. Click on the plugin package ZIP file to get it downloaded into your system.

Step 3:
After downloading the ZIP file, navigate to Dashboard > Plugins and click on Add New.
Step 4:
In the window that appears, Click on Choose file to browse the plugin ZIP file.
Step 5:
Choose the ZIP file and click open.

Step 6:
Click Install Now.
Step 7:
After installing, proceed to activate the plugin.
Step 8:
Get your API Key and API Email from the My Account > License Keys tab in WebToffee.
Step 9:
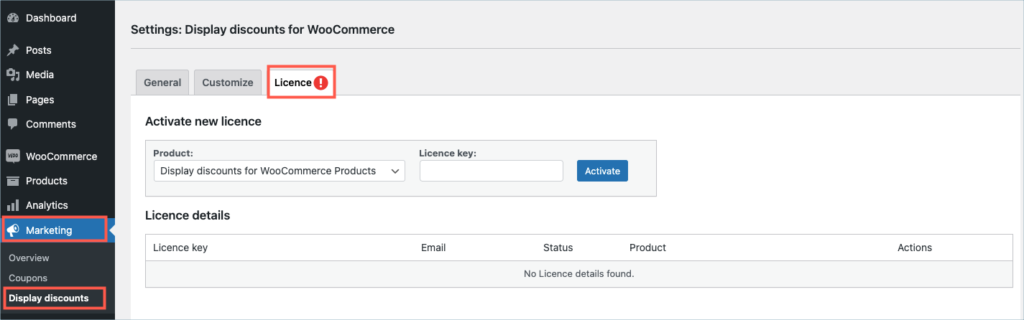
The plugin can be installed as a stand-alone or as an add-on to the Smart Coupons for WooCommerce plugin. In a stand-alone installation, the plugin’s license activation tab is listed at Marketing > Display discount > License tab. When installed as an add-on, the license activation tab is positioned at Smart coupons > General settings > License tab.
Step 10:
Enter the API License Key and Email. Click on Activate button.
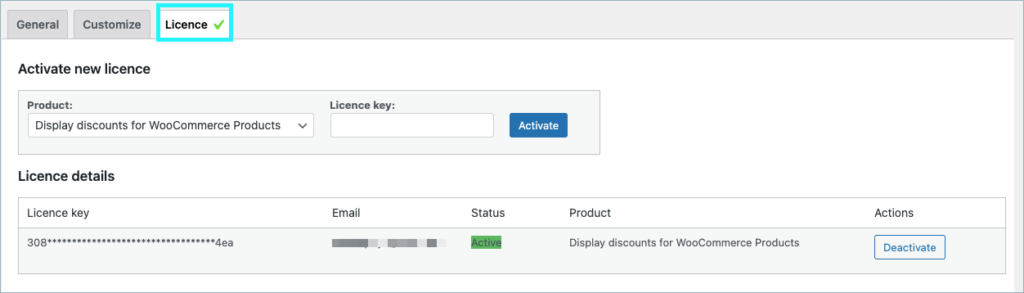
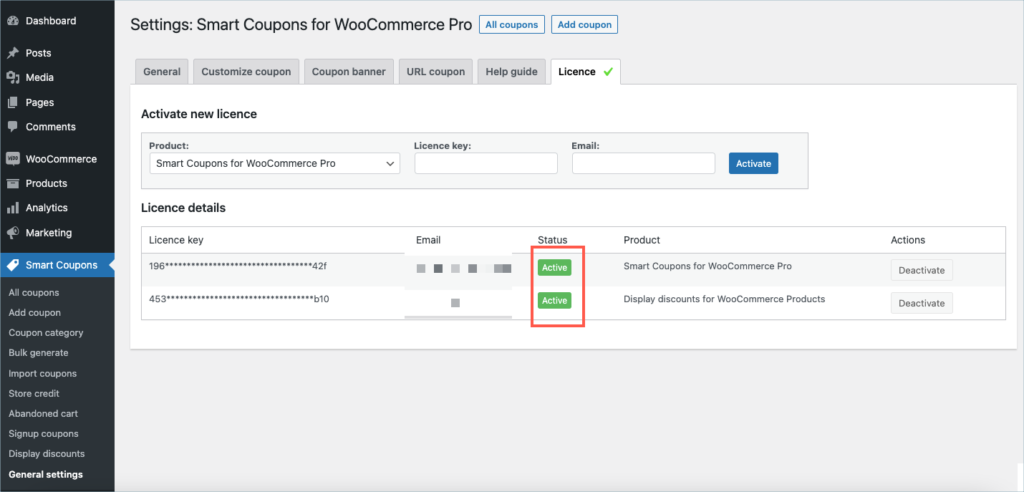
License activation when installed as an add-on
For detailed instructions, troubleshooting guides, and additional resources, please refer to our comprehensive product documentation. Click here to access the documentation and get the most out of the plugin.
Got any query? Please leave a comment or reach out to our support. Cancel reply

WooCommerce Best Sellers
Last updated on: July 19, 2023
Step 1:
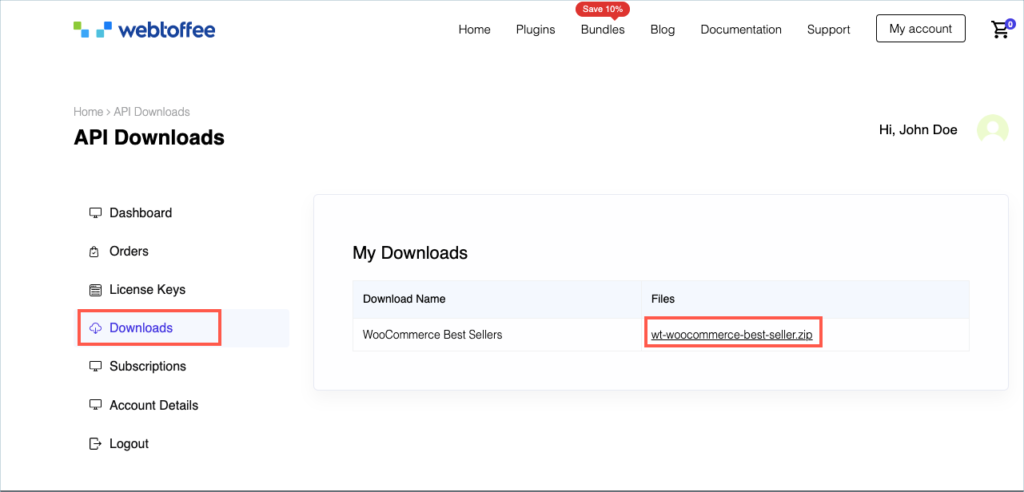
After purchasing the plugin, go to the My Account section in WebToffee. Log in with your credentials. Navigate to Downloads from the dashboard.
Step 2:
Click Downloads to get redirected to My Downloads. Click on the plugin package ZIP file to get it downloaded into your system.
Step 3:
After downloading the ZIP file, navigate to Dashboard > Plugins and click on Add New.
Step 4:
In the window that appears, Click on Choose file to browse the plugin ZIP file.
Step 5:
Choose the ZIP file and click open.
Step 6:
Click Install Now.
Step 7:
After installing, proceed to activate the plugin.
Step 8:
Get your API Key and API Email from the My Account > License Keys tab in WebToffee.
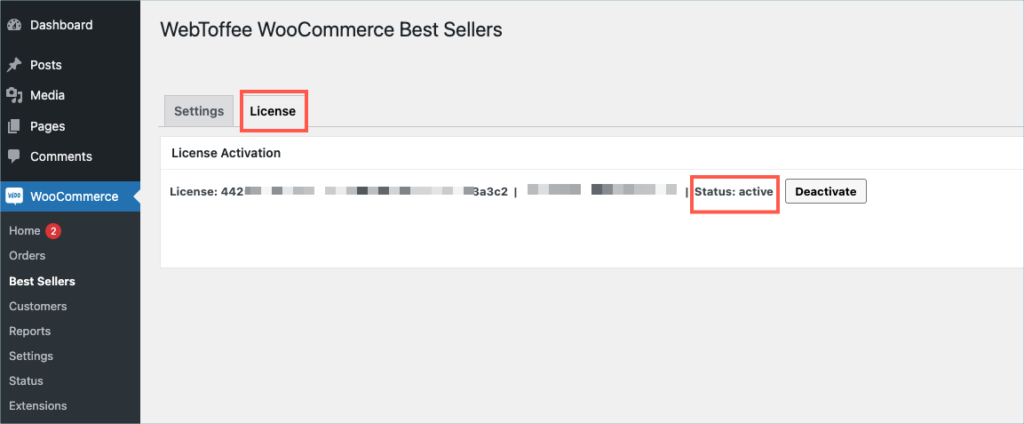
Step 9:
In the dashboard, navigate to WooCommerce > Best Sellers> License. License activation section is displayed.
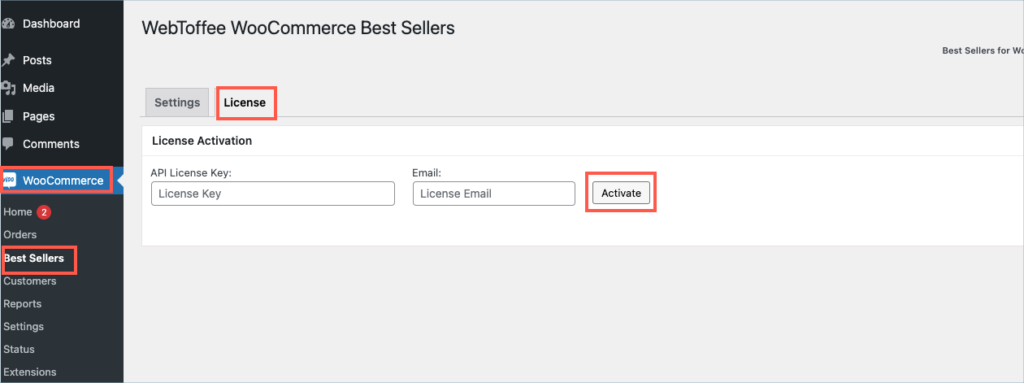
Step 10:
Enter the API License Key and Email. Click on Activate button.
For detailed instructions, troubleshooting guides, and additional resources, please refer to our comprehensive product documentation. Click here to access the documentation and get the most out of the plugin.
Got any query? Please leave a comment or reach out to our support. Cancel reply

WordPress Backup and Migration
Last updated on: July 19, 2023
Step 1:
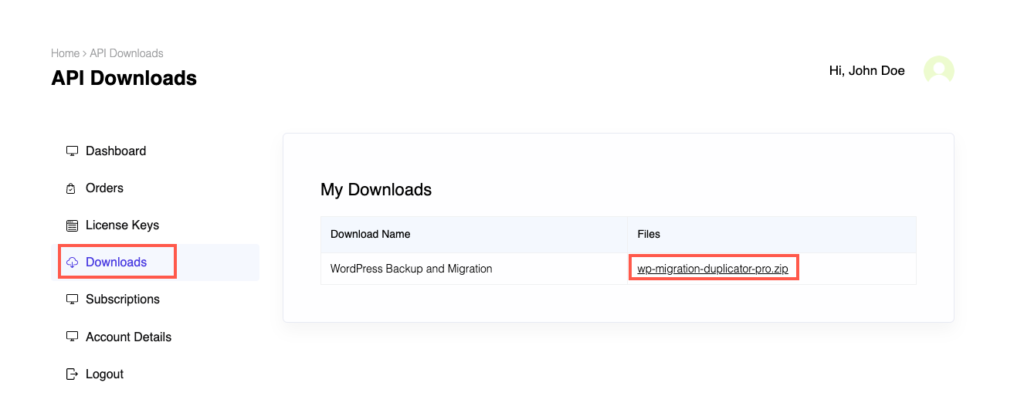
After purchasing the plugin, go to the My Account section in WebToffee. Log in with your credentials. Navigate to Downloads from the dashboard.
Step 2:
Click Downloads to get redirected to My Downloads. Click on the plugin package ZIP file to get it downloaded into your system.
Step 3:
After downloading the ZIP file, navigate to Dashboard > Plugins and click on Add New.
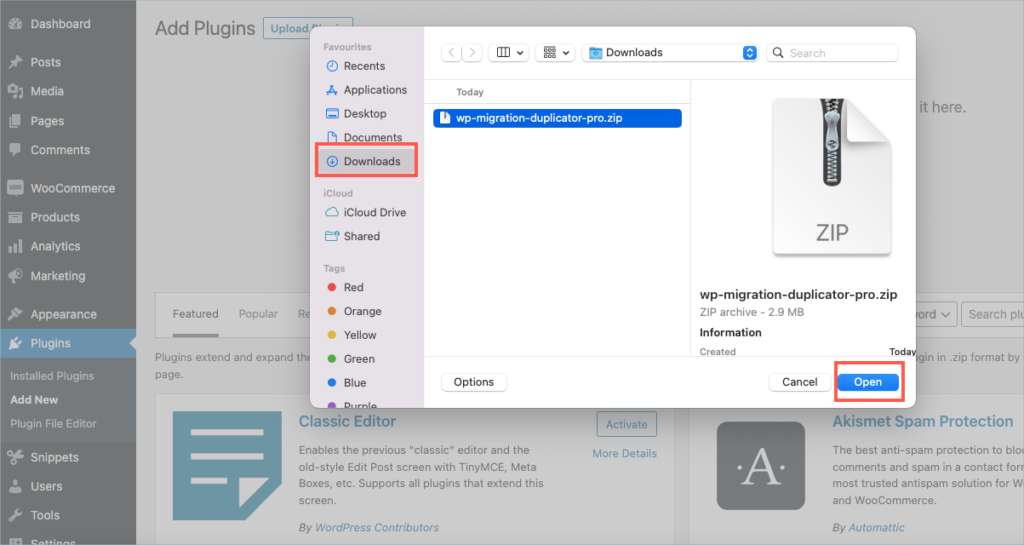
Step 4:
In the window that appears, Click on Choose file to browse the plugin ZIP file.
Step 5:
Choose the ZIP file and click open.
Step 6:
Click Install Now.
Step 7:
After installing, proceed to activate the plugin.
Step 8:
Get your API Key and API Email from the My Account > License Keys tab in WebToffee.
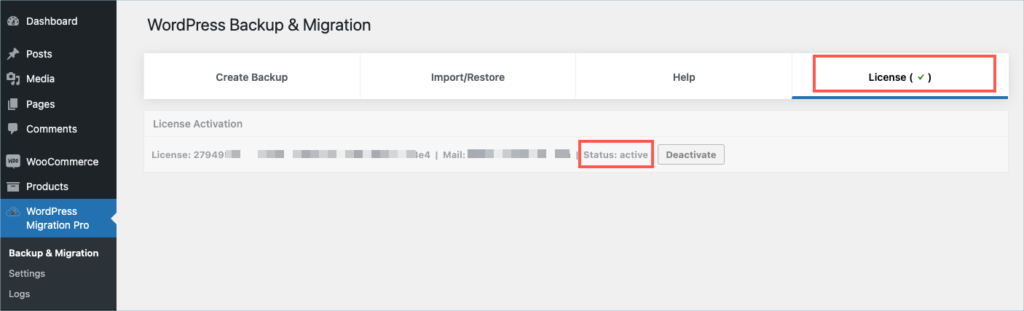
Step 9:
In the dashboard, navigate to WordPress Migration Pro> Backup & Migration > License. License activation section is displayed.
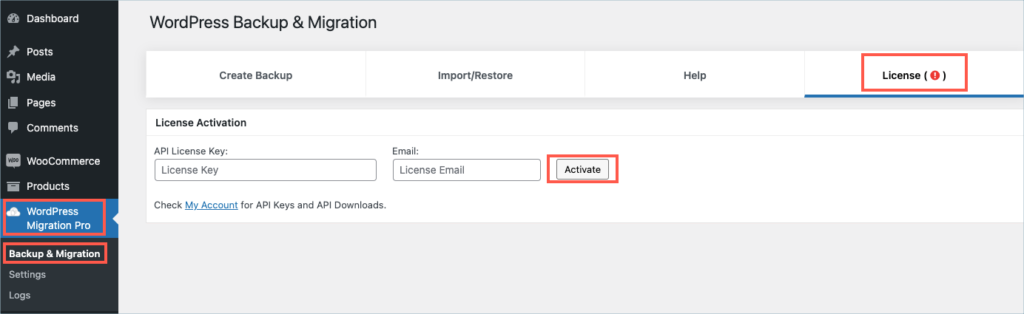
Step 10:
Enter the API License Key and Email. Click on Activate button.
For detailed instructions, troubleshooting guides, and additional resources, please refer to our comprehensive product documentation. Click here to access the documentation and get the most out of the plugin.
Got any query? Please leave a comment or reach out to our support. Cancel reply

WooCommerce Product Recommendations
Last updated on: July 19, 2023
Step 1:
After purchasing the plugin, go to the My Account section in WebToffee. Log in with your credentials. Navigate to Downloads from the dashboard.
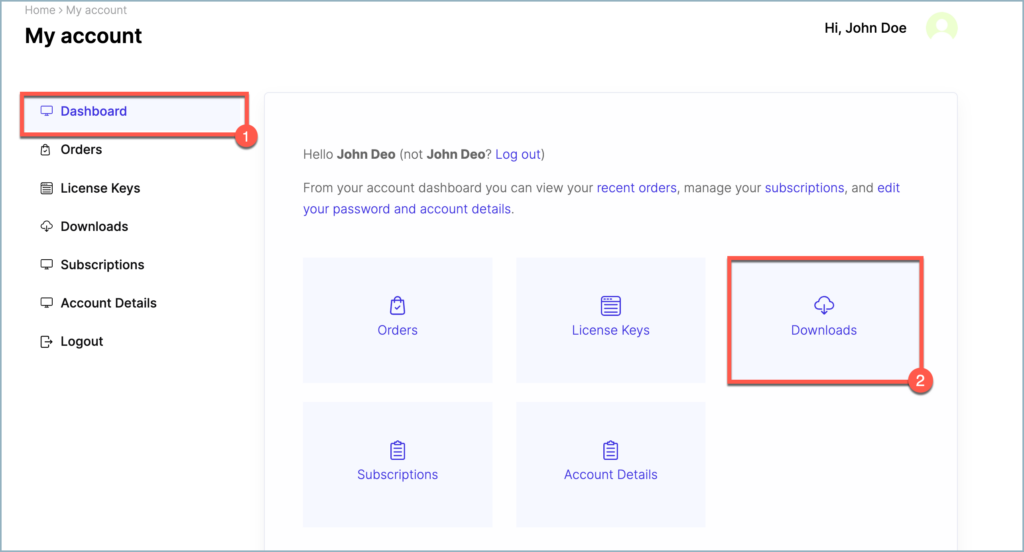
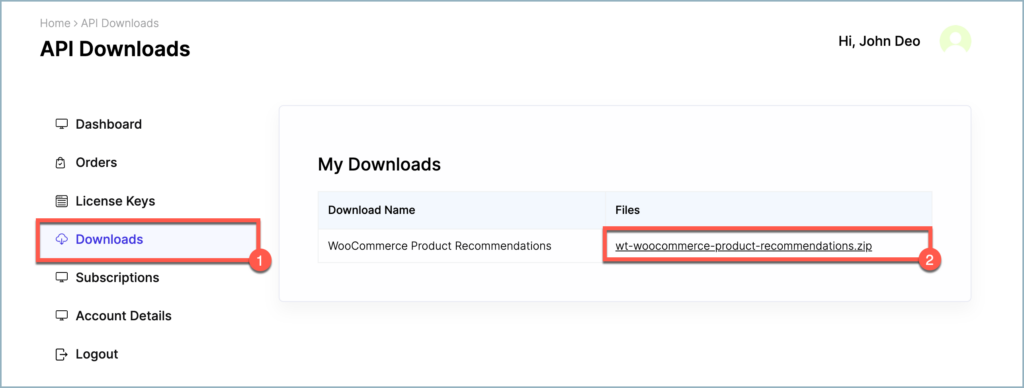
Step 2:
Click on Downloads to get redirected to My Downloads. Click on the plugin package ZIP file to get it downloaded into your system.
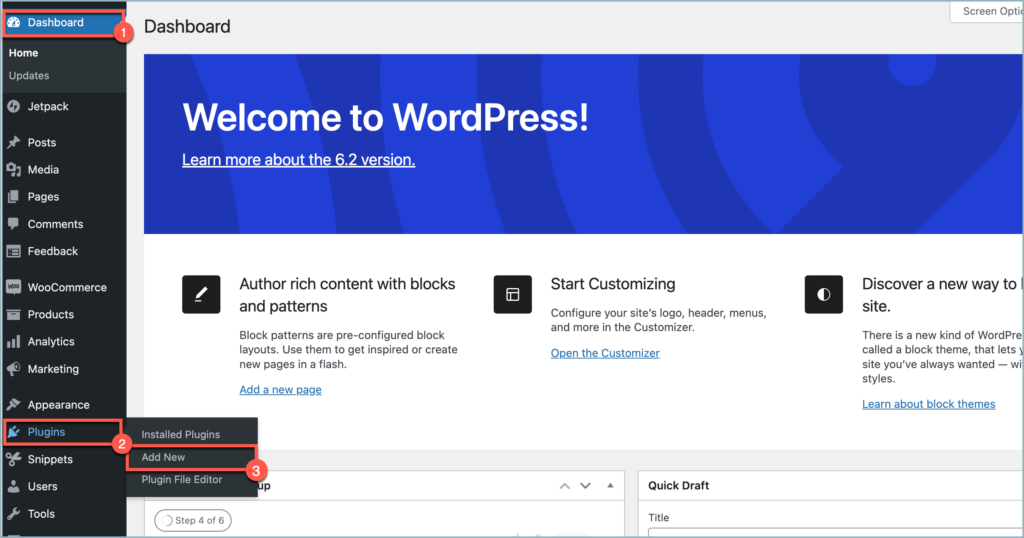
Step 3:
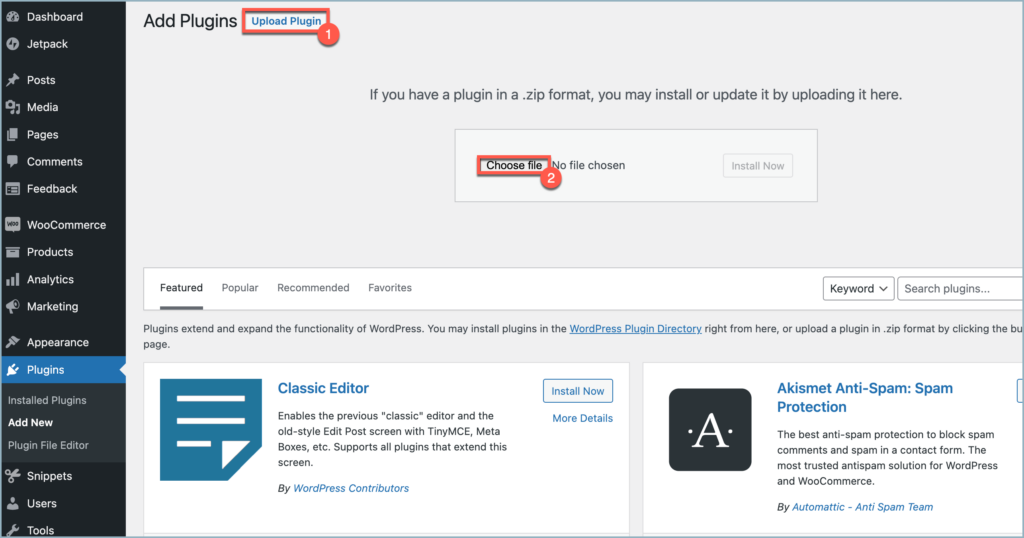
After downloading the ZIP file, navigate to Dashboard > Plugins and click on Add New.
Step 4:
In the window that appears, Click on Upload plugin and then on Choose file to browse the plugin ZIP file.
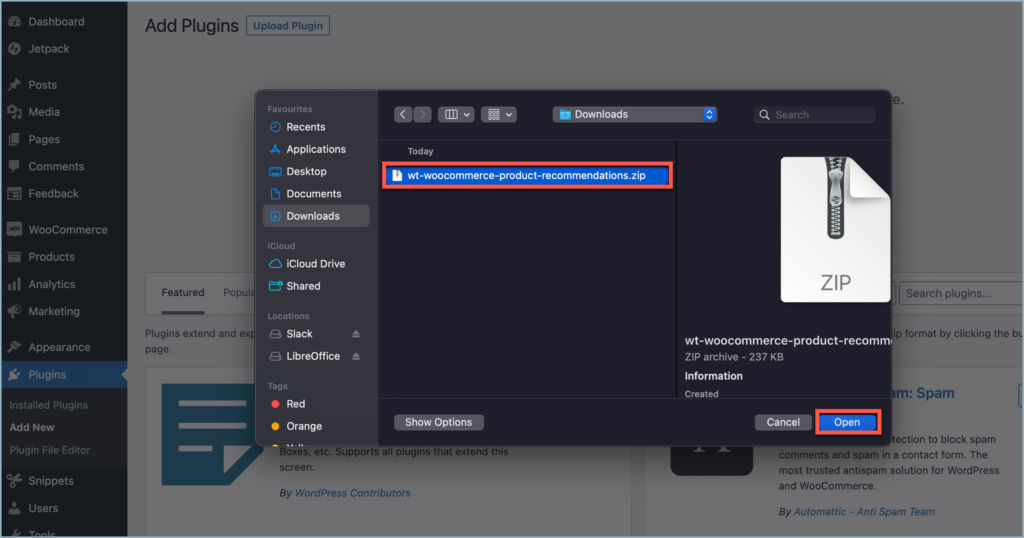
Step 5:
Choose the ZIP file and click open.
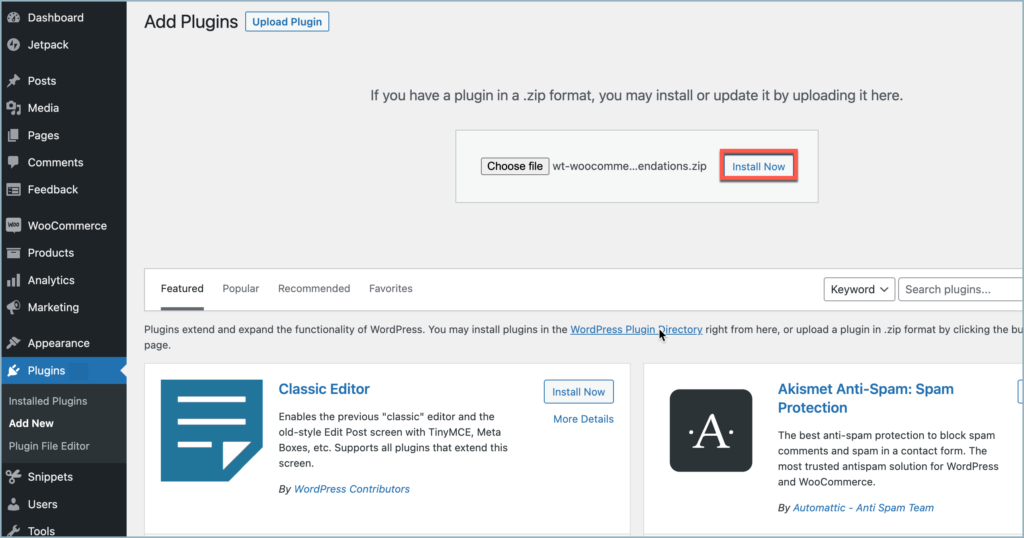
Step 6:
Click Install Now.
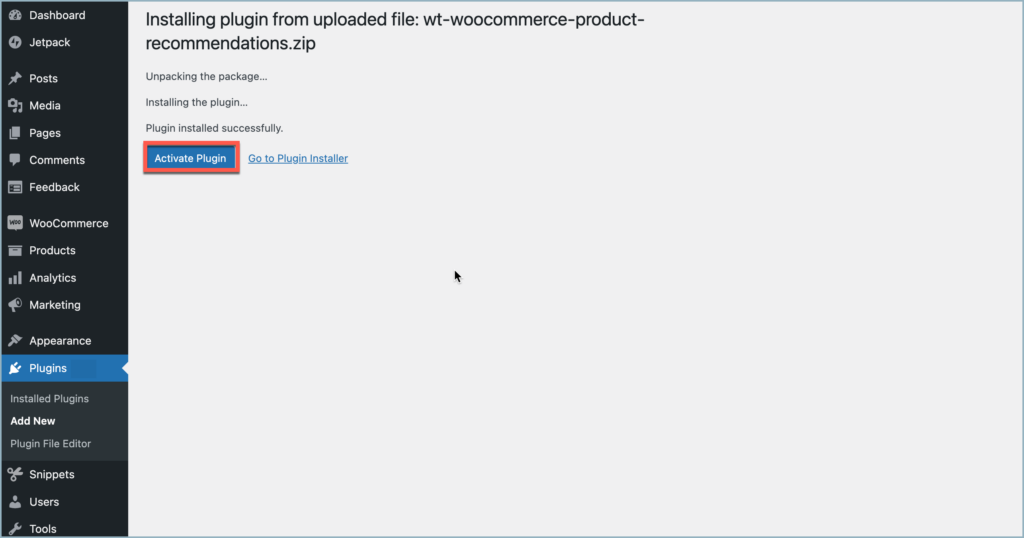
Step 7:
After installing, proceed to activate the plugin.
Step 8:
Get your API Key and API Email from the My Account > License Keys tab in WebToffee.
Step 9:
Navigate to WooCommerce > Product Recommendations and click on the License tab.
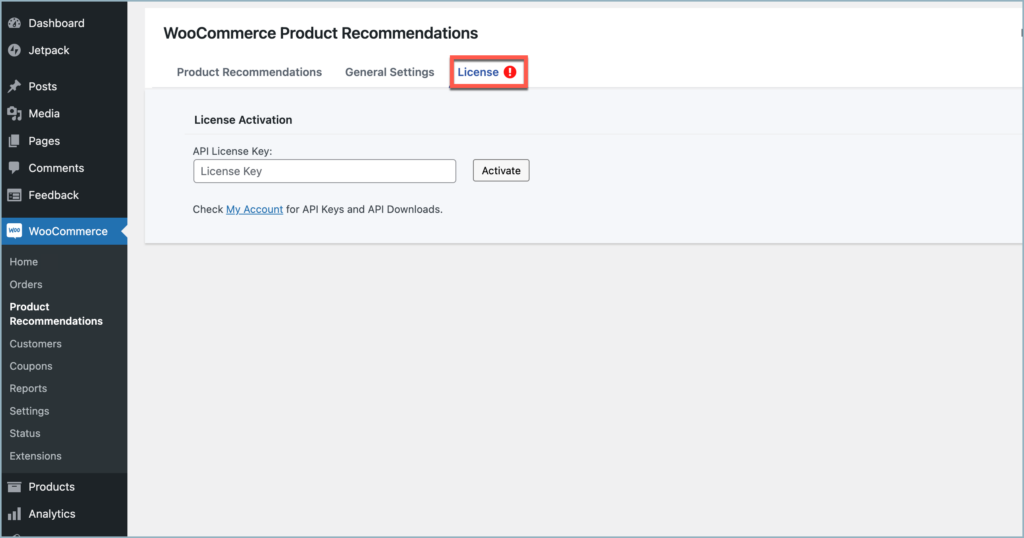
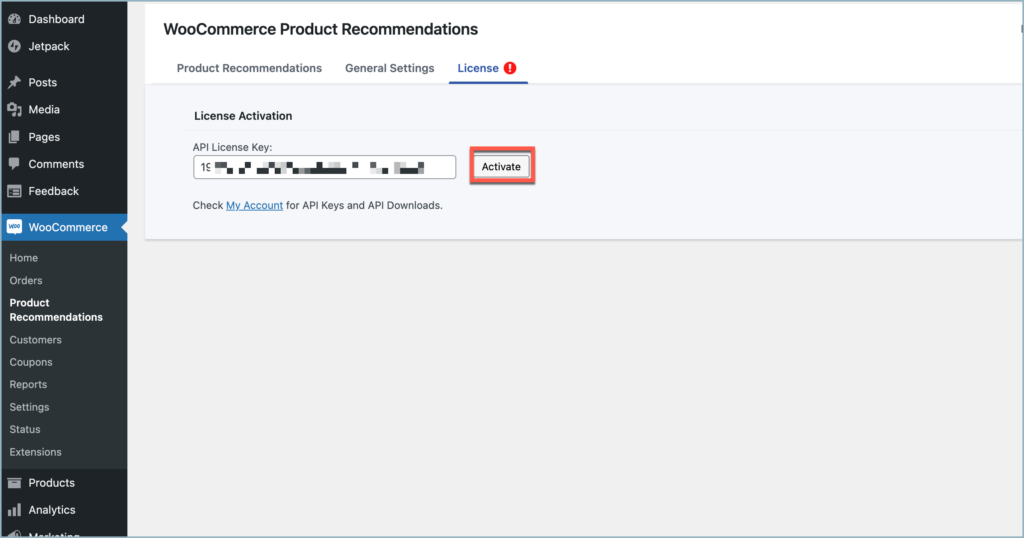
Step 10:
Enter the API License Key. Click on Activate button.

For detailed instructions, troubleshooting guides, and additional resources, please refer to our comprehensive product documentation. Click here to access the documentation and get the most out of the plugin.
Got any query? Please leave a comment or reach out to our support. Cancel reply

Customizer for WooCommerce PDF Invoices
Last updated on: July 19, 2023
Step 1:
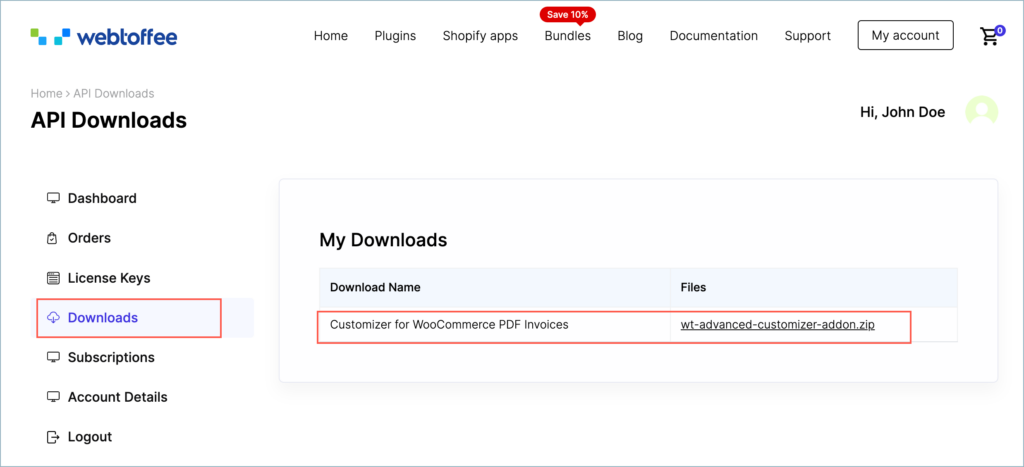
After purchasing the plugin, go to the My Account section in WebToffee. Log in with your credentials. Navigate to Downloads from the dashboard.
Step 2:
Click Downloads to get redirected to My Downloads. Click on the plugin package ZIP file to get it downloaded into your system.
Check:
The Customizer for WooCommerce PDF invoices add-on requires the below-mentioned Pro plugins as a minimum requirement for effective functioning.
- WooCommerce PDF Invoice, Packing Slips, Delivery Notes and Shipping labels (free) plugin version 4.1.0
- WooCommerce PDF Invoices, Packing slips, and Credit notes plugin version 1.0.3
- WooCommerce Shipping Labels, Dispatch labels, and Delivery Notes Plugin version 1.0.3
- WooCommerce Picklist plugin version 1.0.3
- WooCommerce Proforma Invoice Plugin version 1.0.3
Install the relevant versions before installing the customizer.
Step 3:
After downloading the ZIP file, navigate to Dashboard > Plugins and click on Add New.
Step 4:
In the window that appears, Click on Choose file to browse the plugin ZIP file.
Step 5:
Choose the ZIP file and click open.
Step 6:
Click Install Now.
Step 7:
After installing, proceed to activate the plugin.

Step 8:
Get your API Key and API Email from the My Account > License Keys tab in WebToffee.
Step 9:
Navigate to the plugin’s general settings window. Click on the License tab.

Step 10:
Enter the API License Key and Email. Click on Activate button.

For detailed instructions, troubleshooting guides, and additional resources, please refer to our comprehensive product documentation. Click here to access the documentation and get the most out of the plugin.
Comments (1)
-
Scharam Saleh
November 21, 2023
Here is my Order ID: 341339
Ive got the plugin Extension in 1.02. and i need 1.03. Even on the website i can only download the old version and not the actuall one. Cant activate my PLugin.
Thanks!
-
Sanjai Valsan
November 24, 2023
Hi Scharam Saleh,
Thank you for reaching out.
Currently, the latest released version of the plugin is version 1.0.2, and version 1.0.3 has not been released yet. We appreciate your patience, and once version 1.0.3 becomes available, you will be able to download and activate it.
-
Got any query? Please leave a comment or reach out to our support. Cancel reply

WooCommerce Coupon Generator
Last updated on: July 19, 2023
Step 1:
After purchasing the plugin, go to the My Account section in WebToffee. Log in with your credentials. Navigate to Downloads from the dashboard.

Step 2:
Click on Downloads to get redirected to My Downloads. Click on the plugin package ZIP file to get it downloaded into your system.
Step 3:
After downloading the ZIP file, navigate to Dashboard > Plugins and click on Add New.

Step 4:
In the window that appears, Click on Upload plugin and then on Choose file to browse the plugin ZIP file.

Step 5:
Choose the ZIP file and click open.
Step 6:
Click Install Now.
Step 7:
After installing, proceed to activate the plugin.
Step 8:
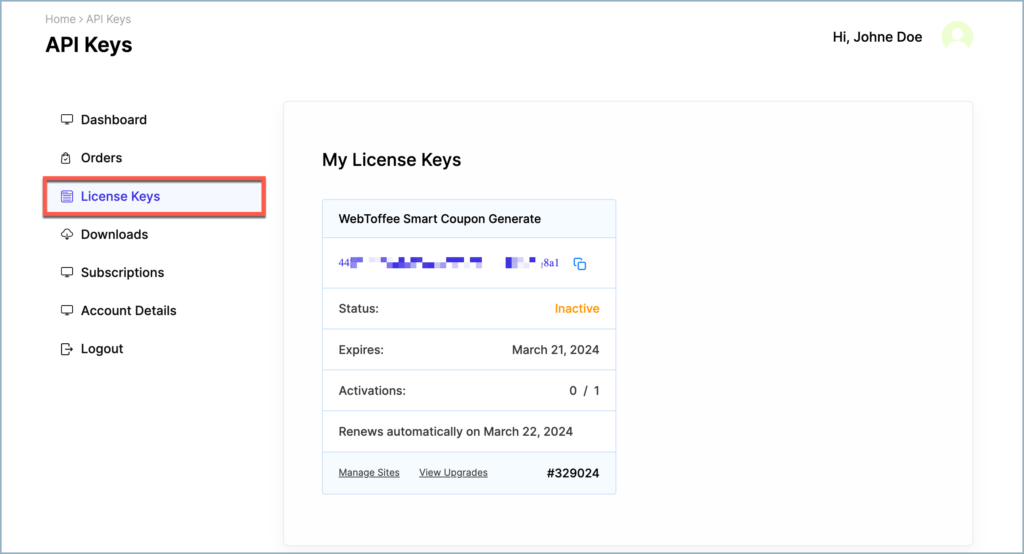
Get your API Key and API Email from the My Account > License Keys tab in WebToffee.
Step 9:
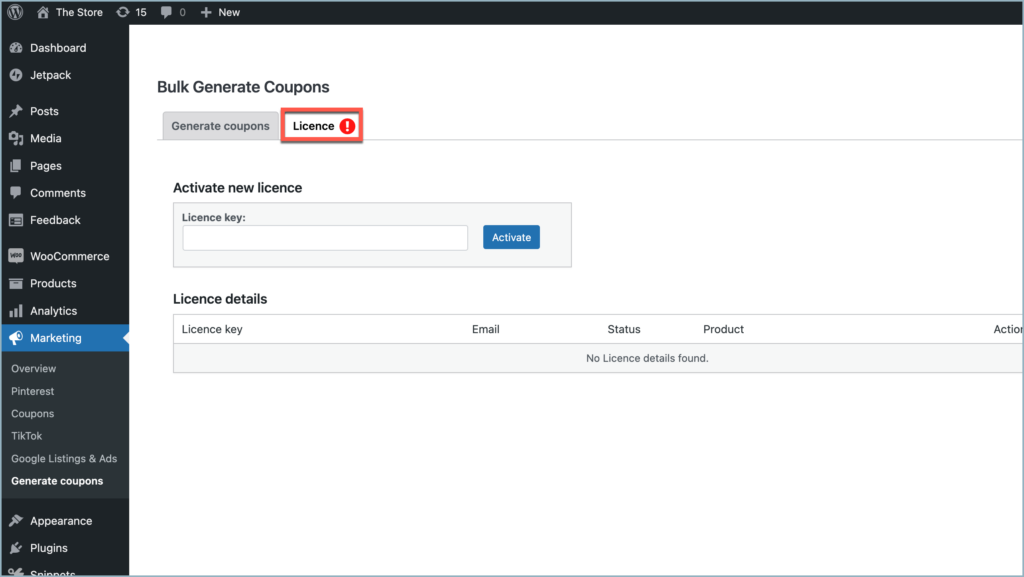
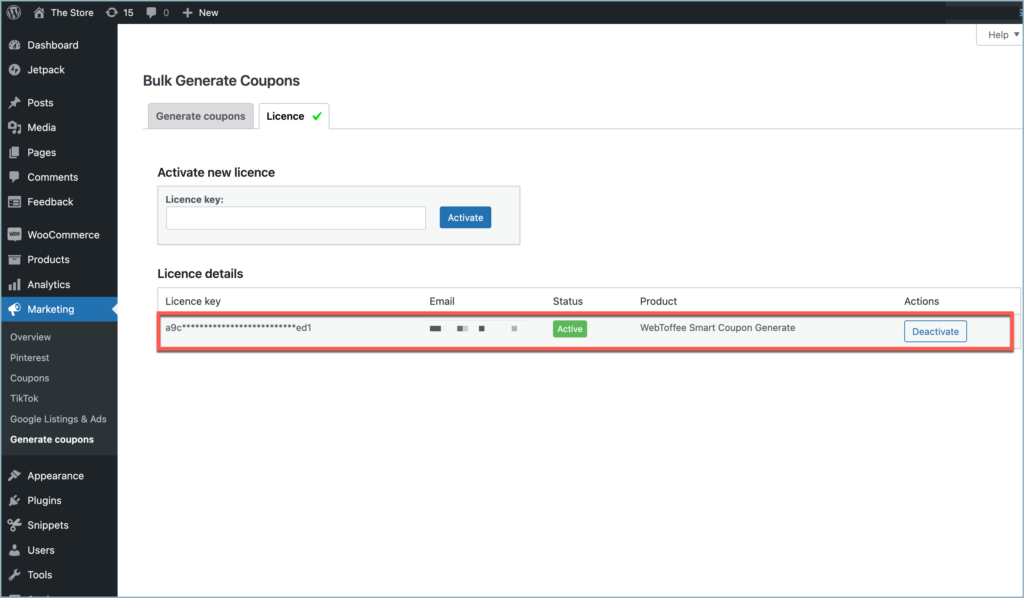
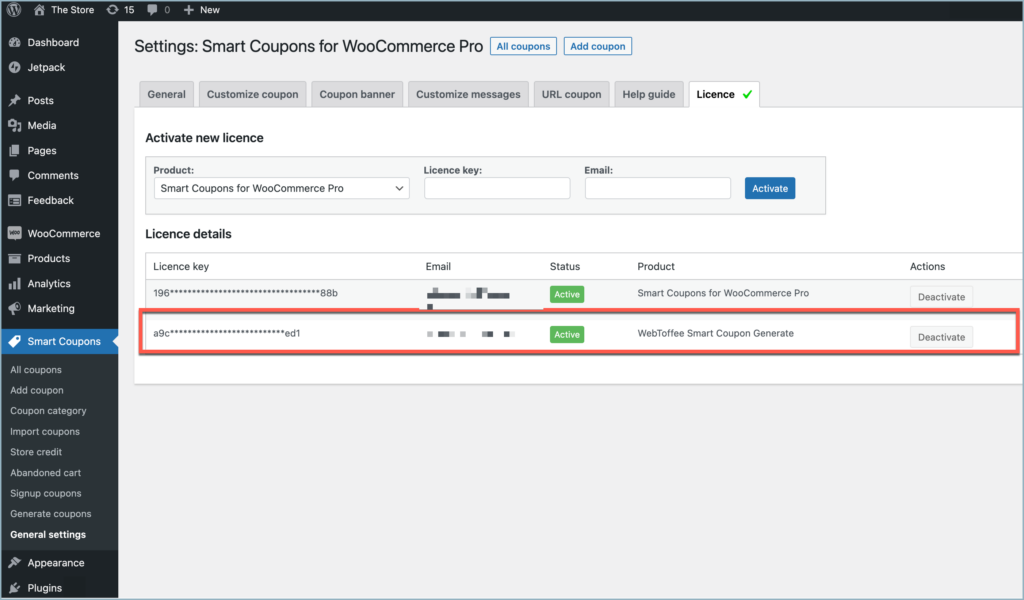
The plugin can be installed as a stand-alone or as an add-on to the Smart Coupons for WooCommerce plugin. In a stand-alone installation, the plugin’s license activation tab is listed at Marketing > Generate Coupons> License tab.
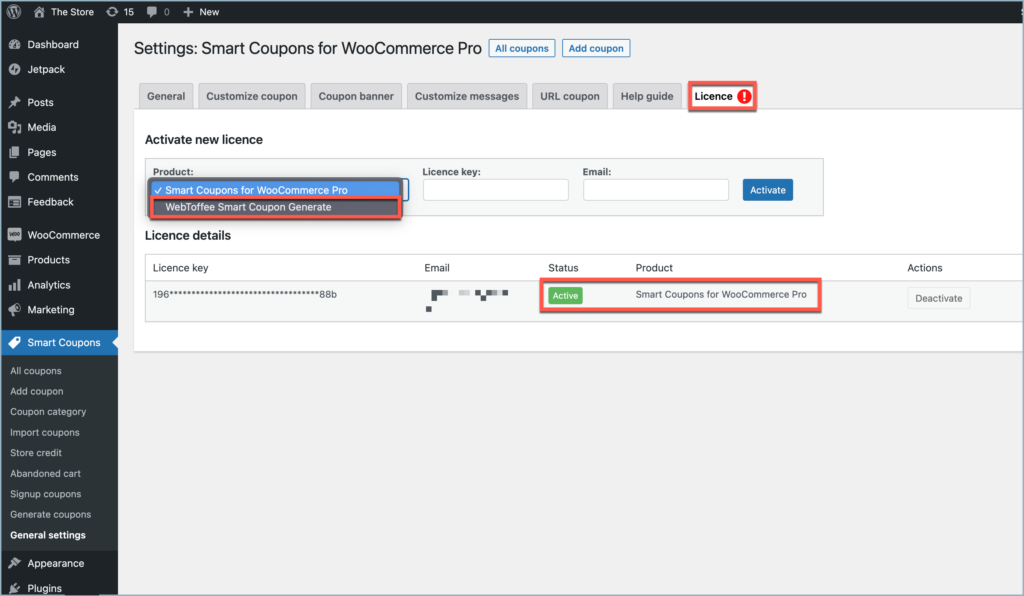
When installed as an add-on, the license activation tab is positioned at Smart coupons > General settings > License tab.
Step 10:
Enter the API License Key. Click on Activate button.
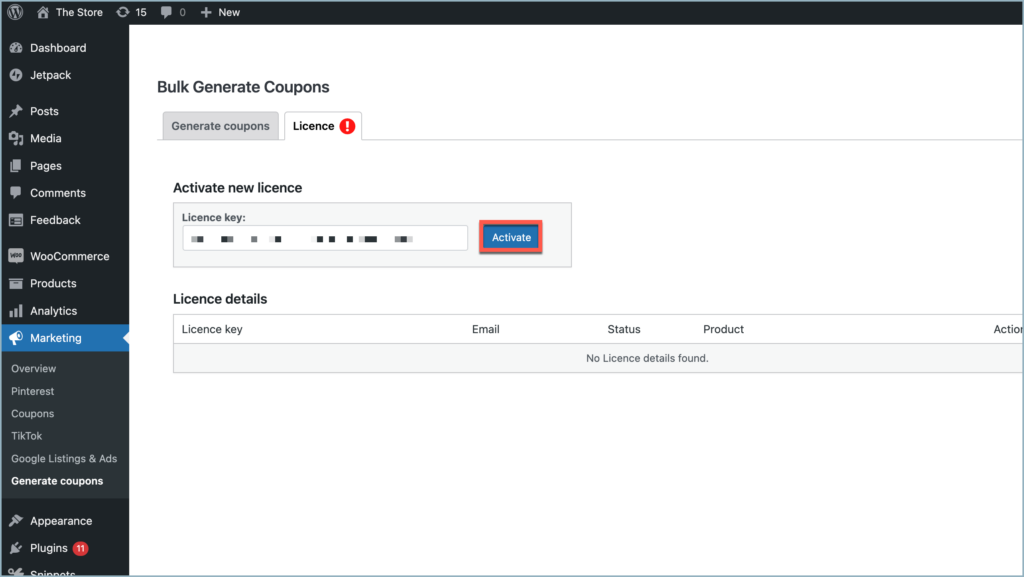
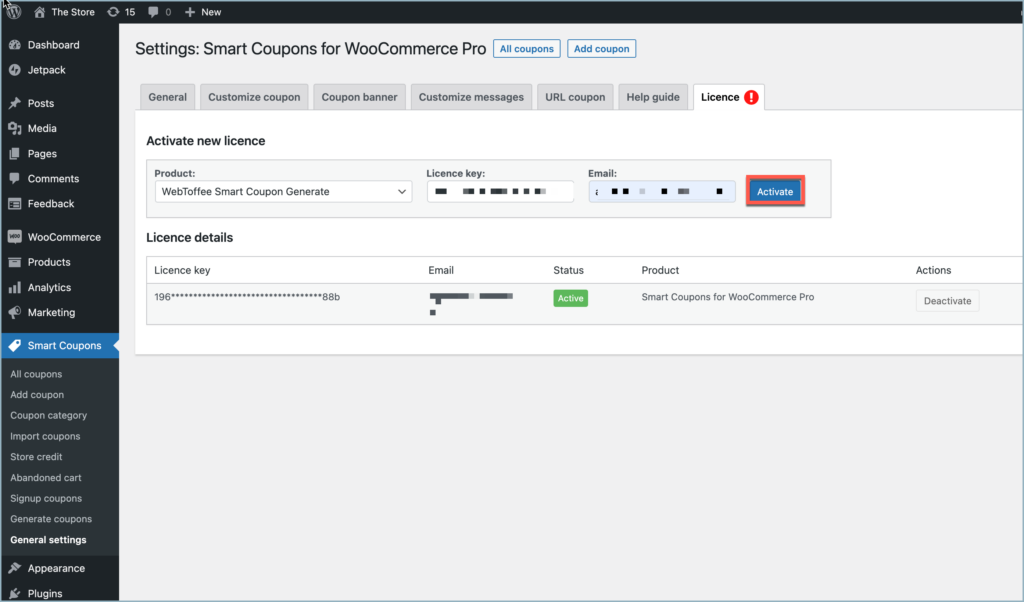
The images show the plugin in Active state.
For detailed instructions, troubleshooting guides, and additional resources, please refer to our comprehensive product documentation. Click here to access the documentation and get the most out of the plugin.
Inge Mennen
March 8, 2024
my license key is not working
Hema Ranjan
March 19, 2024
Hello Inge,
Thank you for your patience. We apologize for the delay in our response, which was caused by ongoing maintenance on our website. To resolve any issues you may be experiencing, please contact our customer support team. They’re dedicated to providing assistance and ensuring your satisfaction.
ap-datenschutz GmbH
November 7, 2023
Hi,
i cannot acces the Design editor for my themes. It is greyed out. Do you have any solution?
CU
Hema
November 17, 2023
Hello GmbH,
Thanks for reaching out. We need more information to process your request. Kindly contact customer support for more assistance.
Mollie Hillburn
November 6, 2023
I cannot get the plug in to work with rlx-consent. Can someone assist me in this, please?
Hema
November 17, 2023
Hello Mollie,
Thanks for reaching out. We need more information to process your request. Kindly contact customer support for more assistance.
Brett
October 30, 2023
Hi there,
We just purchased the Pro version of GDPR Cookie Compliance. Is it possible to position the Pop up version at the bottom of the page like the “banner” verison? We basically want the functionality of “Consent Before Accessing the site”, but with the style and position of the footer “Banner” cookie bar. Thank you so much for your time and help.
Regards,
Brett
Hema
November 3, 2023
Hello Brett,
Thanks for reaching out. You can achieve the same from navigating to Customize Cookie Bar > Cookie Bar > Show cookie bar as. Here select Banner. Now the consent will be displayed as a banner. Refer this article to know more