Customizing shipping labels for different page sizes is a practical necessity for e-commerce businesses that need flexibility in their shipping processes. The WebToffee’s WooCommerce Shipping Labels, Dispatch Labels, and Delivery Notes plugin provides the option to add custom sizes to shipping labels and specify the number of labels to print per row. The steps below will help admins accomplish this:
- Navigate to Invoices/Packing > Shipping label > General.
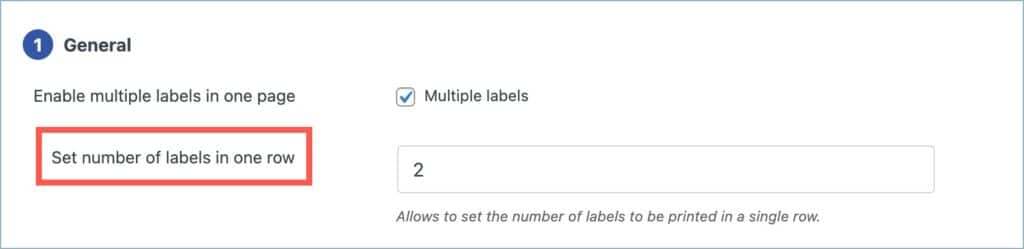
- Under the General section, enter the number of labels to print in one row.
- Set the shipping label size to Custom.
- Specify the custom size for the shipping label.
- Click on Update Settings.
Prerequisites
- Install and activate the following plugins:
- WooCommerce PDF Invoices, Packing Slips, Delivery Notes, and Shipping Labels (Free).
- WooCommerce Shipping Labels, Dispatch Labels, and Delivery Notes (Premium).
Adding custom size and specifying the number of labels to print in a row
- From the WordPress dashboard, navigate to Invoices/Packing > Shipping label > General.
- Under the General section, navigate to the Set number of labels in one row option and enter the required number of labels to print in a row using the arrow keys. By default, the number of labels is set to 2.
- Set the shipping label size to Custom. On selection, a new option named ‘Custom Size‘ will appear, here enter the required width and height for the shipping label in inches.

- Click on Update Settings and save changes.
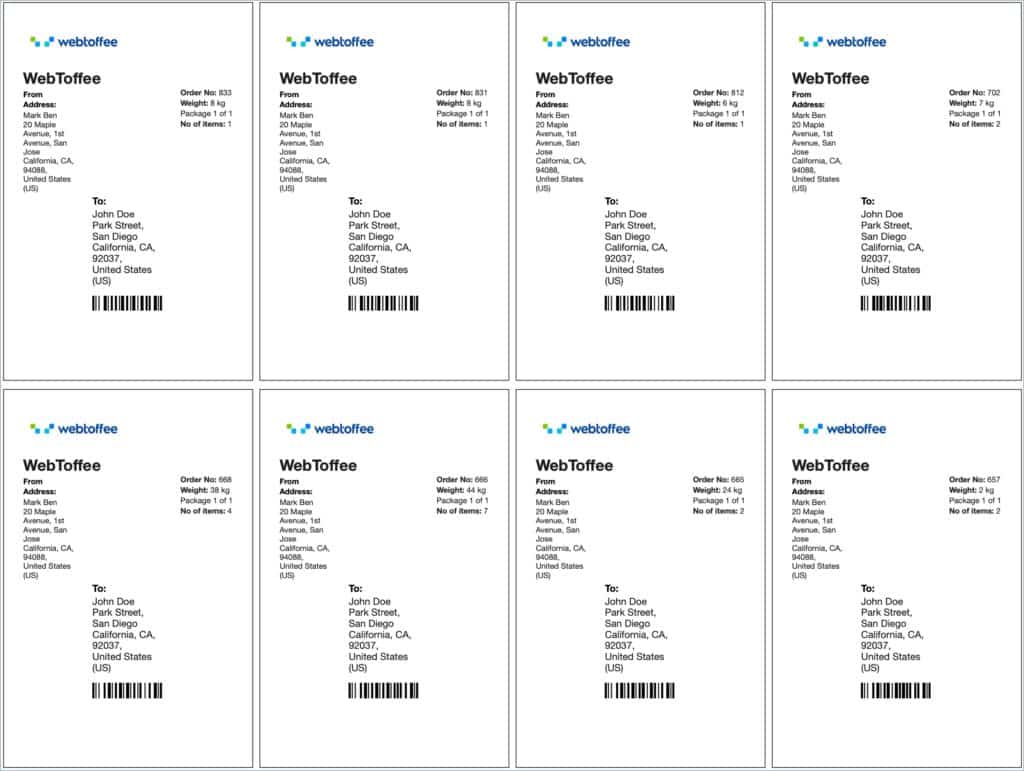
Example: Shipping labels of custom size 4 x 6 with 4 labels in a row
Let us take an example of generating shipping labels of custom size 4 x 6 with 4 labels in a row:
- Set the number of labels to be generated in one row to 4.
- Set the shipping label size to Custom.
- Enter the custom width and height as 4 and 6 respectively.
- Click on Update settings.
- Now navigate to the WooCommerce orders listing page.
- Select the orders for which the shipping label has to be generated. (In this case, let’s choose 8 orders)
- From the Bulk actions dropdown, select Print Shipping Label.
- Click on Apply and generate the shipping labels.
The following image shows the shipping labels of custom size 4 x 6 with 4 labels in a row.