Make all your export or import needs, to and from the WooCommerce stores, easier with the Import export Suite for WooCommerce. However, even the most robust tools can encounter unexpected hitches that momentarily interrupt the plugin’s seamless performance. This article is a comprehensive troubleshooting guide to help you address and resolve common import/export-related issues.
1. Same ID already exists
During import, when you try to add a product(by its ID), but, a product with the same ID is already available in your store.
Case 1:
If the user is trying to update the product that is already present on the site with the same id :
Solution:
The user can select Update for the option: If product exists in the store in step 4: Advanced Options/Batch Import/Scheduling.

Case 2:
User needs to add a new product, but the ID in the file is already taken by another product.
Solution:
Change the Product ID in import CSV file. Else, Skip adding the product.
2. Product with same SKU already exists
During import, when you try to add a product(by its SKU), but a product with the same SKU is already available in your store.
Case 1:
If the user is trying to update the product that is already present on the site with the same SKU.
Solution:
The user can select Update for the option: If product exists in the store in step 4: Advanced Options/Batch Import/Scheduling.

Case 2:
The user needs to add a new product, but the SKU in the file is already taken by another product.
Solution
Change the SKU in the import CSV file. Else, Skip adding the product.
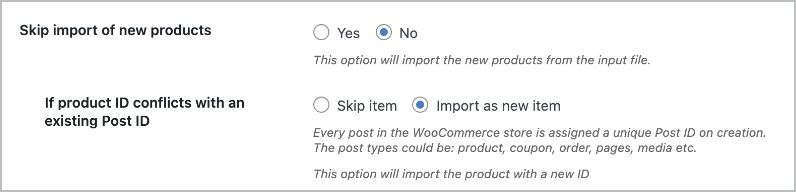
3. Product ID conflicts with an existing Post ID (or) ID conflict issue
During import, when you try to add a product(by its ID), but the Product ID conflicts with an existing Post ID.
Example: You are trying to import a product with ID:1080, but if you have an order/coupon or any other post with ID:1080; then the product will not get imported with the ID: 1080.
This operation is halted by the default WordPress system.
Solution
Solution 1:
Select Import as new item for the option: If product ID conflicts with an existing Post ID. This will assign your product to the next available ID on your site.
Solution 2:
Change the Product ID in the import CSV file. Else, Skip adding the product. For more details, refer: How to resolve ID conflict during import in WooCommerce.
4. Error: "Invalid product type"
The product type is not specified in the required format in the input file.
Case 1: The product type is not specified in the required format in the input file.
Solution: In the input file, specify the correct values for the column, tax:product_type as simple, external, or grouped respectively
Case 2: For Custom product type
Solution: This might’ve occurred because of the incorrect name of the custom product type. Here, the user can create a sample product with the custom product type and export this product to see the correct name of this product type and use this to import further.
5. Could not insert post into database
This issue usually shows up when the import file is not properly UTF-8 encoded.
Solution
Try importing again after saving the CSV file as UTF-8 encoded. For more info, refer to this article.4. Invalid input format for product type
The product type is not specified in the required format in the input file.
Solution
In the input file, specify the correct values for the column, tax:product_type as simple, external, or grouped respectively (only lowercase letters are allowed).
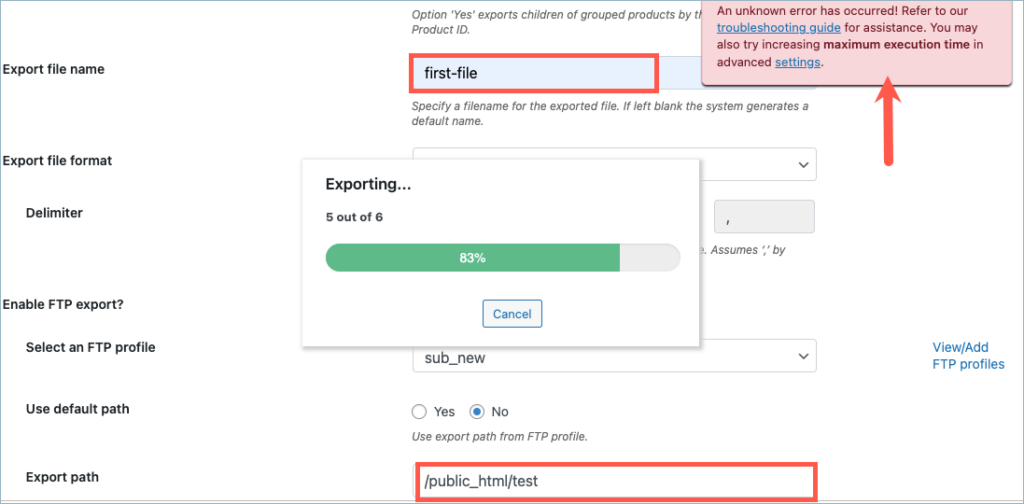
6. Timeout error due to import of images
Server timeout can occur due to slow database speed or due to large number of images.
Solution
Navigate to WebToffee Import Export (Pro) > General Settings. Under Advanced options, increase the value of Maximum execution time to reduce the chances of export/import timeouts.
7. Wrong FTP credentials
Entering any of these credentials wrongly can cause a failed FTP connection:
- FTP server host/IP
- FTP username
- FTP password
- FTP port number
Solution
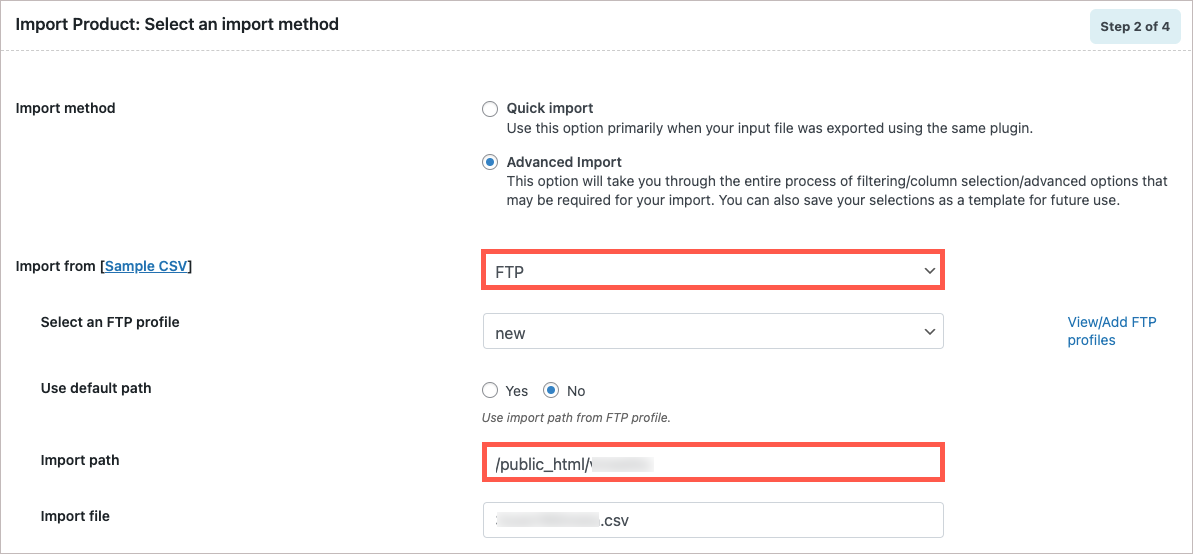
To upload an FTP file without failure:
- Double-check the FTP credentials before establishment.

- Ensure the exact import path is entered.
- This will avoid connection not successful scenarios and will upload the FTP file successfully.
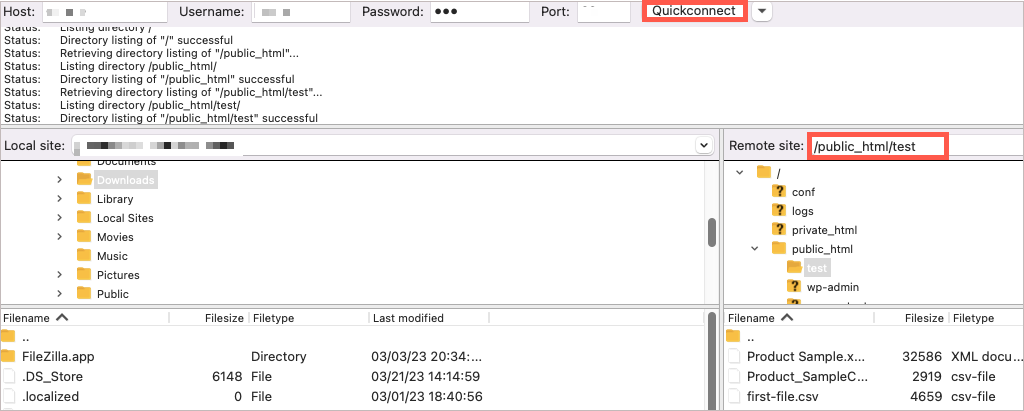
- You can also check the credential’s integrity in FTP client applications, such as: FileZilla. On a successful connection, the folder path will be listed under the Remote site.

8. Connection refused by the server
Here, all your FTP credentials will be correct, but, the connection will be unsuccessful. This case arises due to restrictions or blocking made by the server-side hosting providers.
- In this case, the FTP connection will be unsuccessful in client applications like FileZilla.
- The blocking or restrictions are usually from hosting providers. The restrictions can occur due to the blacklisting of IP addresses or due to restrictions on country codes.
Solution
- Reach out to the hosting provider and inquire about the cause of the restriction.
- Also, activities such as whitelisting of IP can avoid this error and result in a successful FTP connection.
9. FTP module not enabled on the server/site
This error appears due to a disabled FTP extension and thus results in an unsuccessful FTP connection.
Solution
- Ensure the FTP extension is enabled in the client servers.
- If in a disabled state, contact the server-side hosting provider and request to enable the FTP module. This action will enable the FTP extension in the client-server and lead to a successful FTP connection.
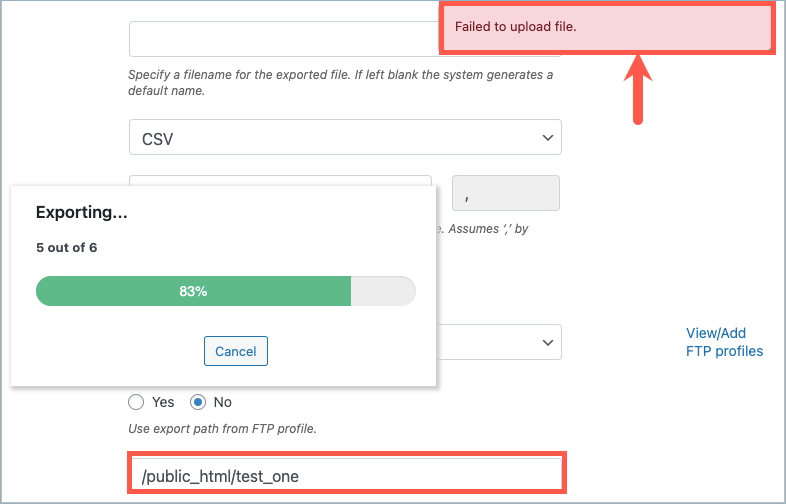
10. Target folder not existing
During export, an FTP file upload failure case arises if the folder does not exist. For example, the user tries to upload a file to the target folder: test_one, But, the server does not have a folder in that name.
Solution
To solve this issue, create a folder in the FTP server and name it the desired name, here test_one. This will be found on the server with the name test_one with the path:/public_html/test_one.
11. No file upload permission to the target folder
This error appears after a successful FTP connection and can appear even when the target folder exists.
Solution
The error arises due to upload permissions.
- Login to the FTP server.
- Give the read and write permission.

- Now, you have permission to upload files to the target location.

12. Unknown error - Incorrect settings
This error can appear due to an unsuccessful FTP connection. In this case, the credentials will be correct and no blocking/ restrictions will be there.
Solution
- From WebToffee Import Export (Pro), navigate to General Settings > FTP Settings > Add profile.
- Select Passive for the option Transfer mode.
- Under Select Protocol, choose FTP.
- Click on Save settings.

13. Errors on importing WooCommerce product images
Following are some of the errors you may have encountered while importing products with images:
- Server request block (Error getting remote image)
- Duplicate entry in Media Library
- Multiple images not getting imported
- Image not getting imported
Solution
Refer to Common errors on importing WooCommerce product images.
Your issue is not on the list..?
If you continue to experience difficulties, feel free to contact our support team. Provide them with the error details to receive additional help and guidance.