While migrating to a new WooCommerce website, the absolute important thing that you need in your website are the products. Including all the products in your new website or adding each product’s information manually, can be dawdling!. Import Export Suite for WooCommerce Plugin helps you to export a CSV/XML file that includes all the WooCommerce product’s data and import the same to the website much quickly. To import WooCommerce products:
- Select the post type as Product.
- Select an import method.
- Map the import columns.
- Use advanced options/ batch import and scheduling.
WooCommerce Mapping Fields
Before you get down to the product import & export operation, you should know some information about mapping fields.
For example, the post_title field gets mapped to the product name and the regular_price field gets mapped to the regular price of your product. If you want the plugin to work correctly, you must map all of the fields in the correct format. If there is any mistake in your import file, your product import may not work as expected.
The details of WooCommerce mapping fields are given below:
| Column/Tag Header | Explanation | Accepted value or format |
| post_title | Indicates the name of the product. | Text (ex. High Heel Shoe) |
| post_name | Indicates slug name of the product. | Text (ex. high-heel-shoe) |
| post_status | Indicates whether the product is in a draft or published mode. | draft/publish |
| post_excerpt | Indicates a short description of the product. | Text/HTML |
| post_content | Indicates description of the product. | Text/HTML |
| post_parent | Indicates parent of grouped and variable products. | Parent ID |
| post_password | For including a password for a private post. | Text |
| sku | SKU(stock keeping unit) is an identification, usually alphanumeric, of a particular product that allows it to be tracked for inventory purposes. | Alpha-numeric characters |
| menu_order | It decides the order of displaying the products in the shop. Items with menu order = 0 are displayed 1, 2, 3, etc. Products with the same menu order number are then listed alphabetically. When you create a new product it defaults to menu_order = 0. | Numeric characters |
| downloadable | After purchasing the product, whether the product can be downloaded or not. | yes/no |
| virtual | It is not physically existing as such but made by software to appear to do so. | yes/no |
| visibility | Indicates whether a product is available for purchase or not. | visible/hidden |
| stock | Total number of products available in stock. You can use (+) or (-) signs with parenthesis to add or subtract the number of products to the stock. | Numeric characters |
| stock_status | It indicates whether the product is in stock or not. | instock/outofstock/onbackorder |
| backorders | Indicate orders for out-of-stock products that cannot be currently fulfilled or shipped, but is requested nonetheless for when the product becomes available again. | yes/no |
| manage_stock | It indicates whether the stock is managed by a store or not. | yes/no |
| regular_price | Indicates the original price of the product. | Numeric characters |
| sale_price | It is the price of the product that is being offered at a discounted rate. | Numeric characters |
| weight | Indicates the weight of the product. | Numeric characters |
| length | Indicates the length of the product. | Numeric characters |
| width | Indicates the width of the product. | Numeric characters |
| height | Indicates the height of the product. | Numeric characters |
| images | Indicate image URL or image name. Supports multiple image URLs separated by ‘|’. | URL Eg: http://url/filename1.png |
| tax_status | It indicates whether the product is taxable or not. | taxable/none |
| tax_class | It indicates the tax option for the product. | Standard rate/Reduced rate/Zero rate |
| tax:product_type | Indicates the type of product, such as simple, variable etc. | Simple, Variable |
| tax:product_cat | It is used during importing the product which indicates the category of product. Use the pipe symbol to import multiple categories and the greater than symbol (>) to import category hierarchy. | Text |
| tax:product_tag | It is used during importing the product which indicates tag(s) used for the product. Use the pipe symbol to add multiple tags | Text |
| tax:product_brand | It indicates the brand of the product. | Text |
| attribute:Color | It indicates the available color of the product. Ex: red|blue|orange etc | Text |
| meta:attribute_color | Ex: red or blue or orange | Text |
| attribute_data:Color | It indicates the metadata about the attribute color of the product. | position|visible|variation (ex. 0|1|1) |
| attribute:Size | It indicates the available size of the product. | Ex. US7|US8|US9 |
| meta:attribute_size | It specifies the attribute value of each variation. | Ex. US7 or US8 or US9 |
| attribute_data:Size | It indicates the metadata about the attribute size of the product. | position|visible|variation (ex. 1|1|1) |
| attribute:pa_unit | This lists out the unit options. | Ex. 10 kg | 20 kg | 30 kg |
| meta:attribute_pa_unit | It indicates the metadata about the product unit. | Ex. 10 kg |
| attribute_data:pa_unit | It defines the position, visibility and whether used for variation or not. | position|visible|variation (ex. 4|1|1) |
| attribute_default:pa_unit | This is the default value of a unit attribute. | Ex. 10 kg |
Note: Attribute names with pa are global attributes and the ones without pa are called local attributes.
Mapping fields supported by Yoast SEO:
- meta:_yoast_wpseo_focuskw
- meta:_yoast_wpseo_title
- meta:_yoast_wpseo_metadesc
- meta:_yoast_wpseo_metakeywords
Import Products
To import WooCommerce products:
- Click on WebToffee Import/Export(Pro) > Import.
Step 1: Select post type
As a first step, you need to choose the post type as Product.
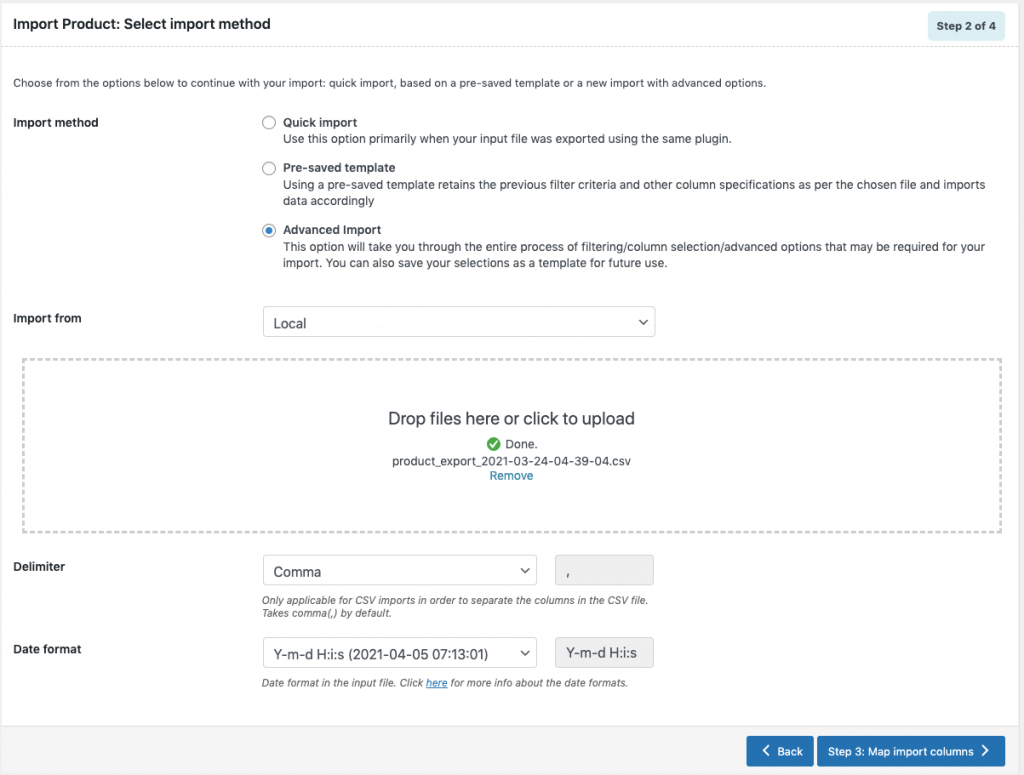
Step 2: Select import method
Choose from the below options to continue with your import:
- Quick import
- Based on a pre-saved template
- Advanced import
Let us have a look at each of these import methods:
Quick Import
- imports the basic/standard fields of the respective post type.
- primarily used when your input file was exported using the same plugin
- One can import file from:
- Local
- URL
- Existing files
- FTP
- Click the Import button to complete the action or proceed to Step3 for advanced options.
- Navigate to Step 4 to know more about Advanced options/ Batch import/ Scheduling.
Pre-saved template
- This method retains the previous filter criteria and other column specifications as per the chosen file and imports data accordingly.
- By selecting this option, one can choose a previously saved template from the Import template drop-down.
- Click the Import button to complete the action or proceed to Step3 to map and reorder columns.
- Navigate to Step 3 to know more about mapping and reordering import columns.
Advanced Import
- This option will take you through a detailed process of filtering/column selection/advanced options that may be required for your import.
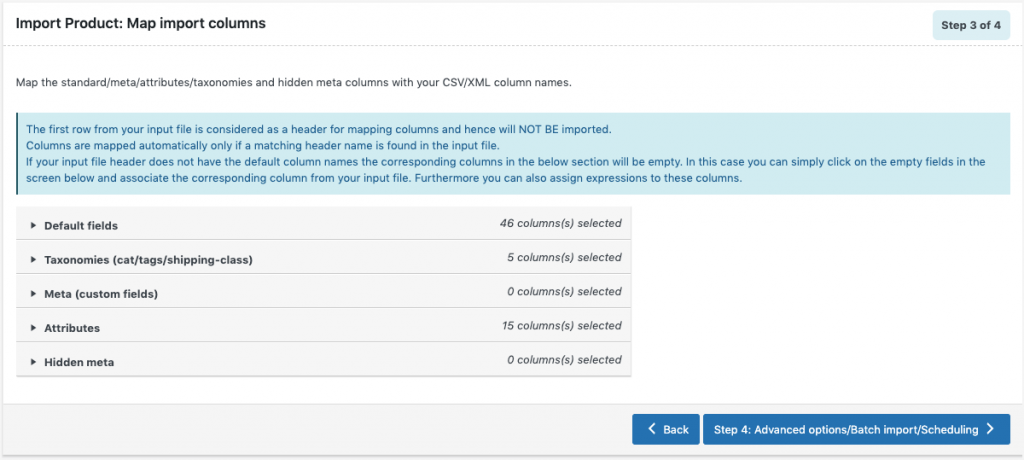
Step 3: Map import columns
Here, one can map the import columns under the following 5 fields:
- Default fields
- Taxonomies
- Meta(Custom fields)
- Attributes
- Hidden meta
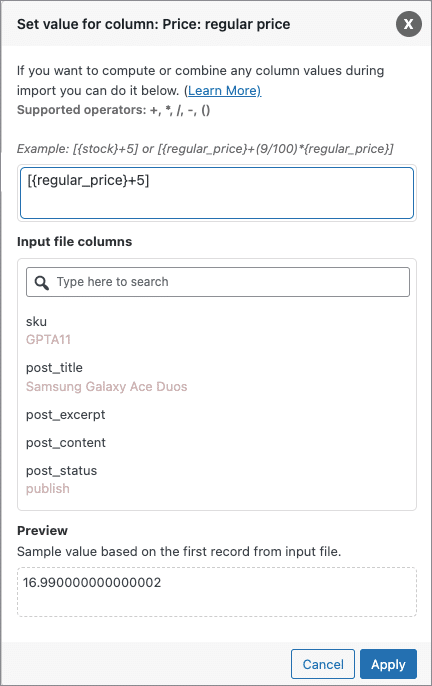
Evaluate field
This field is used to append a value/expression to an existing item while importing. It basically selects/maps any column from the input file and compute the values with expressions and creates output.
- Expression: Any of the operators +*/-()&@ or string constants can be used along with the attributes to manipulate the respective value.
- Input: Select the column from the dropdown which has to be modified.
- Output: Sample value will be created based on the first record from input file.
- Click on Step 4 to proceed.
Step 4: Advanced Options/Batch Export/Scheduling
- On reaching Step 4, the following window will appear, from where one can:
- If product exists in the store: One can either Skip or Update the entry.S
- Match products by their: ID, SKU
- Skip import of new products: On choosing Yes option, import of new products will be skipped. On choosing No option, new products will be imported from the input file.
- If conflict with an existing Post ID: One can either Skip item or Import as new item.
- Use SKU to link up-sells, cross-sells and grouped products
- Delete non-matching products from store
- Save the template file for future export (if needed).
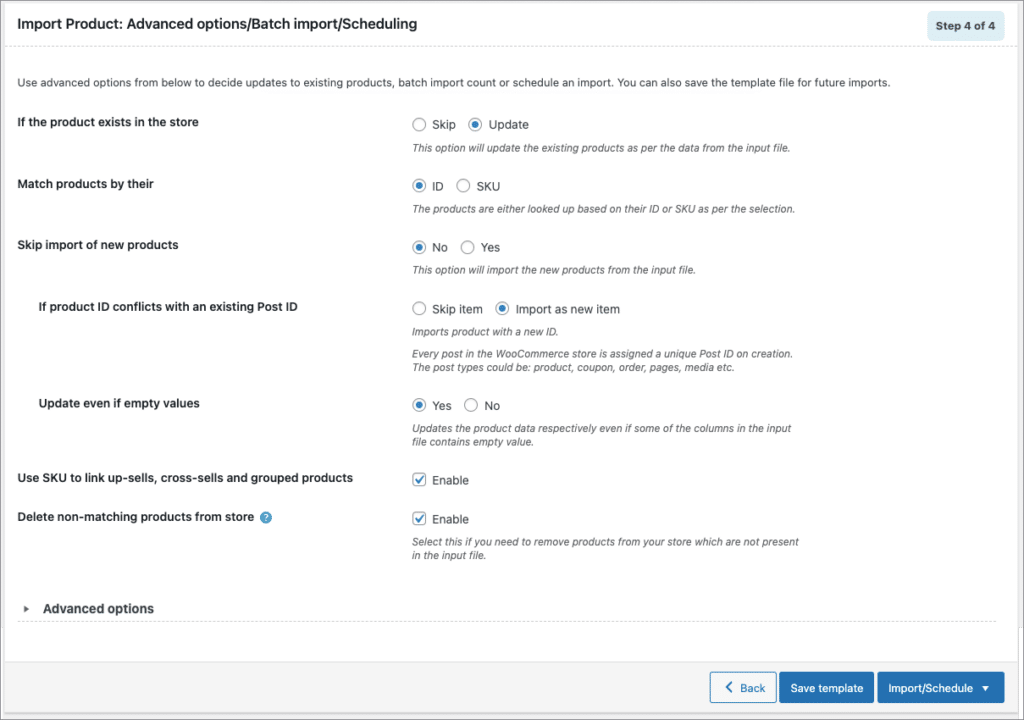
- Click on Import/Schedule to finish.
You can either import the products directly into your store or schedule the import using FTP.
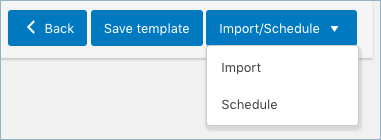
To schedule the import:
- Hit the Schedule option, and you will be taken to the cron schedule window as shown below:
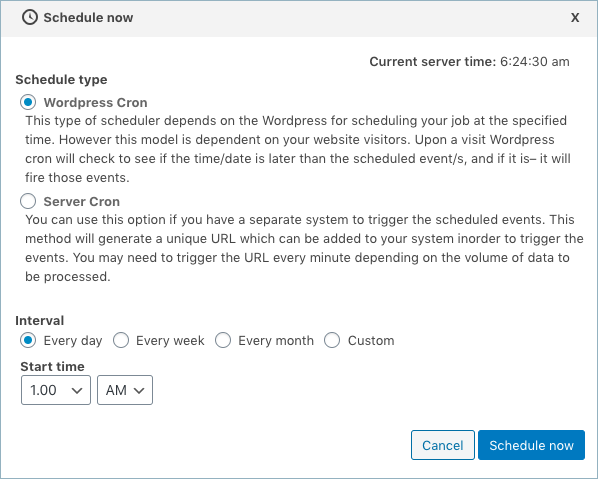
The plugin supports two different schedule types:
- WordPress Cron: Upon a visit, WordPress Cron will check to see if the time/date is later than the scheduled event/s, and if it is– it will fire those events.
- schedules your job at the specified time.
- is dependent on your website visitors.
- Server Cron: You may need to trigger the URL every minute depending on the volume of data to be processed.You can use this option :
- to generate a unique URL that can be added to your system in order to trigger the events.
- if you have a separate system to trigger the scheduled events.
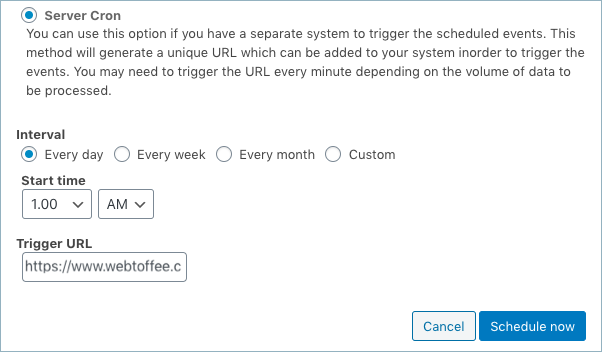
Also, the import/export can be scheduled on a daily, weekly, monthly, custom basis. One can also configure the time at which the import has to be scheduled.
To directly import:
- Hit on the Import option
Once the import is completed, a pop-up will be displayed showing import status which contains the number of successful imports and failed imports (if any).
Comments (3)
FREDERIC ASSEMAT
November 23, 2023
Hi, I have a product import with images. What is the behavior of the plugin when the name of the images of a product is the same but the image is different in content?
Matt
November 5, 2023
hi,
When I run this importer to add new products, it is creating new categories instead of placing the products in the existing category. Are you able to tell me what I’m doing wrong please?
thanks.
Vineetha
November 7, 2023
Hi Matt,
Thank you for reaching out to us. Suppose you haven’t used the correct category slug in the CSV, then, the categories will be duplicated. This issue can also occur if you have given a custom slug.