Overview
The GDPR Cookie Consent(CCPA) plugin makes a website comply with the GDPR & CCPA law for the usage of cookies on a website. To name a few you can:
- Add a cookie notice bar on the front end of the website to notify the usage of the site cookies.
- Restrict banner to EU or CA visitors or all.
- Scan your website for cookies and add them to your cookie list.
- Render or block the scripts of these cookies based on the user’s consent either via the automatic script blocker or by manually adding scripts.
- Maintain an audit log of user consents.
- Consent withdrawal.
Get Started
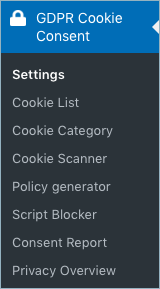
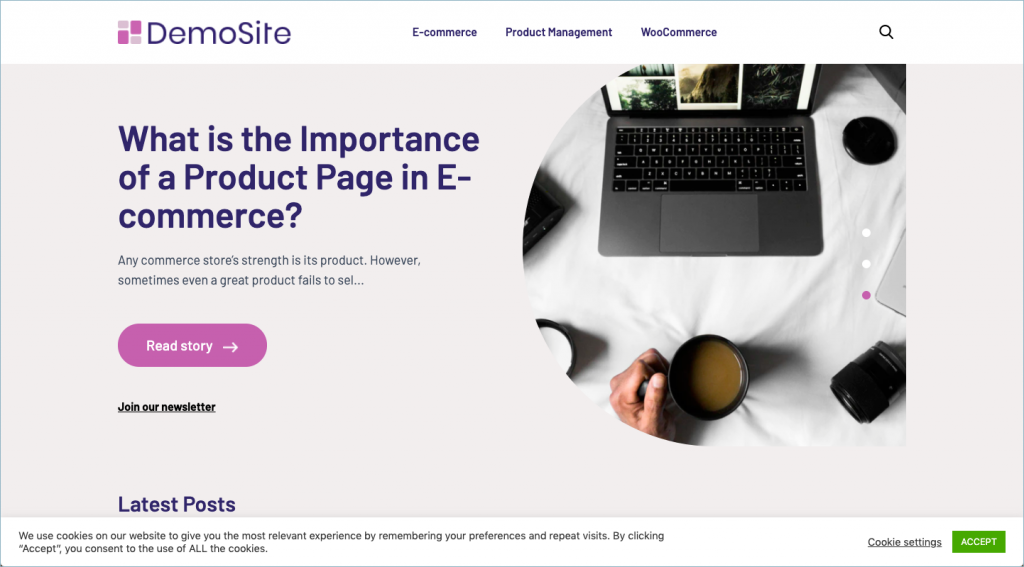
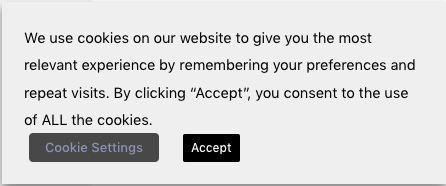
First of all, install and activate the plugin. From your WordPress dashboard, go to the menu GDPR Cookie Consent plugin.
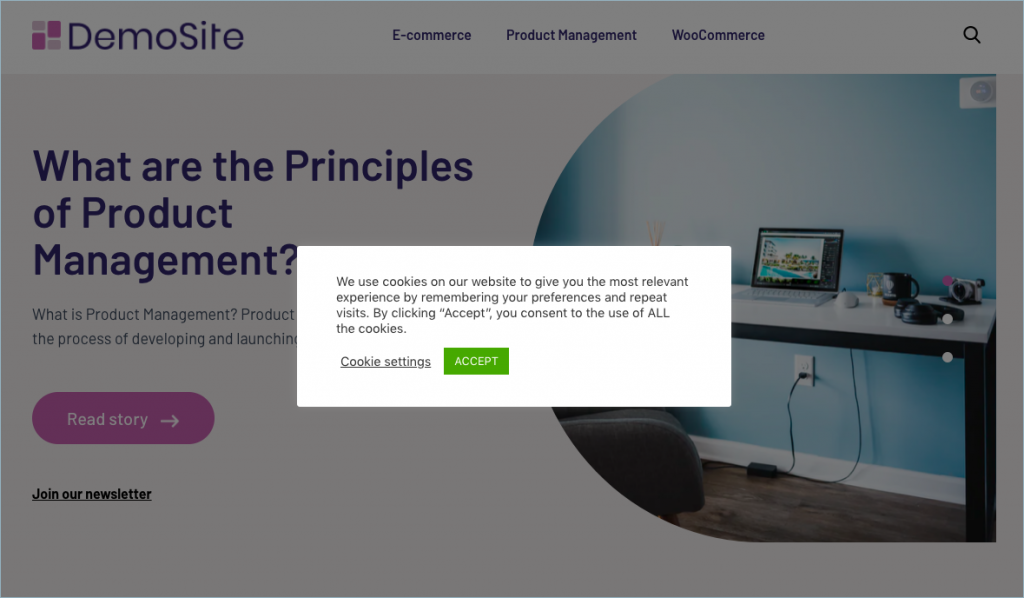
Soon after, a cookie notice bar will appear at the footer of your website.
Settings/Customizations
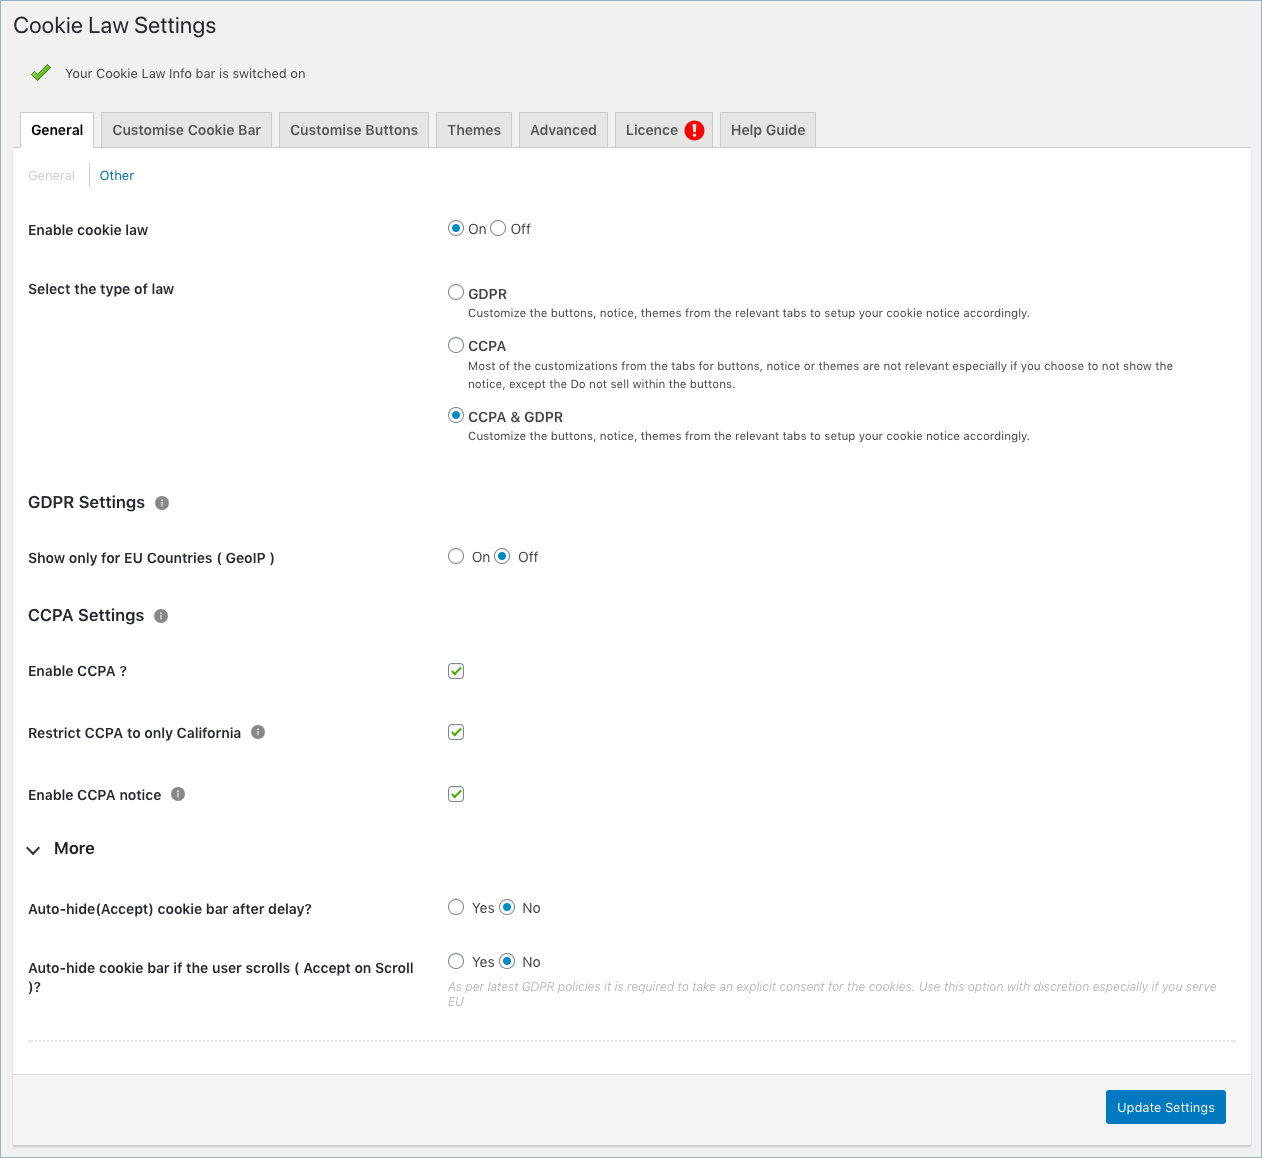
Go to GDPR Cookie Consent > Settings > General. You can explicitly enable the required law and customize the appearance of the cookie notice bar to match with the theme of your website from the Settings window as shown below.
The different tabs of the Settings page allow you to customize the different parts of the cookie consent bar. Let’s go through each of these tabs of the settings page in detail.
General Settings
You can select the type of law and manage its country restrictions from the general window
The general setting consists of the following options:
- Enable Cookie bar: You can enable or disable the cookie bar on your website. By default, it is in the enabled state which shows the banner at the front end of the website. Disable to not show the banner on the front end of the website.
- Select the type of law: You can either choose GDPR, CCPA, or both based on your site requirement.
- GDPR Settings:
- Show only for EU Countries enables you to show the cookie notice only to the visitors from the European countries.
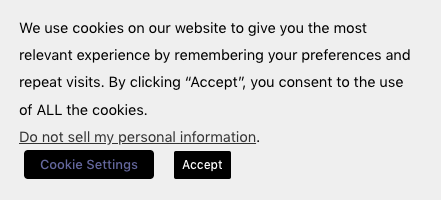
- CCPA Settings: The right to opt-out in the California Consumer Privacy Act gives consumers the ability to direct a business not to sell their personal information to a third party. The shortcode for ‘DO NOT SELL’ is [wt_cl i_cc pa.optout] To setup CCPA, refer here.
- Enable CCPA: Check the option to enable CCPA for your site.
- Restrict CCPA only to California: Enable to show banner only for the visits from California; applicable to all visitors when disabled.
- Enable CCPA notice: Enabling the notice will display the banner with the relevant text as per your configuration. Use this option particularly to record prior consent from the website visitors.
- CCPA and GDPR: Our plugin adds the CCPA notice to the existing GDPR banner to make it compliant with CCPA. Since the plugin’s GDPR capabilities like script blocking before consent etc apply for CCPA as well, it requires those features to be compliant in California as well. The only difference in the California banner would be that an additional consent will be saved regarding selling the data to a third party.
- More options
- Enable the Auto-hide cookie bar after the delay option and configure time if you want to assume the user acceptance if he/she lingers on the web page for the specified amount of time.
- Enable the Auto-hide cookie bar (Accept on scroll) option if you want to assume the user’s acceptance if he/she scrolls the web page.
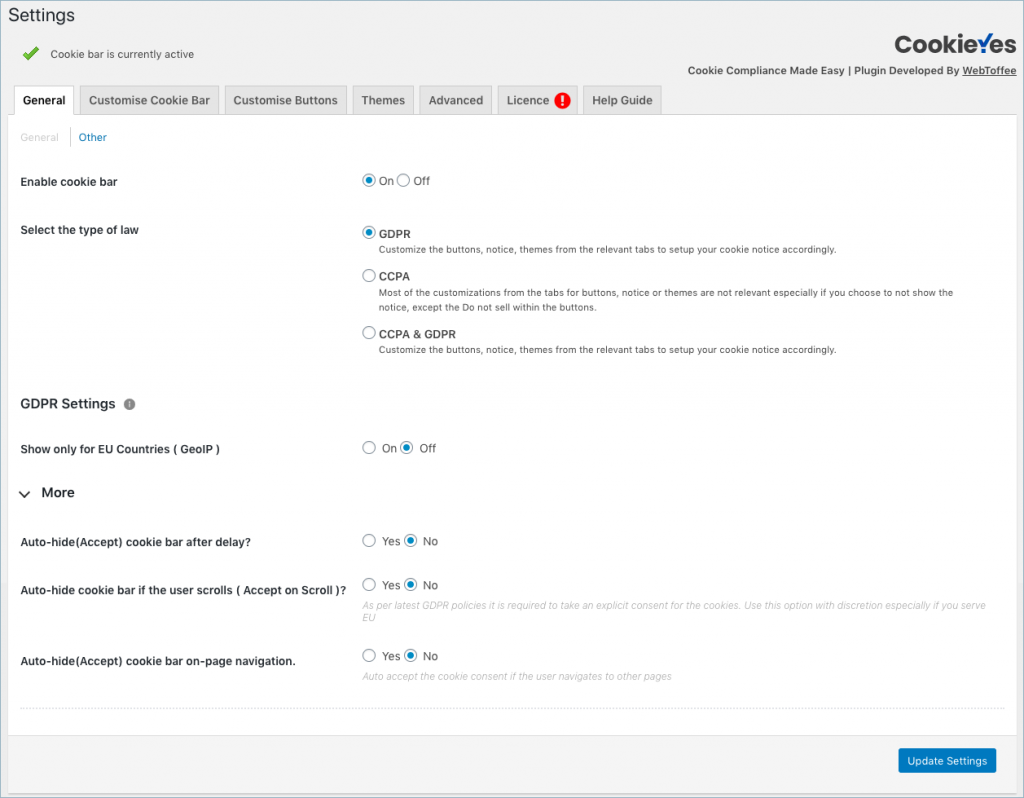
Other
Go to GDPR Cookie Consent > Settings > Other. The screenshot of the Other section is shown below.
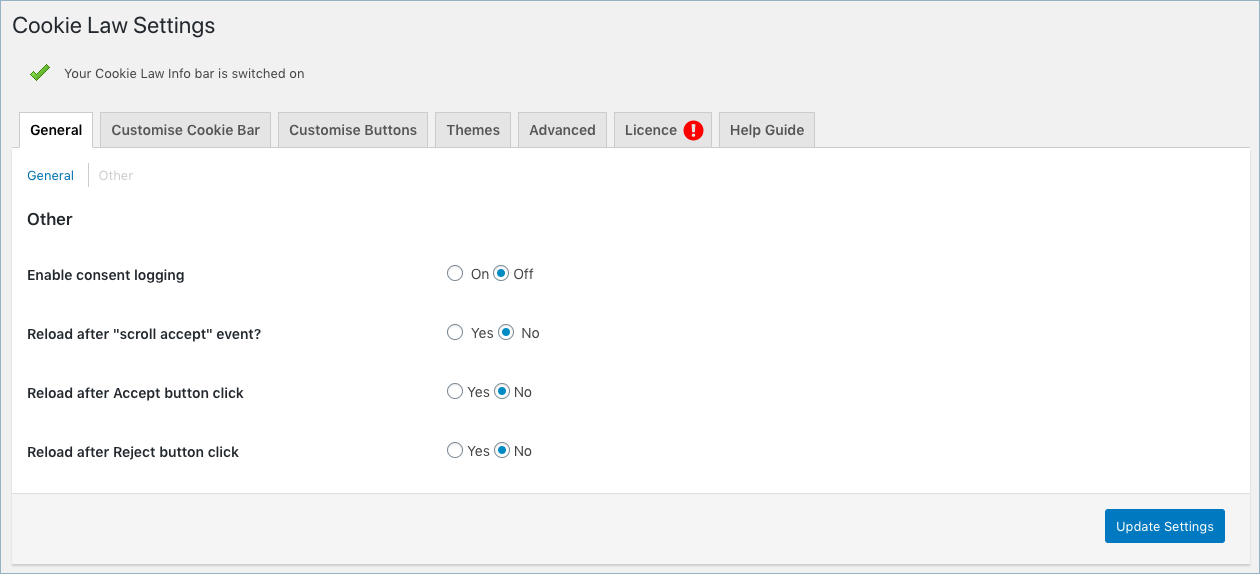
- Enable Consent Logging: Set yes, to record the consent of each user in the database. You can access the same from the Consent Report page.
- Reload after ‘scroll accept‘ event: Choose yes to reload the webpage automatically when the user scrolls, thereby, accepting consent.
- Reload after Accept button click: Choose yes to reload the webpage automatically when the user clicks on the accept button.
- Reload after Reject button click: Choose yes to reload the webpage automatically when the user clicks on the Reject button.
Customize Cookie Bar
Go to GDPR Cookie Consent > Settings > Customise cookie bar. The cookie bar message and its styling can be modified from Customise Cookie Bar tab.
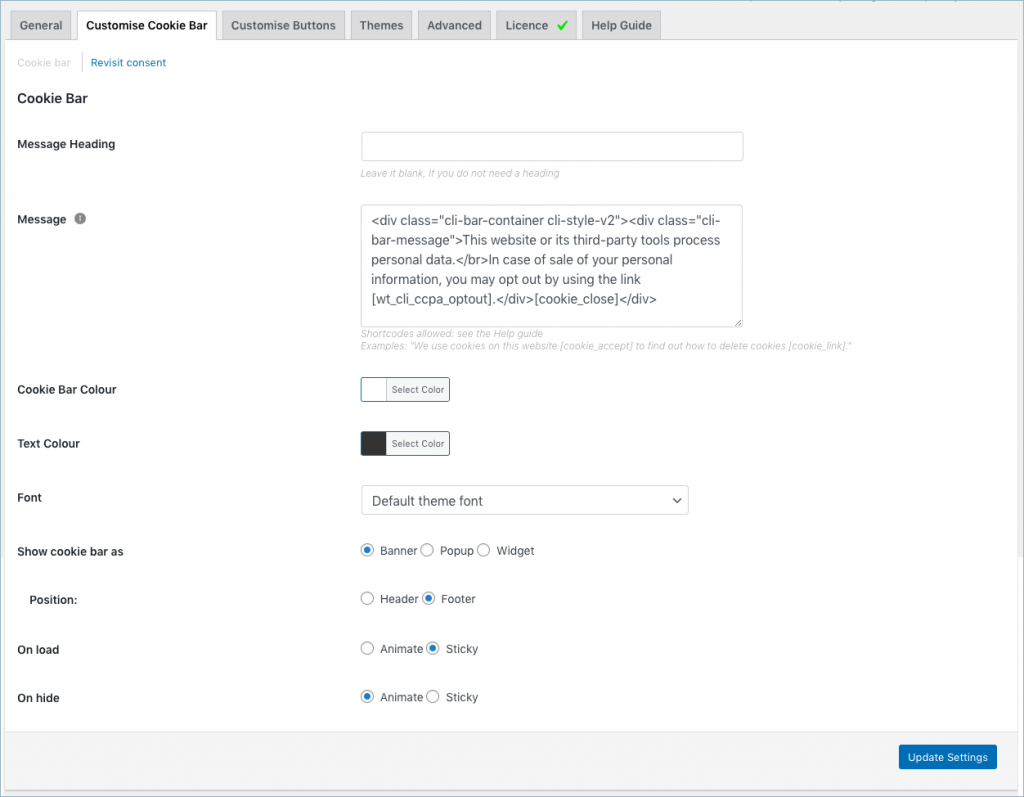
Following are the fields in this tab:
- Enter an appropriate message title for the cookie bar in the field provided. Leave it blank if you don’t need one.
- The message field populates the default cookie banner content. It supports basic HTML tags and other shortcodes for Accept button, Rejects button, etc.
- You also have a provision to control the color of the Cookie Bar and/or the message font. By default, the plugin will take the active theme font.
- The three different styles supported for the cookie bar are Banner, Pop up, or as a widget.
- With the banner option, you get to choose if you want to place the banner in the header or footer.
- The pop-up type will show the cookie message bar as a popup instead of a banner. You can set an overlay along with the popup, which will block the user from browsing the website unless consent is obtained.
- As for the widget, you can position it to the left or right of the website.
- On load option allows you to either animate the notification or make it sticky while loading the website.
- On hide option allows you to either animate the way the notification disappears or to disappear without any visual effect.
Revisit Consent
Go to GDPR Cookie Consent > Settings > Customise cookie bar > Revisit consent.
Below is the screenshot of the Revisit Consent section and its fields explained.
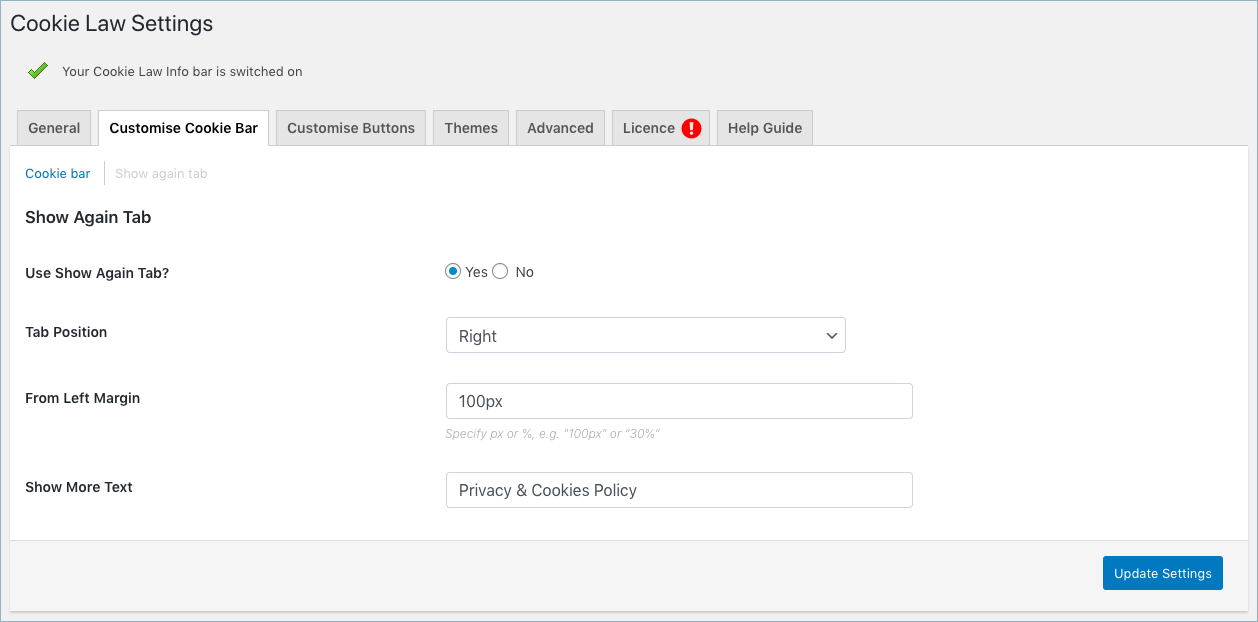
- Enabling the revisit consent automatically displays a small privacy widget at the footer of your website. You can also manually insert a link to manage consent by adding the shortcode Privacy & Cookies Policy to your website.
- You can place the Manage consent tab to either the left or right of the web page.
- Use the From left margin to position the show again tab. Enter a value in either pixel or percentage to specify the distance from the respective margin, to place the dialog accordingly.
- The Title field allows you to customize the text on the widget. For instance, you can key in ‘Privacy and Cookie Policy’ as a title or whatever you may like.
Customize Buttons
Go to GDPR Cookie Consent > Settings > Customise buttons.
Customize the buttons and links used in the cookie message bar. Copy the shortcodes of button/link and paste it to the cookie message bar.
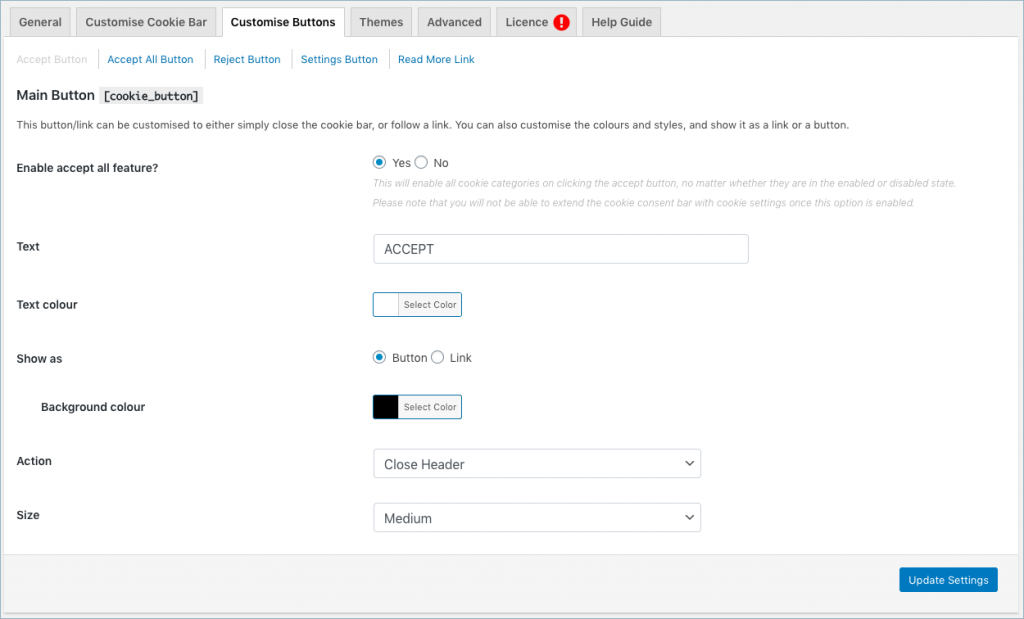
- The Accept, Accept All, Reject and Settings Button section consists of the following fields as shown below:
- The Text field lets you add the button text.
- Text Color lets you choose the text color.
- Show as field lets you choose whether the shortcode should appear as a button or as links. Choose button style to set required the background colour.
- You have the option to set an action against the button/link. The close header option simply closes the cookie bar upon a user action whereas the Open URL option opens the specified URL in a new or existing window as the case may be.
- Select the desired size for the button from the drop-down as either Extra large, Large, Medium, or Small.
- The Read More Link opens to the Privacy & Cookie Policy page of your website.
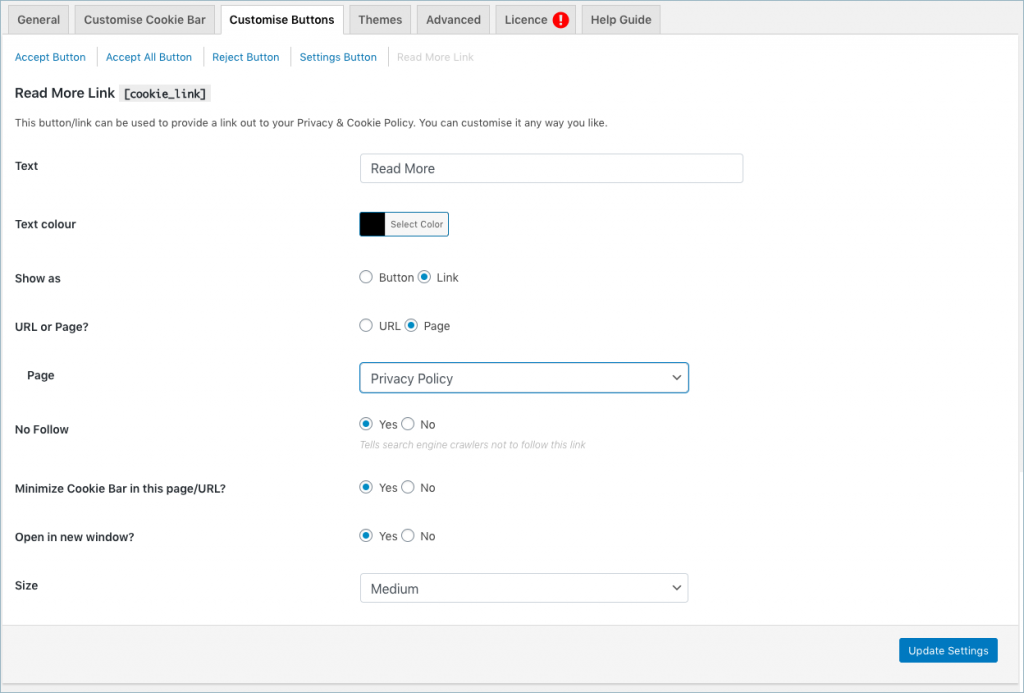
- The additional fields for the Read More Link apart from the common options are the following:
- URL: Redirect users to the specified page URL.
- Page: Select a page from the list of available pages on the website to redirect users. (My Account, Checkout, Cart).
- Choose yes, to open Privacy & Cookie Policy page in a new window.
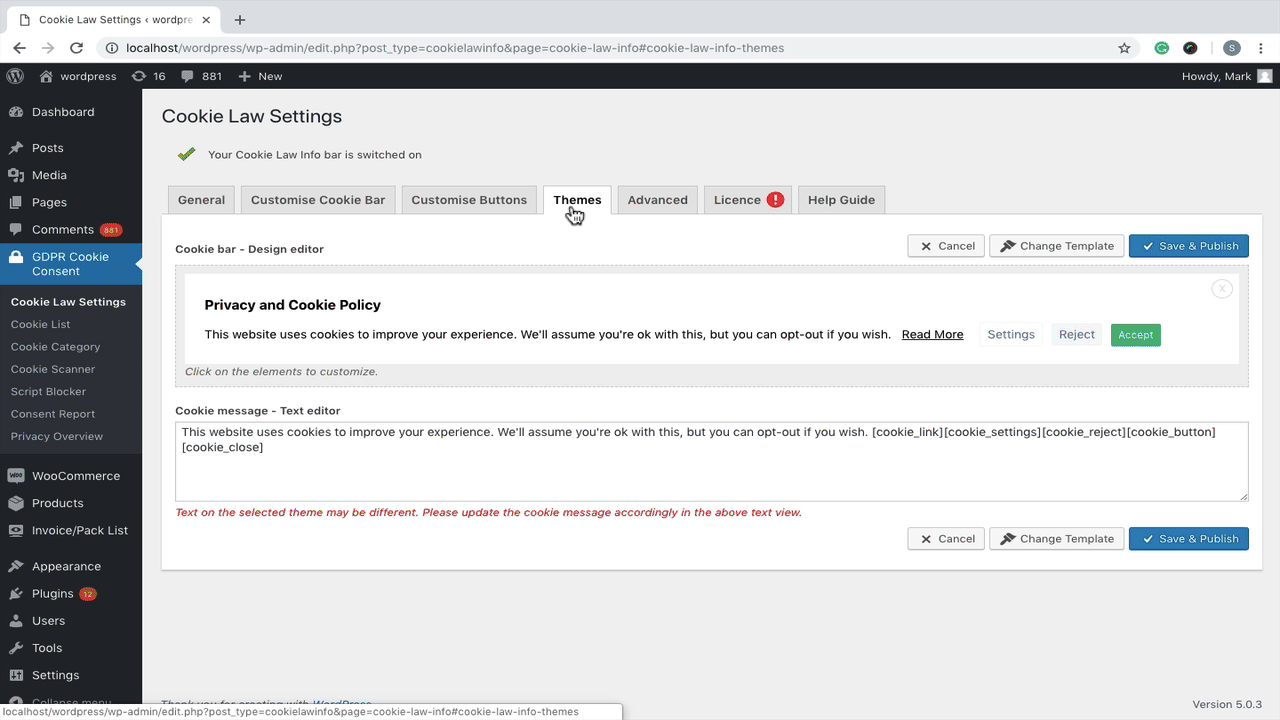
Themes
There are two main panels within the Themes: a Cookie bar-Design editor and a Cookie message-Text editor.
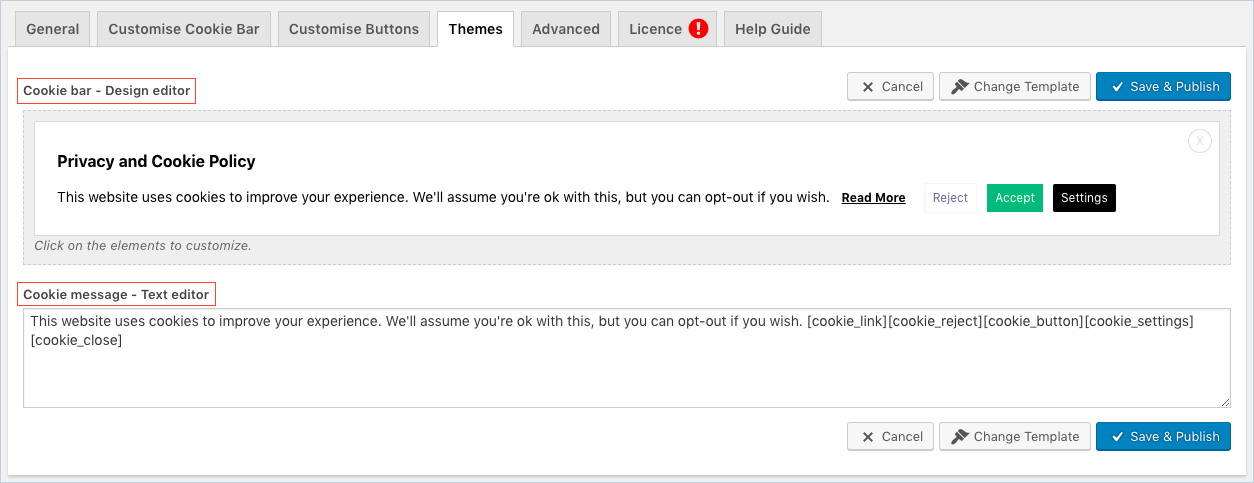
- The Cookie bar-Design editor window will display the cookie bar that is currently active on the website. Click on a cookie text, buttons, etc from the design editor to customize it. You can customize the font size, color, weight, border, or even include a custom CSS from the control panel.

- Edit the cookie bar content from Cookie message-Text editor.

Once done with the styling, Save & Publish the changes. Click on Change template to view other template options. Cancel to revert to your previously active template.
Alternatively, you may use the Change template button to adopt a cookie bar from some of our default templates under the Banner or Pop up or Widget formats in the following manner.
Just select any template from the list and click on the Live preview button to experience it against your website. If you like what you see click on Customize to get it onto your design editor. Besides if you need to customize further you may make the necessary changes from the design editor.
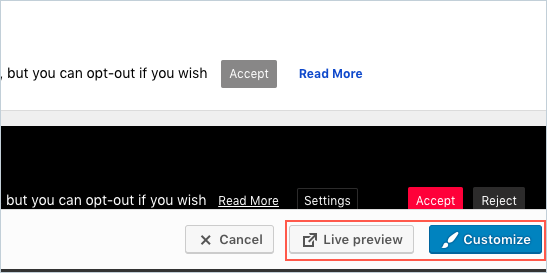
Finally, click on Save & Publish button to set the customized template as the current cookie bar.
Advanced Settings
Go to GDPR Cookie Consent > Settings >Advanced.
The settings come with an Advanced tab with the following options:
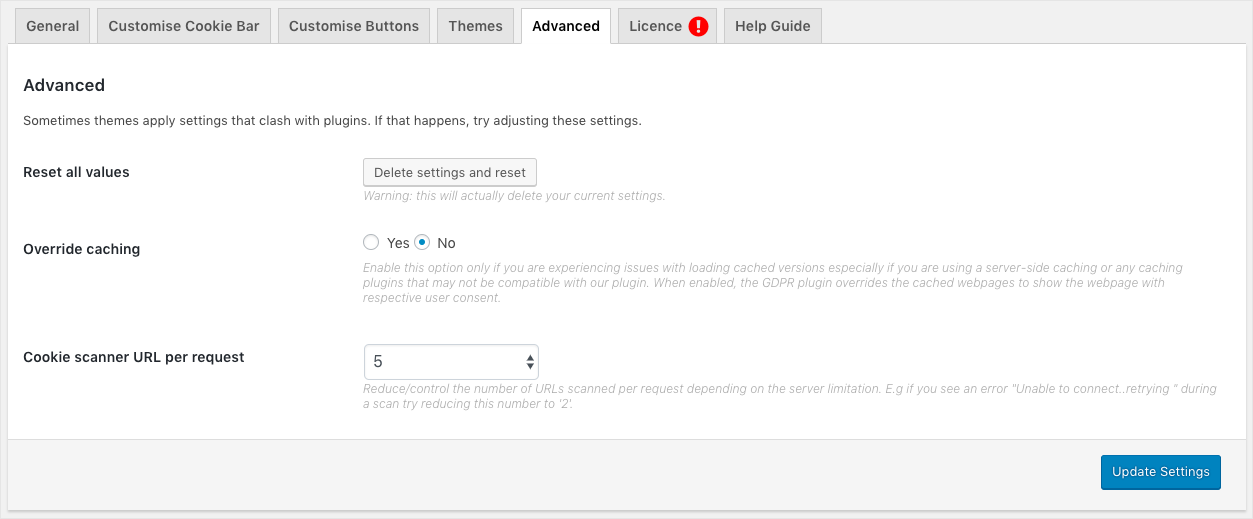
- Reset all values: The Delete settings and reset button will restore the plugin to its default state overriding all your settings.
- Override caching: When enabled, the GDPR plugin overrides the cached webpages to show the webpage with respective user consent.
- Cookie scanner URL per request: Depending on server limitation, restrict the number of URLs scanned per request. For example, if you face an error “Unable to connect..retrying ” during a scan, try reducing the number to ‘2’.
Once done, click on the Update Settings button.
Shortcodes
The Help guide tab consists of two sections Shortcodes and Help links.
Shortcodes are used to insert cookie banner elements in website pages/posts. To add the shortcodes inside a template file, you can use the ‘do_shortcode’ function.
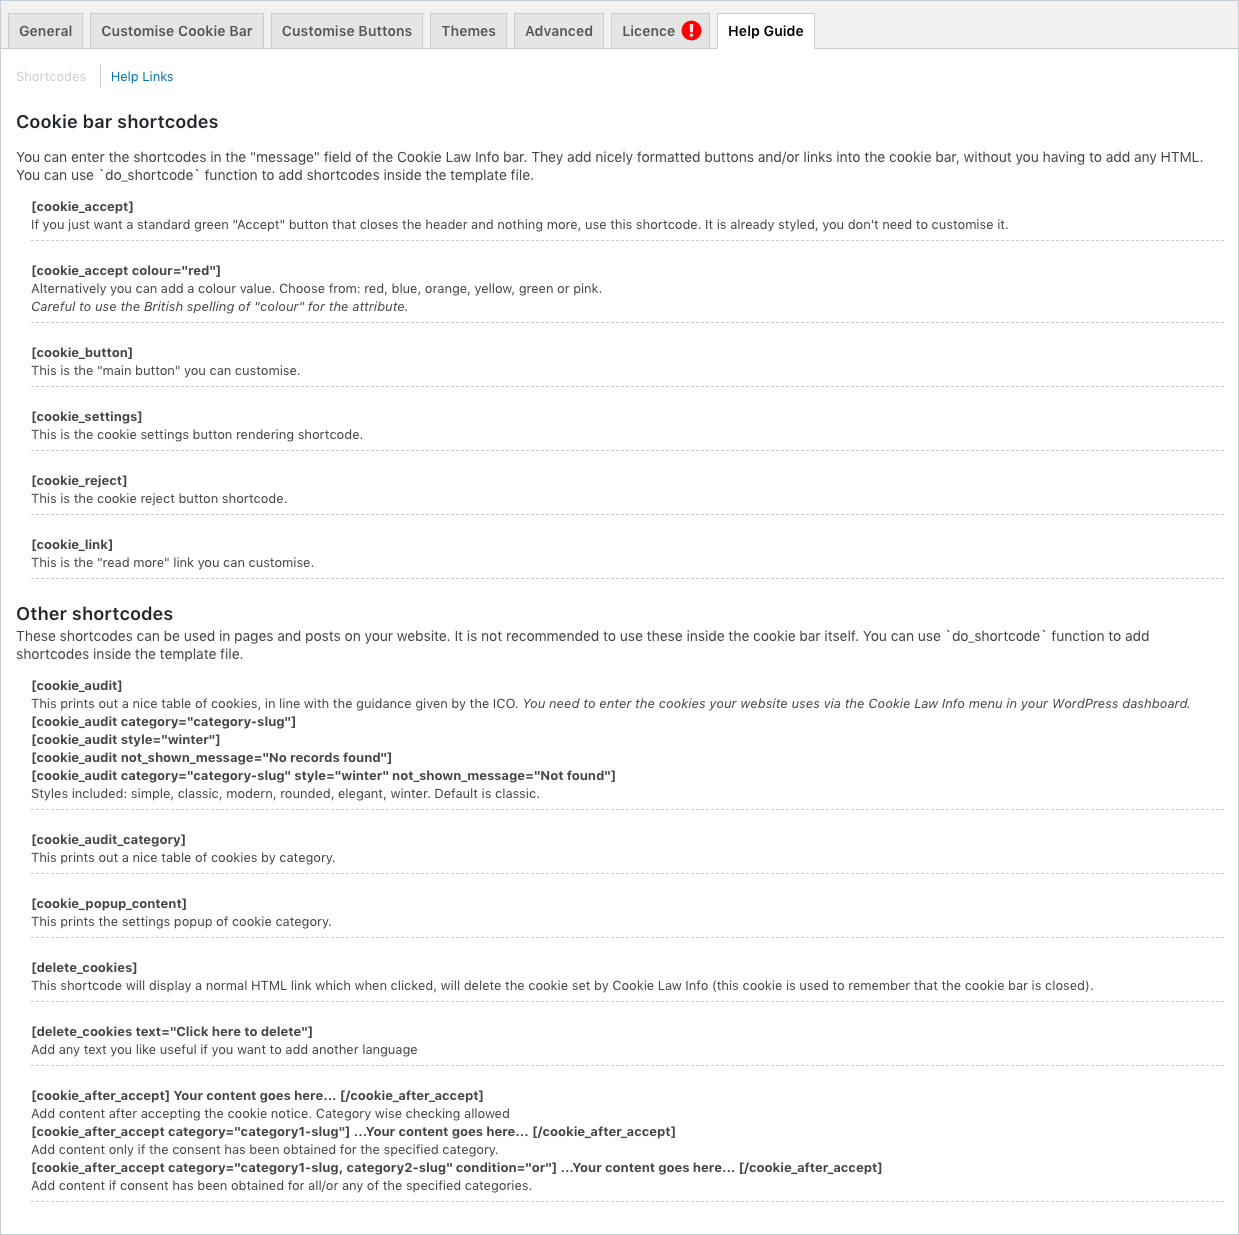
To know more about the shortcodes used in the plugin, read this article.
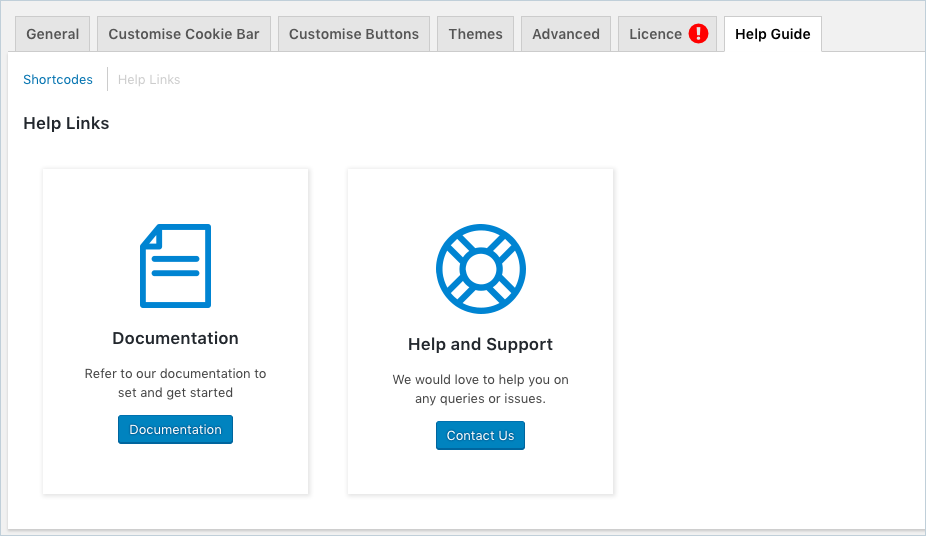
Help Link
This section gives you links to resources related to the GDPR Cookie Consent plugin. The screen looks as below:
Cookie Scanner
GDPR cookie consent allows you to add the cookies automatically by using a cookie scanner. GDPR Cookie Consent now uses CookieYes to bring you enhanced scanning for cookies on your website.
Our cookie scanning solution lets you:
- Discover first-party and third-party cookies used on your website.
- Identify what personal data they collect and what are the other purposes they serve.
- Determine whether you need to comply with the data protection laws governing cookies. Eg:- EU’s GDPR, ePrivacy Directive (EU Cookie Law), California’s CCPA, etc.
The GDPR Cookie Consent plugin comes with multiple ways with which you can add the cookies to the plugin.
1. Connect with CookieYes
The plugin lets you automatically scan the cookies and add them to the plugin. From GDPR Cookie Consent > Cookie scanner, Click on the Connect and Scan button.
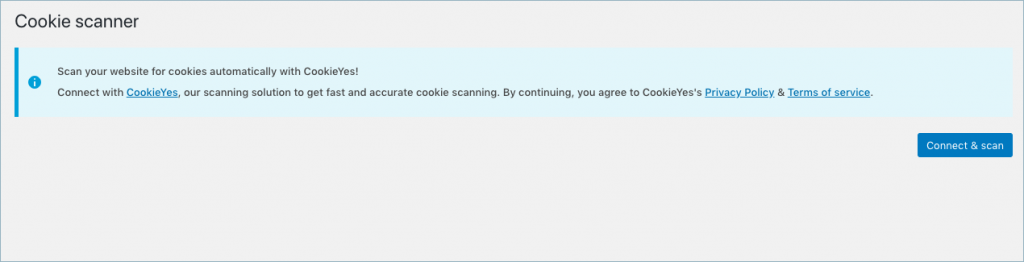
Click on the Connect and scan button to connect with the CookieYes.
Existing users of CookieYes can enter the username and password.
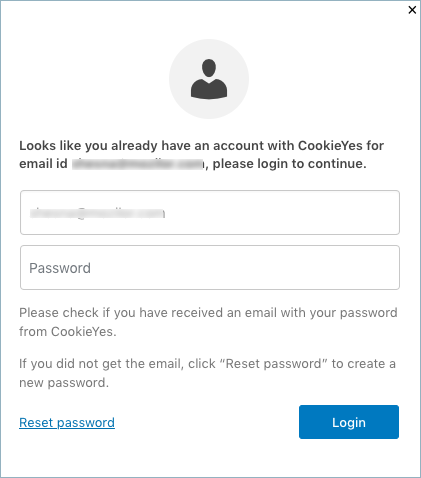
However, new users will get connected automatically with CookieYes. Upon successfully connecting with the CookieYes, you can start the scanning process.
2. Scan website for cookies
Click on the Scan website for cookies to begin the scanning.

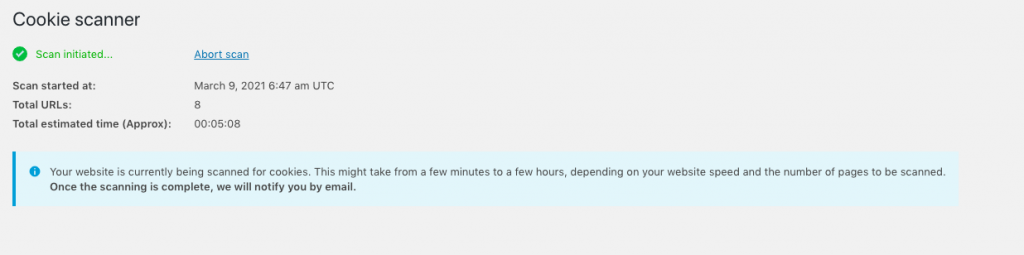
Subsequently, scanning of cookies will be initiated. It might take a few minutes to a few hours to complete the scanning of your website. This depends on the number of pages to scan and the website speed. You can even switch between your screens even while the scanning is in progress. Scanning can be aborted by clicking on Abort scan.
3. Scan completion
After the scan is complete, you can view all the cookies that have been scanned and the URLs that have been scanned from the Scan result. The result will look as shown below:
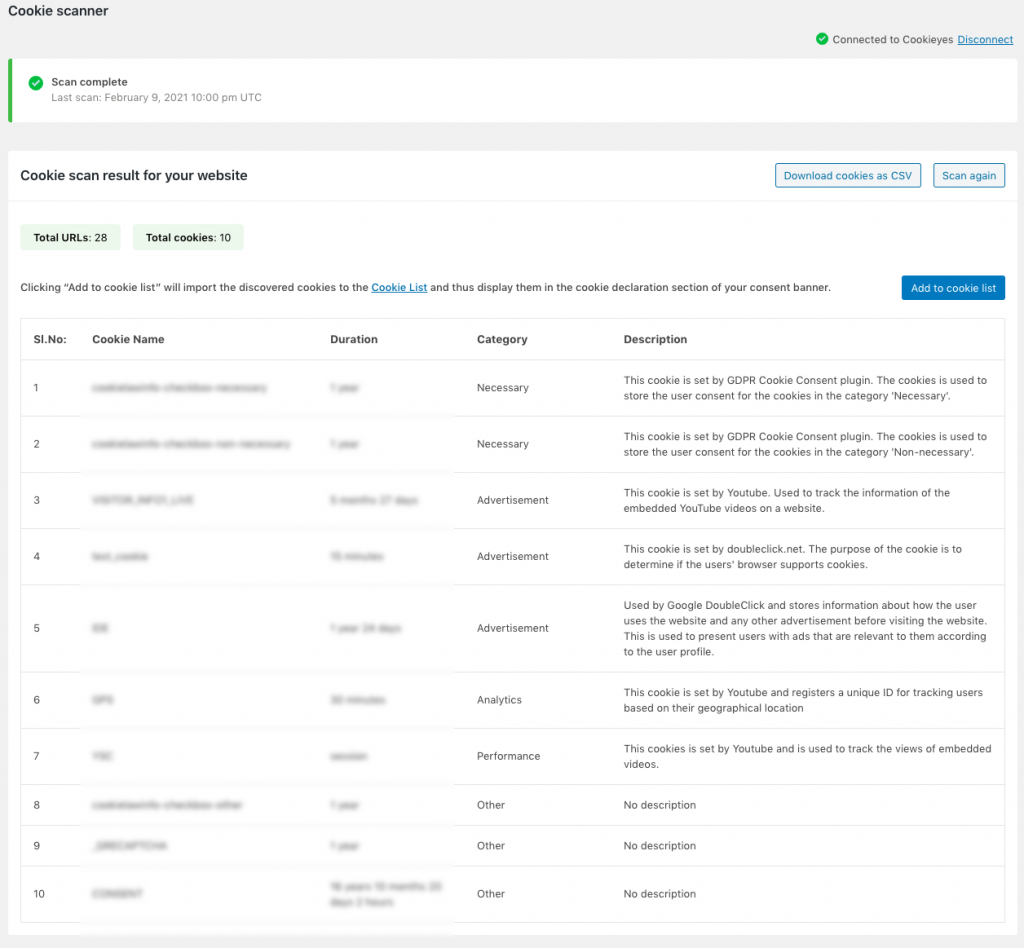
From here, you can add the scanned cookies to the cookie list, download the cookies into a CSV file, and perform the scan again.
4. Cookie import options
When you choose to add the scanned cookies to the list, you are presented with three options as shown below:
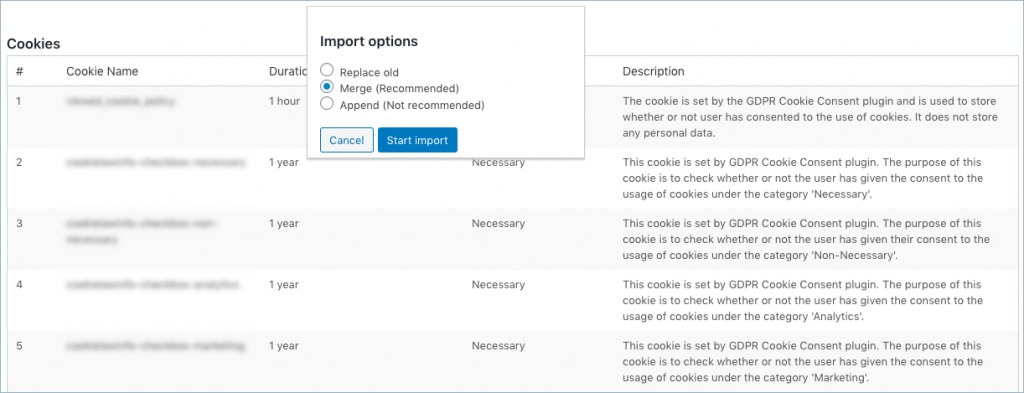
- Replace old: In the first option, you can replace all the existing cookies in the list and add the newly scanned cookies.
- Merge (Recommended): With the second option, the plugin performs a check whether the scanned cookies are already present in the list and skip those cookies that exist. This is the recommended method to add cookies.
- Append (Not recommended): In the third method, you can append the newly scanned cookies with the existing cookies in the list. This is not recommended since it could result in duplicate entries in the cookie list.
After you select an option, click on the Start Import button.
All the scanned cookies and their related data will be added to the cookie list. The data added to the cookie list are the cookie ID, cookie-type, cookie category, and the duration of the cookies.
By default, the values in the cookie type field thus added will be persistent, all the cookies will be assigned to the non-necessary category or necessary category which are the two predefined categories of the plugin, and the value in the cookie-sensitivity field will non-necessary.
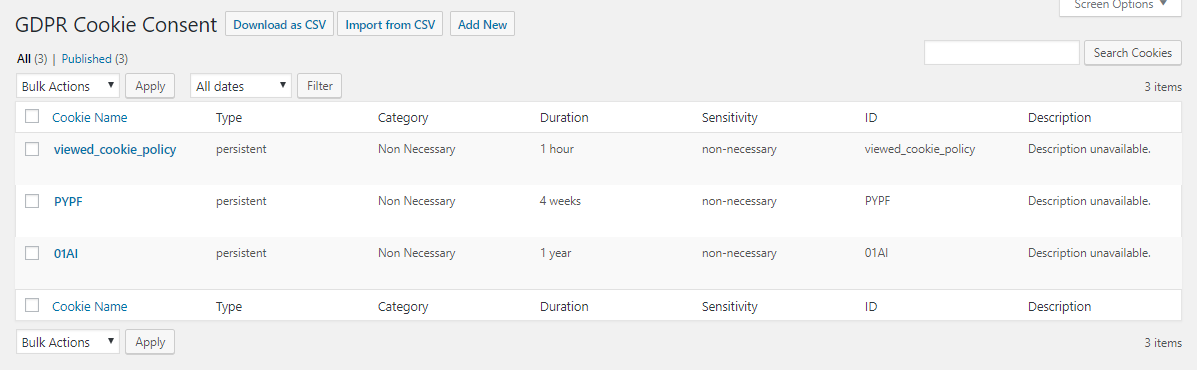
All these, of course, can be edited from the Edit Cookie by clicking on the respective cookie name from the cookie list page.
Cookie list
Using the GDPR plugin, you can even manually add the cookies. To do that, navigate to GDPR Cookie Consent > Cookie List. This will take you to the Cookie List page as shown below:
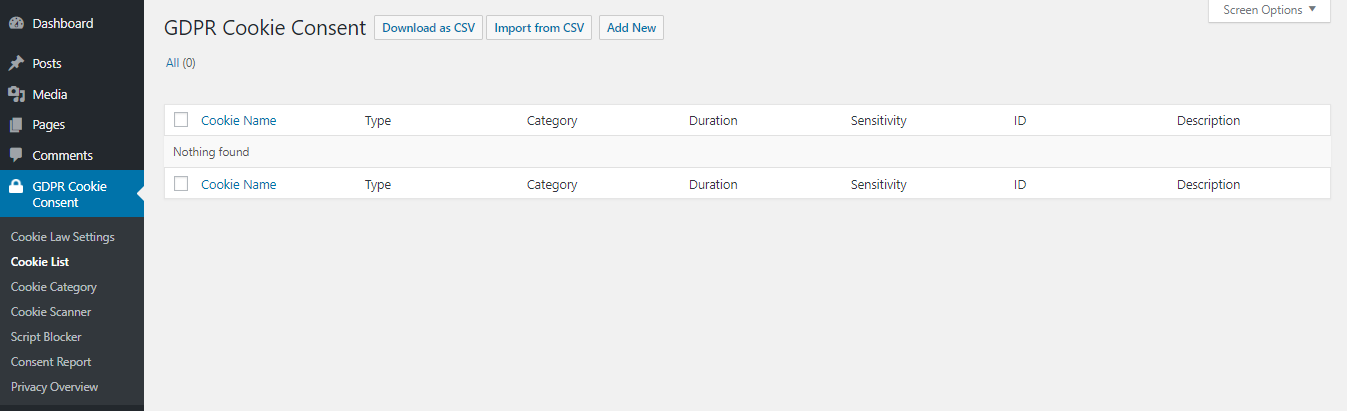
Click on Add New button to add cookies manually. The steps to add cookie manually are explained below:
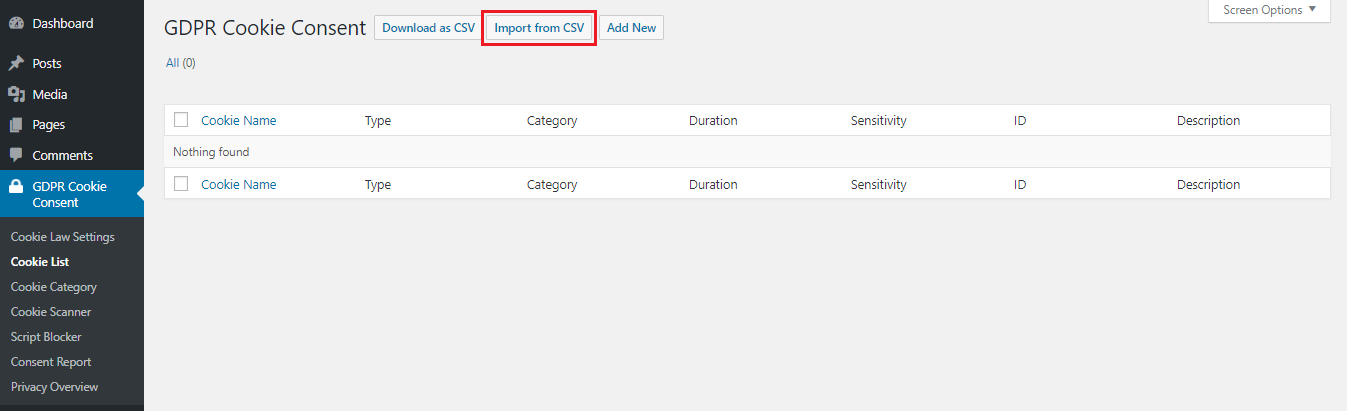
Import cookie using a CSV
You can import the cookies into the plugin using a CSV file. You find the option to import cookies under GDPR Cookie Consent > Cookie List. Prepare a CSV in the required format, click on the Import from CSV button.
This will take you to the Import from a file page.
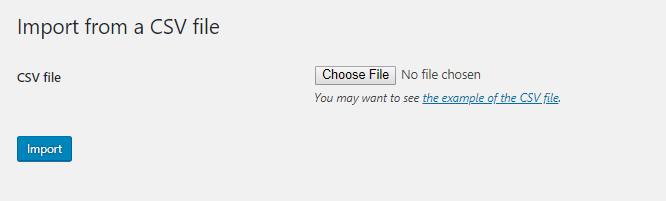
From this page, upload the CSV to the plugin and import. All the cookies and their details can be seen on the Cookie List page after the import.
Click here to download the sample CSV.
The plugin also has an export feature that helps to export the cookies and its related details to a CSV file. To do that, click on the Download as CSV button from the Cookie List page.
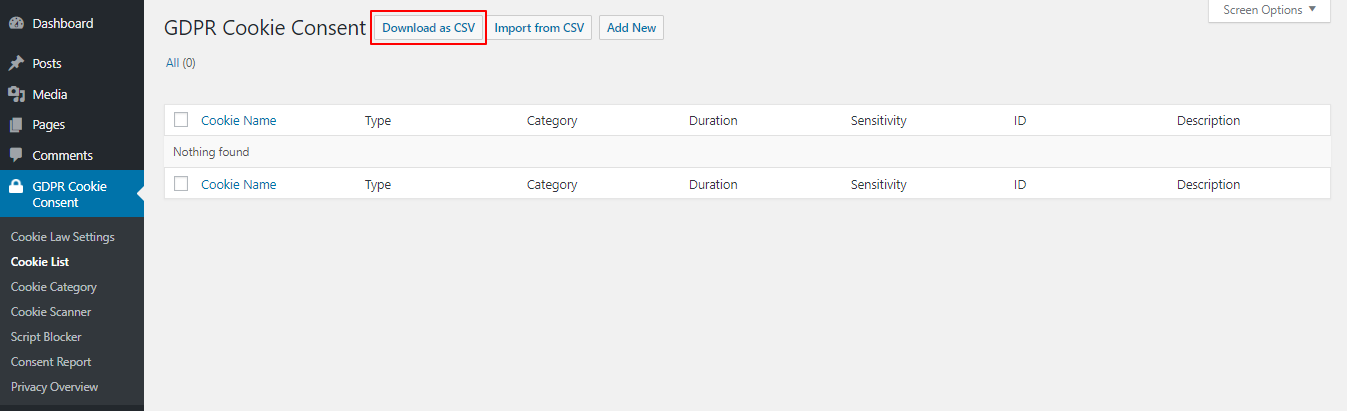
This becomes very useful if there are websites using GDPR plugin that uses similar cookies or if you want to migrate the cookies you set up in the plugin from the development site to the production site. All you need to do is export the cookies of one website into a CSV file and then import them to the other.
Add Cookies Manually
To add the cookies manually, click on the Add New button under GDPR Cookie Consent > Cookie List. Add the cookies and the cookie details from the Add New Cookie Type page. The following is a screenshot of the Add New Cookie Type page.
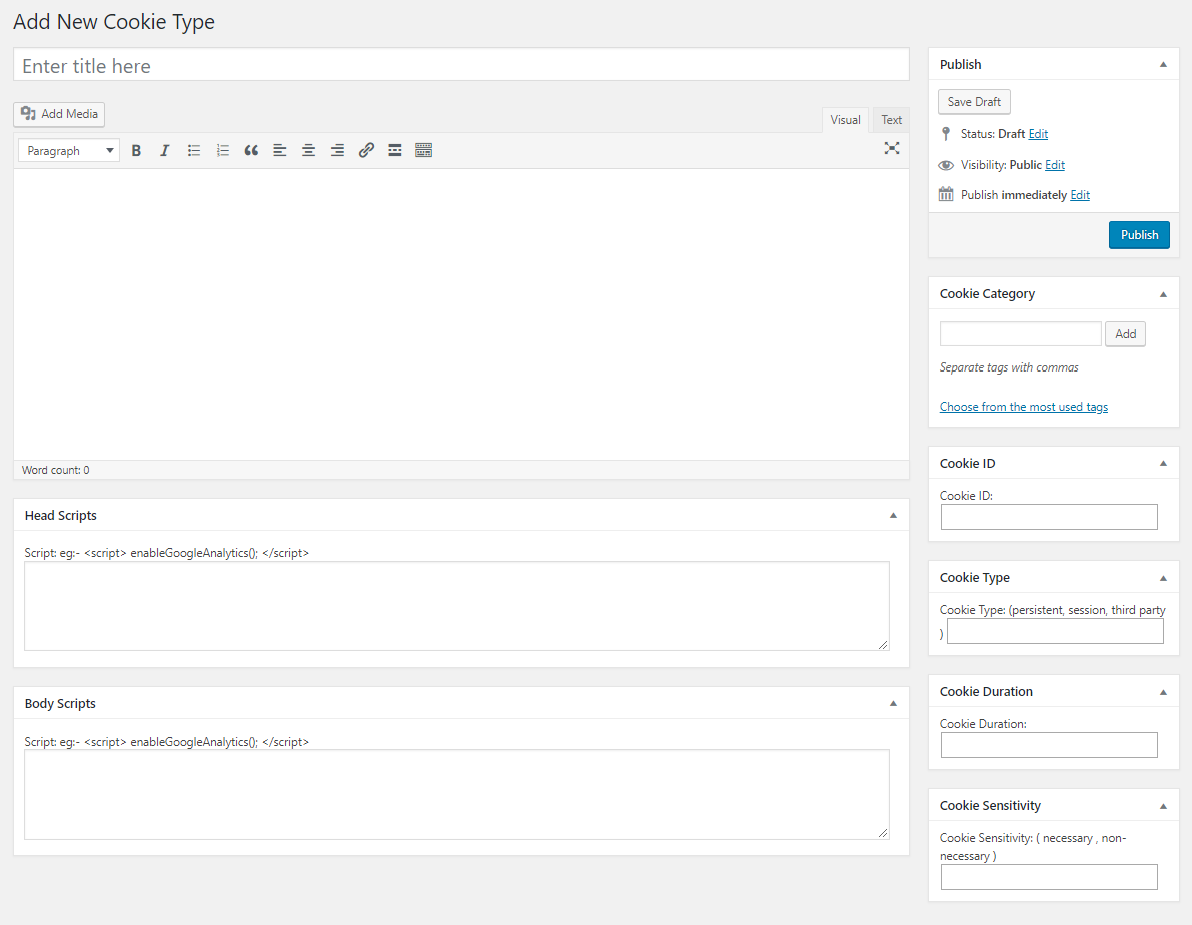
The following are the fields in the Add New Cookie Type page.
- Cookie Title – Add the title of the cookie. This field is for audit purposes, so this field allows you to add the name of the cookie in a user-friendly manner.
- Cookie description – This allows you to add the description of the plugin so that you can explain what the purpose of the cookie is, what it does, what data it collects, etc.
- Cookie Category – Add the category that the cookies belong to.
- Cookie Type – This is to indicate the type of the cookie. The types include persistent, session, or third-party. Persistent cookies are those that generally persists even after the browser is closed. Session cookies are those cookies that will expire when the session is over. Third-party cookies are the cookies that are installed by third-party services being used on the website.
- Cookie Duration – This is the time duration the cookies will be active on the browser. The easiest way to find out the duration of a cookie is from the developer console of the browser.
- Cookie Sensitivity – Cookies are either necessary or non-necessary. The necessary cookies are those cookies that, as the name indicates, are absolutely necessary for the website to function in its intended way. The users do not have the control to disable this category of the cookies. The non-necessary cookies are those cookies whose scripts need to be added in the plugin and that the users can enable/disable.
- Head Scripts/Body Scripts – This is where the scripts related to the cookies are to be added. If the scripts are added in the Head Scripts field, the scripts, on user consent, will be rendered in the head of the website and the scripts will be rendered in the body if added in the Body scripts area.
The screenshot below shows an example of adding Google Analytics cookies to the Cookie list from the Add New Cookie Type page:
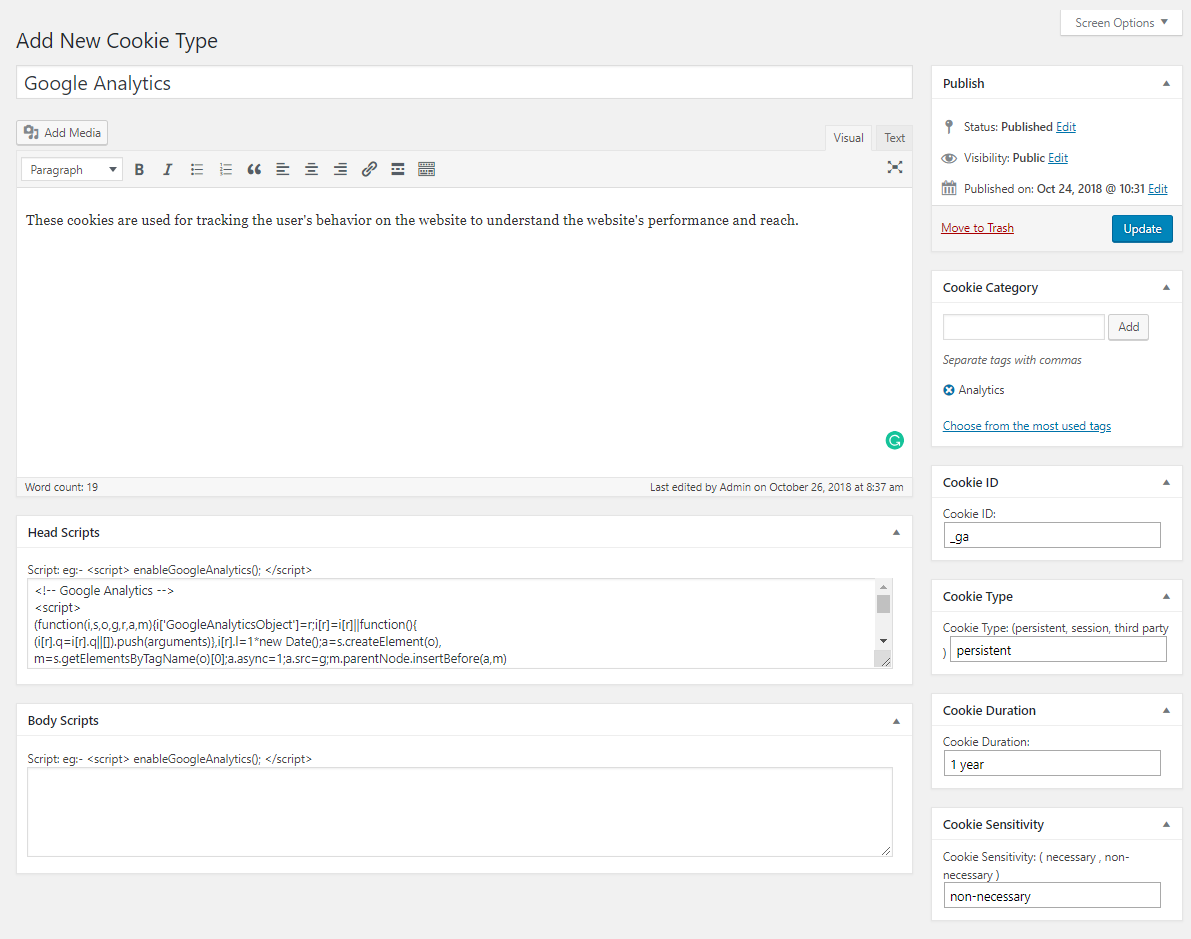
After all the details have been added as above, click on the update button and the cookie will be added to the Cookie List.
Adding the Cookie Category
The GDPR Cookie Consent gives the users granular control over the cookies that they want to allow. They can turn the cookies on/off in their browser depending on their category.
For this, the plugin gives you two predefined categories named Necessary and Non-necessary. You can add the necessary cookies of your website to the Necessary category. The users will not be able to disable the cookies that are categorized as Necessary. So the cookies that are essential for the functioning of the website should be added to this category.
For the rest of the non-necessary cookies used by the website, you can either add them to the Non-necessary category or you can create categories of your own. This allows you to create cookie categories like Analytics, Statistics, Advertisement, etc. based on the nature of the cookies.
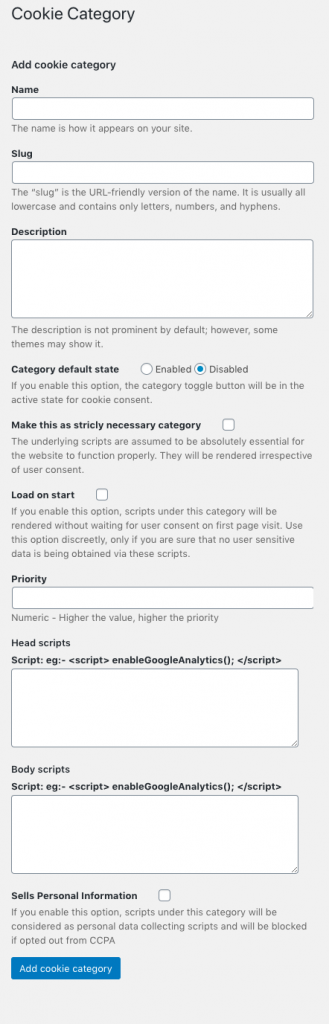
To create a new category for the cookies, go to GDPR Cookie Consent > Cookie Category. This will take you to the Cookie Category page where you can add the name of the category, slug, description of the category, and give the priority to determine the order in which the categories will appear on the front end.
If you enable Load on Start option, scripts under the created category will be rendered without waiting for user consent on the first page visit. This option is discreetly used only if you are sure that no user sensitive data is being obtained via the specified scripts.
If you enable the Category default state option, the category toggle button will be in the active state for cookie consent.
If you enable Sell Personal Information option, scripts under this category will be considered as personal data collecting scripts and will be blocked if opted out from CCPA.
The categories thus added will be visible on the user-end on a pop-up when the user clicks on the Settings button on the cookie bar. When clicked on each category, the users will be shown the description of the category as added by the admin. The user can then choose to enable or disable the cookies of each category from the popup.

Policy Generator
You can easily create and generate the cookie policy from the Policy generator module. Policy generator will help you in creating a separate page for cookie policy which will list out various details like:
- About the cookie policy
- What are cookies?
- How do we use cookies?
- What types of cookies do we use?
- How can I control the cookie preferences?

You can even add additional details from the Add New button. You will get a live preview of the cookie policy from here. Subsequently, a new cookie policy page can be created or an existing page can be updated.
On creating a new policy page it can be published for it to be made available in your store.
Blocking Cookies Automatically
Using the GDPR Cookie Consent plugin you can automatically block the scripts of the cookies being rendered on the website.
The script blocker lists out services/plugins currently supported for auto-blocking. Enabled services/plugins will be blocked by default on the front-end of your website prior to obtaining user consent and rendered respectively based on consent.
It is further categorized into script and plugin sections.
The third-party services that are currently being auto blocked are the following:
- Google Analytics
- Facebook Pixel
- Google Tag Manager
- Hotjar Analytics
- Google Publisher Tag
- Youtube Embed
- Vimeo Embed
- Google Maps
- AddThis Widget
- ShareThis widget
- Twitter Widget
- SoundCloud Embed
- SlideShare Embed
- LinkedIn Widget
- Instagram Embed
- Pinterest Widget
- Google Adsense
- Hubspot Analytics
- Matomo Analytics
To automatically block the scripts of the cookies installed by these services using the GDPR Cookie Consent plugin, go to GDPR Cookie Consent > Script Blocker > Scripts tab. This will take you to the Manage Script Blocking page as shown in the screenshot below.
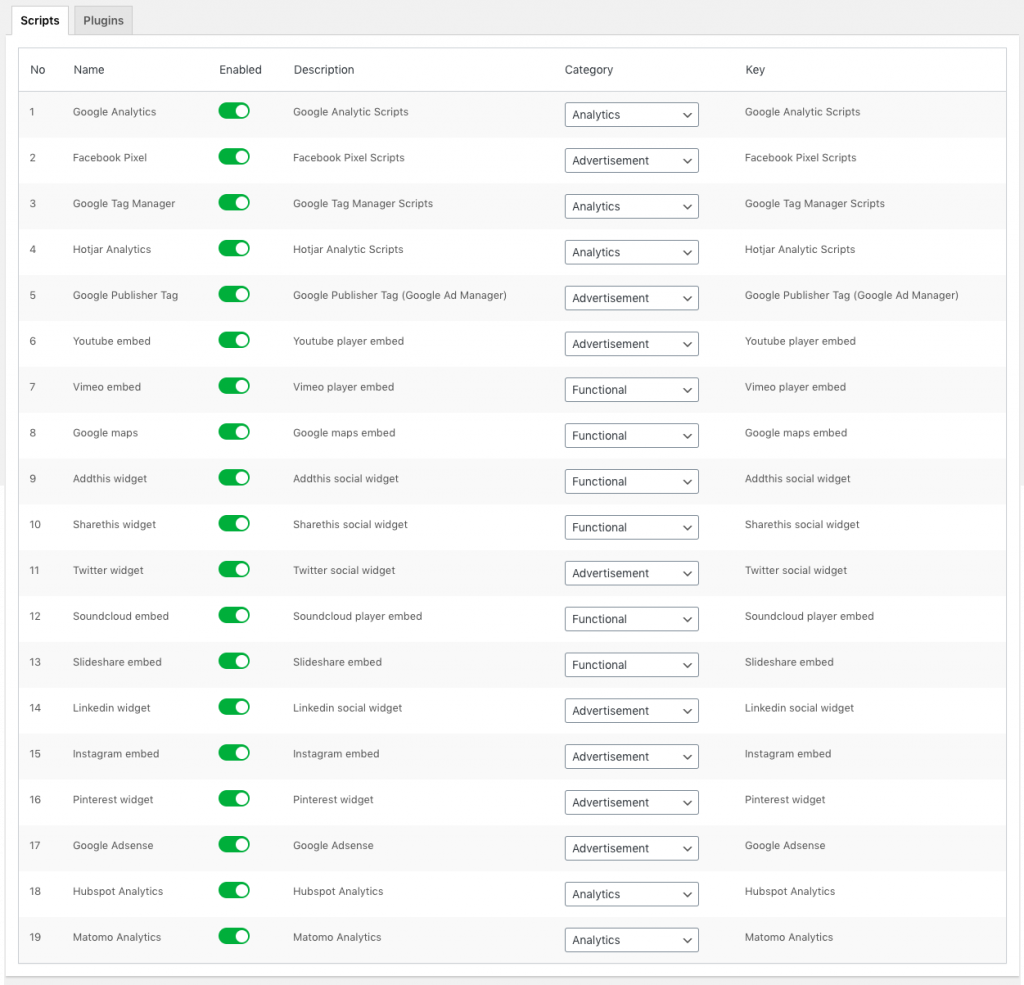
To block the scripts automatically from rendering on the website, enable the toggle button for the selected scripts. This will block the scripts from any sources rendering on the website unless the user consents. If the toggle buttons are in the disabled state, the scripts from other sources other the GDPR plugin will not be automatically blocked.
To autoblock scripts of plugins, move on to the Script Blocker >Plugins section. It will allow you to manage automatic script blocking for your website. The following three plugins are currently supported for auto-blocking.
- Official Facebook Pixel
- Smash Balloon Instagram Feed
- Smash Balloon Twitter Feed
- Feeds for youtube
- Monster Insights
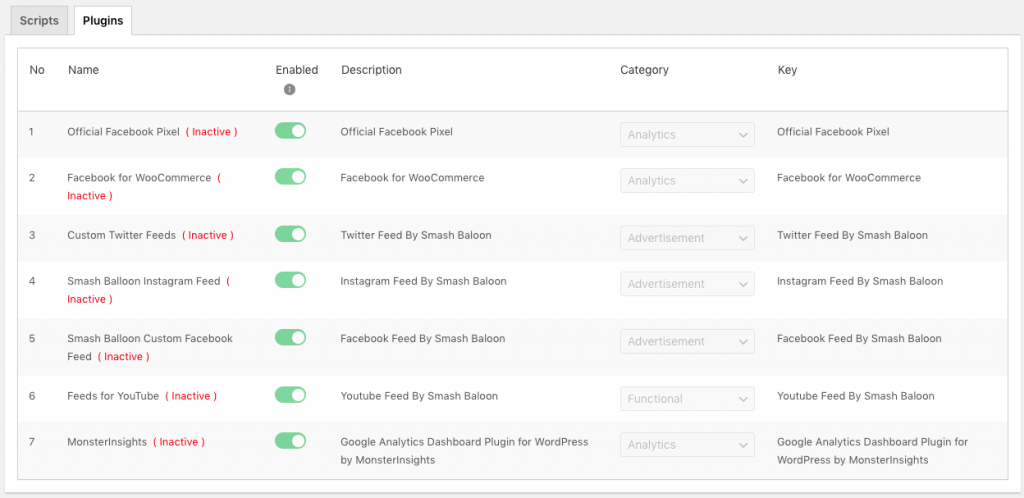
Plugins marked inactive are either not installed or activated on your website. Enabled plugins will be blocked by default on the front-end of your website prior to obtaining user consent and rendered respectively based on consent.
If you wish to disable automatic script blocking for any of these plugins, you can do so by simply toggling the button against the respective plugin.
For more information on automatic script blocking read: How to Automatically Block Cookies Using the GDPR Cookie Consent Plugin.
Logging the Users Consent
You can keep a record of the users who have given their consent using the GDPR Cookie Consent plugin. To log the consent given by the users, make sure that you have enabled the Enable Consent Logging field under GDPR Cookie Consent > Settings > General > Other. When the consent is being logged, the IP addresses of the users that have given their consent and the cookie categories that they have given consent to will be recorded in the Consent Report page, along with the date and time of the visit and the user ID if the user has logged in.
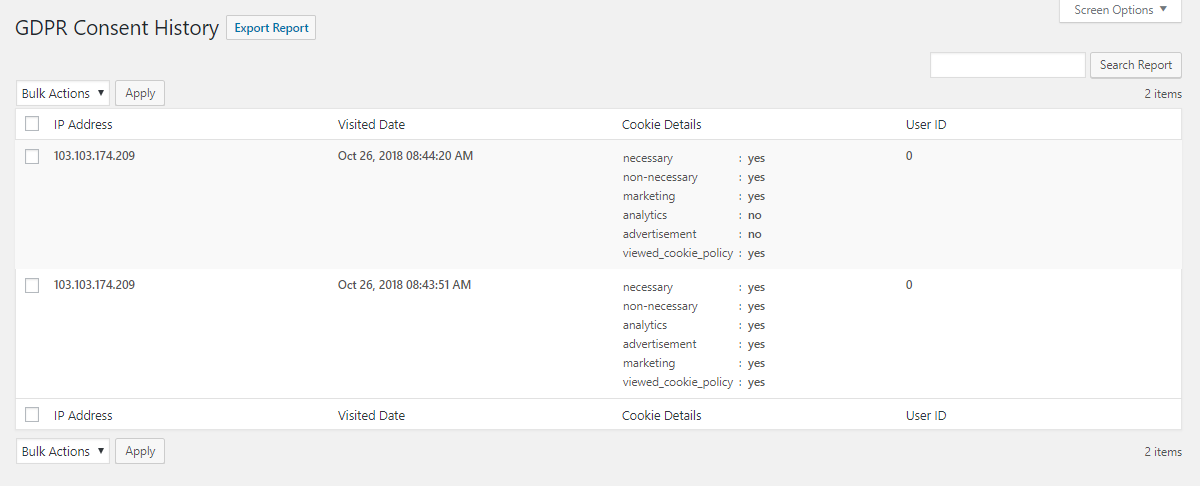
It is completely up to the admin to decide whether he wants to keep a record of the consent. However, when the consent logging is enabled, the users should be notified that their IP address will be collected for the consent logging purposes.
All this data in the consent report can be exported to a CSV file by clicking on the Export Report button on the Consent Report page.
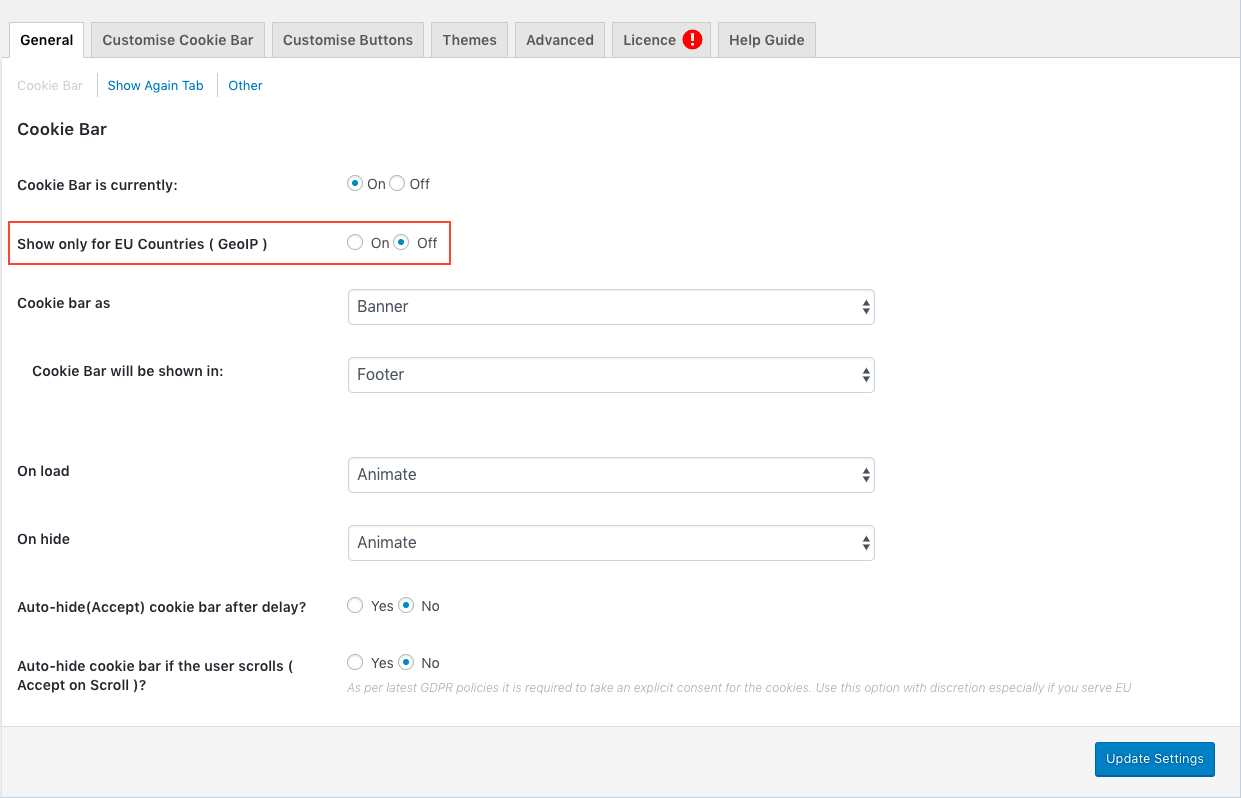
Show the Cookie Bar Only for the EU Countries
You can make the cookie message bar to be visible only to visitors from the European Union. Using this feature, the consent for using the cookies on the website will only be taken from the visitors of the European Union.
To set the cookie notification only for the EU visitors, go to the Settings page under GDPR Cookie Consent. Click on ‘yes’ for Show only for EU Countries ( GeoIP ) field and update the settings.
The GeoIP feature can be extended to more countries using the code snippet in this article.
Privacy Overview
From your dashboard, navigate to the Privacy Overview sub-menu. The text seen on the cookie settings popup window can be changed from here.
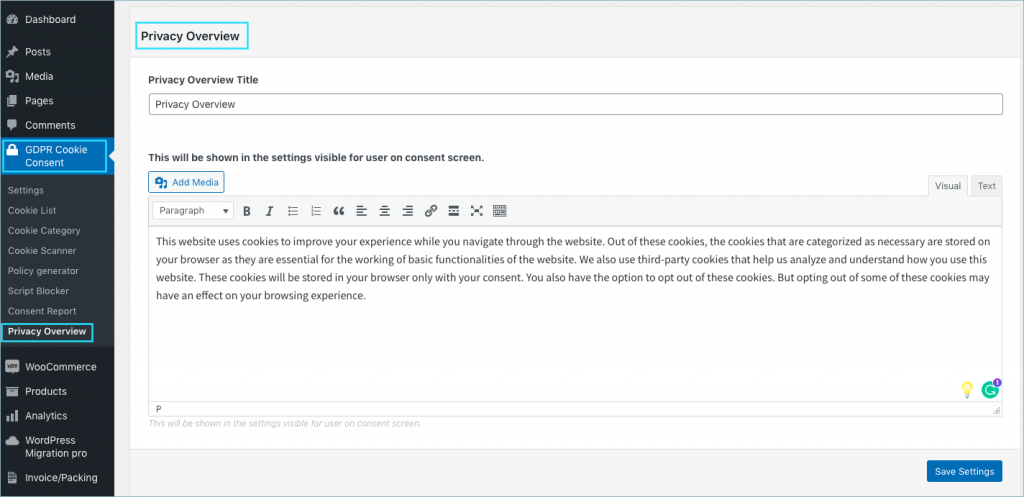
Specify an appropriate title that will appear as the header in the Privacy Overview Title field. Next, in the body part, you can enter the content that will appear beneath the title. Though default content is provided, you can edit and modify them to your need.
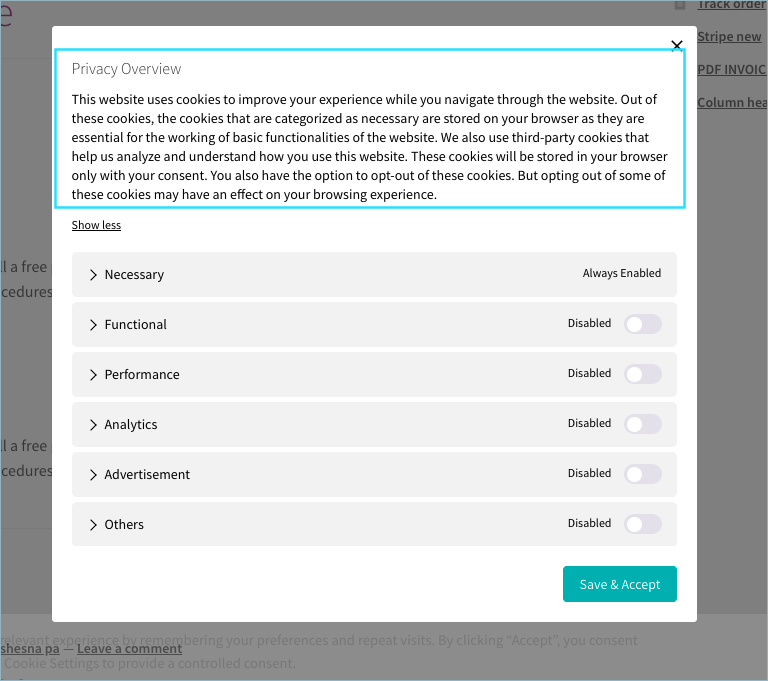
The Privacy Overview content within the Cookie settings pop window will appear as shown below:
License Activation
After you have installed and activated the GDPR Cookie Consent plugin on your website, you need to activate the license of the plugin so that you will be notified of the plugin updates. To do so, from the WordPress admin dashboard, go to GDPR Cookie Consent > Settings > License.
The page looks as in the screenshot below:
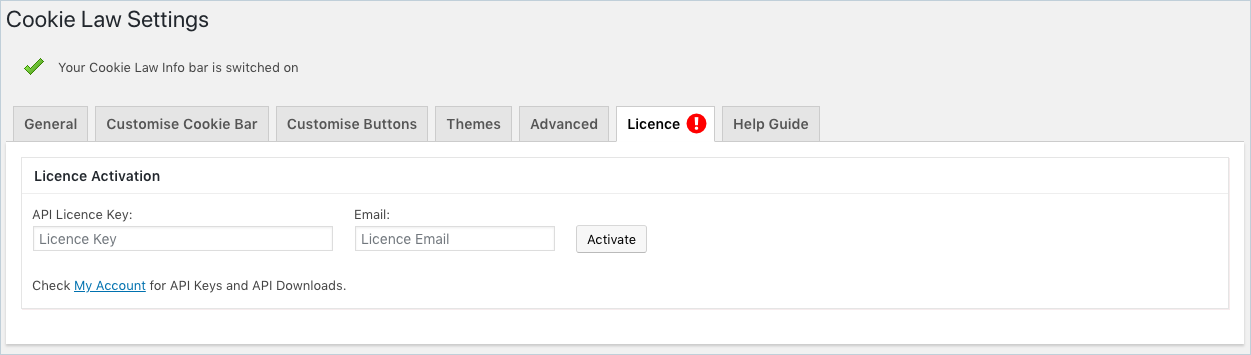
Enter the license key and the license email that you will get from the My Account page in WebToffee and click activate.
Ian
March 4, 2024
How do we configure Google Consent V2 using your plugin?
Hema Ranjan
March 19, 2024
Hello Ian,
Thank you for your patience. We apologize for the delay in our response, which was caused by ongoing maintenance on our website. Kindly follow the steps mentioned in this article to stay compliant.
Frederic Bergman
March 2, 2024
I would like to transfer the plug in with all the data to a new/revised site. Can you advise me of the best way? I do not know if my license is for many sites, or just one. I will ultimately close the original site (stop the hosting of its domain), and use a newly updated (different domain).
Thank you!
current site: mamala.co.il
new site: mamalamaternity.com
Hema Ranjan
March 20, 2024
Hello Frederic Bergman,
Apologies for the delayed response. Our website was undergoing essential maintenance to ensure optimal performance. We appreciate your patience and understanding. Kindly contact customer support for assisting in site migration.
Alan
February 9, 2024
olá,
É possível disponibilizar a configuração de cookies para o usuário selecionar direto na página ao invés de popup?
Hema Ranjan
March 20, 2024
Hello Alan,
Apologies for the delayed response. Our website was undergoing essential maintenance to ensure optimal performance. We appreciate your patience and understanding.
Yes, you can do that. Kindly add the following short code to the page where you want to display the cookie selection.
Short code:
[cookie_popup_content]
Chipur
December 11, 2022
Great plug-in, comprehensive article. I likely missed something, but…Okay, I created Cookies Policy and Privacy Policy pages. Where are they or where do I put the links so they can be accessed? Thank you…
Mark
December 15, 2022
Hi @ Chipur,
Greetings from Webtoffee!
The policy generator has a ‘create cookie policy page’ button at the bottom. When you click on it, a new page will be created in the pages menu of the WordPress dashboard. You can edit the page later from there as you normally do for any page.
steven
November 8, 2022
Hello Sirs,
I write here (because I’ve just realized the support page is for premium user, which I’m not)
I’ve set up and use your plugin, and I think it works very good and it is simple to handle. But I have a strange issue on mobile version view.
Seems the cookie bar cannot be resized under a certain length, so in mobile view, there is a white column on the right.
You can easily check it on http://www.juliesejournetphotography.com from a mobile phone, or simply resizing the window.
Do you have any tip for me?
I cannot figure out where I was wrong.
Thank you.
steven
Mark
December 4, 2022
Hi @ Steven,
Greetings from Webtoffee!
We examined the website and discovered that the problem is with the width of the site, not with our plugin. Everything will work well if you modify the width of your site because the plugin automatically alters the banner size based on that parameter.
Michael Clegg
August 14, 2022
Hi team,
If GeoIP is set to on, then if a country outside of the EU zone visits my site (so they don’t see the popup) then are cookies automatically accepted and allowed, along with any scripts defined in ‘Head scripts’ in the cookie category section?
And would the script blocker not be enabled for non-eu countries in this scenario (where GeoIP is true)?
Thanks,
Mike
Rob
June 9, 2022
Hello. When looking at your guide there should be a enable consent logging button at the General / Other tab but its not showing for me.
This is how it loks for me :
https://www.dropbox.com/s/ewpw0uidt3rxu02/chrome_DhYOoi9sMq.png?dl=0
Does this have to do with me having the free version or?
Mark
July 24, 2022
Hi Rob,
Greetings from Webtoffee!
You are using a free version plugin which is why this option is not available for you. This documentation is for the premium version plugin. If you wish to have a consent log please consider buying a premium subscription.
Axel Nilsson
May 18, 2022
Hi
We have implemented the GDPR Cookie Consent plugin on a customers webiste. Everything seems to work fine regarding how cookies are set AFTER the user have interacted with the cookie consent pop-up. But there is one issue. Google Analytics (GA) cookies are set on the accessed web page before the user have interacted with the pop-up. We have found out that in order to achieve auto blocking of GA cookies we have to buy the premium version. Fair enough. My question:
If we buy the premium version and activate auto blocking of GA cookies, will the page(s) visited before the user interacts with the pop-up and accepts “Analysis” cookies, be tracked and send data to GA? Landing pages are often high priority in analysis reports. Loosing “first hit” traffic data would be disapointing…
/Axel
Mark
May 26, 2022
Hi Axel,
Greetings from Webtoffee!
Our plugin can block Google Analytics scripts both in the free and premium versions. In the free version, please add GA script via our plugin category.
To implement this, go to GDPR Cookie Consent > Cookie Category > Analytics > Edit > Script section and add the scripts so that the plugin will block them until the user gives consent for the Analytics category or given acceptance for all the cookies.
Whereas in the premium version you can go to GDPR Cookie Consent > Script Blocker and turn on the Google Analytics script blocker by assigning it to the Analytics category so that the script added to your site will block automatically until the user gives consent for Analytics or given acceptance for all the cookies. If you want to hide the cookie banner on any of the pages, we can do that by providing you with a code snippet so that it will not block the cookies at this page. This you can find in our documentation.
frank lewis
April 19, 2022
i was searching for this information and here i found similar to this. It’s very helpful and informative.
Dennis
January 11, 2022
Hello,
I have set to just display the cookie law as a banner at the bottom. Nevertheless the script already creates a cookie called “cookielawinfo-checkbox-necessary” before any user action is happening. This is really problematic, because in Europe with the DSGVO setting a cookie before a user accepts it is restricted even if it’s just for the cookie banner itself. I have found no option to turn this off. But there should not be any cookie set before the user has accepted the basic usage of cookies! How can i disable this to be conform with the DSGVO?
Mark
January 19, 2022
Hi Dennis,
We are here to assist.
The plugin cookies are necessary for the working of the plugin, specifically, to save the user preference based on category and as such, it is not possible to block those cookies. It is 100% GDPR compliant because those are necessary cookies. You have to mention this in your cookie policy though and list the cookies and their functionalities.
Fabio Ferrari
September 29, 2021
Hi, how can I set a localized message inside the Cookie Banner? I’m using Avada theme with WPML with 2 languages enabled. I managed to make two different Cookie Policy pages, but don’t know how to fix the initial message. Thanks
Mark
October 5, 2021
Hi Fabio,
Please refer the WPML setup guide and follow the instructions.
Jillian
August 23, 2021
Hi,
I have the premium version and want to scan automatically for cookies but I don’t see that option in the cookie scanner tab to enable that. How do I do so?
Mark
August 26, 2021
Hi Jillian,
The cookie scanner option will be available inside the GDPR Cookie Consent menu on the left sidebar in WordPress admin. Kindly ensure that you have activated the license.
Josh
July 2, 2021
I can see that you can customise the cookies bar, but can you customise the buttons on the ‘cookies settings’ pop-up?
Afonso Mac
June 2, 2021
Hi, please help me understand one simple thing. The fact that the user accepts and consents, when the page reloads it won’t bring problems with the adsense account, if the user takes an action and the page reloads? thank you for reply. thanks.
Mark
June 5, 2021
Hi Alfonso,
If you are having trouble with auto-reload on accept, you can turn that off. The current version of the plugin supports running the scripts without page reload.
Max
May 12, 2021
Hey! I love the Plugin and I love how it blends in with the css of my preexisting site.
Can you help me with one thing though? When i try to change the button labels or the text wich is displayed when clicking on cookie settings is not the one i set in the widget menu. It displays the default labels and texts and not the ones i wrote in the widget menu.
Thanks !
Mark
May 14, 2021
Hi Max,
Please submit a ticket here with a screen recording showing the issue.
John
March 17, 2021
Interesting solution, thanks for that. I didn’t think about using plugin, I wanted to build this notification on my own. I have found here https://dev-bay.com/cookies-notification-bar-only-with-html-css-and-pure-javascript-step-by-step/ that it is also possible to save cookies notification acceptance in Session Storage instead Cookies. What is a better approach?
Ana
February 23, 2021
I am trying to add the “Read more” with link to my policy (I use parallel Polylang) and I have tried to add shortcode in the Cookie bar message, but it doesn’t appear on my page.
I also tried to do the same for the reject button but it doesn’t work either. This is my Cookie bar message (without these shortcodes).
We use cookies on our website to give you the most relevant experience by remembering your preferences and repeat visits. By clicking “Accept”, you consent to the use of ALL the cookies.[cookie_settings margin="0px 10px 0px 5px"][cookie_button]
Thank you
Mark
February 26, 2021
Hi Ana,
After adding the shortcodes, kindly make sure to clear the site cache.
danish
November 9, 2020
Hello, I have installed plugin – GDPR Cookie Consent but this is creating a issue for me, after I click on Accept Button, The popup again appears on load, Can you please provide me the solution for that ?
Mark
November 12, 2020
Please submit a ticket in the support forum with more details and site URL.
yuri
October 16, 2020
Hi when a user click on GDPR checkbox of contactform7 this data is storage?
Mark
October 17, 2020
Please reach us via the support page and clarify the query.
Nishok Tressler
September 12, 2020
There is no option to add scripts to the cookie list.
Mark
September 14, 2020
Which version of the plugin are you using?
Rakesh Sharma
August 7, 2020
Hello
Is this working on amp sites, i tried the plugin but it says script removed and no consent pop us is displayed on my amp website.
Please guide me through the steps to configure it on my amp website.
Thanks
Rakesh
Mark
August 14, 2020
The plugin is not currently AMP compatible.
Angus Ware
July 17, 2020
Once the scanner has been used and the cookies imported, do the scripts need to be manually entered for the cookies added to the cookie list? This is unclear.
Mark
July 17, 2020
If the scripts are among the ones listed in the script blocker settings page, then they will be blocked automatically. You won’t need to add the scripts against each cookies.
Kitty
July 11, 2020
Great plugin!
Where can I edit the text that appears in the tabs “functional cookies” and “non functional cookies”, after clicking on cookie settings in the cookie consent? The place where visitors can choose to enable or disable non-functional cookies… I managed to edit the text above it, but not the words in the tabs. It´s in Dutch now,but I want to put it in English. Kind regards.
Mark
July 16, 2020
Hi,
Go to GDPR Cookie Consent menu > Cookie Category > Click edit on the category you want to edit and you can add the description from there.
information
October 23, 2018
How can I locate my Head script in my WordPress dashboard in order to put my analytics script in my Head code?
Mark
October 24, 2018
Hi,
You can access your theme’s header file from WordPress dashboard under Appearance > Editor > header.php .Same can be accessed via inside your theme directory under wp-content/themes/
info34
June 19, 2018
Should i remove the analytics script from my website and put it in the head script field?
Safwana
June 19, 2018
Hi info34,
Yes, you should put the analytics script in the Head script field for it to be rendered only when the user gives their consent.
Bobby
October 18, 2020
I don’t have the head script option
Mark
October 19, 2020
Are you using the premium version of the plugin?
Emanuel Chirtes
May 31, 2018
Does this plugin save the user’s data in admin?
Safwana
June 1, 2018
Hi Emanuel,
The plugin does not save any user-related data.
Serge-Jérôme
May 31, 2018
Great plugin WordPress for GDPR compliant. Thank you.
Safwana
June 1, 2018
Hi Serge-Jérôme,
Thank you for your high opinion.