The WebToffee’s WooCommerce PDF Invoices, Packing Slips, and Credit Notes plugin allows the addition of tax to WooCommerce invoices. There are two ways to show taxes in WooCommerce invoices.
- As a separate column in the product table
- In the summary table of invoices
Note:
The WooCommerce PDF Invoices, Packing Slips, and Credit Notes plugin aligns with WooCommerce tax settings. So the price display selection made under the Prices entered with tax option (WooCommerce > Tax) will reflect in the invoices as well. To know more about including and excluding taxes from the price, click this link.

If you have chosen to include taxes in the price, then the same will apply to WooCommerce invoices as well. The Price, Total Price in the product table, and the Subtotal, Shipping, and the Total in the summary table will be shown inclusive of tax.
If you have chosen to exclude taxes from the price, then the same will apply to WooCommerce invoices as well. The Price, Total Price in the product table, and the Subtotal, Shipping in the summary table will be shown exclusive of tax.
Brief steps on adding tax to WooCommerce Invoices
Here are the key steps for displaying taxes as a separate column in the product table of invoices:
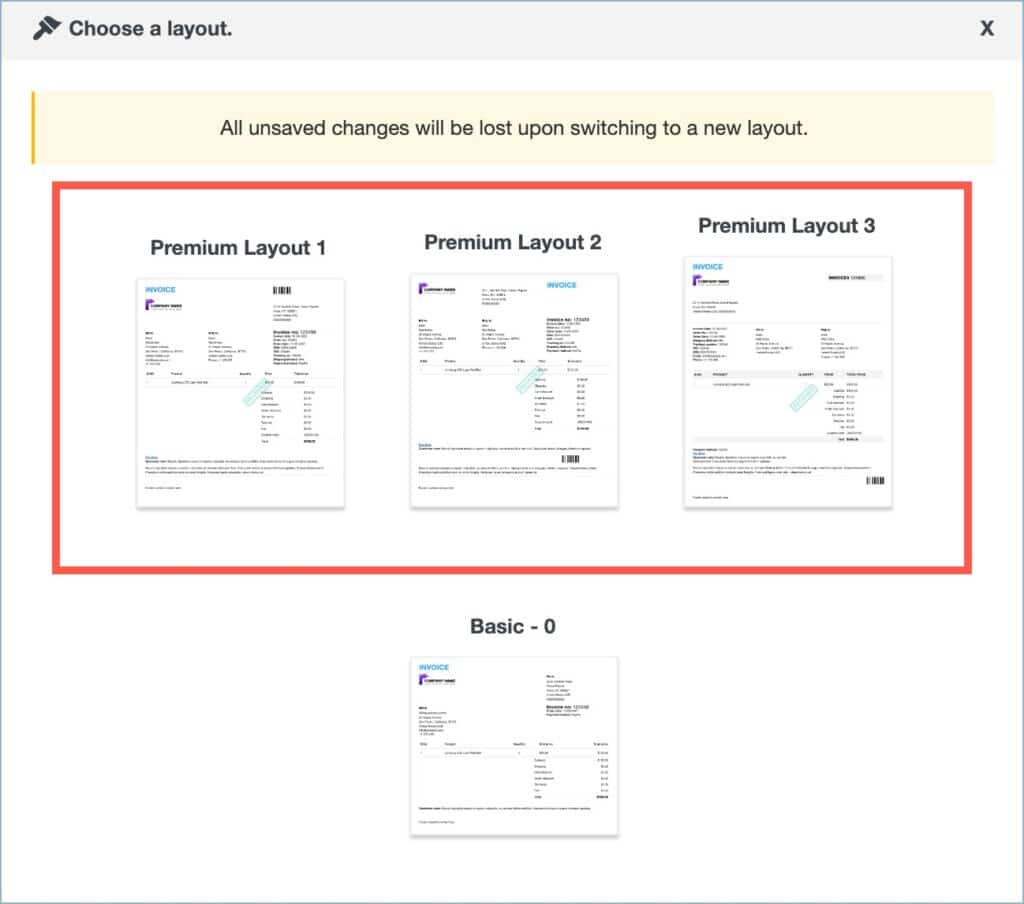
- Choose a Premium template that supports tax.
- Enable the Tax items and Total tax and customize its display format.
- Save and Activate the template.
The following are the key steps for showing taxes in the summary table of invoices:
- Choose a Premium template that supports tax.
- From the Editor panel, enable Total tax and Tax items.
- Save and Activate the template.
Prerequisites
- Install and activate the WooCommerce PDF Invoices, Packing Slips, and Credit Notes plugin.
- Set up tax in WooCommerce. Click here to learn more.
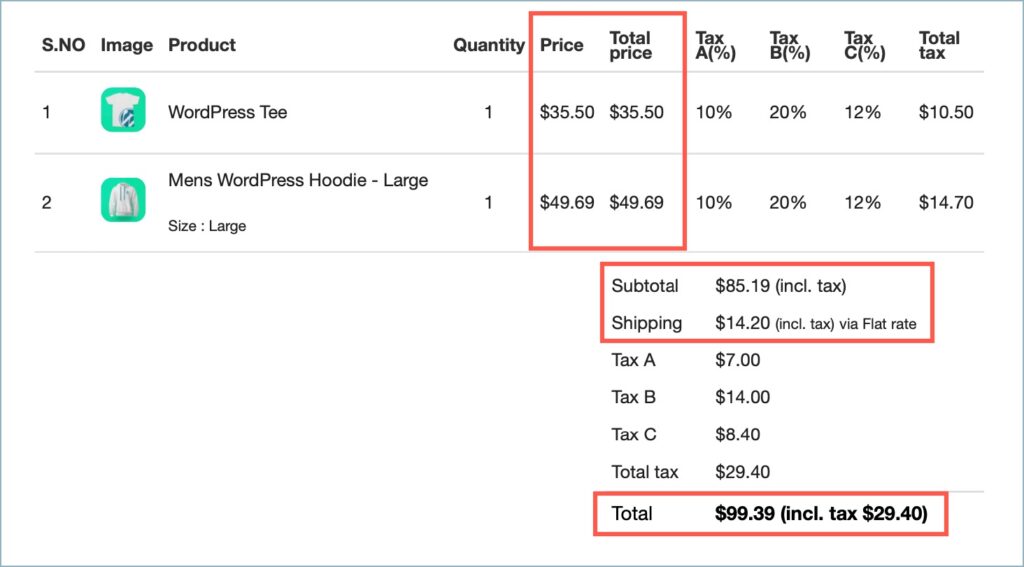
Displaying taxes in the product table of invoices
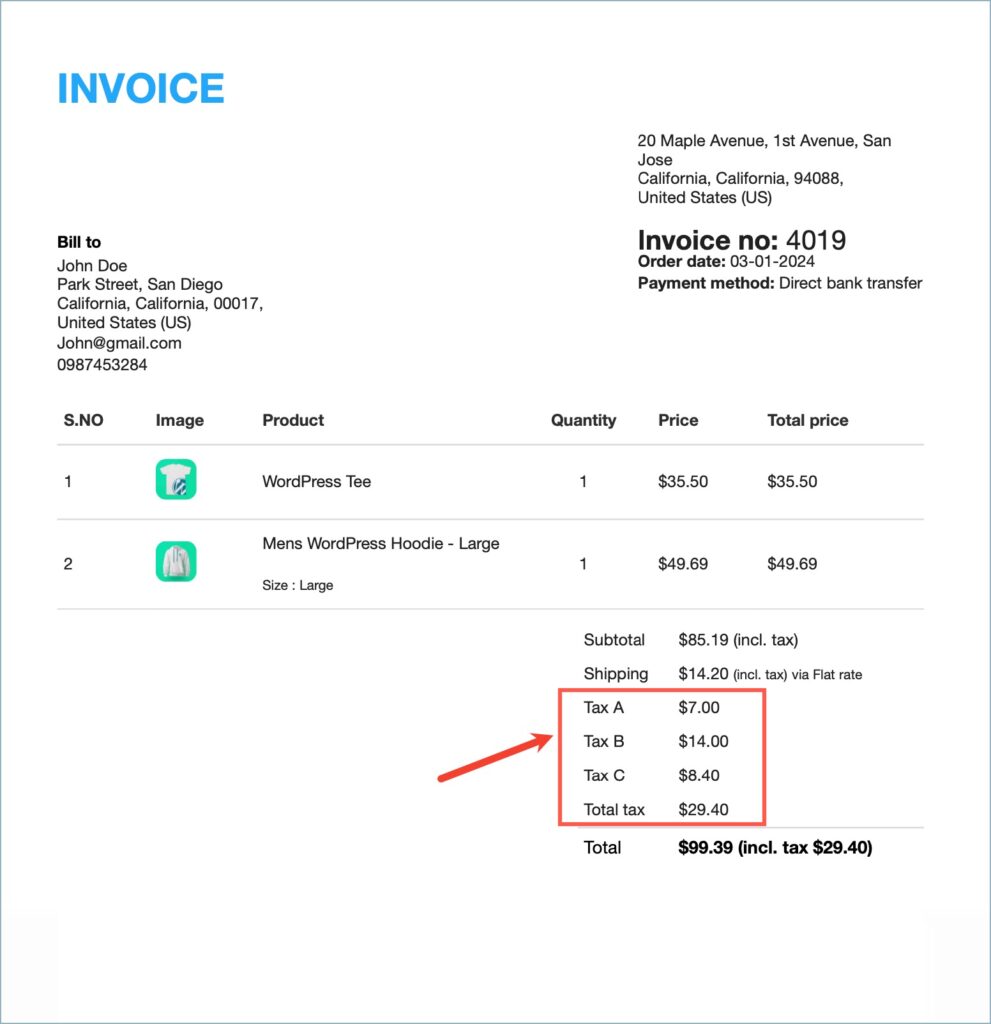
The following image shows a sample invoice that uses a premium template with tax columns added to the product table. Here Price and Total price of each line item are inclusive of tax. The format of the tax items is set as Separate column, to show tax as amount and rate in two different columns.
Here are the detailed steps:
- Choose a premium template that supports the tax.
- Head to Invoice/Packing > Invoice > Customize tab.
- Click on Change layout/Create new template and select a premium template from the Choose a layout dialog box.
- Enable Tax items and Total tax and customize its display format.
- Scroll down and click on the Product table of the active template. The Editor pane on the right side will display an enlarged version of the Product table, where you get additional features.
- Within the enlarged product table, enable Tax items value and Total Tax label by marking the respective checkboxes.
- From the Tax items value dropdown, select your preferred format. Similarly, do it for Total tax value as well. These values allow choosing how the columns ‘Total tax’ or ‘Tax items’ should be displayed in the invoice.
- The Available formats are :
- Amount
- Rate
- Amount with rate
- Separate column (only for Tax items )


- Finally, click on Save and activate to reflect the changes and activate the template.
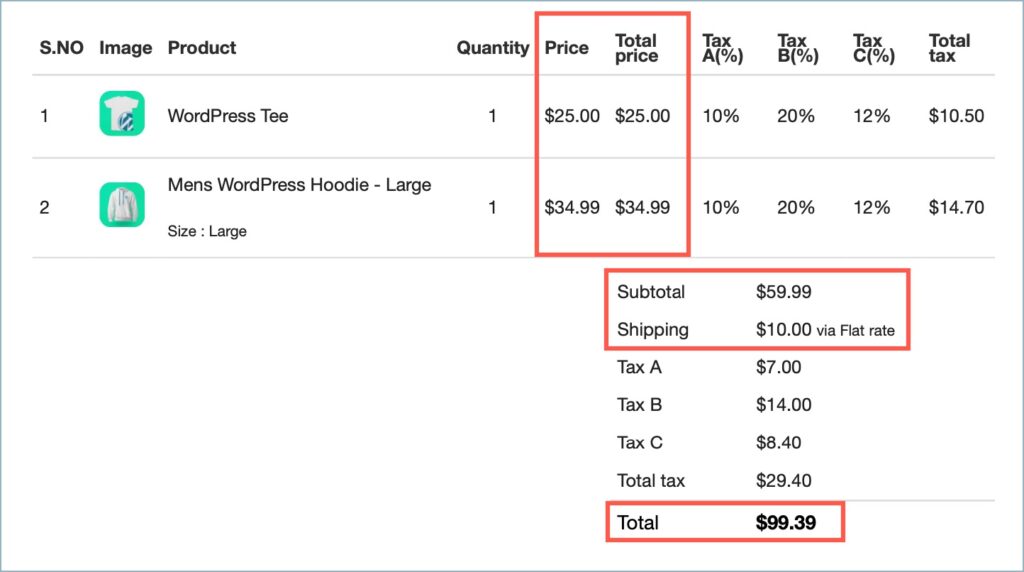
Displaying taxes in the summary table of invoices
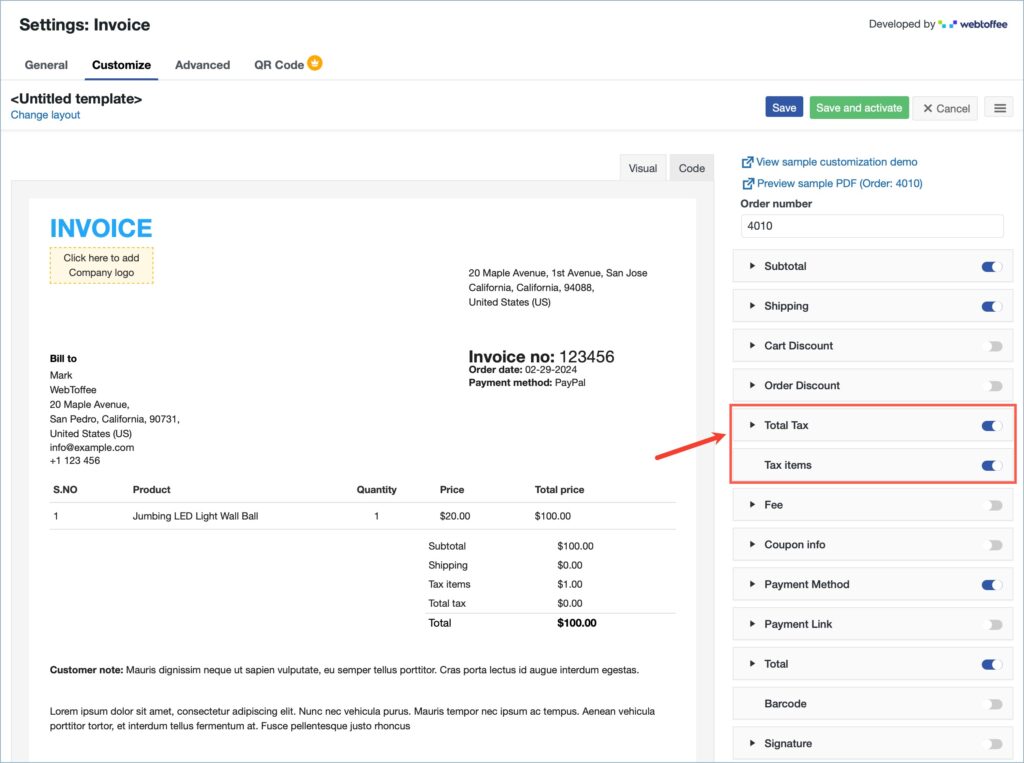
The following image shows a sample invoice that uses a premium template with Total tax and Tax items added to the summary table. Here Subtotal, Shipping, and Total are inclusive of tax.
Here are the detailed steps:
- Choose a premium template that supports the tax.
- Head to Invoice/Packing > Invoice > Customize tab.
- Click on Change layout/Create new template and select a premium template from the Choose a layout dialog box.
- From the Editor panel, enable Total tax and Tax items.
- Upon choosing a template, head to the editor panel on the right and find the elements Total tax and Tax items.
- Using the toggle buttons, enable Total tax and Tax items.
- Save and Activate the template.
- Finally, click on Save and Activate to save the changes and use this template.
Petr
August 14, 2023
Hello. Please, can I set the following columns in the invoice – first column: number of items of the product; second column: price of the product without VAT; third column – VAT only; fourth column: price including VAT; fifth column – total price by number of items. What I need to find out, can I have the price with VAT and the price without VAT displayed in the product row at the same time?
Thanks.
Hema
August 16, 2023
Hello Petr,
Thanks for reaching out. To dynamically configure each fields in the product table, Kindly install Customizer for WooCommerce PDF Invoices by WebToffee. The customizer allows including and excluding tax for every individual field.
Shuchi Chaturvedi
December 7, 2021
Hi,
I am using the plugin and trying to calculate the taxes for India. The current settings are showing:
1. Taxable value.
2. Taxes (adding multiple taxes in CGST and SGST – Intrastate taxes in India)
3. Amount including tax.
I need some more fields like HSN Code and Discount Rates with Amount.
How to show the same, please suggest.
Thanks
Agris Šlaveiks
November 12, 2021
hello
i can’t get the VAT table inside invois
Lorraine Smalberger
November 26, 2021
me neither