Custom filenames for invoice documents make it easier to find and identify specific invoices, which is especially useful for businesses with many transactions. The WebToffee’s free WooCommerce PDF Invoices, Packing Slips, Delivery Notes, and Shipping Labels plugin allows store owners to add a custom filename for invoice PDF documents. The plugin allows the store owners to select the desired filename format and add a custom prefix to it. Store owners can do this by following the below steps:
- Choosing a filename format for Invoice PDF documents.
- Adding a custom prefix to the filename. Store owners can add a custom prefix in two ways:
- Using the Custom PDF name prefix option.
- Using a custom code snippet.
Choosing filename format for Invoice PDF documents
Store owners can choose from the two filename formats provided by the plugin. It can either be [prefix][order_no] or [prefix][invoice_no]. Follow the below steps to choose a filename format for invoice PDF documents:
- Navigate to Invoice/Packing > Invoice > General.
- Under the General tab, head to the Others section.
- In the Others section, go to the PDF name format option.

- Choose the preferred PDF filename format from the dropdown menu.
- For example, let’s select it as [prefix][invoice_no].

- Click on Update Settings and save changes.
Adding a custom prefix to the filename
1. Using the Custom PDF name prefix option
The plugin provides store owners with the provision to add a custom prefix of their choice to the filename. The custom prefix will appear along with the order number or the invoice number in the filename. To add a custom prefix to the filename:
- From the Others section, navigate to the Custom PDF name prefix option.
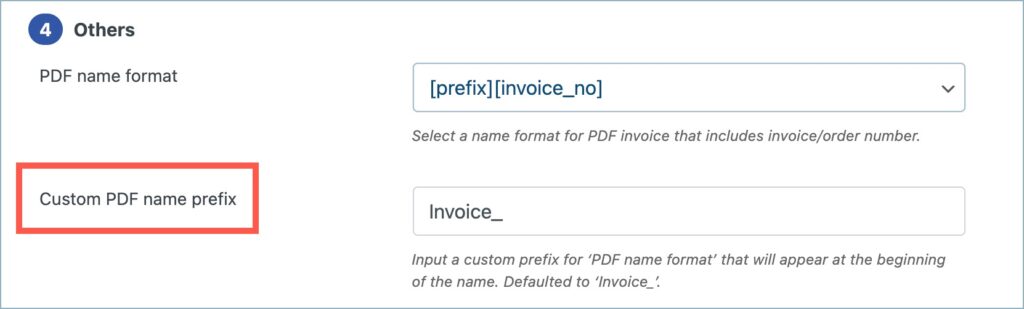
- Input a custom prefix in the space provided. (By default the custom prefix for the filename will be Invoice_). Here let’s take an example of adding a custom prefix ‘RECEIPT’.

- Click on Update Settings and save changes.
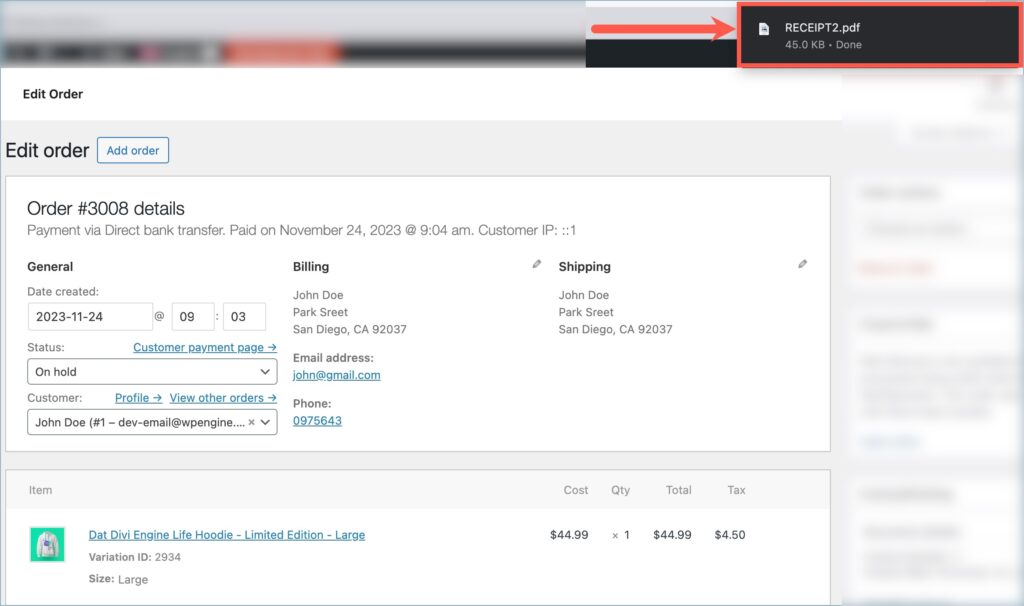
Now, the Admin generates the Invoice PDF document for order #3008 with the invoice number 2. The Invoice PDF document with the filename ‘RECEIPT2’ is downloaded as shown below.
2. Using a custom code snippet
Store owners can add custom prefixes to the Invoice PDF documents using the custom code snippet given below. This snippet is applicable to both single orders as well as bulk orders. To add a custom prefix using the custom code snippet, follow the below steps:
- To add a custom prefix for single orders, replace ‘facture_’ in the custom code snippet with the prefix name of your choice. For bulk orders, replace ‘facture_bulk_’ with the prefix name of your preference.
- Upon updation, add the custom code snippet to the WordPress site which is currently in use. Add it to the active child themes functions.php file or use a third-party plugin for the addition. To know more about how to add a custom code snippet using a third-party plugin, refer to this article.
Using the Invoice number as the filename
Using the custom code snippet given below, store owners can use the invoice number alone as the filename for the invoice PDF documents. To achieve this store owner will have to add the custom code snippet below to the WordPress site in use.
Comment (1)
charlie
October 4, 2021
Hi
Is it possible with the premium version of your plugin “WooCommerce PDF Invoices, Packing Slips, Delivery Notes & Shipping Labels”, to display the “pay now” link on the proforma invoice ? (and not on the real invoice).
I want the customer to be allowed to pay via the proforma invoice, then to receive the real invoice once the order is paid.
Is it possible to set this up ?
Thanks in advance
Charlie