The Stripe Payment Gateway Plugin for WooCommerce empowers WooCommerce store owners to seamlessly accept payments from their online stores. With this plugin, businesses can offer customers multiple payment options, including Credit/Debit Cards, as well as various local payment gateways like Alipay, Apple Pay, Google Pay, Payment Request Button, SEPA Pay, Klarna, and Stripe Checkout through the Stripe platform.
Features offered
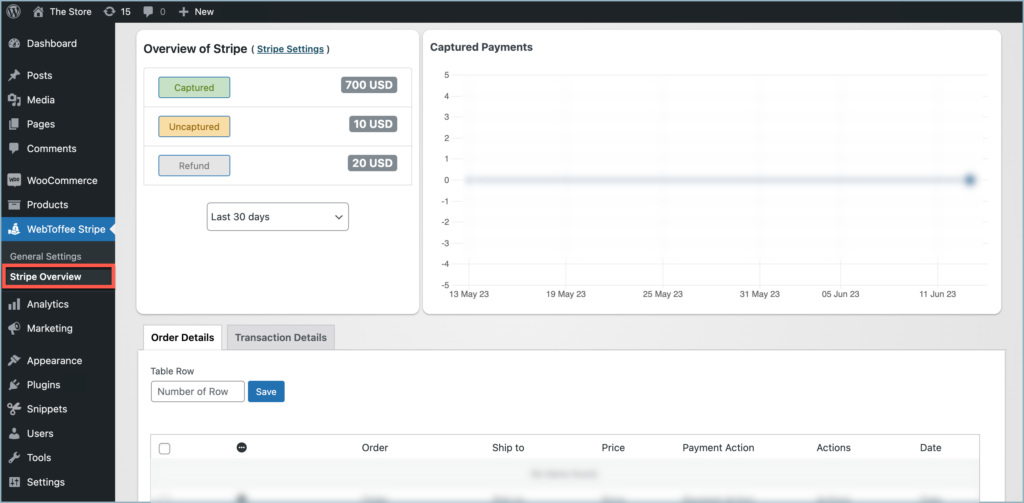
- Stripe Overview Page: A consolidated overview of all the Stripe payments. Capture payments and refunds manually. It also displays a graphical representation of the overview of the Stripe payment for a given period of time. Process partial or full refunds. Displays all the order/transaction details as well.
- Pay with Local payment gateways.
- Customize your Stripe Checkout (custom text, description, and logo for the Stripe payment gateway.)
- Save card details: Save customers’ card details so that it’ll be easy for them to use them for their next transaction.
- Capture Payments: Capture payments immediately, or capture them manually from Stripe Overview Page or Dashboard.
Prerequisite
Before anything else, ensure that you have a Stripe account in place. Creating a Stripe account is free of charge. Additionally, Stripe provides the option to test payments in a test mode. Please refer to Stripe’s guidelines on business information requirements.
Stripe supports payment transactions in 46 countries. Ensure that you belong to the listed country.
- On signing up, navigate to Stripe dashboard > Developers > API keys.
- Copy the Publishable key and Secret key to the clipboard.
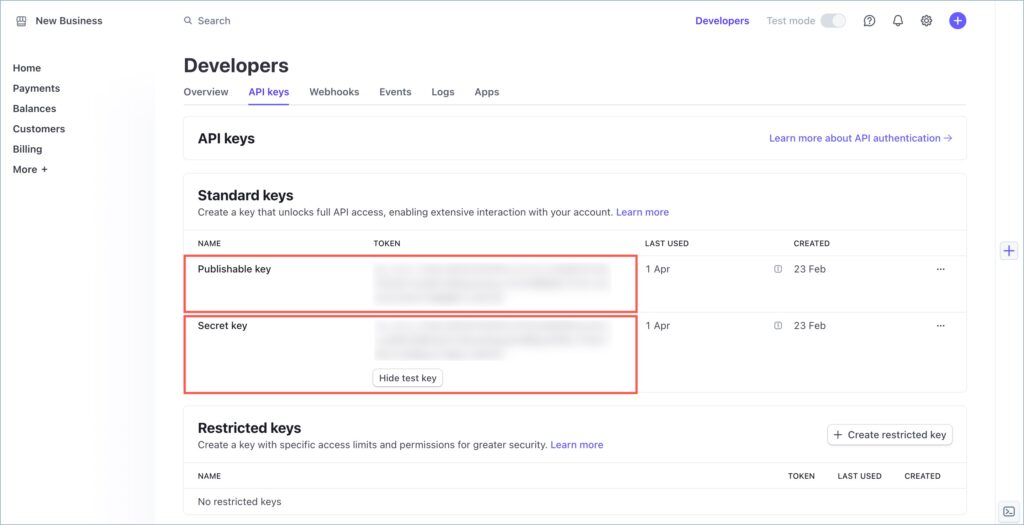
Note: Transaction mode (test/live) is dictated by the respective API keys. In live mode, an SSL certificate must be installed on your site to use Stripe.
Getting started
To begin with, install and activate the plugin. The settings can be accessed in two ways:
- From the dashboard, navigate to Plugins > Installed plugins > Stripe Payment Gateway for WooCommerce > Settings.

OR
- From the WordPress dashboard, click on WebToffee Stripe.


Configure Stripe General settings

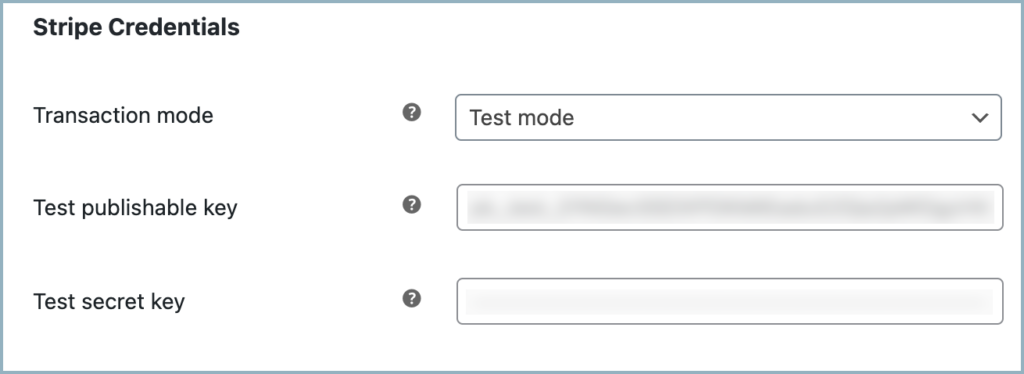
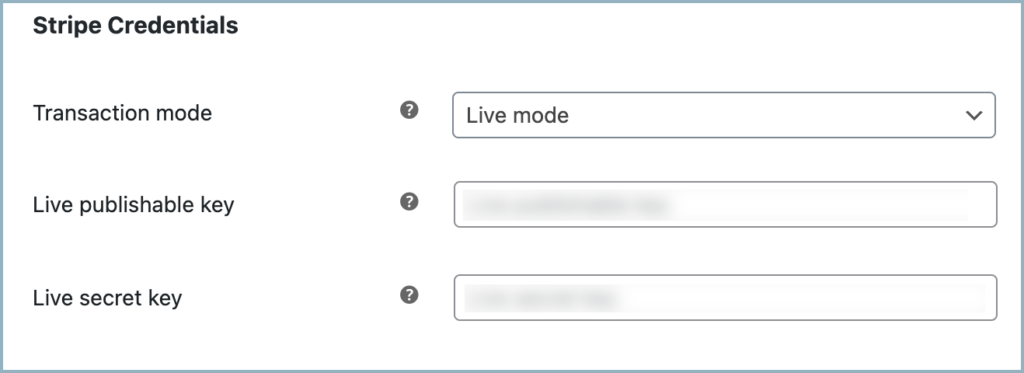
- Stripe Credentials –
- Transaction mode – List the available modes for transactions
- Choose Test mode to trial run using test API keys.
- Switch to live mode to begin accepting payments with Stripe using live API keys.
- Publishable key – In test mode, insert the test publishable key, and in live mode, insert the live publishable key.
- Secret key – In test mode, insert the test secret key, and in live mode, insert the live secret key.
- Transaction mode – List the available modes for transactions
- Stripe overview page – Enable to add a sub-menu named “Stripe Overview” that replicates a Stripe dashboard and provides options to manage orders, process partial/full refunds, and capture payments. Keep the option disabled, if you don’t want to have a stripe overview. Refer to the documentation to learn more about the Stripe Overview.
- Capture payment immediately – Enabled by default to capture the payments immediately on successful transactions. Disable to capture payments later manually from the Stripe dashboard/overview/order details page. Further, read to know more about how to capture Stripe payments manually from Stripe overview.
Un-captured payments will expire in 7 days. Learn more
- Webhooks – To receive order status updates in a timely manner, add the site’s webhook to the Stripe dashboard. Follows the steps in – Setting up Webhooks and Supported events article to add a webhook endpoint. The plugin is compatible with the following webhook events:
- charge.dispute.created
- charge.succeeded
- charge.failed
- checkout.session.expired
- source.chargeable
- source.failed
- payment_intent.succeeded
- payment_intent.payment_failed
- checkout.session.async_payment_succeeded
- checkout.session.async_payment_failed
- Debug – Records stripe payment transactions into WooCommerce status log.
- Log – Enable to record stripe payment transactions in a log file.
- Clicking on Save changes will save the configuration.
Enable the concerned payment gateway
Enable the required local payment gateways the plugin offers by navigating to the Local payment gateway tab.
Learn more about settings up payment gateways:
Meghan
January 28, 2024
Can I set it the plugin to save a customer’s credit card details so I can add an additional charge from the stripe dashboard at a later date? I’m so I want to be able to charge the remaining balance on a later date using the same card they used for the initial purchase. Thanks!
Arjun
January 29, 2024
Hi Meghan,
Thank you for reaching out. We understand your requirement. But as of now, the plugin doesn’t provide the mentioned functionality.
Enesh
August 9, 2023
do you provide any API for ‘Stripe Payment Gateway’ apply in Mobile Application in php.
Arjun
August 14, 2023
Hi Enesh,
Thank you for getting in touch with us. Sounds like you need some technical assistance. Please visit our support page for technical assistance.
Ricardo
June 8, 2022
Hi,stripe is not showing as an authorised payment method for ‘reoccurring payments’ for woocommerce subscriptions products
On the checkout page i have this error message: “Sorry, it seems there are no available payment methods which support subscriptions. Please see Enabling Payment Gateways for Subscriptions if you require assistance.”
Shesna
June 8, 2022
Hi Ricardo,
Thank you for reaching out. Stripe for subscription products is our plugin’s premium feature. If you are using our premium plugin and are not able to resolve the issue, please submit a ticket to here for direct assistance.
Jody Forrester
May 29, 2022
Morning, I have configured the plugin as per instructions, however WT Stripe Checkout is not showing as an authorised payment method for ‘reoccurring payments’ which is needed for my Subscriptions solution.
On the checkout page I am getting the following error message: “Sorry, it seems there are no available payment methods which support subscriptions. Please see Enabling Payment Gateways for Subscriptions if you require assistance.”
Please help.
Donovan Glass
August 26, 2020
Is there no webhook URL for this plugin?
Mark
August 26, 2020
We do not use webhook in the plugin.