The packaging of products has a direct relation to the rate of shipping. Not paying attention while packing will result in a bulk load of packages to ship which will proportionally increase the shipping cost. Webtoffee’s Print Invoice, Packing Slip, Delivery Note & Label Plugin for WooCommerce provides you with three different types of packing options. Pack items individually, box packing, single package per order, etc.
This article gives a detailed explanation of how you can set up box packing using Print Invoice, Packing Slip, Delivery Note & Label Plugin for WooCommerce.
Installation of the Plugin
- Step 1: Go to My Account > “API Downloads” tab and download the plugin.
- Note: If you have the basic/free version already installed, please Deactivate and Delete the Basic Version before installing Premium Version to avoid any conflict. Your plugin settings will be retained on your website.
- Step 2: Install the downloaded plugin into your WordPress / WooCommerce Site.
- Step 3: You will get an Activation Key and Activation Email at My Account -> “API Keys”.
- Step 4: Go to your site admin and the Settings page of the plugin and activate it using email and key.
Setting up Packaging in WooCoomerce
After activating the plugin, go to your WordPress dashboard and go to WooCommerce > Invoice/ Packing > General Settings> Advanced options.
The advanced settings can be used to configure additional information with respect to custom data, RTL support, packaging formats, etc.
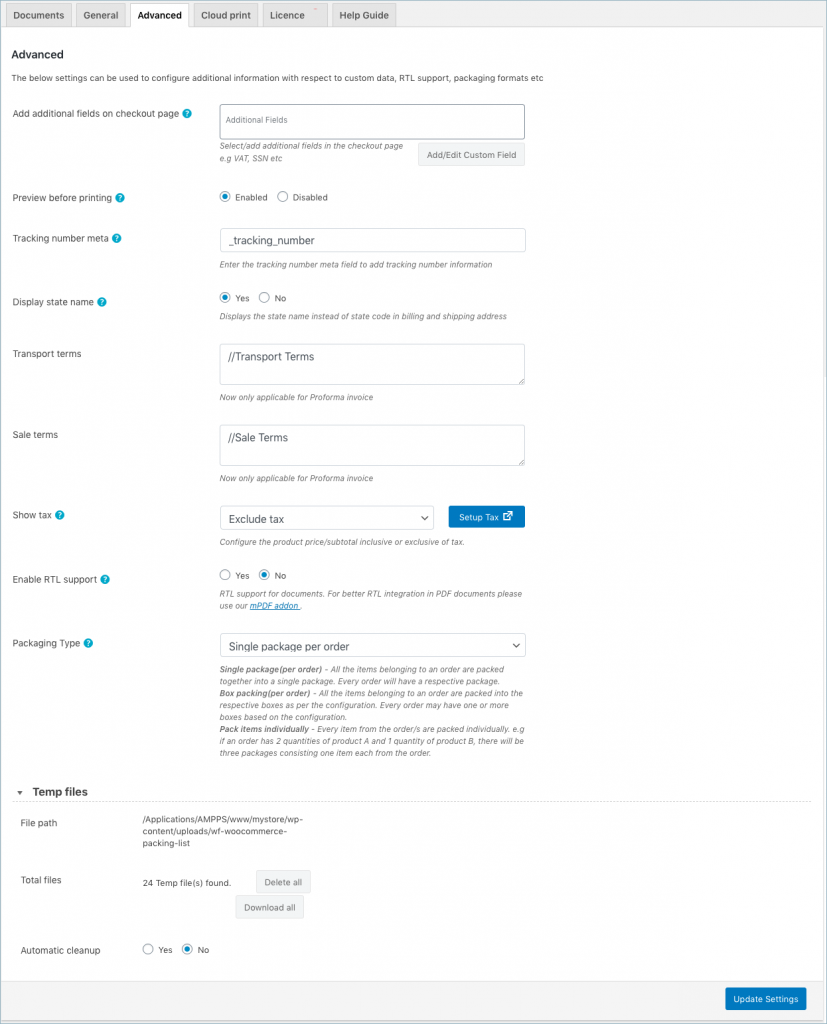
The Advanced tab consist of following fields:
- Add additional fields on the checkout page: Append additional information in documents by selecting the required item from the drop-down. You can select a field from the list of default fields or click the Add Custom Field button to create custom meta fields by providing a custom Field Name. The meta keys can be found in the product’s custom field section of the WooCommerce Order page.

- Preview Before Printing – You can enable this to have a preview option in all the shipping documents before they are printed.
- Enable RTL support: Enable or disable the RTL support in documents generated by the browser.
- Tracking number meta: Enter the tracking number meta field to add tracking number information. The tracking number meta can be obtained from the respective tracking data provider.
- Display state name: Displays the state name instead of state code in billing and shipping address.
- Packaging Type: The packaging type that you set here can be applied to all documents, except Invoice. You can select the packaging type from the three available options:


- Pack items individually: Allows you to pack each item in the cart separately. Total Shipping cost is calculated by adding the shipping cost of each item.
- Box packing: If packing items individually or weight-based packing does not suit your business, then you can customize box sizes based on your requirement. Once you select this option, the following fields will be appended as shown below:

To define a new box size, click the Add Box button. All cart items are packed into custom boxes defined in Box Size settings. The best fit box is chosen automatically from the defined boxes. This box dimension and weight settings are applicable only when Box Packing is selected. Based on your requirement, you can enable or disable a particular box using the checkbox under the Enabled column of the respective box rule. - Single package per order: Allows you to pack all items of a single order as one single package.
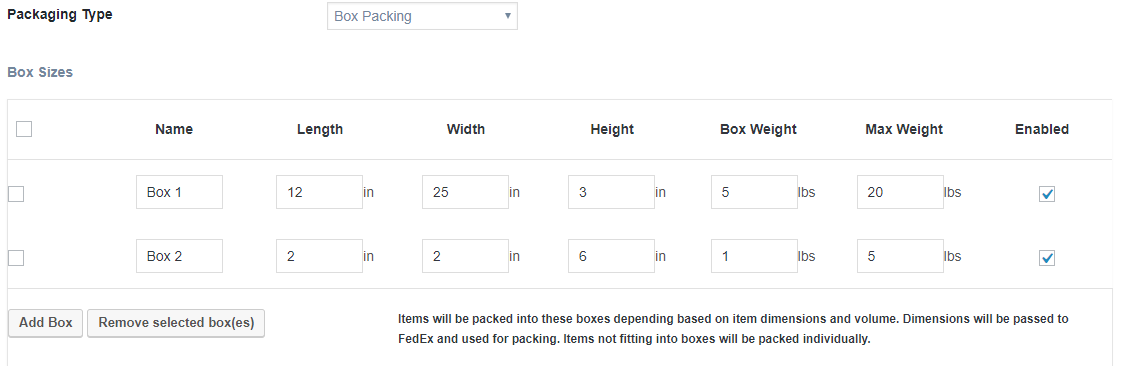
Here, you can add a maximum of 13 boxes by clicking on the Add Box button. If you want to delete one of them you can select a box or boxes by tick marking the small box beside it, then click on Remove selected box(es) button. While adding each box give the name, length, width, height, weight, max weight, etc of the box then enable the checkbox at the end of the row.
thecos packaging
November 5, 2021
You’re doing a great job Man, Keep it up.
thecos packaging
October 7, 2021
Informative post! This is a great share thank you
Custom Design Boxes
August 11, 2021
Impressive! Thanks for sharing this.
Custom Boxes
July 10, 2021
Impressive! Thanks for sharing this.
custom box
July 8, 2021
Irresistible! Thank you so much for this kind and good service.your services is better than better.
customdesignsboxes
June 30, 2021
This is really very helpful for bloggers
You’re doing a great job Man, Keep it up.
Adrian Smith
July 13, 2020
We use Australia Post exclusively. As far as we know the dimensions are not used for pricing calculations, only weight. Does the plugin calculate the final shipping cost based on the response from AusPost or does Auspost do it?
Mark
July 13, 2020
This plugin does not integrate with any shipping or courier services for shipping charge calculation.