When it comes to wholesale B2B transactions customers will prefer a time gap between delivery of goods and payment.
PDF Invoice/Packing Slip for WooCommerce plugin allows accepting invoice payment by adding a ‘Pay Later‘ option at the checkout. On the other hand, the customer can use the ‘Pay Now‘ link on the invoice receipt to make the payment.
Getting started
- First of all, install and activate the plugin, a new menu Invoice/Packing appears in the WordPress dashboard.
- Head on to Invoice/Packing > Invoice menu. The invoice settings window will open up.
- Open the Payment Link tab from the Settings window.
Enabling invoice payment
Enable Show payment link on the invoice to add a payment link beside the payment method on the invoice.
The plugin adds a payment link on the invoice for selected order statuses. However, it is defaulted to ‘On hold’ status, if no selection is made. That is, the plugin adds the ‘Pay now’ link to all the invoices with order status as ‘On hold’.
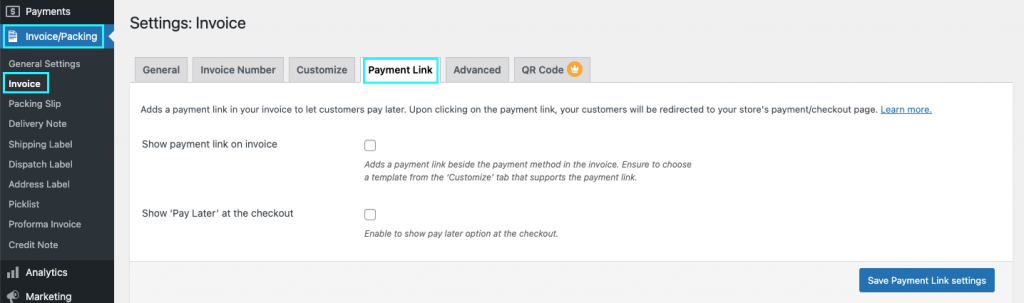
The user can click on the Pay Now link on the invoice to initiate a payment.
‘Pay Later’ at the checkout
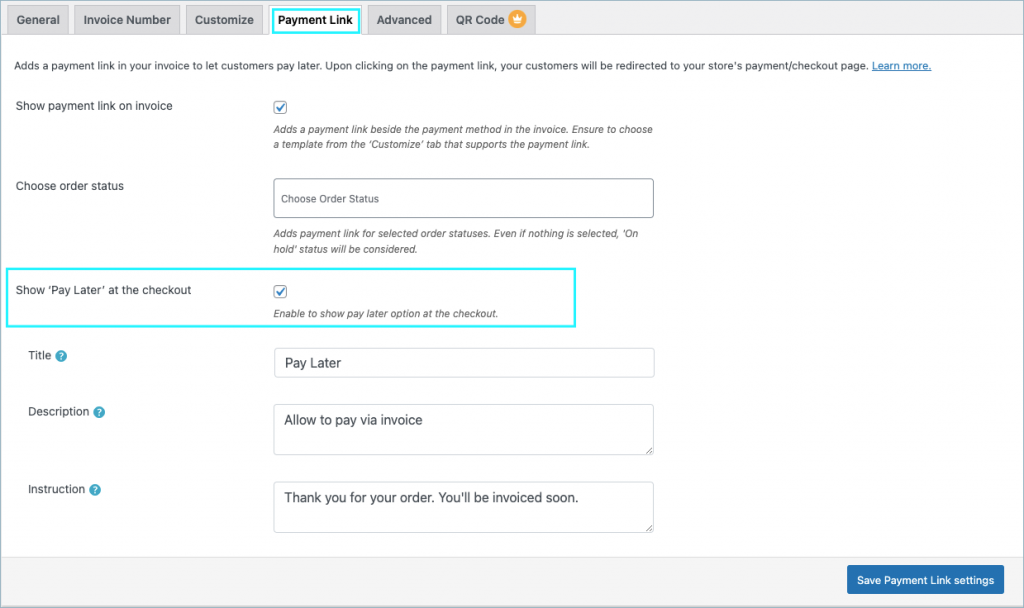
Enable the option ‘Show payment link on invoice‘ to add a ‘Pay Later’ option at the checkout.
- The Title specified here will appear as the payment option at the checkout. For example: Pay Later
- Description will appear just below the title on the checkout page. For example: Allow to pay via invoice.
- Instructions will appear on the ‘Thank you page’ after placing order successfully. For example: Thank you for your order. You’ll be invoiced soon.
- Finally, Save the payment link settings.
The ‘Pay Later’ payment option at the checkout will appear in the following manner:

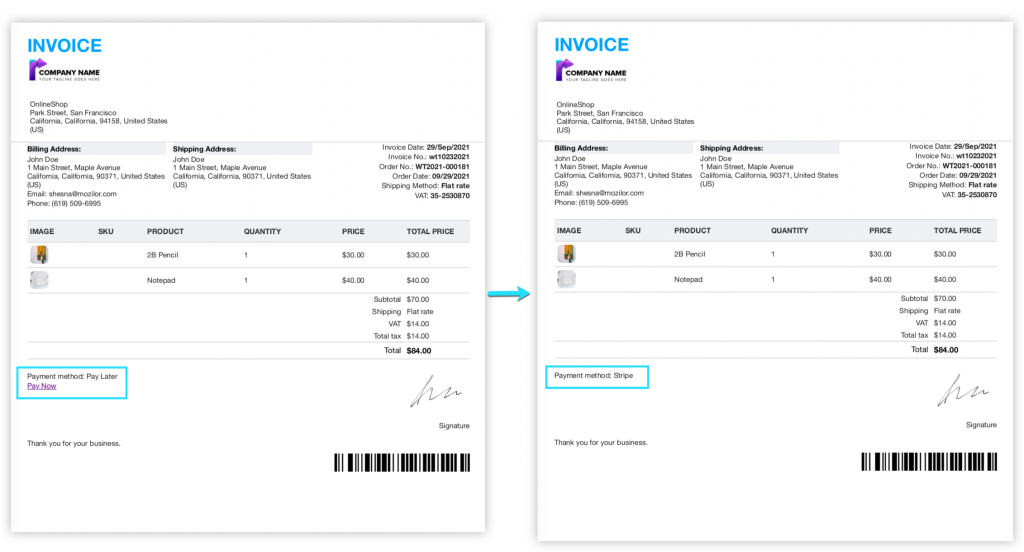
Email an invoice with a ‘Pay Now’ link
- On placing an order with the Pay Later option, the order will be in ‘on hold’ status.
- The buyer on receiving the email with the invoice attachment can click on the Pay Now link on the invoice. Learn more on how to send invoice as email attachment.
- This will redirect buyers to the checkout page. He can make use of the available payment methods on your store to make his payment.
- Therefore:
- Invoice is updated with the latest payment method used.
- The order status changed from ‘On hold’ to ‘Completed’.
An invoice with a Pay Now link and subsequently changed to the used payment method will be as shown below:
Payment workflow
The success of an online store has a lot to do with providing convenient payment options for customers. That way, The ‘Pay Later’ option gives a huge relief to customers by allowing them to pay later, especially after a bulk purchase. And, by keeping your customer satisfied you can make the profit you want for your store.