Overview
Smart Coupon for WooCommerce is a specialized plugin designed to cater to diverse coupon-specific functionalities.
Features offered
- Generate coupons based on the shipping method, payment method, user roles and country.
- Offer BOGO (Buy X Get Y) discounts.
- Import coupons.
- Create and manage Store Credits.
- Signup coupons.
- Abandoned coupons and many more.
Getting started
- First of all, install and activate the plugin.
- From your WordPress dashboard, Navigate to Smart Coupons.
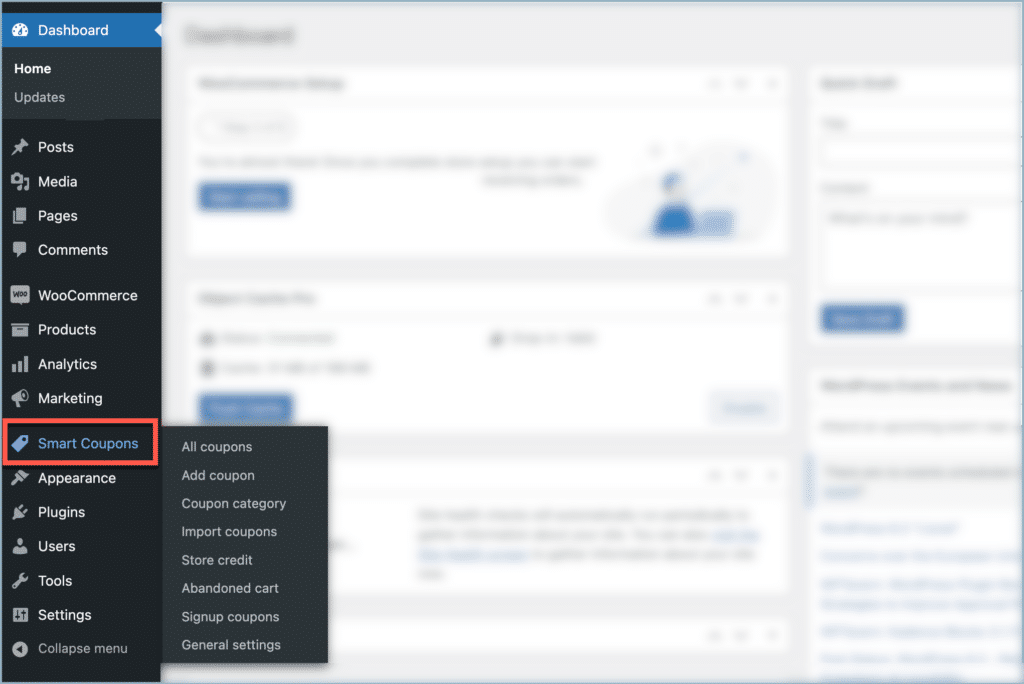
Under the Smart Coupons menu, you can access the following features :
- All coupons
- Add coupon
- Coupon category
- Import coupons
- Store credit
- Abandoned cart
- Signup coupons
- General settings
All coupons
This window displays all available coupons along with coupon details like Coupon code, Coupon type, Coupon amount, Shortcode, and many more as shown :
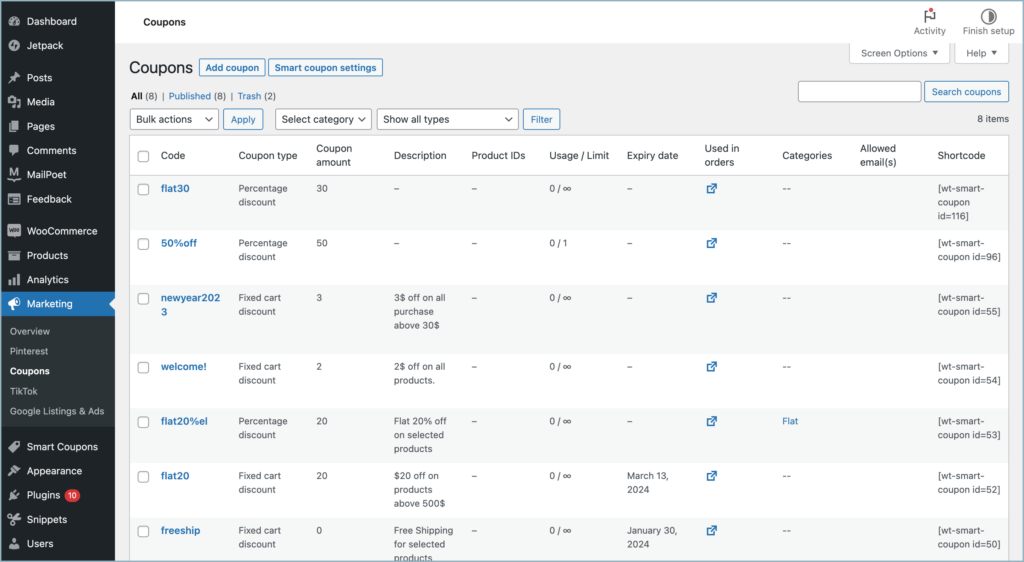
There are three types of lists in this section.
- All – Lists all available coupons.
- Published – Lists active coupons.
- Trash – Lists recently deleted coupons.
This window also contains some other features like Add coupon and Smart coupon settings, which will be discussed later in this article.
Add coupon
This window allows creating new coupons and customizing them with a variety of options.
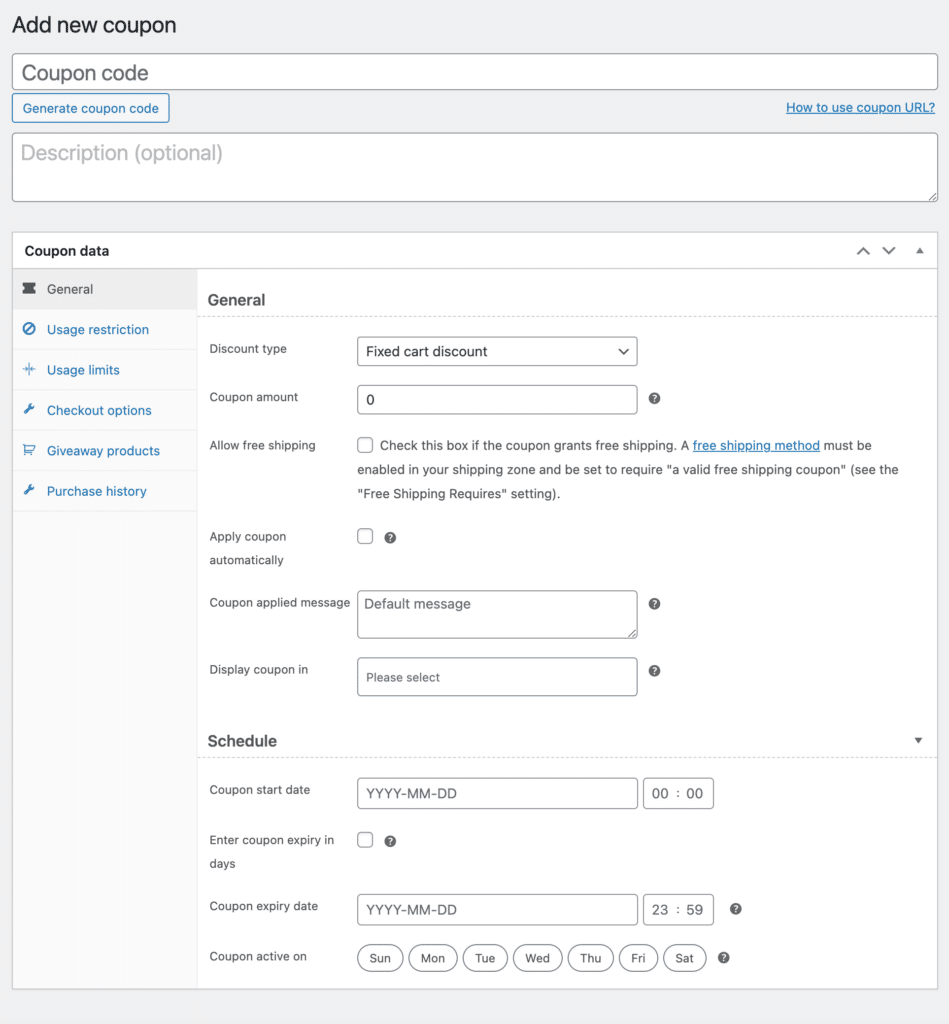
The window is divided into two sections, Add new coupon and associated Coupon data.
Add new coupon
Create a new coupon here.

- Coupon code – Coupon code that the customers will use to redeem the coupon. It must be a unique code, as it serves as an identifier. Or click on Generate coupon code to generate a random code.
- Description (optional) – Information about the coupon like, Date in effect, Promotion, Compensation, Ticket number.
Alternatively, Use the Duplicate function in the All coupons page to create a copy of an existing coupon.

Coupon data
Customize coupons with a variety of options. Under Coupon data meta box, there are seven sections:
- General
- Usage restriction
- Usage limits
- Checkout options
- Giveaway products
- Purchase history
- URL options
General
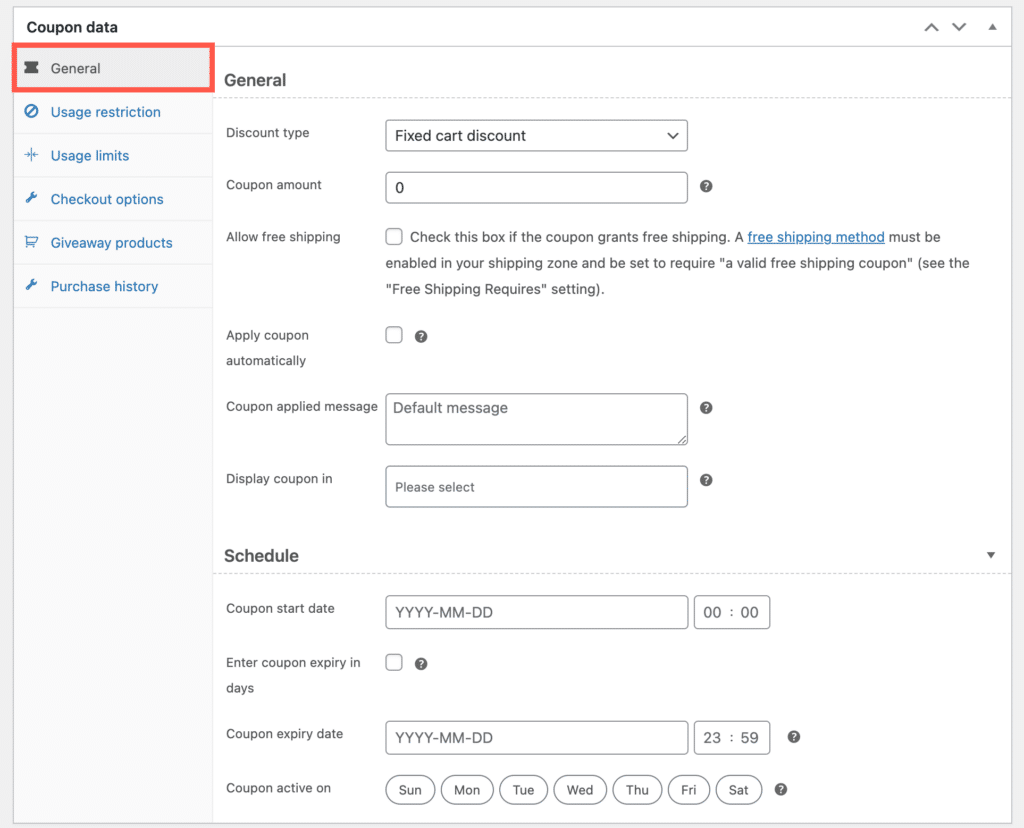
- Discount type – There are five types of discounts to select from. Select the required discount type from the drop-down menu.
- Percentage discounts – Offer a percentage discount on the total value of the eligible products. For example, if the cart contains three (3) t-shirts at $30 each = $90, a coupon for 10% off applies a discount of $9.
- Fixed cart discount – Offer a fixed amount discount for the total cart value. For example, if the cart contains three (3) t-shirts at $30 each = $90, a coupon for $10 off gives the cart a discount of $10.
- Fixed product discount – Offer a fixed amount discount for each eligible product in the cart. The customer receives a fixed amount of discount per item. For example, three (3) t-shirts at $30 each with a coupon for $10 off apply a total discount of $30.
- Store credits – Allows shop owners to create store credit coupons manually from the back end. Unlike normal coupons, a store credit can be redeemed multiple times until its amount is exhausted. Also restrict store credits by product, category, coupon validity, etc.
- BOGO-Buy X get Y offers – Offer a varied quantity or price-based discounts such as buy x and get the same product/any product from store/specific product from store/product from a specific category, etc for free or with a discount.
- Coupon amount – Fixed value or percentage, depending on the discount type selected. Don’t use currency unit or a percent sign. For example, enter the value ’10’ for £10 or 10%.
- Allow free shipping – Enable to remove shipping costs on coupon redemption. Also, enable Free Shipping from WooCommerce settings.
- Apply coupon automatically – Enable to automatically apply coupons on checkout if the criteria are met. Know more about auto-apply coupons and how to manage them.
- Coupon applied message – Set a custom message to show when a coupon is applied. Leave blank to display the default message.
- Display coupon in – Select the location(s) where the coupons should appear. There are 3 options, My Account, Checkout, and Cart.
- Coupon start date – Set the start date and time on which the coupon gets active.
- Coupon expiry date – Set an expiry date for the coupon. Works based on the site’s time zone setting at Settings > General > Timezone on WordPress.
- Coupon active on – The coupon will only be active on select days of the week.
- Enter coupon expiry in days – While enabled, the coupon expiry time will be set based on days instead of a particular date and time. For example, enter the number ‘2’ in the coupon expiry date section and the coupon will expire exactly after 2 days from when which the coupon is created.
Usage restriction
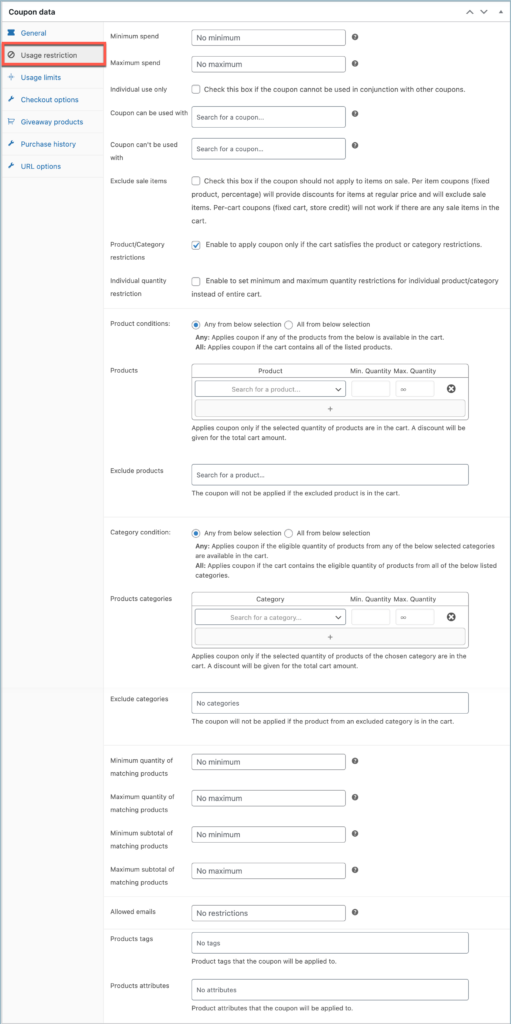
- Minimum spend – Set the minimum subtotal needed to use the coupon. The sum total of the cart subtotal+tax is used to determine the minimum spend.
- Maximum spend – Set the maximum subtotal allowed when using the coupon.
- Individual use only – Enable to not use coupons in conjunction with other coupons.
- Coupons can be used with – Input one or more coupon codes to use along with a created coupon.
- Coupons can’t be used with – Configure the list of coupons that cannot be redeemed along with the selected coupon.
- Exclude sale items – Check this box if the coupon should not apply to items on sale. Per-item coupons will only work if the item is not on sale. Per-cart coupons will only work if there are items in the cart that are not on sale.
- Product/Category restriction – Enable to apply coupons only if the cart satisfies the product or category restrictions.
- Individual quantity restriction – Enable to set minimum and maximum quantity restrictions for individual products/categories instead of the entire cart. If disabled, then the Minimum quantity of matching products will be considered.
Product condition
- Product condition – Select a way to restrict the use of coupon based on products in the cart.
- Any from below selection – Select to apply a coupon if any of the products from the below list is available in the cart.
- All from below selection – Select to apply a coupon if the cart contains all the listed products.
- Products –
- Product – Products that the coupon will be applied to or that need to be in the cart in order for the discount to be applied by satisfying the min and max quantity restrictions.
- Min. Quantity – Select the minimum quantity of the selected product needed in the cart to redeem the coupon.
- Max. Quantity – Select the maximum quantity of the selected product that can be redeemed with the coupon.
- Exclude products – Products that the coupon can’t apply to or that can’t be in the cart for the discount to be applied. This is not applicable for percentage and fixed product discount.
Category condition
- Category condition – Select a way to restrict the use of coupon based on category of products in the cart.
- Any from below selection – Select to apply coupon if eligible quantity of products from any of the below selected categories are available in the cart.
- All from below selection – Select to apply a coupon if the cart contains the eligible quantity of products from all the below-selected categories.
- Product categories –
- Category – Product categories that the coupon will be applied to or that need to be in the cart in order for the discount to be applied by satisfying the min and max quantity restrictions.
- Min. Quantity – Select the minimum quantity of the products needed in the cart from the selected category to redeem the coupon.
- Max. Quantity – Select the maximum quantity of products that can be redeemed with the coupon from the selected category.
- Exclude categories – Product categories that the coupon will not be applied to or that cannot be in the cart in order for the discount to be applied. This is not applicable for percentage and fixed product discounts.
Other restrictions
- Minimum quantity of matching products – Minimum quantity of the products that match the given product or category restrictions. If no product or category restrictions are specified, then the total number of products is used.
- Maximum quantity of matching products – Maximum quantity of the products that match the given product or category restrictions. If no product or category restrictions are specified, then the total number of products is used.
- Minimum subtotal of matching products – Minimum subtotal of the products that match the given product or category restrictions.
- Maximum subtotal of matching products – Maximum subtotal of the products that match the given product or category restrictions.
- Allowed Emails – Whitelist of billing emails to check against when an order is placed. Separate email addresses with commas. Also, use an asterisk (*) to match parts of an email. For example, “*@gmail.com” would match all Gmail addresses.
- Products tags – Select the product tags that the coupon will be applied to.
- Products attributes – Select the product attributes that the coupon will be applied to.
Usage limits

- Usage limit per coupon – Restricts the coupon usage to the specified count.
- Usage limit per user – Restricts the coupon usage to the specified count per user.
- Restrict usage to, once per product – Enable restriction of the coupon in a way that the coupon can be used multiple times based on usage limit, but it can only be used to purchase a particular product once.
On selecting ‘Percentage discount’ in the General section, two additional options will be available in the Usage limit section.
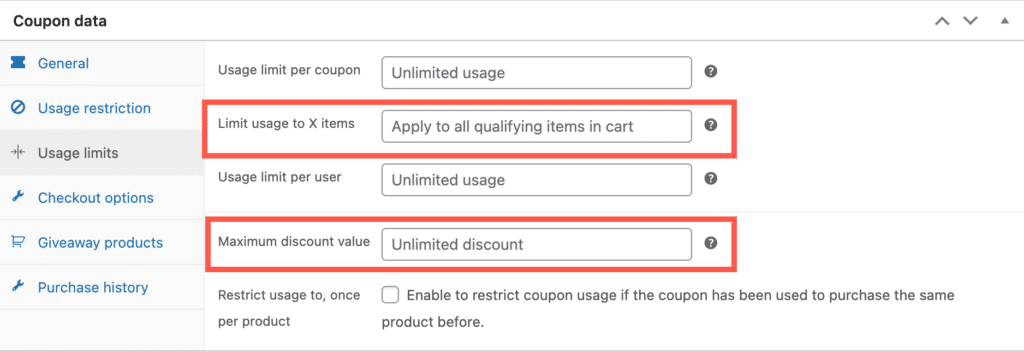
- Limit usage to X items – The maximum number of individual products that the coupon can be used with. If left blank, the coupon applies to all qualifying items in the cart.
- Maximum discount value – Set a limit on the discount value while using percentage discounts, for example, provide a 50% discount coupon for a product but with a maximum discount of up to $100.
Checkout options
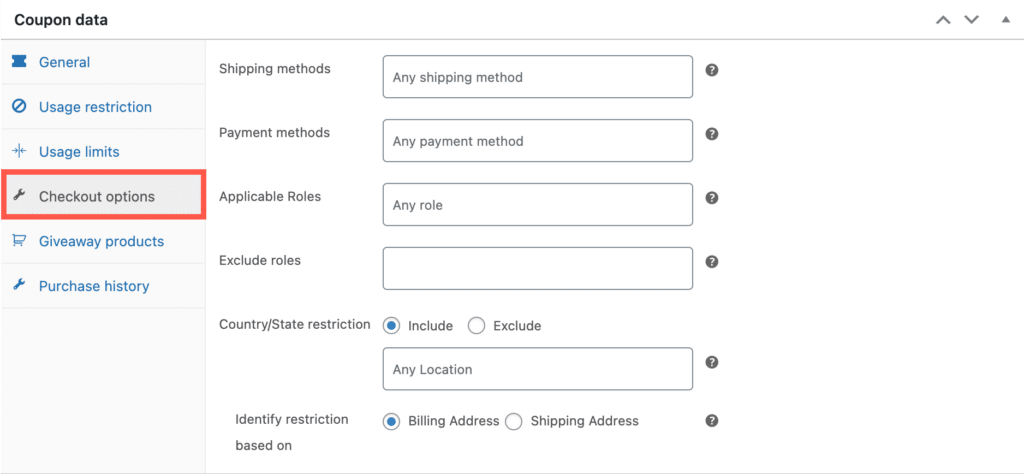
- Shipping Methods – The coupon will only apply if the selected shipping method matches any of the options specified here.
- Payment Methods – The coupon will only apply if the payment method used during checkout process matches any of the options selected here.
- Applicable Roles – The coupon will only apply if the customer belongs to any of the roles selected in this field.
- Exclude roles – The coupon won’t apply to customers belonging to any of the roles selected in this field.
- Country/State restriction – Restrict the usage of the coupon based on the Billing address or Shipping address.
- Include – Coupon applicable to only the selected countries or states.
- Exclude – Coupon not applicable to only the selected countries or states.
- Country – Select the location from the list for restricting the coupon usage.
Giveaway products
Under the Giveaway products tab, select the product(s) want to place under offer combined with this coupon . These can be the same products already in the cart or any product from the store. Additionally, there is an option to apply a partial discount to the product instead of giving it away completely for free.

- Free Products – Select the product(s) for giveaway.
- Quantity – Select the quantity of the selected product for the giveaway.
- Giveaway discount – If left blank the product is completely free. Enter a number to give only a specific amount of discount on the giveaway product. The discount value can be entered in percentage or currency.
- Apply tax only on discounted value – Enable to apply tax on the product’s final value after all discounts. For example, consider providing a $10 off on a $100 product, and then the tax will only apply to the effective price of $90.
Purchase history
The Smart Coupon for WooCommerce plugin can generate coupons for returning customers who have made a specific number of successful purchases.
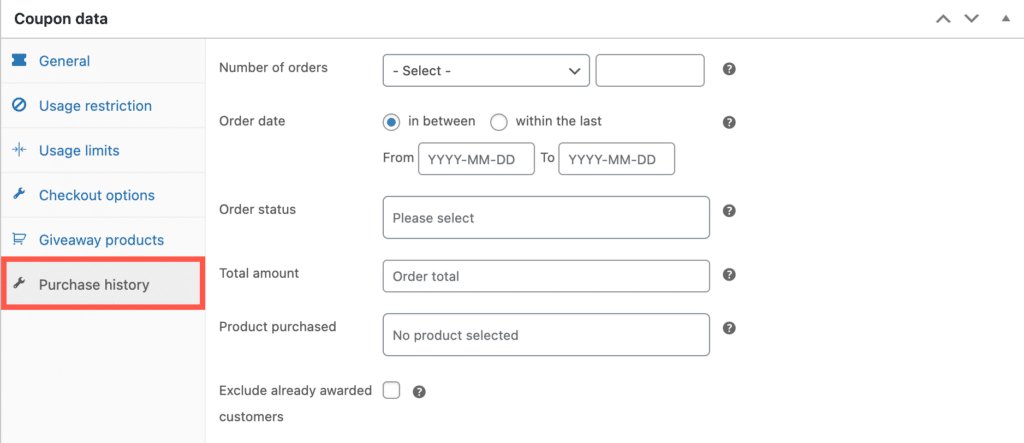
- Number of orders – Choose a number to specify the minimum order count required to use this coupon. There are two options in this section.
- equals – The coupon will apply if the order count is equal to the entered number.
- greater than or equal to – The coupon will apply if the order count is greater than or equal to the entered number.
- Order status – Select the order statuses from the drop-down to which the coupon can be applied. If left blank, then the coupon will be made applicable to all the order statuses.
- Total amount – Enter the aggregate order amount to which the coupon can be applied. If left blank, then the coupon can be redeemed without any amount constraints.
- Product purchased – Coupon is only eligible for customers who purchased the selected product.
- Exclude already awarded customer – On checking this checkbox, the customer can only use the coupon once.
Coupon category
Group coupons based on category by using the Coupon category option.
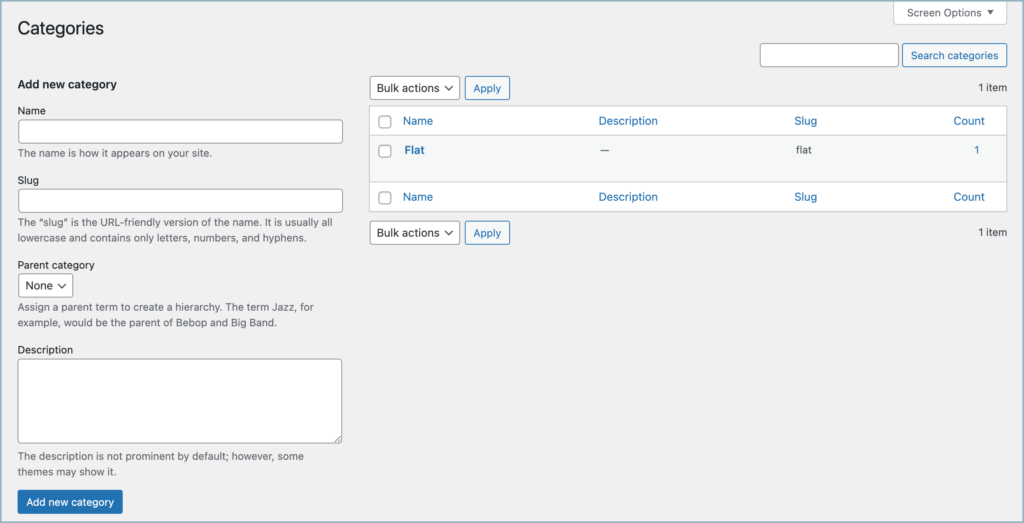
Add New Category
To add a new/custom category enter the following details.
- Name – Name for the coupon category.
- Slug – The “slug” is the URL-friendly version of the name and it will be automatically created. However, it is also possible to add a custom slug.
- Parent category – Assign a parent category if required.
- Description – Enter a description for the coupon category.
- Finally, click on Add new category button to save the category.
Bulk generate
Smart Coupons for WooCommerce plugin provide an opion to generate coupons in bulk matching the criteria set from the Coupon data section. The generated coupons can be: added to the store, exported as a CSV or emailed to the recipient directly.
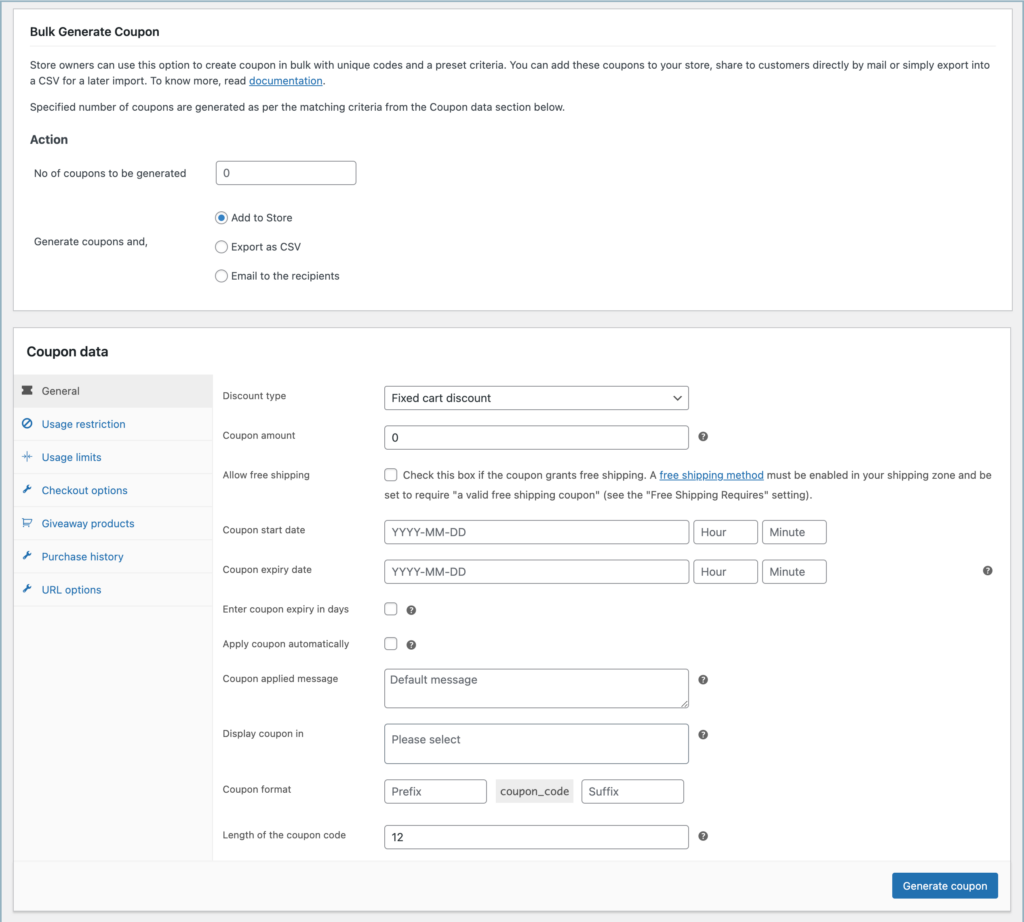
Bulk Generate Coupon
- No of coupons to be generated – The number of coupons to be generated.
- Generate coupons and –
- Add to store: Adds the generated coupons to the store.
- Export as CSV: Exports the generated coupons into a CSV file for future use.
- Email recipient: Emails the respective coupons to the recipients after adding them to the store. This works in combination with the Allowed email option available under usage restriction.
Coupon data
Coupon data is the same as the Coupon data section in Add coupon window.
Import Coupons
This window allows you to import coupons to the store from your device.

For a clean import, the CSV must include the header and adhere to the format as indicated in our sample file. Columns post_title and discount_type are mandatory for the import. Duplicate coupons will be skipped during import.
- Click on Upload and choose a CSV file from the system.
- You can also email coupons to concerned recipients on import by selecting the checkbox. Any email addresses you entered will receive coupons once coupons are imported.
- Once the upload is completed, Next click on the Next: Map columns for import button.
- Now a window will open as shown below:
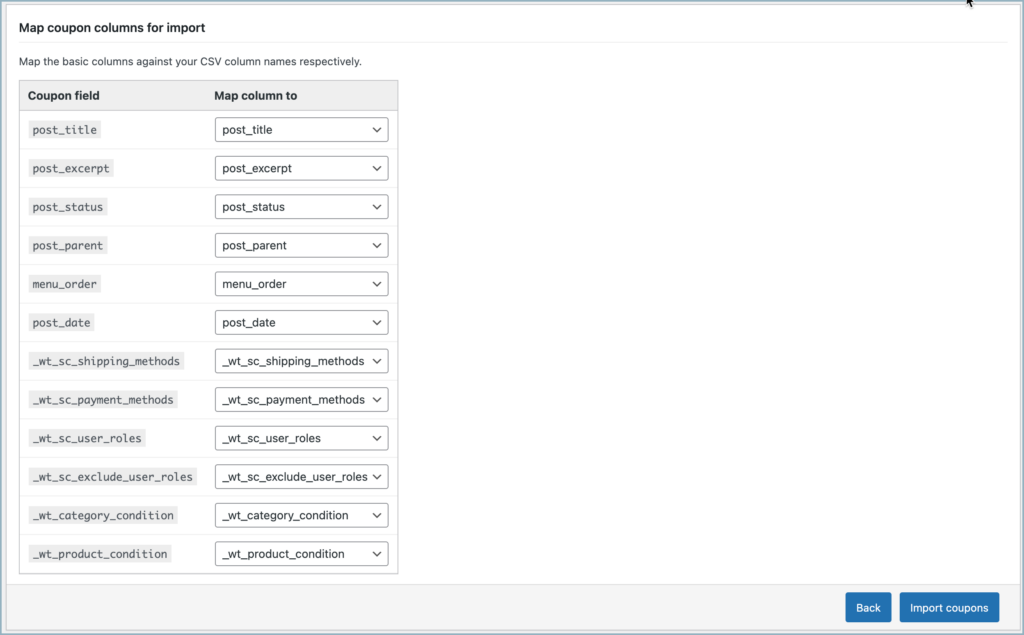
Finally, click on Import coupons to import the coupons to the store.
Store credit
Smart coupons for WooCommers offers a comprehensive store credit functionality where the customers can easily purchase store credit, email it as a gift card for friends or use it for themselves. Store credits can be used in combination with other coupons even for multiple purchases until the value specified is exhausted or when the coupon’s life expires.
Alternatively, the plugin also allows the store owner to email personal store credit vouchers directly to customers using the Email Credit option.
Checkout our tutorial on Store Credit to know more on it.
Store credit section is divided in to three.
- Gereral settings
- Email store credit
- Gift card templates
General settings
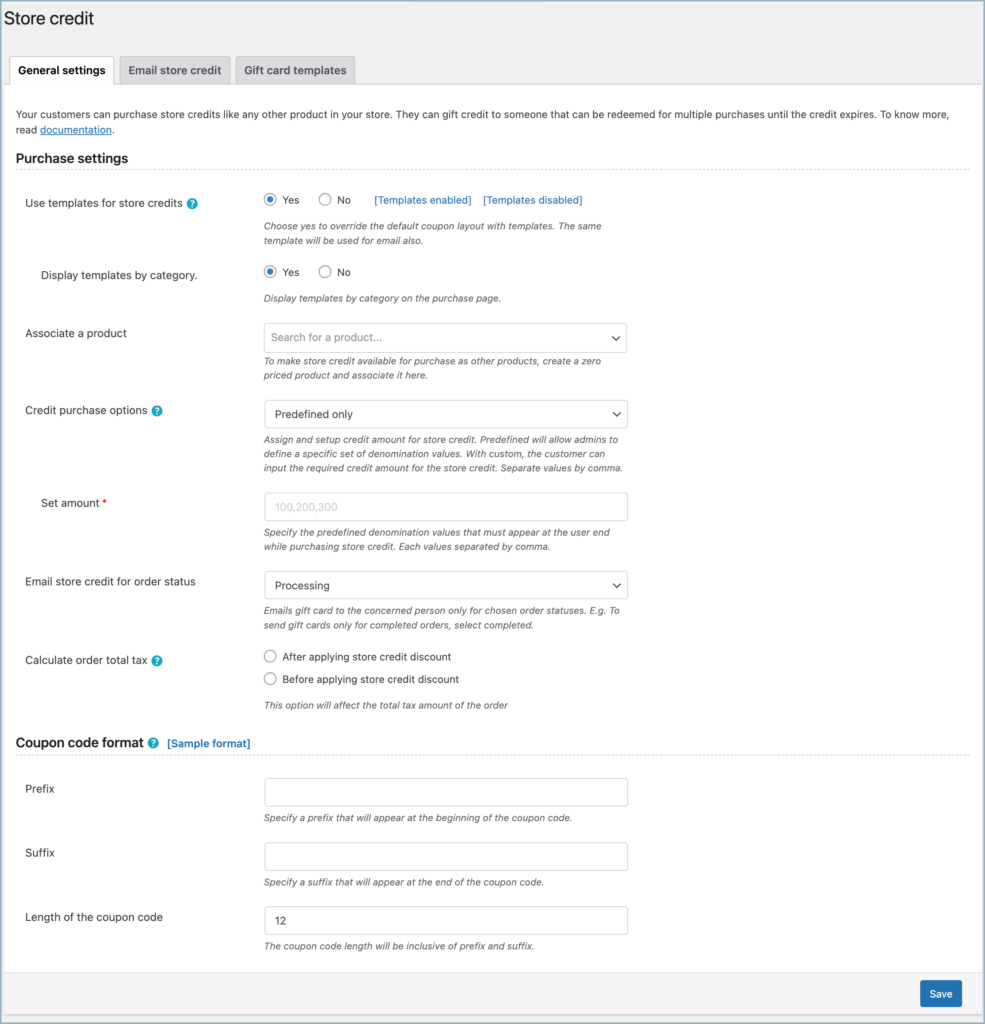
- Purchase ssettings
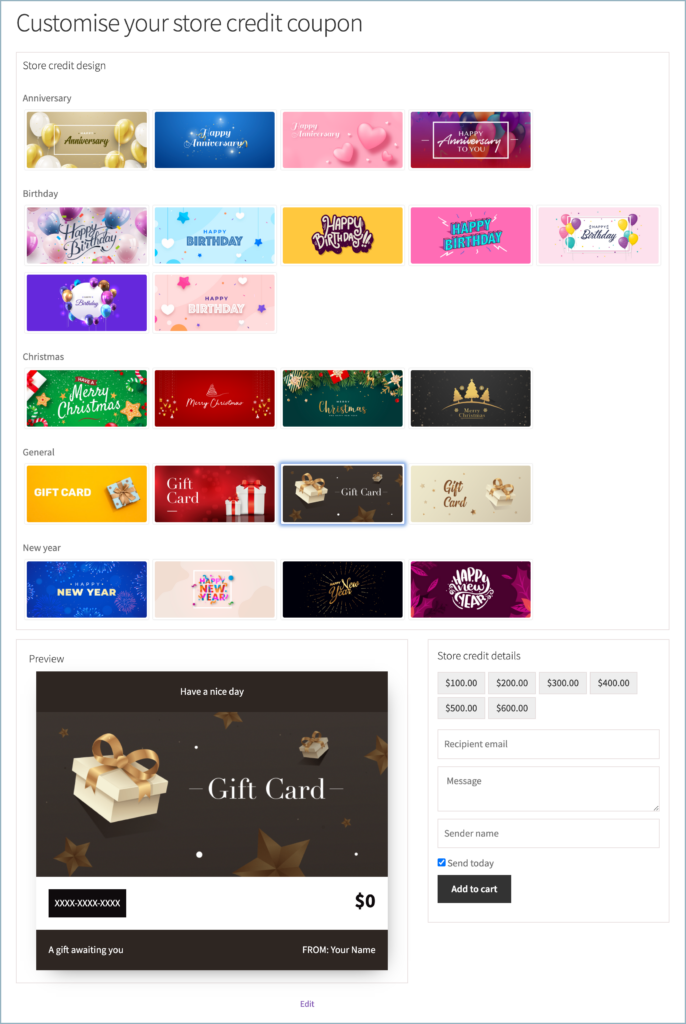
- Use templates for store credit – In default the Store credit are shown as coupons. Select Yes to override the coupon layout with templates.
- Display templates by category – Select Yes to display templates by category in purchase page.
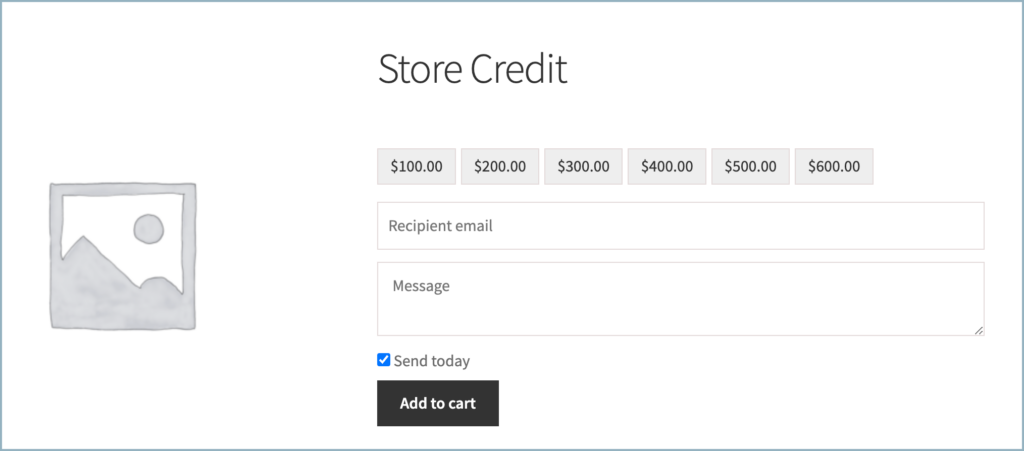
- Associate a product – To make Store credit available as product in the store, create a zero priced product using Add product option in Smart coupons menu and associate it here.
- Credit purchase options – Select who can set store credit value.
- Predefined only – Allows the admin to create a specific set of values.
- Custom only – Allows the user to input the required Store credit amount.
- Predefined and customs – Admin can create specific set of values, although user can input a custom value based on preference.
- Set amount – Set the predefined values for store credit that must appeare at the front end. And also seperate each value with a comma.
- Email store credit for order status – Purchased store credit will be emailed only for the selected order status.(Completed or Processing )
- Calculate order total tax – You can choose to apply tax on the store credit After applying store credit discount or Before applying store credit discount to a product.
- Coupon code format

Finally, Click on Save to save your Store credit settings.
Email store credit
With the help of Email store credit funtion, the store owner can directly send a store credit voucher to a specific customer via mail.
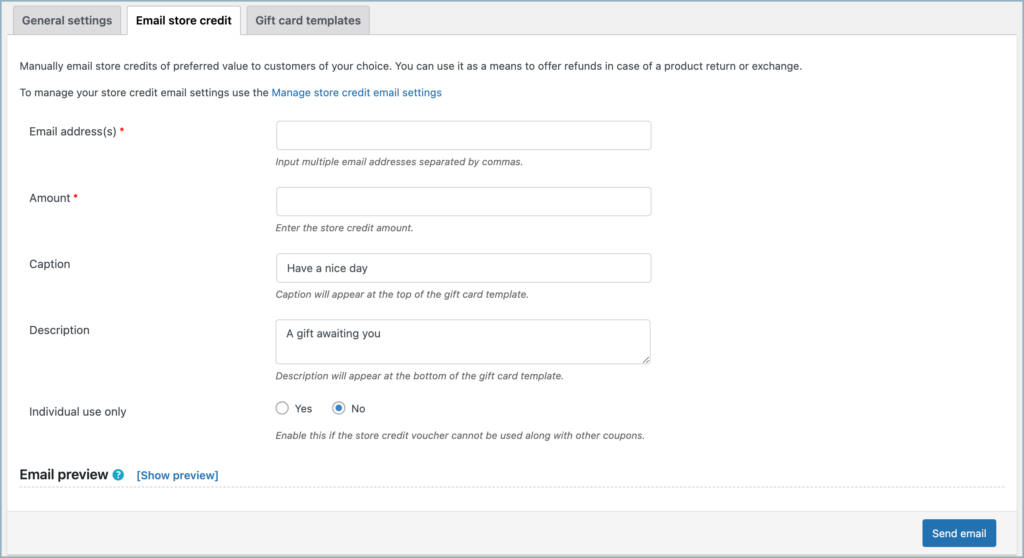
- Email address(s) – Enter the emails of customer to send store credit directly. sepperate mails with comma.
- Amount – Enter the Store crdit amount.
- Caption – Caption will appear at the top of the gift card template.
- Description – Description will appear at the bottom of the gift card template.
- Individual use only – Select Yes to restrict the use of store crdit conjunction with other coupons.
To see a preview of the Store credit voucher Click on Show preview in the Email preview section.
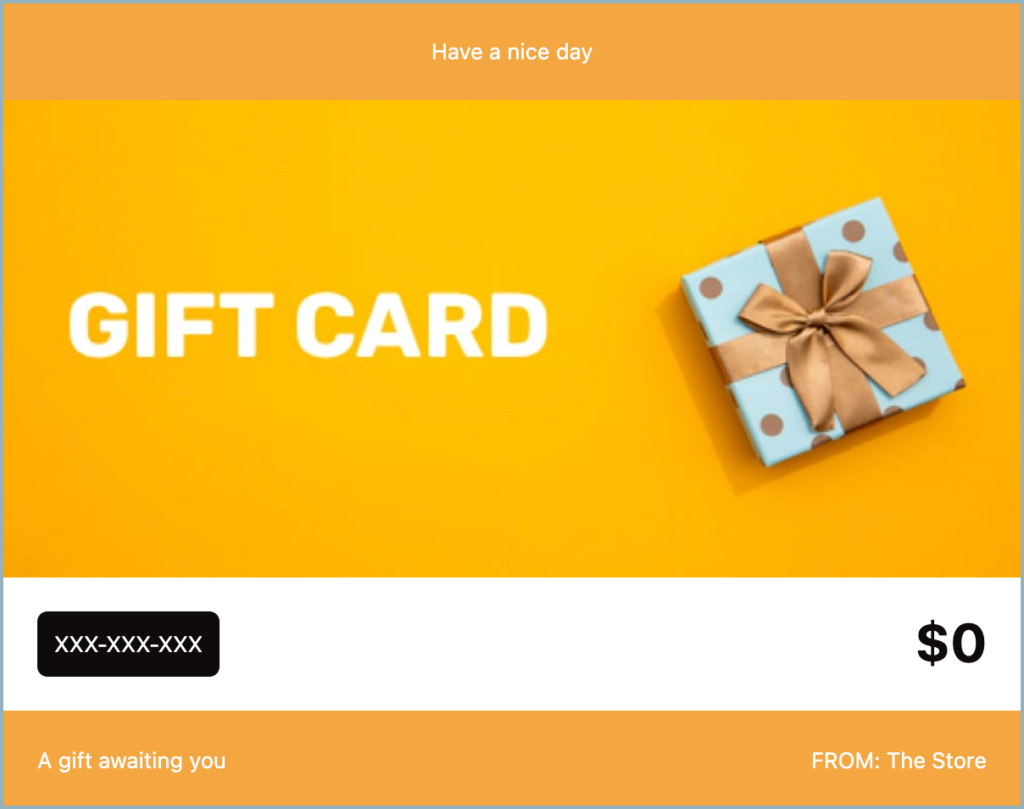
Once the above fields are filled in, click on send to mail the store credit vouchers to customer.
Gift card templates
This window is a gallery of available Store credit voucher templates. There are a number of predefined templates in the window also, there is an option to add new template based on preference.
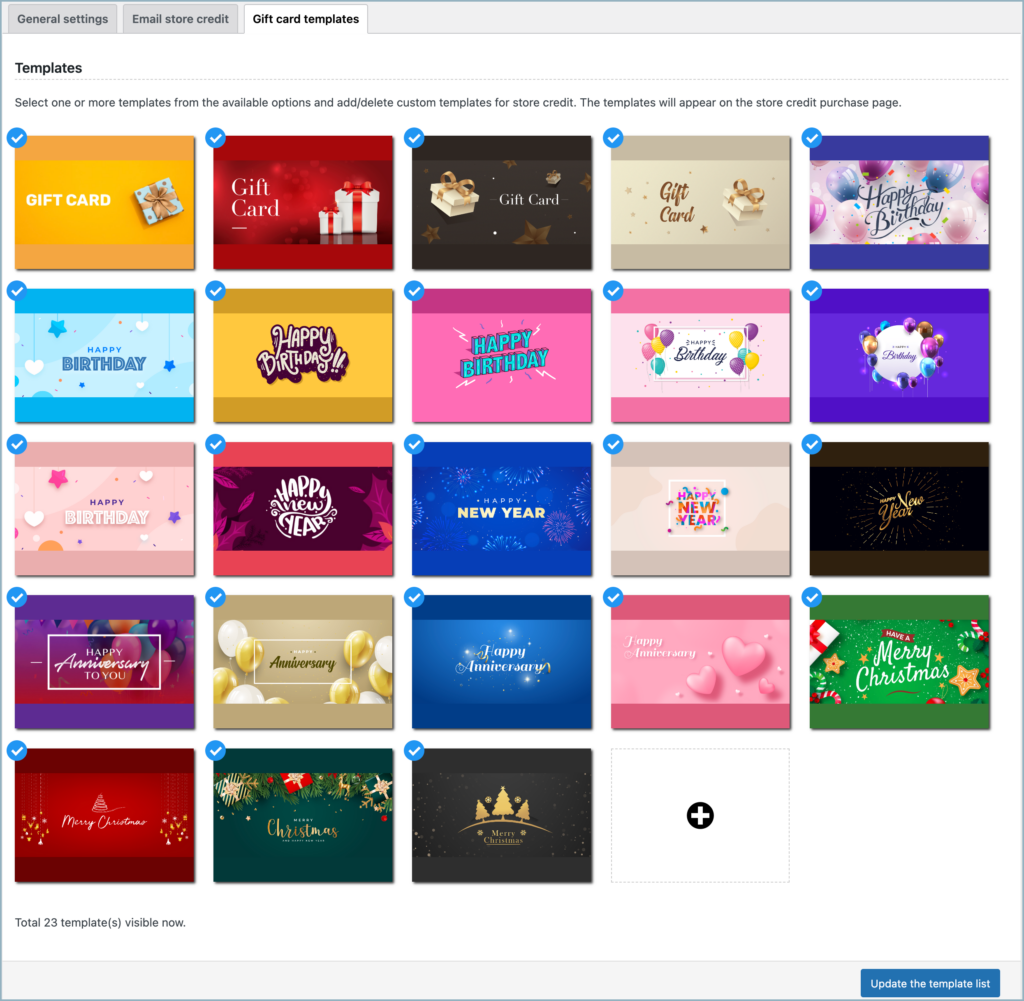
Don’t forget to click on Update the template list after selecting templates.
To add new template, click on the ‘+‘ icon in end of the template grid. And this will open a dialogue box.
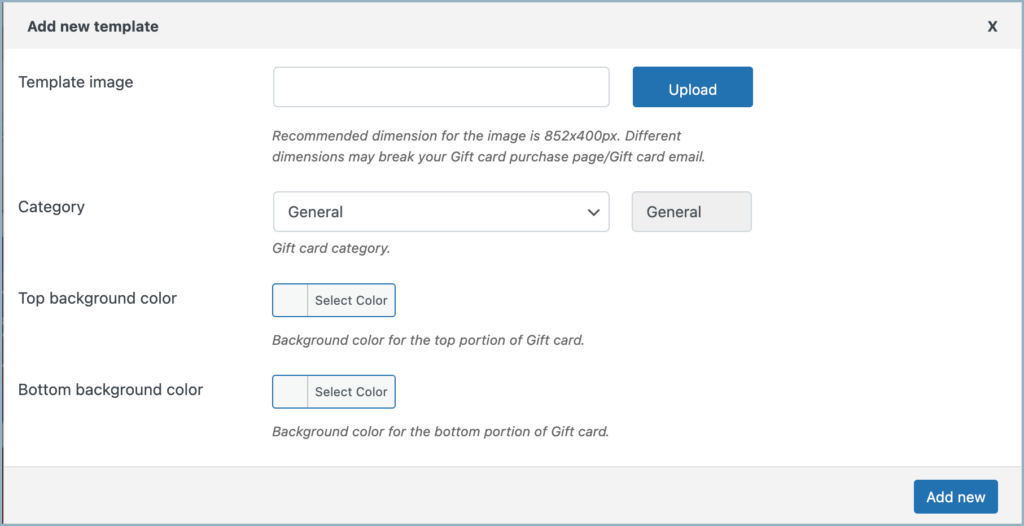
- Template image – Click on Upload to add a image for the voucher.
- Category – Multiple categories are availble to add the voucher. Also you can add new category by clicking on Add new category in the drop-down.
- Top background color – Background color for the top portion of Gift card.
- Bottom background color – Background color for the bottom portion of Gift card.
Finally, Click on Add new to add the template to the list.
Abandoned cart coupons
Smart coupon for WooCommerce plugin helps you to create and assign coupons to customers automatically upon cart/checkout abandonment. After a definite idle time upon which the cart is abandoned, mail notification will be sent to the concerned customer along with the coupon.
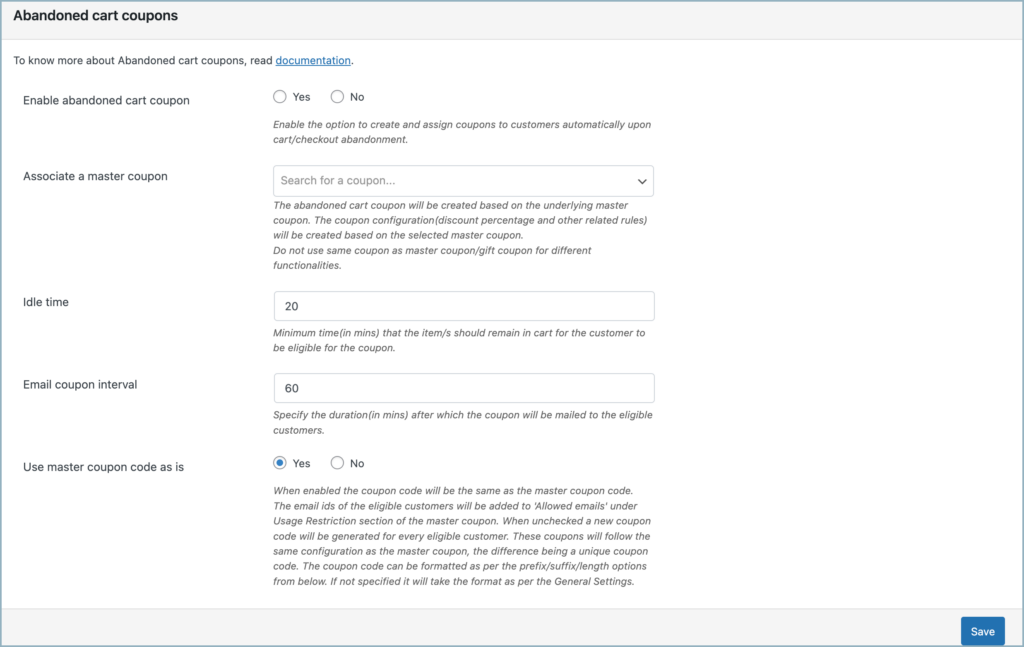
- Enable abandoned cart coupon – Enable the option to create and assign coupons to customers automatically upon cart/checkout abandonment.
- Associate a master coupon: The abandonment coupon will be created based on the underlying master coupon. The coupon configuration (discount percentage and other related rules) will be created based on the selected master coupon.
- Idle time: Specify the minimum time (in mins) that the item/s should remain in cart for the customer to be eligible for the coupon.
- Email coupon interval: Specify the duration (in mins) after which the coupon will be mailed to the eligible customers.
- Use the master coupon code as-is: When enabled the coupon code will be the same as the master coupon code. The email ids of the eligible customers will be added to ‘Allowed emails’ under the Usage Restriction section of the master coupon. When unchecked a new coupon code will be generated for every eligible customer. These coupons will follow the same configuration as the master coupon, the difference being a unique coupon code. The coupon code can be formatted as per the prefix/suffix/length options. If not specified it will take the format as per the General Settings.
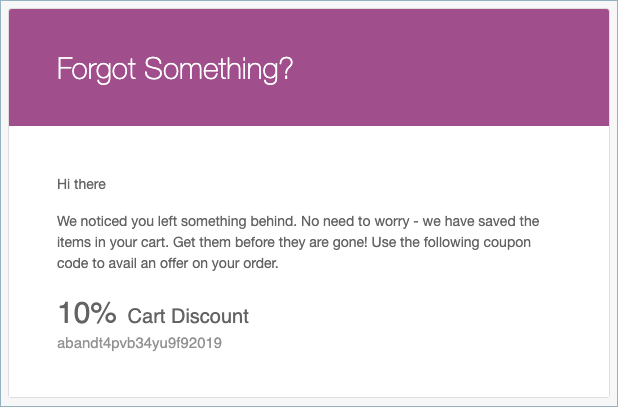
On abandoning the cart/checkout with the specified idle time, the customer will be notified with an email along with the coupon as shown below:
Finally, click on Save to save your changes
Signup coupons
A signup coupon creates and assigns coupons to customers automatically upon signup. In order to set up a signup coupon you will have to create a master coupon with required properties and then associate it to behave as a signup coupon.
The signup coupon window consists of the following options:
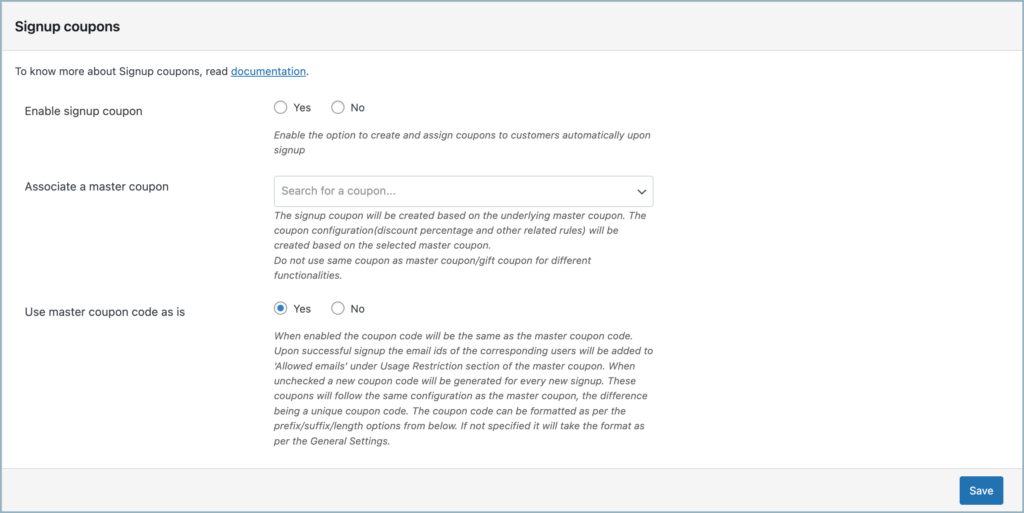
- Enable signup coupon: Select Yes to create and assign coupons to customers automatically upon signup.
- Associate a master coupon: The signup coupon will be created based on the underlying master coupon. The coupon configuration (discount percentage and other related rules) will be created based on the selected master coupon.
- Use the master coupon code as-is: When enabled the coupon code will be the same as the master coupon code. Upon successful signup, the email ids of the corresponding users will be added to ‘Allowed emails’ under the Usage Restriction section of the master coupon. When unchecked a new coupon code will be generated for every new signup. These coupons will follow the same configuration as the master coupon, the difference being a unique coupon code. The coupon code can be formatted as per the prefix/suffix/length options. If not specified it will take the format as per the General Settings.
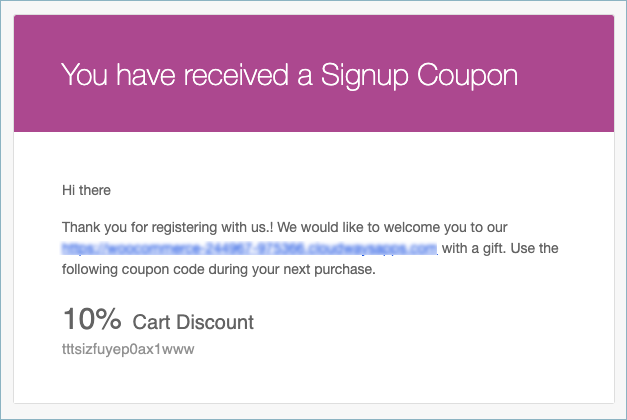
On signing up successfully, the customer will be notified with an email as shown below:
Finally click on Save to save your changes.
General settings
The General settings window is divided in to six sections
- General
- Customize coupon
- Coupon banner
- Customize messages
- Help Guide
- Licence
General
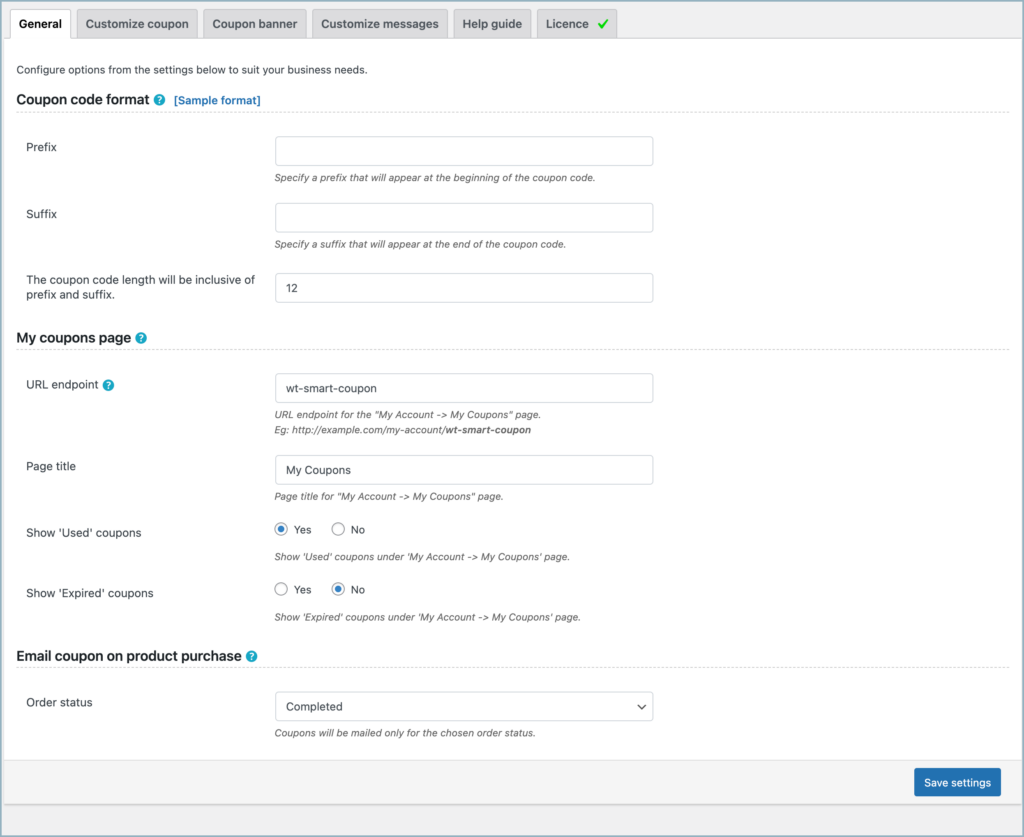
Coupon code format

My coupons page
- URL endpoint – Enter the URL endpoint for the “My Account -> My Coupons” page. For example: http://example.com/my-account/wt-smart-coupon.
- Page title – Enter the page title for My Coupons section in My Account page.
- Show ‘Used’ coupons – Select Yes to show Used coupons in My Coupons page.
- Show ‘Expired’ coupons – Select Yes to show Expired coupons in My Coupons page.
Email coupon on product purchase
Smart coupons let you send coupons along with product purchases. You can attach coupon to each product on the Add/Edit coupon window.
- Order status – Coupon will be only mailed to the selected order status.
Finally, click Save settings to save your changes.
Customize coupon
Use the Customize coupon page to customize the different types of coupons based on preferences.
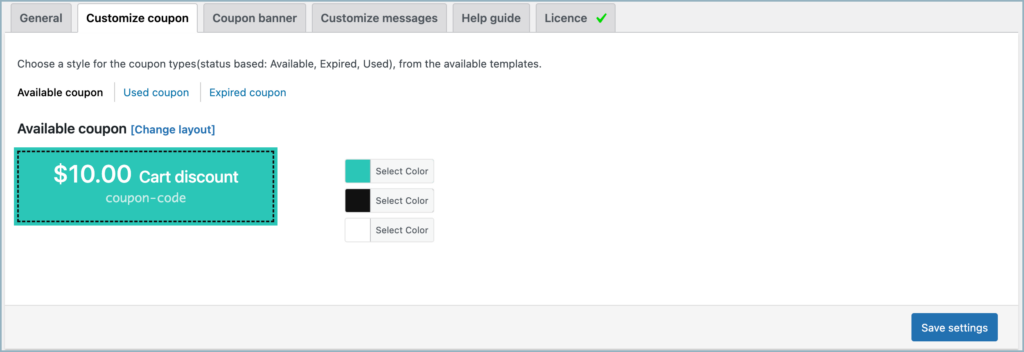
Smart coupons plugin basically display three types of coupons,
- Available Coupon
- Used Coupon
- Expired Coupon
Click on Change layout to select a layout for the coupon from the given list as follow:
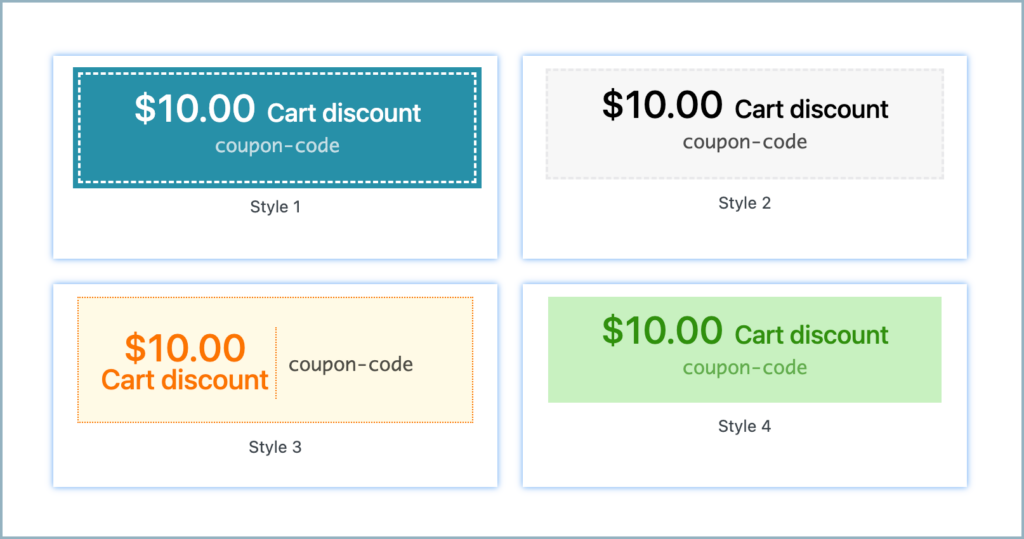
Furthermore, you can also customize the color scheme of the coupons with the three Select Color options.
Coupon banner
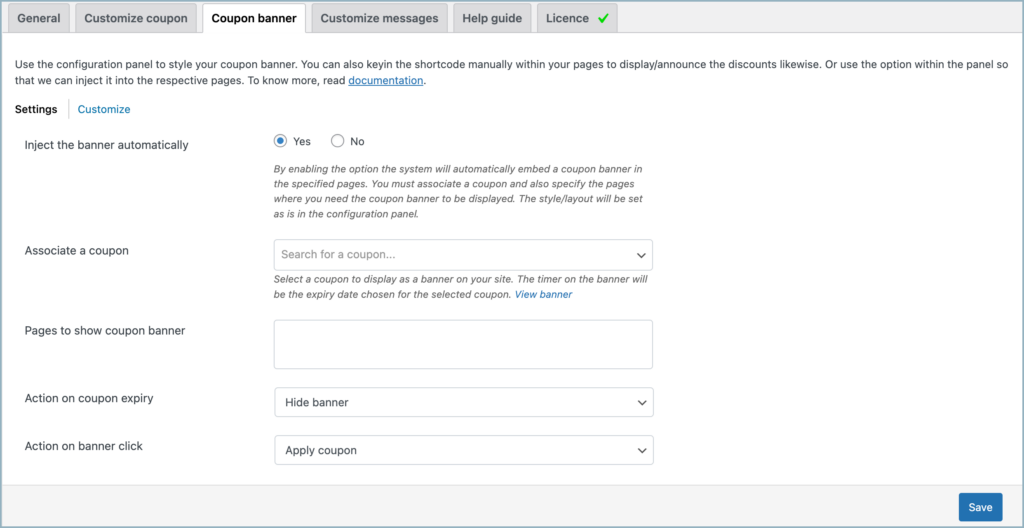
Use the configuration panel to style your coupon banner. You can also key in the shortcode manually within your pages to display/announce the discounts likewise. The configuration panel is divided in to two.
- Settings
- Customize
Settings
- Inject the banner automatically – By enabling the option the system will automatically embed a coupon banner in the selected pages. You must associate a coupon and also select the pages where you need the coupon banner to be displayed.
- Associate a coupon – Select a coupon to show as banner on the site.The timer on the banner will be the expiry date chosen for the selected coupon.
- Pages to show coupon banner – Select the pages to display the coupon banner.
- Action on coupon expiry – Once the coupon is expired you can either choose to Hide the banner or you can display a text of choice.
- Action on banner click – Select what action should happen while clicking the coupon banner. You can choose to Apply the coupon or redirect to a specified URL.
Customize messages
The coupon messages will give an idea about how to redeem the coupon or the current state of the selected coupon and much more information. Use the configuration panel (Customize messages) to customize coupon-related notifications or messages based on your preferences.
From the dashboard, navigate to the customization panel by clicking on, Smart Coupons > General Settings > Customize messages.
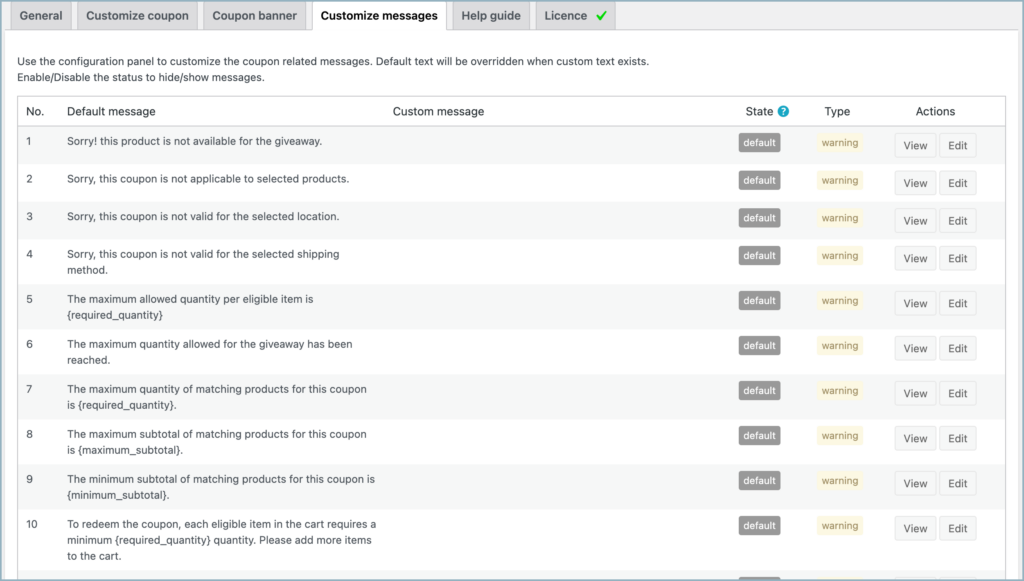
Under Notifications, there are five sections: Default message, Custom message, State, Type, and Actions.
- Default message – The text that appear by default when a coupon notification is displayed.
- Custom message – Custom message replaces the Default message. Custom message can be added using the Actions section. To know how to create custom message, refer here.
- State – Shows whether the Default message or Custom message is currently in use.
- Type – Indicate the message’s category, such as warning, success, label, or info.
- Actions – There are two options under the Actions section.
- View
- Edit
View – This action mode allows seeing the content of the notification message, such as Message description, Custom message, Default message, Available placeholders and Available filters.
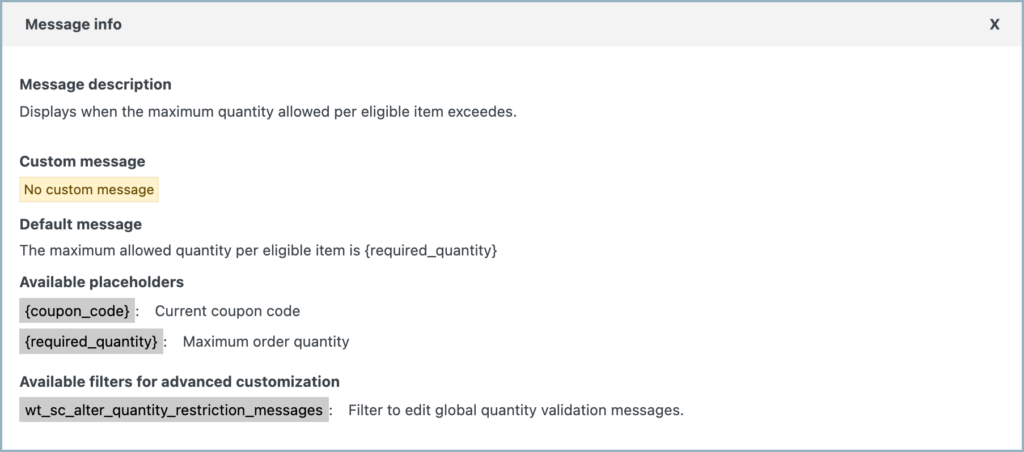
- Message description – Give a clear view about the use case of the message.
- Custom message – Custom message entered by the user. The text can also contain placeholders.
- Default message – The text that appear by default when a coupon notification is displayed.
- Available Placeholders – These are the default WooCommerce placeholders. To know how to create custom placeholders, refer here.
- Available filters for advanced customization – Use the given filters for any additional customization.
Edit – Customize the message related settings here.
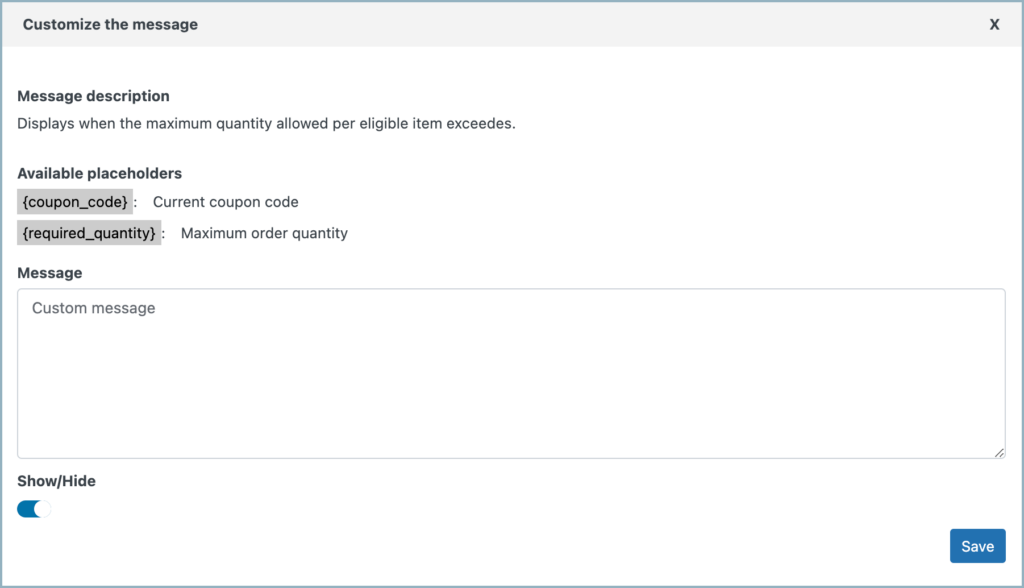
- Message – Any text entered into the text box will be treated as the Custom message.
- Show/Hide – Toggle to Show or Hide the message on the site.

Dan
November 10, 2023
Hi!
I use the plugin only for the automatic add to cart, but the plugin also displays a coupon on the checkout page.
How can I hide it, as I just want the coupon code to be added.
Thanks!
Justine
September 1, 2023
Hi
Is it possible to use your plug in to offer member pricing on products with different discounts on different products.
For example- Add CRACKERDEAL at check out and receive – $5 off 1kg coffee or $2 off coffee pods, $2 off 250g coffee etc
What is the best way to do this?
Arjun
September 4, 2023
Hello Justine,
Thank you for getting in touch with us. We understand your requirement. But our plugin does not currently include the functionality you have specified.
Waldemar Kawulski
October 20, 2021
Is it possible in this plugin set minimal product price like 1USD? Thi should be used when cupon value is bigger than order value.
Example:
i have cupon on 200 usd value.
And buy 3 products with subtotal 150 usd.
Now when i use cupon i receive 0 value order, but i want in this case for any product in this order set price 1 usd, and order subtotal with this cupon should be 3 usd.
it is possible?
Mike
October 26, 2021
Hi Waldemar,
Thanks for reaching out. We understand your requirement. However, our plugin presently doesn’t offer any options to achieve this requirement. Thanks for understanding.
James Thomas
August 16, 2021
Hi There,
Is it possible to give customers coupon based on this condition:
For every $100 purchase Customer will receive $10 coupon and it will have an expiry for 7 days.
For example: customer buy $120 worth of product and after the checkout he/she will be offered a 10$ coupon for next purchase. he/ She can also see the coupon in their “My Coupon” Page
For Every $100 spend they will get 2% cash back coupon.
Example: customer buy $120 worth of product and after the checkout he/she will be offered a $2.4 coupon for next purchase. He/ She can also see the coupon in their “My Coupon” Page
Thanks in advance.
Mike
August 16, 2021
Hi,
We are sorry to let you down. Presently, our plugin does not offer such cashback coupon generation based on the orders.
Talha Tariq
April 8, 2021
Hey folks!
Is there is any chance that we can add the usage restrictions on the auto-generated coupons? Please let me, if feasible I am happy to buy the pro version.
Mark
April 16, 2021
Hi Talha,
You can have usage restrictions on the auto-generated coupons too if you set the same for master/parent coupon.
Paweł Górowicz
November 25, 2020
Any hook to hide coupons below item in cart ? Other than css display:none; ?
Mark
November 26, 2020
Coupons are displayed below items in the cart only if you enable it under the coupon edit page. Kindly leave the “Make coupons available in” option as blank.
vieri
October 17, 2020
how do I restrict for a region or city?
Thank you
Mark
October 17, 2020
We only have country-based restriction option available now.